
Many of us over a certain age endured a high school typing class on a (gasp!) real typewriter. Between nerve-wracking speed tests and paper jams, we were taught to put two spaces after periods in order to make individual sentences easier to identify. Today, the extra space is frowned upon, but those of us who survived an entire semester with one of those metal monsters may find it hard to break the two-space habit. If that’s you (and it’s certainly me), here is a quick tutorial on how to find and delete extra spaces in Microsoft Word.
This tutorial is also available as a YouTube video showing all the steps in real time.
Watch more than 100 other writing-related software tutorials on my YouTube channel.
The images shown below are from Word for Microsoft 365. These steps also apply to Word 2021, Word 2019, Word 2016, Word 2013, and Word 2010.
Delete Extra Spaces Using Word’s Find and Replace Tool
1. Select the Home tab.

2. Select Replace in the Editing group.

3. Ensure you are in the Replace tab in the Find and Replace dialog box.

4. Place your cursor in the Find what text box and press the space bar twice to add two spaces. (The text box will appear empty.)

5. Place your cursor in the Replace with text box and press the space bar once to add one space. (The text box will appear empty.)
 6. Select your preferred replacement option:
- Replace replaces only the current occurrence of a double space with a single space.
- Replace All replaces all the double spaces with single spaces. If you choose this option, a dialog box will appear telling you how many replacements have been made.
- Find Next locates the next double space in the document without replacement.
 7. Select the Close button to close the Find and Replace dialog box when you are finished.

Note that you can also customize Word to flag extra spaces between words and sentences as you type and then correct each occurrence individually.
If you want to remove all multiple extra spaces between words in Word, there are some easy ways to get it done. Please have a look at the following article.
Remove extra spaces between words with Find and Replace function in Word
Remove extra spaces between words with Kutools for Word![]()
Remove extra spaces between words with Find and Replace function
If you want to apply Find and Replace function to remove extra spaces, you can do it by follows:
1. Please press Ctrl + H to display the Find and Replace dialog.
2. Press More button to show more options. Check the Use wildcards box under Search Options section, then type ( ){2,} in Find what field, and 1 in Replace with field. See screenshot:
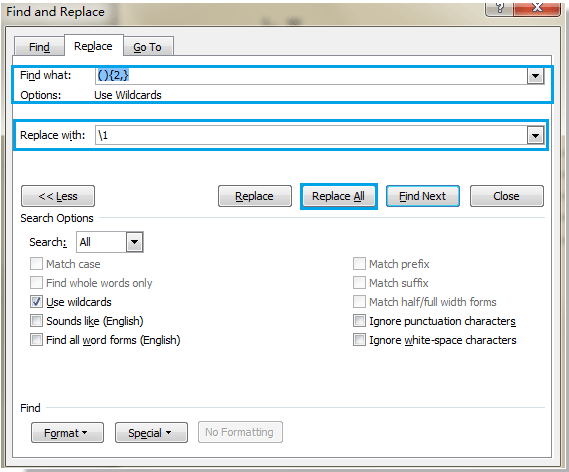
3. After finish the settings, click Replace All to remove all extra spaces between words from the whole document.
Remove extra spaces between words with Kutools for Word
Kutools for word‘s Extra Spaces utility can easily and quickly remove all extra spaces from the document.
After installing Kutools for Word, please do as below:(Free Download Kutools for Word Now!)

Now, all the extra spaces between words are removing. See screenshots:
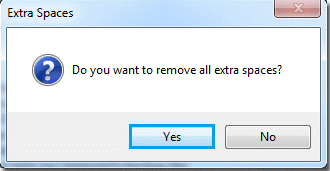
Note: If you directly click Extra Spaces under Kutools tab without selecting anywhere. it will pop out a dialog to remind you if remove all extra spaces from the whole document, click Yes to remove all extra spaces from the documents, click No to cancel.
Please click here to know more about Extra Spaces.
Tip.If you want to remove spaces in Excel cell, you can apply Kutools for Excel’s Remove Spaces function to quickly solve it.
Relative articles:
- Remove all pictures from document in Word
- Remove all frames in Word
- Remove all macros from document in Word
- Remove track changes from Word document
Recommended Word Productivity Tools


Kutools For Word — More Than 100 Advanced Features For Word, Save Your 50% Time
- Complicated and repeated operations can be done one-time processing in seconds.
- Insert multiple images across folders into Word document at once.
- Merge and combine multiple Word files across folders into one with your desired order.
- Split the current document into separate documents according to heading, section break or other criteria.
- Convert files between Doc and Docx, Docx and PDF, collection of tools for common conversions and selection, and so on…
Comments (28)
No ratings yet. Be the first to rate!
A document downloaded from Internet may contain some unwantted formats. To remove the redundant spaces and blank lines in Word, Find and Replace can do a better job than reformatting manually. Let’s see how to achieve it.
1. Replace Blank Spaces in Word
Press Ctrl+H. Put your cursor in the textbox of Find what and click More, then select White Space in Special (Or you can simply press Space key in the textbox)

Click Special and choose White Space.

Click Replace All and there will be no more blank in the document. I know it may not be a very good result. Generally, people only want to delete the redundant blank and keep the necessary one.
To achieve this goal, you can press Space key twice in Find what textbox, and once in Replace with textbox. It means replacing two blank spaces with one space.
Click Replace all and then you can check the result.


2. Replace Blank Lines in Word
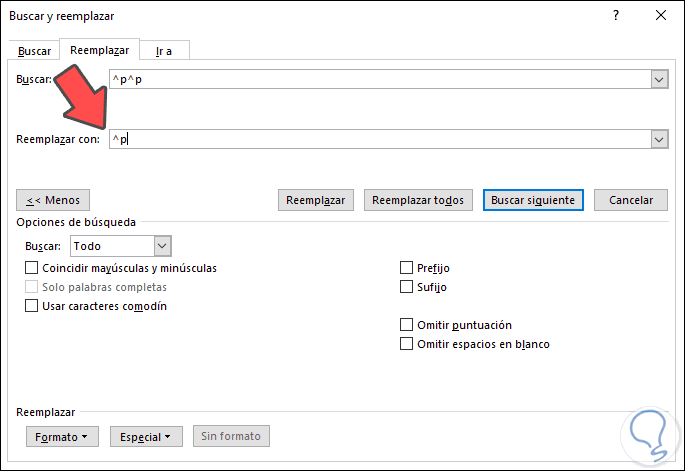
Press Ctrl+H. Place your cursor in the text box of Find what and click More, then select Paragraph Mark in Special.

Please note a blank line is composed of multiple paragraph marks, so you should enter it twice in the textbox which shown as ^p^p and enter it once in the Replace with textbox.

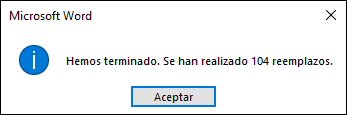
Click Replace All. Now all the redundant blank lines in your Word document have been removed.
Copyright Statement: Regarding all of the posts by this website, any copy or use shall get the written permission or authorization from Myofficetricks.
Since its introduction in 1983, Microsoft Word has revolutionized the way we work. With each passing upgrade, it’s only gotten easier to use and more sophisticated in terms of what it can accomplish. However, formatting has often been an issue with the software, as the smallest changes to a document can add a large amount of blank space.
Removing blank space in a Word document is as much a part of working in Word as creating the documents themselves. While small sections are easy to manage, finding all the blanks spaces in a large document can take considerable time if you don’t know what to do. Luckily, there are some steps you can take that are built within the software, which allows you to organize your documents easily and quickly.
Condensing a Word Document
When creating a Word document, you’ll want to keep it streamlined. Too many blank spaces will create less readable text. Line breaks, page breaks and spaces do have their purpose, however. They delineate where new sentences, paragraphs and pages begin, but having too much blank space in a Word document is unnecessary and should be avoided.
Blank space adds to the time needed to read documents and adds to the number of printed pages. Condensing documents to contain only the necessary breaks is more environmentally friendly, as you’ll be using less paper and ink to print them. When Word documents are used digitally, spaces are less problematic, but keeping them formatted properly makes for easier reading and a better flow of information.
Using Word’s Find and Replace Tool
For smaller Word documents, you can remove standalone blank spaces using the Delete button on your keyboard. For a row of spaces, click the empty area twice to select the entire row and hit the Delete button. To remove blank spaces at the end of a document, select those areas by clicking and dragging, then hit the Delete button.
For larger documents, Techwalla.com suggests using the software’s Find and Replace function, which will allow you to remove all unnecessary blank spaces between paragraphs while leaving those you need intact. To do this, go to the Home tab on the toolbar, locate Edit options, scroll down to Find and click Replace on the submenu. In the dialogue box, select More in the lower left-hand corner and choose Paragraph Mark. Its symbol will appear in the Find What field; leave the Replace With section blank and click Replace All.
Removing Double Spaces Between Sentences
Find and Replace also comes in handy for removing double spaces. According to LaptopMag.com, you should select all the text in the document by hitting CTRL+A and open the Find and Replace window. Then type two blank spaces in the Find What field using the space bar. In the Replace With field, type just one space using the space bar and hit Replace All. All the additional double spaces will be deleted.
When removing excess spaces in Word documents, it’s important to remember that each action you take to do so will influence how the entire document looks. For example, if a section starts at the top of a page, any spaces you remove will pull that section header up to the page before it. When removing spaces, you’ll need to readjust all the areas affected.
Today’s writing style guidelines direct us to type just one space after a period. However, you might get documents with two spaces after periods, because that was the convention a couple of decades ago — and old habits die hard. If you get a Word document with double spaces, you can quickly strip out the extra spaces to meet modern standards by following these steps.
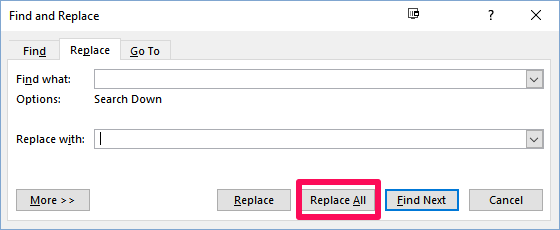
1. Hit CTRL+A to select all the text in the document.
2. Hit CTRL+H to open the Find and Replace window.

3. Type two spaces in the Find what field.
4. Type one space in the Replace with field.
5. Click Replace All.
That’s all there is to it. Word will change the double spaces to single spaces and tell you how many replacements it made. Click No to searching the rest of the document, since you already selected all of the text.
Microsoft Word Tips
- Previous Tip
- Next Tip
- Show Formatting Marks in Microsoft Word
- See All of Microsoft Word’s Keyboard Shortcuts
- Select All Text with Similar Formatting in Microsoft Word
- Create Table Templates in Microsoft Word
- Use Microsoft Office’s Lorem Ipsum (Random Text) Generator
- Add a Table of Contents in Word
- Co-Edit a Document in Word
- Add or Remove Page Breaks in Word
- Put Microsoft Office into Touch-Friendly Mode
- Compare Docs Side-by-Side
- Configure Spell Check and Autocorrect
- Compare and Combine Two Docs
- Copy and Paste Text from Multiple Locations
Get instant access to breaking news, the hottest reviews, great deals and helpful tips.
In the following article, we would like to offer you 3 effective ways to remove unwanted spaces in table cells in your Word document.
Now and then, we need to inset a table to hold texts and data. But we often have to adjust the table size after entering texts and data. And sometimes, we will get a table with unwanted spaces in cells after adjusting its size, such as below:
In the example above, there is a blank line below the text in each cell. But we are unable to get rid of it simply by pressing “Delete”. Instead, we have to use other workarounds.
Method 1: Narrow Down the Row Height Manually
- First and foremost, check if there are removable blank lines in cells. If any, delete them first.
- Then put cursor over the bottom line of a table row. Wait until cursor changes to the sign of double horizontal lines with 2 arrows.
- Next click and drag the bottom line up until the unwanted space disappears.
- Repeat step 2 and 3 on other rows in the table whose height needs to resize.
Here is the result:
Method 2: Disable “Specify height” Function
- First of all, click on the cross sign on the upper-left to select the entire table.
- Then right click and choose “Table Properties”.

- In “Table Properties” box. Click “Row” tab first.
- Next clear “Specify height” box.
- Lastly, click “OK”.


The effect is as same as that in method 1.
Method 3: Use Word Macro
- To start off, click “Developer” then “Visual Basic” to open VBA editor. If the “Developer” tab is not available in the Ribbon, press “Alt+ F11” instead.

- Next, go to create a new module. Click “Normal” in the left column.
- Then click “Insert” at the menu bar.
- Choose “Module” on the drop-down menu.

- Next double click on module to open it.
- Now paste the following codes on the coding area:


Sub RemoveSpacesInTables()
  Dim objTable As Table
  Dim objDoc As Document

  Set objDoc = ActiveDocument

  With objDoc
    If .Tables.Count > 0 Then
      For Each objTable In .Tables
        objTable.Select
        Selection.Rows.HeightRule = wdRowHeightAuto
        Selection.Rows.Height = InchesToPoints(0)
      Next objTable
    Else
      MsgBox ("This document contains no table.")
    End If
  End With
End Sub
- Finally, click “Run” or execute the codes pressing “F5”.


This macro shall work on all tables in a document and remove unnecessary spaces.
Comparison of 3 Methods
| Methods | Advantages | Disadvantages |
| Method 1: Narrow Down the Row Height Manually | Best for a document with only a few tables or tables with a few rows. | 1. You have to pull up the row line up manually and repeatedly.
2. Not the nest way for multiple tables |
| Method 2: Disable “Specify height” Function | 1. No need to manually pull the line up
2. Quicker than method 1 |
You can only deal with one table at a time. |
| Method 3: Use Word Macro | 1. The quickest way
2. Able to process multiple tables at a time |
It requires the use of a macro. |
Once a Document Corrupts
It’s not rare to get a corrupted document now and then. However, the moment your document is damaged, it’s also the time when fear sets in. Therefore, just to be on the safe side, the quickest course of action is to obtain a repairing tool to fix docx so as to prevent it from further damage.
Author Introduction:
Vera Chen is a data recovery expert in DataNumen, Inc., which is the world leader in data recovery technologies, including repair Excel and pdf repair software products. For more information visit www.datanumen.com
Microsoft Word in its 2016 and 2019 versions is one of the most comprehensive applications for everything related to the creation, editing and configuration of high-quality text files thanks to its integrated functions which range from adjusting aspects of the font (size, color, type) to more professional aspects such as the insertion of multimedia files and others..
A common denominator in most of those who use Microsoft Word is that we usually separate the paragraphs using blank (empty) paragraphs which are created by simply pressing the Enter key. In its place, the most ideal and practical thing that TechnoWikis recommends is to use the Spacing before or after which we access from the Start / Paragraph menu:
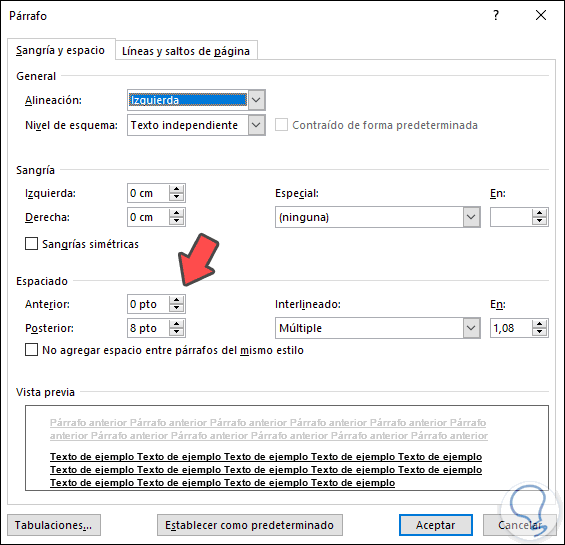
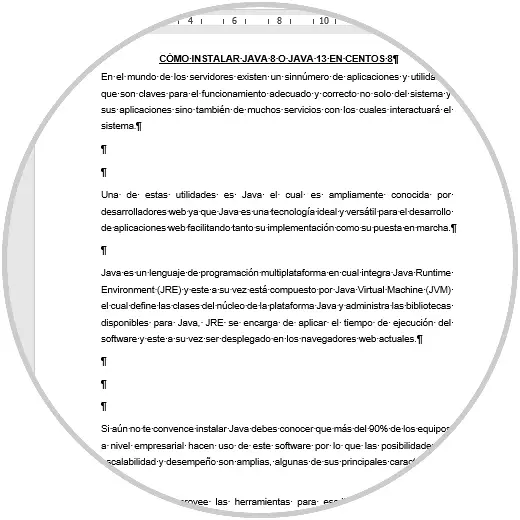
There we can define, in “points†format, the space between the paragraphs thus avoiding leaving blank spaces. For example, we have the following document where the space between the paragraphs is poorly distributed:

TechnoWikis will now explain in detail how to remove these blanks and thus optimize the style of the file worked.
1. How to remove space between paragraphs in Microsoft Word 2019 and Word 2016
Step 1
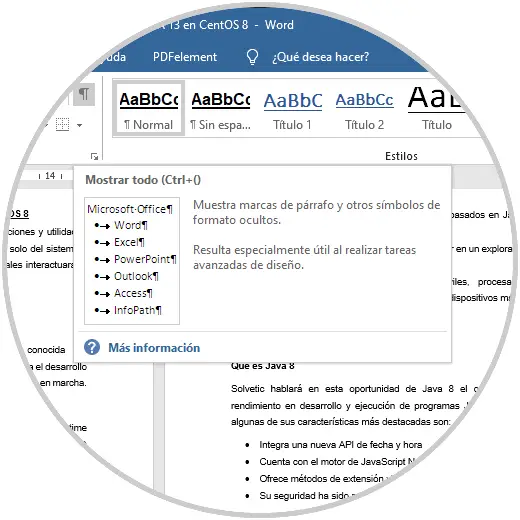
The first step to take will be to activate the option «Show all» which we access from the Start menu, group «Paragraph» or using the key combination Ctrl + ()
This function is responsible for displaying and displaying paragraph marks in the Microsoft Word document:
Step 2
By clicking there we will see the following:
Step 3
There we will have several options to delete these blank spaces, if the file is small we can place the cursor next to the page break and press the Delete key to eliminate said jump and in this way the paragraphs will be adjusted to said spacing:
Step 4
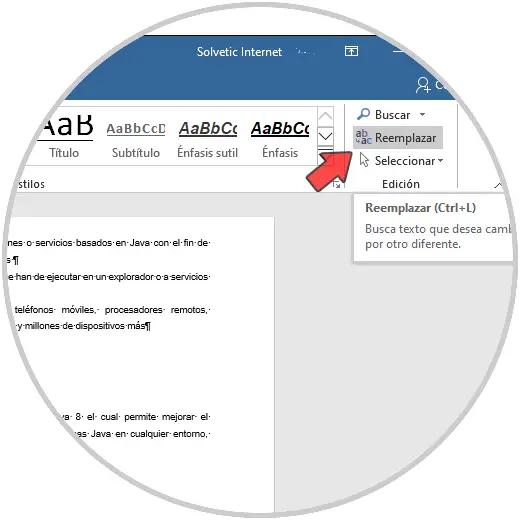
Now, if the file is extensive, doing so in this way will take time and we may leave some spaces without deleting, to automate this process, we will go to the Start menu and in the “Edit†group we click on “Replace†or we can use the Ctrl + L:
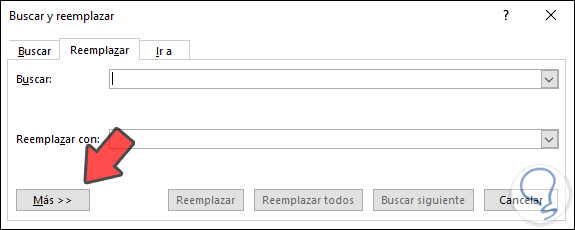
Step 5
The following window will be displayed. There we click on the “More†button
Step 6
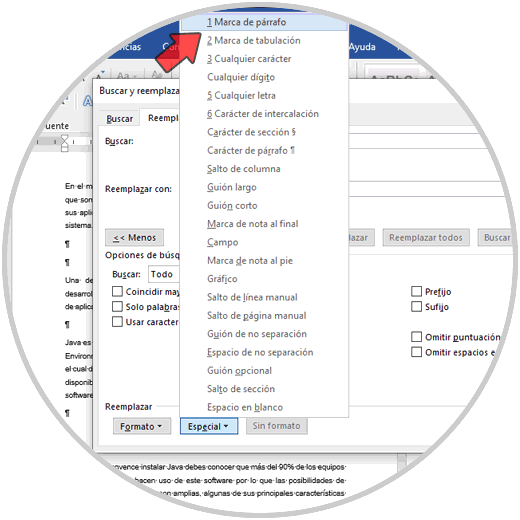
We will place the cursor in the “Search†field and click on “Special†and in the displayed list we will select “Paragraph markâ€:
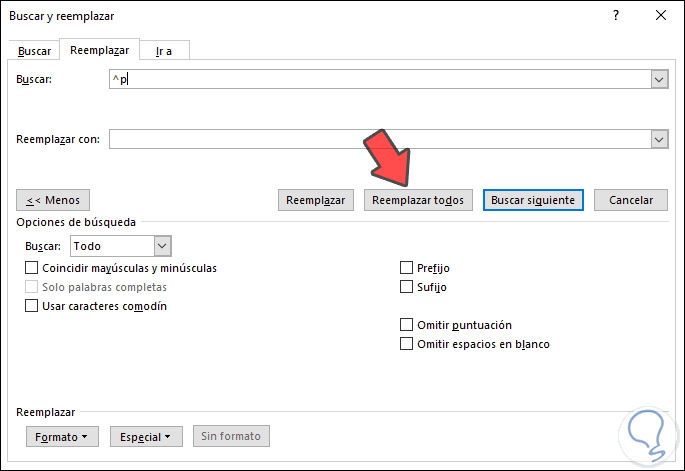
Step 7
The result will be as follows. The “^ p†sign refers to the page breaks of the selected document, there we can click on “Replace all†so that the page breaks of the file are deleted since we have not specified anything in the “Replace with†field
Step 8
We will see how many changes have been processed:
Step 9
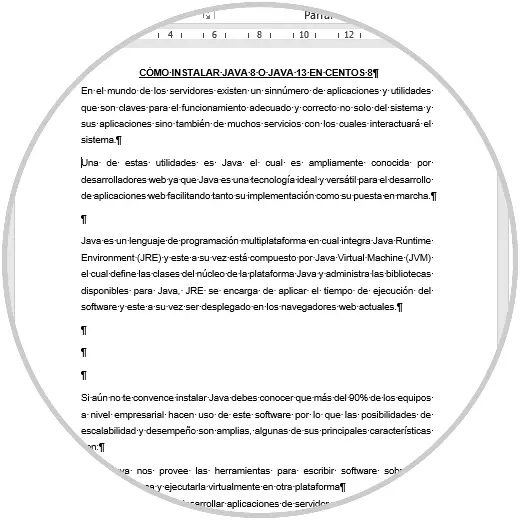
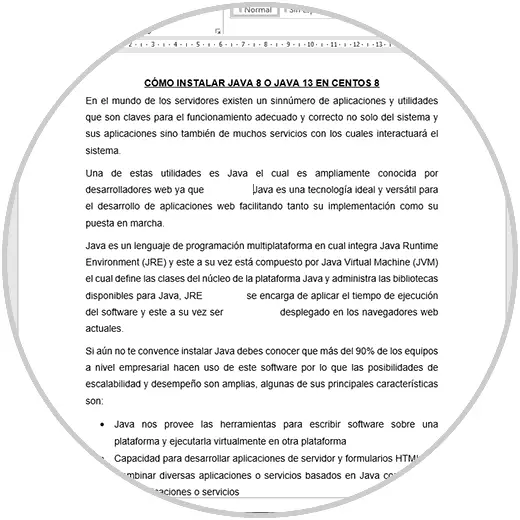
But (if there is a but), when we perform this method we will see that all the text is continuous which gives an appearance of disorder: 
Step 10
To avoid this, we must repeat the above process, but by adding “Paragraph marks†twice in the “Search†field and adding a paragraph mark in the “Replace with†field which indicates that you should always leave a space between the Microsoft Word 2016 or 2019 document paragraphs:
Step 11
When we click on “Replace all†we will see that the amount of changes applied is reduced:

Step 12
Click on OK and now we will see the file much more orderly: 
Step 13
Finally we can use the Ctrl + L keys or click on the “Show all†icon to hide the paragraph breaks and display the file structure: 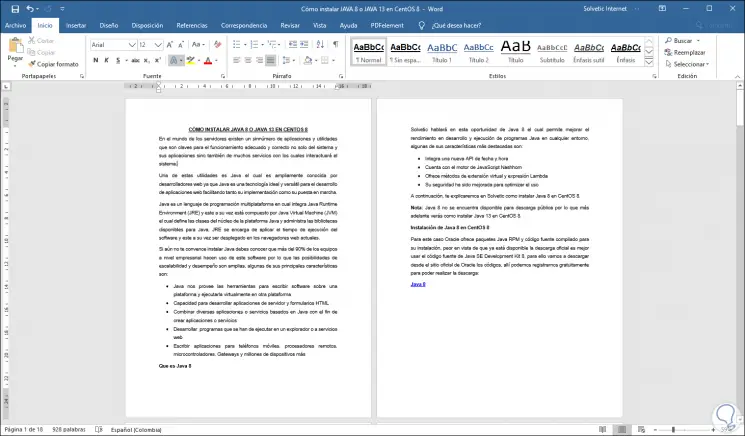
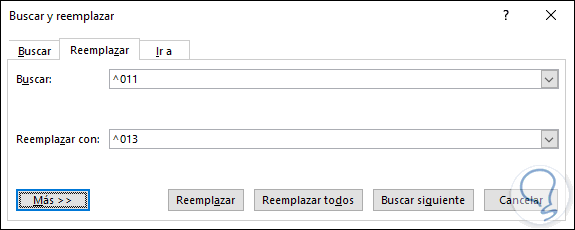
2. How to remove spaces when justifying text in Microsoft Word 2019 and Word 2016
Step 1
Another of the traditional problems when using Microsoft Word is that when justifying the text (which should give an appearance of order) we notice that the text is left with wide spaces between its lines:
Step 2
To solve this, just use the Ctrl + L keys and do the following:
- In the Search field enter ^ 011
- In the field Replace with enter ^ 013
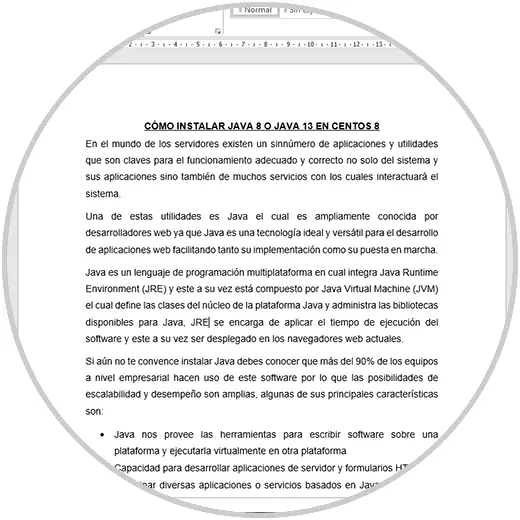
Step 3
After this we click on the «Replace all» button and as a result we will see that the spaces in the document justification have been deleted:
Following these steps you will be able to remove the spaces between words or paragraphs that cause a bad appearance of the Microsoft Word file..