
Word for Microsoft 365 Word 2021 Word 2019 Word 2016 Word 2013 Word 2010 Word 2007 More…Less
Delete lines or connectors
Click the line, connector, or shape that you want to delete, and then press Delete.
Tip:
If you want to delete multiple lines or connectors, select the first line, press and hold Ctrl while you select the other lines, and then press Delete.
If you can’t select a line to delete, it might actually be a horizontal line, which is a type of border.
Remove a horizontal line
-
Place the cursor immediately above the horizontal line.
-
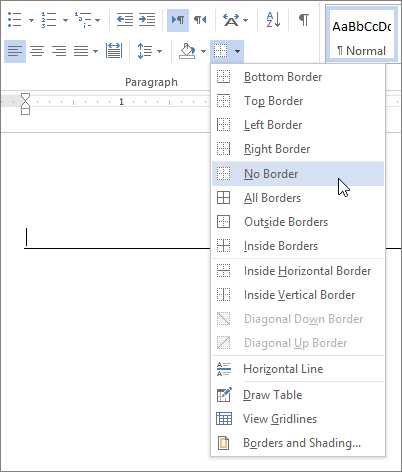
On the Home tab, click the arrow next to the Borders and Shading button, and click No Border.

For more on how lines work in borders, see Add, change, or delete borders from documents or pictures.
Need more help?
Want more options?
Explore subscription benefits, browse training courses, learn how to secure your device, and more.
Communities help you ask and answer questions, give feedback, and hear from experts with rich knowledge.
Delete lines or connectors Click the line, connector, or shape that you want to delete, and then press Delete. Tip: If you want to delete multiple lines or connectors, select the first line, press and hold Ctrl while you select the other lines, and then press Delete.
Contents
- 1 How do I delete a line in word that won’t delete?
- 2 How do I get rid of automatic horizontal lines in Word?
- 3 Where is eraser in MS Word?
- 4 How do I remove a vertical line between columns in Word?
- 5 How do I remove space between lines in Word?
- 6 How do I decrease line spacing in Word?
- 7 Why is there an extra space between lines in Word?
- 8 Where is eraser in MS Word 2010?
- 9 How do I delete part of a shape in Word?
- 10 How do you delete column lines?
- 11 How do I get rid of the vertical line on the left side of a Word document?
- 12 What are the 4 alignment options?
- 13 How do I get rid of paragraph marks in Word?
- 14 What is a eraser tool?
- 15 What is eraser tool in MS Paint?
- 16 What is computer eraser?
How do I delete a line in word that won’t delete?
The easiest way to get rid of it is to use the Ctrl+Q combination on your keyboard. Simply move your cursor anywhere in the paragraph above the line that you want to delete, and then use Ctrl+Q.
How do I get rid of automatic horizontal lines in Word?
The first method is to press “Ctrl + Z” right after typing the characters and pressing “Enter” to undo the automatic creation of the horizontal line. The line is removed and your characters remain.
Where is eraser in MS Word?
If you are referring to the Eraser command that you can use in a table, note that you’ll find it on the Table Tools Layout tab (when the insertion point is inside a table).
How do I remove a vertical line between columns in Word?
Select the table, Design contextual tab, Table styles group, Border button, click Inside Vertical border that should leave the table border and the horizontal lines. Note that the lines will not be deleted but just won’t print. Select it and press the delete button.
How do I remove space between lines in Word?
Click or tap anywhere in the paragraph you want to change, or press Ctrl+A to select all text. Click Home > Line Spacing. Select the line spacing you want. If you want more exact spacing, select Line Spacing Options.
How do I decrease line spacing in Word?
- Select the “Paragraph” group on Word’s Home tab to open your paragraph settings.
- Choose the “Indents and Spacing” tab, then select the drop-down box below the Line Spacing header to reduce your line spacing or to choose a custom line spacing, as per your preference.
According to the Microsoft’s “Word Blog,” spacing changed because “Back in 2007, the product designers changed the default line spacing to improve document readability.” The noticeable differences in the new settings are a larger space between lines and a whole skipped line between paragraphs.
Where is eraser in MS Word 2010?
Click on the Eraser tool, in the Draw Borders group (Word 2007 and Word 2010) or the Draw group (Word 2013 and Word 2016). Click and drag to select the table lines you want to erase. Click on the Eraser tool again or press the Esc key.
How do I delete part of a shape in Word?
If I draw a rectangle object in Word, is it possible to delete one of the edges?
- Right-click the edge of the rectangle.
- Select Edit Points.
- Right-click the side you want to remove.
- Select Delete Segment.
How do you delete column lines?
To do this, select the row or column and then press the Delete key.
- Right-click in a table cell, row, or column you want to delete.
- On the menu, click Delete Cells.
- To delete one cell, choose Shift cells left or Shift cells up. To delete the row, click Delete entire row. To delete the column, click Delete entire column.
How do I get rid of the vertical line on the left side of a Word document?
Click the arrow under Accept on the ribbon and select “Accept All Changes” to remove the vertical lines.
What are the 4 alignment options?
There are four main alignments: left, right, center, and justified. Left-aligned text is text that is aligned with a left edge. Right-aligned text is text that is aligned with a right edge.
How do I get rid of paragraph marks in Word?
Click on Word Options. In the left pane of the Word Options dialog, click on Display. Locate the Paragraph marks option under the Always show these formatting marks on the screen section and uncheck the checkbox beside it to have Word hide the symbols.
What is a eraser tool?
The Eraser tool changes pixels to either the background color or to transparent. If you’re working on a background or in a layer with transparency locked, the pixels change to the background color; otherwise, the pixels are erased to transparency.
What is eraser tool in MS Paint?
E. This tool is used to remove parts of the active layer or selection. It can be useful when working with multi-layered images as portions of an upper layer erased will allow lower layers to show through.
What is computer eraser?
Eraser is an open source secure file erasure tool available for the Windows operating system. It supports both file and volume wiping. Eraser securely erases data by overwriting it such that the data is irrecoverable.
Horizontal lines in Microsoft Word don’t count as characters, so getting rid of them can be challenging—unless you use this tip!

If you want to split up a Microsoft Word document with simple dividers for readability, all you have to do is type three hyphens and press Enter for a long horizontal line to appear.
However, once it’s there, getting rid of it can prove challenging. You’d think using the Delete or Backspace keys would work, but they don’t—you seem to be stuck with that line. Don’t worry, though. Here’s how to remove a line in Microsoft Word.
How to Delete a Horizontal Line in Microsoft Word
While you can’t use the Backspace or Delete keys to get rid of it, you can still delete that line:
- Click directly above the line.
- Go to the Home tab in the Ribbon.
- Within the Paragraph section, click the dropdown arrow next to the Borders icon and select No Border.
How to Stop Word Automatically Creating a Horizontal Line
You might not want Word to automatically create a horizontal line when you type three dashes. If that’s the case, here’s how to disable that feature:
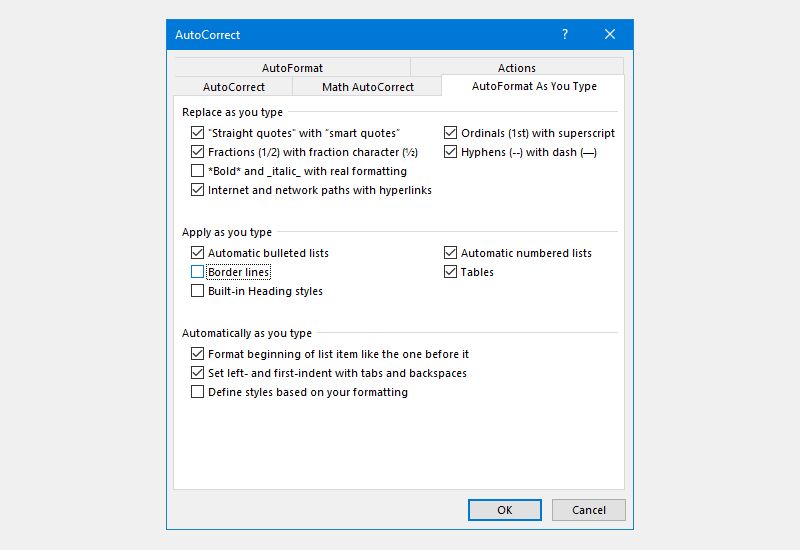
- Go to File > Options > Proofing > AutoCorrect Options > AutoFormat As You Type.
- Beneath Apply as you type, remove the tick from Border lines.
- Click OK.
How to Insert a Horizontal Line in Microsoft Word
If you want an alternative method to insert a horizontal line in Word, and one that is more obvious to delete, here’s how:
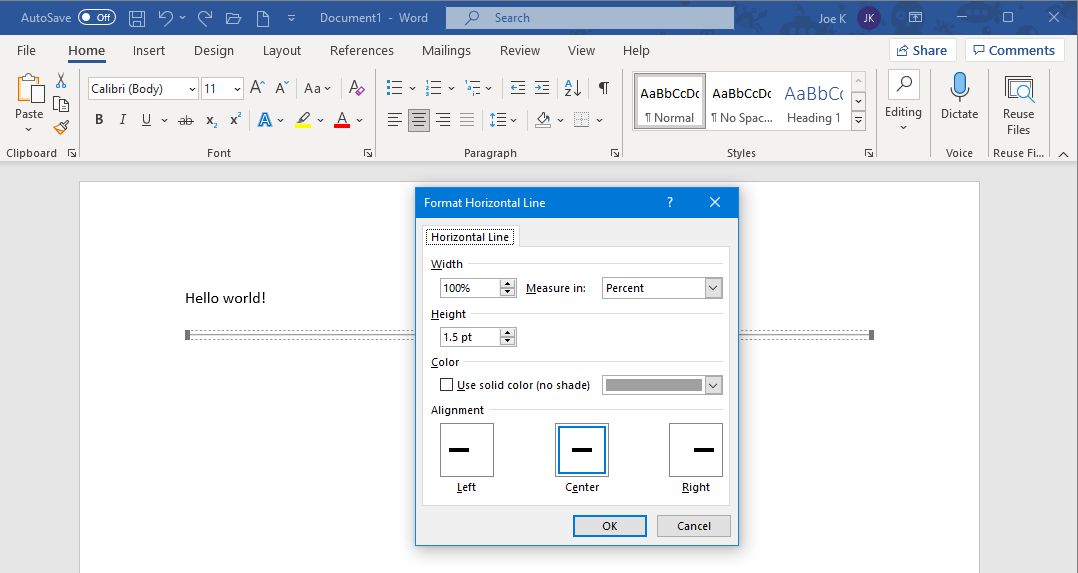
- Click where you want to place the line.
- Go to the Home tab in the Ribbon.
- Within the Paragraph section, click the dropdown arrow next to the Borders icon and select Horizontal Line.
- Double click the newly inserted line to format it, like adjusting width, height, and color.
If you ever need to remove the line, all you need to do is click on it and press the Delete or Backspace key.
There are numerous ways to insert lines into Microsoft Word, so be sure to check them all out.
Now you know how easy it is to remove a horizontal line in Word. This is just the tip of the iceberg when it comes to the great hidden features of Microsoft Word; it has plenty of advanced tools just waiting to be discovered, so don’t be afraid to experiment.
In this article, we are going to look at the way of quickly deleting extra blank lines in your Word document.
To Be More Environment-friendly
Now and then, when you are browsing around in the network, you may download some documents which are helpful for your work. Or in another way, you copy some material from the Internet and paste them to be a Word document. Yet, you notice that there are too many blank lines between paragraphs which certainly will cost a lot of extra papers when you print them out.
Below is an example of a Word document with too many blank lines:
However, it can be centuries after you finishing removing these blank lines one by one. In order to be more efficient and environmentally friendly, it’s important for us to know how to quickly delete all these blank lines in seconds instead.
Delete All Blank Lines between Paragraphs
- First of all, open a Word document which you need to modify.
- Click “Home”.
- Then click “Replace” in “Editing” group. Or you can press “Ctrl+ h”. Both ways can open the “Find and replace” dialog box.

- Next click “Replace” option.
- Continue to click “More” on the left-down side.

- Now, click “Special”.
- Choose “Paragraph Mark”.

- Then you will see “^p” symbol in “Find what” text box. Next time, you can type “^p” yourself without doing step 5, 6, and 7.

- Now, click “Replace All”. And you shall achieve the following effect:


Leave One Blank Line between Paragraphs Only
- This time it will be much easier. Just repeat from the above step 1 to step 4.
- Input “^p^p” in the “Find what” text box.
- Then type “^p” in the “Replace with” text box.

- Last but not the least, click “Replace All”. You shall see the result as below:


Sometimes, you need repeat several times to remove all the extra blank lines until you achieve the effect you want.
Cope with Word File Corruptions
Word is one of the most widely used software used in daily office work. Yet, despite its powerful functions and features, Word is vulnerable to corruption. This will absolutely undermines the security of your Word documents.
Therefore, you should prepare and know what exact to do when your file gets damaged. One of the options available for most of us is to use the built-in recovery function in Word. However, it can only carry out the repair work when the damage is not severe. Otherwise, choose a third-party doc repair tool will be much more helpful.
Author Introduction:
Vera Chen is a data recovery expert in DataNumen, Inc., which is the world leader in data recovery technologies, including excel recovery and pdf repair software products. For more information visit www.datanumen.com
Contents
- 1 How to Remove an Automatic Horizontal Line in Word
- 2 Extra: How to Clear Formatting in Word
- 3 Extra: How to Delete Extra Pages in Word
Microsoft Word has several features to speed up your word processing experience, from hotkeys to autocorrect. One feature that’s particularly contentious, though, is the automatic insertion of a horizontal line when you type —, ===, or ___. Today we’re going to show you how to remove these lines in Word and how to stop it from happening again.
The first thing you should know is that when you accidentally insert a line in Word, you can always undo it with Ctrl + Z. If you press Enter immediately after that, Word shouldn’t create the line again.
If you use the symbols above a lot, though, you’re going to waste a lot of time undoing and not a lot of time actually writing. Before we can stop this from happening, though, you need to understand how the line is inserted in the first place.
Below, you’ll be showing you this, and in the process another method to delete a horizontal line in Word. We’ll then move on to how you can adjust your preferences to disable the feature:
When Word inserts a horizontal line, it doesn’t use the shape tool as you might expect. Instead, it inserts a border line at the location you pressed Enter. We can remove this border line in Word to get rid of the horizontal line. In settings, we can then disable automatic border lines to stop this behavior. Here’s how:
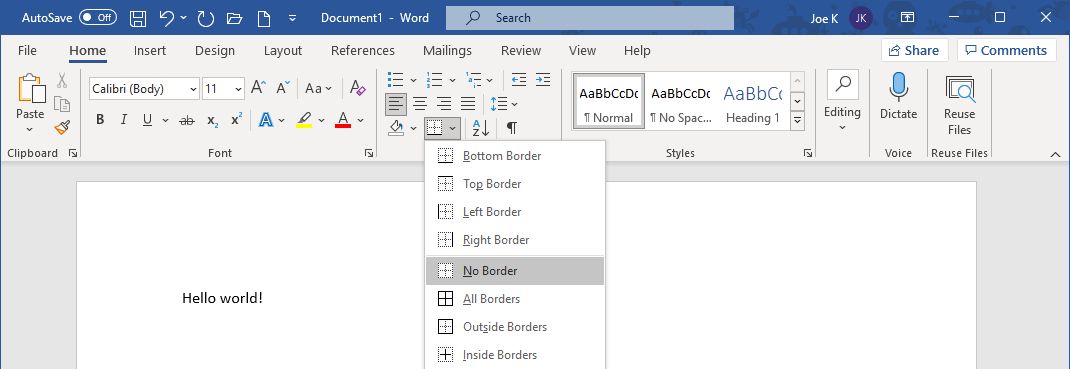
- Place your cursor above the horizontal line in Word and press the border line icon
You’ll find the border line icon in the “Home” tab of your ribbon, in the bottom middle row of the “Paragraph” section.

- Select “No Border” from the list
Pressing the No Border button will delete the horizontal line in Word immediately. You can now move on to disabling the automation insertion feature.

- Click “File” in the top-left corner

- Press “More… > Options” in the File menu

- Click “Proofing” in the sidebar, then “AutoCorrect Options…” in the main pane

- Open the “AutoFormat As You Type” tab and untick “Border lines” and press “OK”

- Press “OK” at the bottom of the main options window

- Type ‘—‘ and check whether the line is inserted


A blank page may be useful if you’re planning to continue your document, but it can look very unprofessional when you’re sending off a finished document and you might want to delete it. We show you a few different ways to delete a page in Word.

If you pasted text into your document from the internet or another document, you may find it necessary to learn how to clear formatting in Word. You can do this for an entire document or just a certain section that’s causing you trouble.
![]()
![]()
Download Article
Troubleshooting methods to remove a horizontal line in Word
![]()
Download Article
This wikiHow teaches you how to remove a border line in Microsoft Word that you may have inadvertently created by typing three hyphens (-), underscores (_), equal signs (=), or asterisks (*), and pressing «return.»
-
1
Click in the row immediately above the unwanted line. If there is any text immediately above the line, select the entire row above the line.
-
2
Drag the cursor to the row immediately below the unwanted line. The left end of the line will be highlighted.
Advertisement
-
3
Press delete. In many versions of Word, doing so will remove the line.


Advertisement
-
1
Click in the row immediately above the unwanted line. If there is any text immediately above the line, select the entire row above the line.
-
2
Drag the cursor to the row immediately below the unwanted line. The left end of the line will be highlighted.
-
3
Click the Home tab at the top of the screen.
-
4
Click the «Borders and Shading» icon. It’s a square divided into four panes in the «Paragraph» section of the ribbon.
-
5
Click No Borders. The border line will disappear.


Advertisement
-
1
Click in the row immediately above the unwanted line. If there is any text immediately above the line, select the entire row above the line.
-
2
Drag the cursor to the row immediately below the unwanted line. The left end of the line will be highlighted.
-
3
Click the Design tab at the top of the window.
-
4
Click Page Borders in the upper-right corner of the window.
-
5
Click the Borders tab at the top of the dialog box.
-
6
Click None in the left pane.
-
7
Click OK. The border line will disappear.


Advertisement
Add New Question
-
Question
I typed a couple of underscores and then pressed enter and it won’t go away. How do I get rid of them?

First, select part of your text which contains «Border Lines,» then go to the «Home» tab and select the «Paragraph» ribbon, click on «Borders» command and finally choose «No Border.»
-
Question
How do I identify an unwanted line on a page?
Press the backspace key. It is the one with an arrow going left on most keyboards. You can tell which way left is by making your hands into letters — the L is the left hand.
-
Question
What do I do if the print of a section I was trying to cut and paste became small, and I need it to be big again?
Press Control + Z (which is undo) and right-click on the passage to find Undo.
See more answers
Ask a Question
200 characters left
Include your email address to get a message when this question is answered.
Submit
Advertisement
Thanks for submitting a tip for review!
About This Article
Article SummaryX
1. Click the row above the line.
2. Drag the cursor below the line.
3. Press the Delete key.
Did this summary help you?
Thanks to all authors for creating a page that has been read 970,844 times.
Is this article up to date?

Manually removing extra blank lines from a Microsoft Word document is tedious. Luckily, a feature built into Word can remove all empty lines at once. Here’s how to do it.
How Blank Lines Work in Microsoft Word
Microsoft Word adds a hidden tag (called a “paragraph tag”) to the end of each line whenever you hit Enter. You can see these tags in your document by clicking the paragraph icon (which looks like a backward “P” with two lines) in the “Home” tab of Word.

Using “Find and Replace” in Word, you can replace those double paragraph tags with a single tag. That removes the extra empty lines from your document.
How to Delete Extra Blank Lines in a Word Document
To start removing empty lines, open your document with Microsoft Word. Click “Home” in the menu and then select “Replace” on the right of the screen.
The “Find and Replace” window will open. Click the “Find What” box and type this:
^p^p
Each “^p” is a special code that stands for the paragraph tag. We’re going to replace instances of two-paragraph tags in a row with a single paragraph tag. In the “Replace With” box, type this:
^p
Then click “Replace All” at the bottom of the window.
After you click, all the blank lines will be removed from your document. When you see the confirmation pop-up, click “OK.”
If you still see any blank lines, that’s because there were more than two consecutive blank lines in place. In this case, click “Replace All” in the “Find and Replace” window again until all the extra lines are removed (or you can experiment with the number of “^p” codes that you find and replace until your needs are met).
When you’re all done, close the “Find and Replace” window. If you ever get annoyed with horizontal lines automatically appearing in Word when you type certain characters, you can replace those, too.
RELATED: How to Remove Automatic Horizontal Lines in Word
READ NEXT
- › How to Adjust and Change Discord Fonts
- › HoloLens Now Has Windows 11 and Incredible 3D Ink Features
- › The New NVIDIA GeForce RTX 4070 Is Like an RTX 3080 for $599
- › BLUETTI Slashed Hundreds off Its Best Power Stations for Easter Sale
- › Google Chrome Is Getting Faster
- › This New Google TV Streaming Device Costs Just $20
How-To Geek is where you turn when you want experts to explain technology. Since we launched in 2006, our articles have been read billions of times. Want to know more?
Blank lines in word documents can be annoying. Learn how to remove them within a few clicks.

May 28, 2021
• 2 min read
Microsoft Word has been the user’s go-to word processor for a long time now. It can be attributed to the ease of functioning, plethora of features, and straightforward interface. Word offers multiple shortcuts for users which if done conventionally will require both time and effort.
One such issue is removing blank lines for a document. Blank lines do not just make the document look lengthier but also affect the readability. The unnecessary use of blank lines should be avoided when drafting a document but for pre-drafted documents, you can easily remove the blank lines with the method mentioned in the following sections.
Word adds a paragraph tag each time you hit ENTER to move to the next line. Two consecutive paragraph tags can show as blank/empty lines in your document. To remove the blank lines or double paragraph tags, you can either go manual for each OR use the ‘Replace’ option to remove all empty lines at once. We will walk you through the process of removing blank lines with the ‘Replace’ option.
Viewing Paragraph Tags in Word
This is how the document looks initially when there are blank lines between the text. Just click on the ‘Show/Hide ¶‘ option in Word’s control bar to view the paragraph tags. The double paragraph tags here indicate a blank line and replacing them with a single tag will remove the blank lines.
![]()
Remove Blank Lines in Word
To remove blank lines in a Word document, click on the ‘Replace’ option in the ‘Editing’ section at the top-right corner.
![]()
Next, enter ^p^p which indicates a double paragraph tag (‘^p’ is the code for paragraph tag) in the ‘Find what’ text box, and ^p which indicates a single paragraph tag in the ‘Replace with’ text box.
After you have entered it, click on ‘Replace All’ at the bottom. You will see a prompt informing you about how many replacements were made to the document.
![]()
Once the blank lines are removed, the text will appear concise and occupy less space on the screen as is evident in the picture below.
![]()
Removing blank lines from a lengthy Word document wouldn’t seem like a herculean task anymore, now that you know the replace method.