
Comments are quite useful when you want to add some information about a cell/data point without changing the content of the cell.
I often use these when I am using formulas and I need to specify what a formula does and what a cell value means. If you’re collaborating with others, you can also add comments for other people’s reference.
In this tutorial, I will show you all you need to know about comments – including how to insert comments in Excel, how to edit/delete comments, how to delete comments from the entire sheet or workbook, etc.
But before I go ahead and show you how to insert comments in Excel (or delete/edit comments), there is something important you need to know.
In Office-365, Microsoft has renamed the Comment functionality as Notes. So the traditional comments that you know (one that shows a yellow box and small red triangle in the cell at top-right) are now called Notes. And comments now refer to a new feature that allows you to create threaded conversations. Here is an article about the difference between notes and comments
Bottom line – If you’re NOT using Office 365, you don’t need to worry about anything and a comment remains unchanged. If you’re using Office 365, comments are now referred to as Notes
How to Insert Comments in Excel (Shortcut)
If you want to insert a comment in a cell in Excel, you can use the below keyboard shortcut:
SHIFT + F2 in Windows
and
Command + F2 in Mac
Here is how to use this shortcut to insert a comment:
- Select a cell where you want to insert a comment
- Hold the Shift Key (or Command key if using Mac)
- Press the F2 key
The above steps would instantly add a comment to the selected cell.

Now, you can enter any text that you want in the comment and then hit the Escape key or click anywhere in the worksheet to make that comment save in the cell.
In case you select a range of cells and use the above shortcut, it would insert a comment in the active cell only.
In case you don’t prefer the shortcut method, below is another method to add a comment:
- Right-click on the cell in which you want to add the comment
- Click on New Comment (or New Note in case you’re using Office 365)

Show All Comments/Notes
If you want all the comments to expand and show the text in it, you can do that easily with a single click:
- Go to the Review tab
- In the Comments group, click on Show All comments

This will instantly show all the comments on the worksheet.
This works like a toggle button. So if you click on it again, it will hide all the comments in the worksheet.
In case you’re using Office 365, you need to click on the Notes option and then click on Show All Notes

Navigate Through Comments (Previous/Next)
If you want to go through each comment one by one, you can do that as well. This can be useful when you have a lot of comments and you want to make sure you don’t miss any while going through these comments.
Below are the steps to go through comments one by one:
- Click the Review tab
- In the Comments group, click on the Next option to go to the Next comment (and Previous to go to the previous comment).

When you are navigating through these comments, only the comment that is active will be shown. The rest will be hidden. When you click on Next, it takes you to the next comment and hides all the other comments.
If you’re using Office 365 (where comments are now called Notes), you need to click on the Review tab, then click on the Notes option and then click on the Next/Previous Note options. This has been made a bit difficult if you have to use this option a lot (as it now takes more clicks). One way to deal this could be to add the Next/Previous notes option to the QAT (this option comes when you right-click on the Next/Previous Note options).

Copy Comments
When you do a simple copy-paste, it will copy everything including the values, formulas, formatting and comments. So if you want to copy-paste everything, all you need is the regular Control-C and Control-V
But what if you only need to copy the comments (and nothing else).
Excel allows you to do this using the Paste Special options.
Below are the steps to copy and paste comments only in Excel:
- Select all the cells that have the comments that you want to copy
- Right-click on any cell in the selection and then click on Copy (or use Control + C keyboard shortcut)
- Go to the cell where you want to paste the comments.
- Right-click and select Paste Special.
- In the Paste Special dialog box, click on Comments (it will be ‘Comments and Notes’ if you’re using Office 365)

- Click OK

The above steps would only paste the comments and not the values/formatting/formulas.
This can be a useful thing when you have two versions of the same file with different comments. You can copy and paste all the comments in the latest version to make sure you’ve everything in one place.
Delete Comments
There are different methods you can use to Delete comments in Excel. The method you choose will depend on what comments you want to delete.
For example, if you only want to delete comments in a selection or from the entire worksheet, you can use the easy way – shortcut or option in the ribbon.
But if you want to delete comments from all the worksheets at one go, you need to use VBA.
Let’s see both of these scenarios.
Delete Comments from a Selected Range or the Entire Worksheet
This one is simple.
To delete all comments in a selection, follow the below steps:
- Right-click anywhere in the selection
- Click on Delete Comment (or ‘Delete Note’ if you’re using Office 365)

In case you want to remove comments from the entire worksheet, follow the below steps:
- Click on the gray triangle at the top-left of the Excel application. This will select the entire worksheet (or you can use Control + A + A)
- Click the Home tab
- In the Editing group, click on Clear
- Click on Clear Comments

The above steps would remove all the comments in the worksheet.
Note that when you select the entire worksheet and then right-click on any cell, you won’t get the option to delete all the comments (or notes)
Delete Comments from All the Worksheets at One Go
Deleting comments from the entire workbook is a bit tricky. You can go to each sheet and delete all the comments in each sheet, but this can become tiresome if you have a lot of sheets in the workbook.
A simple VBA code, in this case, can do all the heavy lifting.
Below is the code that will go to each sheet in the workbook and delete comments from the entire sheet:
For each ws in Worksheets: ws.cells.ClearComments: Next ws
The above code uses the For Each Next loop to go through each worksheet in the workbook. And for each sheet, it uses the ClearComments method to remove all the comments at one go.
Since Microsoft has renamed comments to notes in Office 365, in future, the above code may delete comments (new feature in O365) and you may have to use the below code to delete notes (the comments in prior versions)
For each ws in Worksheets: ws.cells.ClearNotes: Next ws
As of now, both of these codes work and delete comments from the specified cells.
Now, let me show you how to use this code.
- Right-click on any sheet tab
- Click on View code. This will open the VB Editor (you can also open the keyboard shortcut ALT + F11)

- In the VB Editor, if you don’t see the immediate window, click on the View option in the menu and then click on Immediate window

- Copy and Paste the above VBA macro code into the immediate window.

- Place the cursor at the end of the line in the immediate window
- Hit the Enter key


The above steps will delete all the comments in the entire workbook.
Copy All Comments In a Separate Worksheet
It would be great to have a list of all the comments and all the text within each comment as a list in the worksheet. This will make it easy to go through the comments one by one (instead of navigating and jumping across cells in the sheet).
While this can not be done with an in-built feature, you can get this done using VBA.
Here is a detailed tutorial that shows how to get a list of all the comments in a separate worksheet.
Convert Notes to Comments (Office 365 Only)
This feature is only available to the users of Office 365.
Since there are two types of comments now – comments and notes, it allows you to change notes to comments (not vice-versa).
So if you have traditional comments (now called notes in O365), you can easily convert these to comments using the below steps:
- Click the Review tab
- Click on the Notes option
- Click on Convert to Comments

- In the dialog box that opens, click on ‘Convert All Notes’


The above steps would convert all the comments into Notes.
Note that if you have any formatting or images in the comments, it would be removed automatically.
Also, you can not choose to convert some of the notes to comments and leave others as is. The above steps would change all the notes to comments in the entire worksheet.
So this is all that there is to know about inserting and deleting comments in Excel.
I hope you found this tutorial useful!
You may also like the following Excel tutorials:
- How to Print Comments in Excel
- How to Remove Cell Formatting in Excel (from All, Blank, Specific Cells)
- Delete Blank Rows in Excel (with and without VBA)
Comments in Excel are great when you’re working with multiple people and need to tag a few cells with some important notes.
And with comments, you can have multiple people adding comments and it will show their names with each comment to make sure you know who has added that note in a cell.
But what if you get a workbook and you want to delete a comment (or all comments or all comments by a specific person)?
In this Excel tutorial, I will show you how to quickly delete comments in Excel.
So let’s get started!
This one pretty straight forward.
Suppose you have a dataset as shown below and you want to quickly delete the comment in cell C3.
Below are the steps to delete a comment in an Excel cell:
- Right-click on the cell
- Click on ‘Delete Note’ (or ‘Delete Comment’ if you’re not using Office 365)

That’s it!
This will delete the comment in that specific cell.
Note: In Office 365, Excel now has comments and notes as two separate features. In Office-365, a comment is a new feature that can be used to create threads of conversation. And note now refers to the traditional comment that exists in earlier versions of Excel. In this tutorial, I am using Office 365, so comments are somewhere shown as notes in snapshots.
Delete All Comments (In the Entire Sheet or Selection)
In case you want to delete all comments from the entire sheets or a specific selection, you need to first make the selection and then follow the same steps (as shown above) to delete all the comments.
To delete all the comments in the entire sheet:
- Select all the cells in the worksheet (by clicking on the gray triangle at the top-left of the Excel window)
- Click the Home tab

- In the Editing group, click on Clear

- Click on ‘Clear Comments and Notes’


In case you want to delete all comments from a specific selection of range, first make the selection and follow the below steps:
- Right-click on any cell in the selection
- Click on ‘Delete Note’ (or ‘Delete Comment’ if you’re not using Office 365)
Delete All Comments from All Sheets
This one is a bit tricky.
If you only have a few worksheets, you can manually go to each sheet, select all the cells and delete all the comments,
But in case you have a lot of sheets, doing this manually can take a lot of time.
So, the better way of doing this could be by using a simple VBA code.
Don’t worry, it’s really simple and I will show you the exact steps to get this done.
Below is the VBA code which will go through each sheet and delete all the comments in it:
For each ws in Worksheets: ws.cells.ClearComments: Next ws
The above VBA code uses the For Each Next loop that goes through all the sheets one by one and deletes all the comments in it.
Below are the steps to use this VBA macro code in Excel:
- Open the workbook from where you want to delete comments from all sheets
- Right-click on any tab
- Click on View Code. This will open the VB Editor window

- If you don’t already see the immediate window, click on the View option in the menu and then click on ‘Immediate Window’

- Copy the above code in the immediate window

- Place the cursor at the end of the line
- Hit the Enter key


The above steps would instantly run the code and remove comments from all the sheets.
In case you want to delete comments from specific sheets only, you will have to create a code that allows you to go through those sheets only and not all the sheets.
[BONUS] Adding the Delete Comment button in the Quick Access Toolbar
Another time-saving tip when you have to delete comments quite often is to add the delete comment icon in the quick access toolbar.
This way, you can simply make the selection and click the button on the QAT to remove the comments from the selection (which is always visible when working with Excel).
Below are the steps to add the Delete Comments icon in the Quick Access Toolbar:
- Click on the Customize Quick Access Toolbar icon.

- Click on More Commands

- In the ‘Excel Options’ dialog box that opens, click on the ‘Choose Commands from’ drop-down and then click on ‘All Commands’

- Scroll down and select the ‘Delete Comment’ option

- Click on the Add button
- Click OK


The above steps would add the Delete Comment button in the Quick Access Toolbar.
![]()
Now. when you have to remove comments from a specific cell/range or the entire worksheet, simply make the selection and click on this icon.
So these some of the methods you can use to delete comments in Excel.
Hope you found this tutorial useful.
You may also like the following Excel tutorials:
- How to Set a Row to Print on Every Page in Excel
- How to Clear Contents in Excel without Deleting Formulas
- How to Delete a Sheet in Excel Using VBA
- How to Delete Chart in Excel? (Manual & VBA)
- How to Remove Drop-down List in Excel?
- How to Print Comments in Excel? 4 Easy Ways!
- Delete Cell in Excel (Shortcut)
- How to Filter Cells with Notes in Excel?
You can add comments to cells. When a cell has a comment, an indicator appears in the corner of the cell. When you hover your cursor over the cell, the comment appears.

-
Right-click the cell and then click New Comment.
-
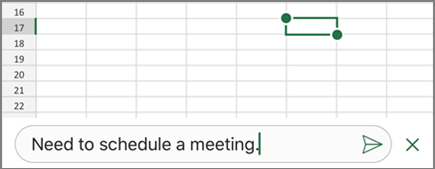
Type your comment. You can @mention someone to address the comment to them — this sends them email notification of the comment.
-
Click the Post button (or press Ctrl+Enter).
-
If other people have something to add, they can right-click the cell and choose Reply to Comment.
-
If you need to edit a threaded comment, rest your cursor over the cell. Then rest your cursor over the comment text itself, and click Edit.
-
If you need to delete a threaded comment, right-click the cell and then click Delete Comment.
-
If you need to delete a reply, rest your cursor over the cell. Then rest your cursor over the reply text itself, and click Delete.
-
If a comment thread is complete, then you can mark it as Resolved: rest your cursor over the cell, then click … > Resolve thread. The comment will still be viewable, but no further additions can be made to it unless it’s reopened. Anyone who has write access to a workbook can resolve or reopen comments.
Note: Keep in mind that it’s possible for others to edit your comments. Comments in Office documents are stored in the file, so anyone with edit access to your file can edit your comment.
-
Right-click the cell and then click Insert Comment (or press Shift+F2). If you’re using Excel for Office 365, right-click the cell and choose New Note.
-
Type your annotation text.
-
Click outside the cell.
If you need to edit the note, right-click the cell, and then click Edit Comment. If you’re using Excel for Office 365, right-click the cell and choose Edit Note.
If you need to delete the note, right-click the cell and choose Delete Comment. If you’re using Excel for Office 365, right-click the cell and choose Delete Note.
The Comments Task Pane shows you all the comments on the current worksheet, and lets you navigate to other worksheets to review those comments as well.
-
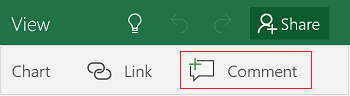
Select the first worksheet containing comments, and then on the ribbon, next to the Editing menu, select Comments.
-
Review the listed comments. Select a comment to see the cell containing it, and to make changes to the comment.
-
After you’ve reviewed all the comments on the sheet, at the bottom of the list select See more comments to see the next comment on another worksheet.
-
When you’ve reviewed the last set of comments you can go back to where you started: at the bottom of the list, select Return to first comment.
In Excel for Office 365, there are two kinds of comments to choose from: comments and notes. For more information, see the article, Threaded comments and notes.
-
Select the cell or cells that contain the comments that you want to copy.
-
Press Ctrl+C.
-
On the Home tab, click the arrow below Paste, and then click Paste Special.
-
In the Paste Special dialog box, under Paste, click Comments, and then click OK.
-
To cancel the moving border, click another cell or press Esc.
Notes:
-
Do not press Enter after you click OK. If you do, cell contents are copied to the paste area in addition to the comment.
-
Copied comments replace any existing comments in the destination area.
By default, Excel displays an indicator when a cell contains a comment or a note. You can control how Excel displays comments and indicators in cells by changing the default settings to always show or hide the comments.
-
Click the File tab, then click Options.
-
In the Advanced category, under Display, do one of the following:
-
To hide both comments and indicators throughout the workbook, under For cells with comments, show, click No comments or indicators.
-
To show indicators but display comments only when you rest the pointer over their cells, under For cells with comments, show, click Indicators only, and comments on hover.
-
To always display both comments and indicators, under For cells with comments, show, click Comments and indicators. Note that in Excel for Office 365, this setting only applies to notes, not threaded comments.
-
Excel labels each threaded comment with the name of the person who is currently logged in with their account. This cannot be changed by typing over it. However, notes are different. Excel labels notes by using a name that you specify in the Options dialog box. The following procedure explains how to change the name that appears on notes, not threaded comments.
-
Click the File tab and then click Options.
-
In the General category, under Personalize your copy of Microsoft Office, type a name in the User name box.
Notes:
-
If the User name box is empty, Excel automatically sets the value of the User name box to your user name, and uses that name for the label.
-
Although you can’t suppress note labels, you can remove labels from notes by deleting them.
-
See Also
Print comments and notes in Excel
What to do if you’re missing New Comment and New Note from Excel’s context menu
-
Right-click the cell and then click New Comment.
-
Type your comment.
-
Click the Post button (or press ⌘+Enter).
-
If other people have something to add, they can right-click the cell and choose Reply to Comment.
-
If you need to edit a threaded comment or reply, rest your cursor over the cell. Then rest your cursor over the comment text itself and click Edit. You can only edit comments you’ve created.
-
If you need to delete a threaded comment, right-click the cell and then click Delete Comment.
-
If you need to delete a reply, rest your cursor over the cell. Then rest your cursor over the reply text itself and click Delete.
-
If a comment thread is complete, then you can mark it as Resolved: rest your cursor over the cell, then click … > Resolve thread. The comment will still be viewable, but no further additions can be made to it unless it’s reopened. Anyone who has write access to a workbook can resolve or reopen comments.
-
Select the cell or cells that contain the comments that you want to copy.
-
Press ⌘+C.
-
On the Home tab, click the arrow below Paste, and then click Paste Special.
-
In the Paste Special dialog box, under Paste, click Comments, and then click OK.
-
To cancel the moving border, click another cell or press Esc.
-
Select a destination cell, and then press ⌘+V.
Note: Copied comments replace any existing comments in the destination area.
By default, Excel for Mac displays an indicator when a cell contains a comment or a note. You can control how Excel displays comments and indicators in cells by changing the default settings to always show or hide the comments.
-
Click Excel > Preferences > View (under Authoring).
-
In the View dialog box, under For Cells with Comments, Show, do one of the following:
-
To hide both comments and indicators throughout the workbook, click No comments or indicators.
-
To show indicators but display comments only when you rest the pointer over their cells, click Indicators only, and comments on rollover.
-
To always display both comments and indicators, click Comments and indicators.
-
Excel labels each threaded comment with the name of the person who is currently logged in with their account. This cannot be changed by typing over it. However, notes are different. Excel labels notes by using a name that you specify in the Options dialog box. The following procedure explains how to change the name that appears on notes, not threaded comments.
-
Click Excel > Preferences > General.
-
In the General dialog box, under Personalize , type a name in the User name box.
Notes:
-
If the User name box is empty, Excel automatically sets the value of the User name box to your user name, and uses that name for the label.
-
Although you can’t suppress note labels, you can remove labels from notes by deleting them.
-
The Comments Task Pane shows you all the comments on the current worksheet, and lets you navigate to other worksheets to review those comments as well.
-
Select the first worksheet containing comments, and then on the ribbon, next to the Editing menu, select Comments.
-
Review the listed comments. Select a comment to see the cell containing it, and to make changes to the comment.
-
After you’ve reviewed all the comments on the sheet, at the bottom of the list select See more comments to see the next comment on another worksheet.
-
When you’ve reviewed the last set of comments you can go back to where you started: at the bottom of the list, select Return to first comment.
See Also
Print comments and notes in Excel
What to do if you’re missing New Comment and New Note from Excel’s context menu
-
Right-click the cell and then select New Comment.
-
Type your comment. You can @mention someone to address the comment to them — this sends them email notification of the comment.
-
Select the Post Comment button (or press Ctrl+Enter).
-
If other people have something to add, they can right-click the cell and choose New Reply.
-
If you need to edit a threaded comment, rest your cursor over the cell. Then select the comment, select the More thread actions menu, and select Edit comment.
-
If you need to delete a threaded comment, right-click the cell and then click Delete Comment.
-
If you need to delete a reply, rest your cursor over the cell. Then rest your cursor over the reply text itself, and click Delete.
-
If a comment thread is complete, then you can mark it as Resolved: rest your cursor over the cell, then click More thread actions > Resolve thread. The comment will still be viewable, but no further additions can be made to it unless it’s reopened. Anyone who has write access to a workbook can resolve or reopen comments.
Note: Keep in mind that it’s possible for others to edit your comments. Comments in Office documents are stored in the file, so anyone with edit access to your file can edit your comment.
-
Right-click the cell and then click Insert Comment (or press Shift+F2). If you’re using Excel for Office 365, right-click the cell and choose New Note.
-
Type your annotation text.
-
Click outside the cell.
If you need to edit the note, right-click the cell, and then click Edit Comment. If you’re using Excel for Office 365, right-click the cell and choose Edit Note.
If you need to delete the note, right-click the cell and choose Delete Comment. If you’re using Excel for Office 365, right-click the cell and choose Delete Note.
In Excel for Office 365, there are two kinds of comments to choose from: comments and notes. For more information, see the article, Threaded comments and notes.
Note: When you copy and paste threaded comments to other cells, Excel for the web will also paste the cell values.
-
Select the cell or cells that contain the comments that you want to copy.
-
Press Ctrl+C.
-
Select the empty cells and press Ctrl + V.
Note: Copied comments replace any existing comments in the destination area.
The Comments Task Pane shows you all the comments on the current worksheet, and lets you navigate to other worksheets to review those comments as well.
-
Select the first worksheet containing comments, and then on the ribbon, next to the Editing menu, select Comments.
-
Review the listed comments. Select a comment to see the cell containing it, and to make changes to the comment.
-
After you’ve reviewed all the comments on the sheet, at the bottom of the list select See more comments to see the next comment on another worksheet.
-
When you’ve reviewed the last set of comments you can go back to where you started: at the bottom of the list, select Return to first comment.
-
In an Excel workbook, tap in the worksheet.
-
Tap Review.
-
Tap Comment.
-
Type your comment and tap the Post button.
-
To reply to a comment, tap the cell (that has the comment), tap the purple comment icon that appears above it, and in the Reply text box, enter a reply and tap the Post button.
Here are other things you can do with threaded comments on your Android tablet:
-
To view a particular thread, tap the cell, and then tap the purple comment icon.
-
To view all threads in the worksheet, tap Review and then tap Show Comments.
-
To edit a particular comment in a thread, tap the cell (that has the comment), tap the purple comment icon that appears above it, tap the particular comment you want to edit, and then tap Edit. Modify the comment as necessary and then click Save.
-
To delete a particular comment in a thread, tap the cell (that has the comment), tap the purple comment icon that appears above it, tap the comment you want to delete, and then tap Delete.
-
To delete an entire thread, tap the cell (that has the comment), tap the purple comment icon that appears above it, tap … (the ellipsis icon) next to the first comment in the thread, and tap Delete thread.
-
To resolve a thread, tap the cell (that has the comment), tap the purple comment icon that appears above it, tap … (the ellipsis icon) next to the first comment in the thread, and tap Resolve thread.
-
Tap the Edit icon
 on your Android phone.
 -
Tap Home, and then tap Review.
-
Tap Comment, type your comment, and then tap the Post button.
-
To reply to a comment, tap the cell (that has the comment), tap the purple comment icon that appears above it, and in the Reply text box, enter a reply and tap the Post button.
 on your Android phone.
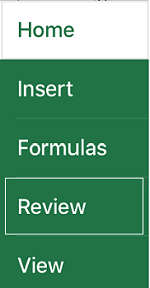
Here are other things you can do with threaded comments on your Android phone:
-
To view a particular thread, tap the cell, and then tap the purple comment icon.
-
To view all threads in the worksheet, tap Review and then tap Show Comments.
-
To edit a particular comment in a thread, tap the cell (that has the comment), tap the purple comment icon that appears above it, tap the particular comment you want to edit, and then tap Edit. Modify the comment as necessary and then click Save.
-
To delete a particular comment in a thread, tap the cell (that has the comment), tap the purple comment icon that appears above it, tap the comment you want to delete, and then tap Delete.
-
To delete an entire thread, tap the cell (that has the comment), tap the purple comment icon that appears above it, tap … (the ellipsis icon) next to the first comment in the thread, and tap Delete thread.
-
To resolve a thread, tap the cell (that has the comment), tap the purple comment icon that appears above it, tap … (the ellipsis icon) next to the first comment in the thread, and tap Resolve thread.
-
In an Excel workbook, tap in the worksheet.
-
Tap Insert.
-
Tap Comment.
-
Type your comment and tap the Post button.
-
To reply to a comment, tap the cell (that has the comment), tap the purple comment icon that appears above it, and in the Reply text box, enter a reply and tap the Post button.
Here are other things you can do with threaded comments on your iPad:
-
To view a particular thread, tap the cell, and then tap the purple comment icon.
-
To view all threads in the worksheet, tap Review and then tap Show Comments.
-
To edit a particular comment in a thread, tap the cell (that has the comment), tap the purple comment icon that appears above it, tap the particular comment you want to edit, and then tap Edit. Modify the comment as necessary and then click Save.
-
To delete a particular comment in a thread, tap the cell (that has the comment), tap the purple comment icon that appears above it, tap the comment you want to delete, and then tap Delete.
-
To delete an entire thread, tap the cell (that has the comment), tap the purple comment icon that appears above it, tap … (the ellipsis icon) next to the first comment in the thread, and tap Delete thread.
-
Tap the Edit icon
on your iPhone. -
Tap Home, and then tap Review.
-
Tap Comment, type your comment, and then tap the Post button.
-
To reply to a comment, tap the cell (that has the comment), tap the purple comment icon that appears above it, and in the Reply text box, enter a reply and tap the Post button.
-
Click the green down arrow once you are done.
Here are other things you can do with threaded comments on your iPhone:
-
To view a particular thread, tap the cell, and then tap the purple comment icon.
-
To view all threads in the worksheet, tap Review and then tap Show Comments.
-
To edit a particular comment in a thread, tap the cell (that has the comment), tap the purple comment icon that appears above it, tap the particular comment you want to edit, and then tap Edit. Modify the comment as necessary and then click Save.
-
To delete a particular comment in a thread, tap the cell (that has the comment), tap the purple comment icon that appears above it, tap the comment you want to delete, and then tap Delete.
-
To delete an entire thread, tap the cell (that has the comment), tap the purple comment icon that appears above it, tap … (the ellipsis icon) next to the first comment in the thread, and tap Delete thread.

-
In an Excel workbook, tap in the worksheet.
-
Tap Insert.
-
Tap Comment.
-
Type your comment.
-
Tap outside the comment box to stop commenting.
-
To view the comment, tap the comment in the workbook.
To delete a comment, tap the comment icon and then tap X.
-
Tap More
on your Windows phone. -
Tap Home, and then tap Review.
-
To add a comment, tap Comment on your Windows phone, type your comment, and then tap Done.
-
To view or edit existing comments, tap the comment.
To edit a comment, tap the Edit comment icon.
To delete a comment, tap the Delete comment icon.
When you are done with your changes, close the comment box by tapping the X on your Windows phone.
 on your Windows phone.

Important: Keep in mind that it’s possible for others to edit your comments. Comments in an Office document are stored in the file, so anyone with edit access to your file can edit your comment.
Need more help?
You can always ask an expert in the Excel Tech Community or get support in the Answers community.
In this article, we will learn to delete or remove comments in Excel cells.
Comments in Excel to remind ourselves and inform someone else about what the cell contains. To add the comment in a cell, Excel 2016 provides the insert Comment function. After inserting the comment it is displayed with little red triangles.
How to insert comment on the cell?
Go to Review > New Comment
Comment box appears on the selected cell. You can write in the yellow bow.
Let’s delete some comments on the table shown below

All the yellow box are the comments on the sheet.
Select the cells where you want to delete comment. In this case,we select the sheet with CTRL + A.
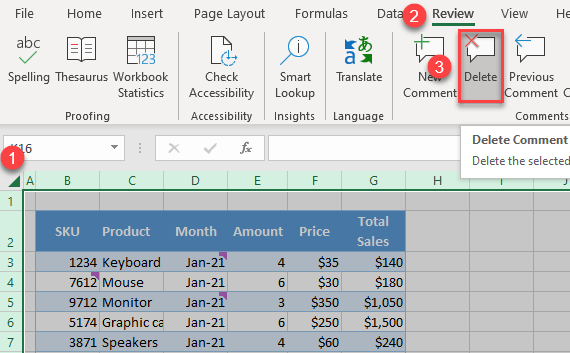
Go to Review > Delete

Click Delete to remove the comments
Now our worksheet is free of comments.
Hope you got how to delete all cell comments in Excel 2016. Find more articles on similar topics here. Please state your query in the comment box below. We will help you.
Popular Articles:
50 Excel Shortcuts to Increase Your Productivity
How to use the VLOOKUP Function in Excel
How to use the COUNTIF function in Excel
How to use the SUMIF Function in Excel
This tutorial demonstrates how to delete all comments or notes in Excel and Google Sheets.
Delete a Single Comment
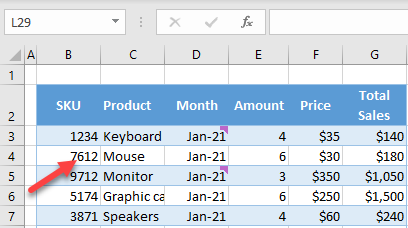
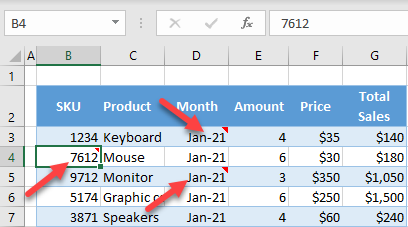
Say you have the following data table with comments in cells B4, D3, and D5.

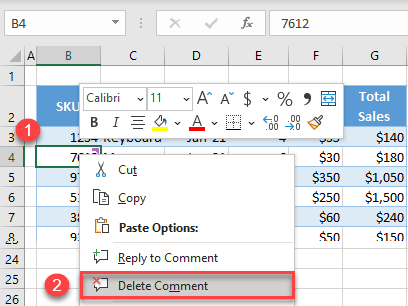
To delete a single comment in Excel, right-click on a cell with a comment (e.g., B4), and click on Delete Comment.
Another way to achieve the same thing is to select the cell with a comment (e.g., B4), click on the three dots in the upper right corner of the comment, and click on Delete thread.

The third option for deleting a comment is to select the cell (here, B4), and in the Ribbon, go to Review > Delete.

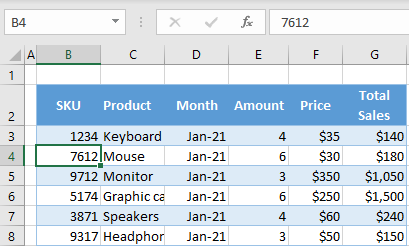
By using any of these three options, the comment from cell B4 is deleted, and the purple indicator for a comment in the upper right corner of the cell will disappear.
Delete All Comments
If you want to delete all comments in the sheet (here, cells B4, D3, and D5), select the whole worksheet by pressing CTRL + A on the keyboard, and in the Ribbon, go to Review > Delete.
This way, Excel will delete all comments in the selected area.
Delete a Single Note
In the newer versions of Excel, notes are what comments used to be called earlier. Now comments are upgraded to threads – where you can enter comments, reply to them, and even tag people in conversation – while notes are simple comments displayed in a yellow box.
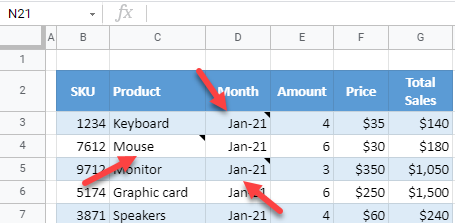
See the data table below with notes instead of comments in cells B4, D3, and D5. These cells have a red triangle in the upper right corner.
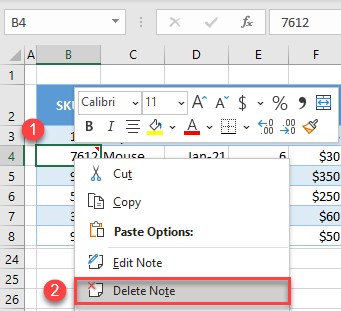
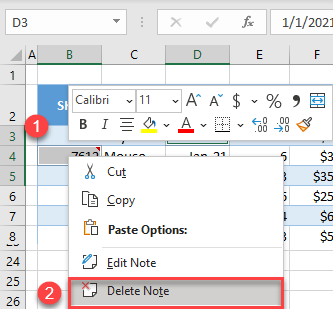
To delete a single note in Excel (e.g., cell B4), right-click on a cell with a note and click on Delete Note.
Delete All Notes
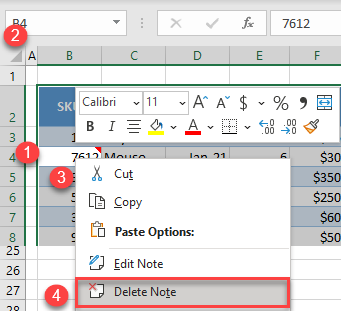
To delete all notes in an Excel worksheet, select any cell with a note (e.g., B4), select the whole worksheet by pressing CTRL + A on the keyboard, right-click on a cell with a note, and click on Delete Note.
You can also use the Go To Special option to delete all notes.
- In the Ribbon, go to Home > Find & Select > Go To Special…
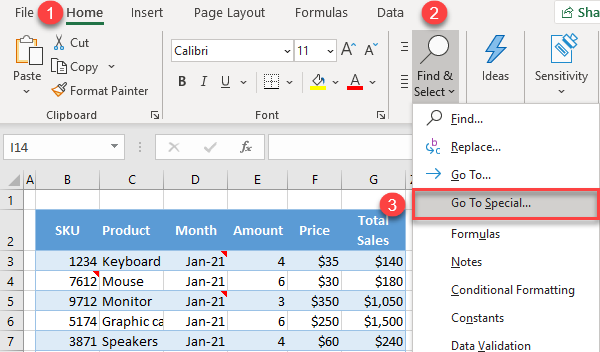
- In the pop-up window, select Notes and click on OK.
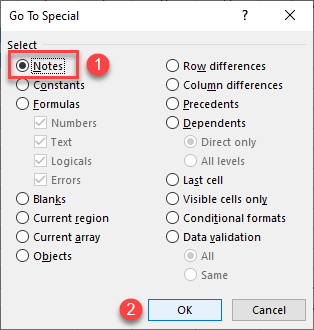
- Now, all cells with notes are selected. Right-click any of the selected cells, and click on Delete Note.
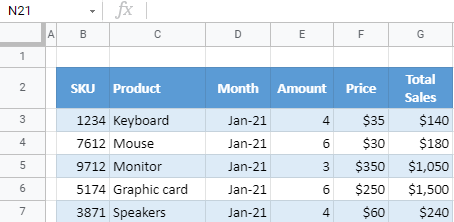
By using any of these options, all notes are deleted, and the red triangles in the upper right corners of cells will disappear.
It’s also possible to use macros to delete comments and notes.
Delete All Notes in Google Sheets
In Google Sheets, you can only delete notes all at once; comments have to be deleted one by one. In this example, there are notes in cells D3, C4, and D5.
To delete all notes, select the whole worksheet by pressing CTRL + A on the keyboard. Then in the Menu, go to Edit > Clear notes.

As a result, all notes are deleted, and any black triangles in the upper right corners of cells will disappear.
When you create a presentation from your draft Excel spreadsheet, you might need to delete all comments.
You can delete every comment one by one, but this will take some time. This tip shows the quick way how to
delete all comments in your spreadsheet.
There are several different ways how to delete all comments in your spreadsheet quickly, but the fastest and
easiest is to:
1. Select all cells in your spreadsheet. For example, by clicking
Ctrl+A (see also
Quick way to select all cells
for more details).
2. On the Review tab, in the Comments group, click
the Delete button:

See also this tip in French:
Comment supprimer tous les commentaires dans la feuille de calcul.
Please, disable AdBlock and reload the page to continue
Today, 30% of our visitors use Ad-Block to block ads.We understand your pain with ads, but without ads, we won’t be able to provide you with free content soon. If you need our content for work or study, please support our efforts and disable AdBlock for our site. As you will see, we have a lot of helpful information to share.
Содержание:
- Как вставить комментарии в Excel (ярлык)
- Показать все комментарии / заметки
- Навигация по комментариям (предыдущий / следующий)
- Копировать комментарии
- Удалить комментарии
- Удалить комментарии из выбранного диапазона или всего рабочего листа
- Удаление комментариев со всех листов за один раз
- Скопируйте все комментарии на отдельном листе
- Преобразование заметок в комментарии (только для Office 365)
Комментарии очень полезны, когда вы хотите добавить некоторую информацию о ячейке / точке данных без изменения содержимого ячейки.
Я часто использую их, когда использую формулы, и мне нужно указать, что делает формула и что означает значение ячейки. Если вы сотрудничаете с другими, вы также можете добавлять комментарии для справки.
В этом руководстве я покажу вам все, что вам нужно знать о комментариях, в том числе о том, как вставлять комментарии в Excel, как редактировать / удалять комментарии, как удалять комментарии со всего листа или книги и т. Д.
Но прежде чем я продолжу и покажу вам, как вставлять комментарии в Excel (или удалять / редактировать комментарии), вам нужно знать кое-что важное.
В Office-365 у Microsoft есть переименовал функцию комментариев в Notes. Итак, традиционные комментарии, которые вы знаете (тот, который показывает желтую рамку и маленький красный треугольник в ячейке вверху справа) теперь называются примечаниями. А комментарии теперь относятся к новой функции, которая позволяет создавать цепочки бесед. Вот статья о разнице между заметками и комментариями
Нижняя граница — Если вы НЕ используете Office 365, вам не о чем беспокоиться, и комментарий останется неизменным. Если вы используете Office 365, комментарии теперь называются заметками.
Как вставить комментарии в Excel (ярлык)
Если вы хотите вставить комментарий в ячейку в Excel, вы можете использовать следующую комбинацию клавиш:
SHIFT + F2 в Windows
и
Command + F2 в Mac
Вот как использовать этот ярлык для вставки комментария:
- Выберите ячейку, в которую вы хотите вставить комментарий
- Удерживайте клавишу Shift (или клавишу Command при использовании Mac)
- Нажмите клавишу F2
Вышеупомянутые шаги мгновенно добавят комментарий к выбранной ячейке.

Теперь вы можете ввести любой текст, который хотите в комментарии, а затем нажать клавишу Escape или щелкнуть в любом месте листа, чтобы сохранить этот комментарий в ячейке.
Если вы выберете диапазон ячеек и воспользуетесь указанным выше ярлыком, он вставит комментарий только в активную ячейку.
Если вы не предпочитаете метод быстрого доступа, ниже представлен еще один способ добавления комментария:
- Щелкните правой кнопкой мыши ячейку, в которую вы хотите добавить комментарий
- Нажмите «Новый комментарий» (или «Новая заметка», если вы используете Office 365).

Показать все комментарии / заметки
Если вы хотите, чтобы все комментарии расширялись и отображался текст в нем, вы можете легко сделать это одним щелчком мыши:
- Перейдите на вкладку «Обзор»
- В группе «Комментарии» нажмите «Показать все комментарии».

Это мгновенно отобразит все комментарии на листе.
Это работает как кнопка переключения. Поэтому, если вы нажмете на него еще раз, он скроет все комментарии на листе.
Если вы используете Office 365, вам нужно выбрать параметр «Заметки», а затем нажать «Показать все заметки».

Навигация по комментариям (предыдущий / следующий)
Если вы хотите просмотреть каждый комментарий один за другим, вы тоже можете это сделать. Это может быть полезно, если у вас много комментариев и вы хотите убедиться, что не пропустите ни одного, просматривая эти комментарии.
Ниже приведены шаги, чтобы просмотреть комментарии один за другим:
- Перейдите на вкладку «Обзор».
- В группе «Комментарии» нажмите «Далее», чтобы перейти к следующему комментарию (и «Предыдущий», чтобы перейти к предыдущему комментарию).

Когда вы просматриваете эти комментарии, будет отображаться только активный комментарий. Остальное будет скрыто. Когда вы нажимаете «Далее», вы переходите к следующему комментарию и скрываете все остальные комментарии.
Если вы используете Office 365 (где комментарии теперь называются заметками), вам нужно перейти на вкладку «Рецензирование», затем выбрать параметр «Примечания», а затем выбрать параметры «Следующее / Предыдущее примечание». Это было немного затруднительно, если вам приходится часто использовать эту опцию (так как теперь она требует больше щелчков). Один из способов справиться с этим — добавить параметр «Следующее / Предыдущее примечание» в QAT (этот параметр появляется, когда вы щелкаете правой кнопкой мыши на параметрах «Следующее / Предыдущее примечание»).

Копировать комментарии
Когда вы выполняете простую копипасту, она копирует все, включая значения, формулы, форматирование и комментарии. Поэтому, если вы хотите скопировать и вставить все, все, что вам нужно, это обычные Ctrl-C и Ctrl-V.
Но что, если вам нужно скопировать только комментарии (и ничего больше).
Excel позволяет сделать это с помощью параметров «Специальная вставка».
Ниже приведены инструкции по копированию и вставке комментариев только в Excel:
- Выделите все ячейки с комментариями, которые вы хотите скопировать.
- Щелкните правой кнопкой мыши любую ячейку в выделенном фрагменте, а затем нажмите «Копировать» (или используйте сочетание клавиш Ctrl + C).
- Перейдите в ячейку, в которую вы хотите вставить комментарии.
- Щелкните правой кнопкой мыши и выберите «Специальная вставка».
- В диалоговом окне «Специальная вставка» нажмите «Комментарии» (это будет «Комментарии и заметки», если вы используете Office 365).
- Нажмите ОК.

Приведенные выше шаги будут вставлять только комментарии, а не значения / форматирование / формулы.
Это может быть полезно, когда у вас есть две версии одного файла с разными комментариями. Вы можете скопировать и вставить все комментарии в последней версии, чтобы все было в одном месте.
Удалить комментарии
Есть разные методы, которые вы можете использовать для удаления комментариев в Excel. Выбранный вами метод будет зависеть от того, какие комментарии вы хотите удалить.
Например, если вы хотите удалить комментарии только в выделенном фрагменте или со всего листа, вы можете использовать простой способ — ярлык или параметр на ленте.
Но если вы хотите удалить комментарии со всех листов за один раз, вам нужно использовать VBA.
Давайте посмотрим на оба этих сценария.
Удалить комментарии из выбранного диапазона или всего рабочего листа
Это просто.
Чтобы удалить все комментарии в выделенном фрагменте, выполните следующие действия:
- Щелкните правой кнопкой мыши в любом месте выделения
- Нажмите «Удалить комментарий» (или «Удалить заметку», если вы используете Office 365).

Если вы хотите удалить комментарии со всего листа, выполните следующие действия:
- Щелкните серый треугольник в верхнем левом углу приложения Excel. Это выберет весь рабочий лист (или вы можете использовать Ctrl + A + A)
- Перейдите на вкладку «Главная»
- В группе редактирования нажмите Очистить
- Нажмите Очистить комментарии

Вышеупомянутые шаги удалят все комментарии на листе.
Обратите внимание: когда вы выбираете весь лист и затем щелкаете правой кнопкой мыши любую ячейку, у вас не будет возможности удалить все комментарии (или заметки).
Удаление комментариев со всех листов за один раз
Удаление комментариев из всей книги немного сложно. Вы можете перейти к каждому листу и удалить все комментарии на каждом листе, но это может стать утомительным, если у вас много листов в книге.
В этом случае простой код VBA может сделать всю тяжелую работу.
Ниже приведен код, который перейдет к каждому листу в книге и удалит комментарии со всего листа:
Для каждого ws в листах: ws.cells.ClearComments: Next ws
В приведенном выше коде используется цикл For Each Next для просмотра каждого листа в книге. И для каждого листа он использует метод ClearComments, чтобы удалить все комментарии за один раз.
Поскольку Microsoft переименовала комментарии в заметки в Office 365, в будущем указанный выше код может удалять комментарии (новая функция в O365), и вам, возможно, придется использовать приведенный ниже код для удаления заметок (комментарии в предыдущих версиях)
Для каждого ws в Worksheets: ws.cells.ClearNotes: Next ws
На данный момент оба этих кода работают и удаляют комментарии из указанных ячеек.
Теперь позвольте мне показать вам, как использовать этот код.
- Щелкните правой кнопкой мыши любую вкладку листа
- Щелкните Просмотреть код. Это откроет редактор VB (вы также можете открыть сочетание клавиш ALT + F11)
- В редакторе VB, если вы не видите немедленное окно, выберите в меню пункт «Просмотр», а затем нажмите «Немедленное окно».
- Скопируйте и вставьте приведенный выше код макроса VBA в ближайшее окно.
- Поместите курсор в конец строки в непосредственном окне
- Нажмите клавишу Enter


Вышеупомянутые шаги удалят все комментарии во всей книге.
Скопируйте все комментарии на отдельном листе
Было бы здорово иметь список всех комментариев и всего текста в каждом комментарии в виде списка на листе. Это упростит просмотр комментариев один за другим (вместо навигации и перехода по ячейкам на листе).
Хотя это невозможно сделать с помощью встроенной функции, вы можете сделать это с помощью VBA.
Вот подробное руководство, в котором показано, как получить список всех комментариев на отдельном листе.
Преобразование заметок в комментарии (только для Office 365)
Эта функция доступна только пользователям Office 365.
Поскольку сейчас есть два типа комментариев — комментарии и заметки, это позволяет вам заменять заметки на комментарии (а не наоборот).
Поэтому, если у вас есть традиционные комментарии (теперь они называются заметками в O365), вы можете легко преобразовать их в комментарии, выполнив следующие действия:
- Перейдите на вкладку «Обзор».
- Нажмите на опцию Notes
- Нажмите «Преобразовать в комментарии».
- В открывшемся диалоговом окне нажмите «Преобразовать все заметки».


Вышеупомянутые шаги превратят все комментарии в заметки.
Обратите внимание, что если у вас есть какие-либо форматирования или изображения в комментариях, они будут удалены автоматически.
Кроме того, вы не можете преобразовать некоторые заметки в комментарии и оставить другие как есть. Вышеупомянутые шаги превратят все примечания в комментарии на всем листе.
Это все, что нужно знать о вставке и удалении комментариев в Excel.
Надеюсь, вы нашли этот урок полезным!
Excel spreadsheets are an excellent tool for data storage, transformation, and analysis. When used with the rest of Microsoft Office 365 tools, it can become a key component in your business workflow. Excel spreadsheets are the basis for collaborative work in any sector that requires working with datasets, i.e., human resources, finance, marketing, sales, etc. For example, Excel Co-Authoring helps your team boost productivity levels, regardless of the size.
This article will explain how Excel comments and notes work in the 365 version. You’ll learn how to add comments and notes in Excel, how to edit comments and notes in Excel, and how to delete comments and notes in Excel.
Microsoft Office 365 allows users to add Excel “Notes” and “Threaded Comments”. In this version, “Threaded Comments” are comments that can be addressed to specific users via “@mention” feature. On the other hand, “Notes” are like sticky notes, the equivalent of “Comments” in Excel 2019 or 2016. For more information on this topic, visit the Microsoft Support page.
Although adding a comment in Excel is simple, it can become a powerful feature if you learn how to apply it fully. This is how you can insert a comment in Excel.
In Excel 2016 or 2019, you can add a comment by pressing Shift + F2. In Excel 365, there are two ways to add your comment:
- 1. Open your Excel spreadsheet and right-click on the cell where you want to insert the comment. Then, select “New Comment”.

Add, Edit & Delete Comments and Notes in Excel — Right-click to insert
- 2. The other option is to go to Review > New Comment.

Add, Edit & Delete Comments and Notes in Excel — Insert from Review
- 3. The comment window displays the name of the user who created the comment. To address the comment, start by typing “@” and search for the user you would like to address it to.

Add, Edit & Delete Comments and Notes in Excel — Enter or mention
- 4. Click on “Post” icon to send.

Add, Edit & Delete Comments and Notes in Excel — Post comment
You can also add a comment or note in an Excel formula by adding +N(«comment») to the formula. For example, the comment or note in =SUM(C2:C101)+N(«Only estimated according to proposed dates») would only be visible if you click on the cell formula.
How to View and Reply to Comments in Excel?
There are two simple ways to view a comment:
- 1. Hover over any cell containing a purple ribbon in the upper-right corner.

Add, Edit & Delete Comments and Notes in Excel — View cell comment
- 2. Or, go to Review > Show Comments.

Add, Edit & Delete Comments and Notes in Excel — Show Comments
- 3. This will open the “Comments” pane where you can reply, edit, or delete comments.

Add, Edit & Delete Comments and Notes in Excel — Comments pane
- 4. Type your reply using the “@mention” in case you want to address the user. Then press “Enter” or click on “Post” to send.

Add, Edit & Delete Comments and Notes in Excel — Post reply
Close the “Comments” pane by clicking on “Show Comments”. The “Previous Comment” and “Next Comment” buttons allow you to move across comments. Now, let’s see how you can edit comments in Excel.
There are many ways to edit comments in Excel.
- 1. Open your spreadsheet and click on the cell containing the comment, or click on “Show Comments”. Select “Edit” to the right of the comment box.

Add, Edit & Delete Comments and Notes in Excel — Edit comment
- 2. Excel prompts you to modify the text. You can then click “Save”, to keep the changes, or “Cancel”.

Add, Edit & Delete Comments and Notes in Excel — Save or Cancel
But what if you want to assign the comment to a different cell? Let’s explore how to anchor comments to a different cell in Excel.
- 1. Select the cell containing the comment and press Ctrl + C (Copy).

Add, Edit & Delete Comments and Notes in Excel — Copy comment
- 2. Right-click on the cell you would like to anchor the comment to, and select “Paste Special” under “Paste Options”.

Add, Edit & Delete Comments and Notes in Excel — Paste Special
- 3. Select “Comments and Notes” in the “Paste Special” pop-up window. Then, click “OK”.

Add, Edit & Delete Comments and Notes in Excel — Comments and Notes
You can also anchor Excel Notes to a different cell in the same way. The “Paste Special” feature is also applicable in case you want to apply the same comment to multiple cells.
In Excel 2016 or 2019, press Shift + F10 + m to delete a comment. In 365, you can either delete or resolve a comment.
- 1. Open the comment and click on the “⋯” icon. Then, “Delete thread».

Add, Edit & Delete Comments and Notes in Excel — More thread actions
- 2. Another option is to head over to Review > Delete.

Add, Edit & Delete Comments and Notes in Excel — Delete from Review
- 3. Or right-click on the cell comment and “Delete Comment”.

Add, Edit & Delete Comments and Notes in Excel — Right-click Delete
Resolving a comment will keep the reference in case you need to restore it further on.
- 1. Click on the “⋯” icon. Then, “Resolve thread».

Add, Edit & Delete Comments and Notes in Excel — Resolve thread
- 2. Once resolved, Excel will give you the option to “Reopen” or “Delete” for future use.

Add, Edit & Delete Comments and Notes in Excel — Reopen or Delete
You have seen the many ways to add, edit, and delete comments in Excel 365 and how useful they can be when used accurately. Let’s now turn to how to create, edit, and delete notes in Excel.
How to Share an Excel File for Multiple Users?
There are different ways to share an Excel file. Here’s how to share an Excel file with multiple users for easy collaboration
READ MORE

How to Add Notes in Excel?
How to Insert Notes in Excel?
You can insert notes in Excel in different ways.
- 1. Right-click on the cell and select “New Note”.

Add, Edit & Delete Comments and Notes in Excel — New Note
- 2. Another option is to go to Review > New Note.

Add, Edit & Delete Comments and Notes in Excel — Add note from Review
- 3. To save, simply click outside the note box. The notes in Excel are shown as a red triangle in the top-right corner of the cell.

Add, Edit & Delete Comments and Notes in Excel — Save note
How to View Notes in Excel?
Like comments, you can view all notes at the same time.
- 1. Go to Review > Show All Notes. To hide all notes again, click on “Show All Notes” to disable viewing.

Add, Edit & Delete Comments and Notes in Excel — Show all notes
- 2. Select “Previous Note” and “Next Note” to read through all notes.

Add, Edit & Delete Comments and Notes in Excel — Previous note
- 3. If you want to hide specific notes in cells, select the “Hide Note” or “Show Note” to keep them displayed.

Add, Edit & Delete Comments and Notes in Excel — Show/Hide notes
How to Edit Notes in Excel?
To edit a note based on the text, size, position, or format, follow these steps.
- 1. Right-click on the cell note or go to Review > Notes. Then, select “Edit Note”. Excel also offers the option to “Convert to Comments”. To save, click outside the note box.

Add, Edit & Delete Comments and Notes in Excel — Edit note
- 2. To resize your notes, place your cursor on a corner and drag the two-sided arrow to increase or decrease the size.

Add, Edit & Delete Comments and Notes in Excel — Resize note
- 3. To reposition, drag the note using the four-sided arrow to the preferred position.

Add, Edit & Delete Comments and Notes in Excel — Reposition note
How to Delete Notes in Excel?
You can delete notes by right-clicking on the cell and selecting “Delete Note”. Or, click on the cell and head over to Review > Notes > Delete Note. Be aware that Excel will delete without asking for confirmation.

Add, Edit & Delete Comments and Notes in Excel — Save note
Want to Boost Your Team’s Productivity and Efficiency?
Transform the way your team collaborates with Confluence, a remote-friendly workspace designed to bring knowledge and collaboration together. Say goodbye to scattered information and disjointed communication, and embrace a platform that empowers your team to accomplish more, together.
Key Features and Benefits:
- Centralized Knowledge: Access your team’s collective wisdom with ease.
- Collaborative Workspace: Foster engagement with flexible project tools.
- Seamless Communication: Connect your entire organization effortlessly.
- Preserve Ideas: Capture insights without losing them in chats or notifications.
- Comprehensive Platform: Manage all content in one organized location.
- Open Teamwork: Empower employees to contribute, share, and grow.
- Superior Integrations: Sync with tools like Slack, Jira, Trello, and more.
Limited-Time Offer: Sign up for Confluence today and claim your forever-free plan, revolutionizing your team’s collaboration experience.
Conclusion
Understanding how Excel comments and notes work in Microsoft Office 365 is an excellent way to level up your skills for team collaboration. You should now know the key difference between Excel “Threaded Comments” and “Notes” and how to use them to your advantage. Moreover, you have seen how easy it is to insert, edit, and delete comments and notes to unlock the full potential of this feature.
Finally, make sure to check out our guide on How to share an Excel file.