-
Right-click in a table cell, row, or column you want to delete.
-
On the Mini toolbar, click Delete.

-
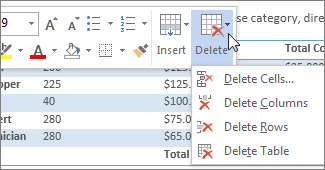
Choose Delete Cells, Delete Columns, or Delete Rows.
Tip: You can delete the contents of a table row or column without deleting the table structure. To do this, select the row or column and then press the Delete key.
-
Right-click in a table cell, row, or column you want to delete.
-
On the menu, click Delete Cells.
-
To delete one cell, choose Shift cells left or Shift cells up.
To delete the row, click Delete entire row.
To delete the column, click Delete entire column.
Tip: You can delete the contents of a row or column without deleting the table structure. To do this, select the row or column and then press the Delete key.
In this tutorial, I will share a couple of methods to delete rows in MS Word Document.
- Using the Context Menu upon right-clicking.
- Using the Layout Tab under the Table Tools section.
Method 1: Using the Context Menu upon right-clicking.
Right-clicking a table will open up a couple of context menus. Let’s see how you can use those menus to delete the rows of a table.
Step 1: Open MS Word document.

Step 2: Right-click on the table and locate the appropriate buttons.
Right click on the row which you want to delete. It will open up a context menu.

Click on Delete Cells. A window will Popup.
Select Delete Entire Row.
This will delete the selected row.

Another option for you to use is the Delete Table button on the horizontal menu.

Click on Delete – > Delete Rows.
It will remove the selected row from the table.

Note: This method deletes the selected row.
Meaning , if you have selected multiple rows, it will delete all of them.

Method 2: Using the Layout tab under the Table Tools section.
While straight-forward, this method requires a few more clicks to achieve what we want.
Step 1: Open MS Word document.

Step 2: Click on the table row and go to Table Layouts
Left click on the row you want to delete.
Clicking will open up a Table Layout window in the Ribbon.

Step 3: Delete the Row.
Click on Delete – > Delete Rows.
It will delete the selected row(s).

How to Recover Deleted Rows in a Table in MS Word
Simply press Ctrl + Z to undo and recover the deleted rows.
If you’ve already made several changes to your document after deleting that row, it might not even be worth it to undo all the way back. So, just be careful with what you delete.
Conclusion
Thats it. We hope you’ve found this article helpful!
I want to increase my efficiency, instead of right-click -> «delete cells»-> «delete entire row» , how can i do it quickly?
i want to select a row, then press shortcut and it will delete entire row from table
asked Mar 22, 2016 at 11:35
![]()
I want to select a row, then press shortcut and it will delete entire row from table
-
Select the row and press Backspace to delete the row.
-
Select the row and press Del to delete the just the row contents.
answered Mar 22, 2016 at 11:55
![]()
DavidPostill♦DavidPostill
150k77 gold badges348 silver badges386 bronze badges
1
(I just tweaked what David suggested)
Select the cells in the row (or several rows) and drag the cursor to outside the table in such a way that the entire row (or rows) along with a small area outside the table boundary is highlighted. Then press backspace. The entire row (or rows) will be deleted in one go.
![]()
Glorfindel
4,0798 gold badges23 silver badges37 bronze badges
answered Jul 3, 2017 at 10:00
![]()
3
- Shift + ↑/↓ to select rows.
- Alt + JL + D + R
![]()
Worthwelle
4,44811 gold badges19 silver badges31 bronze badges
answered May 30, 2019 at 14:46
![]()
1
Content-wise: Mark the rows you’d like to delete and hit Del.
If you want to delete the row itself which is apparently what you intend to, i.e. you want to reduce the number of rows:
-
Click into the row(s) you’d like to delete. Or set the focus mark in the row with your keyboard’s arrow keys.
-
hold Ctrl, hit - (minus sign), then let go of Ctrl
-
hit r (for selecting r ows, you’ll observe you can use c for c olumns)
-
hit ENTER
answered Jul 3, 2017 at 12:14
![]()
henryhenry
3063 gold badges6 silver badges16 bronze badges
To delete a row with one keystroke without having to select it first, add the command «Delete Rows» as the first item of the quick access toolbar. Then you can hit Alt+1 to delete the row your cursor is currently in.
answered Dec 16, 2020 at 17:35
![]()
NoumenonNoumenon
7092 gold badges10 silver badges22 bronze badges

Способ 1: Контекстное меню
Наиболее быстрым методом удаления ненужной строки из таблицы в Word будет использование контекстного меню, где предусмотрена соответствующая опция, точнее даже опции, так как для одного и того же действия доступно два варианта реализации.
Читайте также: Как создать таблицу в Ворде
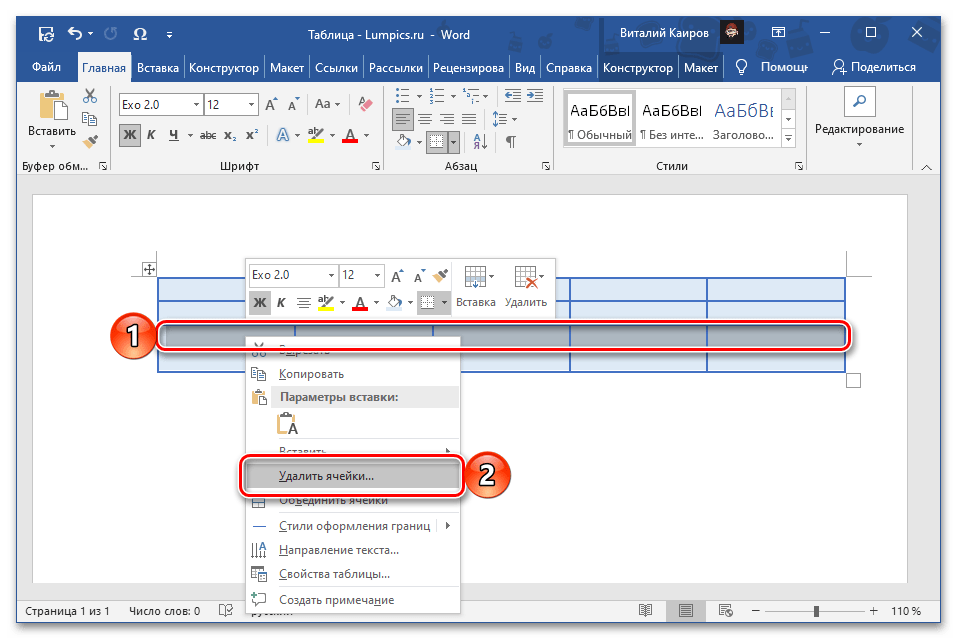
- Используя мышку, полностью выделите ту строку, от которой нужно избавиться. Кликните по любому ее месту правой кнопкой мышки (ПКМ), чтобы вызвать меню, и выберите в нем «Удалить ячейки».

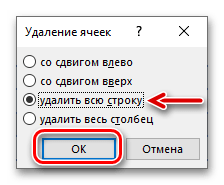
В появившемся диалоговом окне установите маркер напротив пункта «Удалить всю строку» и подтвердите свое намерение нажатием «ОК».
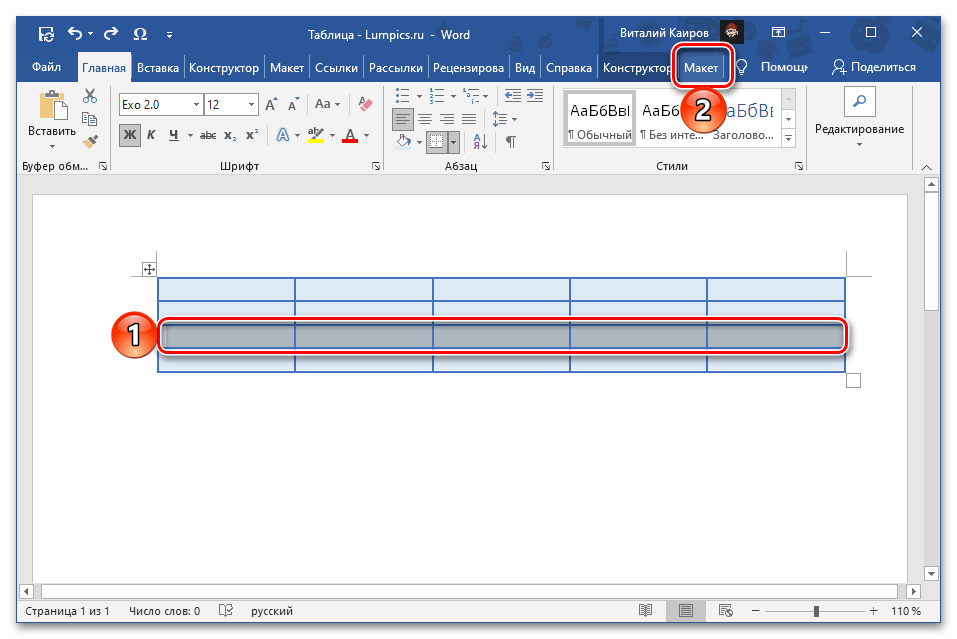
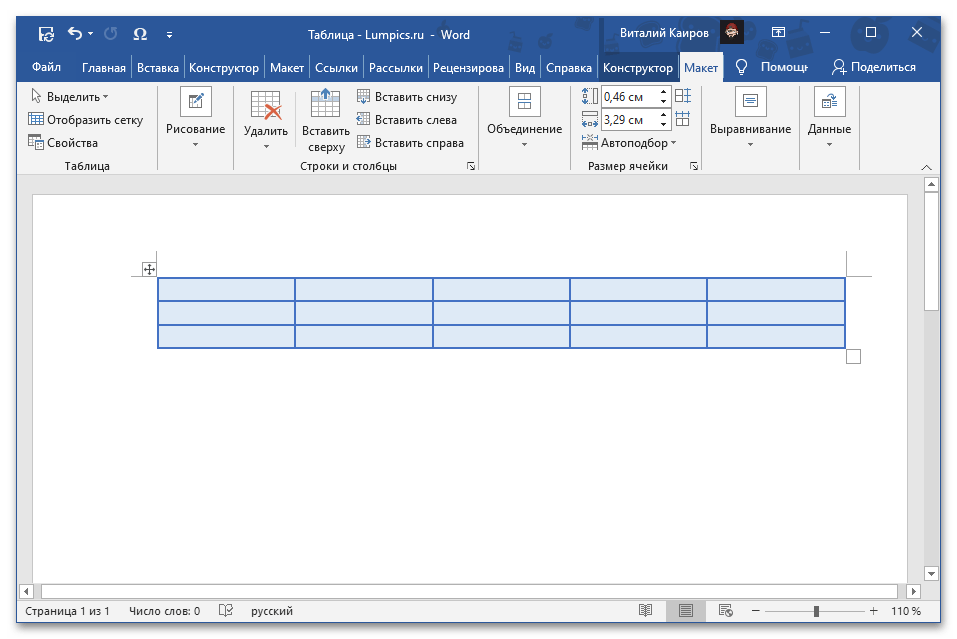
- Установите указатель курсора (каретку) в любой ячейке более ненужной строки и нажмите ПКМ для вызова контекстного меню. Нажмите по расположенной справа на верхней панели кнопке «Удалить» и выберите в открывшемся списке опций «Удалить строки».

Каким бы из двух вариантов, по сути, одного и того же решения вы не воспользовались, желаемый результат в виде удаления строки из таблицы будет достигнут.
Читайте также: Как объединить ячейки таблицы в Word
Способ 2: Инструменты «Строки и столбцы»
После вставки таблицы в документ и ее выделения на ленте появляется дополнительная вкладка «Работа с таблицами», одним из инструментов которой также можно воспользоваться для удаления строки.
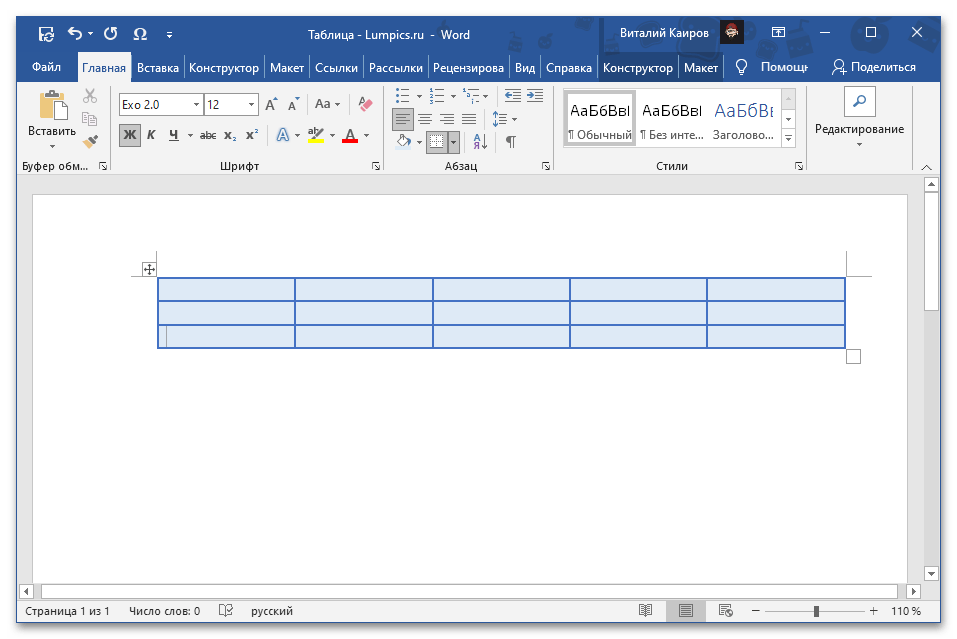
- Установите указатель курсора в любую ячейку той строки, которую требуется удалить, или полностью выделите ее, после чего перейдите во вкладку «Макет» группы «Работа с таблицами».
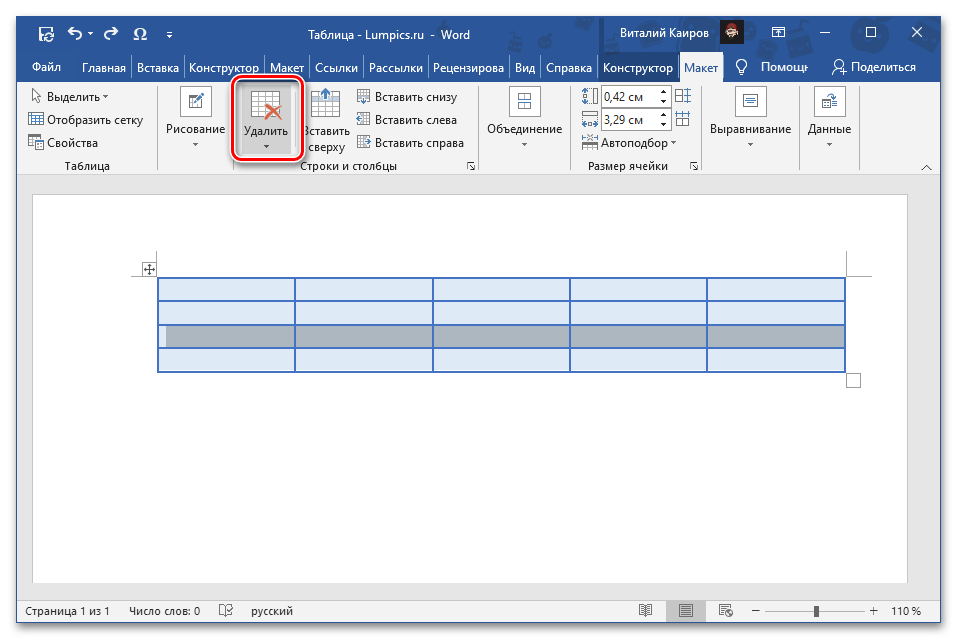
- Нажмите на кнопку «Удалить», расположенную в блоке «Строки и столбцы».
- Выберите пункт «Удалить строки».
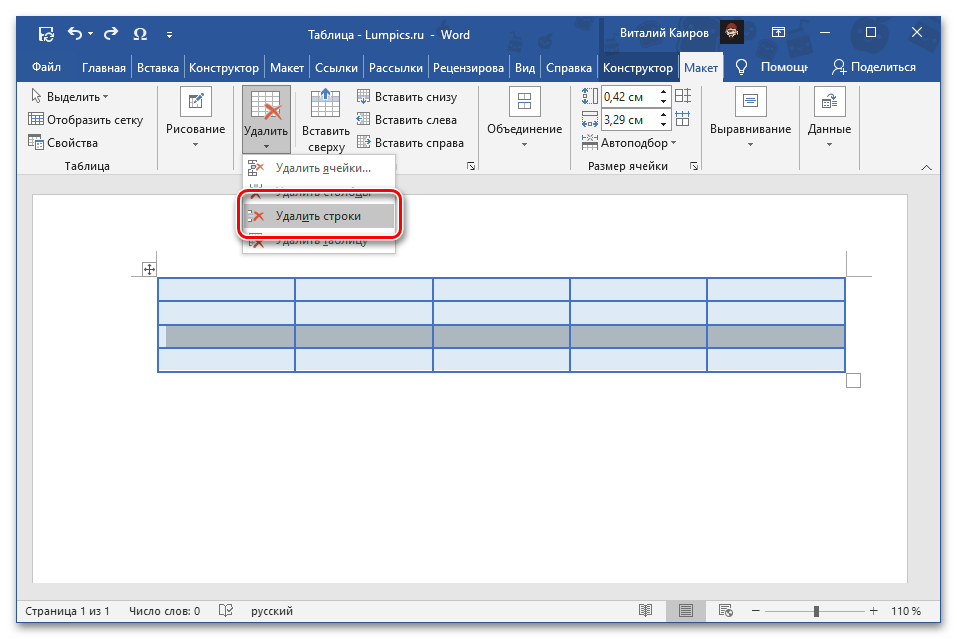
Обозначенная вами строка будет сразу же удалена из таблицы.
Читайте также:
Как добавить строку в таблицу в Ворде
Как удалить столбец из таблицы в Ворде

Еще статьи по данной теме:
Помогла ли Вам статья?
There are many options to delete (erase) a row, column, or cell of a table in Word. So the deletion may be a whole table or a part of it.
To easiest way to delete/erase a table or part of it, follow the steps below the table of contents.
Table of Contents
- Delete a Row, Column, or Cell in a Table in Word
- Erase a Row, Column or Cell in a Table | Word 2013 and Later Versions:
- Erase a Row, Column or Cell in a Table | Word 2010 and earlier Versions
- Conclusion:
A table’s Design and Layout tab will open once the table has been added to the Word document.
→ On the Table Tools Layout tab, in the rows and columns group, click on Delete.

→ After clicking the “Delete“, soon you a drop-down list will open
→ From the drop-down list, select one of the options you want to delete.
→ To delete a cell, position the cursor at one of the cells in a table, and then select Delete Cell.
→ To delete the Column/s, position the cursor or select the Column/s in a table, and then select the Delete Column.
→ To delete the row/s, position the cursor or select the row/s in a table, and then select the Delete Row.
→ To delete the entire Table, position the cursor at one of the cells in a table, and then select Delete Table.
→ Otherwise, select the table and press Backspace.
Erase a Row, Column or Cell in a Table | Word 2013 and Later Versions:
Erasing some parts of the table is the best way to merge or remove Cells/Columns/Rows in Word 2013 and earlier versions:

→ After inserting them into the Word document, the table tools Design and Layout tab will open
→ On the Table Tools Layout tab, in the Draw group, select the Eraser to select
→ Then automatically the mouse pointer turned as an Eraser
→ Now, move the mouse (Eraser) pointer over the table
→ After that, press and keep holding down the left mouse button and then drag it in any direction you want to erase any part of the table
→ To remove any border of the cell, click on it.
Erase a Row, Column or Cell in a Table | Word 2010 and earlier Versions
Erasing some parts of the table is the best way to merge or remove cells, columns, or rows in Word 2010 and earlier versions.
→ After inserting the table into the word document, the table tools Design and Layout tab will open
→ On the Table Tools Design tab, in the Draw Borders group, click the Eraser to select
→ Then automatically the mouse pointer turned as an Eraser
→ Now, move the mouse (Eraser) pointer over the table
→ After that, press and keep holding down the left mouse button and then drag it in any direction you want to erase any part of it
→ To remove any border of the cell, click on it.
Conclusion:
Deleting or erasing a column, row, or table cell is the same task, but it is not unique. The work of both is special. So what is the use of it? It has a variety of options or commands to delete or erase, so use them as explained above.
Is deleting or erasing a table or part of it different?
A table or a portion of a table can be deleted or erased in order to be removed. However, while the intent behind removal and deletion are the same, the conditions and process are not.
In this post, we will explain to you 3 fast ways to delete blank rows and columns in your Word table.
Tables are essential to a document, especially in holding various types of data. Sometimes, a long table can exceed a page and extend over several. So once a table gets long and complicated, there are measures you can do to simplify it. For example, you can delete unnecessary blank rows and columns.
Following are 3 methods you can use.
Method 1: Delete Blank Rows and Columns Manually
- Firstly, select a row or a column in blank.
- Then right click to get the contextual menu. On the menu, select “Delete Rows” or “Delete Columns” accordingly.


Unfortunately, you can’t select multiple non-consecutive rows or columns and delete them together with this way. For this demand, you can refer to our previous article: 5 Quick Methods to Batch Delete Multiple Rows or Columns in Your Word Table
Method 2: Batch Delete All Blank Rows and Columns in a Table
Method 1 has its limitation. So we will offer you the way to batch remove rows and columns in a table via VBA codes.
- To begin with, put cursor inside a target table.
- Second, trigger VBA editor by pressing “Alt+ F11”.
- In the editor, click “Normal” project first.
- Then click “Insert” tab on menu bar.
- On the drop-down menu, choose “Module”.

- Double click on module to open it and paste following codes there:

Sub DeleteBlankRowsAndTablesInATable()
  Dim objCell As Cell
  Dim nRowIndex As Integer, nRows As Integer, nColumns As Integer, nColumnIndex As Integer
  Dim varCellEmpty As Boolean

  Application.ScreenUpdating = False

  If Selection.Information(wdWithInTable) = False Then
    MsgBox ("Put cursor inside a table first!")
    Exit Sub
  Else
    With Selection.Tables(1)
      nRows = .Rows.Count
      For nRowIndex = nRows To 1 Step -1
        varCellEmpty = True
        For Each objCell In .Rows(nRowIndex).Cells
          If Len(objCell.Range.Text) > 2 Then
            varCellEmpty = False
            Exit For
          End If
        Next objCell
          If varCellEmpty = True Then
            .Rows(nRowIndex).Delete
          End If
      Next nRowIndex

      nColumns = .Columns.Count
      For nColumnIndex = nColumns To 1 Step -1
        varCellEmpty = True
        For Each objCell In .Columns(nColumnIndex).Cells
          If Len(objCell.Range.Text) > 2 Then
            varCellEmpty = False
            Exit For
          End If
        Next objCell
          If varCellEmpty = True Then
            .Columns(nColumnIndex).Delete
          End If
      Next nColumnIndex
    End With
  End If

  Set objCell = Nothing

  Application.ScreenUpdating = True
End Sub
- Finally, click “Run” button on menu bar or hit “F5”.


In seconds, you will get all blank rows and columns in that table removed.
Method 3: Batch Delete All Blank Rows and Columns in All Tables in a Document
- First off, repeat steps in method 2 to install and run a macro.
- Only this time, replace that macro with the following:
Sub DeleteBlankRowsAndColumnsInAllTables()
  Dim objCell As Cell
  Dim objTable As Table
  Dim nRowIndex As Integer, nRows As Integer, nColumns As Integer, nColumnIndex As Integer
  Dim varCellEmpty As Boolean

  Application.ScreenUpdating = False

  With ActiveDocument
    For Each objTable In .Tables
      nRows = objTable.Rows.Count
      For nRowIndex = nRows To 1 Step -1
        varCellEmpty = True
        For Each objCell In objTable.Rows(nRowIndex).Cells
          If Len(objCell.Range.Text) > 2 Then
            varCellEmpty = False
            Exit For
          End If
        Next objCell
          If varCellEmpty = True Then
            objTable.Rows(nRowIndex).Delete
          End If
      Next nRowIndex
    Next objTable

    For Each objTable In .Tables
      nColumns = objTable.Columns.Count
      For nColumnIndex = nColumns To 1 Step -1
        varCellEmpty = True
        For Each objCell In objTable.Columns(nColumnIndex).Cells
          If Len(objCell.Range.Text) > 2 Then
            varCellEmpty = False
            Exit For
          End If
        Next objCell
          If varCellEmpty = True Then
            objTable.Columns(nColumnIndex).Delete
          End If
      Next nColumnIndex
    Next objTable
  End With

  Set objCell = Nothing
  Set objTable = Nothing

  Application.ScreenUpdating = True
End Sub
Recover Broken Document
There is more than a way to retrieve lost data back nowadays. For example, resorting to backups always remains your top priority. If that doesn’t satisfy your need to get the latest information back, you can then try a doc repair tool.
Author Introduction:
Vera Chen is a data recovery expert in DataNumen, Inc., which is the world leader in data recovery technologies, including xlsx repair and pdf repair software products. For more information visit www.datanumen.com
Как удалить строку или столбец в таблице Ворд
На чтение 4 мин Просмотров 291
Если вам приходится работать с таблицами в Ворде, то, думаю, вы ни раз задавались вопросом: Как удалить строку или столбец в таблице? Давайте разберем два метода удаления: вручную и автоматически.
В ручную мы можем удалить любые строчку или столбец в таблице. Также можно удалить пустые строки и столбы в Ворде с помощью скрипта VBA, который сделает это самостоятельно.
- Удалить вручную строку или столбец
- Удалить с помощью скрипта VBA все пустые строки и столбцы
Удалить вручную строку или столбец
Данный метод проверялся в Word 2007, 2010, 2013, 2016, 2019.
Шаг 1.
Выделите левой кнопкой мыши строку или столбец, который вы желаете убрать. Подведите курсор к краю таблицы, чтобы он изменил свой вид. Смотрите на скриншот, как это сделать.
Шаг 2.
В ленте в разделе «Работа с таблицами» откройте вкладку «Макет».
Шаг 3.
В разделе «Строки и столбцы» найдите кнопку «Удаление», и в выпадающем списке выберите нужное вам действие.
В Word 2010, 2013 в выплывающем окне есть этот же список по удалению столбцов и строк из таблицы. Лишние ячейки можно убрать таким же образом.

Удалить с помощью скрипта VBA все пустые строки и столбцы
Если вы желаете подчистить таблицу в Ворде от пустых строк и столбцов, то ручной метод может быть довольно утомительным, если, скажем, у вас большая таблица. Для этого можно прибегнуть к помощи VBA, который сделает все это за вас.
Как пользоваться скриптами VBA в Word читайте здесь >>>
Скопируйте этот скрипт и запустите его выполнение.
Sub DeleteEmptyTablerowsandcolumns()
Application.ScreenUpdating = False
Dim Tbl As Table, cel As Cell, i As Long, n As Long, fEmpty As Boolean
With ActiveDocument
For Each Tbl In .Tables
n = Tbl.Columns.Count
For i = n To 1 Step -1
fEmpty = True
For Each cel In Tbl.Columns(i).Cells
If Len(cel.Range.Text) > 2 Then
fEmpty = False
Exit For
End If
Next cel
If fEmpty = True Then Tbl.Columns(i).Delete
Next i
Next Tbl
End With
With ActiveDocument
For Each Tbl In .Tables
n = Tbl.Rows.Count
For i = n To 1 Step -1
fEmpty = True
For Each cel In Tbl.Rows(i).Cells
If Len(cel.Range.Text) > 2 Then
fEmpty = False
Exit For
End If
Next cel
If fEmpty = True Then Tbl.Rows(i).Delete
Next i
Next Tbl
End With
Set cel = Nothing: Set Tbl = Nothing
Application.ScreenUpdating = True
End Sub
Немного юмора:
Мир конечно сошел с ума от технологий… но было бы неплохо если бы после уборки в квартире можно было бы нажать на «Сохранить»
In Word you can easily edit a table that you have made. This article will explain what the various modifications you can make are, and how to delete a certain part of a table: columns, rows, or other cells.
How to delete part of a table in Word?
In the Table Tools tab, you can, by clicking on the Delete button (Rows & Columns), you get three very explicit commands:
- Delete Columns: removes the column of the active cell or selected columns.
- Delete Rows: deletes the row of the active cell or selected lines.
- Delete table: deletes the table.

The Delete cells options, displays a dialog box in which you specify how Word must reorganize the rest of the table:
- Shift cells left: the cells to the right of the deleted cells will shift to the left to «fill» the empty space.
- Shift cells up: cells located below the deleted cells will shift up to «fill» the empty space.
- Delete the entire row or column: the deletion extends to all cells in the same column or the same row.
Do you need more help with Microsoft Office? Check out our forum!
In this chapter, we will discuss how to work with rows and columns in Word 2010. As discussed in the previous chapter, a table is a structure of vertical columns and horizontal rows with a cell at every intersection. A Word table can contain as many as 63 columns but the number of rows is unlimited. This chapter will teach you how to add and delete rows and columns in a table.
Add a Row
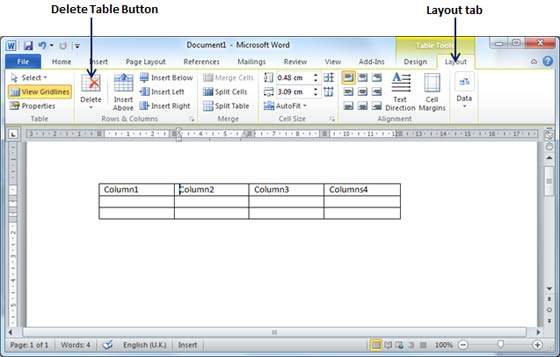
Following are the simple steps to add rows in a table of a word document.
Step 1 − Click a row where you want to add an additional row and then click the Layout tab; it will show the following screen.
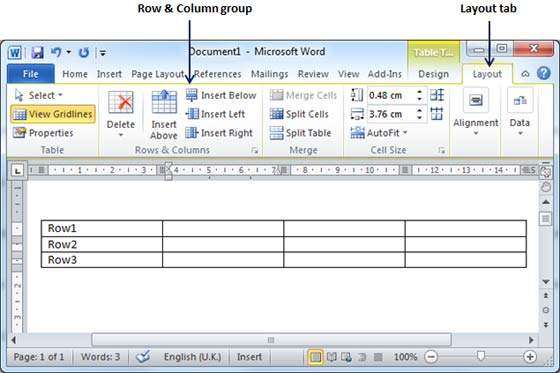
Step 2 − Now use the Row & Column group of buttons to add any row below or above to the selected row. If you click the Insert Below button, it will add a row just below the selected row as follows.
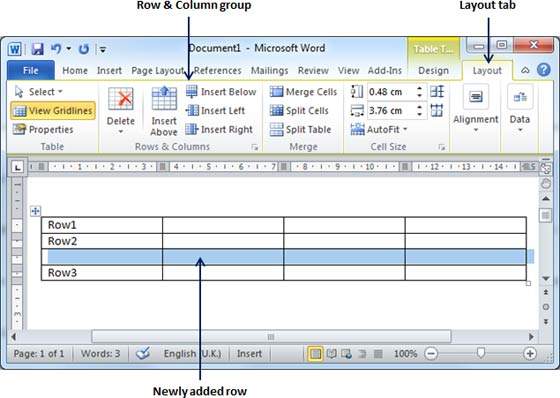
If you click the Insert Above button, it will add a row just above the selected row.
Delete a Row
The following steps will help you delete rows from a table of a Word document.
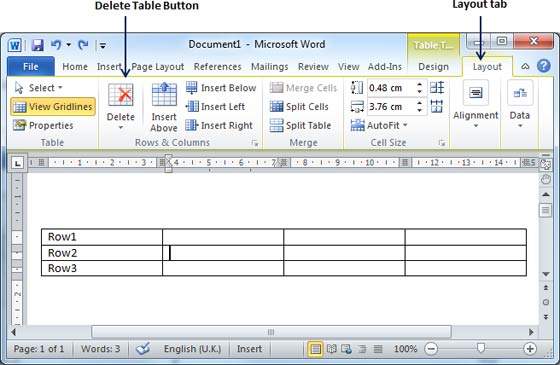
Step 1 − Click a row which you want to delete from the table and then click the Layout tab; it will show the following screen.
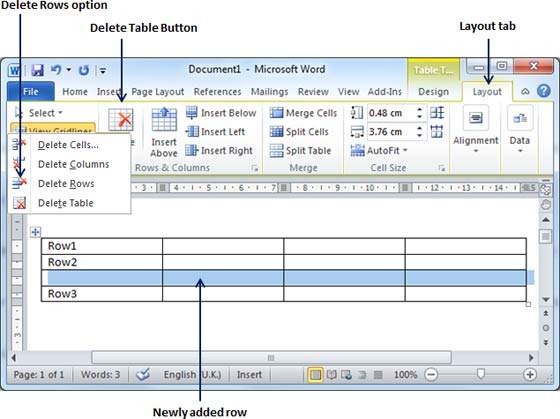
Step 2 − Click the Layout tab, and then click the Delete Rows option under the Delete Table Button to delete the selected row.
Add a Column
The following steps will help you add columns in a table of a Word document.
Step 1 − Click a column where you want to add an additional column and then click the Layout tab; it will show the following screen.
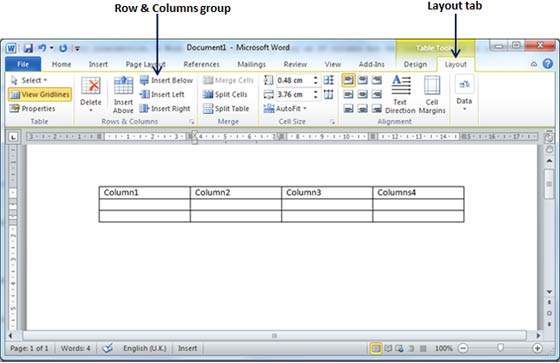
Step 2 − Now use the Row & Column group of buttons to add any column to the left or right of the selected column. If you click the Insert Left button, it will add a column just left to the selected column as follows.
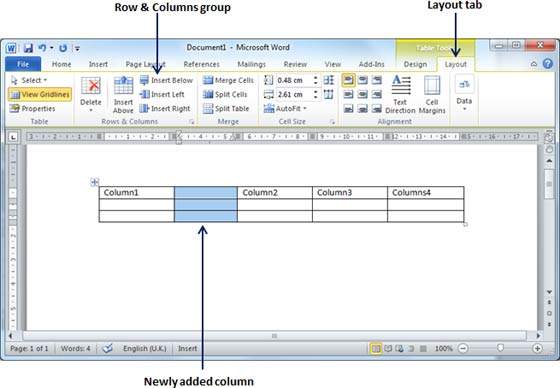
If you click the Insert Right button, it will add a column just next to the selected column.
Delete a Column
Following are the simple steps to delete columns from a table of a word document.
Step 1 − Click a column which you want to delete from the table and then click the Layout tab; it will show the following screen.
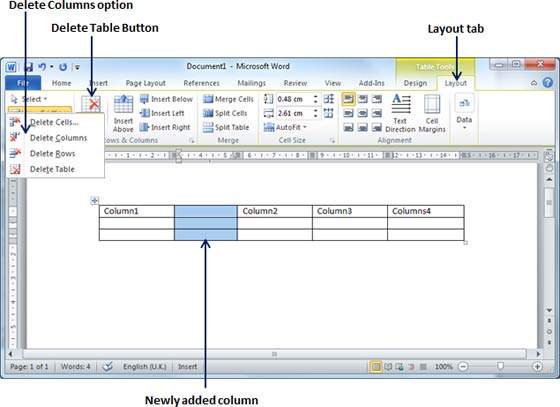
Step 2 − Click the Layout tab, and click the Delete Column option under the Delete Table Button to delete the selected column.