
Normally in an Excel worksheet, we have two different methods to delete columns: the keyboard shortcut and the right-click and insert method. But, in VBA, we must use the “Delete” command and the entire column statement to delete any column together. If we need to delete a single column, we give a single column reference, but we give multiple column references for multiple columns.
We perform many actions in Excel like cutting, copying, pasting, adding, deleting, and inserting regularly. We can use all of these actions using VBA coding. However, one of the important concepts we need to learn in VBA is the “deleting column.” This article will show you how to use this “Delete Column” option in VBA.
Table of contents
- Excel VBA Delete Column
- What Does Delete Column Do in Excel VBA?
- Examples of Excel VBA Delete Column Method
- Example #1 – Using Delete Method
- Example #2 – Delete Columns with Worksheet Name
- Example #3 – Delete Blank Columns
- Example #4 – Delete Blank Cells Columns
- Recommended Articles
What Does Delete Column Do in Excel VBA?
As the name says, it will delete the specified column. To perform this task, we must first identify which column to delete. The selection of deleted columns differs from one scenario to another, so that we will cover some of the important and often faced scenarios in this article.
Deleting the columns is easy. First, we need to use the COLUMNS property to select the column, so VBA’s syntax of the “Delete Column” method is below.
Columns (Column Reference).Delete
So, we can construct the code like this:
Columns (2).Delete or Columns (“B”).Delete
It will delete column number 2, i.e., column B.
If we want to delete multiple columns, we cannot enter columns. Instead, we need to reference the columns by column headers, i.e., alphabets.
Columns (“A:D”).Delete
It will delete the column from A to D, i.e., the first 4 columns.
Like this, we can use the “Delete Column” method in VBA to delete particular columns. In the below section, we will see more examples to understand it better. Read on.
Examples of Excel VBA Delete Column Method
Below are examples of deleting columns using VBA.
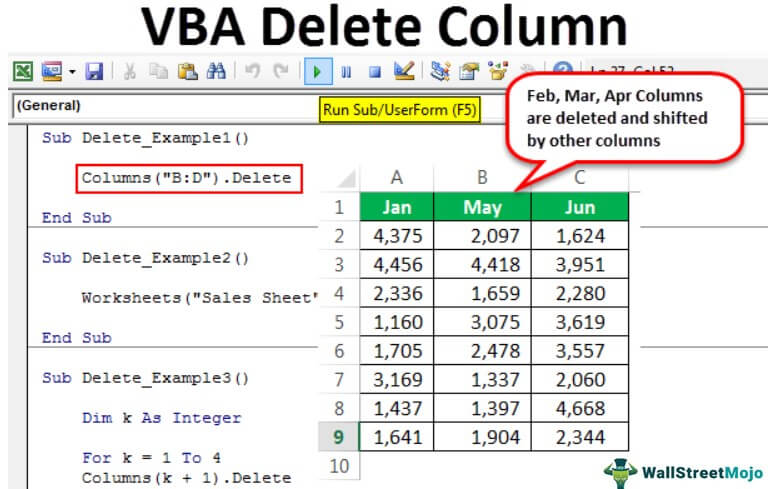
Example #1 – Using Delete Method
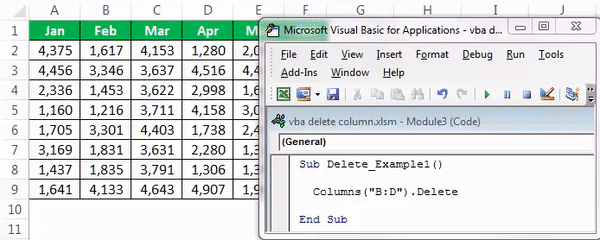
Assume you have the datasheet, something like the below.

If we want to delete the month “Mar,” first select the column property.
Code:
Sub Delete_Example1()

  Columns(

End Sub

Mention the column number or alphabet. In this case, it is either 3 or C.
Code:
Sub Delete_Example1()

  Columns(3).

End Sub

Use the Delete method.
Note: You would not get the IntelliSense list to select the Delete method. Just type “Delete.”
Code:
Sub Delete_Example1()

  Columns(3).Delete

End Sub

Or you can enter the column address like this.
Code:
Sub Delete_Example1()

  Columns("C").Delete

End Sub

Run this code using the F5 key, or you can run it manually and see the result.

Both the codes will do the same job of deleting the mentioned column.

If we want to delete multiple columns, we need to mention them in the alphabet. We cannot use column numbers here.
If we want to delete columns 2 to 4, we can pass the code like the below.
Code:
Sub Delete_Example1()

  Columns("C:D").Delete

End Sub

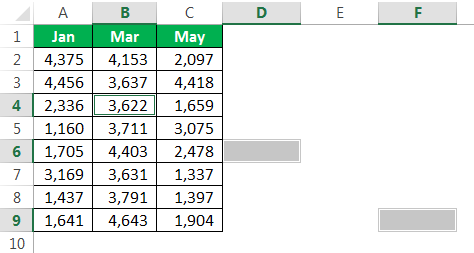
Run this code manually through the run option or press the F5 key. It will delete the columns “Feb,” “Mar,” and “Apr.”
Example #2 – Delete Columns with Worksheet Name
The above is an overview of how to delete columns using VBA code. However, that is not a good practice to delete columns. Deleting the column without referring to the worksheet name is dangerous.
If you have not mentioned the worksheet name, then whichever sheet is active will delete columns of that sheet.
First, we need to select the worksheet by its name.
Code:
Sub Delete_Example2()

    Worksheets("Sales Sheet").Select

End Sub

After selecting the sheet, we need to select the columns. We can also select the columns by using the VBA RANGE objectRange is a property in VBA that helps specify a particular cell, a range of cells, a row, a column, or a three-dimensional range. In the context of the Excel worksheet, the VBA range object includes a single cell or multiple cells spread across various rows and columns.read more.
Code:
Sub Delete_Example2()

   Worksheets("Sales Sheet").Select
   Range("B:D").Delete

End Sub

It will delete columns B to D of the worksheet “Sales Sheet.” For this code, it does not matter which is active. Still, it will delete the mentioned columns of that sheet only.
We can construct the VBA codeVBA code refers to a set of instructions written by the user in the Visual Basic Applications programming language on a Visual Basic Editor (VBE) to perform a specific task.read more in the single line itself.
Code:
Sub Delete_Example2()

    Worksheets("Sales Sheet").Range("B:D").Delete

End Sub

It also deletes the columns “B to D” without selecting the worksheet “Sales Sheet.”
Example #3 – Delete Blank Columns
Assume you have data that has alternative blank columns like the below.

So, delete every alternate column. Then, we can use the below code.
Code:
Sub Delete_Example3()

    Dim k As Integer

    For k = 1 To 4
    Columns(k + 1).Delete
    Next k

End Sub

Run this code using the F5 key or manually. Then, it will delete all the alternative blank columns, and our data will look like this.

Note: This works only for alternative blank columns.
Example #4 – Delete Blank Cells Columns
Now, look at this example. In certain situations, we need to delete the entire column if we find any blank cells in the data range. Consider the below data for an example.

All the yellow-colored cells are blank. So here, we require to delete all the blank cell columns. The below code will do that.
Code:
Sub Delete_Example4()

    Range("A1:F9").Select

    Selection.SpecialCells(xlCellTypeBlanks).Select

    Selection.EntireColumn.Delete

End Sub

Let me explain this code line by line for you.
Our data is from A1 to F9, so first, we must select that range. The below code will do that.
Range("A1:F9").Select
We need to select the blank cells in this selected range of cells. So, to select a blank cell, we need a special cell property. In that property, we have used cell type as blank.
Selection.SpecialCells(xlCellTypeBlanks).Select
Next, it will select all the blank cells, and we are deleting the entire selection column in the selection.
Selection.EntireColumn.Delete
So, our result will look like this.
Wherever it has found the blank cell, it has deleted those blank cells entirely.
You can download this Excel VBA Delete Column here – VBA Delete Column Template
Recommended Articles
This article has been a guide to VBA Delete Column. Here, we learn four methods to delete columns using Excel VBA code, practical examples, and downloadable codes. Below are some useful Excel articles related to VBA: –
- How to Delete File in VBA?
- VBA Integer Function
- IsEmpty Function in VBA
- IFERROR in VBA
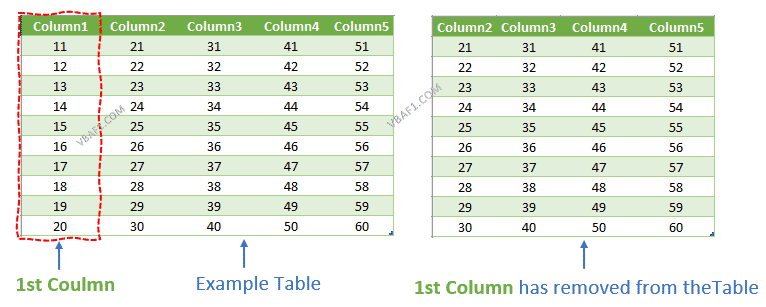
VBA Delete Column from Table in Excel. We can Delete or remove a single Column or multiple Columns from Table at any position. Default first Columns Deleted from the table. In this tutorial we have explained multiple examples with explanation. We also shown example output screenshots. We have specified two examples in the following tutorial. You can change table and sheet name as per your requirement. We also specified step by step instructions how to run VBA macro code at the end of the session.
Table of Formats:
- Objective
- Syntax to Delete Column from Table using VBA in Excel
- Example to Delete the First Column from Table on the Worksheet
- Remove the Fourth Column from Table on the Worksheet in Excel
- Delete Multiple Columns from Table in Excel using VBA
- Instructions to Run VBA Macro Code
- Other Useful Resources
Syntax to Delete Column from Table using VBA in Excel
Here is the syntax to Delete Column from Table on the worksheet using VBA in Excel.
ListColumns(Number).Delete
Where Number contains the integer data type. It is a mandatory argument. Represents the column number to delete.
Example to Delete the First Column from Table on the Worksheet
Let us see the example to Delete column from Table on the worksheet. The sheet name defined as ‘Table‘. And we use table name as ‘MyTable1‘. You can change these two as per your requirement. We Delete method of the ListObject object.
 'VBA Delete the First Column from the Table
Sub VBAF1_Delete_First_Column_from_Table()

    'Declare Variables
    Dim oSheetName As Worksheet
    Dim sTableName As String
    Dim loTable As ListObject

    'Define Variable
    sTableName = "MyTable1"

    'Define WorkSheet object
    Set oSheetName = Sheets("Table")

    'Define Table Object
    Set loTable = oSheetName.ListObjects(sTableName)

    'Delete a column from the table
    loTable.ListColumns(1).Delete


End Sub
Output: Here is the following output screenshot of above example macro VBA code.
Remove the Fourth Column from Table on the Worksheet
Let us see the example to remove the fourth column from the table on the worksheet. The difference between above and below procedure is change in column number.
'VBA Delete the Fourth Row from the Table
Sub VBAF1_Delete_Fourth_row_from_Table1()

    'Declare Variables
    Dim oSheetName As Worksheet
    Dim sTableName As String
    Dim loTable As ListObject

    'Define Variable
    sTableName = "MyTable1"

    'Define WorkSheet object
    Set oSheetName = Sheets("Table")

    'Define Table Object
    Set loTable = oSheetName.ListObjects(sTableName)

    'Delete fourth Row from the table
    loTable.ListRows(4).Delete

End Sub
Delete Multiple Columns from Table in Excel using VBA
Here is another example to Delete multiple columns from the Table. In this example we delete three(3) columns from the table. You can specify the number of columns count in the for loop.
  'VBA Delete Multiple Columns from the Table
Sub VBAF1_Delete_Multiple_Columns_from_Table()

    'Declare Variables
    Dim oSheetName As Worksheet
    Dim sTableName As String
    Dim loTable As ListObject

    'Define Variable
    sTableName = "MyTable2"

    'Define WorkSheet object
    Set oSheetName = Sheets("Table")

    'Define Table Object
    Set loTable = oSheetName.ListObjects(sTableName)

	'Loop through 3 times to delete
    For iCnt = 1 To 3
        'Delete multiple columns from the table
        loTable.ListColumns(1).Delete
    Next

End Sub
Output: Let us see the following output screenshot of above example macro VBA code.

Instructions to Run VBA Macro Code or Procedure:
You can refer the following link for the step by step instructions.
Instructions to run VBA Macro Code
Other Useful Resources:
Click on the following links of the useful resources. These helps to learn and gain more knowledge.
VBA Tutorial VBA Functions List VBA Arrays in Excel VBA Tables and ListObjects
VBA Editor Keyboard Shortcut Keys List VBA Interview Questions & Answers Blog
You can use the following methods to delete columns in Excel using VBA:
Method 1: Delete One Column
Sub DeleteColumns()
Columns("C").Delete
End Sub
This particular example will delete column C from the current workbook.
Method 2: Delete All Columns in Range
Sub DeleteColumns()
Columns("B:D").Delete
End Sub
This particular example will delete all columns in the range B through D in the current workbook.
Method 3: Delete Several Specific Columns
Sub DeleteColumns()
Range("B:B, D:D").Delete
End Sub
This particular example will delete columns B and D in the current workbook.
The following examples show how to use each of these methods in practice with the following dataset in Excel:

Example 1: Delete One Column in VBA
We can create the following macro to delete only column C from our dataset:
Sub DeleteColumns()
Columns("C").Delete
End Sub
When we run this macro, we receive the following output:

Notice that only column C (the “Assists” column) has been deleted from the dataset.
Example 2: Delete All Columns in Range
We can create the following macro to delete all columns in the range from B to D:
Sub DeleteColumns()
Columns("B:D").Delete
End Sub
When we run this macro, we receive the following output:

Notice that each column in the range from B to D (the “Points”, “Assists”, and “Rebounds” columns) have been deleted from the dataset.
Example 3: Delete Several Specific Columns
We can create the following macro to delete columns B and D from the dataset:
Sub DeleteColumns()
Range("B:B, D:D").Delete
End Sub
When we run this macro, we receive the following output:

Notice that columns B and D (the “Points” and “Rebounds” columns) have been deleted from the dataset.
Additional Resources
The following tutorials explain how to perform other common tasks in VBA:
VBA: How to Count Number of Rows in Range
VBA: How to Count Number of Used Columns
VBA: How to Find Last Used Column
VBA Delete Column
Copy, paste, cut, delete, insert is some of the common operations used to perform in excel. The easy method to do this is, using the shortcut keys or built-in functions. But when you want to perform the operation in a single click or automatically, VBA is the solution. We can automate these tasks using excel macros. VBA also provides different methods similar to excel functions. This performs these tasks smoothly in VBA.
Columns delete method is used to delete single or multiple columns in Excel VBA. The delete property of columns is used along with column index.
Syntax to Delete Column in Excel VBA
The syntax to delete a column in excel is as below.
Columns (Column Reference). Delete
- Where column reference is the column number you want to delete.
- Columns([RowIndex], ColumnIndex]) here the column range is also accepted.
![]()
How to Delete Column in Excel Using VBA?
We will learn how to Delete a Column in VBA with few examples in excel.
You can download this VBA Delete Column Excel Template here – VBA Delete Column Excel Template
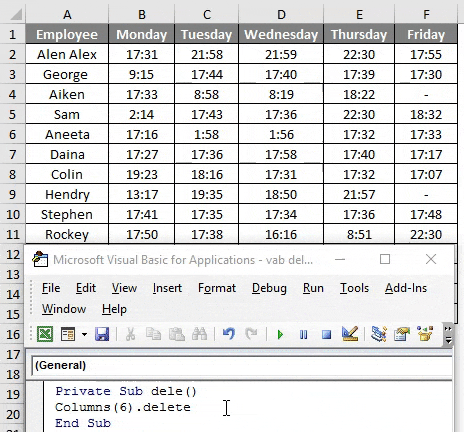
VBA Delete Column – Example #1
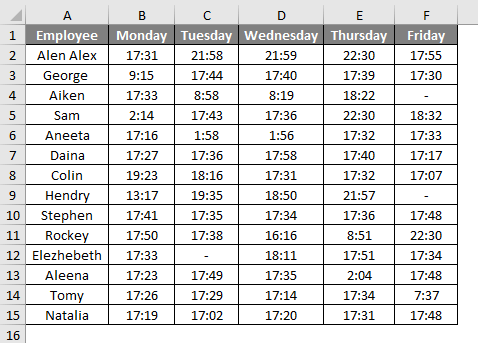
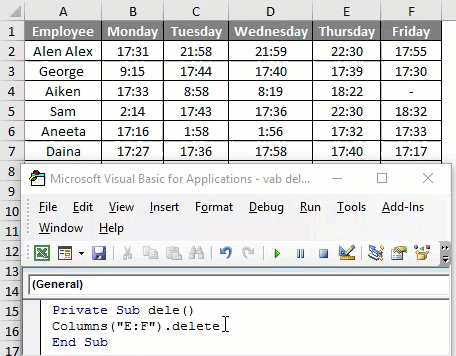
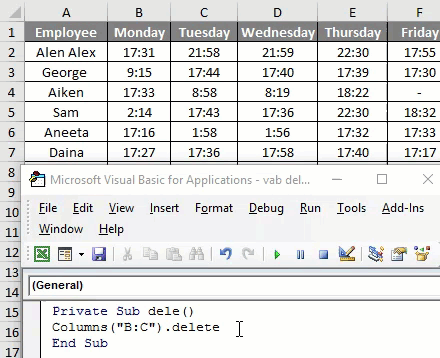
From an attendance database, the office leaving time for some employees are given. It’s the data captured for one week, from Monday to Friday.
We want to delete column Friday.
Follow the below steps to delete a column in excel.
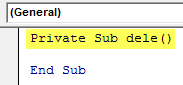
Step 1: So first we can create a simple function as dele() since the delete is a keyword which is not preferred.
Code:
Private Sub dele()

End Sub
Step 2: Now let’s use the columns property delete.
Code:
Private Sub dele()

Columns(6).delete

End Sub
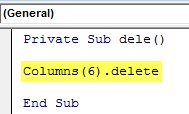
Within the columns() ‘6 ‘is mentioned since the specified column is a 6th column in the table.
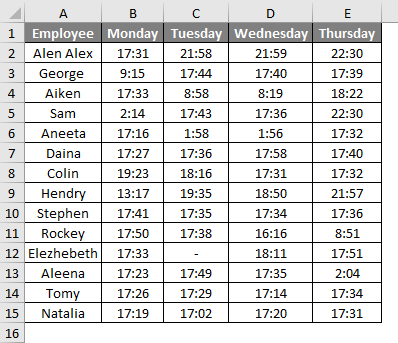
Step 3: Run this code by hitting F5 or Run button and see the output.
If you check the table, it will look as below. Where the column Friday got deleted.
VBA Delete Column – Example #2
Another easy method to perform the deletion is specifying the column reference by alphabetical order.
Follow below steps to delete a column in excel using VBA.
Step 1: Since Friday is column F, mention the column address as below in the code.
Code:
Private Sub dele1()
Columns("F").delete

End Sub
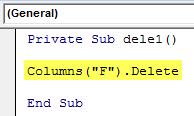
While using the alphabet remember to put the alphabet in the double quotation.
Step 2: Run this code by hitting F5 or Run button and see the output.
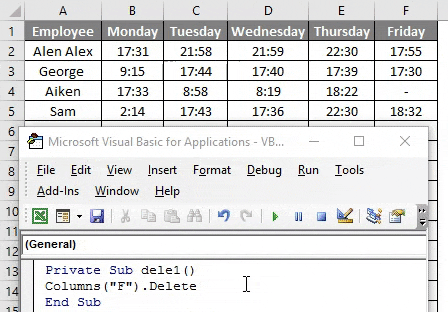
This will delete column Friday from the table.
VBA Delete Column – Example #3
In the same table if you want to delete more than one column then the column range should be specified.
Follow the below steps to delete the last two columns in excel.
Step 1: The code can be modified as below.
Code:
Private Sub dele2()

Columns("E:F").delete

End Sub
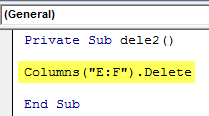
The range specified as “E:F” and this will delete the column from F to G.
Step 2: Run this code by hitting F5 or Run button and see the output.
The last two columns are deleted.
VBA Delete Column – Example #4
Let’s see what will happen if we delete the middle columns in a table.
Follow the below steps to delete the middle columns in a table.
Step 1: The code can be modified as below.
Code:
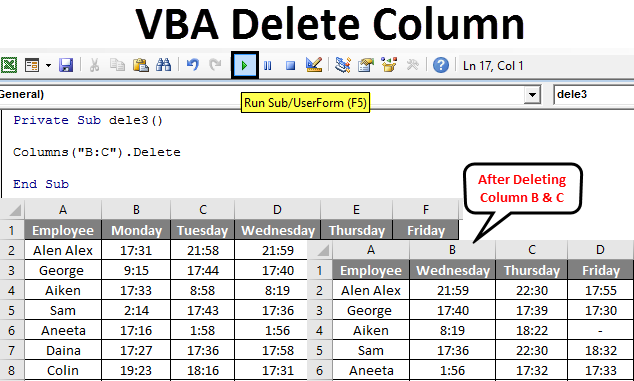
Private Sub dele3()

Columns("B:C").delete

End Sub
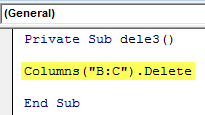
Here “B:C” refers to the column Monday and Tuesday.
Step 2: Run this code by hitting F5 or Run button and see the output.
After running the code if you check the table you can see the column after “B:C” is shifted from right to left.
VBA Delete Column – Example #5
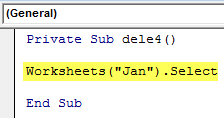
In the above example, we did not mention a worksheet name, if the workbook contains more than one sheet then the worksheet name should be specified then only the code will perform the proper action.
The two sheets contain the details of employees for two months Jan and Feb. Since the same worksheet have more than one sheet to avoid errors better to specify the sheet name.
Follow the below steps to delete a column in excel using VBA.
Step 1: The sheet should be selected using the code.
Code:
Private Sub dele4()

Worksheets("Jan").Select

End Sub
Step 2: Now the code for deleting the column should be given.
Code:
Private Sub dele()

Worksheets("Jan").Select

Columns("B:C").delete

End Sub
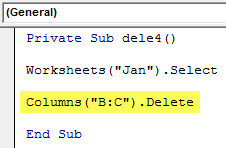
Step 3: Run this code by hitting F5 or Run button and see the output.
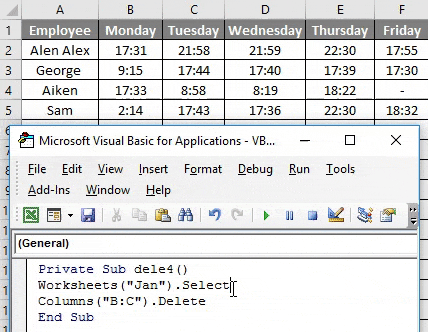
The sheet “Jan “will be selected and columns B, C i.e. Monday, Tuesday will be deleted from the table.
Deleting multiple columns using range object in VBA
The range object also used to delete a column in VBA instead of column delete. If the range object is used the code will look as below.
Private Sub dele()

Range("B:C").Delete

End Sub
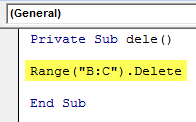
The Range(“B:C”) is represented the column range which needs to be deleted.
Deleting a single column using the range object
To delete a single column using the range object the range need to be specified as below.
Private Sub dele()

Range("B:B").Delete

End Sub
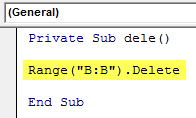
Range (“B: B”) points to the single column and it will be deleted.
Things to Remember
- The column can be specified using column number or corresponding alphabet while deleting.
- When deleting multiple columns, the numbers will not be accepted as a column reference.
- Instead of columns property, Range object can be used to delete a column in VBA.
Recommended Articles
This has been a guide to VBA Delete Column. Here we discussed how to Delete Column in Excel using VBA along with practical examples and downloadable excel template. You can also go through our other suggested articles –
- VBA Delete Row
- VBA RGB
- VBA Transpose
- VBA CDEC
 You’re probably aware that the process of cleaning up data can be annoying and time consuming. At the same time, it’s important to ensure the accuracy of the data you’re using for your analysis.
Excel VBA macros can help you automate some data-cleanup activities. At the same time, if you set up your macros properly, they can reduce the risk of mistakes during the process.
In this particular Excel tutorial, I focus on explaining several ways in which you can automate the deletion of columns using VBA macros. More precisely, I:
- Explain some of the most common VBA constructs that you can use to delete columns.
- Show you 8 different sample macros that you can easily adjust and start using immediately to delete columns. Each of these macro code examples is accompanied by a detailed step-by-step explanation.
I’m aware that, depending on the situation, you may use different criteria to determine the columns that Visual Basic for Applications deletes. Therefore, I try to cover a wide variety of circumstances in the examples below.
Depending on the particular case you’re working on, other tutorials within Power Spreadsheets may also help you craft the precise macro you need to delete columns. For example, if your objective is to delete empty columns (like example #5 below) or columns with blank cells (code example #4 below), the examples within my blog post on how to delete blank rows or rows with empty cells can provide further guidance.
This Excel VBA Delete Column Tutorial is accompanied by an Excel workbook containing the data and macros I use in the examples below. You can get immediate free access to this example workbook by subscribing to the Power Spreadsheets Newsletter.
The following table of contents lists the main topics I cover within this VBA tutorial:
Let’s start then by taking a look at some…
Excel VBA Constructs To Delete Columns
If you want to create a macro to delete columns with VBA, you’ll generally proceed in the following 3 steps:
- Identify the columns you want to delete.
- Select the columns you’re deleting.
- Delete the complete columns you’ve selected.
The following sections introduce several VBA constructs that may help you in each of these steps.
Further to the above, some of the sample macros below rely on the following 2 VBA structures:
- If… Then… statements.
- Loops.
I provide a very basic explanation of these constructs in the relevant sections below. For a thorough explanation of VBA loops, you can refer to the detailed tutorial I prepared here.
Step #1: Identify Columns To Delete
In order to delete columns using VBA, the first thing you need to do is identify which columns to delete.
The criteria you use to identify those columns varies from case to case. Covering all of the cases exceeds the scope of this VBA tutorial. I may write more specific posts about this particular topic in the future. If you want to receive an email whenever I publish new material in Power Spreadsheets, you can easily register for our Newsletter now by entering your email address below:
In the following sections, I explain some of the most commonly-used criteria to identify columns to delete with VBA. Further below, I provide macro examples that use these constructs.
Specify Particular Columns With The Worksheet.Range Property
Form a general perspective, the Worksheet.Range property returns a Range object. The returned object represents either a cell or a range of cells.
I explain the Worksheet.Range property in more detail in my tutorial about the Range object and Range references. For purposes of the topic I cover in this blog post, you just need to know that you can use Worksheet.Range to specify a particular column or range of columns.
For these purposes, you can use a VBA statement that follows this structure:
expression.Range(Cell)
The relevant item definitions are as follows:
- expression: A Worksheet object.
- Cell: A required parameter. This is the range you specify.
Let’s take a closer look at the main characteristics of the Cell parameter:
- You can specify the Cell argument as either (i) a string, or (ii) a range name.
- If you specify Cell as a string, you generally use A1-style references.
- You can use (i) the range operator (:), (ii) the intersection operator ( ), and/or (iii) the union operator (,).
If you’re using the Worksheet.Range property to specify columns, the range (:) and union (,) operators can be particularly useful. More precisely, you can use them as follows:
- Range Operator (:): You can use colon (:) to easily refer to entire columns.
- Union Operator (,): The comma (,) allows you to combine several non-contiguous ranges of columns.
Considering the comments above, I simplify the syntax of the Worksheet.Range property (for this tutorial) as follows:
Worksheet.Range(Columns)
Identify Columns Based On Cell Type With The Range.SpecialCells Method
You can use the Range.SpecialCells method for purposes of identifying cells that match:
- A particular type; and
- A certain value.
In other words, Range.SpecialCells allows you to specify (i) a cell type, and (ii) a value. The SpecialCells method takes your input and returns a Range object representing all the cells matching the type and value you provide.
The basic syntax of the Range.SpecialCells method is as follows:
expression.SpecialCells(Type, Value)
The items within this statement are defined as follows:
- expression: A Range object.
- Type: A required parameter. Allows you to specify the type of cells you want the method to return. You use the xlCellType constants I explain below for these purposes.
- Value: An optional parameter. Applies if the Type you specify is either (i) cells that contain constants (xlCellTypeConstants), or (ii) cells that contain formulas (xlCellTypeFormulas).
By default, Visual Basic for Applications selects all constants or formulas.
You can, however, use Value to determine the type of values held by the cells SpecialCells returns. You specify these type of values by using the xlSpecialCellValue constants I explain below. If you want Range.SpecialCells to return more than 1 value type, add the relevant xlSpecialCellValue constants.
Considering the above, I replace “expression” with “Range” within the syntax of Range.SpecialCells. The result is as follows:
Range.SpecialCells(Type, Value)
Let’s take a look at the constants you can use when specifying the Type and Value argument of the Range.SpecialCells method:
Type Parameter: xlCellType Enumeration
You specify the Type parameter of the Range.SpecialCells method by using the constants within the xlCellType enumeration. These constants determine the type of cells returned by Range.SpecialCells.
You can use the following xlCellType constants:
- xlCellTypeAllFormatConditions (-4172).
- xlCellTypeAllValidation (-4174).
- xlCellTypeBlanks (4).
- xlCellTypeComments (-4144).
- xlCellTypeConstants (2).
- xlCellTypeFormulas (-4123).
- xlCellTypeLastCell (11).
- xlCellTypeSameFormatConditions (-4173).
- xlCellTypeSameValidation (-4175).
- xlCellTypeVisible (12).
You can think of the constants above as the VBA equivalents of several options within the Go To Special dialog box.

I explain each of these xlCellType constants in the following sections. For ease of reference, I include an image showing the equivalent command within the Go To Special dialog box.
xlCellTypeAllFormatConditions
xlCellTypeAllFormatConditions represents cells with any conditional format. The value of xlCellTypeAllFormatConditions is -4172.

xlCellTypeAllValidation
xlCellTypeAllValidation represents cells with validation criteria. Its value is -4174.

xlCellTypeBlanks
xlCellTypeBlanks makes reference to empty cells. The value of xlCellTypeBlanks is 4.

xlCellTypeComments
xlCellTypeComments refers to cells with comments. Its value is -4144.

xlCellTypeConstants
xlCellTypeConstants represents cells with constants. Its value is 2.

xlCellTypeFormulas
xlCellTypeFormulas makes reference to cells with formulas. The corresponding value is -4123.

xlCellTypeLastCell
xlCellTypeLastCell refers to the last cell within the used range. Its value is 11.

xlCellTypeSameFormatConditions
xlCellTypeSameFormatConditions makes reference to cells that have the same conditional format. The value of xlCellTypeSameFormatConditions is -4173.

xlCellTypeSameValidation
xlCellTypeSameValidation represents cells having the same validation criteria. Its value is -4175.

xlCellTypeVisible
xlCellTypeVisible refers to (all) visible cells. The corresponding value is 12.

Value Parameter: xlSpecialCellsValue Enumeration
You use the constants within the xlSpecialCellsValue enumeration for purposes of specifying the Value parameter of the SpecialCells method. These constants determine the type of values that Range.SpecialCells considers.
You can use the Value parameter if you’ve used xlCellTypeConstants or xlCellTypeFormulas when specifying the Type parameter above.
The following are the constants within the xlSpecialCellsValue enumeration:
- xlErrors (16).
- xlLogical (4).
- xlNumbers (1).
- xlTextValues (2).
These constants are the equivalent of the Numbers (xlNumbers), Text (xlTextValues), Logicals (xlLogical) and Errors (xlErrors) options within the Go To Special dialog box. When you’re working from the Go To Special dialog, these options are active when you previously select Constants (xlCellTypeConstants) or Formulas (xlCellTypeConstants).

I explain each of these constants further in the following sections.
xlErrors
xlErrors represents cells with errors. The corresponding constant is 16.
xlLogical
xlLogical makes reference to cells that contain logical values. Its value is 4.
xlNumbers
xlNumbers refers to cells that contain numeric values. The value of xlNumbers is 1.
xlTextValues
xlTextValues represents cells that contain text. Its value is 2.
Identify Blank And Non-Blank Columns With The WorksheetFunction.CountA Method
You may be familiar with Excel’s COUNTA worksheet function. You can use this function for purposes of counting the number of cells within a range that aren’t empty.
The WorksheetFunction.CountA method is the VBA equivalent of the COUNTA function. Within Visual Basic for Applications, you generally access worksheet functions through the WorksheetFunction object.
Therefore, you can use the WorksheetFunction.CountA method for purposes of counting the number of cells that aren’t empty within a particular range of cells.
The following are the main characteristics of WorksheetFunction.CountA:
- You can apply it to a range or an array.
- It counts the number of cells containing any data.
- As a consequence of #2 above, CountA counts (i) error values, (ii) empty strings (“”), (iii) text, and (iv) logical values.
- CountA doesn’t count empty cells.
- As explained at the Microsoft Dev Center, if an argument of CountA “is an array or reference, only values in that array or reference are used”.
The basic syntax of the CountA method is as follows:
expression.CountA(Arg1, Arg2, Arg3, Arg4, Arg5, Arg6, Arg7, Arg8, Arg9, Arg10, Arg11, Arg12, Arg13, Arg14, Arg15, Arg16, Arg17, Arg18, Arg19, Arg20, Arg21, Arg22, Arg23, Arg24, Arg25, Arg26, Arg27, Arg28, Arg29, Arg30)
For these purposes, the following definitions apply:
- expression: A WorksheetFunction object.
- Arg# (Arg 1 through Arg30): The values that Visual Basic for Applications should count.
You must specify at least 1 Arg. The maximum amount of arguments you can include is 30.
As a consequence of the above, I simplify the syntax of WorksheetFunction.CountA as follows:
WorksheetFunction.CountA(Arguments)
Identify Columns Based On Header String With The InStr Function
The InStr VBA Function allows you to determine the position of a particular string within another string.
InStr isn’t the only way you can compare strings. You can, for example, use the Like operator as I explain in macro example #7 below.
The syntax of InStr is as follows:
InStr([start, ]string1, string2[, compare])
The InStr Function has the following 4 parameters:
- start: Optional parameter that you can use to specify the starting position for the search. You specify start as a number.
If you omit the start parameter, InStr begins its search on the first character.
If you use the compare parameter below, start becomes a required argument.
- string1: The string that you’re searching in.
- string2: The string that you’re searching for.
- compare: Optional parameter that allows you to specify the type of string comparison carried out by Visual Basic for Applications. I explain this argument below.
Let’s take a closer look at the compare argument:
compare Parameter Of InStr
The compare Argument of the InStr Function determines how string1 and string2 are compared.
By default (if you omit compare), Visual Basic for Applications uses the default string-comparison setting for the relevant module. You can specify this string-data-comparison method for a module by using the Option Compare Statement. Within Excel, Option Compare can specify any of the following 2 comparison methods:
- Binary: Comparison based on the sort order “derived from the internal binary representations of the characters”.
- Text: Comparison based on text sort order determined by the system’s locale. Text comparison is generally case-insensitive.
Therefore, if you choose to use the compare parameter of InStr, you can choose any of the following 3 values:
- vbUseCompareOption (-1): Applies if you use the Option Compare Statement within the relevant module. Therefore, if you (i) use Option Compare and (ii) set compare to vbUseCompareOption, Excel uses the string-comparison setting specified with Option Compare.
- vbBinaryCompare (0): Binary comparison.
- vbTextCompare (1): Textual comparison.
In Access, there’s an additional comparison method: Database.
When using the InStr function for purposes of identifying the contents of a column header, you can usually set compare to vbTextCompare or 1.
Value Returned By InStr
From a broad perspective, InStr usually returns one of the following values:
- 0: InStr returns 0 in the following 3 cases:
- The string you’re searching in (string1) has a length of 0.
- InStr doesn’t find string2 within string1.
- The value you set for the start parameter is a number larger than the length of the string you’re searching in (string1).
- Position of string2 within string1: If InStr finds string2 within string1, it returns the position at which it found the match.
- start: If the string you’re searching for (string2) has a length of 0, InStr returns the value of the start parameter.
- Null: InStr returns Null if either of the strings (string1 or string2) is Null.
If your objective is to determine whether a column header contains a particular string, you’ll be interested in the cases where the InStr Function returns the position of string2 within string1 (#2 above). This leads us to the basic rule you can use to determine whether the column header contains the string you’re looking for:
- If InStr is larger than 0 (InStr > 0), the relevant header contains the string you’re looking for.
- Otherwise, the header doesn’t contain the string you’re looking for.
Notice that, by appropriately manipulating these results you can also use the InStr Function for, among others, determining whether the column header doesn’t contain the string you’re looking for.
Identify Columns Based On Cell Value With The Range.Value Property
From a general perspective, you can use the Range.Value property for either of the following:
- Return the value of a particular range.
- Set the value of the range.
When seeking to identify a column based on a cell value, you’re interested in reading the value of that cell.
The basic syntax of Range.Value is as follows:
expression.Value(RangeValueDataType)
The relevant item definitions are as follows:
- expression: A Range object.
- RangeValueDataType: An optional parameter. It allows you to specify the range value data type. You can set it to any of the constants within the xlRangeValueDataType enumeration.
I don’t use the RangeValueDataType argument within this tutorial.
Considering the above, I can simplify the syntax of Range.Value for purposes of this blog post to the following:
Range.Value
Identify Columns Based On Header Contents With The Range.Find Method
You can use the Range.Find method for purposes of finding information within a particular range. More precisely, Range.Find returns either of the following:
- If Range.Find finds a match: A Range object representing “the first cell where the information is found”.
- If the method finds no match: Nothing.
By appropriately using the Range.Find method, you can replicate several of the features that you usually access through the Find and Replace dialog box.
 The syntax of Range.Find is as follows:
expression.Find(What, After, LookIn, LookAt, SearchOrder, SearchDirection, MatchCase, MatchByte, SearchFormat)
“expression” is a Range object.
Range.Find has only 1 required parameter and 8 optional arguments.
- The only required argument is What.
- The 8 optional parameters are After, LookIn, LookAt, SearchOrder, SearchDirection, MatchCase, MatchByte, and SearchFormat.
Let’s take a closer look at each of these parameters. Where appropriate, I include a visual indication of the equivalent option within the Find and Replace dialog box.
What Parameter Of Range.Find
You use What to specify the data you’re searching for.

You can specify What as either of the following:
- A string.
- An Excel data type.
This is the only required argument of the Range.Find method.
After Parameter Of Range.Find
The After parameter of the Range.Find method allows you to determine the cell after which Range.Find begins its search.
The following are the main characteristics of After:
- It must be a single cell within the relevant range.
- The search begins after the cell you specify. Therefore, the cell itself is only subject to search once the Range.Find method “wraps-around” back to this cell.
- By default (if you omit After), the search begins after the cell in the upper-left corner of the applicable range.
The After parameter is the equivalent to the active cell when you carry out a manual search.

LookIn Parameter Of Range.Find
You can use the LookIn parameter of the Range.Find method in order to determine the type of data VBA searches for.
For these purposes, you can set LookIn to any of the following xlFindLookIn constants:
- xlComments (-4144): Comments.
- xlFormulas (-4123): Formulas.
- xlValues (-4163): Values.

LookAt Parameter Of Range.Find
The LookAt parameter allows you to specify whether the Range.Find method matches (i) the whole text, or (ii) any part of the text.
You specify the value of LookAt by using either of the following xlLookAt constants:
- xlPart: Range.Find matches any part of the text.
- xlWhole: The match is against the whole search text.

SearchOrder Parameter Of Range.Find
You can use the SearchOrder parameter of Range.Find to specify the order in which the search is carried out. SearchOrder can be either of the following xlSearchOrder constants:
- xlByColumns (2): Searches by columns. In other words, Range.Find (i) goes down (or up) a column, then (ii) moves to the next column.
- xlByRows (1): Searches by rows. This means that Range.Find (ii) goes across each row, then (ii) moves to the next row.

SearchDirection Parameter Of Range.Find
The SearchDirection parameter of Range.Find allows you to determine the direction in which the search is carried out. Use the constants from the xlSearchDirection enumeration for purposes of specifying this:
- xlNext (1): Range.Find searches for the next match within the applicable range.
- xlPrevious (2): The Find method searches for the previous match.

MatchCase Parameter Of Range.Find
The MatchCase parameter of the Range.Find method allows you to make a case-sensitive search. MatchCase can take the following values:
- False: The default value. In this case, the search isn’t case-sensitive.
- True: The search is case-sensitive.

MatchByte Parameter Of Range.Find
The MatchByte parameter of Range.Find is applicable when double-byte language support is selected or installed. If applicable, you can use MatchByte to determine whether double-byte characters match (i) only double-byte characters; or (ii) single-byte character equivalents.
For these purposes, MatchByte can take the following values:
- True: Double-byte characters match only double-byte characters.
- False: Double-byte characters match single-byte character equivalents.
SearchFormat Parameter Of Range.Find
The SearchFormat parameter of the Find method allows you to specify whether the search considers cell formatting. For these purposes, SearchFormat generally takes the following values:
- True: Cell formatting is considered.
- False: Cell formatting isn’t considered.
If you want to consider cell formatting during the search (SearchFormat:=True), you can specify the applicable format criteria by using the Application.FindFormat property.

Step #2: Select Column
In the following sections, I explain 2 VBA properties that are commonly used for purposes of selecting the column you want to delete. Let’s start by taking a look at how too…
Return Column With The Columns Property
From a general perspective, the Columns property returns a Range object. You may find the following 2 versions of the Columns property particularly useful for purposes of deleting columns:
- The Worksheet.Columns property: Returns a Range object representing all the columns within the relevant worksheet.
- The Range.Columns property: Returns a Range object representing all the columns in the applicable range.
The syntax of the Columns property is as follows:
expression.Columns
“expression” is a Worksheet object (in Worksheet.Columns) or a Range object (in Range.Columns). Therefore, I simplify the above as follows:
Worksheet.Columns
Range.Columns
You can refer to the members of a VBA collection in different ways. One of these ways is using an index number.
You can, therefore, use the following statements to refer to an individual Column object from the ranges returned by the Columns property:
Worksheet.Columns(ColumnNumber)
Range.Columns(ColumnNumber)
For these purposes, “ColumnNumber” is the number of the column you’re referring to within the applicable range. That range differs depending on which version of the property you’re using:
- Worksheet.Columns: The reference are all columns within a worksheet.
For example: (i) “Worksheet.Columns(1)” refers to the first column of the worksheet (A), (ii) “Worksheet.Columns(2)” refers to the second column of the worksheet (B), and so on.
- Range.Columns: The reference is the range you specify.
Therefore: (i) “Range.Columns(1)” refers to the first column within the range, (ii) “Range.Columns(2)” refers to the second column within the range, and so on.
As I show in examples #5, #6 and #7 below, this way of referring to a column is helpful if the macro you’re creating relies on loops.
Select Entire Column With The Range.EntireColumn Property
When you use the Range.EntireColumn property, it returns the entire column(s) containing the range of cells you specify.
To be more precise, the following are the main characteristics of Range.EntireColumn:
- It’s a read-only property.
- It returns a Range object.
- The Range object that EntireColumn returns represents the entire column(s) containing the range you specify as an object qualifier when calling Range.EntireColumn.
To call the Range.EntireColumn property, use the following syntax:
expression.EntireColumn
“expression” is a Range object. More precisely, this is the range for which the entire column(s) are returned.
Therefore, the syntax can be simplified to the following:
Range.EntireColumn
Step #3: Delete Cells With The Range.Delete Method
You can use the Range.Delete method for purposes of deleting the specified Range object.
The basic syntax of Range.Delete is as follows:
expression.Delete(Shift)
The items within this expression have the following definitions:
- expression: A Range object.
- Shift: An optional parameter. Shift allows you to determine how Excel shifts cells in order to replace the cells that are deleted.
By default (for example, if you omit Shift), Excel decides how to shift the cells “based on the shape of the range”.
You can, however, set Shift to either of the following 2 xlDeleteShiftDirection constants:
- xlShiftToLeft (-4159): Shift cells to the left.
- xlShiftUp (-4162): Shift cells up.
Since “expression” represents a Range object, I rewrite the syntax above as follows:
Range.Delete(Shift)
When using the Range.Delete method to delete complete columns, the Shift parameter isn’t really necessary. As explained by Excel guru John Walkenbach in Excel VBA Programming for Dummies:
When you delete a range that’s not a complete row or column, Excel needs to know how to shift the cells.
If you delete a complete column, Excel shifts the cells to the left. Therefore, you can simplify the syntax of Range.Delete even further:
Range.Delete
Relevant VBA Structures To Delete Columns
In addition to the VBA constructs that I introduce in the previous sections, the following 2 VBA structures are useful when creating macros to delete columns:
- If… Then Statements.
- Loops. More specifically (i) For… Next loops, and (ii) Do Loop While loops.
I provide a basic introduction to each of these topics in the following sections. My focus here is on how they’re used by the macro examples further below.
These explanations, however, only cover a small portion of the material related to these VBA constructs. Therefore, if you want to learn more about these topics, please refer to the comprehensive VBA tutorials that you can find within the Archives.
If… Then Statements
At a basic level, a basic If… Then statement proceeds in the following 2 steps:
- Checks whether a particular condition is met.
- If the condition is met, it carries out a particular action. Otherwise, it does nothing.
As a consequence of the above, you can use a basic If… Then statement to conditionally execute certain VBA statements.
You can write an If… Then statement using slightly different structures. The macro examples within this tutorial that rely on such statements (#5, #6, #7 and #8) do so for relatively short and simple logical tests. In these cases, you can use the following one-line syntax:
If condition Then conditionalStatements
For these purposes, the following definitions apply:
- condition: The condition you want to test.
The most common way to structure this condition (used by the examples below) is as an expression that evaluates to True or False. If the condition evaluates to Null, Visual Basic for Applications treats it as False.
- conditionalStatements: The statement(s) that the macro executes if the condition evaluates to True.
Loops: For… Next And Do Loop While
From a basic perspective, looping is simply repeating the execution of certain statements more than 1 time. In other words, a loop usually does the following:
- Executes a group of statements.
- Once the statements have been executed, goes back to the beginning of the structure. This step is where the actual looping takes place.
You can create VBA loops in several different ways. The examples within this tutorial (#5, #6, #7 and #8) only use the following 2 looping structures:
- For… Next.
- Do Loop While.
Therefore, I introduce these 2 looping structures in the following sections:
For… Next Loops
A For… Next loop repeats a group of statements a certain number of times.
The sample macros that rely on For… Next loops below use the following simplified syntax:
For counter = start To end Step step
statements
Next counter
The items above have the following meanings:
- counter: The loop counter. You use the counter for purposes of keeping track of the number of times the statements within the loop are executed. This allows you to control the looping.
The loop counter is generally a numeric variable.
- start: The value at which the counter begins.
- end: The value at which the counter ends.
- step: The amount by which the counter changes each time the statements within the loop are executed.
Notice that the macro examples that use a For… Next loop below specify a step of -1. In other words, the loop goes backwards. The reason for this is well explained by Mike Alexander and Dick Kusleika in Excel 2016 Power Programming with VBA, and Bill Jelen (Mr. Excel) in Excel 2016 In Depth.They explain this matter it in the context of deleting empty rows, but the lessons apply to deleting columns. Whenever you delete a column, the columns shift to the left (as I explain above). If you don’t loop backwards, the column references (which depend on the loop counter), become inaccurate immediately after a column is deleted.
- statements: The statements that you want VBA to execute a certain number of times.
Do Loop While Loops
Do Loop While Loops rely on VBA’s Do… Loop statement. The Do… Loop statement allows you to repeat a certain group of statements (i) while a condition is True, or (ii) until a condition becomes True.
The Do… Loop statement allows you to create several different types of loops. For purposes of this VBA tutorial, the particular structure we’re interested in is Do Loop While.
Do Loop While loops repeat the applicable statements while a condition is True. Once the condition becomes False, Visual Basic for Applications exits the loop.
The sample macro that relies on Do Loop While loops below uses the following syntax:
Do
statements
Loop While condition
In this case, the following definitions apply:
- statements: The statements that you want to execute while the condition is True.
- condition: The condition you want to test. It must evaluate to True or False. VBA treats Null as False.
The structure of the Do Loop While loop means that the relevant statements are executed at least once. In other words, the Do Loop While proceeds as follows:
- Executes the statements at least once.
- Checks whether the condition is met.
- If the condition is met, goes back to step #1 above. In other words, the statements are executed (again) subject to the condition being met.
Let’s see how you can put all of the VBA constructs that appear above into practice by looking at some macro code examples:
In the following sections, I provide and explain 8 practical macro examples to delete columns. The main purpose of each of the macros is as follows:
- Delete a single column.
- Delete several contiguous columns.
- Delete several non-contiguous columns.
- Delete columns with blank cells.
- Delete empty columns.
- Delete columns based on whether the header contains a particular string.
- Delete columns based on whether a cell contains a particular value.
- Delete columns based on the contents of the header.
You can easily adjust most of these macros for your own objectives. The additional explanations and information about the most relevant VBA constructs that I provide in the first section of this tutorial should help you do this.
For illustration purposes, I execute all of the sample macros on a particular Excel worksheet. The worksheet includes historical share prices for Microsoft (MSFT, columns B to G), Alphabet (GOOGL, columns I to N), Apple (AAPL, columns P to U), Amazon (AMZN, columns W to AB) and eBay (EBAY, columns AD to AI) for the period between August 25, 2015 and August 22, 2016. The source of the data is Google Finance.
The cell at the top-left corner of the data is cell B5. In other words, column A is empty.

Excel Macro Examples #1 To #3: Delete Specific Column(s)
The first 3 macro examples use the same structure for purposes of deleting specific columns. More precisely, they use a single statement of the following form:
Worksheet.Range(Columns).EntireColumn.Delete
Notice that this basic statement simply concatenates several of the VBA constructs that I explain above. More precisely, this VBA statement is composed of the following items:
- The Worksheet.Range property (Worksheet.Range(Columns)).
- The Range.EntireColumn property (EntireColumn).
- The Range.Delete method (Delete).
Let’s take a look at how each of the actual macros implements this basic statement:
Macro Example #1: Delete A Specific Column
The following statement deletes column A of the worksheet named “Delete Column”:
Worksheets(“Delete Column”).Range(“A:A”).EntireColumn.Delete
The items within this sample statement proceed roughly as follows:
- Worksheets(“Delete Column”).Range(“A:A”): The Worksheet.Range property returns column A. The relevant range (column A) is specified by using the range operator (:).
- EntireColumn: The Range.EntireColumn property returns the entire column A.
- Delete: The Range.Delete method deletes the range that items #1 and #2 above return.
This results in Excel deleting column A.
The following sample macro (Delete_Single_Column) uses the statement above to delete column A:

The following screenshot shows the result I obtain when executing this macro. The original data had a blank column A which, as shown below, is now gone. The data in column A (MSFT – Date) was (prior to the macro being executed) in column B.

Macro Example #2: Delete Several Specific Contiguous Columns
The sample VBA statement below deletes columns B to H of the worksheet named “Delete Contiguous Columns”:
Worksheets(“Delete Contiguous Columns”).Range(“B:H”).EntireColumn.Delete
The items within this statement are, in broad terms, exactly the same as those in example #1 above. The difference between these 2 examples lies in the way in which the parameter of the Worksheet.Range property is specified. More precisely, the arguments are the following:
- Example #1: A:A.
This results in the Worksheet.Range property returning a Range object that represents column A.
- Example #2: B:H.
In this case, the Range object that the Range property returns represents columns B through H.
As a consequence of this difference, the Range.Delete method applies to columns B through H. The end result is that Excel deletes all of those columns.
The following macro example (Delete_Contiguous_Columns) implements the statement above:

The following screenshot shows the results I obtain after the macro runs. Prior to macro execution, columns B through contained data for Microsoft (MSFT). After the macro runs, the Microsoft data is gone. Notice how, in the image below, columns B through G contain Alphabet’s (GOOGL) data.

Macro Example #3: Delete Several Specific Non-Contiguous Columns
The statement example that appears below deletes (i) columns B to H (as the previous example #3), and (ii) P to V. In this case, the relevant worksheet is named “Delete NonContiguous Columns”.
Worksheets(“Delete NonContiguous Columns”).Range(“B:H,P:V”).EntireColumn.Delete
Once again, the items within this statement are the same as those of examples #1 and #2 above. Just as in the comparison above (example #2 vs. example #1), the difference is in the parameter of the Worksheet.Range property. Compare the following 3 specifications:
- Example #1: A:A.
The Worksheet.Range property returns a Range object representing column A.
- Example #2: B:H.
The Range object returned by Worksheet.Range represents columns B through H.
- Example #3: B:H,P:V.
The Range property returns a Range object that represents (i) columns B through H, and (ii) columns P through V.
The end result of macro example #3 is Excel deleting cells B through H and P through V.
The following sample macro (Delete_NonContiguous_Columns) deletes these non-contiguous columns:

The image below shows how the Delete NonContiguous Columns worksheet looks like after I execute the macro. Prior to macro execution:
- Columns B through G contained Microsoft’s (MSFT) data.
- Columns P to V had Apple’s (AAPL) data.
Notice how, after I execute the macro, the only data that’s left is for Alphabet (GOOGL), Amazon (AMZN) and eBay (EBAY).

Macro Example #4: Delete Columns With Blank Cells
The following sample macro (Delete_Columns_Blank_Cells) deletes all columns with blank cells within the relevant range. I explain how I determine the range further below.

The basic process followed by this macro to delete columns with blank cells is as follows:
- Determines the cell range in which to search for blank cells.
- Obtains all blank cells within the cell range determined in step #1.
- Gets the entire columns containing the blank cells obtained by step #2.
- Deletes the columns returned by step #3.
This process looks roughly as follows:

Let’s go through each of the lines of code to understand how this sample macro #4 achieves the above:
Lines #1 To #4: Dim myWorksheet As Worksheet | Dim lastColumn As Long | Dim lastRow As Long | Dim myRange As Range
These lines use the Dim statement to declare 4 variables (including 2 object variables), as follows:
- myWorksheet: A Worksheet object. myWorksheet is the Excel worksheet the macro works with.
- lastColumn: The number of the last column with data within myWorksheet.
- lastRow: The number of the last row with data in myWorksheet.
- myRange: A Range object. myRange is the cell range where you want to check for blank cells.
Line #5: Set myWorksheet = Worksheets(“Delete Columns with Blanks”)
Uses the Set statement to assign an object reference (Worksheets(“Delete Columns with Blanks”)) to the myWorksheet object variable.
The items within this particular line of code are as follows:
- Set: The Set statement.
- myWorksheet: The object variable to which the object reference is assigned to.
- =: The assignment operator.
- Worksheets(“Delete Columns with Blanks”): The Worksheet object that is assigned to the myWorksheet variable.
As a consequence of the above, this sample macro works with the worksheet named “Delete Columns with Blanks”.
Lines #6 And #7: lastColumn = myWorksheet.Cells.Find(What:=”*”, LookIn:=xlFormulas, LookAt:=xlPart, SearchOrder:=xlByColumns, SearchDirection:=xlPrevious).Column | lastRow = myWorksheet.Cells.Find(What:=”*”, LookIn:=xlFormulas, LookAt:=xlPart, SearchOrder:=xlByRows, SearchDirection:=xlPrevious).Row
Both lines of code are substantially the same. Their purpose, in both cases, is to assign a numeric value to the following 2 variables:
- lastRow.
- lastColumn.
The basic structures of both lines is substantially the same. They’re both composed of the following items:
- lastColumn or lastRow: The variable to which the value is assigned to.
- =: The assignment operator.
- myWorksheet.Cells: The Worksheet.Cells property returns all cells within myWorksheet.
- Find(What, LookIn, LookAt, SearchOrder, SearchDirection): The Range.Find method searches for certain information within the relevant cell range. If the information is found, Range.Find returns the first cell where it finds the information. If the information isn’t found, the Find method returns Nothing.
The search is carried out as specified by the following parameters:
- What:=”*”: The What parameter determines the data you’re searching for. The asterisk (*) acts like a wildcard. Therefore, Range.Find searches for any character sequence within a cell.
- LookIn:=xlFormulas: The LookIn parameter specifies that Range.Find looks in the formulas (xlFormulas).
- LookAt:=xlPart: The LookAt argument is set to xlPart. Therefore, the Find method matches any part of the text.
- SearchOrder:=xlByColumns or SearchOrder:=xlByRows: The SearchOrder parameter determines that the search is carried by columns (xlByColumns in line #6) or by rows (xlByRows in line #7).
- SearchDirection:=xlPrevious: The SearchDirection argument specifies that Range.Find searches for the previous match.
- Column or Row: The Range.Column property (line #6) or Range.Row property (line #7). These properties return the number of the column (line #6) or row (line #7) corresponding to the Range object returned by items #3 and #4 above.
The critical item above is #4: the Range.Find method. What Range.Find does in the statements we’re looking at can be summarized as follows:
- It searches for any sequence of characters within a cell.
- Since the After parameter isn’t specified, the search begins before the cell in the upper-left corner of the relevant range. In this case, that is cell A1 of myWorksheet. As a result of this, Range.Find wraps-around the worksheet and begins the search in the last cell of myWorksheet (cell XFD1048576 in recent Excel versions).
- Line #6 carries out the search by columns. Line #7 does the search by rows.
As a consequence of this factors, the practical result of lines #6 and #7 is as follows:
- Line #6: Assigns the number of the last column with data in myWorksheet to the lastColumn variable.
- Line #7: Assigns the number of the last row with data within myWorksheet to lastRow.
The above is one of the many ways in which you can determine the last row and last column. This topic may seem surprisingly complicated. I cover the topic of how to find the last row in detail in this tutorial. I also provide 9 different macro examples, and explain their strengths and weaknesses. Most of the comments within that blog post are roughly applicable to the topic of finding the last column.
Line #8: Set myRange = myWorksheet.Range(Cells(5, 2), Cells(lastRow, lastColumn))
Similar to line #5 above, line #8 uses the Set statement to assign an object reference to an object variable (myRange).
The following are the items within this VBA statement:
- Set: The Set keyword.
- myRange: The object variable to which you’re assigning a reference.
- =: The assignment operator.
- myWorksheet.Range(Cells(5, 2), Cells(lastRow, lastColumn)): The Worksheet.Range property and the Cells property are used to return a cell range that goes from cell B5 to the last cell with data in myWorksheet.
Let’s take a closer look at the way in which the Worksheet.Range and Cells properties return the cell range going from cell B5 to the last cell of the worksheet:
The basic structure of the statement in #4 above is as follows:
Worksheet.Range(Cells(Row, Column), Cells (Row, Column))
Let’s break this further apart by taking out the references to the Cells property:
Worksheet.Range(Cell1, Cell2)
This is one of the accepted syntaxes for the Worksheet.Range property. In this case, the parameters have the following meaning:
- Cell1: The cell in the upper-left corner of the range.
- Cell2: The cell in the lower-right corner of the range.
But let’s continue with the statement above:
In the statement we’re looking at, both argument of the Worksheet.Range property (Cell1 and Cell2) are of the following form:
Cells(Row, Column)
This is the basic syntax of the Cells property. For these purposes, the property arguments have the following definitions:
- Row: The relevant row number.
- Column: The corresponding column number.
Therefore, the statement in item #4 above uses the Cells property as a parameter of the Range property. The result is that the Worksheet.Range property returns a range of cells defined by the following parameters:
- Cell1 (Cells(5, 2)): The cell lying at the intersection of row 5 and column 2. In other words, cell B5

- Cell2 (Cells(lastRow, lastColumn)): The cell at the intersection of lastRow and lastColumn. These are the values found and assigned by the previous lines #6 and #7.


Line #9: On Error Resume Next
The On Error Resume Next statement instructs Visual Basic for Applications to continue the execution of the macro with the statement that follows the point where a run-time error occurs.
The reason why I include this error-handler is because the statement in the following line #10 causes a run-time error if there aren’t any empty cells in myRange.
Line #10: myRange.SpecialCells(xlBlanks).EntireColumn.Delete
This is the main line of code of this sample macro. This VBA statement proceeds roughly as follows:
- myRange.SpecialCells(xlBlanks): The Range.SpecialCells method identifies blank cells (xlBlanks) within myRange.
- EntireColumn: The Range.EntireColumn property returns the entire column(s) containing any blank cells identified in step #1 above.
- Delete: The Range.Delete method deletes the columns returned by step #2 above.
Line #11: On Error GoTo 0
The On Error GoTo 0 statement disables the error-handler that line #8 above enabled.
Macro Example #4 In Practice
For purposes of testing the Delete_Columns_Blank_Cells macro, I delete the contents of certain individual cells within the sample worksheet prior to executing the macro.

As a consequence of this changes, the macro deletes the following columns:
- Columns with 1 empty cell: Column C (MSFT – Open), Column K (GOOGL – High), Column S (AAPL – Low) and Column X (AMZN – Open).
- Empty columns: Columns H, O, V and AC.
The following screenshot shows the results I get when running the sample macro. Notice how, as expected, the columns I mention above are gone. I include arrows pointing to the places where columns with 1 empty cell used to be.

Macro Example #5: Delete Empty Columns
The following macro example (Delete_Empty_Columns) deletes all completely empty columns within the applicable column range.

Several of the basic elements of this macro are suggested by, among other Excel authorities, Mike Alexander (in Excel Macros for Dummies), Dick Kusleika and Mike Alexander (in Excel 2016 Power Programming with VBA), and Allen Wyatt.
The process to delete empty columns followed by this macro can be summarized as follows:
- It determines the las column with data in the worksheet.
- It loops through each column. The looping begins in the last column found in step #1 above and ends in the second column (column B) of the worksheet (first column with data in the example). In each column, the Sub procedure does the following:
- Tests whether the column is completely empty.
- If the column is empty (the test returns True), it deletes the column.
The process looks roughly as follows:

Let’s take a look at each of the lines of code of this Sub procedure to better understand the process above:
Lines #1 And #2: Dim myWorksheet As Worksheet | Dim iCounter As Long
Lines #1 is exactly the same as in the previous sample macro #4. Line #2 (Dim iCounter As Long) is new.
Both lines of code use the Dim statement to declare the following variables:
- myWorksheet: Worksheet the macro works with.
- iCounter: Loop counter.
Line #3: Set myWorksheet = Worksheets(“Delete Empty Columns”)
Substantially the same as line #5 of the previous macro example #4.
Uses the Set statement to assign the worksheet named “Delete Empty Columns” (Worksheets(“Delete Empty Columns”)) to myWorksheet.
Line #4: For iCounter = myWorksheet.Cells.Find(What:=”*”, LookIn:=xlFormulas, LookAt:=xlPart, SearchOrder:=xlByColumns, SearchDirection:=xlPrevious).Column To 2 Step -1
The opening statement of a For… Next loop.
The following are the main items within this statement:
- iCounter: Loop counter.
- myWorksheet.Cells.Find(What:=”*”, LookIn:=xlFormulas, LookAt:=xlPart, SearchOrder:=xlByColumns, SearchDirection:=xlPrevious).Column: Value at which the loop counter begins.
This particular item may seem quite complicated at first glance. However, is exactly the same as that used in the previous macro example #4 to find and return the number of the last column with data within myWorksheet.
- To 2: 2 is the value at which the counter ends. The second column of myWorksheet is column B. This is the first column with data in the sample worksheet.
- Step -1: Step decreases by 1 (changes by -1) every time the macro loops.
As a consequence of the above, the loop proceeds as follows:
- Starts with the last column with data.
- Loops (backwards) through each column.
- Stops after reaching column B.
Line #5: If WorksheetFunction.CountA(myWorksheet.Columns(iCounter)) = 0 Then myWorksheet.Columns(iCounter).EntireColumn.Delete
An If… Then statement.
This particular If… Then statement has the following items:
- WorksheetFunction.CountA(myWorksheet.Columns(iCounter)) = 0: The condition you’re testing.
As I explain below, this test asks the question: Is a particular column (myWorksheet.Columns(iCounter)) empty?
- myWorksheet.Columns(iCounter).EntireColumn.Delete: The conditional statement that is executed if the condition in #1 above evaluates to True.
This statement deletes a column (myWorksheet.Columns(iCounter)) for which the conditional test in item #1 returns True. I explain the specifics of this conditional statement further below.
Let’s take a closer look at each of these items:
WorksheetFunction.CountA(myWorksheet.Columns(iCounter)) = 0
This conditional test asks whether the expression to the left of the equal sign (WorksheetFunction.CountA(myWorksheet.Columns(iCounter))) is equal to 0.
Let’s take a close look at each of the elements of this expression:
- WorksheetFunction.CountA: The WorksheetFunction.CountA method (the equivalent of the COUNTA worksheet function) counts the number of cells within the range specified by #2 below that aren’t empty.
- myWorksheet.Columns(iCounter): The Worksheet.Columns property refers to column number iCounter within myWorksheet.
In other words, the first time the statements within the loop are executed, Worksheet.Columns returns the last column with data in myWorksheet. The macro then goes (backwards) through each column of myWorksheet. The last time the statements within the loop run, Worksheet.Columns returns the second column of myWorksheet.
The practical consequence of the above is that CountA counts the non-empty cells within the applicable column. That column is determined by iCounter’s current value.
If a particular column is empty, CountA is equal to 0. In such cases, the condition you’re testing is met.
As a consequence of the above, whenever the macro encounters an empty column within myWorksheet, the conditional statement below is executed:
myWorksheet.Columns(iCounter).EntireColumn.Delete
This conditional statement proceeds as follows to delete columns:
- myWorksheet.Columns(iCounter): The Worksheet.Columns property makes reference to column number iCounter in myWorksheet. This is exactly the same column to which the conditional test above (using CountA) is applied.
- EntireColumn: The EntireColumn property returns the entire column identified by item #1 above.
- Delete: The Range.Delete method deletes the column that item #2 above returns.
Line #6: Next iCounter
The closing statement of the For… Next loop.
Results Obtained With Macro Example #5
The following screenshot shows the sample data after I’ve executed the macro. Notice that all empty columns within the data (from the original worksheet) are gone:

Macro Example #6: Delete Columns Based On Header (String)
The following sample macro (Delete_Columns_Header_String) deletes all columns where the header contains a particular string:

Similar macros are suggested by, among others, BobbitWormJoe at Stack Overflow. David Zemens (at the same site) provides an alternative where the InStr Function is used for purposes of identifying the columns where the header doesn’t contain a particular string.
The following are the main steps within the process followed by this macro to delete columns depending on the header contents:
- Identify the last column with data within the relevant worksheet.
- Start looping through each column within the worksheet, starting with the last column identified in step #1 above. For each column, do the following:
- Test whether the cell in row 5 of the relevant column (the header) contains a particular string. In the case of this example, that string is “MSFT” (Microsoft’s stock ticker symbol).
- If the header contains the string you’re looking for (MSFT in this example), delete the column.
- Exit the loop after getting to the second column (column B) of the worksheet.
The following diagram illustrates the process above:

Let’s take a closer look at each of the lines of code within this macro to understand its structure better:
Lines #1 And #2: Dim myWorksheet As Worksheet | Dim iCounter As Long
Lines #1 and #2 are exactly the same as lines in the previous macro example #5.
Both of these lines use the Dim statement to declare a variable or object variable, as follows:
- myWorksheet: Worksheet you want to work with.
- iCounter: Loop counter.
Line #3: Set myWorksheet = Worksheets(“Delete Columns Header String”)
Substantially the same as previous macro examples #4 and #5.
The Set statement assigns a worksheet (Delete Columns Header String) to myWorksheet.
Line #4: For iCounter = myWorksheet.Cells.Find(What:=”*”, LookIn:=xlFormulas, LookAt:=xlPart, SearchOrder:=xlByColumns, SearchDirection:=xlPrevious).Column To 2 Step -1
The opening statement of a For… Next loop. In fact, it’s exactly the same opening statement that I use in macro example #5 above.
The basic steps followed by the loop are as follows:
- Begin with the last column with data.
- Loop (backwards) through each column.
- Stop after reaching column B.
Line #5: If InStr(1, myWorksheet.Cells(5, iCounter).value, “MSFT”, vbTextCompare) > 0 Then myWorksheet.Columns(iCounter).EntireColumn.Delete
An If… Then statement.
The items within this If… Then statement are as follows:
- InStr(1, myWorksheet.Cells(5, iCounter).value, “MSFT”, vbTextCompare) > 0: The condition you’re testing.
I explain this item further below. However, the broad question you’re asking is: Is the string I’m searching for (MSFT) found within the string I’m searching in (Cells (5, iCounter).value)?
- myWorksheet.Columns(iCounter).EntireColumn.Delete: The conditional statement that the macro executes if the condition specified in #1 above is met.
This statement is substantially the same as the conditional statement within line #5 of the previous macro example #5. Therefore, this statement deletes the column (myWorksheet.Columns(iCounter).EntireColumn), conditional on the test in item #1 above returning True.
Let’s take a closer look at item #1 above:
InStr(1, myWorksheet.Cells(5, iCounter).value, “MSFT”, vbTextCompare) > 0
From a numeric perspective, this statements asks whether the expression to the left of the greater than operator (InStr(1, myWorksheet.Cells(5, iCounter).value, “MSFT”, vbTextCompare)) is larger than 0.
This expression uses the InStr Function to determine the position of a string within another. In the sample statement above, the parameters of the InStr are as follows:
- 1: The starting position for the search. As a consequence of this, InStr begins its search on the first character.
- myWorksheet.Cells(5, iCounter).value: The string you’re searching in. In this case, that’s the value of the header cell of the appropriate column.
The Range.Value property returns the value of the cell returned by the Worksheet.Cells property (myWorksheet.Cells(5, iCounter)).
In this example, Worksheet.Cells returns the cell at the intersection of row 5 (the header row in the sample worksheet) and column iCounter. Column iCounter is the column the loop is working with at any particular iteration.
- “MSFT”: The string you’re searching for.
- vbTextCompare: The type of comparison (textual) carried out by InStr.
As a consequence of the above, InStr returns a number larger than 0 whenever the relevant header (as determined by the loop iteration) contains the string you’re searching for. In such cases, the conditional statement (myWorksheet.Columns(iCounter).EntireColumn.Delete) is executed. This results in the deletion of the column.
An alternative way of comparing strings is to use the Like operator. In such a case, the basic structure of the macro is similar to example #7 below. For further examples of how to use the Like operator, check out Excel MVP Ron de Bruin’s example (for rows, but easily modifiable to work with columns) here.
Line #6: Next iCounter
Closes the For… Next loop.
Results From Executing Macro Example #6
The following screenshot displays the results I obtain when executing the sample Delete_Columns_Header_String macro. Notice how, as expected, the columns where the string “MSFT” was part of the header (originally columns B through G) are gone.

Macro Example #7: Delete Columns Based On Cell Value
The following macro example (Delete_Columns_Cell_Value) deletes all columns where a cell within a row contains a certain value. You can easily change this example so that it works with the column header.

This macro proceeds roughly as follows in order to delete columns based on a cell value:
- Identifies the last column with data in the applicable worksheet.
- Loops through each column within the worksheet. The looping begins with the last column of the worksheet and ends on the second column (column B). For each column, the macro does the following:
- Test whether the cell value in row 6 of the column is larger than 700 (in this example). You can easily change both the cell where the test is carried out and the comparison that the macro carries out.
- If the condition is met (cell’s value is larger than 700 in this example), delete the column.
This process is illustrated by the following diagram:

I explain each of the lines of code of this macro below:
Lines #1 And #2: Dim myWorksheet As Worksheet | Dim iCounter As Long
These lines are exactly the same as lines #1 and #2 of macro examples #5 or #6.
They use the Dim statement to declare the following:
- myWorksheet: Object variable representing the worksheet you’re working with.
- iCounter: The loop counter.
Line #3: Set myWorksheet = Worksheets(“Delete Columns Cell Value”)
This line is substantially the same as those in previous macro examples #4, #5 and #6.
It uses the Set statement to assign a particular worksheet (Delete Columns Cell Value) to the myWorksheet object variable.
Line #4: For iCounter = myWorksheet.Cells.Find(What:=”*”, LookIn:=xlFormulas, LookAt:=xlPart, SearchOrder:=xlByColumns, SearchDirection:=xlPrevious).Column To 2 Step -1
This opening statement of a For… Next loop is exactly the same as that in the previous examples #5 and #6.
The looping process is, basically, as follows:
- The loop begins with the last column with data (myWorksheet.Cells.Find(Parameters).Column).
- The loop goes backwards through each column within the worksheet (Step -1).
- Ends after column B (To 2).
Line #5: If myWorksheet.Cells(6, iCounter).value > 700 Then myWorksheet.Columns(iCounter).EntireColumn.Delete
An If… Then statement.
The following are the main 2 items of the statement:
- myWorksheet.Cells(6, iCounter).value > 700: The conditional test you want to apply.
I take a closer look at this item below. From a broad perspective, the question you ask here is: Is the value in the cell I’m looking at (Cells (6, iCounter).value) larger than a certain value I specify (700)?
You can adjust this statement depending on the condition you want to test for. For example, you can do any of the following:
- Change both the comparison operator (> in this example) or the value (700 in this case).
- Extend the test by adding several conditions, such as the macro example suggested by JazzSP8 at MrExcel.com.
- Apply this conditional test to strings and use operators such as Like.
- myWorksheet.Columns(iCounter).EntireColumn.Delete: The conditional statement executed whenever the conditional test in item #1 above returns True.
This particular conditional statement is exactly the same as that in macro examples #5 and #6. It deletes the column (myWorksheet.Columns(iCounter).EntireColumn) whenever the condition in item #1 is met.
Let’s look closer at item #1 above:
myWorksheet.Cells(6, iCounter).value > 700
This conditional test is simply asking whether the expression to the left of the greater than operator is larger than 700. That expression is built by appropriately using the following items:
- myWorksheet.Cells(6, iCounter): The Worksheet.Cells property returns the cell at the intersection of row 6 and column iCounter. At any given time, iCounter is equal to the current loop iteration.
- value: The Range.Value property returns the value within the cell provided by item #1 above.
Line #6: Next iCounter
The closing statement of the For… Next loop.
Macro Example #7 In Practice
The following screenshot shows the results of executing the sample macro #7 on the sample worksheet. Notice how all the columns where row 6 had a value above 700 are gone. Notice that the practical result includes the deletion of the following types of columns:
- Dates. This is due to the fact that the serial number that corresponds to August 22, 2016 is 42,604. This value is larger than 700.
- Columns corresponding to stocks with prices above $700. This are Alphabet (GOOGL) and Amazon (AMZN).

Macro Example #8: Delete Columns Based On Header Contents
The following sample macro (Delete_Columns_Header_Content) deletes all columns where the header contains certain information:

The process followed by this macro to delete columns based on their header contents is as follows:
- Search for certain information within a range of cells. In this example, the macro searches for the string “MSFT” (Microsoft’s stock ticker symbol).
- If there’s a match, delete the relevant column.
- Loop until there are no further matches for the search.
This process is illustrated by the following diagram:

The macro example I provide here relies solely on the Range.Find method. Visual Basic for Applications, however, also has Range.FindNext and Range.FindPrevious methods which you can use for similar purposes. Excel expert Colin Legg provides an example of such a macro structure at RAD Excel. Colin’s macro makes reference to deleting rows, but the structure for deleting columns is substantially similar.
I explain the main statements within this macro below:
Lines #1 And #2: Dim myWorksheet As Worksheet | Dim myColumn As Range
Both lines use the Dim keyword to declare the following:
- myWorksheet: A Worksheet object. Represents the worksheet the macro works with.
- myColumn: A Range object. Represents the column where the information you search for is found.
Line #3: Set myWorksheet = Worksheets(“Delete Columns Header Content”)
The Set keyword assigns a worksheet (Delete Columns Header Content) to the myWorksheet object variable.
Line #4: Do
The opening statement of a Do Loop While loop.
Line #5: Set myColumn = myWorksheet.Rows(5).Find(What:=”MSFT”, LookIn:=xlFormulas, LookAt:=xlPart, SearchOrder:=xlByColumns, SearchDirection:=xlNext)
The Set keyword assigns the cell where the information you’re searching for is found to the myColumn object variable.
The statement is composed of the following items:
- Set.
- myColumn.
- myWorksheet.Rows(5): The Worksheet.Rows property returns row 5.
- Find(What:=”MSFT”, LookIn:=xlFormulas, LookAt:=xlPart, SearchOrder:=xlByColumns, SearchDirection:=xlNext): The Range.Find method searches for the information you want to find in the range returned by item #3 above (row 5). The search is carried out in accordance with the following parameters:
- What: What specifies the data you’re searching for. In this example, this is the string “MSFT”.
- LookIn: Determines that the Range.Find method looks in the formulas (xlFormulas).
- LookAt: Specifies that Range.Find matches any part of the text (xlPart).
- SearchOrder: Determines that the search is carried out by columns (xlByColumns).
- SearchDirection: Specifies that Range.Find searches for the next match (xlNext).
Depending on whether Range.Find finds a match, or not, the result returned by the expression above changes. More precisely:
- If there’s a match: Range.Find returns the first cell where it has found the information.
- If there’s no match: Find returns Nothing.
What the Find method returns is relevant for the following lines of code:
Line #6: If Not myColumn Is Nothing Then myColumn.EntireColumn.Delete
An If… Then statement.
The items of this If… Then statement are as follows:
- Not myColumn Is Nothing: The condition you want to test.
- myColumn.EntireColumn.Delete: The conditional statement that the macro executes if the test in item #1 above returns True.
This conditional statement uses the Range.Delete method to delete the column returned by the Range.EntireColumn property. That column, in turn, is determined by line #5 above. In other words, is a column where the information you’re searching for is found.
The condition within item #1 above is composed of the following items:
- Not myColumn: The Not operator performs a logical negation of myColumn. Therefore, this item depends on what the Range.Find method in line #5 returns.
The Range.Find method returns Nothing when it doesn’t find a match. As a consequence, the logical negation of myColumn (Not myColumn), is Nothing if there’s a match. In other words, if Range.Find finds a match, the condition is met and the column is deleted.
- Is: The Is operator compares item #1 above and item #3 below.
- Nothing.
Line #7: Loop While Not myColumn Is Nothing
The closing statement of the Do Loop While loop.
The condition within this statement is as follows:
Not myColumn Is Nothing
The macro loops as long as this condition is True. This condition is exactly the same as that in the If… Then statement in line #6 above. Therefore, the macro loops as long as the Range.Find method finds a match. Once the Range.Find method stops finding matches, the Sub procedure exits the loop.
Results Obtained When Executing Macro Example #8
The following screenshot shows the results I obtain after executing macro example #8. Notice that, as expected, all of the columns whose header included “MSFT” are deleted. This result is the same I obtain with sample macro #6 above.

Conclusion
After reading this tutorial, you’re equipped with the knowledge and information you need to delete columns using Excel VBA in a wide variety of circumstances. More precisely, you’ve read about the following topics:
- What are some of the most commonly used VBA constructs to identify the columns you want to delete.
- How do you get Visual Basic for Applications to return the column(s) you want to delete.
- The Range.Delete method, and how you can use it when deleting columns.
- How loops and If… Then statements can be relevant when creating VBA macros that delete columns.
Further to the above, you’ve gone through 8 practical macro examples that you can use for the following purposes:
- Delete a particular column.
- Delete several contiguous columns.
- Delete several non-contiguous columns.
- Delete columns with blank cells.
- Delete empty columns.
- Delete columns based on whether a string is found on the header.
- Delete columns based on whether a particular row contains a certain value.
- Delete columns based on the contents of the header.
This Excel VBA Delete Column Tutorial is accompanied by an Excel workbook containing the data and macros I use in the examples above. You can get immediate free access to this example workbook by subscribing to the Power Spreadsheets Newsletter.
Books Referenced In This Excel VBA Tutorial
- Alexander, Michael (2015). Excel Macros for Dummies. Hoboken, NJ: John Wiley & Sons Inc.
- Alexander, Michael and Kusleika, Dick (2016). Excel 2016 Power Programming with VBA. Indianapolis, IN: John Wiley & Sons Inc.
- Jelen, Bill and Syrstad, Tracy (2015). Excel 2016 VBA and Macros. Indianapolis, IN: Pearson Education, Inc.
- Walkenbach, John (2015). Excel VBA Programming for Dummies. Hoboken, NJ: John Wiley & Sons Inc.
In this article we will see how to delete columns in Excel using VBA.
Example 1: Delete an entire column in a sheet using column number:
Say, the Excel data that is of the form below and you need to delete the column for May-18 i.e column G

Here is the code. We need to specify the column number to be deleted and use .EntireColumn.Delete to delete the entire column
Sub delCol() Dim sourceSheet As Worksheet Set sourceSheet = Sheet1 sourceSheet.Columns(7).EntireColumn.Delete End SubThis is how the data will look like after executing the above code
Example 2: Delete an entire column in a sheet using column letter:
You can also use column letter instead of column number to delete it. So, the end-result in the above example can also be achieved using the code below:
Sub delColUsingLetter() Dim sourceSheet As Worksheet Set sourceSheet = Sheet1 sourceSheet.Columns("G").EntireColumn.Delete End SubExample 3: Delete multiple columns in a sheet:
You can also delete multiple columns in a single delete statement. Here is the code that will delete columns D to F (4 to 6):
Sub delCol() Dim sourceSheet As Worksheet Set sourceSheet = Sheet1 sourceSheet.Columns("D:F").EntireColumn.Delete End SubThe output will look like this
Example 4: Delete non adjacent multiple columns in a sheet:
It is not necessary that the columns be adjacent in order to delete them in a single statement. Here is an example where multiple non adjacent columns are deleted
Sub delCol() Dim sourceSheet As Worksheet Set sourceSheet = Sheet1 sourceSheet.Range("D:E, H:H, J:K").EntireColumn.Delete End SubNote that we have used “Range” to specify the columns instead of “Columns” in this case.
After running the code the data will look like this.
Example 5: Delete a column in a table:
The data (starting point) for this example is a table as seen in the snapshot below. The name of the table is “Table1”
If you want to delete the Address column (i.e. Column F of the sheet), you need to use the code below:
Sub delColTable() Dim tbl As ListObject Dim sourceSheet As Worksheet 'Set the table from which column is to be deleted Set tbl = ActiveSheet.ListObjects("Table1") 'Set the sheet that contains the table Set sourceSheet = Sheet2 With sourceSheet tbl.ListColumns(5).Delete End With End SubAn important thing to note here is that while deleting a column from a table, you need to specify the column number relative to the first column of the table. Column “No” is the first column, “Title” the second, and so on. In our case we want to delete the 5th column of the table (6th of the sheet). So, we have used “ListColumns(5)”
This is how the table will look like after execution of the code
Example 6: Delete multiple columns in a table:
To delete columns say, 5 and 6 from the table, we can use a for loop as given below
Sub delColsTable() Dim tbl As ListObject Dim sourceSheet As Worksheet Dim i As Integer 'Set the table from which column is to be deleted Set tbl = ActiveSheet.ListObjects("Table1") 'Set the sheet that contains the table Set sourceSheet = Sheet2 'Run the loop twice as we need to delete 2 columns For i = 1 To 2 With Source tbl.ListColumns(5).Delete End With Next i End SubAs we are going to delete 2 columns, the for loop has been iterated twice. A point to note here is that, in both the iterations we are deleting column 5. This is because, after the first execution of the delete column statement, column 6 will be shifted left to the position of 5. Hence, on the second execution, the city column is now at position 5 and deleted correctly.
This is useful when you need to delete a particular column and another column adjacent to it
The same result can be achieved without using the for loop as below:
Sub delColsTable() Dim tbl As ListObject Dim sourceSheet As Worksheet Dim i As Integer 'Set the table from which column is to be deleted Set tbl = ActiveSheet.ListObjects("Table1") 'Set the sheet that contains the table Set sourceSheet = Sheet2 With sourceSheet tbl.ListColumns(6).Delete tbl.ListColumns(5).Delete End With End SubNote that we are deleting column 6 first, so that the position of the second column to be deleted does not change. The output will look like this:
Example 7: Delete a column in a table based on the column header:
In this final example, we will see how to delete a column from a table when you know the name of the column header and not it’s position. So, we will be deleting the column “City” in the code below.
Sub delOnColHeaderOfTable() Dim tbl As ListObject Dim sourceSheet As Worksheet Dim i As Integer Dim colNameToDel As String 'Set the table from which column is to be deleted Set tbl = ActiveSheet.ListObjects("Table1") 'Set the sheet that contains the table Set sourceSheet = Sheet2 'Case sensitive colNameToDel = "City" 'Loop through all the columns in the table For i = 1 To tbl.ListColumns.Count With sourceSheet 'Check the column header If tbl.ListColumns(i).Name = colNameToDel Then tbl.ListColumns(i).Delete Exit For End If End With Next i End SubHere, we run the for loop through all the columns of the table. The column count in the table is given by “tbl.ListColumns.Count”. As we have to delete a single column, we have started the counter at 1. If you need to delete multiple columns, you need to start from the last column. Also remove the exit for statement in that case
The if condition checks whether the name of the current column (using tbl.ListColumns(i).Name) matches the name of the column to be deleted. If so, that column is deleted.
Thus, we have seen different ways to delete a single and multiple columns from a sheet or a table.
For further information on Tables, refer to the article – VBA, Word Table Insert/Remove Rows/Columns
See also:


- How to delete rows using VBA
In this Article
- Delete Entire Row or Column
- Delete Multiple Rows or Columns
- Delete Blank / Empty Rows
- Delete Row if Cell is Blank
- Delete Row Based on Cell Value
- More Delete Row and Column Examples
- Delete Duplicate Rows
- Delete Table Rows
- Delete Filtered Rows
- Delete Rows in Range
- Delete Selected Rows
- Delete Last Row
- Delete Columns by Number
This tutorial will demonstrate different ways to delete rows and columns in Excel using VBA.
Delete Entire Row or Column
To delete an entire row in VBA use this line of code:
Rows(1).DeleteNotice we use the Delete method to delete a row.
Instead of referencing the Rows Object, you can reference rows based on their Range Object with EntireRow:
Range("a1").EntireRow.DeleteSimilarly to delete an entire column, use these lines of code:
Columns(1).DeleteRange("a1").EntireColumn.DeleteDelete Multiple Rows or Columns
Using the same logic, you can also delete multiple rows at once:
Rows("1:3").Deleteor columns:
Columns("A:C").DeleteNotice here we reference the specific row and column numbers / letters surrounded by quotations.
Of course, you can also reference the EntireRow of a range:
Range("a1:a10").EntireRow.DeleteNote: The examples below only demonstrate deleting rows, however as you can see above, the syntax is virtually identically to delete columns.
Delete Blank / Empty Rows
This example will delete a row if the entire row is blank:
Sub DeleteRows_EntireRowBlank()

Dim cell As Range

For Each cell In Range("b2:b20")
    If Application.WorksheetFunction.CountA(cell.EntireRow) = 0 Then
        cell.EntireRow.Delete
    End If
Next cell

End Sub
It makes use of the Excel worksheet function: COUNTA.
Delete Row if Cell is Blank
This will delete a row if specific column in that row is blank (in this case column B):
Range("b3:b20").SpecialCells(xlCellTypeBlanks).EntireRow.DeleteDelete Row Based on Cell Value
This will loop through a range, and delete rows if a certain cell value in that row says “delete”.
Sub DeleteRowswithSpecificValue()

Dim cell As Range

For Each cell In Range("b2:b20")
    If cell.Value = "delete" Then
        cell.EntireRow.Delete
    End If
Next cell

End Sub
More Delete Row and Column Examples
VBA Coding Made Easy
Stop searching for VBA code online. Learn more about AutoMacro — A VBA Code Builder that allows beginners to code procedures from scratch with minimal coding knowledge and with many time-saving features for all users!

Learn More
Delete Duplicate Rows
This code will delete all duplicate rows in a range:
Range("b2:c100").RemoveDuplicates Columns:=2Notice we set Columns:=2. This tells VBA to check both the first two columns of data when considering if rows are duplicates. A duplicate is only found when both columns have duplicate values.
If we had set this to 1, only the first row would’ve been checked for duplicate values.
Delete Table Rows
This code will delete the second row in a Table by referencing ListObjects.
ThisWorkbook.Sheets("Sheet1").ListObjects("list1").ListRows(2).DeleteDelete Filtered Rows
To delete only rows that are visible after filtering:
Range("b3:b20").SpecialCells(xlCellTypeVisible).EntireRow.DeleteVBA Programming | Code Generator does work for you!
Delete Rows in Range
This code will delete all rows in range:
Range("a1:a10").EntireRow.DeleteDelete Selected Rows
This code will delete all selected rows:
Selection.EntireRow.DeleteDelete Last Row
This will delete the last used row in column B:
Cells(Rows.Count, 2).End(xlUp).EntireRow.DeleteBy changing 2 to 1, you can delete the last used row in column A, etc.:
Cells(Rows.Count, 1).End(xlUp).EntireRow.DeleteDelete Columns by Number
To delete a column by it’s number, use a code like this:
Columns (2).DeleteDelete Rows and Columns in Excel VBA
A Powerful & Multi-purpose Templates for project management. Now seamlessly manage your projects, tasks, meetings, presentations, teams, customers, stakeholders and time. This page describes all the amazing new features and options that come with our premium templates.
Save Up to 85% LIMITED TIME OFFER

All-in-One Pack
120+ Project Management Templates
Essential Pack
50+ Project Management Templates
Excel Pack
50+ Excel PM Templates
PowerPoint Pack
50+ Excel PM Templates
MS Word Pack
25+ Word PM Templates
Ultimate Project Management Template
Ultimate Resource Management Template
Project Portfolio Management Templates
Related Posts
- VBA delete rows columns excel – Delete Rows
- Deleting Rows in Excel VBA: Examples
- Deleting Columns in Excel VBA
- Deleting Columns in Excel VBA: Examples
VBA Reference
Effortlessly
Manage Your Projects
120+ Project Management Templates
Seamlessly manage your projects with our powerful & multi-purpose templates for project management.
120+ PM Templates Includes:
6 Comments
-
Sharan
April 3, 2015 at 4:09 PM — ReplyHi,
VBA delete rows columns excel – Delete Rows
Can you please check why the below code is not working as mentioned ?
The following example will delete all the rows between 1 to 10 which having an even number in the first Column.
[code language=”vb”]
Sub sbDeleteARowEvenNumbers()
Dim lRow‘Last record number
lRow = 10‘loop from last row until first row
Do While lRow >= 1‘if the cell value is even then delete the row
If Cells(lRow,1) Mod 2 = 0 Then Rows(lRow).DeletelRow = lRow – 1
Loop
End SubThanks & Regards,
Sharan -
PNRao
April 7, 2015 at 8:21 PM — ReplyHi Sharan,
Please try this code, I have tested and its working fine.
Sub sbDeleteARowEvenNumbers()
Dim lRow

'Last record number
lRow = 10

'loop from last row until first row
Do While lRow >= 1

'if the cell value is even then delete the row
If Cells(lRow, 1) Mod 2 = 0 Then Rows(lRow).Delete

lRow = lRow - 1
Loop
End Sub
-
Sean
June 10, 2015 at 8:57 PM — ReplyHi,
How can I delete row two and everything beyond it not knowing how many rows exactly it could be?
Thanks,
Sean -
Piirtola
November 21, 2015 at 5:42 PM — ReplyAlternate code to use method to first find the last row with data.
Like thisSub Delete2toLastRow() Dim LastRow As Long 'Count Rows in A column LastRow = Range("A" & Rows.Count).End(xlUp).Row If LastRow = 1 Then 'To make sure you don't delete Row 1 LastRow = 3 End If Rows("2:" & LastRow).Delete End Sub -
Pavan
August 14, 2018 at 1:48 PM — Reply -
Eduard Roy A. Sumacot
March 9, 2019 at 10:14 AM — ReplyWhats wrong with this
if i selected the 2nd data i want to delete it cant.
the result is it deleted the 1st dataPrivate Sub cmdDelete_Click()
Dim i As Integer
For i = 2 To Range(“A65356”).End(xlUp).Row-1
If ListBox1.Selected(i) Then
Rows(i).Select
Selection.DeleteEnd If
Next iEnd Sub
Effectively Manage Your
Projects and Resources
ANALYSISTABS.COM provides free and premium project management tools, templates and dashboards for effectively managing the projects and analyzing the data.
We’re a crew of professionals expertise in Excel VBA, Business Analysis, Project Management. We’re Sharing our map to Project success with innovative tools, templates, tutorials and tips.
Project Management
Excel VBA
Download Free Excel 2007, 2010, 2013 Add-in for Creating Innovative Dashboards, Tools for Data Mining, Analysis, Visualization. Learn VBA for MS Excel, Word, PowerPoint, Access, Outlook to develop applications for retail, insurance, banking, finance, telecom, healthcare domains.
Page load link
Go to Top