
TechRepublic Premium
-
TechRepublic PremiumHiring kit: Wireless system engineer
PURPOSE Finding and hiring Wireless System Engineers will require a focused and comprehensive recruitment plan that looks for qualified individuals with the right technical skills and a personality that will best fit your organizational culture. This Hiring Kit from TechRepublic Premium provides an adjustable framework your business can use to find, recruit and ultimately hire …
-
TechRepublic PremiumiCloud Usage Policy
PURPOSE The policy’s purpose is to define proper practices for using Apple iCloud services whenever accessing, connecting to, or otherwise interacting with organization systems, services, data and resources. This policy, from TechRepublic Premium, can be customized as needed to fit the needs of your organization. From the policy: POLICY DETAILS All organization representatives, including all …
-
TechRepublic PremiumIT expense reimbursement policy
PURPOSE The policy’s purpose is to define for employees and authorized representatives the technology-related purchases eligible for reimbursement. The policy also seeks to ensure all expenses are properly reported, processed and reimbursed. This policy, from TechRepublic Premium, can be customized as needed to fit your organization’s needs. From the policy: POLICY DETAILS No technology-related purchases …
-
TechRepublic PremiumInterviewing guidelines policy
PURPOSE This policy from TechRepublic Premium provides guidelines for conducting useful and appropriate interviews with potential new hires, both from a proper methodology perspective and a legal standpoint. These guidelines will help build a reproducible and consistent interview framework that can be applied to any open role. From the policy: INTERVIEWING GUIDELINES The first step …
Fix 1: Run the Windows Troubleshooter. Fix 2: Update, Roll Back or Uninstall the Keyboard Driver. Fix 3: Uninstall the Recently Installed Windows Update. User Comments.
Similarly, How do you use the delete key on a Mac?
The delete key on a Windows keyboard does the opposite and deletes the character to the right of the cursor. To perform this maneuver on a Mac, press Function-Delete.
Additionally, What is shortcut key for Delete?
| To delete | Press |
|---|---|
| Next character | Delete |
| Next word |
Ctrl+Delete or Ctrl+Backspace |
| Previous character | Backspace |
Related Contents
- 1 Why is Backspace and Delete not working?
- 2 When I press Backspace It doesn’t delete?
- 3 How do you hold Delete on a Mac?
- 4 What is Shift Delete in Mac?
- 5 How do you delete instead of Backspace on Mac?
- 6 How do I delete using keys?
- 7 What is the delete key in laptop?
- 8 What is Ctrl +F?
- 9 How do I reset my keyboard?
- 10 How do I enable backspace?
- 11 How do I change backspace settings?
- 12 How do I change backspace key to delete?
- 13 How do you use the Delete key Backspace?
- 14 What is the equivalent of delete key on Mac?
- 15 Why doesn’t my key repeat when I hold it down on Mac?
- 16 How do I make the delete button faster on Mac?
- 17 Where is shift key on Mac?
- 18 What is the shortcut to delete a file on Mac?
- 19 How do you do Control Alt Delete on a Mac?
- 20 What is the equivalent of Delete key on Mac?
- 21 How do I highlight and delete on a Mac?
Why is Backspace and Delete not working?
Solution 1: Turn off the Sticky Keys and the Filter Keys feature. … Sticky Keys allows you to press one key at a time for keyboard shortcuts; Filter Keys tells the keyboard to ignore your brief or repeated keystrokes. If these two keyboard functions are enabled, sometimes your backspace key cannot work fine.
When I press Backspace It doesn’t delete?
When I try to delete selected text by using BACKSPACE in Microsoft Word, it doesn’t work. Choose Advanced from the left hand side, Under Editing options, make sure there is a tick against Typing Replaces Selected Text.
How do you hold Delete on a Mac?
Photo by Matt McGee.
- Deleting text in front of the cursor with the regular Delete key can be done by holding down the Function, or fn key while pressing it.
- You can also do this by pressing Control + D.
- You can delete the entire word behind the cursor by pressing Control + Delete or Option + Delete.
What is Shift Delete in Mac?
The keyboard shortcut Command-Option-Shift-Delete empties the trash while bypassing the confirmation dialog window.
How do you delete instead of Backspace on Mac?
The delete key on a Mac, however, acts like the backspace key on a Windows keyboard. That is, it deletes the character to the left of the cursor. The delete key on a Windows keyboard does the opposite and deletes the character to the right of the cursor. To perform this maneuver on a Mac, press Function-Delete.
How do I delete using keys?
command + delete works just fine. Highlight the file (single click or use your keyboard to select it), then hold command and without releasing it, push delete . This moves the file or folder to the trash. Note that delete is in the same place as Backspace on a Windows keyboard.
What is the delete key in laptop?
The delete key is a key on most computer keyboards which typically is used to delete either (in text mode) the character ahead of or beneath the cursor, or (in GUI mode) the currently-selected object. The key is sometimes referred to as the “forward delete” key.
What is Ctrl +F?
Alternatively known as Control+F and C-f, Ctrl+F is a keyboard shortcut most often used to open a find box to locate a specific character, word, or phrase in a document or web page. Tip. On Apple computers, the keyboard shortcut for find Command + F .
How do I reset my keyboard?
For all other keyboards:
- Unplug your keyboard.
- With the keyboard unplugged, hold down the ESC key.
- While holding down the ESC key, plug the keyboard back into your computer.
- After about 5 seconds, release the ESC key. You will see the keyboard lighting flash if the reset is successful.
How do I enable backspace?
Go Back With Backspace extension
- Go to the Extension page, and install it on Chrome or Edge.
- Once installed, it will re-enable the backspace key as a back navigation button.
- When you are typing anything, it will preserve the Delete function.
How do I change backspace settings?
This is because you will have to set the backspace key to send backspace or delete. To do this, select the “Terminal” menu and choose “Setup” and select the “Keyboard” tab. Now choose the setting you wish in the “Backspace Key Sends” section. The key can send either Backspace or Delete.
How do I change backspace key to delete?
Press and hold fn+Option, hit Backspace and you delete to the right word by word. Hope this helps.
How do you use the Delete key Backspace?
The keyboard key used to delete the text character at, or to the right of, the screen cursor. Pressing Delete (DEL) also deletes the currently highlighted text, image or group of images. The Delete key removes characters to the right of the cursor, whereas the Backspace key deletes to the left. See Backspace key.
What is the equivalent of delete key on Mac?
Backspace and Delete.
On the Mac, the backspace key is labeled Delete, although it’s in exactly the same place as the Windows Backspace key.
Why doesn’t my key repeat when I hold it down on Mac?
You can set how long you must hold down the key before it starts repeating and how fast it repeats once it starts. On your Mac, choose Apple menu > System Preferences, click Keyboard , then click Keyboard. Drag the Delay Until Repeat slider to set how long to wait before the character begins repeating.
How do I make the delete button faster on Mac?
3 Answers. Under System Preferences, click Keyboard, and adjust the “Key Repeat” speed (see below). Tested in Word and it does affect how quickly the delete key deletes characters when held down. can be used to change the delay before the repeat starts (default is 15).
Where is shift key on Mac?
Which key is a shift key on a macbook keyboard? Answer: A: Answer: A: The one between caps lock key and fn key on the left side of the keyboard.
What is the shortcut to delete a file on Mac?
Command + Option + Delete to instantly delete files.
Use this shortcut to delete a selected file without sending it to the Trash. The item will immediately be deleted, which cannot be undone.
How do you do Control Alt Delete on a Mac?
How to force quit on a Mac using a keyboard shortcut
- Pressing Command + Option + Escape on a Mac is equivalent to pressing Control + Alt + Delete on a PC. Apple/Business Insider.
- Select the program you want to close. Business Insider.
- Select “Force quit…” Steven John/Business Insider.
What is the equivalent of Delete key on Mac?
Backspace and Delete.
On the Mac, the backspace key is labeled Delete, although it’s in exactly the same place as the Windows Backspace key.
How do I highlight and delete on a Mac?
Select multiple items: Press and hold the Command key, then click the items (they don’t need to be next to each other). Select multiple items that are adjacent: Click the first item, then press the Shift key and click the last item.
 Please Note:
This article is written for users of the following Microsoft Word versions: 2007, 2010, 2013, 2016, 2019, and Word in Microsoft 365. If you are using an earlier version (Word 2003 or earlier), this tip may not work for you. For a version of this tip written specifically for earlier versions of Word, click here: Deletions Don’t Work as Expected.
![]()
Written by Allen Wyatt (last updated March 28, 2020)
This tip applies to Word 2007, 2010, 2013, 2016, 2019, and Word in Microsoft 365
Somehow, Greg pushed the wrong key and changed the way Word deletes words. Normally, he selects a word or phrase and just starts typing a replacement. Or, he selects a word or phrase, hits Backspace, and the selected word of phrase disappears. Now they don’t disappear. Greg wonders how he can get back to the way deletions used to work.
The most likely cause of the problem is that you’ve somehow changed how Word handles what you type when a selection exists. Here’s how to get things back to the way they were:
- Display the Word Options dialog box. (In Word 2007 click the Office button and then click Word Options. In Word 2010 or a later version, display the File tab of the ribbon and then click Options.)
- Click Advanced at the left side of the dialog box. (See Figure 1.)
- Make sure the Typing Replaces Selected Text option is selected.
- Click on OK.
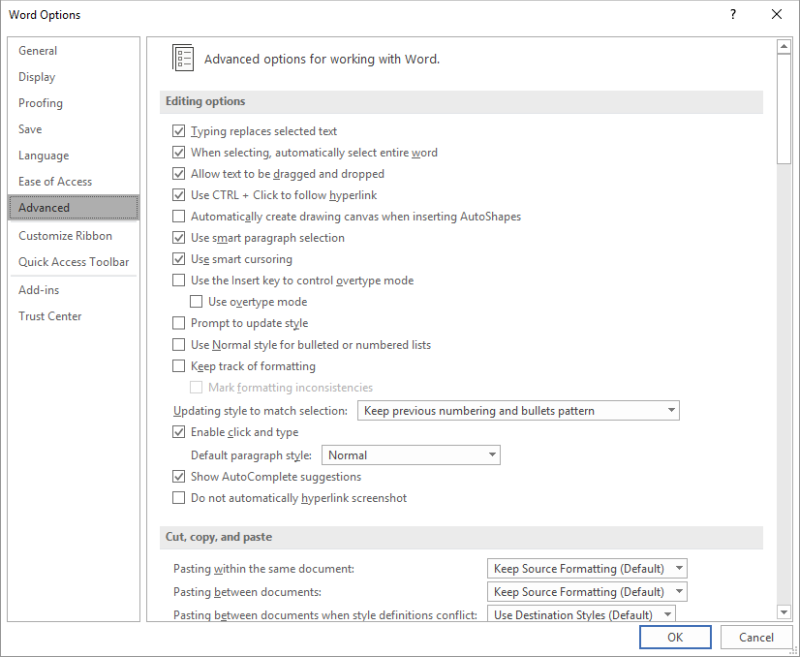
Figure 1. The Advanced options in the Word Options dialog box.
There is no single-key shortcut that we know of that will change this setting, so it is unlikely that Greg «somehow pushed the wrong key» to change the behavior of Word. If the change wasn’t made in the Word Options dialog box explicitly, then the only other explanation is that someone else made the change while using Greg’s machine or there is a macro or add-in that modifies the setting.
It is also possible (but not probable) that Track Changes is enabled on the system and that its configuration has been modified so that deletions aren’t «marked» on the screen and insertions don’t have a change mark displayed. This would stop deletions from appearing deleted and still allow insertions to appear. If the configuration changes weren’t made, then it would be easy to tell that Track Changes was turned on; with the configuration changes, it would be easy to assume that something is messed up in how Word handles edits. You can check if this is the case by simply checking to see if Track Changes (on the Review tab of the ribbon) is enabled.
WordTips is your source for cost-effective Microsoft Word training.
(Microsoft Word is the most popular word processing software in the world.)
This tip (9294) applies to Microsoft Word 2007, 2010, 2013, 2016, 2019, and Word in Microsoft 365. You can find a version of this tip for the older menu interface of Word here: Deletions Don’t Work as Expected.
Author Bio
With more than 50 non-fiction books and numerous magazine articles to his credit, Allen Wyatt is an internationally recognized author. He is president of Sharon Parq Associates, a computer and publishing services company. Learn more about Allen…
MORE FROM ALLEN
MS-DOS with Line Breaks Format in Word 2002 and Word 2003
Finding the built in functionality in Word 2002 & 2003 for saving your document as a MS-DOS format.
Discover More
Limiting Lines in a Table Cell
When creating tables, Word automatically sets the size of the cells. But what if you want to make sure each cell is a …
Discover More
Protecting an Entire Folder of Workbooks
Want to protect the Excel information stored in a particular folder on your system? There are a number of ways you can …
Discover More
More WordTips (ribbon)
Viewing More of the Left Margin Area
When working in Draft or Normal view, you may want to view the area just to the left of the document’s left margin. …
Discover More
Adding an Inverted A
Want to insert an upside-down letter in your text? This tip provides a number of different approaches you can use to get …
Discover More
Deleting Freezes Computer
Sometimes a strange object or text may appear in your document, as happened to Sharon. To complicate the situation, her …
Discover More
To err is human, and deleting in the middle of typing is not unusual. But in case of the delete button not working, you can be in a super mess. If it’s Mac, the virtual keyboard can be of great help here. But in Windows, there are many fixes to try.
You can be a computer programmer or an SEO expert or change the lives of many by sharing your thoughts on social media. And it simply doesn’t matter how organized you are; you have to delete sentences or words or letters from your draft from time to time.
Of course, you can just get a new keyboard. But before doing that, how about learning a few tricks to deal with the issue?
If you want to know the solutions, carry on reading as we’ll show you the fixes for both Mac and Windows devices.
The most obvious reason, however impossible it may seem, is the dust residue. Delete key is one of the most used keys in any laptop. And a Mac isn’t any different. So continuous usage with dust deposited underneath can stop the delete key on Mac or Macbook Pro or Macbook Air from working.
The delete button on Mac works both ways – forward and backward – in conjunction with the ‘fn’ key. So, when you want to delete something that moves forward, you have to press ‘fn’ first before using the delete key. You can’t change this because this is a default setting.
So, if the delete key is not working, maybe the problem is in the ‘fn’ button. If the ‘fn’ key is stuck, or there is dust or something else is underneath, or simply the key malfunctions – the delete key on your Mac will stop working.
If you want to try to fix the problem before calling for help or buying a new one, let me tell you a few ways to deal with the issue of your Mac.
Solution When Delete Key Not Working On Mac
Before going for a replacement, have a look at the following steps to get rid of the problem:
Use Virtual Keyboard to Use the Delete Key
Follow the below steps carefully-
- Go to System Preference by clicking on the Apple logo on Mac.
- From there, find Language & Text. Clicking it will get you into the Input Sources Tab. Put a tick mark in the box to select the box for Keyboard and Character Viewer and your country’s flag as well.
- Go back to System Preferences. From there, go to the Keyboard panel and select the option for showing Keyboard & Character Viewer in the menu bar.
- Now click on the icon flag and choose Show Character Viewer. When the viewer opens up on the screen, check if the iOS recognizes the delete button.
- Use the delete button from the virtual keyboard.
Reset NVRAM
Resetting NVRAM, known as Non-Volatile Random Access Memory, is an effective way to solve the issue. To do it, follow steps:
- Close your Mac down. Turn it back on and promptly keep pressing and holding down the following keys for about 20 seconds:
Option + Command + P + R
- After 20 seconds or so, your computer may appear to restart.
- If your Mac doesn’t have Apple T2 Security Chip, you may release the buttons after the second start-up sound. If you do have the Security Chip, you can leave the keys when the logo of Apple reappears and then vanishes again.
If the Mac has Firmware Password, you need to turn the password off first.
When the Mac comes back to life again, NVRAM is reset, and all the hiccups with the delete key may be gone.
Now let’s get to know about the reasons why your delete button is not working on Windows.
Know Why Delete Key Not Working on Windows
The reasons for a disabled delete button in your Windows are pretty much the same as they are in Apple computers. Except that the delete button in Windows works individually. So another malfunctioning key won’t make it stop working.
If you find the delete key not working on the desktop, the keyboard jack may be disconnected from the CPU, and the entire keyboard will stop working. Let’s look at some of the techniques we can use to solve the delete key unresponsive issue:
Solve Delete Key Issue on Windows 10
Windows 10 comes with some fantastic troubleshooting features. And using that, you can easily solve your problems with the delete key. Who knows, it was just a simple software glitch.
Troubleshoot the Windows
The built-in troubleshooter in Windows 10 is a powerful tool to solve many hiccups. To run troubleshooting successfully, do the following steps:
- From the Windows logo, go to Taskbar and then to Settings.
- Find Update & Security tab in Settings. After clicking the tab, you will get Troubleshoot and click it open.
- From the dropdown menu on the right, choose Keyboard and let the troubleshooter run for the keyboard.
- Restart after the task is finished.
Update the Keyboard Driver
Another fix to try is keyboard driver updating.
To update the Keyboard Driver,
- From the Windows menu, go to Device Manager.
- Expand the window, find the keyboard, and double click.
- Under the Devise Property option, you will get the Update button and click the button.
- Let the computer find the appropriate version. You need to have uninterrupted internet for this.
- Download the right version and follow the instructions to complete the update.
If the Update step doesn’t fix the issue, go for rolling back the driver option.
Uninstall And Reinstall The Keyboard Driver
To uninstall the driver from Device Manager, find Uninstall driver and select the option. After that, as we have mentioned earlier, find another updated version of the keyword driver and reinstall the software.
There will be successive Yes or No options. You need to choose the Yes buttons until you get to the Finish position. Press the button and restart your computer.
Hopefully, the delete button will start working now.
Turn off the Filter Keys & Sticky Keys
Well, sometimes, if you have turned on the filter keys for easy keyboard usage, it might bring some mess with the key being unresponsive.
In that case, turning off them can solve the issue.
To do so,
- From Windows start menu bar, type ease
- Select the Ease of Access Keyboard
- When the Keyboard Window pops up on your screen, turn off the filter keys and sticky keys options.
Fix When Delete Button Is Unresponsive on Windows 7
To resolve the delete key not working issue on Windows 7,
- Go to the Windows Explorer option and select ‘Organize.’
- You will find the Folder & Search Options tab there.
- Go to the View option and select Reset Folders.
- Now, reboot the system.
In most cases, the above process can fix the delete button not working issue for Windows 7.
What to Do When Delete Button Not Working In Excel
Most people use Microsoft Excel applications for their functionality. If the delete button doesn’t work there, you can try the following step to solve the problem by fixing the registry Keys:
As we mentioned above about the Registry Key, fixing them can solve the issue for Excel most of the time.
- Get the Run option by pressing Windows logo + R simultaneously.
- In the box, type ‘Regedit and press open to run the Registry Editor.
- Find the following path – ComputerHKEY_CURRENT_USERSoftwareMicrosoftoffice16.0ExcelOptions
- In this example, 16 refer to Excel 2016, so you should check for your appropriate version.
- Select the Options folder, and after right-clicking, rename the folder. You can choose ‘Options-2021’ just so that you can remember if you need it to re-use again.
Hopefully, the issue is solved now.
Fix When Delete Button Does Not Work in Outlook
When working on Outlook, if the delete button does not work, follow the below method carefully,
- Close the Outlook application first.
- From the run application, go to the following path:
C:Program FilesMicrosoft Office%OfficeVersion%SCANPST.EXE
- When you get to the destination, start scanning by double-clicking SCANPST.EXE.
- You may need to restart to see if the solution works.
Final Thought
Delete button not working is like any other technical glitches that we face with many other electronic devices. It doesn’t always mean that the device is faulty or we cannot fix it.
We believe applying the above remedies will fix the issue most of the time. But if there is physical damage, you have no other way but to go for a replacement.
Let us know if our suggested ideas help you get the delete button working again.
You Can Also Read:
- How to Know Why Computer Doesn’t Turn On When Pressing Power Button?
- How I Fix My Phone Won’t Save New Contact| iOS & Android
- Select Multiple Files Mac’s Shift Key Not Working
- Pc Won’t Turn On But Motherboard light is On- Tips to Fix
- Power Button Not Working PC? Experts Recommended Fix With Tips
Download PC Repair Tool to quickly find & fix Windows errors automatically
Track Changes feature in Microsoft Word enables collaboration between you and your coworkers and makes changes that are easy to spot. Unfortunately, in some cases, enabling this feature causes an issue. For instance, when activated to edit a document or file the ‘Delete’ button does not enable strikethrough. Let’s try to solve it!
Those who are familiar with the Track Changes option know that when it’s turned on, deletions are marked with a strikethrough (when selected by highlighting and pressing the Delete button on the keyboard), and additions are marked with an underline. Yet, sometimes, the word or sentence to be deleted does not show a red line striking it out. Rather, the text or the complete sentence gets wiped out. In such cases, tracking changes for coworkers becomes difficult as they have no idea where to incorporate changes. The only information displayed is the message in the comment balloon reading: DELETED: ABC.
The deletion isn’t being displayed as Strikethrough due to a combination of certain factors. You’ll need to disable them as follows:
- Configure Advanced Track Changes options
- Check ‘Show Markup’ section.
1] Configure Advanced Track Changes options

In Word, use the flyout option in the Tracking section of the ribbon.
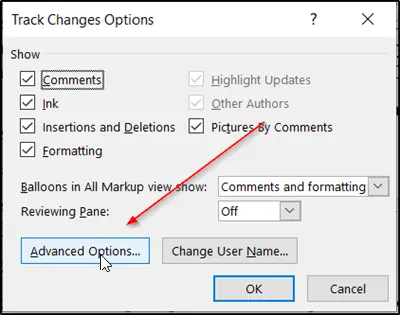
Next, click the ‘Advanced Options’ tab.
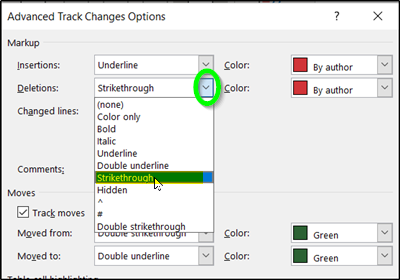
When the ‘Advanced Track Changes Options’ window opens, hit the Markup/Deletions pulldown menu item and from the list of options displayed, select ‘Strikethrough’.
Read: How to Strikethrough text in Word or Excel
2] Check ‘Show Markup’ section
Select the ‘Review’ tab from the ribbon menu of Microsoft Word and go to the ‘Tracking’ section.
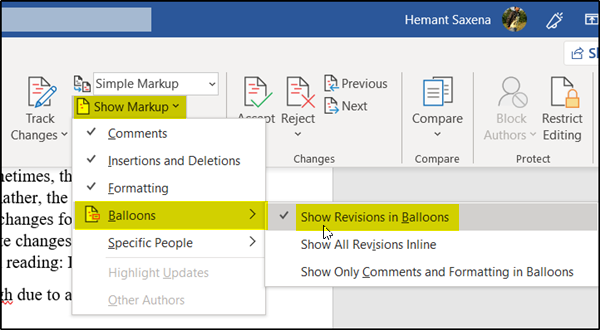
There, click the pull-down arrow, just adjacent to ‘Show Markup’ and uncheck the ‘Show revisions in Balloons’ option.
When you do so, the deleted text will be displayed as stricken rather than in the balloons.
The same procedure also works on Microsoft Word for Mac although there may be slight variations in the steps.
This post will show you how to track Changes and Comments in Microsoft Word.

A post-graduate in Biotechnology, Hemant switched gears to writing about Microsoft technologies and has been a contributor to TheWindowsClub since then. When he is not working, you can usually find him out traveling to different places or indulging himself in binge-watching.
To delete a page in Word, you usually place the cursor at the start of the page and press the delete/backspace key. But sometimes, you can’t seem to delete the page. And even if you can, the formatting of the page gets disrupted.
It generally happens when you use the Enter key multiple times to go to a new page. However, deleting a page is much easier if you have used page breaks or section breaks.
So, without further delay, let’s get into the article to learn more about how to delete an unwanted page in Word.
How to Fix a Page that Won’t Delete in Word?
This issue is more frequently seen on a blank page. Also, you can face the problem if you have a table in your document.
One method is to decrease the font size until everything is sorted. But, it doesn’t always work as expected. Nonetheless, you can go through the various fixes mentioned below to delete the pages appropriately.
Search and Delete the Page in Word
You can reveal the invisible paragraph markers and page breaks and then delete them to remove an unwanted page. Refer to the following steps below to do it.
Use the Navigation Pane to Find Pages Quickly
Usually, you can delete a page in normal view. Otherwise, you can use the navigation pane to view all the blank pages in the document.
Here’s how you can do it.
- Click the View tab from the top menu.
- Then, enable the Navigation Pane checkbox. Alternatively, you can use the shortcut key;
Ctrl + Fon Windows andCommand + Fon Mac.

Show All the Formatting Marks
Now, unhide the invisible page breaks and then use them to delete specific pages. You can do it as follows.
- Click the Home tab.
- Inside the Paragraph group, enable the pilcrow symbol (which looks like a backward P letter).

- Alternatively, you can use the keyboard shortcuts Ctrl + Shift + 8 and Command + 8 for Windows and Mac, respectively.

Delete an Empty Page with Page Breaks
Select the “Page Break” mark on your pages and delete it using the backspace/delete key to remove the entire blank page.

Alternatively, use the Find and Replace feature to find all the page breaks in the document. Then, you can use them to delete all the blank pages at once or only delete a particular page.
For this,
- Press the Ctrl + H.
- Under the Replace tab, type
^mand leave the Replace with field empty.
- Click Replace All to remove all the blank pages created with page breaks. And click the Find Next button and click Replace to delete specific pages with page breaks.

However, if you don’t see the page breaks but find extra empty spaces on your pages, it means you have used the Enter key multiple times. So, to remove them, select and delete the paragraph markers.
Delete Non-Empty Pages
You can also delete a specific page on your document as follows.
- First, navigate to the page you want to delete and place the keyboard cursor anywhere on that page. You can use the navigation pane to find a specific page quickly.
- Press
Ctrl + GorOption + Command + Gfor Windows and Mac, respectively. - Now, under Enter the page number, type page, and click Go To. This will select all the text (empty or non-empty) on the page. Click the Close button.

- Next, press the Delete/Backspace key to delete the page.

Delete a Page after a Table
Since Word automatically adds a paragraph at the end of a table, it can cause an extra blank page to appear at the end of the document.
And, even if you press the delete or backspace key, the page won’t get deleted.
To resolve the issue, you can adjust the properties of the paragraph marker that Word inserted. Here’s how you can do it.
- Click the Home tab.
- Then, right-click in front of the paragraph marker, and choose the Paragraph option.

- Now, click the Indents and Spacing tab.
- Next, under the Spacing section, set 0pt for Before and After field. And set the Line spacing to Exactly and the At value to 1pt.


Alternatively, select the pilcrow and decrease its font size until it moves to the page above it. You can use the following shortcut keys to decrease the font size.
- Windows: Ctrl + Shift +
- Mac: Command + Shift + <
Save/Convert the Word Document as a Pdf
While formatting the Word document can get complicated, you can use this workaround to eliminate the unwanted page.
Here, we save the Word as a pdf to use the page range option and edit the pdf instead of the Word file. Here’s how you can do it.
- Open your Word document.
- Then, navigate to File > Save As.
- Browse a location to save.
- Next to the Save as type field, expand the dropdown and select the PDF option.

- Then, click the Options button and select Page(s) under the Page range section. You can find the total number of pages in the bottom left corner of your document.
- Now, enter the page range except the last page(i.e., Total Pages -1) and click OK.


Furthermore, you can right-click on the pdf and open it with the Word app. Alternatively, you can use various PDF editors to delete a page after converting the Word document to a pdf.
Remove a Blank Page in the Middle of the Word Document
If removing a blank page breaks the document’s normal flow and formatting, you most likely have a section break.
So, you can modify the section break settings to keep the formatting as is and avoid a blank page simultaneously. Here’s how you can do it.
- Enable the Show all the formatting marks as mentioned in the above sections.
- Place the cursor before the section break.
- Now, under the Layout tab, click and open the Page Setup dialog (looks like a diagonal arrow).

- Then, under the Layout tab, set the Section start to Continuous.

- Click OK and see if the unwanted page gets deleted without affecting your document flow.


EcityWorks — Land The Perfect Job. Get Hired
We’re on a mission to help job seekers choose the right career path and provide the optimum solution to find great talents for recruiters.
Top Blogs
We created useful articles about recruitment, interview tips and updated the biggest trends in the job markets.
4.2
So you’ve landed an interview for your dream job. Congrats! This is your chance to show the hiring manager why you’re the perfect candidate for the posi
4.1
The job market is more competitive than ever. In order to stand out amongst the sea of other job seekers, you need to have a solid game plan. Just blindly submi
4.3
There are a lot of unemployed people out there right now. The economy is tough, and jobs are scarce. If you’re one of the many people who are currently look
4.6
Wondering what the future of work will look like? You’re not alone. With so much uncertainty in the world, it’s normal to feel a little anxious about wh
4.5
If you’ve been reading about Generation Z in the workplace, you know that it’s a big deal. With more than 1 million people entering the workforce every
4.4
2021 was a year of industry resurgence in the wake of the Covid-19 pandemic, it was also a year of numerous firsts. As more businesses adjusted their organizati