
Home / VBA / How to DELETE a SHEET using VBA in Excel
To delete a sheet using VBA, you need to use the VBA Delete method. You need to specify the sheet that you want to delete and then use this method. Let’s say if you want to delete the “Sheet1”, then you need to mention sheet1 and then type a dot (.) and in the end, type “Delete”.

In this tutorial, we will see different ways that you can use to delete a sheet using a VBA code. Make sure to have the developer tab on the ribbon from here you can get into the visual basic editor.
Delete a Sheet using its Name
Each sheet has a name, and you can use write a code to delete a sheet using the name. So, let’s say you want to delete the worksheet “Data”, the code would be:
Sub vba_delete_sheet()
Sheets("Data").Delete
End Sub
- When you delete a worksheet, Excel shows a message to confirm if you want to remove it or wish to cancel. And when you use a VBA code, in that case, Excel will also do that.

To deal with this, you can turn OFF the screen updating to delete a sheet and then turn it ON.
Application.DisplayAlerts = False
Sheets("Data").Delete
Application.DisplayAlerts = True
Now let’s say you want to use a cell value to use the name of the worksheet. In that case, you need to use the VBA range object to do that.

Delete the Sheet using the Sheet Number
That’s right. You can use the sheet’s number to delete it. Here’s the code.
Sub vba_delete_sheet()
Sheets(1).Delete
End Sub
Delete the ActiveSheet
To delete the active sheet, you can use the “ActiveSheet” object instead of using the sheet name to specify the sheet.
ActiveSheet.Delete
As I said, it deletes the active sheet, and you can activate it before removing it. But necessarily, you don’t need to do that as you can refer to a sheet and delete it as we have seen at the start of this tutorial.
Check if Sheet Exists before Deleting
You can also write code in a way that it can check if the sheet exists or not and then deletes it.
Sub check_sheet_delete()
Dim ws As Worksheet
Dim mySheet As Variant
mySheet = InputBox("enter sheet name")
Application.DisplayAlerts = False
For Each ws In ThisWorkbook.Worksheets
    If mySheet = ws.Name Then
      ws.Delete
    End If
Next ws
Application.DisplayAlerts = True
End Sub
In this code, you have FOR EACH to loop through all the worksheets. And then, an IF STATEMENT to delete the sheet if its name is equal to the name you have typed in the input box.
Delete All the Worksheets in Workbook
I’m sure you have this question in your mind, but I’m afraid it’s impossible to delete all the worksheets that you have in the workbook. You must have at least one worksheet left.
But I have found a solution to this problem. You can insert a new sheet that’s a blank one and then delete all which are already there.
Here’s the code: This code adds a new sheet and deletes all the other sheets.
Sub vba_delete_all_worksheets()
Dim ws As Worksheet
Dim mySheet As String
mySheet = "BlankSheet-" & Format(Now, "SS")
Sheets.Add.Name = mySheet
Application.DisplayAlerts = False
For Each ws In ThisWorkbook.Worksheets
    If ws.Name <> mySheet Then
      ws.Delete
    End If
Next ws
Application.DisplayAlerts = True
End Sub
More Tutorials on VBA Worksheets
- Back to VBA Worksheet / VBA Tutorial
I have a macros that generates a number of workbooks. I would like the macros, at the start of the run, to check if the file contains 2 spreadsheets, and delete them if they exist.
The code I tried was:
If Sheet.Name = "ID Sheet" Then
    Application.DisplayAlerts = False
    Sheet.Delete
    Application.DisplayAlerts = True

End If

If Sheet.Name = "Summary" Then
    Application.DisplayAlerts = False
    Sheet.Delete
    Application.DisplayAlerts = True
End If
This code is returning an error:
run time error #424, object required.
I probably have the wrong formatting, but if there is an easier way to do this, it would be very useful.
![]()
shA.t
16.4k5 gold badges53 silver badges111 bronze badges
asked Jul 17, 2015 at 11:59
![]()
1
Consider:
Sub SheetKiller()
    Dim s As Worksheet, t As String
    Dim i As Long, K As Long
    K = Sheets.Count

    For i = K To 1 Step -1
        t = Sheets(i).Name
        If t = "ID Sheet" Or t = "Summary" Then
            Application.DisplayAlerts = False
                Sheets(i).Delete
            Application.DisplayAlerts = True
        End If
    Next i
End Sub
NOTE:
Because we are deleting, we run the loop backwards.
answered Jul 17, 2015 at 12:08
![]()
Gary’s StudentGary’s Student
95.3k9 gold badges58 silver badges98 bronze badges
Try this code:
For Each aSheet In Worksheets

    Select Case aSheet.Name

        Case "ID Sheet", "Summary"
            Application.DisplayAlerts = False
            aSheet.Delete
            Application.DisplayAlerts = True

    End Select

Next aSheet
answered Jul 17, 2015 at 12:07
![]()
R.KatnaanR.Katnaan
2,4764 gold badges23 silver badges35 bronze badges
You could use On Error Resume Next then there is no need to loop through all the sheets in the workbook.
With On Error Resume Next the errors are not propagated, but are suppressed instead. So here when the sheets does’t exist or when for any reason can’t be deleted, nothing happens. It is like when you would say : delete this sheets, and if it fails I don’t care. Excel is supposed to find the sheet, you will not do any searching.
Note: When the workbook would contain only those two sheets, then only the first sheet will be deleted.
Dim book
Dim sht as Worksheet

set book= Workbooks("SomeBook.xlsx")

On Error Resume Next

Application.DisplayAlerts=False

Set sht = book.Worksheets("ID Sheet")
sht.Delete

Set sht = book.Worksheets("Summary")
sht.Delete

Application.DisplayAlerts=True

On Error GoTo 0
answered Jul 17, 2015 at 12:24
![]()
Daniel DušekDaniel Dušek
13.6k5 gold badges35 silver badges51 bronze badges
5
Worksheets("Sheet1").Delete
Worksheets("Sheet2").Delete
![]()
maazza
6,92615 gold badges61 silver badges95 bronze badges
answered Feb 2, 2017 at 16:43
![]()
try this within your if statements:
Application.DisplayAlerts = False
Worksheets(“Sheetname”).Delete
Application.DisplayAlerts = True
answered Jul 17, 2015 at 12:04
![]()
LuuklagLuuklag
3,90711 gold badges39 silver badges57 bronze badges
4
 In this VBA Tutorial, you learn how to delete sheets in Excel (in different ways) with macros.
This VBA Tutorial is accompanied by Excel workbooks containing the data and macros I use in the examples below. You can get immediate free access to these example workbooks by subscribing to the Power Spreadsheets Newsletter.
Use the following Table of Contents to navigate to the section you’re interested in.
Related VBA and Macro Tutorials
The following VBA and macro tutorials may help you better understand and implement the contents below:
- General VBA constructs and structures:
- Learn about commonly-used VBA terms here.
- Learn how to work with the Visual Basic Editor (VBE) here.
- Learn how to create and work with VBA Sub procedures here.
- Learn how to work with object methods here.
- Learn how to declare and work with variables here.
- Learn how to work with data types here.
- Learn how to work with arrays here.
- Practical VBA applications and macro examples:
- Learn other operations you can carry out when working with Excel worksheets here.
You can find additional VBA and Macro Tutorials in the Archives.
#1: Delete Sheet by Position
VBA Code to Delete Sheet by Position
To delete a sheet by its position using VBA, use a statement with the following structure:
Sheets(SheetIndex).Delete
Process Followed by VBA Code to Delete Sheet by Position

VBA Statement Explanation
- Item: Sheets.
- VBA Construct: Workbook.Sheets property.
- Description: The Workbook.Sheets property returns a Sheets collection representing all the sheets within the workbook you deal with. Identify a single object from this Sheets collection by specifying the appropriate index number (SheetIndex).
When deleting a worksheet, you can work with the Workbook.Worksheets property. Workbook.Worksheets represents a Sheets collection representing all worksheets within the workbook you deal with.
When deleting a chart sheet, you can work with the Workbook.Charts property. Workbook.Charts returns a Sheets collection representing all chart sheets within the workbook you deal with.
- Item: SheetIndex.
- VBA Construct: Index parameter/number of the sheet you want to delete.
- Description: The Index parameter/number of a sheet allows you to identify a single object (worksheet or chart sheet) from the Sheets collection you work with.
The Index parameter/number represents the position of the sheet, worksheet or chart sheet in the tab bar of the workbook you deal with, from left to right. For example, 1 is the first (leftmost) sheet/worksheet/chart sheet.
When specifying the Index parameter/number, consider the following:
- The count usually includes hidden sheets/worksheets/chart sheets as well.
- If you’re working with the Workbook.Worksheets property, the count includes worksheets but not chart sheets.
- If you’re working with the Workbook.Charts property, the count includes chart sheets but not worksheets.
If you explicitly declare a variable to represent SheetIndex, use the Long data type.
- Item: Delete.
- VBA Construct: Worksheet.Delete method or Chart.Delete method.
- Description: The Delete method deletes the object (worksheet or chart sheet) you identify with Sheets(SheetIndex).
When you delete a sheet with the Delete method, Excel usually displays (by default) a dialog box asking the user to confirm the deletion. Please refer to the appropriate section below to delete a sheet with no prompt.
Macro Example to Delete Sheet by Position
The following macro deletes the first sheet (Sheets(mySheetIndex)) in the workbook where the macro is stored (ThisWorkbook). The macro suppresses the prompt that asks the user to confirm the sheet deletion (Application.DisplayAlerts = False).
Sub deleteSheet()

    'Source: https://powerspreadsheets.com/
    'For further information: https://powerspreadsheets.com/excel-vba-delete-sheet/

    'declare variable to hold index number of sheet you want to delete
    Dim mySheetIndex As Long

    'specify index number of sheet you want to delete
    mySheetIndex = 1

    'suppress the dialog box that asks the user to confirm the sheet deletion
    Application.DisplayAlerts = False

    'identify sheet you want to delete, and delete it
    ThisWorkbook.Sheets(mySheetIndex).Delete

    're-enable the display of alerts and messages
    Application.DisplayAlerts = True

End Sub
Effects of Executing Macro Example to Delete Sheet by Position
The following GIF illustrates the results of executing the macro example. The first sheet in the workbook (Sheet1) is deleted.

#2: Delete Active Sheet
VBA Code to Delete Active Sheet
To delete the active sheet with VBA, use a statement with the following structure:
ActiveSheet.Delete
Process Followed by VBA Code to Delete Active Sheet

VBA Statement Explanation
- Item: ActiveSheet.
- VBA Construct: Application.ActiveSheet property.
- Description: The Application.ActiveSheet property returns an object representing the active sheet.
- Item: Delete.
- VBA Construct: Worksheet.Delete method or Chart.Delete method.
- Description: The Delete method deletes the object (worksheet or chart sheet) returned by ActiveSheet (the active sheet).
When you delete a sheet with the Delete method, Excel usually displays (by default) a dialog box asking the user to confirm the deletion. Please refer to the appropriate section below to delete a sheet with no prompt.
Macro Example to Delete Active Sheet
The following macro deletes the active sheet (ActiveSheet). The macro suppresses the prompt that asks the user to confirm the sheet deletion (Application.DisplayAlerts = False).
Sub deleteActiveSheet()

    'Source: https://powerspreadsheets.com/
    'For further information: https://powerspreadsheets.com/excel-vba-delete-sheet/

    'suppress the dialog box that asks the user to confirm the sheet deletion
    Application.DisplayAlerts = False

    'identify active sheet, and delete it
    ActiveSheet.Delete

    're-enable the display of alerts and messages
    Application.DisplayAlerts = True

End Sub
Effects of Executing Macro Example to Delete Active Sheet
The following GIF illustrates the results of executing the macro example. The active sheet (Sheet2) is deleted.

#3: Delete Sheet by Name
VBA Code to Delete Sheet by Name
To delete a sheet by name using VBA, use a statement with the following structure:
Sheets(SheetName).Delete
Process Followed by VBA Code to Delete Sheet by Name

VBA Statement Explanation
- Item: Sheets.
- VBA Construct: Workbook.Sheets property.
- Description: The Workbook.Sheets property returns a Sheets collection representing all the sheets within the workbook you deal with. Identify a single object from this Sheets collection by specifying the appropriate name (SheetName).
When deleting a worksheet, you can work with the Workbook.Worksheets property. Workbook.Worksheets represents a Sheets collection representing all worksheets within the workbook you deal with.
When deleting a chart sheet, you can work with the Workbook.Charts property. Workbook.Charts returns a Sheets collection representing all chart sheets within the workbook you deal with.
- Item: SheetName.
- VBA Construct: Name of the sheet you want to delete.
- Description: The name of a sheet allows you to identify a single object (worksheet or chart sheet) from the Sheets collection you work with.
For these purposes, the sheet name is that displayed in the tab of the worksheet or chart sheet. If you explicitly declare a variable to represent SheetName, use the String data type.
- Item: Delete.
- VBA Construct: Worksheet.Delete method or Chart.Delete method.
- Description: The Delete method deletes the object (worksheet or chart sheet) you identify with Sheets(SheetName).
When you delete a sheet with the Delete method, Excel usually displays (by default) a dialog box asking the user to confirm the deletion. Please refer to the appropriate section below to delete a sheet with no prompt.
Macro Example to Delete Sheet by Name
The following macro deletes the sheet named “delete Sheet” (Sheets(mySheetName)) in the workbook where the macro is stored (ThisWorkbook). The macro suppresses the prompt that asks the user to confirm the sheet deletion (Application.DisplayAlerts = False).
Sub deleteSheetByName()

    'Source: https://powerspreadsheets.com/
    'For further information: https://powerspreadsheets.com/excel-vba-delete-sheet/

    'declare variable to hold name of sheet you want to delete
    Dim mySheetName As String

    'specify name of sheet you want to delete
    mySheetName = "delete sheet"

    'suppress the dialog box that asks the user to confirm the sheet deletion
    Application.DisplayAlerts = False

    'identify sheet you want to delete, and delete it
    ThisWorkbook.Sheets(mySheetName).Delete

    're-enable the display of alerts and messages
    Application.DisplayAlerts = True

End Sub
Effects of Executing Macro Example to Delete Sheet by Name
The following GIF illustrates the results of executing the macro example. The sheet named “delete sheet” is deleted.

#4: Delete Sheet Without Prompt or Warning
VBA Code to Delete Sheet Without Prompt or Warning
To delete a sheet without Excel displaying the usual prompt (warning) with VBA, use a macro with the following statement structure:
Application.DisplayAlerts = False
Sheets(SheetName).Delete
Application.DisplayAlerts = True
Process Followed by VBA Code to Delete Sheet Without Prompt or Warning

VBA Statement Explanation
Lines #1 and #3: Application.DisplayAlerts = False | Application.DisplayAlerts = True
- Item: Application.DisplayAlerts.
- VBA Construct: Application.DisplayAlerts property.
- Description: The Application.DisplayAlerts property allows you to specify whether Excel displays alerts and messages while the macro is running. When you delete a sheet, the main alert that Excel usually displays (and you want to handle) is the dialog box that prompts the user to confirm the sheet deletion.

The default value of the Application.DisplayAlerts property is True. In such cases, Excel displays the dialog box prompting the user to confirm the sheet deletion.
- Item: False.
- VBA Construct: New property value of Application.DisplayAlerts property.
- Description: When you delete a sheet, you can suppress the dialog box that prompts the user to confirm the sheet deletion, by setting the Application.DisplayAlerts property to False.
When you set Application.DisplayAlerts to False and Excel requires a response, Excel chooses the default response. When you delete a sheet, the default response to the dialog box prompting the user to confirm the sheet deletion is “Delete”. This results in Excel deleting the sheet.
- Item: True.
- VBA Construct: New property value of Application.DisplayAlerts property.
- Description: The default value of the Application.DisplayAlerts property is True. This results in Excel displaying alerts and messages while a macro is running.
Generally, when you set Application.DisplayAlerts to False, Excel sets the property back to True upon finishing macro execution. Since there are exceptions (such as executing cross-process code), you can explicitly set Application.DisplayAlerts back to True after deleting the sheet.

Line #2: Sheets(SheetName).Delete
- Item: Sheets.
- VBA Construct: Workbook.Sheets property.
- Description: The Workbook.Sheets property returns a Sheets collection representing all the sheets within the workbook you deal with. Identify a single object from this Sheets collection by specifying the appropriate name (SheetName).
When deleting a worksheet, you can work with the Workbook.Worksheets property. Workbook.Worksheets represents a Sheets collection representing all worksheets within the workbook you deal with.
When deleting a chart sheet, you can work with the Workbook.Charts property. Workbook.Charts returns a Sheets collection representing all chart sheets within the workbook you deal with.
- Item: SheetName.
- VBA Construct: Name of the sheet you want to delete.
- Description: The name of a sheet allows you to identify a single object (worksheet or chart sheet) from the Sheets collection you work with.
For these purposes, the sheet name is that displayed in the tab of the worksheet or chart sheet. If you explicitly declare a variable to represent SheetName, use the String data type.
- Item: Delete.
- VBA Construct: Worksheet.Delete method or Chart.Delete method.
- Description: The Delete method deletes the object (worksheet or chart sheet) you identify with Sheets(SheetName).
Macro Example to Delete Sheet Without Prompt or Warning
The following macro deletes the sheet named “delete sheet no prompt” (Sheets(mySheetName)) in the workbook where the macro is stored (ThisWorkbook) without displaying the prompt that asks the user to confirm the sheet deletion (Application.DisplayAlerts = False).
Sub deleteSheetNoPrompt()

    'Source: https://powerspreadsheets.com/
    'For further information: https://powerspreadsheets.com/excel-vba-delete-sheet/

    'declare variable to hold name of sheet you want to delete
    Dim mySheetName As String

    'specify name of sheet you want to delete
    mySheetName = "delete sheet no prompt"

    'suppress the dialog box that asks the user to confirm the sheet deletion
    Application.DisplayAlerts = False

    'identify sheet you want to delete, and delete it
    ThisWorkbook.Sheets(mySheetName).Delete

    're-enable the display of alerts and messages
    Application.DisplayAlerts = True

End Sub
Effects of Executing Macro Example to Delete Sheet Without Prompt or Warning
The following GIF illustrates the results of executing the macro example. The sheet named “delete sheet no prompt” is deleted without a prompt or warning.

#5: Delete Sheet if it Exists
VBA Code to Delete Sheet if it Exists
To delete a sheet if it exists with VBA, use a macro with the following statement structure:
On Error Resume Next
Sheets(SheetName).Delete
On Error GoTo 0
Process Followed by VBA Code to Delete Sheet if it Exists

VBA Statement Explanation
Line #1: On Error Resume Next
- Item: On Error Resume Next.
- VBA Construct: On Error Resume Next statement.
- Description: The On Error Resume Next statement specifies that, if an error occurs, control goes to the statement immediately following the statement where the error occurs. Execution continues at that statement that follows that where the error occurs.
“Sheets(SheetName).Delete” usually returns run-time error 9 (subscript out of range) when the sheet identified by Sheets(SheetName) doesn’t exist. Without the On Error Resume Next statement, such error results in Excel displaying an error message and stopping macro execution.
Therefore:
- If the sheet named SheetName exists, Excel deletes the sheet as specified by “Sheets(SheetName).Delete”.
- If the sheet named SheetName doesn’t exist, execution of the macro continues on the statement following “Sheet(SheetName).Delete”. Due to the On Error Resume Next statement, Excel handles the run-time error.
Line #2: Sheets(SheetName).Delete
- Item: Sheets.
- VBA Construct: Workbook.Sheets property.
- Description: The Workbook.Sheets property returns a Sheets collection representing all the sheets within the workbook you deal with. Identify a single object from this Sheets collection by specifying the appropriate name (SheetName).
When deleting a worksheet, you can work with the Workbook.Worksheets property. Workbook.Worksheets represents a Sheets collection representing all worksheets within the workbook you deal with.
When deleting a chart sheet, you can work with the Workbook.Charts property. Workbook.Charts returns a Sheets collection representing all chart sheets within the workbook you deal with.
- Item: SheetName.
- VBA Construct: Name of the sheet you want to delete.
- Description: The name of a sheet allows you to identify a single object (worksheet or chart sheet) from the Sheets collection you work with.
For these purposes, the sheet name is that displayed in the tab of the worksheet or chart sheet. If you explicitly declare a variable to represent SheetName, use the String data type.
- Item: Delete.
- VBA Construct: Worksheet.Delete method or Chart.Delete method.
- Description: The Delete method deletes the object (worksheet or chart sheet) you identify with Sheets(SheetName).
When you delete a sheet with the Delete method, Excel usually displays (by default) a dialog box asking the user to confirm the deletion. Please refer to the appropriate section above to delete a sheet with no prompt.
Line #3: On Error GoTo 0
- Item: On Error GoTo 0.
- VBA Construct: On Error GoTo 0 statement.
- Description: The On Error GoTo 0 statement disables the error handling specified by the On Error Resume Next statement. If you omit the On Error GoTo 0 statement, Excel generally disables the error handler automatically when exiting the procedure.
Macro Example to Delete Sheet if it Exists
The following macro deletes the sheet named “delete sheet if exists” (Sheets(mySheetName)) in the workbook where the macro is stored (ThisWorkbook), if such sheet exists. If the sheet doesn’t exist, the macro handles the error. The macro suppresses the prompt that asks the user to confirm the sheet deletion (Application.DisplayAlerts = False).
Sub deleteSheetIfExists()

    'Source: https://powerspreadsheets.com/
    'For further information: https://powerspreadsheets.com/excel-vba-delete-sheet/

    'declare variable to hold name of sheet you want to delete
    Dim mySheetName As String

    'specify name of sheet you want to delete
    mySheetName = "delete sheet if exists"

    'suppress the dialog box that asks the user to confirm the sheet deletion
    Application.DisplayAlerts = False

    'enable error handling to deal with error that occurs when (if) you try to delete a sheet that doesn't exist
    On Error Resume Next

    'identify sheet you want to delete, and delete it
    ThisWorkbook.Sheets(mySheetName).Delete

    'disable error handling
    On Error GoTo 0

    're-enable the display of alerts and messages
    Application.DisplayAlerts = True

End Sub
Effects of Executing Macro Example to Delete Sheet if it Exists
The following GIF illustrates the results of executing the macro example. The sheet named “delete sheet if exists” is deleted.

#6: Delete Multiple Sheets
VBA Code to Delete Multiple Sheets
To delete multiple sheets with VBA, use a statement with the following structure:
Sheets(Array(SheetsList)).Delete
Process Followed by VBA Code to Delete Multiple Sheets

VBA Statement Explanation
- Item: Sheets.
- VBA Construct: Workbook.Sheets property.
- Description: The Workbook.Sheets property returns a Sheets collection representing all the sheets within the workbook you deal with. Identify a single object from this Sheets collection by specifying the appropriate name (SheetName).
When deleting worksheets, you can work with the Workbook.Worksheets property. Workbook.Worksheets represents a Sheets collection representing all worksheets within the workbook you deal with.
When deleting chart sheets, you can work with the Workbook.Charts property. Workbook.Charts returns a Sheets collection representing all chart sheets within the workbook you deal with.
- Item: Array(…).
- VBA Construct: Array function.
- Description: The Array function returns a Variant containing an array.
- Item: SheetsList.
- VBA Construct: Argument list of Array function.
- Description: A comma-delimited list of the values you assign to each of the array elements.
You can generally identify specific objects from the Sheets collection you work with using an index number or the sheet name, as follows:
- The index number represents the position of a sheet, worksheet or chart sheet in the tab bar of the workbook you deal with, from left to right. For example, 1 is the first (leftmost) sheet/worksheet/chart sheet.
When specifying the Index parameter/number, consider the following:
- The count usually includes hidden sheets/worksheets/chart sheets as well.
- If you’re working with the Workbook.Worksheets property, the count includes worksheets but not chart sheets.
- If you’re working with the Workbook.Charts property, the count includes chart sheets but not worksheets.
- The sheet name is that displayed in the tab of the worksheet or chart sheet.
- The index number represents the position of a sheet, worksheet or chart sheet in the tab bar of the workbook you deal with, from left to right. For example, 1 is the first (leftmost) sheet/worksheet/chart sheet.
- Item: Delete.
- VBA Construct: Worksheet.Delete method or Chart.Delete method.
- Description: The Delete method deletes the object (worksheets or chart sheets) you identify with Sheets(Array(SheetsList)).
When you delete a sheet with the Delete method, Excel usually displays (by default) a dialog box asking the user to confirm the deletion. Please refer to the appropriate section above to delete a sheet with no prompt.
Macro Example to Delete Multiple Sheets
The following macro deletes (i) the first 2 sheets, and (ii) the sheets named “delete multiple sheets 1” and “delete multiple sheets 2” (Sheets(mySheetNames)), in the workbook where the macro is stored (ThisWorkbook). The macro suppresses the prompt that asks the user to confirm the sheet deletion (Application.DisplayAlerts = False).
Sub deleteMultipleSheets()

    'Source: https://powerspreadsheets.com/
    'For further information: https://powerspreadsheets.com/excel-vba-delete-sheet/

    'declare variable to hold Variant containing array whose elements are the index numbers or names of the sheets you want to delete
    Dim mySheetNames() As Variant

    'specify (using index numbers or names) the sheets you want to delete
    mySheetNames = Array(1, 2, "delete multiple sheets 1", "delete multiple sheets 2")

    'suppress the dialog box that asks the user to confirm the sheet deletion
    Application.DisplayAlerts = False

    'identify sheets you want to delete, and delete them
    ThisWorkbook.Sheets(mySheetNames).Delete

    're-enable the display of alerts and messages
    Application.DisplayAlerts = True

End Sub
Effects of Executing Macro Example to Delete Multiple Sheets
The following GIF illustrates the results of executing the macro example. The (i) the first 2 sheets (Sheet6 and Sheet7), and (ii) the sheets named “delete multiple sheets 1” and “delete multiple sheets 2”, are deleted.

References to VBA Constructs Used in this VBA Tutorial
Use the following links to visit the appropriate webpage in the Microsoft Developer Network:
- Identify workbook containing sheets, worksheets or chart sheets to delete:
- Application.ThisWorkbook property.
- Application.ActiveWorkbook property.
- Application.Workbooks property.
- Workbook object.
- Identify sheets, worksheets and chart sheets:
- Workbook.Sheets property.
- Application.ActiveSheet property.
- Sheets object.
- Workbook.Worksheets property.
- Worksheet object.
- Workbook.Charts property.
- Chart object.
- Delete sheets, worksheets and chart sheets:
- Worksheet.Delete method.
- Chart.Delete method.
- Prevent Excel from displaying prompts or warnings when deleting a sheet, worksheet or chart sheet:
- Application.DisplayAlerts property.
- Handle errors:
- On Error statement.
- Create an array containing the names of several sheets, worksheets or chart sheets to delete:
- Array function.
- Work with variables and data types:
- Dim statement.
- = operator.
- Data types:
- Long data type.
- String data type.
- Variant data type.
We use a “Delete Worksheet” method to delete a sheet in VBA. To apply this method, first, we need to identify which sheet we are deleting by calling the sheet name. We have two methods to do the same. First, we directly write sheet1.delete; the second method is sheets(sheet1).delete.
Table of contents
- Excel VBA Delete Sheet
- How to Delete Excel Sheets using VBA Code?
- Example #1 – Delete Worksheet by using its Name
- Example #2 – Delete Worksheet by its Name with Variables
- Example #3 – Delete Active Worksheet
- Example #4 – Delete More than One Worksheet
- Recommended Articles
- How to Delete Excel Sheets using VBA Code?
So, the syntax follows.
Worksheets("Worksheet Name").Delete
OR
Sheets("Sheet Name").Delete
So, first, we need to specify the sheet name by using either Worksheet or Sheets Object, then later, we can use the “Delete” method.
How to Delete Excel Sheets using VBA Code?
You can download this VBA Delete Sheet Excel Template here – VBA Delete Sheet Excel Template
Example #1 – Delete Worksheet by using its Name
Assume you have many sheets. We need to mention the worksheet’s name to delete a particular worksheet. For example, we have 3 different sheets named “Sales 2016”, “Sales 2017”, and “Sales 2018”.
If we want to delete the sheet named “Sales 2017,” then we have to mention the sheet name like the below.
Code:
Sub Delete_Example1()

  Worksheets("sheets 2017").

End Sub
The problem with mentioning the worksheet name is that we do not get to see the IntelliSense list of VBA. So, anyways, mention the method as “Delete.”
Code:
Sub Delete_Example1()

  Worksheets("sheets 2017").Delete

End Sub
So this will delete the sheet named “Sales 2017“.
Error While Deleting the Worksheet: If we try to delete the worksheet that does not exist or mention the worksheet name wrongly, we will get the VBA error as “Subscript Out of Range.”
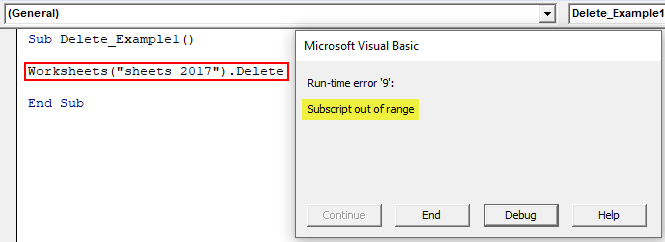
In the above, we got the “Subscript Out of Range” error because, in our workbook, there is no sheet name called “Sales 2017.”
Example #2 – Delete Worksheet by its Name with Variables
As we have seen in the above example, the moment we refer to the worksheet name by using the Worksheet object, we do not get to see the IntelliSense list. To get to see the IntelliSense list, we need to use variables.
Step 1: First, declare the variable as Worksheet.
Code:
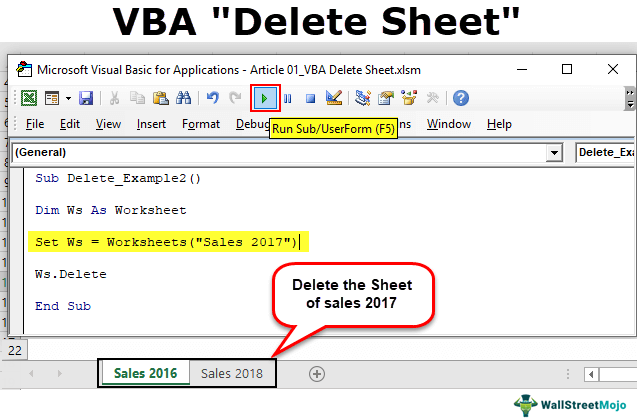
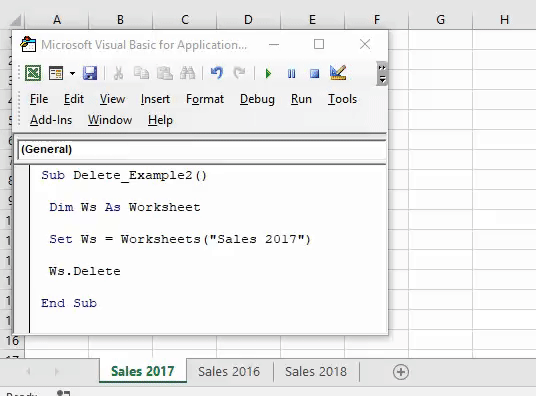
Sub Delete_Example2()

  Dim Ws As Worksheet

End Sub

Step 2: Since the worksheet is an object variable, we need to set the variable to the specific worksheet using the “SET” word.
Code:
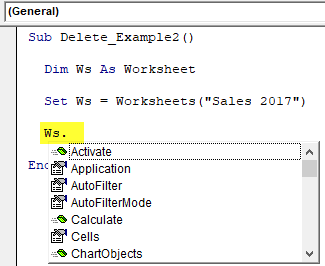
Sub Delete_Example2()

  Dim Ws As Worksheet

  Set Ws = Worksheets("Sales 2017")

End Sub

The variable “Ws” refers to the “Sales 2017” worksheet.
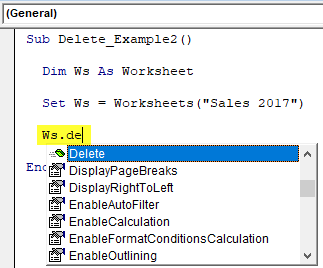
Step 3: Now, using the variable “Ws,” we can access all the IntelliSense lists of the worksheet.
Code:
Sub Delete_Example2()

  Dim Ws As Worksheet

  Set Ws = Worksheets("Sales 2017")

  Ws.

End Sub
Step 4: From the IntelliSense list, select the “Delete” method.
Code:
Sub Delete_Example2()

  Dim Ws As Worksheet

  Set Ws = Worksheets("Sales 2017")

  Ws.Delete

End Sub
Like this, using variables, we can access the IntelliSense list.
Example #3 – Delete Active Worksheet
ActiveSheet is nothing but whichever worksheet is active or selected at the moment. For this method, we need not mention the worksheet name. For example, look at the VBA codeVBA code refers to a set of instructions written by the user in the Visual Basic Applications programming language on a Visual Basic Editor (VBE) to perform a specific task.read more.
ActiveSheet.Delete
Right now, the active sheet is “Sales 2017”.

If we run the code, it will delete the active sheet, “Sales 2017.”
Now, we will select “Sales 2016.”

Now, it will delete the active sheet, “Sales 2016.”
Like this, we can use the “Active Sheet” object to delete the worksheet.
Note: To use this method, we must be sure what we are doing with the ActiveSheet and which sheet will be active.
Example #4 – Delete More than One Worksheet
In our above examples, we have seen how to delete a single sheet, but what if we have multiple worksheets? For example, let us say we want to delete 10 worksheets.
We cannot keep writing 10 lines of code to delete the worksheet, so we need to use loops to loop through the collection of worksheets and delete them.
The below code will loop through the worksheets and delete all the worksheets in the workbook.
Code:
Sub Delete_Example2()

  Dim Ws As Worksheet

  For Each Ws In ActiveWorkbook.Worksheets
    Ws.Delete
  Next Ws

End Sub
The above code will throw an error because it attempts to delete all the sheets in the workbook. So, to avoid this, we need to retain at least one worksheet.
If we want to delete all the worksheets except the active sheet, then we need to use the below code.
Code:
Sub Delete_Example2()

  Dim Ws As Worksheet

  For Each Ws In ActiveWorkbook.Worksheets
    If ActiveSheet.Name <> Ws.Name Then
      Ws.Delete
    End If
  Next Ws

End Sub
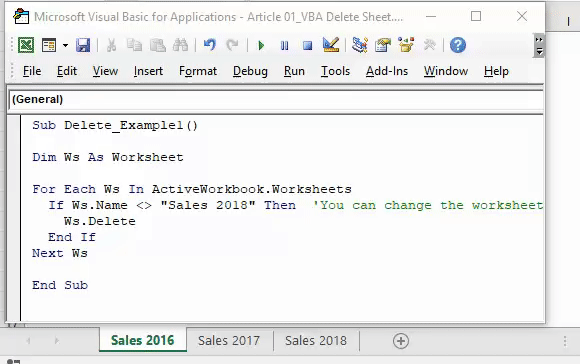
Similarly, we can use the code below if we do not want to delete a specific worksheet but all other worksheets.
Code:
Sub Delete_Example2()

 Dim Ws As Worksheet

 For Each Ws In ActiveWorkbook.Worksheets
   If Ws.Name <> "Sales 2018" Then 'You can change the worksheet name
     Ws.Delete
   End If
 Next Ws

End Sub
The above code will delete all the worksheets except the worksheet named “Sales 2018.”
Recommended Articles
This article has been a guide to VBA Delete Sheet. Here, we learn how to delete worksheets using VBA coding, practical examples, and a downloadable Excel template. You may also have a look at other articles related to Excel VBA: –
- What is VBA Message Box (Yes/No)?
- VBA Delete File
- Delete Row in VBA
- Protect Sheet with Excel VBA
- VBA ByRef
Excel VBA Delete Sheet
By this time, we all know how to Unprotect Sheet any sheet. VBA Delete sheet has the same way of writing code as an Unprotect sheet. VBA Delete Sheet, as the name says is used for deleting the selected worksheet automatically. For using the VBA Delete function to delete any sheet, first, we need to identify which sheet we want to delete. VBA Delete function works when we call the name of the sheet or sequence of that sheet and then use Delete function after that. Below is the syntax of the VBA Delete Sheet.
![]()
The above-shown syntax will be used in many different ways in upcoming examples.
How to Delete Sheet in Excel VBA?
We will learn how to Delete Sheet in Excel by using the VBA Code.
You can download this VBA Delete Sheet Example here – VBA Delete Sheet Example
VBA Delete Sheet – Example #1
In this example, we will see a simple way of deleting any worksheet. For this, follow the below steps:
Step 1: Open a Module from the Insert menu tab.
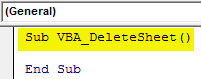
Step 2: Now write the subcategory of the VBA Delete Sheet. We can use any other name to define the code.
Code:
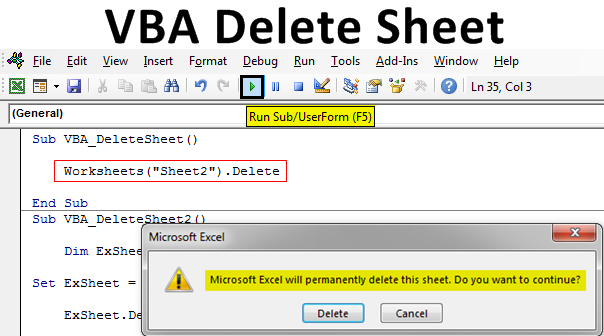
Sub VBA_DeleteSheet()

End Sub
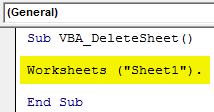
Step 3: Use Worksheets object and select the sheet which we want to delete. Here that sheet is named as Sheet1.
Code:
Sub VBA_DeleteSheet()

Worksheets("Sheet1").

End Sub
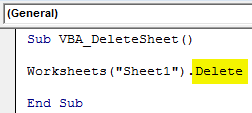
Step 4: Now use Delete function after the name of the selected Sheet.
Code:
Sub VBA_DeleteSheet()

Worksheets("Sheet1").Delete

End Sub
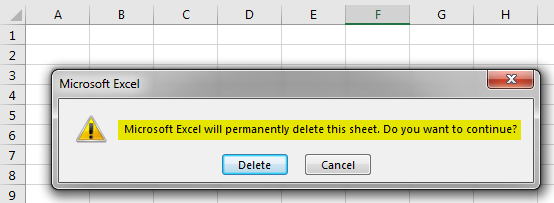
Step 5: Run the code by pressing the F5 key or by clicking on the Play Button.
We will see the system will prompt us with an Alert that excel will permanently delete the sheet. To proceed further click on Delete.
Step 6: We will see the sheet “Sheet1” is now deleted.
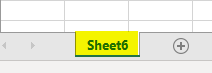
Step 7: Suppose, we try to delete a sheet that does not exist or if we end up putting an incorrect name. Below I tried to enter the name of the sheet which is not there in the excel file as shown below.
Code:
Sub VBA_DeleteSheet()

Worksheets("Sheet2").Delete

End Sub
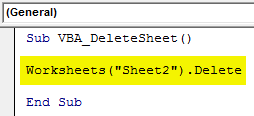
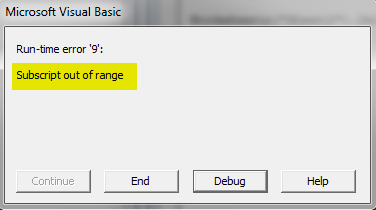
Step 8: Now run the code. We will see, VBA gives us the error “Subscript out of Range” which means we have selected a sheet that does not exist.
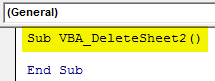
VBA Delete Sheet – Example #2
There is another way to implement VBA Delete Sheet. This is not as small code as the method which we have seen in Example-1. But also an easy way to implement. For this, follow the below steps:
Step 1: Write the subprocedure of the VBA Delete sheet as shown below.
Code:
Sub VBA_DeleteSheet2()

End Sub
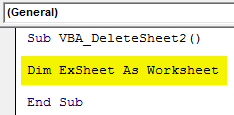
Step 2: Now select a variable for Worksheet with any name. Here we have chosen ExSheet as shown below.
Code:
Sub VBA_DeleteSheet2()

Dim ExSheet As Worksheet

End Sub
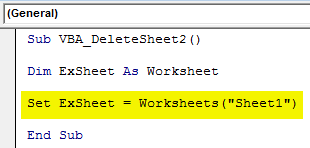
Step 3: Now Set the defined variable with the Worksheets function and there put the name of the sheet which we want to Delete. Here, again the sheet name is “Sheet1”.
Code:
Sub VBA_DeleteSheet2()

Dim ExSheet As Worksheet

Set ExSheet = Worksheets("Sheet1")

End Sub
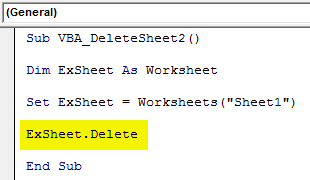
Step 4: Now assign the defined variable with Delete function as shown below.
Code:
Sub VBA_DeleteSheet2()

Dim ExSheet As Worksheet

Set ExSheet = Worksheets("Sheet1")

ExSheet.Delete

End Sub
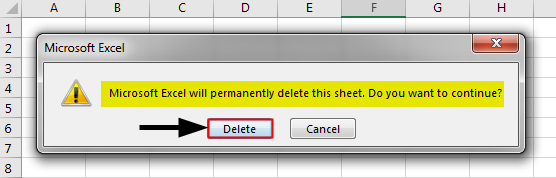
Step 5: Now run the code by pressing the F5 key or by clicking on the Play button.
We will again get a prompt message as we still want to proceed to delete the selected Sheet. Click on Delete to proceed.
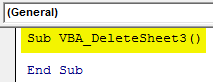
VBA Delete Sheet – Example #3
In this example, we will see, how to delete a sheet that is currently active. For this, follow the below steps.
Step 1: Write the subprocedure of the VBA Delete Sheet as shown below.
Code:
Sub VBA_DeleteSheet3()

End Sub
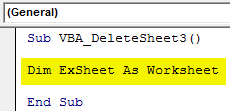
Step 2: Use the same line of code for declaring the variable as Worksheet as shown below which we have used in the above examples.
Code:
Sub VBA_DeleteSheet3()

Dim ExSheet As Worksheet

End Sub
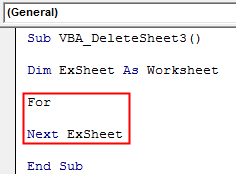
Step 3: Now open a For Next loop as shown below.
Code:
Sub VBA_DeleteSheet3()

Dim ExSheet As Worksheet

For

Next ExSheet

End Sub
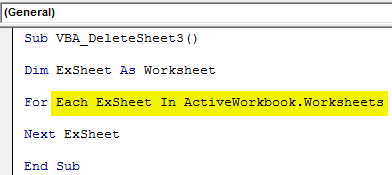
Step 4: Now we will select the active current worksheet from all the worksheets available in Excel Workbook.
Code:
Sub VBA_DeleteSheet3()

Dim ExSheet As Worksheet

For Each ExSheet In ActiveWorkbook.Worksheets

Next ExSheet

End Sub
Step 5: Once the currently opened worksheet is selected, we will use Delete function with variable ExSheet to delete that.
Code:
Sub VBA_DeleteSheet3()

Dim ExSheet As Worksheet

For Each ExSheet In ActiveWorkbook.Worksheets

ExSheet.Delete

Next ExSheet

End Sub
Step 6: Now compile the code and run it if there is no error found. This will delete the active worksheet from the opened workbook which is selected.
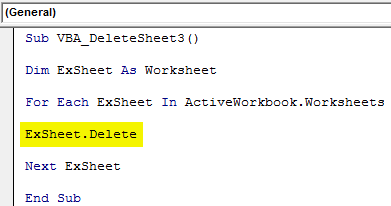
VBA Delete Sheet – Example #4
The code which we have seen in example-3 can also be seen in one more way. We can use If End If Loop along with the For Next loop.
Step 1: Let’s just consider the same code which we have seen in the above example-3.
Code:
Sub VBA_DeleteSheet4()

Dim ExSheet As Worksheet
For Each ExSheet In ActiveWorkbook.Worksheets
ExSheet.Delete
Next ExSheet

End Sub
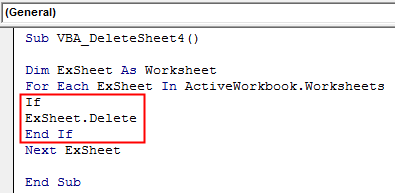
Step 2: This code deletes the sheet which is currently active. What if we improve this condition by selecting the sheet which is currently active and with the exact same name? Yes, for this we need to open If End If loop where we will write the condition for this just after For loop.
Code:
Sub VBA_DeleteSheet4()

Dim ExSheet As Worksheet
For Each ExSheet In ActiveWorkbook.Worksheets
If
ExSheet.Delete
End If
Next ExSheet

End Sub
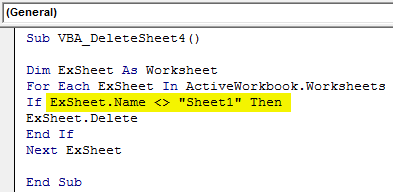
Step 3: Now write the condition in If loop as if the name of the sheet under variable ExSheet is equal and exact to “Sheet1” (Or any other sheet name), then Delete that sheet using variable ExSheet.
Code:
Sub VBA_DeleteSheet4()

Dim ExSheet As Worksheet
For Each ExSheet In ActiveWorkbook.Worksheets
If ExSheet.Name <> "Sheet1" Then
ExSheet.Delete
End If
Next ExSheet

End Sub
Step 4: We can compile the code here as there are many steps are involved. Then run the code after that.

Again we will get the prompt message where we still want to Delete that sheet or not. By clicking on Delete, it will delete the sheet which is selected.
Pros of Excel VBA Delete Sheet
- This is quite useful when we have a huge set of data in the different sheets which we need to delete quite often once the task is done.
- Code shown in example-1 is the easiest code to apply.
- We can even select more than one sheet which we want to delete.
Things to Remember
- We can choose the sequence of the sheet as well instead of the Sheet name which we want to delete.
- The reason behind getting the alert before deleting the sheet is that Excel prompts us to check if there is any data which we don’t want to lose.
- Once we are done with coding, save the excel file in Macro enable excel format to avoid losing the written code.
Recommended Articles
This is a guide to VBA Delete Sheet. Here we discuss how to Delete Sheet in Excel VBA along with practical examples and downloadable excel template. You can also go through our other suggested articles –
- VBA Collection
- VBA IF Statements
- VBA While Loop
- VBA Environ
Создание, копирование, перемещение и удаление рабочих листов Excel с помощью кода VBA. Методы Sheets.Add, Worksheet.Copy, Worksheet.Move и Worksheet.Delete.
Создание новых листов
Создание новых рабочих листов осуществляется с помощью метода Sheets.Add.
Синтаксис метода Sheets.Add
expression.Add [Before, After, Count, Type]
где expression — переменная, представляющая собой объект Sheet.
Компоненты метода Sheets.Add
- Before* — необязательный параметр типа данных Variant, указывающий на лист, перед которым будет добавлен новый.
- After* — необязательный параметр типа данных Variant, указывающий на лист, после которого будет добавлен новый.
- Count — необязательный параметр типа данных Variant, указывающий, сколько листов будет добавлено (по умолчанию — 1).
- Type — необязательный параметр типа данных Variant, указывающий тип листа: xlWorksheet** (рабочий лист) или xlChart (диаграмма), по умолчанию — xlWorksheet.
*Если Before и After не указаны, новый лист, по умолчанию, будет добавлен перед активным листом.
**Для создания рабочего листа (xlWorksheet) можно использовать метод Worksheets.Add, который для создания диаграмм уже не подойдет.
Примеры создания листов
|
1 2 3 4 5 6 7 8 9 10 11 12 13 14 15 16 17 18 19 20 |
‘Создание рабочего листа: Sheets.Add Worksheets.Add ThisWorkbook.Sheets.Add After:=ActiveSheet, Count:=2 Workbooks(«Книга1.xlsm»).Sheets.Add After:=Лист1 Workbooks(«Книга1.xlsm»).Sheets.Add After:=Worksheets(1) Workbooks(«Книга1.xlsm»).Sheets.Add After:=Worksheets(«Лист1») ‘Создание нового листа с заданным именем: Workbooks(«Книга1.xlsm»).Sheets.Add.Name = «Мой новый лист» ‘Создание диаграммы: Sheets.Add Type:=xlChart ‘Добавление нового листа перед ‘последним листом рабочей книги Sheets.Add Before:=Sheets(Sheets.Count) ‘Добавление нового листа в конец Sheets.Add After:=Sheets(Sheets.Count) |
- Лист1 в After:=Лист1 — это уникальное имя листа, указанное в проводнике редактора VBA без скобок.
- Лист1 в After:=Worksheets(«Лист1») — это имя на ярлыке листа, указанное в проводнике редактора VBA в скобках.
Создаваемый лист можно присвоить объектной переменной:
|
Dim myList As Object ‘В активной книге Set myList = Worksheets.Add ‘В книге «Книга1.xlsm» Set myList = Workbooks(«Книга1.xlsm»).Worksheets.Add ‘Работаем с переменной myList.Name = «Listok1» myList.Cells(1, 1) = myList.Name ‘Очищаем переменную Set myList = Nothing |
Если создаваемый лист присваивается объектной переменной, он будет помещен перед активным листом. Указать дополнительные параметры невозможно.
Копирование листов
Копирование рабочих листов осуществляется с помощью метода Worksheet.Copy.
Синтаксис метода Worksheet.Copy
expression.Copy [Before, After]
где expression — переменная, представляющая собой объект Worksheet.
Компоненты метода Worksheet.Copy
- Before* — необязательный параметр типа данных Variant, указывающий на лист, перед которым будет добавлена копия.
- After* — необязательный параметр типа данных Variant, указывающий на лист, после которого будет добавлена копия.
*Если Before и After не указаны, Excel создаст новую книгу и поместит копию листа в нее. Если скопированный лист содержит код в проекте VBA (в модуле листа), он тоже будет перенесен в новую книгу.
Примеры копирования листов
|
1 2 3 4 5 6 7 8 9 10 11 12 13 14 15 16 17 18 19 20 21 22 23 |
‘В пределах активной книги ‘(уникальные имена листов) Лист1.Copy After:=Лист2 ‘В пределах активной книги ‘(имена листов на ярлычках) Worksheets(«Лист1»).Copy Before:=Worksheets(«Лист2») ‘Вставить копию в конец Лист1.Copy After:=Sheets(Sheets.Count) ‘Из одной книги в другую Workbooks(«Книга1.xlsm»).Worksheets(«Лист1»).Copy _ After:=Workbooks(«Книга2.xlsm»).Worksheets(«Лист1») ‘Один лист активной книги в новую книгу Лист1.Copy ‘Несколько листов активной книги в новую книгу* Sheets(Array(«Лист1», «Лист2», «Лист3»)).Copy ‘Все листы книги с кодом в новую книгу ThisWorkbook.Worksheets.Copy |
* Если при копировании в новую книгу нескольких листов хотя бы один лист содержит умную таблицу — копирование невозможно. Один лист, содержащий умную таблицу, копируется в новую книгу без проблем.
Если рабочие книги указаны как элементы коллекции Workbooks, в том числе ActiveWorkbook и ThisWorkbook, листы нужно указывать как элементы коллекции Worksheets, использование уникальных имен вызовет ошибку.
Перемещение листов
Перемещение рабочих листов осуществляется с помощью метода Worksheet.Move.
Синтаксис метода Worksheet.Move
expression.Move [Before, After]
где expression — переменная, представляющая собой объект Worksheet.
Компоненты метода Worksheet.Move
- Before* — необязательный параметр типа данных Variant, указывающий на лист, перед которым будет размещен перемещаемый лист.
- After* — необязательный параметр типа данных Variant, указывающий на лист, после которого будет размещен перемещаемый лист.
*Если Before и After не указаны, Excel создаст новую книгу и переместит лист в нее.
Примеры перемещения листов
Простые примеры перемещения листов:
|
1 2 3 4 5 6 7 8 9 10 11 12 13 14 15 16 17 |
‘В пределах активной книги ‘(уникальные имена листов) Лист1.Move After:=Лист2 ‘В пределах активной книги ‘(имена листов на ярлычках) Worksheets(«Лист1»).Move Before:=Worksheets(«Лист2») ‘Размещение после последнего листа: Лист1.Move After:=Sheets(Sheets.Count) ‘Из одной книги в другую Workbooks(«Книга1.xlsm»).Worksheets(«Лист1»).Move _ After:=Workbooks(«Книга2.xlsm»).Worksheets(«Лист1») ‘В новую книгу Лист1.Move |
Если рабочие книги указаны как элементы коллекции Workbooks, в том числе ActiveWorkbook и ThisWorkbook, листы нужно указывать как элементы коллекции Worksheets, использование уникальных имен вызовет ошибку.
Перемещение листа «Лист4» в позицию перед листом, указанным как по порядковому номеру, так и по имени ярлыка:
|
Sub Peremeshcheniye() Dim x x = InputBox(«Введите имя или номер листа», «Перемещение листа «Лист4»») If IsNumeric(x) Then x = CLng(x) Sheets(«Лист4»).Move Before:=Sheets(x) End Sub |
Удаление листов
Удаление рабочих листов осуществляется с помощью метода Worksheet.Delete
Синтаксис метода Worksheet.Delete
expression.Delete
где expression — переменная, представляющая собой объект Worksheet.
Примеры удаления листов
|
‘По уникальному имени Лист1.Delete ‘По имени на ярлычке Worksheets(«Лист1»).Delete ‘По индексу листа Worksheets(1).Delete ‘В другой книге Workbooks(«Книга1.xlsm»).Worksheets(«Лист1»).Delete |
Если рабочие книги указаны как элементы коллекции Workbooks, в том числе ActiveWorkbook и ThisWorkbook, листы нужно указывать как элементы коллекции Worksheets, использование уникальных имен вызовет ошибку.
Как обратиться к рабочему листу, переименовать, скрыть или отобразить его с помощью кода VBA Excel, смотрите в этой статье.
There are times when we have to create or add sheet and later on we found of no use of that sheet, hence we get need to delete sheet quickly from the workbook. This article focus on saving time & provide code for removing sheets without any prompt message box using vba macro / code. It could be one sheet or several. And excel gives a popup alert to confirm the sheet deletion. If its one sheet, its manageable. But if you have to delete several sheets, you will get one popup per sheet.
You often create multiple sheets using VBA. But in the end, you don’t need them actually. You would want to delete them after your work is done. It will keep your file lighter, faster and sensible.
VBA code to delete a sheet is simple
Sheets("SheetName").Delete
Let’s say you have this code to add a sheet and then delete it when work is done.
Sub AddAndDeleteSheet()
Sheets.Add 'Adds a new sheet to the active workbook

'----

'----

'----

'some work on sheet done
ActiveSheet.Delete 'deletes the active Activesheet

End Sub
When you execute this code, Sheets.Add will work without any prompt but when compiler will come to ActiveSheet.Delete it will prompt a message like this.

Since you are deleting sheets using VBA, you know what you are doing. You would like to tell Excel not to show this warning and delete the damn sheet.
To do this we will switch off the display alert button of Excel Application.
The code below will bypass this alert message and the sheet will be deleted without any intimation.
Sub AddAndDeleteSheet()

Application.DisplayAlerts = False 'switching off the alert button
Sheets.Add

'----

'----

'----

'some work on sheet done
ActiveSheet.Delete

Application.DisplayAlerts = True 'switching on the alert button

End Sub
Here we are deleting Activesheet using VBA. You can delete any sheet using VBA. Just write Sheets(«Sheetname»).delete. Moving on…
DisplayAlerts is a property of Application object in VBA. Here we are switching it off at the beginning of our code and switching it on at the end of the code. The above code will confirm deletion without any intimation.
Note:The above code will ignore all the warnings thrown by excel. If you want to allow only sheet deletion than use this line.
Application.DisplayAlerts = False 'switching off the alert button

ActiveSheet.Delete

Application.DisplayAlerts = True 'switching on the alert button
This will ignore only sheet deletion warning.
Pro Tip: This lines of code make your VBA code more efficient. Always use them at the beginning of your macro and turn them back on wherever is your code expected to exit routine.
Warning: If not turned on before exiting the subroutine, you may not see any warning at all. Even if your code is not running. This may cause many problems.
If you have multiple sheets to delete and are using a loop, try this code –
Option Explicit

Sub macro2()

Dim i As Long

Application.DisplayAlerts = False

For i = 1 to Worksheets.Count

If Worksheets(i).Name Like "Test*" Then Worksheets(i).Delete

Next i

Application.DisplayAlerts = True

End Sub
That’s it. It’s done. It easy like switching your fan on and off. Isn’t it?
![]()
If you liked our blogs, share it with your friends on Facebook. And also you can follow us on Twitter and Facebook.
We would love to hear from you, do let us know how we can improve, complement or innovate our work and make it better for you. Write us at info@exceltip.comDownload file
Delete sheets without confirmation prompts using VBA in Microsoft Excel
Related Articles:
Split Excel Sheet Into Multiple Files Based On Column Using VBA
Change The Default Printer Using VBA in Microsoft Excel 2016
Turn Off Warning Messages Using VBA in Microsoft Excel 2016
Display A Message On The Excel VBA Status Bar
Insert Pictures Using VBA in Microsoft Excel 2016
How To Loop Through Sheets In Excel Using VBA
Popular Articles:
50 Excel Shortcuts to Increase Your Productivity
How to use the VLOOKUP Function in Excel
How to use the COUNTIF function in Excel
How to use the SUMIF Function in Excel
Deleting worksheets in Excel is a fairly easy task. All you need to do is just right-click on the sheet’s name at the bottom of the Excel window and hit ‘Delete’ from the popup menu.
But when working with worksheets day in and day out, you might be dealing with quite a large number of sheets on a regular basis.
Manually deleting the sheets can then become quite time-consuming, not to mention boring!
As such, you might feel the need to automate some of your tasks to save time.
That’s where VBA comes to your rescue. Using VBA, you can build code with a small number of lines to do the task. After that, just run the code whenever you feel the need. A lot of people get put off by the thought of having to code, but trust me, it’s just 2-3 lines of code max.
Write it once and reuse it over and over for the rest of your life! Tell me that doesn’t tempt you *raising eyebrow*.
So how do we do this?
Read on to find out.
Deleting a Specific Sheet using VBA
Let’s start with the simplest task – deleting just one specific sheet. The main syntax for deleting a sheet is just:
Worksheets("YourSheetName").Delete
Here are the steps you need to follow when you want to use VBA to delete a sheet named ‘MySheet’: Replace the word “YourSheetName” with the name of your worksheet, simple!
- From the Developer Menu Ribbon, select Visual Basic
Note: If you can’t see the Developer ribbon, from the File menu, go to Options. Select Customize Ribbon and check the Developer option from the Main Tabs. Finally, Click OK. - Once your VBA window opens, Click Insert->Module. Now you can start coding.

- Type the following 3 lines into the module window:
Sub deleteWorksheet()
Worksheets("MySheet").Delete
End Sub
- That’s all, you’re done with the coding part. The first line marks the start of the module and gives it the name ‘deleteWorksheet’,
- The second line does the actual work of deleting the worksheet
- The last line marks the end of the module.
Close the VBA window.
Running the VBA Macro Code
Now, whenever you need to delete a sheet named ‘MySheet’:
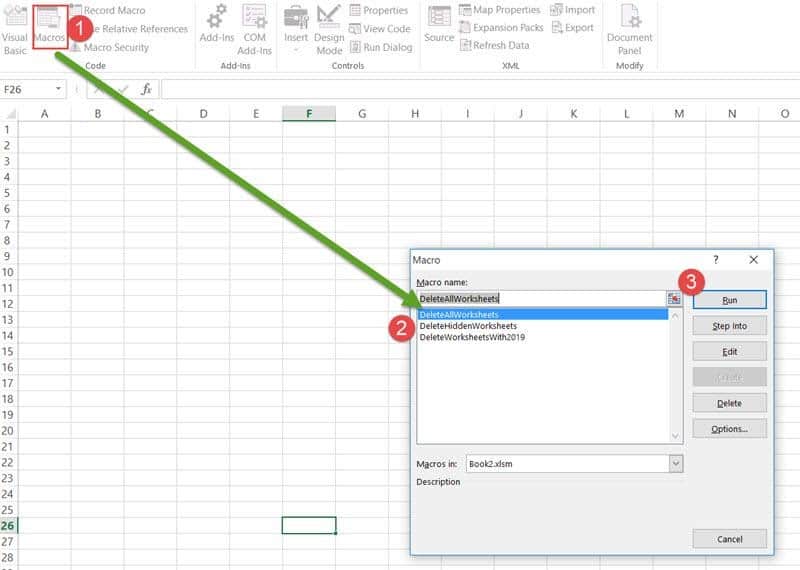
- Select the Macros button from the Developer Ribbon. This will open the Macro Window, where you will find the names of all the Macros that you have created so far.
- Select the Macro (or module) named ‘deleteWorksheet’ and click on the Run button. If a sheet named ‘MySheet’ exists, the Macro will delete it right after asking you if you’re sure you want to delete it.

Now, what if you just want to delete the active worksheet, irrespective of the name. This makes more sense in terms of reusability right? That’s easy too, just change the second line of code to:
ActiveSheet.Delete
Now one thing to note here is that each time you delete a sheet, Excel gives you a warning that you are about to delete a sheet and that you can’t undo this later.
So you have an option to either press Delete or Cancel. Oftentimes, we might not want this warning to show, and just get the job done. When you run the module now, you’ll find whichever sheet is active in your workbook, deleted.
To get rid of this warning message, you can add the following line to your code, right before you give the delete command:
Application.DisplayAlerts = False
This disables the DisplayAlerts command. But we also want to make sure that the command is disabled just this once, not forever. So after you’re done deleting, you can reset the command to True by saying:
Application.DisplayAlerts = True
Your entire code will thus be:
Sub deleteWorksheet()
Application.DisplayAlerts = False
ActiveSheet.Delete
Application.DisplayAlerts = True
End Sub
Now, I understand it doesn’t make sense to write code for this when you can manually get it done faster. But bear with me. It gets better.Try this out. You’ll find your active sheet deleted, without the annoying warning.
Deleting All Sheets Except the Active Sheet
Now let’s do something that’s actually more useful with VBA. Say you want to delete not one, but ALL the sheets in your Workbook.
This is when your VBA script will save you both time and effort by just a click of a button (OK two buttons).
To delete all the sheets in your workbook, you need to cycle through every sheet, deleting them one after the other.
Now, this might sound like you have to write a lot of lines of code, but thanks to loops this can get done with just 5-6 lines, irrespective of the number of sheets that you need to delete!
The syntax for a VBA loop is simple. You start the loop with a For statement and end it with a Next statement. So the general syntax is:
For <<condition>>
<<one or more statements>>
Next
To delete all the worksheets in your Workbook, just type out the following lines of code into your module window:
Whatever you put in between the For and the Next statements, gets repeated over and over as long as the <<condition>> is true.
Sub DeleteAllWorksheets()
Dim ws As Worksheet
For Each ws In ThisWorkbook.Worksheets
ws.Delete
Next ws
End Sub
By now you already know what the first (Sub command) and last (End Sub command) lines do. In the second line, we are declaring a variable named ws to be of type Worksheet. In other words, ws is going to be an instance of a worksheet.Lets’ go through this code line by line.
The third line starts the loop off by specifying that at each repetition of the loop, ws will refer to one of the worksheets in your Workbook.
In our case, the first time, ws will point to Sheet1. In the fourth line, we specify that the sheet ws is pointing to should be deleted.
The fifth line now tells VBA to repeat the loop, but this time, ws will point to the next worksheet in the Workbook.
So ws should now point to Sheet2. Once this sheet is deleted, ws will point to Sheet3, then Sheet4, then…you get the drift.
In this way, as long as there are sheets in ThisWorkbook, the statement ws.Delete will keep getting repeated.
Now there’s one more thing to add. Remember the annoying warning messages? Now we don’t want that to keep bothering us every time a sheet needs to get deleted, right?
So we again set Application.DisplayAlerts to False before we start the loop and set it back to True once we’re done deleting all the sheets.
Sub DeleteAllWorksheets()
Dim ws As Worksheet
Application.DisplayAlerts = False
For Each ws In ThisWorkbook.Worksheets
ws.Delete
Next ws
Application.DisplayAlerts = True
End Sub
While the above code does work, it will end up giving you an error as it will try and delete all the sheets in the workbook (which doesn’t make sense as if that’s what you want then better delete the entire workbook).
Since you can not delete all the sheets, it will end up giving you an error.
What would make more sense would be to delete all the sheets except, say, the current sheet or the ActiveSheet.
Sub DeleteAllWorksheets()
Dim ws As Worksheet
Application.DisplayAlerts = False
For Each ws In ThisWorkbook.Worksheets
If ws.Name <> ThisWorkbook.ActiveSheet.Name Then
ws.Delete
End If
Next ws
Application.DisplayAlerts = True
End Sub
Always remember to end an If statement with an End If statement. Hence, we put it after the Delete statement.
The If statement makes sure that the next line gets executed only if the name of the worksheet ws is pointing to does not have the same name as the Active worksheet (The <> symbol in VBA means ‘not equal to’).
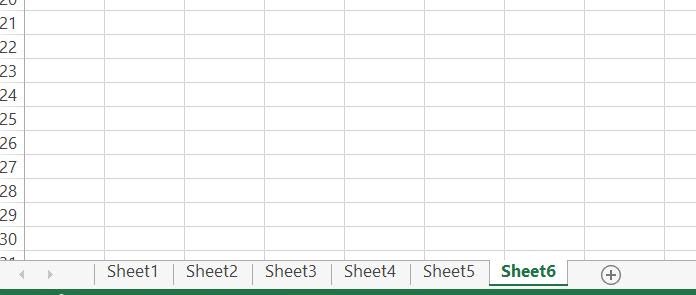
Our code is done. If you now run this module, you’ll find all the sheets, except the current sheet deleted.
Deleting All Sheets with a Specific Word
Let’s get a little more creative now. What if you have a set of worksheets, like in the image below and want to delete all the sheets belonging to last year?
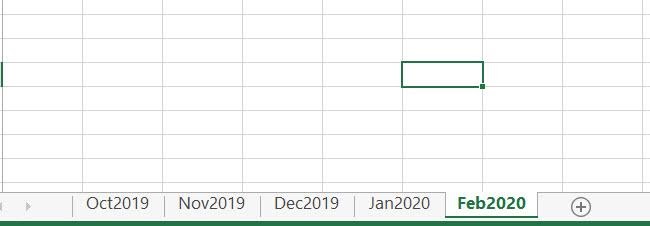
Say you want to retain the sheets of 2020 but delete all sheets that have the “2019”in the name. To do this, you only need to change your If statement in the earlier code.
So you can change the If statement in line 5 to:
If InStr(ws.Name, "2019") Then
This line makes sure that the next line (or set of lines) gets executed only if the name of the worksheet has the string “2019” in it.
Your entire code should look like this (You can copy this into a new module named “DeleteWorksheetsWith2019”:
Sub DeleteWorksheetsWith2019()
Dim ws As Worksheet
Application.DisplayAlerts = False
For Each ws In ThisWorkbook.Worksheets
If InStr(ws.Name, "2019") Then
ws.Delete
End If
Next ws
Application.DisplayAlerts = True
End Sub
That’s it! When you run this code you will find all worksheets of 2019 deleted and only the sheets of 2020 will be retained.
Deleting All Hidden Sheets
Finally, let’s see how you can delete all the hidden sheets in your workbook. If you’ve ever tried manually deleting hidden sheets, you’ll find that it’s not possible to delete more than one of them in one go without first un-hiding them.
But with VBA, doing this is a piece of cake…or…code….like literally just a piece of it.
Once again, all you need to do is change your If statement. So you can change the If statement in line 5 to:
If ws.Visible <> True Then
And that’s all, this will make sure that the next line (or set of lines) gets executed only if the worksheet that ws is pointing to is not visible.
Your entire code should look like this (Once again, you can copy this into a new module named “DeleteHiddenWorksheets”:
Sub DeleteHiddenWorksheets()
Dim ws As Worksheet
Application.DisplayAlerts = False
For Each ws In ThisWorkbook.Worksheets
If ws.Visible <> True Then
ws.Delete
End If
Next ws
Application.DisplayAlerts = True
End Sub
Note that you can reverse this code to delete only the visible sheets rather than the hidden sheets by simply replacing the <> symbol with the ‘=’ symbol.
There you go, with just a click of a button you can delete ALL your hidden sheets without anyone noticing!
Sneaky!
Conclusion
So we saw four different ways to use VBA to delete sheets in your Excel Workbook. These codes can be saved and then reused whenever you find the need.
This is what makes VBA coding so much more efficient and helpful. You can also choose to link these modules to different buttons.
We hope you found this tutorial helpful. We love to get your feedback and suggestions in our comment section.
Other Excel tutorials you may find useful:
- How to Select Every Other Cell in Excel (Or Every Nth Cell)
- How to Delete Filtered Rows in Excel (with and without VBA)
- How to Group and Ungroup Worksheets in Excel
- How to Delete a Comment in Excel (or Delete ALL Comments)
- How to Unhide All Rows in Excel with VBA
- How to Copy Multiple Sheets to a New Workbook in Excel
- How to Filter as You Type in Excel (With and Without VBA)
- How to Delete Chart in Excel? (Manual & VBA)
- How to Delete a Pivot Table? 4 Different Ways!