
Word for Microsoft 365 Word for Microsoft 365 for Mac Word 2021 Word 2021 for Mac Word 2019 Word 2019 for Mac Word 2016 Word 2016 for Mac Word 2013 Word 2010 Word for Mac 2011 More…Less
A text box is an object you can add to your document that lets you put and type text anywhere in your file. Text boxes can be useful for drawing attention to specific text and can also be helpful when you need to move text around in your document.
Add a text box
-
Place cursor where you want the text box to appear.
-
Go to Insert and in Illustrations select Drawing.
-
Select Text Box and use your cursor to create the text box.
-
Insert text in box and apply any styling needed.
-
Select Save andClose.
If you aren’t using a mouse
-
Press Alt + Period (.) and then press N.
-
Then press D to select drawings.
-
Press Alt + Period (.) and then press N.
-
Type the text that you want.
-
Press the Esc key 3 times.
-
Press Enter to save textbox.
Notes:
-
To format the text in the text box, select the text, and then use the formatting options in the Font group on the Home tab.
-
To format the text box itself, use the commands on the Shape Format contextual tab that appears when you select a text box.
-
To position the text box, select it, and then when the pointer becomes a
 four-headed arrow, drag the text box to a new location.
 -
You can also change or remove a border from a text box or shape.
-
If you have multiple text boxes, you can link them together so that text will flow from one box to another. Select one of the text boxes and on the Shape Format tab, select Create Link.
-
 four-headed arrow, drag the text box to a new location.
Editing in a text box
-
Double click the textbox.
-
In Drawing (Preview), select the textbox to place your cursor and edit text.
-
When finished select Save and Close to view updated text box.
Copy a text box
-
Select the border of the text box that you want to copy.
-
Press Ctrl+C.
Note: Make sure the pointer is on the border of the text box, not inside it. If the pointer is inside, pressing Ctrl+C will copy the text, not the text box.
-
Select a location and press Ctrl+V to paste the text box.
Delete a text box
-
Select the border of the text box that you want to delete, and then press Delete.
Note: Make sure the pointer is on the border of the text box and not inside it. If the pointer is inside the box, pressing Delete will delete the text inside the text box, not the box.
Add a text box
-
Go to Insert > Text Box, and then select Draw Text Box.
-
Click or tap in the document, and drag to draw the text box the size that you want.
-
To add text to a text box, select inside the text box, and then type or paste text.
Notes:
-
To format the text in the text box, select the text, and then use the formatting options in the Font group on the Home tab.
-
To format the text box itself, use the commands on the Format contextual tab, which appears under Drawing Tools when you select a text box.
-
To position the text box, select it, and then when the pointer becomes a
, drag the text box to a new location. -
You can also change or remove a border from a text box or shape.
-
If you have multiple text boxes, you can link them together so that text will flow from one box to another. Select one of the text boxes and on the Format tab, under Drawing Tools, and then select Create Link.
-
Copy a text box
-
Select the border of the text box that you want to copy.
-
Go to Home > Copy
.Make sure that the pointer is not inside the text box, but rather on the border of the text box. If the pointer is not on the border, pressing Copy will copy the text inside the text box and not the text box.
-
Go to Home and select Paste.
 .
.
Delete a text box
-
Select the border of the text box and then press DELETE.
Make sure that the pointer is not inside the text box, but rather on the border of the text box. If the pointer is not on the border, pressing DELETE will delete the text inside the text box instead.
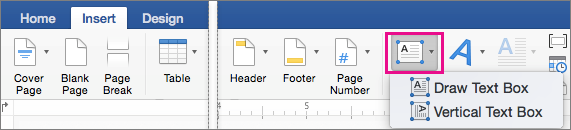
Add a text box
-
Go to Insert > Text Box and then select either Draw Text Box (where the text aligns horizontally on the page) or Vertical Text Box (where the text aligns vertically on the page).
-
Select in the document, and then drag to draw the text box the size that you want.
-
To add text to a text box, click or tap inside the text box, and then type or paste text.
-
To format the text in the text box, select it, and then Control + Click the text and select Font.
-
To add different effects to the text box, select the text box, and use the options on the Shape Format tab (such as changing the text direction or aligning the text at the top, middle or bottom of the text box).
-
To position the text box, select and hold it, and then when the pointer becomes a
, drag the text box to a new location.
-
Note: If you have drawn multiple text boxes, you can link them together so that text will flow from one box to another. You can only link an empty text box to the one that you’ve selected. To do this, select the text box that you want to link to another text box, and then go to Shape Format > Create Link.
Copy a text box
-
Select the text box you want to copy.
Make sure that the pointer is on the border of the text box and not inside the text box. If the pointer is not on the border, the text inside the text box is copied.
-
Press Control + Click, and then select Copy. Or, press
+ C. -
Select the location in your document where you want to paste the text box, press Control + Click, and then select Paste. Or, press
+ V.
 + C.
+ C.Remove a text box
-
Select the border of the text box that you want to delete, and then press DELETE.
Make sure that the pointer is on the border of the text box and not inside the text box. If the pointer is not on the border, pressing DELETE will delete the text inside the text box.
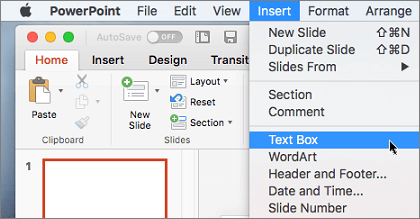
Add a text box
-
Go to Insert > Text Box.
-
Click in your file where you’d like to insert the text box, hold your mouse button down, then drag to draw the text box the size that you want.
-
After you’ve drawn the text box click inside it to add text.
Copy a text box
-
Select the text box you want to copy.
Make sure that the pointer is on the border of the text box and not inside the text box. If the pointer is not on the border, the text inside the text box is copied.
-
Press Control + Click, and then select Copy. Or, press
+ C. -
Select the location in your document where you want to paste the text box, press Control + Click, and then select Paste. Or, press
+ V.
Remove a text box
-
Select the border of the text box that you want to delete, and then press DELETE.
Make sure that the pointer is on the border of the text box and not inside the text box. If the pointer is not on the border, pressing DELETE will delete the text inside the text box.
Need more help?
Want more options?
Explore subscription benefits, browse training courses, learn how to secure your device, and more.
Communities help you ask and answer questions, give feedback, and hear from experts with rich knowledge.
Text boxes offers users an easy way to manager blocks of text in document. But how to remove them when you formatting a document. This tutorial will show you several ways to get rid of all text boxes from Word document.
Manually remove all text boxes one by one
Remove all text boxes with VBA code
Easily remove all text boxes without removing text with Kutools for Word
Manually remove all text boxes one by one
If there are just one or two text boxes you want to remove, you can do as follows:
Step 1: Click inside the text box and press Ctrl+C to copy the text (skip this step if you don’t want to keep the text).
Step 2: Click the border of the text box, press Delete.
Step 3: Repeat step 1 and step 2 until all the undesired text boxes are removed.
Remove all text boxes with VBA code
While there are too many text boxes you want to remove, and you don’t want to keep the text inside either, VBA code will be great helpful. Please use VBA code to remove all text boxes in document as follows:
1. Press Alt+F11 to open the VBA window in Word;
2. Click Module in Insert tab, and insert the VBA code into Module window;
3. Click Run![]() button to apply the VBA code (or press F5);
button to apply the VBA code (or press F5);
The VBA code to remove all text boxes without keeping text:
Sub Test()
Dim oShp As Word.Shape
Dim i As Long
For i = ActiveDocument.Shapes.Count To 1 Step -1
Set oShp = ActiveDocument.Shapes(i)
If oShp.Type = msoTextBox Then
oShp.Delete
End If
Next i
End SubNote: This VBA code can only remove the drawing text boxes.
Easily remove all text boxes with Kutools for Word
You can remove all text boxes but keep their contents or remove both text boxes and their contents in document with Kutools for Word.
Kutools for Word : With more than 100 handy Word add-ins, free to try with no limitation in 60 days.
1. Please apply this utility by clicking Kutools > Remove > Remove All Text Boxes. See screenshot:

2. If you just want to remove the text boxes and keep the text, please check Just remove text box, and keep the text option in Remove All Text Boxes dialog, then click OK. If you want to remove both the text box and the text, please uncheck it.

3. Then a dialog box is popping up to tell you how many text boxes are removed successfully, please click the OK button.

Then you can see all text boxes with or without contents are removed from the document. See screenshots:

Tip: After removing text boxes from document, blank rows may show up. Then the Remove Empty Paragraph Marks utility of Kutools for Word can help you remove all empty rows from document at the same time. Please click Kutools > Emty Paras > Remove Empty Paragraph Marks. See screenshot:

Then all empty rows are removed from current documemt automatically at the same time:

If you want to have a free trial of this utility, please go to free download the software first, and then go to apply the operation according above steps.
Demo: Easily remove all text boxes without removing text with Kutools for Word
Recommended Word Productivity Tools


Kutools For Word — More Than 100 Advanced Features For Word, Save Your 50% Time
- Complicated and repeated operations can be done one-time processing in seconds.
- Insert multiple images across folders into Word document at once.
- Merge and combine multiple Word files across folders into one with your desired order.
- Split the current document into separate documents according to heading, section break or other criteria.
- Convert files between Doc and Docx, Docx and PDF, collection of tools for common conversions and selection, and so on…
Comments (3)
No ratings yet. Be the first to rate!
 Please Note:
This article is written for users of the following Microsoft Word versions: 2007, 2010, and 2013. If you are using an earlier version (Word 2003 or earlier), this tip may not work for you. For a version of this tip written specifically for earlier versions of Word, click here: Removing All Text Boxes In a Document.
![]()
Written by Allen Wyatt (last updated August 11, 2022)
This tip applies to Word 2007, 2010, and 2013
If you do a lot of work with documents from other people, you may have a need to remove text boxes in those documents. If there are only one or two text boxes in the document, it is not that difficult to select them and delete them. What if there are 30, 40, or more text boxes, though? Deleting them individually can quickly get tedious.
One potential solution is a «brute force» method. Follow these steps:
- In your document, press Ctrl+A. The entire document is selected.
- Press Ctrl+C. The document is now on the Clipboard.
- Open a new, blank document.
- Make sure the Home tab of the ribbon is displayed.
- Click the down-arrow under the Paste tool (at the left side of the ribbon) and choose Paste Special. Word displays the Paste Special dialog box. (See Figure 1.)
- In the list of formats, choose Unformatted Text.
- Click on OK.
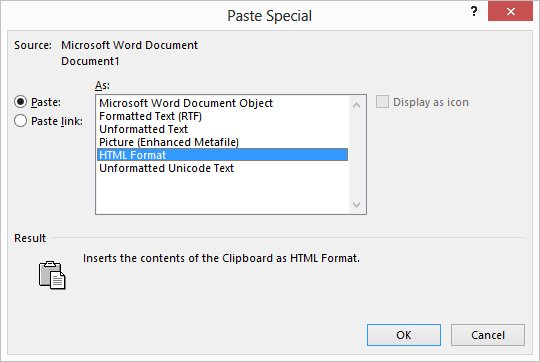
Figure 1. The Paste Special dialog box.
The document text, minus the text boxes, is now in the new document. The obvious drawback to this approach is that the other formatting of the original document is also lost, and you must reformat the entire document. (I told you this was a brute force method.)
If you want to get rid of only the text boxes, then the quickest solution is to use a macro. The following macro will quickly remove all text boxes in your document:
Sub RemoveTextBox1()
    Dim shp As Shape
    For Each shp In ActiveDocument.Shapes
        If shp.Type = msoTextBox Then shp.Delete
    Next shp
End Sub
You should realize that this macro removes all of the text boxes and their contents. In other words, if a text box is used for placement of text, then the text in that text box is deleted along with the text box itself.
If you prefer to transfer the text from the text boxes to the document, prior to deleting the text box, then a slight modification on the above macro will work:
Sub RemoveTextBox2()
    Dim shp As Shape
    Dim oRngAnchor As Range
    Dim sString As String

    For Each shp In ActiveDocument.Shapes
        If shp.Type = msoTextBox Then
            ' copy text to string, without last paragraph mark
            sString = Left(shp.TextFrame.TextRange.Text, _
              shp.TextFrame.TextRange.Characters.Count - 1)
            If Len(sString) > 0 Then
                ' set the range to insert the text
                Set oRngAnchor = shp.Anchor.Paragraphs(1).Range
                ' insert the textbox text before the range object
                oRngAnchor.InsertBefore _
                  "Textbox start << " & sString & " >> Textbox end"
            End If
            shp.delete
        End If
    Next shp
End Sub
When this macro is done, you can do a search for «Textbox start» and you will be at the beginning of text that used to be in the text boxes that are now gone from your document. You can then edit the text so that it appears as you want. Understand, as well, that anything «special» in the text—such as tables—is converted to regular text by the macro. This means that the macro may result in a fair amount of work that needs to be done in formatted the transferred text.
If you would like to know how to use the macros described on this page (or on any other page on the WordTips sites), I’ve prepared a special page that includes helpful information. Click here to open that special page in a new browser tab.
WordTips is your source for cost-effective Microsoft Word training.
(Microsoft Word is the most popular word processing software in the world.)
This tip (9169) applies to Microsoft Word 2007, 2010, and 2013. You can find a version of this tip for the older menu interface of Word here: Removing All Text Boxes In a Document.
Author Bio
With more than 50 non-fiction books and numerous magazine articles to his credit, Allen Wyatt is an internationally recognized author. He is president of Sharon Parq Associates, a computer and publishing services company. Learn more about Allen…
MORE FROM ALLEN
Inserting a Non-Breaking Space
In Word a non-breaking space will help you keep two words together on the same line. Here’s two different ways that you …
Discover More
Changing Links
If your worksheet is linked to data in other worksheets, you may need to change the link from time to time. Here’s how to …
Discover More
Controlling the Automatic Copying of Formulas
When you add a new row of data to the bottom of the data of a worksheet, Excel may (or may not) copy formulas downward to …
Discover More