
Эта инструкция познакомит Вас с тремя способами удалить возвраты каретки из ячеек в Excel. Вы также узнаете, как заменить символы переноса строки другими символами. Все предложенные решения работают в Excel 2013, 2010, 2007 и 2003.

Переносы строк могут появиться в тексте по разным причинам. Обычно возвраты каретки встречаются в рабочей книге, например, когда текст скопирован с веб-страницы, когда они уже есть в рабочей книге, полученной от клиента, или, когда мы сами добавляем их нажатием клавиш Alt+Enter.
Какой бы ни была причина их появления, сейчас перед нами стоит задача удалить возвраты каретки, так как они мешают выполнять поиск фраз и приводят к беспорядку в столбце при включении режима переноса текста.
Все три представленных способа довольно быстры. Выбирайте тот, который Вам больше подходит:
- Удаляем все переносы строк вручную, чтобы быстро навести порядок на одном листе.
- Удаляем переносы строк при помощи формул и настраиваем таким образом комплексную обработку текстовых данных в ячейках.
- Используем макрос VBA, чтобы очистить от переносов строк несколько рабочих книг.
Замечание: Первоначально термины «Возврат каретки» и «Перевод строки» использовались при работе на печатных машинках и обозначали две различных операции. Любознательный читатель может самостоятельно найти подробную информацию об этом в интернете.
Компьютеры и программное обеспечение для работы с текстами разрабатывались с учётом особенностей печатных машинок. Вот почему теперь для обозначения разрыва строки используют два различных непечатаемых символа: Возврат каретки (Carriage return, CR или ASCII код 13) и Перевод строки (Line feed, LF или ASCII код 10). В Windows используются оба символа вместе, а в системах *NIX применяется только перевод строки.
Будьте внимательны: В Excel встречаются оба варианта. При импорте из файлов .txt или .csv данные обычно содержат возвраты каретки и переводы строки. Когда перенос строки вводится вручную нажатием Alt+Enter, Excel вставляет только символ перевода строки. Если же файл .csv получен от поклонника Linux, Unix или другой подобной системы, то готовьтесь к встрече только с символом перевода строки.
Содержание
- Удаляем возвраты каретки вручную
- Удаляем переносы строк при помощи формул Excel
- Удаляем переносы строк при помощи макроса VBA
Удаляем возвраты каретки вручную
Плюсы: Этот способ самый быстрый.
Минусы: Никаких дополнительных плюшек 🙁
Вот так можно удалить переносы строк при помощи инструмента «Найти и заменить»:
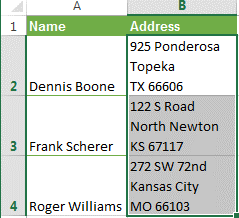
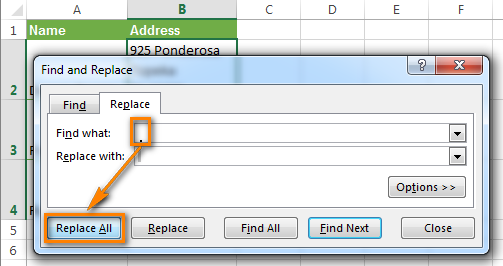
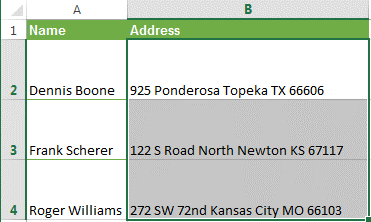
- Выделите все ячейки, в которых требуется удалить возвраты каретки или заменить их другим символом.

- Нажмите Ctrl+H, чтобы вызвать диалоговое окно Найти и заменить (Find and Replace).
- Поставьте курсор в поле Найти (Find what) и нажмите Ctrl+J. На первый взгляд поле покажется пустым, но если посмотрите внимательно, то увидите в нём маленькую точку.
- В поле Заменить на (Replace With) введите любое значение для вставки вместо возвратов каретки. Обычно для этого используют пробел, чтобы избежать случайного склеивания двух соседних слов. Если нужно просто удалить переносы строк, оставьте поле Заменить на (Replace With) пустым.
- Нажмите кнопку Заменить все (Replace All) и наслаждайтесь результатом!
Удаляем переносы строк при помощи формул Excel
Плюсы: Доступно использование последовательных или вложенных формул для сложной проверки текста в обрабатываемой ячейке. Например, можно удалить возвраты каретки, а затем найти лишние начальные или конечные пробелы, или лишние пробелы между словами.
В некоторых случаях переносы строк необходимо удалять, чтобы в дальнейшем использовать текст в качестве аргументов функций, не внося изменения в исходные ячейки. Результат можно использовать, например, как аргумент функции ПРОСМОТР (LOOKUP).
Минусы: Потребуется создать вспомогательный столбец и выполнить множество дополнительных шагов.
- Добавьте вспомогательный столбец в конце данных. В нашем примере он будет называться 1 line.
- В первой ячейке вспомогательного столбца (C2) введите формулу для удаления/замены переносов строк. Ниже приведены несколько полезных формул для различных случаев:
- Эта формула подходит для использования с комбинациями возврат каретки / перенос строки, характерными для Windows и для UNIX.
=ПОДСТАВИТЬ(ПОДСТАВИТЬ(B2;СИМВОЛ(13);"");СИМВОЛ(10);"")
=SUBSTITUTE(SUBSTITUTE(B2,CHAR(13),""),CHAR(10),"") - Следующая формула подходит для замены переноса строки любым другим символом (например, «, » – запятая + пробел). В таком случае строки не будут объединены и лишние пробелы не появятся.
=СЖПРОБЕЛЫ(ПОДСТАВИТЬ(ПОДСТАВИТЬ(B2;СИМВОЛ(13);"");СИМВОЛ(10);", ")
=TRIM(SUBSTITUTE(SUBSTITUTE(B2,CHAR(13),""),CHAR(10),", ") - А вот так можно удалить все непечатаемые символы из текста, включая переносы строк:
=ПЕЧСИМВ(B2)
=CLEAN(B2)
- Эта формула подходит для использования с комбинациями возврат каретки / перенос строки, характерными для Windows и для UNIX.
- Скопируйте формулу во все ячейки столбца.
- По желанию, можете заменить исходный столбец новым, с удалёнными переносами строк:
- Выделите все ячейки в столбце C и нажатием Ctrl+C скопируйте данные в буфер обмена.
- Далее выделите ячейку B2, нажмите сочетание клавиш Shift+F10 и выберите Вставить (Insert).
- Удалите вспомогательный столбец.

Удаляем переносы строк при помощи макроса VBA
Плюсы: Создаём один раз – используем снова и снова с любой рабочей книгой.
Минусы: Требуется хотя бы базовое знание VBA.
Макрос VBA из следующего примера удаляет возвраты каретки из всех ячеек на активном листе.
Sub RemoveCarriageReturns()
    Dim MyRange As Range
    Application.ScreenUpdating = False
    Application.Calculation = xlCalculationManual

    For Each MyRange In ActiveSheet.UsedRange
        If 0 < InStr(MyRange, Chr(10)) Then
            MyRange = Replace(MyRange, Chr(10), "")
        End If
    Next

    Application.ScreenUpdating = True
    Application.Calculation = xlCalculationAutomatic
End Sub
Если Вы не слишком близко знакомы с VBA, рекомендую изучить статью о том, как вставить и выполнить код VBA в Excel.
Оцените качество статьи. Нам важно ваше мнение:
Skip to content
В этом совете вы найдете 4 совета для удаления символа переноса строки из ячеек Excel. Вы также узнаете, как заменять разрывы строк другими символами. Все решения работают с Excel 2019, 2016, 2013 и более ранними версиями.
Перенос строки в вашем тексте внутри ячейки Excel может возникнуть разными способами. Обычно он появляется, когда вы копируете текст с веб-страницы или из Word, получаете файл, который уже содержит разрывы строк, от коллеги или клиента. Или вы добавляете его самостоятельно, используя комбинацию Alt + Enter.
В любом случае, вы можете решить убрать перенос строки из ваших ячеек, поскольку он не позволяет найти нужную фразу или же заставляет содержимое столбца выглядеть неаккуратно, когда вы включаете опцию переноса текста. Если вы решите загрузить ваши данные в файл .csv для использования в других программах, то в итоге у вас одна ячейка с переносами строк превратится в несколько. Конечно, это нарушит структуру ваших данных.
Все эти 4 способа, которые мы вам предлагаем, действительно быстрые. Выберите тот, который вам больше всего подходит:
- Как убрать перенос строки при помощи «Найти и заменить».
- 3 формулы, чтобы удалить переносы строк в ячейках.
- Как можно использовать макрос VBA.
- Удаляем перенос строки с помощью надстройки Ultimate Suite
Примечание. Первоначально термины «возврат каретки» и «перевод строки» использовались в пишущей машинке и означали два различных действия.
Компьютеры и программное обеспечение для обработки текстов создавались с учетом специфики пишущей машинки. Вот почему теперь для обозначения переноса строки используются два разных непечатаемых символа: «Возврат каретки» (CR, код ASCII 13) и «Перевод строки» (LF, код ASCII 10).
Имейте в виду, что в Excel вы можете найти оба варианта. Если вы импортируете данные из файла .txt или .csv, вы с большей вероятностью найдете комбинацию возврат каретки + перевод строки. Когда вы разбиваете текст в ячейке, используя Alt + Enter, то Excel вставляет только перевод строки. Если вы получите файлы .csv от человека, который использует Linux или Unix, то там также найдете только перевод строки.
Удаление вручную.
Плюсы: самый быстрый способ.
Минусы: никаких дополнительных возможностей.
Итак, воспользуемся помощью стандартной функции «Найти и заменить»:

- Выделите все позиции, которые вы хотите обработать.
- Нажмите
Ctrl + H, чтобы открыть диалоговое окно «Найти и заменить». - В поле » Найти» введите
Ctrl + J. Оно будет выглядеть пустым, но вы увидите крошечную точку. - В поле «Заменить на» введите любое значение для замены. Обычно это пробел, чтобы избежать случайного «слипания» двух слов. Если вам нужно просто удалить разрывы строк, оставьте поле пустым.
- Нажимаем кнопку «Заменить все» и наслаждаемся результатом!

Удалите разрывы строк с помощью формул Excel.
Плюсы: вы можете использовать вложенные формулы для более сложной обработки текста в ячейках. Например, можно удалить символы перевода строки, а затем удалить лишние начальные и конечные пробелы, а также пробелы между словами.
Или вам может потребоваться удалить перевод строки, чтобы использовать ваш текст в качестве аргумента другой функции без изменения исходных ячеек. Например, если вы хотите использовать результат в качестве аргумента функции ВПР.
Минусы: вам нужно создать вспомогательный столбец и выполнить некоторое количество дополнительных действий.
- Добавьте вспомогательный столбец в конец ваших данных. Вы можете назвать его «В одну строку».
- В первой его позиции (C2) введите формулу для удаления или замены переносов строк. Здесь мы представим вам несколько полезных формул для разных случаев:
Удаление возврата каретки и перевода строки как в Windows, так и в UNIX.
=ПОДСТАВИТЬ(ПОДСТАВИТЬ(A2;СИМВОЛ(13);»»);СИМВОЛ(10);»»)
Заменяем перенос строки любым другим символом (например, запятая + пробел). В этом случае строки не будут «слипаться» и лишние пробелы не появятся.
=СЖПРОБЕЛЫ(ПОДСТАВИТЬ(ПОДСТАВИТЬ(A3;СИМВОЛ(13);», «);СИМВОЛ(10);», «))
Или же можно обойтись и без запятой, просто заменив пробелом:
=СЖПРОБЕЛЫ(ПОДСТАВИТЬ(ПОДСТАВИТЬ(A3;СИМВОЛ(13);» «);СИМВОЛ(10);» «))
Если вы хотите удалить из текста все непечатаемые символы, включая в том числе и переносы строк:
=ПЕЧСИМВ(A4)

Как видите, не всегда результат выглядит красиво и аккуратно. В зависимости от исходных данных выбирайте наиболее подходящий для вас вариант.
При желании вы можете заменить исходный столбец на тот, в котором были удалены переносы строк:
- Выделите все данные в столбце В и нажмите
Ctrl + C, чтобы скопировать данные в буфер обмена. - Теперь выберите А2 и нажмите
Shift + F10 + V. - Удалите вспомогательный столбец В.
Макрос VBA для замены переноса строки на пробел.
Плюсы: создав один раз, макрос можно повторно использовать в любой книге, поместив его в персональную книгу макросов.
Минусы: желательно иметь базовые знания VBA. Или воспользуйтесь нашей подробной инструкцией.
Макрос VBA из приведенного ниже примера заменяет на пробел символ возврата каретки из всех ячеек на текущем активном листе.
Sub RemoveCarriageReturns()
Dim MyRange As Range
Application.ScreenUpdating = False
Application.Calculation = xlCalculationManual
For Each MyRange In ActiveSheet.UsedRange
If 0 < InStr(MyRange, Chr(10)) Then
MyRange = Replace(MyRange, Chr(10), » «)
End If
Next
Application.ScreenUpdating = True
Application.Calculation = xlCalculationAutomatic
End Sub
Если вы не очень хорошо знаете VBA, просто следуйте рекомендациям ниже:
- Нажмите
Alt + F11, чтобы открыть редактор Visual Basic. - Щелкните правой кнопкой мыши имя книги на панели «Project — VBAProject » (в верхнем левом углу окна редактора) и выберите «Вставить» -> «Модуль» в контекстном меню.
- Скопируйте код VBA и вставьте его в правую панель редактора VBA ( окно « Module1 »).
- Сохраните книгу как «книгу Excel с поддержкой макросов».
НажмитеCrl + S, затем нажмите кнопку «Нет» в диалоговом окне предупреждения «Следующие функции не могут быть сохранены в книге без макросов». - Откроется диалоговое окно «Сохранить как». Выберите «Книга Excel с поддержкой макросов» из раскрывающегося списка «Тип файла». Нажмите кнопку «Сохранить».
- Нажмите
Alt + Q, чтобы закрыть окно редактора и вернуться к своей книге. - Если вы хотите запустить код VBA, который вы добавили, как описано в разделе выше: нажмите
Alt + F8, чтобы открыть диалог «Макросы». - Затем выберите нужный макрос из списка «Имя макроса» и нажмите кнопку «Выполнить».
Но если какая-либо формула возвращает возврат каретки, я боюсь, что с этим ничего нельзя поделать. Макрос не может найти, где именно в формуле происходит возврат каретки, поэтому он обрабатывает результат формулы, а не формулу как таковую.
Удаляем перенос строки с помощью надстройки Ultimate Suite.
Если вы являетесь пользователем Ultimate Suite for Excel , то вам не нужно тратить время на какие-либо из вышеперечисленных манипуляций. Все, что требуется, — это 3 быстрых шага:
- Выберите одну или несколько ячеек, в которых вы хотите удалить переносы строк.
- На ленте Excel перейдите на вкладку Ablebits Data и нажмите кнопку «Преобразовать (Convert)» .
- На панели «Преобразовать текст» выберите переключатель «Конвертировать перенос строки в (Convert line break to)», введите в поле «заменяющий» символ (это может быть точка с запятой, точка, запятая, пробел) и нажмите кнопку «Преобразовать (Convert)» .
В нашем примере мы заменяем каждый перенос строки пробелом:

В результате у вас будет аккуратно организованная таблица с однострочными адресами, как это изображено на рисунке выше. Такой же результат мы получали выше и при помощи формул, но занимало это гораздо больше времени.
Это далеко не единственный инструмент для упрощения работы с текстом. Вы можете удалить лишние пробелы, изменить регистр символов, добавить текст в начале в конце, перед или после выбранных символов, удалить непечатаемые символы, извлечь часть текста по позиции или после указанных символов, извлечь числа из текста, разделить текст по столбцам или строкам и многое другое. Подробнее вы можете ознакомиться с этими возможностями на страничке обзора инструментов работы с текстом.
Если вам интересно попробовать этот и еще 60 инструментов для экономии времени для Excel, вы можете загрузить пробную версию Ultimate Suite . Вы будете приятно удивлены, когда найдете решения для самых сложных и утомительных задач в Excel всего в несколько кликов!
Итак, теперь вы легко можете убрать либо заменить символ переноса строки в вашей таблице Excel.
Ещё о работе с текстом в Excel:
 Формула ЗАМЕНИТЬ и ПОДСТАВИТЬ для текста и чисел — В статье объясняется на примерах как работают функции Excel ЗАМЕНИТЬ (REPLACE в английской версии) и ПОДСТАВИТЬ (SUBSTITUTE по-английски). Мы покажем, как использовать функцию ЗАМЕНИТЬ с текстом, числами и датами, а также…
  Как сделать диаграмму Ганта — Думаю, каждый пользователь Excel знает, что такое диаграмма и как ее создать. Однако один вид графиков остается достаточно сложным для многих — это диаграмма Ганта. В этом кратком руководстве я постараюсь показать…
  Как сделать автозаполнение в Excel — В этой статье рассматривается функция автозаполнения Excel. Вы узнаете, как заполнять ряды чисел, дат и других данных, создавать и использовать настраиваемые списки в Excel. Эта статья также позволяет вам убедиться, что вы…
  Быстрое удаление пустых столбцов в Excel — В этом руководстве вы узнаете, как можно легко удалить пустые столбцы в Excel с помощью макроса, формулы и даже простым нажатием кнопки. Как бы банально это ни звучало, удаление пустых…
Переносы строк внутри одной ячейки, добавляемые с помощью сочетания клавиш Alt+Enter — дело весьма частое и привычное. Иногда их делают сами пользователи, чтобы добавить красоты длинному тексту. Иногда такие переносы добавляются автоматически при выгрузке данных из каких-либо рабочих программ (привет 1С, SAP и т.д.) Проблема в том, что на такие таблицы приходится потом не просто любоваться, а с ними работать — и вот тогда эти невидимые символы переноса могут стать проблемой. А могут и не стать — если уметь правильно с ними обращаться.
Давайте-ка мы разберёмся в этом вопросе поподробнее.
Удаление переносов строк заменой
Если нам нужно избавиться от переносов, то первое, что обычно приходит в голову — это классическая техника «найти и заменить». Выделяем текст и затем вызываем окно замены сочетанием клавиш Ctrl+H или через Главная — Найти и выделить — Заменить (Home — Find&Select — Replace). Одна неувязочка — не очень понятно, как ввести в верхнее поле Найти (Find what) наш невидимый символ переноса строки. Alt+Enter тут, к сожалению, уже не работает, скопировать этот символ непосредственно из ячейки и вставить его сюда тоже не получается.
Поможет сочетание Ctrl+J — именно оно является альтернативой Alt+Enter в диалоговых окнах или полях ввода Excel:

Обратите внимание, что после того, как вы поставите мигающий курсор в верхнее поле и нажмёте Ctrl+J — в самом поле ничего не появится. Не пугайтесь — это нормально, символ-то невидимый 
В нижнее поле Заменить (Replace with) либо ничего не вводим, либо вводим пробел (если хотим не просто удалить переносы, а заменить их на пробел, чтобы строки не склеились в единое целое). Останется нажать на кнопку Заменить всё (Replace All) и наши переносы исчезнут:

Нюанс: после выполнения замены введённый с помощью Ctrl+J невидимый символ остаётся в поле Найти и может помешать в дальнейшем — не забудьте его удалить, установив курсор в это поле и несколько раз (для надёжности) нажав на клавиши Delete и Backspace.
Удаление переносов строк формулой
Если нужно решить задачу именно формулами, то можно использовать встроенную функцию ПЕЧСИМВ (CLEAN), которая умеет очищать текст от всех непечатаемых символов, включая и наши злополучные переносы строк:

Такой вариант, однако, не всегда бывает удобен, т.к. строки после этой операции могут склеиваться между собой. Чтобы этого не происходило, нужно не просто удалять символ переноса, а заменять его на пробел (см. следующий пункт).
Замена переносов строк формулой
А если хочется не просто удалить, а именно заменить Alt+Enter на, например, пробел, то потребуется уже другая, чуть более сложная конструкция:

Чтобы задать невидимый символ переноса мы используем функцию СИМВОЛ (CHAR), которая выводит символ по его коду (10). А потом функция ПОДСТАВИТЬ (SUBSTITUTE) ищет в исходных данных наши переносы и заменяет их на любой другой текст, например, на пробел.
Деление на столбцы по переносу строки
Знакомый многим и очень удобный инструмент Текст по столбцам с вкладки Данные (Data — Text to Columns) тоже может замечательно работать с переносами строк и разделить текст из одной ячейки на несколько, разбив его по Alt+Enter. Для этого на втором шаге мастера нужно выбрать вариант пользовательского символа-разделителя Другой (Custom) и использовать уже знакомое нам сочетание клавиш Ctrl+J как альтернативу Alt+Enter:

Если в ваших данных может встречаться несколько переносов строк подряд, то можно их «схлопнуть», включив флажок Считать последовательные разделители одним (Treat consecutive delimiters as one).
После нажатия на Далее (Next) и прохождения всех трёх шагов мастера мы получим желаемый результат:

Обратите внимание, что до выполнения этой операции необходимо вставить справа от разделяемого столбца достаточное количество пустых колонок, чтобы образовавшийся текст не затёр те значения (цены), которые были справа.
Деление на строки по Alt+Enter через Power Query
Ещё одной любопытной задачей является деление многострочного текста из каждой ячейки не на столбцы, а на строки:

Вручную такое делать долго, формулами — сложно, макросом — не каждый напишет. А на практике подобная задача встречается чаще, чем хотелось бы. Самым простым и лёгким решением будет использовать для этой задачи возможности надстройки Power Query, которая встроена в Excel начиная с 2016 года, а для более ранних версий 2010-2013 её можно совершенно бесплатно скачать с сайта Microsoft.
Чтобы загрузить исходные данные в Power Query их нужно сначала преобразовать в «умную таблицу» сочетанием клавиш Ctrl+T или кнопкой Форматировать как таблицу на вкладке Главная (Home — Format as Table). Если по каким-то причинам вы не хотите или не можете использовать «умные таблицы», то можно работать и с «глупыми». В этом случае просто выделите исходный диапазон и дайте ему имя на вкладке Формулы — Диспетчер имен — Создать (Formulas — Name Manager — New).
После этого на вкладке Данные (если у вас Excel 2016 или новее) или на вкладке Power Query (если у вас Excel 2010-2013) можно жать на кнопку Из таблицы / диапазона (From Table/Range), чтобы загрузить нашу таблицу в редактор Power Query:

После загрузки выделим столбец с многострочным текстом в ячейках и выберем на Главной вкладке команду Разделить столбец — По разделителю (Home — Split Column — By delimiter):

Скорее всего, Power Query автоматически распознает принцип деления и сам подставит условное обозначение #(lf) невидимого символа переноса строки (lf = line feed = перенос строки) в поле ввода разделителя. Если нужно, то другие символы можно выбрать из выпадающего списка в нижней части окна, если включить предварительно галочку Разделить с помощью специальных символов (Split by special characters).
Чтобы всё разделилось на строки, а не не столбцы — не забудьте переключить селектор Строки (By rows) в группе расширенных параметров.
Останется только нажать на ОК и получить желаемое:

Готовую таблицу можно выгрузить обратно на лист с помощью команды Закрыть и загрузить — Закрыть и загрузить в… на вкладке Главная (Home — Close&Load — Close&Load to…).
Важно отметить, что при использовании Power Query необходимо помнить о том, что при изменении исходных данных результаты автоматически не обновляются, т.к. это не формулы. Для обновления нужно обязательно щёлкнуть правой кнопкой мыши по итоговой таблице на листе и выбрать команду Обновить (Refresh) или нажать кнопку Обновить всё на вкладке Данные (Data — Refresh All).
Макрос для деления на строки по Alt+Enter
Для полноты картины давайте упомянем решение предыдущей задачи ещё и с помощью макроса. Откройте редактор Visual Basic с помощью одноимённой кнопки на вкладке Разрабочик (Developer) или сочетания клавиш Alt+F11. В появившемся окне вставьте новый модуль через меню Insert — Module и скопируйте туда нижеприведённый код:
Sub Split_By_Rows()
    Dim cell As Range, n As Integer

    Set cell = ActiveCell

    For i = 1 To Selection.Rows.Count
        ar = Split(cell, Chr(10))         'делим текст по переносам в массив
        n = UBound(ar)                    'определяем кол-во фрагментов
        cell.Offset(1, 0).Resize(n, 1).EntireRow.Insert             'вставляем пустые строки ниже
        cell.Resize(n + 1, 1) = WorksheetFunction.Transpose(ar)     'вводим в них данные из массива
        Set cell = cell.Offset(n + 1, 0)                            'сдвигаемся на следующую ячейку
    Next i
End Sub
Вернитесь в Excel и выделите ячейки с многострочным текстом, который надо разделить. Затем воспользуйтесь кнопкой Макросы на вкладке Разработчик (Developer — Macros) или сочетанием клавиш Alt+F8, чтобы запустить созданный макрос, который и проделает за вас всю работу:

Вуаля! Программисты — это, на самом деле, просто очень ленивые люди, которые лучше один раз как следует напрягутся, чтобы потом ничего не делать
Ссылки по теме
- Зачистка текста от мусора и лишних символов
- Замена текста и зачистка от неразрывных пробелов функцией ПОДСТАВИТЬ
- Как разделить слипшийся текст на части в Excel
Many users find that using an external keyboard with keyboard shortcuts for Excel helps them work more efficiently. For users with mobility or vision disabilities, keyboard shortcuts can be easier than using the touchscreen and are an essential alternative to using a mouse.
Notes:
-
The shortcuts in this topic refer to the US keyboard layout. Keys for other layouts might not correspond exactly to the keys on a US keyboard.
-
A plus sign (+) in a shortcut means that you need to press multiple keys at the same time.
-
A comma sign (,) in a shortcut means that you need to press multiple keys in order.
This article describes the keyboard shortcuts, function keys, and some other common shortcut keys in Excel for Windows.
Notes:
-
To quickly find a shortcut in this article, you can use the Search. Press Ctrl+F, and then type your search words.
-
If an action that you use often does not have a shortcut key, you can record a macro to create one. For instructions, go to Automate tasks with the Macro Recorder.
-
Download our 50 time-saving Excel shortcuts quick tips guide.
-
Get the Excel 2016 keyboard shortcuts in a Word document: Excel keyboard shortcuts and function keys.
In this topic
-
Frequently used shortcuts
-
Ribbon keyboard shortcuts
-
Use the Access keys for ribbon tabs
-
Work in the ribbon with the keyboard
-
-
Keyboard shortcuts for navigating in cells
-
Keyboard shortcuts for formatting cells
-
Keyboard shortcuts in the Paste Special dialog box in Excel 2013
-
-
Keyboard shortcuts for making selections and performing actions
-
Keyboard shortcuts for working with data, functions, and the formula bar
-
Keyboard shortcuts for refreshing external data
-
Power Pivot keyboard shortcuts
-
Function keys
-
Other useful shortcut keys
Frequently used shortcuts
This table lists the most frequently used shortcuts in Excel.
|
To do this |
Press |
|---|---|
|
Close a workbook. |
Ctrl+W |
|
Open a workbook. |
Ctrl+O |
|
Go to the Home tab. |
Alt+H |
|
Save a workbook. |
Ctrl+S |
|
Copy selection. |
Ctrl+C |
|
Paste selection. |
Ctrl+V |
|
Undo recent action. |
Ctrl+Z |
|
Remove cell contents. |
Delete |
|
Choose a fill color. |
Alt+H, H |
|
Cut selection. |
Ctrl+X |
|
Go to the Insert tab. |
Alt+N |
|
Apply bold formatting. |
Ctrl+B |
|
Center align cell contents. |
Alt+H, A, C |
|
Go to the Page Layout tab. |
Alt+P |
|
Go to the Data tab. |
Alt+A |
|
Go to the View tab. |
Alt+W |
|
Open the context menu. |
Shift+F10 or Windows Menu key |
|
Add borders. |
Alt+H, B |
|
Delete column. |
Alt+H, D, C |
|
Go to the Formula tab. |
Alt+M |
|
Hide the selected rows. |
Ctrl+9 |
|
Hide the selected columns. |
Ctrl+0 |
Top of Page
Ribbon keyboard shortcuts
The ribbon groups related options on tabs. For example, on the Home tab, the Number group includes the Number Format option. Press the Alt key to display the ribbon shortcuts, called Key Tips, as letters in small images next to the tabs and options as shown in the image below.
You can combine the Key Tips letters with the Alt key to make shortcuts called Access Keys for the ribbon options. For example, press Alt+H to open the Home tab, and Alt+Q to move to the Tell me or Search field. Press Alt again to see KeyTips for the options for the selected tab.
Depending on the version of Microsoft 365 you are using, the Search text field at the top of the app window might be called Tell Me instead. Both offer a largely similar experience, but some options and search results can vary.
In Office 2013 and Office 2010, most of the old Alt key menu shortcuts still work, too. However, you need to know the full shortcut. For example, press Alt, and then press one of the old menu keys, for example, E (Edit), V (View), I (Insert), and so on. A notification pops up saying you’re using an access key from an earlier version of Microsoft 365. If you know the entire key sequence, go ahead, and use it. If you don’t know the sequence, press Esc and use Key Tips instead.
Use the Access keys for ribbon tabs
To go directly to a tab on the ribbon, press one of the following access keys. Additional tabs might appear depending on your selection in the worksheet.
|
To do this |
Press |
|---|---|
|
Move to the Tell me or Search field on the ribbon and type a search term for assistance or Help content. |
Alt+Q, then enter the search term. |
|
Open the File menu. |
Alt+F |
|
Open the Home tab and format text and numbers and use the Find tool. |
Alt+H |
|
Open the Insert tab and insert PivotTables, charts, add-ins, Sparklines, pictures, shapes, headers, or text boxes. |
Alt+N |
|
Open the Page Layout tab and work with themes, page setup, scale, and alignment. |
Alt+P |
|
Open the Formulas tab and insert, trace, and customize functions and calculations. |
Alt+M |
|
Open the Data tab and connect to, sort, filter, analyze, and work with data. |
Alt+A |
|
Open the Review tab and check spelling, add notes and threaded comments, and protect sheets and workbooks. |
Alt+R |
|
Open the View tab and preview page breaks and layouts, show and hide gridlines and headings, set zoom magnification, manage windows and panes, and view macros. |
Alt+W |
Top of Page
Work in the ribbon with the keyboard
|
To do this |
Press |
|---|---|
|
Select the active tab on the ribbon and activate the access keys. |
Alt or F10. To move to a different tab, use access keys or the arrow keys. |
|
Move the focus to commands on the ribbon. |
Tab key or Shift+Tab |
|
Move down, up, left, or right, respectively, among the items on the ribbon. |
Arrow keys |
|
Show the tooltip for the ribbon element currently in focus. |
Ctrl+Shift+F10 |
|
Activate a selected button. |
Spacebar or Enter |
|
Open the list for a selected command. |
Down arrow key |
|
Open the menu for a selected button. |
Alt+Down arrow key |
|
When a menu or submenu is open, move to the next command. |
Down arrow key |
|
Expand or collapse the ribbon. |
Ctrl+F1 |
|
Open a context menu. |
Shift+F10 Or, on a Windows keyboard, the Windows Menu key (usually between the Alt Gr and right Ctrl keys) |
|
Move to the submenu when a main menu is open or selected. |
Left arrow key |
|
Move from one group of controls to another. |
Ctrl+Left or Right arrow key |
Top of Page
Keyboard shortcuts for navigating in cells
|
To do this |
Press |
|---|---|
|
Move to the previous cell in a worksheet or the previous option in a dialog box. |
Shift+Tab |
|
Move one cell up in a worksheet. |
Up arrow key |
|
Move one cell down in a worksheet. |
Down arrow key |
|
Move one cell left in a worksheet. |
Left arrow key |
|
Move one cell right in a worksheet. |
Right arrow key |
|
Move to the edge of the current data region in a worksheet. |
Ctrl+Arrow key |
|
Enter the End mode, move to the next nonblank cell in the same column or row as the active cell, and turn off End mode. If the cells are blank, move to the last cell in the row or column. |
End, Arrow key |
|
Move to the last cell on a worksheet, to the lowest used row of the rightmost used column. |
Ctrl+End |
|
Extend the selection of cells to the last used cell on the worksheet (lower-right corner). |
Ctrl+Shift+End |
|
Move to the cell in the upper-left corner of the window when Scroll lock is turned on. |
Home+Scroll lock |
|
Move to the beginning of a worksheet. |
Ctrl+Home |
|
Move one screen down in a worksheet. |
Page down |
|
Move to the next sheet in a workbook. |
Ctrl+Page down |
|
Move one screen to the right in a worksheet. |
Alt+Page down |
|
Move one screen up in a worksheet. |
Page up |
|
Move one screen to the left in a worksheet. |
Alt+Page up |
|
Move to the previous sheet in a workbook. |
Ctrl+Page up |
|
Move one cell to the right in a worksheet. Or, in a protected worksheet, move between unlocked cells. |
Tab key |
|
Open the list of validation choices on a cell that has data validation option applied to it. |
Alt+Down arrow key |
|
Cycle through floating shapes, such as text boxes or images. |
Ctrl+Alt+5, then the Tab key repeatedly |
|
Exit the floating shape navigation and return to the normal navigation. |
Esc |
|
Scroll horizontally. |
Ctrl+Shift, then scroll your mouse wheel up to go left, down to go right |
|
Zoom in. |
Ctrl+Alt+Equal sign ( = ) |
|
Zoom out. |
Ctrl+Alt+Minus sign (-) |
Top of Page
Keyboard shortcuts for formatting cells
|
To do this |
Press |
|---|---|
|
Open the Format Cells dialog box. |
Ctrl+1 |
|
Format fonts in the Format Cells dialog box. |
Ctrl+Shift+F or Ctrl+Shift+P |
|
Edit the active cell and put the insertion point at the end of its contents. Or, if editing is turned off for the cell, move the insertion point into the formula bar. If editing a formula, toggle Point mode off or on so you can use the arrow keys to create a reference. |
F2 |
|
Insert a note. Open and edit a cell note. |
Shift+F2 Shift+F2 |
|
Insert a threaded comment. Open and reply to a threaded comment. |
Ctrl+Shift+F2 Ctrl+Shift+F2 |
|
Open the Insert dialog box to insert blank cells. |
Ctrl+Shift+Plus sign (+) |
|
Open the Delete dialog box to delete selected cells. |
Ctrl+Minus sign (-) |
|
Enter the current time. |
Ctrl+Shift+Colon (:) |
|
Enter the current date. |
Ctrl+Semicolon (;) |
|
Switch between displaying cell values or formulas in the worksheet. |
Ctrl+Grave accent (`) |
|
Copy a formula from the cell above the active cell into the cell or the formula bar. |
Ctrl+Apostrophe (‘) |
|
Move the selected cells. |
Ctrl+X |
|
Copy the selected cells. |
Ctrl+C |
|
Paste content at the insertion point, replacing any selection. |
Ctrl+V |
|
Open the Paste Special dialog box. |
Ctrl+Alt+V |
|
Italicize text or remove italic formatting. |
Ctrl+I or Ctrl+3 |
|
Bold text or remove bold formatting. |
Ctrl+B or Ctrl+2 |
|
Underline text or remove underline. |
Ctrl+U or Ctrl+4 |
|
Apply or remove strikethrough formatting. |
Ctrl+5 |
|
Switch between hiding objects, displaying objects, and displaying placeholders for objects. |
Ctrl+6 |
|
Apply an outline border to the selected cells. |
Ctrl+Shift+Ampersand sign (&) |
|
Remove the outline border from the selected cells. |
Ctrl+Shift+Underscore (_) |
|
Display or hide the outline symbols. |
Ctrl+8 |
|
Use the Fill Down command to copy the contents and format of the topmost cell of a selected range into the cells below. |
Ctrl+D |
|
Apply the General number format. |
Ctrl+Shift+Tilde sign (~) |
|
Apply the Currency format with two decimal places (negative numbers in parentheses). |
Ctrl+Shift+Dollar sign ($) |
|
Apply the Percentage format with no decimal places. |
Ctrl+Shift+Percent sign (%) |
|
Apply the Scientific number format with two decimal places. |
Ctrl+Shift+Caret sign (^) |
|
Apply the Date format with the day, month, and year. |
Ctrl+Shift+Number sign (#) |
|
Apply the Time format with the hour and minute, and AM or PM. |
Ctrl+Shift+At sign (@) |
|
Apply the Number format with two decimal places, thousands separator, and minus sign (-) for negative values. |
Ctrl+Shift+Exclamation point (!) |
|
Open the Insert hyperlink dialog box. |
Ctrl+K |
|
Check spelling in the active worksheet or selected range. |
F7 |
|
Display the Quick Analysis options for selected cells that contain data. |
Ctrl+Q |
|
Display the Create Table dialog box. |
Ctrl+L or Ctrl+T |
|
Open the Workbook Statistics dialog box. |
Ctrl+Shift+G |
Top of Page
Keyboard shortcuts in the Paste Special dialog box in Excel 2013
In Excel 2013, you can paste a specific aspect of the copied data like its formatting or value using the Paste Special options. After you’ve copied the data, press Ctrl+Alt+V, or Alt+E+S to open the Paste Special dialog box.
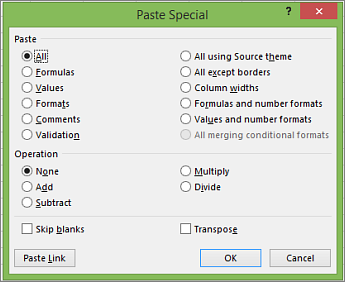
Tip: You can also select Home > Paste > Paste Special.
To pick an option in the dialog box, press the underlined letter for that option. For example, press the letter C to pick the Comments option.
|
To do this |
Press |
|---|---|
|
Paste all cell contents and formatting. |
A |
|
Paste only the formulas as entered in the formula bar. |
F |
|
Paste only the values (not the formulas). |
V |
|
Paste only the copied formatting. |
T |
|
Paste only comments and notes attached to the cell. |
C |
|
Paste only the data validation settings from copied cells. |
N |
|
Paste all cell contents and formatting from copied cells. |
H |
|
Paste all cell contents without borders. |
X |
|
Paste only column widths from copied cells. |
W |
|
Paste only formulas and number formats from copied cells. |
R |
|
Paste only the values (not formulas) and number formats from copied cells. |
U |
Top of Page
Keyboard shortcuts for making selections and performing actions
|
To do this |
Press |
|---|---|
|
Select the entire worksheet. |
Ctrl+A or Ctrl+Shift+Spacebar |
|
Select the current and next sheet in a workbook. |
Ctrl+Shift+Page down |
|
Select the current and previous sheet in a workbook. |
Ctrl+Shift+Page up |
|
Extend the selection of cells by one cell. |
Shift+Arrow key |
|
Extend the selection of cells to the last nonblank cell in the same column or row as the active cell, or if the next cell is blank, to the next nonblank cell. |
Ctrl+Shift+Arrow key |
|
Turn extend mode on and use the arrow keys to extend a selection. Press again to turn off. |
F8 |
|
Add a non-adjacent cell or range to a selection of cells by using the arrow keys. |
Shift+F8 |
|
Start a new line in the same cell. |
Alt+Enter |
|
Fill the selected cell range with the current entry. |
Ctrl+Enter |
|
Complete a cell entry and select the cell above. |
Shift+Enter |
|
Select an entire column in a worksheet. |
Ctrl+Spacebar |
|
Select an entire row in a worksheet. |
Shift+Spacebar |
|
Select all objects on a worksheet when an object is selected. |
Ctrl+Shift+Spacebar |
|
Extend the selection of cells to the beginning of the worksheet. |
Ctrl+Shift+Home |
|
Select the current region if the worksheet contains data. Press a second time to select the current region and its summary rows. Press a third time to select the entire worksheet. |
Ctrl+A or Ctrl+Shift+Spacebar |
|
Select the current region around the active cell. |
Ctrl+Shift+Asterisk sign (*) |
|
Select the first command on the menu when a menu or submenu is visible. |
Home |
|
Repeat the last command or action, if possible. |
Ctrl+Y |
|
Undo the last action. |
Ctrl+Z |
|
Expand grouped rows or columns. |
While hovering over the collapsed items, press and hold the Shift key and scroll down. |
|
Collapse grouped rows or columns. |
While hovering over the expanded items, press and hold the Shift key and scroll up. |
Top of Page
Keyboard shortcuts for working with data, functions, and the formula bar
|
To do this |
Press |
|---|---|
|
Turn on or off tooltips for checking formulas directly in the formula bar or in the cell you’re editing. |
Ctrl+Alt+P |
|
Edit the active cell and put the insertion point at the end of its contents. Or, if editing is turned off for the cell, move the insertion point into the formula bar. If editing a formula, toggle Point mode off or on so you can use the arrow keys to create a reference. |
F2 |
|
Expand or collapse the formula bar. |
Ctrl+Shift+U |
|
Cancel an entry in the cell or formula bar. |
Esc |
|
Complete an entry in the formula bar and select the cell below. |
Enter |
|
Move the cursor to the end of the text when in the formula bar. |
Ctrl+End |
|
Select all text in the formula bar from the cursor position to the end. |
Ctrl+Shift+End |
|
Calculate all worksheets in all open workbooks. |
F9 |
|
Calculate the active worksheet. |
Shift+F9 |
|
Calculate all worksheets in all open workbooks, regardless of whether they have changed since the last calculation. |
Ctrl+Alt+F9 |
|
Check dependent formulas, and then calculate all cells in all open workbooks, including cells not marked as needing to be calculated. |
Ctrl+Alt+Shift+F9 |
|
Display the menu or message for an Error Checking button. |
Alt+Shift+F10 |
|
Display the Function Arguments dialog box when the insertion point is to the right of a function name in a formula. |
Ctrl+A |
|
Insert argument names and parentheses when the insertion point is to the right of a function name in a formula. |
Ctrl+Shift+A |
|
Insert the AutoSum formula |
Alt+Equal sign ( = ) |
|
Invoke Flash Fill to automatically recognize patterns in adjacent columns and fill the current column |
Ctrl+E |
|
Cycle through all combinations of absolute and relative references in a formula if a cell reference or range is selected. |
F4 |
|
Insert a function. |
Shift+F3 |
|
Copy the value from the cell above the active cell into the cell or the formula bar. |
Ctrl+Shift+Straight quotation mark («) |
|
Create an embedded chart of the data in the current range. |
Alt+F1 |
|
Create a chart of the data in the current range in a separate Chart sheet. |
F11 |
|
Define a name to use in references. |
Alt+M, M, D |
|
Paste a name from the Paste Name dialog box (if names have been defined in the workbook). |
F3 |
|
Move to the first field in the next record of a data form. |
Enter |
|
Create, run, edit, or delete a macro. |
Alt+F8 |
|
Open the Microsoft Visual Basic For Applications Editor. |
Alt+F11 |
|
Open the Power Query Editor |
Alt+F12 |
Top of Page
Keyboard shortcuts for refreshing external data
Use the following keys to refresh data from external data sources.
|
To do this |
Press |
|---|---|
|
Stop a refresh operation. |
Esc |
|
Refresh data in the current worksheet. |
Ctrl+F5 |
|
Refresh all data in the workbook. |
Ctrl+Alt+F5 |
Top of Page
Power Pivot keyboard shortcuts
Use the following keyboard shortcuts with Power Pivot in Microsoft 365, Excel 2019, Excel 2016, and Excel 2013.
|
To do this |
Press |
|---|---|
|
Open the context menu for the selected cell, column, or row. |
Shift+F10 |
|
Select the entire table. |
Ctrl+A |
|
Copy selected data. |
Ctrl+C |
|
Delete the table. |
Ctrl+D |
|
Move the table. |
Ctrl+M |
|
Rename the table. |
Ctrl+R |
|
Save the file. |
Ctrl+S |
|
Redo the last action. |
Ctrl+Y |
|
Undo the last action. |
Ctrl+Z |
|
Select the current column. |
Ctrl+Spacebar |
|
Select the current row. |
Shift+Spacebar |
|
Select all cells from the current location to the last cell of the column. |
Shift+Page down |
|
Select all cells from the current location to the first cell of the column. |
Shift+Page up |
|
Select all cells from the current location to the last cell of the row. |
Shift+End |
|
Select all cells from the current location to the first cell of the row. |
Shift+Home |
|
Move to the previous table. |
Ctrl+Page up |
|
Move to the next table. |
Ctrl+Page down |
|
Move to the first cell in the upper-left corner of selected table. |
Ctrl+Home |
|
Move to the last cell in the lower-right corner of selected table. |
Ctrl+End |
|
Move to the first cell of the selected row. |
Ctrl+Left arrow key |
|
Move to the last cell of the selected row. |
Ctrl+Right arrow key |
|
Move to the first cell of the selected column. |
Ctrl+Up arrow key |
|
Move to the last cell of selected column. |
Ctrl+Down arrow key |
|
Close a dialog box or cancel a process, such as a paste operation. |
Ctrl+Esc |
|
Open the AutoFilter Menu dialog box. |
Alt+Down arrow key |
|
Open the Go To dialog box. |
F5 |
|
Recalculate all formulas in the Power Pivot window. For more information, see Recalculate Formulas in Power Pivot. |
F9 |
Top of Page
Function keys
|
Key |
Description |
|---|---|
|
F1 |
|
|
F2 |
|
|
F3 |
|
|
F4 |
|
|
F5 |
|
|
F6 |
|
|
F7 |
|
|
F8 |
|
|
F9 |
|
|
F10 |
|
|
F11 |
|
|
F12 |
|
Top of Page
Other useful shortcut keys
|
Key |
Description |
|---|---|
|
Alt |
For example,
|
|
Arrow keys |
|
|
Backspace |
|
|
Delete |
|
|
End |
|
|
Enter |
|
|
Esc |
|
|
Home |
|
|
Page down |
|
|
Page up |
|
|
Shift |
|
|
Spacebar |
|
|
Tab key |
|
Top of Page
See also
Excel help & learning
Basic tasks using a screen reader with Excel
Use a screen reader to explore and navigate Excel
Screen reader support for Excel
This article describes the keyboard shortcuts, function keys, and some other common shortcut keys in Excel for Mac.
Notes:
-
The settings in some versions of the Mac operating system (OS) and some utility applications might conflict with keyboard shortcuts and function key operations in Microsoft 365 for Mac.
-
If you don’t find a keyboard shortcut here that meets your needs, you can create a custom keyboard shortcut. For instructions, go to Create a custom keyboard shortcut for Office for Mac.
-
Many of the shortcuts that use the Ctrl key on a Windows keyboard also work with the Control key in Excel for Mac. However, not all do.
-
To quickly find a shortcut in this article, you can use the Search. Press
+F, and then type your search words. -
Click-to-add is available but requires a setup. Select Excel> Preferences > Edit > Enable Click to Add Mode. To start a formula, type an equal sign ( = ), and then select cells to add them together. The plus sign (+) will be added automatically.
 +F, and then type your search words.
In this topic
-
Frequently used shortcuts
-
Shortcut conflicts
-
Change system preferences for keyboard shortcuts with the mouse
-
-
Work in windows and dialog boxes
-
Move and scroll in a sheet or workbook
-
Enter data on a sheet
-
Work in cells or the Formula bar
-
Format and edit data
-
Select cells, columns, or rows
-
Work with a selection
-
Use charts
-
Sort, filter, and use PivotTable reports
-
Outline data
-
Use function key shortcuts
-
Change function key preferences with the mouse
-
-
Drawing
Frequently used shortcuts
This table itemizes the most frequently used shortcuts in Excel for Mac.
|
To do this |
Press |
|---|---|
|
Paste selection. |
|
|
Copy selection. |
|
|
Clear selection. |
Delete |
|
Save workbook. |
|
|
Undo action. |
|
|
Redo action. |
|
|
Cut selection. |
|
|
Apply bold formatting. |
|
|
Print workbook. |
|
|
Open Visual Basic. |
Option+F11 |
|
Fill cells down. |
|
|
Fill cells right. |
|
|
Insert cells. |
Control+Shift+Equal sign ( = ) |
|
Delete cells. |
|
|
Calculate all open workbooks. |
|
|
Close window. |
|
|
Quit Excel. |
|
|
Display the Go To dialog box. |
Control+G |
|
Display the Format Cells dialog box. |
|
|
Display the Replace dialog box. |
Control+H |
|
Use Paste Special. |
|
|
Apply underline formatting. |
|
|
Apply italic formatting. |
|
|
Open a new blank workbook. |
|
|
Create a new workbook from template. |
|
|
Display the Save As dialog box. |
|
|
Display the Help window. |
F1 |
|
Select all. |
|
|
Add or remove a filter. |
|
|
Minimize or maximize the ribbon tabs. |
|
|
Display the Open dialog box. |
|
|
Check spelling. |
F7 |
|
Open the thesaurus. |
Shift+F7 |
|
Display the Formula Builder. |
Shift+F3 |
|
Open the Define Name dialog box. |
|
|
Insert or reply to a threaded comment. |
|
|
Open the Create names dialog box. |
|
|
Insert a new sheet. * |
Shift+F11 |
|
Print preview. |
|

Top of Page
Shortcut conflicts
Some Windows keyboard shortcuts conflict with the corresponding default macOS keyboard shortcuts. This topic flags such shortcuts with an asterisk (*). To use these shortcuts, you might have to change your Mac keyboard settings to change the Show Desktop shortcut for the key.
Change system preferences for keyboard shortcuts with the mouse
-
On the Apple menu, select System Settings.
-
Select Keyboard.
-
Select Keyboard Shortcuts.
-
Find the shortcut that you want to use in Excel and clear the checkbox for it.
Top of Page
Work in windows and dialog boxes
|
To do this |
Press |
|---|---|
|
Expand or minimize the ribbon. |
|
|
Switch to full screen view. |
|
|
Switch to the next application. |
|
|
Switch to the previous application. |
Shift+ |
|
Close the active workbook window. |
|
|
Take a screenshot and save it on your desktop. |
Shift+ |
|
Minimize the active window. |
Control+F9 |
|
Maximize or restore the active window. |
Control+F10 |
|
Hide Excel. |
|
|
Move to the next box, option, control, or command. |
Tab key |
|
Move to the previous box, option, control, or command. |
Shift+Tab |
|
Exit a dialog box or cancel an action. |
Esc |
|
Perform the action assigned to the default button (the button with the bold outline). |
Return |
|
Cancel the command and close the dialog box or menu. |
Esc |
Top of Page
Move and scroll in a sheet or workbook
|
To do this |
Press |
|---|---|
|
Move one cell up, down, left, or right. |
Arrow keys |
|
Move to the edge of the current data region. |
|
|
Move to the beginning of the row. |
Home |
|
Move to the beginning of the sheet. |
Control+Home |
|
Move to the last cell in use on the sheet. |
Control+End |
|
Move down one screen. |
Page down |
|
Move up one screen. |
Page up |
|
Move one screen to the right. |
Option+Page down |
|
Move one screen to the left. |
Option+Page up |
|
Move to the next sheet in the workbook. |
Control+Page down |
|
Move to the previous sheet in the workbook. |
Control+Page down |
|
Scroll to display the active cell. |
Control+Delete |
|
Display the Go To dialog box. |
Control+G |
|
Display the Find dialog box. |
Control+F |
|
Access search (when in a cell or when a cell is selected). |
|
|
Move between unlocked cells on a protected sheet. |
Tab key |
|
Scroll horizontally. |
Shift, then scroll the mouse wheel up for left, down for right |
Tip: To use the arrow keys to move between cells in Excel for Mac 2011, you must turn Scroll Lock off. To toggle Scroll Lock off or on, press Shift+F14. Depending on the type of your keyboard, you might need to use the Control, Option, or the Command key instead of the Shift key. If you are using a MacBook, you might need to plug in a USB keyboard to use the F14 key combination.
Top of Page
Enter data on a sheet
|
To do this |
Press |
|---|---|
|
Edit the selected cell. |
F2 |
|
Complete a cell entry and move forward in the selection. |
Return |
|
Start a new line in the same cell. |
Option+Return or Control+Option+Return |
|
Fill the selected cell range with the text that you type. |
|
|
Complete a cell entry and move up in the selection. |
Shift+Return |
|
Complete a cell entry and move to the right in the selection. |
Tab key |
|
Complete a cell entry and move to the left in the selection. |
Shift+Tab |
|
Cancel a cell entry. |
Esc |
|
Delete the character to the left of the insertion point or delete the selection. |
Delete |
|
Delete the character to the right of the insertion point or delete the selection. Note: Some smaller keyboards do not have this key. |
|
|
Delete text to the end of the line. Note: Some smaller keyboards do not have this key. |
Control+ |
|
Move one character up, down, left, or right. |
Arrow keys |
|
Move to the beginning of the line. |
Home |
|
Insert a note. |
Shift+F2 |
|
Open and edit a cell note. |
Shift+F2 |
|
Insert a threaded comment. |
|
|
Open and reply to a threaded comment. |
|
|
Fill down. |
Control+D |
|
Fill to the right. |
Control+R |
|
Invoke Flash Fill to automatically recognize patterns in adjacent columns and fill the current column. |
Control+E |
|
Define a name. |
Control+L |
Top of Page
Work in cells or the Formula bar
|
To do this |
Press |
|---|---|
|
Turn on or off tooltips for checking formulas directly in the formula bar. |
Control+Option+P |
|
Edit the selected cell. |
F2 |
|
Expand or collapse the formula bar. |
Control+Shift+U |
|
Edit the active cell and then clear it or delete the preceding character in the active cell as you edit the cell contents. |
Delete |
|
Complete a cell entry. |
Return |
|
Enter a formula as an array formula. |
Shift+ |
|
Cancel an entry in the cell or formula bar. |
Esc |
|
Display the Formula Builder after you type a valid function name in a formula |
Control+A |
|
Insert a hyperlink. |
|
|
Edit the active cell and position the insertion point at the end of the line. |
Control+U |
|
Open the Formula Builder. |
Shift+F3 |
|
Calculate the active sheet. |
Shift+F9 |
|
Display the context menu. |
Shift+F10 |
|
Start a formula. |
Equal sign ( = ) |
|
Toggle the formula reference style between absolute, relative, and mixed. |
|
|
Insert the AutoSum formula. |
Shift+ |
|
Enter the date. |
Control+Semicolon (;) |
|
Enter the time. |
|
|
Copy the value from the cell above the active cell into the cell or the formula bar. |
Control+Shift+Inch mark/Straight double quote («) |
|
Alternate between displaying cell values and displaying cell formulas. |
Control+Grave accent (`) |
|
Copy a formula from the cell above the active cell into the cell or the formula bar. |
Control+Apostrophe (‘) |
|
Display the AutoComplete list. |
Option+Down arrow key |
|
Define a name. |
Control+L |
|
Open the Smart Lookup pane. |
Control+Option+ |
Top of Page
Format and edit data
|
To do this |
Press |
|---|---|
|
Edit the selected cell. |
F2 |
|
Create a table. |
|
|
Insert a line break in a cell. |
|
|
Insert special characters like symbols, including emoji. |
Control+ |
|
Increase font size. |
Shift+ |
|
Decrease font size. |
Shift+ |
|
Align center. |
|
|
Align left. |
|
|
Display the Modify Cell Style dialog box. |
Shift+ |
|
Display the Format Cells dialog box. |
|
|
Apply the general number format. |
Control+Shift+Tilde (~) |
|
Apply the currency format with two decimal places (negative numbers appear in red with parentheses). |
Control+Shift+Dollar sign ($) |
|
Apply the percentage format with no decimal places. |
Control+Shift+Percent sign (%) |
|
Apply the exponential number format with two decimal places. |
Control+Shift+Caret (^) |
|
Apply the date format with the day, month, and year. |
Control+Shift+Number sign (#) |
|
Apply the time format with the hour and minute, and indicate AM or PM. |
Control+Shift+At symbol (@) |
|
Apply the number format with two decimal places, thousands separator, and minus sign (-) for negative values. |
Control+Shift+Exclamation point (!) |
|
Apply the outline border around the selected cells. |
|
|
Add an outline border to the right of the selection. |
|
|
Add an outline border to the left of the selection. |
|
|
Add an outline border to the top of the selection. |
|
|
Add an outline border to the bottom of the selection. |
|
|
Remove outline borders. |
|
|
Apply or remove bold formatting. |
|
|
Apply or remove italic formatting. |
|
|
Apply or remove underline formatting. |
|
|
Apply or remove strikethrough formatting. |
Shift+ |
|
Hide a column. |
|
|
Unhide a column. |
Shift+ |
|
Hide a row. |
|
|
Unhide a row. |
Shift+ |
|
Edit the active cell. |
Control+U |
|
Cancel an entry in the cell or the formula bar. |
Esc |
|
Edit the active cell and then clear it or delete the preceding character in the active cell as you edit the cell contents. |
Delete |
|
Paste text into the active cell. |
|
|
Complete a cell entry |
Return |
|
Give selected cells the current cell’s entry. |
|
|
Enter a formula as an array formula. |
Shift+ |
|
Display the Formula Builder after you type a valid function name in a formula. |
Control+A |
Top of Page
Select cells, columns, or rows
|
To do this |
Press |
|---|---|
|
Extend the selection by one cell. |
Shift+Arrow key |
|
Extend the selection to the last nonblank cell in the same column or row as the active cell. |
Shift+ |
|
Extend the selection to the beginning of the row. |
Shift+Home |
|
Extend the selection to the beginning of the sheet. |
Control+Shift+Home |
|
Extend the selection to the last cell used |
Control+Shift+End |
|
Select the entire column. * |
Control+Spacebar |
|
Select the entire row. |
Shift+Spacebar |
|
Select the current region or entire sheet. Press more than once to expand the selection. |
|
|
Select only visible cells. |
Shift+ |
|
Select only the active cell when multiple cells are selected. |
Shift+Delete |
|
Extend the selection down one screen. |
Shift+Page down |
|
Extend the selection up one screen |
Shift+Page up |
|
Alternate between hiding objects, displaying objects, |
Control+6 |
|
Turn on the capability to extend a selection |
F8 |
|
Add another range of cells to the selection. |
Shift+F8 |
|
Select the current array, which is the array that the |
Control+Forward slash (/) |
|
Select cells in a row that don’t match the value |
Control+Backward slash () |
|
Select only cells that are directly referred to by formulas in the selection. |
Control+Shift+Left bracket ([) |
|
Select all cells that are directly or indirectly referred to by formulas in the selection. |
Control+Shift+Left brace ({) |
|
Select only cells with formulas that refer directly to the active cell. |
Control+Right bracket (]) |
|
Select all cells with formulas that refer directly or indirectly to the active cell. |
Control+Shift+Right brace (}) |
Top of Page
Work with a selection
|
To do this |
Press |
|---|---|
|
Copy a selection. |
|
|
Paste a selection. |
|
|
Cut a selection. |
|
|
Clear a selection. |
Delete |
|
Delete the selection. |
Control+Hyphen |
|
Undo the last action. |
|
|
Hide a column. |
|
|
Unhide a column. |
|
|
Hide a row. |
|
|
Unhide a row. |
|
|
Move selected rows, columns, or cells. |
Hold the Shift key while you drag a selected row, column, or selected cells to move the selected cells and drop to insert them in a new location. If you don’t hold the Shift key while you drag and drop, the selected cells will be cut from the original location and pasted to the new location (not inserted). |
|
Move from top to bottom within the selection (down). * |
Return |
|
Move from bottom to top within the selection (up). * |
Shift+Return |
|
Move from left to right within the selection, |
Tab key |
|
Move from right to left within the selection, |
Shift+Tab |
|
Move clockwise to the next corner of the selection. |
Control+Period (.) |
|
Group selected cells. |
|
|
Ungroup selected cells. |
|
* These shortcuts might move in another direction other than down or up. If you’d like to change the direction of these shortcuts using the mouse, select Excel > Preferences > Edit, and then, in After pressing Return, move selection, select the direction you want to move to.
Top of Page
Use charts
|
To do this |
Press |
|---|---|
|
Insert a new chart sheet. * |
F11 |
|
Cycle through chart object selection. |
Arrow keys |
Top of Page
Sort, filter, and use PivotTable reports
|
To do this |
Press |
|---|---|
|
Open the Sort dialog box. |
|
|
Add or remove a filter. |
|
|
Display the Filter list or PivotTable page |
Option+Down arrow key |
Top of Page
Outline data
|
To do this |
Press |
|---|---|
|
Display or hide outline symbols. |
Control+8 |
|
Hide selected rows. |
Control+9 |
|
Unhide selected rows. |
Control+Shift+Left parenthesis (() |
|
Hide selected columns. |
Control+Zero (0) |
|
Unhide selected columns. |
Control+Shift+Right parenthesis ()) |
Top of Page
Use function key shortcuts
Excel for Mac uses the function keys for common commands, including Copy and Paste. For quick access to these shortcuts, you can change your Apple system preferences, so you don’t have to press the Fn key every time you use a function key shortcut.
Note: Changing system function key preferences affects how the function keys work for your Mac, not just Excel for Mac. After changing this setting, you can still perform the special features printed on a function key. Just press the Fn key. For example, to use the F12 key to change your volume, you would press Fn+F12.
If a function key doesn’t work as you expect it to, press the Fn key in addition to the function key. If you don’t want to press the Fn key each time, you can change your Apple system preferences. For instructions, go to Change function key preferences with the mouse.
The following table provides the function key shortcuts for Excel for Mac.
|
To do this |
Press |
|---|---|
|
Display the Help window. |
F1 |
|
Edit the selected cell. |
F2 |
|
Insert a note or open and edit a cell note. |
Shift+F2 |
|
Insert a threaded comment or open and reply to a threaded comment. |
|
|
Open the Save dialog box. |
Option+F2 |
|
Open the Formula Builder. |
Shift+F3 |
|
Open the Define Name dialog box. |
|
|
Close a window or a dialog box. |
|
|
Display the Go To dialog box. |
F5 |
|
Display the Find dialog box. |
Shift+F5 |
|
Move to the Search Sheet dialog box. |
Control+F5 |
|
Switch focus between the worksheet, ribbon, task pane, and status bar. |
F6 or Shift+F6 |
|
Check spelling. |
F7 |
|
Open the thesaurus. |
Shift+F7 |
|
Extend the selection. |
F8 |
|
Add to the selection. |
Shift+F8 |
|
Display the Macro dialog box. |
Option+F8 |
|
Calculate all open workbooks. |
F9 |
|
Calculate the active sheet. |
Shift+F9 |
|
Minimize the active window. |
Control+F9 |
|
Display the context menu, or «right click» menu. |
Shift+F10 |
|
Display a pop-up menu (on object button menu), such as by clicking the button after you paste into a sheet. |
Option+Shift+F10 |
|
Maximize or restore the active window. |
Control+F10 |
|
Insert a new chart sheet.* |
F11 |
|
Insert a new sheet.* |
Shift+F11 |
|
Insert an Excel 4.0 macro sheet. |
|
|
Open Visual Basic. |
Option+F11 |
|
Display the Save As dialog box. |
F12 |
|
Display the Open dialog box. |
|
|
Open the Power Query Editor |
Option+F12 |
Top of Page
Change function key preferences with the mouse
-
On the Apple menu, select System Preferences > Keyboard.
-
On the Keyboard tab, select the checkbox for Use all F1, F2, etc. keys as standard function keys.
Drawing
|
To do this |
Press |
|---|---|
|
Toggle Drawing mode on and off. |
|
Top of Page
See also
Excel help & learning
Use a screen reader to explore and navigate Excel
Basic tasks using a screen reader with Excel
Screen reader support for Excel
This article describes the keyboard shortcuts in Excel for iOS.
Notes:
-
If you’re familiar with keyboard shortcuts on your macOS computer, the same key combinations work with Excel for iOS using an external keyboard, too.
-
To quickly find a shortcut, you can use the Search. Press
+F and then type your search words.
In this topic
-
Navigate the worksheet
-
Format and edit data
-
Work in cells or the formula bar
Navigate the worksheet
|
To do this |
Press |
|---|---|
|
Move one cell to the right. |
Tab key |
|
Move one cell up, down, left, or right. |
Arrow keys |
|
Move to the next sheet in the workbook. |
Option+Right arrow key |
|
Move to the previous sheet in the workbook. |
Option+Left arrow key |
Top of Page
Format and edit data
|
To do this |
Press |
|---|---|
|
Apply outline border. |
|
|
Remove outline border. |
|
|
Hide column(s). |
|
|
Hide row(s). |
Control+9 |
|
Unhide column(s). |
Shift+ |
|
Unhide row(s). |
Shift+Control+9 or Shift+Control+Left parenthesis (() |
Top of Page
Work in cells or the formula bar
|
To do this |
Press |
|---|---|
|
Move to the cell on the right. |
Tab key |
|
Move within cell text. |
Arrow keys |
|
Copy a selection. |
|
|
Paste a selection. |
|
|
Cut a selection. |
|
|
Undo an action. |
|
|
Redo an action. |
|
|
Apply bold formatting to the selected text. |
|
|
Apply italic formatting to the selected text. |
|
|
Underline the selected text. |
|
|
Select all. |
|
|
Select a range of cells. |
Shift+Left or Right arrow key |
|
Insert a line break within a cell. |
|
|
Move the cursor to the beginning of the current line within a cell. |
|
|
Move the cursor to the end of the current line within a cell. |
|
|
Move the cursor to the beginning of the current cell. |
|
|
Move the cursor to the end of the current cell. |
|
|
Move the cursor up by one paragraph within a cell that contains a line break. |
Option+Up arrow key |
|
Move the cursor down by one paragraph within a cell that contains a line break. |
Option+Down arrow key |
|
Move the cursor right by one word. |
Option+Right arrow key |
|
Move the cursor left by one word. |
Option+Left arrow key |
|
Insert an AutoSum formula. |
Shift+ |
Top of Page
See also
Excel help & learning
Screen reader support for Excel
Basic tasks using a screen reader with Excel
Use a screen reader to explore and navigate Excel
This article describes the keyboard shortcuts in Excel for Android.
Notes:
-
If you’re familiar with keyboard shortcuts on your Windows computer, the same key combinations work with Excel for Android using an external keyboard, too.
-
To quickly find a shortcut, you can use the Search. Press Control+F and then type your search words.
In this topic
-
Navigate the worksheet
-
Work with cells
Navigate the worksheet
|
To do this |
Press |
|---|---|
|
Move one cell to the right. |
Tab key |
|
Move one cell up, down, left, or right. |
Up, Down, Left, or Right arrow key |
Top of Page
Work with cells
|
To do this |
Press |
|---|---|
|
Save a worksheet. |
Control+S |
|
Copy a selection. |
Control+C |
|
Paste a selection. |
Control+V |
|
Cut a selection. |
Control+X |
|
Undo an action. |
Control+Z |
|
Redo an action. |
Control+Y |
|
Apply bold formatting. |
Control+B |
|
Apply italic formatting. |
Control+I |
|
Apply underline formatting. |
Control+U |
|
Select all. |
Control+A |
|
Find. |
Control+F |
|
Insert a line break within a cell. |
Alt+Enter |
Top of Page
See also
Excel help & learning
Screen reader support for Excel
Basic tasks using a screen reader with Excel
Use a screen reader to explore and navigate Excel
This article describes the keyboard shortcuts in Excel for the web.
Notes:
-
If you use Narrator with the Windows 10 Fall Creators Update, you have to turn off scan mode in order to edit documents, spreadsheets, or presentations with Microsoft 365 for the web. For more information, refer to Turn off virtual or browse mode in screen readers in Windows 10 Fall Creators Update.
-
To quickly find a shortcut, you can use the Search. Press Ctrl+F and then type your search words.
-
When you use Excel for the web, we recommend that you use Microsoft Edge as your web browser. Because Excel for the web runs in your web browser, the keyboard shortcuts are different from those in the desktop program. For example, you’ll use Ctrl+F6 instead of F6 for jumping in and out of the commands. Also, common shortcuts like F1 (Help) and Ctrl+O (Open) apply to the web browser — not Excel for the web.
In this article
-
Quick tips for using keyboard shortcuts with Excel for the web
-
Frequently used shortcuts
-
Access keys: Shortcuts for using the ribbon
-
Keyboard shortcuts for editing cells
-
Keyboard shortcuts for entering data
-
Keyboard shortcuts for editing data within a cell
-
Keyboard shortcuts for formatting cells
-
Keyboard shortcuts for moving and scrolling within worksheets
-
Keyboard shortcuts for working with objects
-
Keyboard shortcuts for working with cells, rows, columns, and objects
-
Keyboard shortcuts for moving within a selected range
-
Keyboard shortcuts for calculating data
-
Accessibility Shortcuts Menu (Alt+Shift+A)
-
Control keyboard shortcuts in Excel for the web by overriding browser keyboard shortcuts
Quick tips for using keyboard shortcuts with Excel for the web
-
To find any command quickly, press Alt+Windows logo key, Q to jump to the Search or Tell Me text field. In Search or Tell Me, type a word or the name of a command you want (available only in Editing mode). Search or Tell Me searches for related options and provides a list. Use the Up and Down arrow keys to select a command, and then press Enter.
Depending on the version of Microsoft 365 you are using, the Search text field at the top of the app window might be called Tell Me instead. Both offer a largely similar experience, but some options and search results can vary.
-
To jump to a particular cell in a workbook, use the Go To option: press Ctrl+G, type the cell reference (such as B14), and then press Enter.
-
If you use a screen reader, go to Accessibility Shortcuts Menu (Alt+Shift+A).
Frequently used shortcuts
These are the most frequently used shortcuts for Excel for the web.
Tip: To quickly create a new worksheet in Excel for the web, open your browser, type Excel.new in the address bar, and then press Enter.
|
To do this |
Press |
|---|---|
|
Go to a specific cell. |
Ctrl+G |
|
Move down. |
Page down or Down arrow key |
|
Move up. |
Page up or Up arrow key |
|
Print a workbook. |
Ctrl+P |
|
Copy selection. |
Ctrl+C |
|
Paste selection. |
Ctrl+V |
|
Cut selection. |
Ctrl+X |
|
Undo action. |
Ctrl+Z |
|
Open workbook. |
Ctrl+O |
|
Close workbook. |
Ctrl+W |
|
Open the Save As dialog box. |
Alt+F2 |
|
Use Find. |
Ctrl+F or Shift+F3 |
|
Apply bold formatting. |
Ctrl+B |
|
Open the context menu. |
|
|
Jump to Search or Tell me. |
Alt+Q |
|
Repeat Find downward. |
Shift+F4 |
|
Repeat Find upward. |
Ctrl+Shift+F4 |
|
Insert a chart. |
Alt+F1 |
|
Display the access keys (ribbon commands) on the classic ribbon when using Narrator. |
Alt+Period (.) |
Top of Page
Access keys: Shortcuts for using the ribbon
Excel for the web offers access keys, keyboard shortcuts to navigate the ribbon. If you’ve used access keys to save time on Excel for desktop computers, you’ll find access keys very similar in Excel for the web.
In Excel for the web, access keys all start with Alt+Windows logo key, then add a letter for the ribbon tab. For example, to go to the Review tab, press Alt+Windows logo key, R.
Note: To learn how to override the browser’s Alt-based ribbon shortcuts, go to Control keyboard shortcuts in Excel for the web by overriding browser keyboard shortcuts.
If you’re using Excel for the web on a Mac computer, press Control+Option to start.
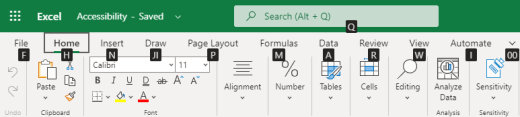
-
To get to the ribbon, press Alt+Windows logo key, or press Ctrl+F6 until you reach the Home tab.
-
To move between tabs on the ribbon, press the Tab key.
-
To hide the ribbon so you have more room to work, press Ctrl+F1. To display the ribbon again, press Ctrl+F1.
Go to the access keys for the ribbon
To go directly to a tab on the ribbon, press one of the following access keys:
|
To do this |
Press |
|---|---|
|
Go to the Search or Tell Me field on the ribbon and type a search term. |
Alt+Windows logo key, Q |
|
Open the File menu. |
Alt+Windows logo key, F |
|
Open the Home tab and format text and numbers or use other tools such as Sort & Filter. |
Alt+Windows logo key, H |
|
Open the Insert tab and insert a function, table, chart, hyperlink, or threaded comment. |
Alt+Windows logo key, N |
|
Open the Data tab and refresh connections or use data tools. |
Alt+Windows logo key, A |
|
Open the Review tab and use the Accessibility Checker or work with threaded comments and notes. |
Alt+Windows logo key, R |
|
Open the View tab to choose a view, freeze rows or columns in your worksheet, or show gridlines and headers. |
Alt+Windows logo key, W |
Top of Page
Work in the ribbon tabs and menus
The shortcuts in this table can save time when you work with the ribbon tabs and ribbon menus.
|
To do this |
Press |
|---|---|
|
Select the active tab of the ribbon and activate the access keys. |
Alt+Windows logo key. To move to a different tab, use an access key or the Tab key. |
|
Move the focus to commands on the ribbon. |
Enter, then the Tab key or Shift+Tab |
|
Activate a selected button. |
Spacebar or Enter |
|
Open the list for a selected command. |
Spacebar or Enter |
|
Open the menu for a selected button. |
Alt+Down arrow key |
|
When a menu or submenu is open, move to the next command. |
Esc |
Top of Page
Keyboard shortcuts for editing cells
Tip: If a spreadsheet opens in the Viewing mode, editing commands won’t work. To switch to Editing mode, press Alt+Windows logo key, Z, M, E.
|
To do this |
Press |
|---|---|
|
Insert a row above the current row. |
Alt+Windows logo key, H, I, R |
|
Insert a column to the left of the current column. |
Alt+Windows logo key, H, I, C |
|
Cut selection. |
Ctrl+X |
|
Copy selection. |
Ctrl+C |
|
Paste selection. |
Ctrl+V |
|
Undo an action. |
Ctrl+Z |
|
Redo an action. |
Ctrl+Y |
|
Start a new line in the same cell. |
Alt+Enter |
|
Insert a hyperlink. |
Ctrl+K |
|
Insert a table. |
Ctrl+L |
|
Insert a function. |
Shift+F3 |
|
Increase font size. |
Ctrl+Shift+Right angle bracket (>) |
|
Decrease font size. |
Ctrl+Shift+Left angle bracket (<) |
|
Apply a filter. |
Alt+Windows logo key, A, T |
|
Re-apply a filter. |
Ctrl+Alt+L |
|
Toggle AutoFilter on and off. |
Ctrl+Shift+L |
Top of Page
Keyboard shortcuts for entering data
|
To do this |
Press |
|---|---|
|
Complete cell entry and select the cell below. |
Enter |
|
Complete cell entry and select the cell above. |
Shift+Enter |
|
Complete cell entry and select the next cell in the row. |
Tab key |
|
Complete cell entry and select the previous cell in the row. |
Shift+Tab |
|
Cancel cell entry. |
Esc |
Top of Page
Keyboard shortcuts for editing data within a cell
|
To do this |
Press |
|---|---|
|
Edit the selected cell. |
F2 |
|
Cycle through all the various combinations of absolute and relative references when a cell reference or range is selected in a formula. |
F4 |
|
Clear the selected cell. |
Delete |
|
Clear the selected cell and start editing. |
Backspace |
|
Go to beginning of cell line. |
Home |
|
Go to end of cell line. |
End |
|
Select right by one character. |
Shift+Right arrow key |
|
Select to the beginning of cell data. |
Shift+Home |
|
Select to the end of cell data. |
Shift+End |
|
Select left by one character. |
Shift+Left arrow key |
|
Extend selection to the last nonblank cell in the same column or row as the active cell, or if the next cell is blank, to the next nonblank cell. |
Ctrl+Shift+Right arrow key or Ctrl+Shift+Left arrow key |
|
Insert the current date. |
Ctrl+Semicolon (;) |
|
Insert the current time. |
Ctrl+Shift+Semicolon (;) |
|
Copy a formula from the cell above. |
Ctrl+Apostrophe (‘) |
|
Copy the value from the cell above. |
Ctrl+Shift+Apostrophe (‘) |
|
Insert a formula argument. |
Ctrl+Shift+A |
Top of Page
Keyboard shortcuts for formatting cells
|
To do this |
Press |
|---|---|
|
Apply bold formatting. |
Ctrl+B |
|
Apply italic formatting. |
Ctrl+I |
|
Apply underline formatting. |
Ctrl+U |
|
Paste formatting. |
Shift+Ctrl+V |
|
Apply the outline border to the selected cells. |
Ctrl+Shift+Ampersand (&) |
|
Apply the number format. |
Ctrl+Shift+1 |
|
Apply the time format. |
Ctrl+Shift+2 |
|
Apply the date format. |
Ctrl+Shift+3 |
|
Apply the currency format. |
Ctrl+Shift+4 |
|
Apply the percentage format. |
Ctrl+Shift+5 |
|
Apply the scientific format. |
Ctrl+Shift+6 |
|
Apply outside border. |
Ctrl+Shift+7 |
|
Open the Number Format dialog box. |
Ctrl+1 |
Top of Page
Keyboard shortcuts for moving and scrolling within worksheets
|
To do this |
Press |
|---|---|
|
Move up one cell. |
Up arrow key or Shift+Enter |
|
Move down one cell. |
Down arrow key or Enter |
|
Move right one cell. |
Right arrow key or Tab key |
|
Go to the beginning of the row. |
Home |
|
Go to cell A1. |
Ctrl+Home |
|
Go to the last cell of the used range. |
Ctrl+End |
|
Move down one screen (28 rows). |
Page down |
|
Move up one screen (28 rows). |
Page up |
|
Move to the edge of the current data region. |
Ctrl+Right arrow key or Ctrl+Left arrow key |
|
Move between ribbon and workbook content. |
Ctrl+F6 |
|
Move to a different ribbon tab. |
Tab key Press Enter to go to the ribbon for the tab. |
|
Insert a new sheet. |
Shift+F11 |
|
Switch to the next sheet. |
Alt+Ctrl+Page down |
|
Switch to the next sheet (when in Microsoft Teams or a browser other than Chrome). |
Ctrl+Page down |
|
Switch to the previous sheet. |
Alt+Ctrl+Page up |
|
Switch to previous sheet (when in Microsoft Teams or a browser other than Chrome). |
Ctrl+Page up |
Top of Page
Keyboard shortcuts for working with objects
|
To do this |
Press |
|---|---|
|
Open menu or drill down. |
Alt+Down arrow key |
|
Close menu or drill up. |
Alt+Up arrow key |
|
Follow hyperlink. |
Ctrl+Enter |
|
Open a note for editing. |
Shift+F2 |
|
Open and reply to a threaded comment. |
Ctrl+Shift+F2 |
|
Rotate an object left. |
Alt+Left arrow key |
|
Rotate an object right. |
Alt+Right arrow key |
Top of Page
Keyboard shortcuts for working with cells, rows, columns, and objects
|
To do this |
Press |
|---|---|
|
Select a range of cells. |
Shift+Arrow keys |
|
Select an entire column. |
Ctrl+Spacebar |
|
Select an entire row. |
Shift+Spacebar |
|
Extend selection to the last nonblank cell in the same column or row as the active cell, or if the next cell is blank, to the next nonblank cell. |
Ctrl+Shift+Right arrow key or Ctrl+Shift+Left arrow key |
|
Add a non-adjacent cell or range to a selection. |
Shift+F8 |
|
Insert cells, rows, or columns. |
Ctrl+Plus sign (+) |
|
Delete cells, rows, or columns. |
Ctrl+Minus sign (-) |
|
Hide rows. |
Ctrl+9 |
|
Unhide rows. |
Ctrl+Shift+9 |
|
Hide columns |
Ctrl+0 |
|
Unhide columns |
Ctrl+Shift+0 |
Top of Page
Keyboard shortcuts for moving within a selected range
|
To do this |
Press |
|---|---|
|
Move from top to bottom (or forward through the selection). |
Enter |
|
Move from bottom to top (or back through the selection). |
Shift+Enter |
|
Move forward through a row (or down through a single-column selection). |
Tab key |
|
Move back through a row (or up through a single-column selection). |
Shift+Tab |
|
Move to an active cell. |
Shift+Backspace |
|
Move to an active cell and keep the selection. |
Ctrl+Backspace |
|
Rotate the active cell through the corners of the selection. |
Ctrl+Period (.) |
|
Move to the next selected range. |
Ctrl+Alt+Right arrow key |
|
Move to the previous selected range. |
Ctrl+Alt+Left arrow key |
|
Extend selection to the last used cell in the sheet. |
Ctrl+Shift+End |
|
Extend selection to the first cell in the sheet. |
Ctrl+Shift+Home |
Top of Page
Keyboard shortcuts for calculating data
|
To do this |
Press |
|---|---|
|
Calculate workbook (refresh). |
F9 |
|
Perform full calculation. |
Ctrl+Shift+Alt+F9 |
|
Refresh external data. |
Alt+F5 |
|
Refresh all external data. |
Ctrl+Alt+F5 |
|
Apply Auto Sum. |
Alt+Equal sign ( = ) |
|
Apply Flash Fill. |
Ctrl+E |
Top of Page
Accessibility Shortcuts Menu (Alt+Shift+A)
Access the common features quickly by using the following shortcuts:
|
To do this |
Press |
|---|---|
|
Cycle between landmark regions. |
Ctrl+F6 or Ctrl+Shift+F6 |
|
Move within a landmark region. |
Tab key or Shift+Tab |
|
Go to the Search or Tell Me field to run any command. |
Alt+Q |
|
Display or hide Key Tips or access the ribbon. |
Alt+Windows logo key |
|
Edit the selected cell. |
F2 |
|
Go to a specific cell. |
Ctrl+G |
|
Move to another worksheet in the workbook. |
Ctrl+Alt+Page up or Ctrl+Alt+Page down |
|
Open the context menu. |
Shift+F10 or Windows Menu key |
|
Read row header. |
Ctrl+Alt+Shift+T |
|
Read row until an active cell. |
Ctrl+Alt+Shift+Home |
|
Read row from an active cell. |
Ctrl+Alt+Shift+End |
|
Read column header. |
Ctrl+Alt+Shift+H |
|
Read column until an active cell. |
Ctrl+Alt+Shift+Page up |
|
Read column from an active cell. |
Ctrl+Alt+Shift+Page down |
|
Open a list of moving options within a dialog box. |
Ctrl+Alt+Spacebar |
Top of Page
Control keyboard shortcuts in Excel for the web by overriding browser keyboard shortcuts
Excel for the web works in a browser. Browsers have keyboard shortcuts, some of which conflict with shortcuts that work in Excel on the desktop. You can control these shortcuts, so they work the same in both versions of Excel by changing the Keyboard Shortcuts settings. Overriding browser shortcuts also enables you to open the Excel for the web Help by pressing F1.
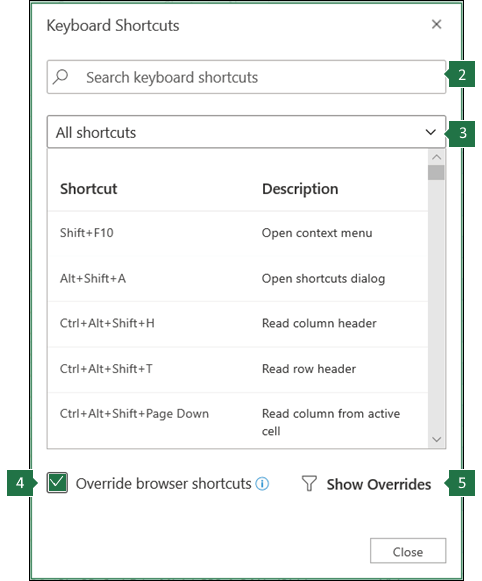
|
|
Top of Page
See also
Excel help & learning
Use a screen reader to explore and navigate Excel
Basic tasks using a screen reader with Excel
Screen reader support for Excel
Technical support for customers with disabilities
Microsoft wants to provide the best possible experience for all our customers. If you have a disability or questions related to accessibility, please contact the Microsoft Disability Answer Desk for technical assistance. The Disability Answer Desk support team is trained in using many popular assistive technologies and can offer assistance in English, Spanish, French, and American Sign Language. Please go to the Microsoft Disability Answer Desk site to find out the contact details for your region.
If you are a government, commercial, or enterprise user, please contact the enterprise Disability Answer Desk.
Содержание
- Общая информация
- Основные комбинации клавиш в Эксель
- Клавиши для навигации по документу
- Горячие клавиши Excel по работе с лентой функций (Ribbon)
- Горячие клавиши Excel с использованием функциональных клавиш (F1-F12)
- Набор новичка
- Боевая готовность браузера
- Основные комбинации клавиш на клавиатуре
- Горячие клавиши общего назначения
- Комбинации клавиш предназначенные для работы с текстом
- Комбинации клавиш для работы с файлами
- Полезные сочетания клавиш Windows
- Это должен знать каждый пользователь компьютера!
- «Копировать», «Вырезать», «Вставить» клавишами:
- «Выделить всё» и «Отменить»:
- Сочетания клавиш Microsoft Word
- Управление Microsoft Word с клавиатуры
- Перемещение по рабочему листу или ячейке
- Выбор ячеек
- Заключение
Общая информация
Для начала хотим обратить ваше внимание на одну важную деталь. Это обозначения, использующиеся в приведенном ниже списке комбинаций кнопок.
Если указан один символ «+» — это стоит трактовать как предлог «И», а не нажатие знака плюса на клавиатуре. Т.е. сочетание Ctrl+C означает, что нужно нажать клавиши “Ctrl” и “C”.
Если же указан двойной знак плюса «++» — это стоит трактовать, как «И нажать на клавиатуре знак плюса вместе с указанной клавишей». Т.е. сочетание Shift+C означает, что нужно нажать клавиши “Shift” и “+”.
Обозначения F1, F2, F3… F10 – означают нажатие соответствующих клавиш в верхней части клавиатуры, а не сочетания клавиши F и числа.
Еще одной важной деталью является очередность нажатия клавиш. В приоритете очередности всегда служебные кнопки – это три клавиши Alt, Ctrl и Shift. Их следует нажимать первыми. И только после них уже остальные кнопки на клавиатуре.

И напоследок, в операционных системах macOS, и соответственно, клавиатурах для данных систем вместо клавиши Control (Ctrl) обычно используется command (cmd).

Однако, не все комбинации ниже применимы к macOS, и не во всех комбинациях клавиша Сontrol обязательно меняется на command.
Основные комбинации клавиш в Эксель
К основным комбинациям клавиш относятся те, которые предоставляют доступ к базовым инструментам приложения. Это такие функции, как открытие документа, создание нового файла, сохранение документа и прочее.
Ниже представлен список основных комбинаций.
- Ctrl+A – при помощи этой комбинации выделяется весь лист целиком, если курсор установлен вне таблицы. Если курсор установлен внутри заполненной таблицы, выделяется вся таблица. И только повторное нажатие комбинации приведет к выделению всего листа.

- Ctrl+N – создание нового документа
- Ctrl+O – открытие нового документа
- Ctrl+P – просмотр документа перед отправкой на печать
- Ctrl+S – сохранение документа
- F12 – выбор пути для сохранения файла и его формата (функция “Сохранить как”)
- Ctrl+W – закрытие документа

Клавиши для навигации по документу
Для облегчения навигации по открытому документу пользователь может воспользоваться следующими комбинациями кнопок на клавиатуре.
- Page Down – прокрутка листа вниз на один экран
- Page Up – прокрутка листа вверх на один экран
- Ctrl+End – перемещение курсора в самую нижнюю правую ячейку листа
- Ctrl+Home – перемещение курсора в самую верхнюю левую ячейку листа
- Tab – перемещение курсора в следующую ячейку листа
- Shift+Tab – перемещение курсора в предыдущую ячейку листа
- Ctrl+Page Down – перемещение к следующему листу документа
- Ctrl+Page Up – перемещение к предыдущему листу документа
- Ctrl+F6 – переключение в следующую открытую книгу
Горячие клавиши Excel по работе с лентой функций (Ribbon)
В новых версиях программ Microsoft Office, начиная с версии 2007, существенно изменился интерфейс пользователя. В верхней части экрана появилась так называемая Лента (Ribbon), содержащая закладки, на которых размещены функциональные кнопки.
Закладки и некоторые кнопки могут быть активированы сочетаниями клавиш. Для просмотра этих сочетаний достаточно нажать кнопку Alt.
Горячие клавиши Excel с использованием функциональных клавиш (F1-F12)
| Комбинация | Описание |
|---|---|
| F1 | Отображение панели помощи Excel. Ctrl+F1 отображение или скрытие ленты функций. Alt+F1 создание встроенного графика из данных выделенного диапазона. Alt+Shift+F1 вставка нового листа. |
| F2 | Редактирование активной ячейки с помещением курсора в конец данных ячейки. Также перемещает курсор в область формул, если режим редактирования в ячейке выключен. Shift+F2 добавление или редактирование комментарий. Ctrl+F2 отображение панели печати с предварительным просмотром. |
| F3 | Отображение диалога вставки имени. Доступно только, если в книге были определены имена (вкладка Формулы на ленте, группа Определенные имена, Задать имя). Shift+F3 отображает диалог вставки функции. |
| F4 | Повторяет последнюю команду или действие, если возможно. Когда в формуле выделена ячейка или область, то осуществляет переключение между различными комбинациями абсолютных и относительных ссылок). Ctrl+F4 закрывает активное окно рабочей книги. Alt+F4 закрывает Excel. |
| F5 | Отображение диалога Перейти к. Ctrl+F5 восстанавливает размер окна выбранной рабочей книги. |
| F6 | Переключение между рабочим листом, лентой функций, панелью задач и элементами масштабирования. На рабочем листе, для которого включено разделение областей (команда меню Вид, Окно, Разделить), F6 также позволяет переключаться между разделенными окнами листа. Shift+F6 обеспечивает переключение между рабочим листом, элементами масштабирования, панелью задач и лентой функций. Ctrl+F6 переключает на следующую рабочую книгу, когда открыто более одного окна с рабочими книгами. |
| F7 | Отображает диалог проверки правописания для активного рабочего листа или выделенного диапазона ячеек. Ctrl+F7 включает режим перемещения окна рабочей книги, если оно не максимизировано (использование клавиш курсора позволяет передвигать окно в нужном направлении; нажатие Enter завершает перемещение; нажатие Esc отменяет перемещение). |
| F8 | Включает или выключает режим расширения выделенного фрагмента. В режиме расширения клавиши курсора позволяют расширить выделение. Shift+F8 позволяет добавлять несмежные ячейки или области к области выделения с использованием клавиш курсора. Ctrl+F8 позволяет с помощью клавиш курсора изменить размер окна рабочей книги, если оно не максимизировано. Alt+F8 отображает диалог Макросы для создания, запуска, изменения или удаления макросов. |
| F9 | Осуществляет вычисления на всех рабочих листах всех открытых рабочих книг. Shift+F9 осуществляет вычисления на активном рабочем листе. Ctrl+Alt+F9 осуществляет вычисления на всех рабочих листах всех открытых рабочих книг, независимо от того, были ли изменения со времени последнего вычисления. Ctrl+Alt+Shift+F9 перепроверяет зависимые формулы и затем выполняет вычисления во всех ячейках всех открытых рабочих книг, включая ячейки, не помеченные как требующие вычислений. Ctrl+F9 сворачивает окно рабочей книги в иконку. |
| F10 | Включает или выключает подсказки горячих клавиш на ленте функций (аналогично клавише Alt). Shift+F10 отображает контекстное меню для выделенного объекта. Alt+Shift+F10 отображает меню или сообщение для кнопки проверки наличия ошибок. Ctrl+F10 максимизирует или восстанавливает размер текущей рабочей книги. |
| F11 | Создает диаграмму с данными из текущего выделенного диапазона в отдельном листе диаграмм. Shift+F11 добавляет новый рабочий лист. Alt+F11 открывает редактор Microsoft Visual Basic For Applications, в котором вы можете создавать макросы с использованием Visual Basic for Applications (VBA). |
| F12 | Отображает диалог Сохранить как. |
Набор новичка
Начнем с самых азов. При работе с перемещением, копированием и вставкой файлов или символов можно использовать сочетания клавиш Ctrl + Х, Ctrl + C и Ctrl + V, полностью игнорируя правую кнопку мыши и аналогичные в ней пункты. А если потребуется отменить последние действия — Ctrl + Z к вашим услугам. Создать папку с помощью горячих клавиш также можно — для этого нажмите Ctrl + Shift + N, а чтобы переименовать ее просто нажмите F2. Эта возможность доступна для любых файлов. Чтобы просмотреть буфер обмена в данный момент нажмите Win + V — особенно полезна эта функция при синхронизированном буфере с вашим смартфоном. Ах да, быстро открыть проводник можно, выполнив комбинацию Windows (далее Win) + E, а закрыть — Ctrl + W, и эта функция работает абсолютно с любым окном, помимо привычного всем Alt + F4. А одновременное нажатие Win + D сворачивает все открытые окна на рабочем столе.
Для тех, кто очищает корзину после каждого удаления, есть клавиша Shift. Зажмите ее перед удалением, игнорируя тем самым перемещение файлов корзину. А для забывчивых полезной может оказаться клавиша F3 — нажмите ее в окне проводника, чтобы воспользоваться поиском. Ctrl + P служит универсальной командой для перехода к окну печати выбранного файла, текста или страницы в браузере.
| Ctrl + Х | вырезать файл или текст для перемещения |
| Ctrl + C | скопировать файл или текст |
| Ctrl + V | вставка вырезанного или скопированного файла |
| Ctrl + Z | отменить действие |
| Ctrl + Shift + N | создать папку |
| F2 | переименовать папку |
| Win + V | открыть буфер обмена |
| Win + E | открыть проводник |
| Ctrl + W, Alt + F4 | закрыть текущее окно |
| Shift | безвозвратное удаление файлов |
| Ctrl + P | окно печати |
| Win + D | свернуть все окна на рабочем столе |
Боевая готовность браузера
Как часто вы пользуетесь браузером, постоянно? Что ж, для вас, разумеется, также существует несколько очень даже полезных сочетаний. Прежде всего, самая важная комбинация, Ctrl + Shift + T, открывает последние закрытые вкладки — спасение для случайно закрытых, важных страниц. Если же, наоборот, требуется закрыть активную вкладку — с Ctrl + W это можно сделать ощутимо быстрее. Для создания новой вкладки воспользуйтесь сочетанием Ctrl + T. При работе с большим количеством открытых вкладок приятной находкой может стать возможность перемещения между ними путем нажатия Ctrl + 1-9, в зависимости от номера нужной вкладки в последовательном порядке. Тут же может пригодиться поиск на странице, который можно быстро вызвать нажатием клавиши F3. С помощью Ctrl + N можно открыть новое окно браузера, а при переходе по ссылке с зажатым Ctrl или Shift вы откроете страницу в новом окне или новой вкладке соответственно. Также можно открыть и новое окно в режиме инкогнито, выполнив комбинацию Ctrl + Shift + N. Если все же забыли перейти в режим инкогнито — очистить историю быстро и просто можно нажав Ctrl + H. Для просмотра окна загрузок нажмите Ctrl + J. Все вышеупомянутые горячие клавиши актуально для любого браузера для Windows.
| Ctrl + Shift + T | открыть последние закрытые вкладки |
| Ctrl + W | закрыть вкладку |
| Ctrl + T | создать новую вкладку |
| Ctrl + 1-9 | перемещение между вкладками |
| F3 | окно поиска по странице |
| Ctrl + N | новое окно браузера |
| Ctrl + Shift + N | новое окно в режиме инкогнито |
| Ctrl + H | очистить историю |
| Ctrl + J | окно загрузок |
Основные комбинации клавиш на клавиатуре
Alt+Tab – Переключение между окнами
Win+Tab – Переключение между окнами в режиме Flip 3D Win+Up – Развернуть окно
Win+Down – Восстановить / Минимизировать окно
Win+Left – Прикрепить окно к левому краю экрана
Win+Right – Прикрепить окно к правому краю экрана
Win+Shift+Left – Переключиться на левый монитор
Win+Shift+Right – Переключиться на правый монитор
Win+Home – Минимизировать / Восстановить все неактивные окна
Win+Break(или Pause) – Запустить элемент Система из Панели Управления (пункт Свойства при нажатии правой кнопкой мыши на Компьютер в меню Пуск)
Win+Space – Показать рабочий стол
Win+B – Переход в область уведомлений(трей)
Win+D– Свернуть окна или восстановить все окна
Win+E – Запустить Проводник(Explorer)
Win+F – Запустить встроенный диалог поиска Windows
Win+Ctrl+F – Запустить Поиск по компьютеру из домена
Win+F1 – Запустить встроенный диалог Windows: Справка и Поддержка Win+G – Отобразить гаджеты поверх всех окон
Win+L – Блокировка рабочей станции(текущего сеанса пользователя) Win+M – Минимизировать все окна
Win+P – Отобразить дополнительные опции дисплея (расширить рабочий стол на 2 монитор и т.п.)
Win+R – Запустить диалоговое окно Выполнить
Win+Т – Выбрать первый элемент в панели задач (Повторное нажатие переключает на следующий элемент,
Win+Shift+T – прокручивает в обратном порядке)
Win+U – Запустить Центр специальных возможностей (Ease of Access Center)
Win+X – Запустить Mobility Center
Win+цифра– Запустить приложение с панели задач (Win+1 запускает первое приложения слева, Win+2, второе, и т.к.)
Win + “+” – Увеличить масштаб Win + “-“ – Уменьшить масштаб
Ctrl + колесо мыши (вверхвниз) на рабочем столе – увеличитьуменьшить иконки рабочего стола.
В Проводнике (Explorer):Alt+P – Показать / Скрыть Область предпросмотра
Панель задач:Shift + щелчок на иконке – Открыть новое окно приложения Ctrl + Shift + щелчок по иконке – Открыть новое окно приложения с привилегиями администратора
Shift + щелчок правой кнопкой на иконке – Показать меню приложения Shift + щелчок правой кнопкой на группе иконок – Показать меню, восстановить все / cвернуть все / Закрыть все
Ctrl + щелчок по группе иконок – Развернуть все окна группы
Примечание Клавиша Win находится между клавишами Ctrl и Alt с левой стороны (на ней нарисована эмблема Windows). Клавиша Menu находится слева от правого Ctrl. Комбинация «клавиша» + «клавиша» означает, что сначала надо нажать первую клавишу, а затем, удерживая ее, вторую.
Горячие клавиши общего назначения
Ctrl + Esc Win Открыть меню «Пуск» (Start)
Ctrl + Shift + EscCtrl + Alt + Delete Вызов «Диспетчера задач»
Win + E Запуск «Проводника» (Explore)
Win + R Отображение диалога «Запуск программы» (Run), аналог «Пуск» — «Выполнить»
Win + D Свернуть все окна или вернуться в исходное состояние (переключатель)
Win + L Блокировка рабочей станции
Win + F1 Вызов справки Windows
Win + Pause Вызов окна «Свойства системы» (System Properties)
Win + F Открыть окно поиска файлов
Win + Сtrl + F Открыть окно поиска компьютеров
Printscreen Сделать скриншот всего экрана
Alt + Printscreen Сделать скриншот текущего активного окна
Win + TabWin + Shift + Tab Выполняет переключение между кнопками на панели задач
F6 Tab Перемещение между панелями. Например, между рабочим столом и панелью «Быстрый запуск»
Ctrl + A Выделить всё (объекты, текст)
Ctrl + C Ctrl + Insert Копировать в буфер обмена (объекты, текст)
Ctrl + X Shift + Delete Вырезать в буфер обмена (объекты, текст)
Ctrl + V Shift + Insert Вставить из буфера обмена (объекты, текст)
Ctrl + N Создать новый документ, проект или подобное действие. В Internet Explorer это приводит к открытию нового окна с копией содержимого текущего окна.
Ctrl + S Сохранить текущий документ, проект и т.п.
Ctrl + O Вызвать диалог выбора файла для открытия документа, проекта и т.п.
Ctrl + P Печать
Ctrl + Z Отменить последнее действие
ShiftБлокировка автозапуска CD-ROM (удерживать, пока привод читает только что вставленный диск)
Alt + Enter Переход в полноэкранный режим и обратно (переключатель; например, в Windows Media Player или в окне командного интерпретатора).
Комбинации клавиш предназначенные для работы с текстом
Ctrl + A Выделить всё
Ctrl + C Ctrl + Insert Копировать
Ctrl + X Shift + Delete Вырезать
Ctrl + V Shift + Insert Вставить
Ctrl + ← Ctrl + → Переход по словам в тексте. Работает не только в текстовых редакторах. Например, очень удобно использовать в адресной строке браузера
Shift + ← Shift + → Shift + ↑Shift + ↓ Выделение текста
Ctrl + Shift + ← Ctrl + Shift + → Выделение текста по словам
Home End Ctrl + Home Ctrl + End Перемещение в начало-конец строки текста
Ctrl + Home Ctrl + End Перемещение в начало-конец документа
Комбинации клавиш для работы с файлами
Shift + F10 Menu Отображение контекстного меню текущего объекта (аналогично нажатию правой кнопкой мыши).
Alt + Enter Вызов «Свойств объекта»
F2 Переименование объекта
Перетаскивание с Ctrl Копирование объекта
Перетаскивание с Shift Перемещение объекта
Перетаскивание с Ctrl + Shift Создание ярлыка объекта
Щелчки с Ctrl Выделение нескольких объектов в произвольном порядке
Щелчки с Shift Выделение нескольких смежных объектов
Enter То же, что и двойной щелчок по объекту
Delete Удаление объекта
Shift + Delete Безвозвратное удаление объекта, не помещая его в корзину
Полезные сочетания клавиш Windows
А теперь самые полезные сочетания клавиш Windows, которые я рекомендую запомнить. Все эти сочетания используют «клавиши-модификаторы» (Ctrl, Alt, Shift и клавиша Windows):
Это должен знать каждый пользователь компьютера!
Эти сочетания клавиш Windows должны знать все пользователи ПК, действуют они как с папками и файлами, так и с текстом.
«Копировать», «Вырезать», «Вставить» клавишами:
- Ctrl + C – копировать в буфер обмена (файл, папка или текст останется в текущем месте).
- Ctrl + X – вырезать в буфер обмена (файл, папка или текст удалится из текущего места).
- Ctrl + V – вставить из буфера обмена (скопированные или вырезанные файлы, папки или текст появятся в текущем месте).

Сочетания клавиш для копирования, вырезания, вставки
«Выделить всё» и «Отменить»:
Чтобы выделить всё содержимое текущей папки или всё содержимое открытого документа:
- Ctrl + A – выделить всё.
Надеюсь, Вы уже знаете про эти горячие клавиши, но повторить лишним не будет.
А вот эти сочетания уже знают не все:
- Ctrl + Z – отменить предыдущее действие (в том числе и копирование/перемещение файлов).
- Ctrl + Y – повторить отмененное действие (т.е. противоположно предыдущему сочетанию клавиш).
Сочетания клавиш Microsoft Word
В программе Ворд можно работать не только при помощи мышки, но и используя комбинации клавиш. Это удобно, особенно, если приходится часто выполнять одни и те же действия.
Работа с документами:
- Ctrl + N: создание нового документа.
- Ctrl + O: открытие документа с компьютера.
- Ctrl + S или Shift + F12: сохранение (аналог кнопки «Сохранить»).
- F12: сохранение под именем (аналог «Сохранить как»).
- Ctrl + W или Alt + F4: закрытие документа.
- Ctrl + F2: предварительный просмотр перед печатью.
- Ctrl + P: открытие окна печати.
- Ctrl + F: поиск по тексту.
- F7: проверка правописания.
Перемещение по тексту:
- Стрелки: перемещение мигающего курсора по тексту. Находятся на цифровой части клавиатуры (обычно внизу). Стрелки вправо и влево перемещают курсор на одну букву, вверх и вниз – на одну строку.
- Ctrl + стрелка вправо/влево: перемещение мигающего курсора на одно слово.
- End: переход в конец строки.
- Ctrl + End: переход в конец документа.
- Home: переход в начало строки.
- Ctrl + Home: переход в начало документа.
- Page Up и Page Down: двигает документ вверх и вниз относительно мигающего курсора.
Выделение:
- Shift + стрелка вправо/влево: символ (буква).
- Ctrl + Shift + стрелка вправо/влево: слово.
- Shift + стрелка вверх/вниз: строка.
- Ctrl + Shift + стрелка вверх/вниз: абзац.
- Shift + End: от мигающего курсора до конца строки.
- Shift + Home: от мигающего курсора до начала строки.
- Ctrl + Shift + End: до конца документа.
- Ctrl + Shift + Home: до начала документа.
- Shift + Page Up или Page Down: вверх и вниз на один экран.
- Ctrl + A: выделение всего документа.
Редактирование текста:
- Ctrl + B: полужирное начертание.
- Ctrl + I: курсивное начертание.
- Ctrl + U: подчеркнутое начертание.
- Ctrl + D: настройка шрифта.
- Ctrl + L: выравнивание по левому краю.
- Ctrl + E: выравнивание по центру.
- Ctrl + R: по правому краю.
- Ctrl + J: по ширине.
- Ctrl + M: двигает абзац вправо.
- Tab: красная строка.
- Ctrl + Shift + L: маркированный список.
- Ctrl + Shift + *: непечатаемые символы.
- Ctrl + 1: одинарный междустрочный интервал.
- Ctrl + 2: двойной интервал.
- Ctrl + 5: полуторный интервал.
- Ctrl + пробел: очистка формата у выделенного текста (сброс на шрифт по умолчанию).
- Ctrl + Z: отменить последнее действие.
- Ctrl + Y или F4: повторить последнее действие.
Удаление:
- Backspace: удаляет один символ (букву) перед мигающим курсором.
- Ctrl + Backspace: удаляет одно слово перед мигающим курсором.
- Delete: удаляет один символ (букву) после мигающего курсора.
- Ctrl + Delete: удаляет одно слово после мигающего курсора.
Управление Microsoft Word с клавиатуры
Кроме горячих клавиш есть другой способ работы в Ворд с клавиатуры:
- Нажмите Alt.
- В верхней части программы появятся иконки букв.
- Нажмите на клавишу с нужной буквой и используйте предложенные сочетания.

Например, нужно поменять размер букв. Значит, сначала нажимаем Alt, чтобы активировать режим выбора с клавиатуры. Затем, клавишу с буквой Я, чтобы работать с вкладкой «Главная».

Теперь нажимаем сочетание ФР (две клавиши сразу).

Поле выбора размера активируется.

Печатаем нужное значение и нажимаем Enter.
Перемещение по рабочему листу или ячейке
Вы можете использовать сочетания клавиш, чтобы легко перемещаться по всему рабочему листу, внутри ячейки или по всей вашей книге.
- Стрелка влево / вправо: перемещение одной ячейки влево или вправо
- Ctrl + стрелка влево / вправо: переход в самую дальнюю ячейку слева или справа в строке
- Стрелка вверх / вниз: перемещение одной ячейки вверх или вниз
- Ctrl + стрелка вверх / вниз: переход в верхнюю или нижнюю ячейку в столбце
- Tab: переход к следующей ячейке
- Shift + Tab: переход к предыдущей ячейке
- Ctrl + End: переход в самую нижнюю правую ячейку
- F5: перейдите в любую ячейку, нажав F5 и набрав координату ячейки или имя ячейки.
- Home: перейдите в крайнюю левую ячейку в текущей строке (или перейдите к началу ячейки при редактировании ячейки)
- Ctrl + Home: переход к началу рабочего листа
- Page Up / Down: перемещение одного экрана вверх или вниз на листе
- Alt + Page Up / Down: переместить один экран вправо или влево на листе
- Ctrl + Page Up / Down: переход на предыдущий или следующий рабочий лист
Выбор ячеек
Возможно, вы заметили из предыдущего раздела, что вы используете клавиши со стрелками для перемещения между ячейками, и клавишу Ctrl, чтобы изменить это движение. Использование клавиши Shift для изменения клавиш со стрелками позволяет расширить выделенные ячейки. Есть также несколько других комбо для ускорения выбора.
- Shift + стрелка влево / вправо: расширение ячейки выбора влево или вправо
- Shift + Space: выберите всю строку
- Ctrl + пробел: выберите весь столбец
- Ctrl + Shift + Space: выберите весь рабочий лист
Заключение
Разумеется, в Excel существует гораздо больше комбинаций клавиш. Мы привели список лишь самых популярных и полезных сочетаний. Использование этих комбинаций поможет вам существенно упростить работу с документами в приложении.
Источники
- https://MicroExcel.ru/goryachie-klavishi/
- https://adsc.ru/excel_hotkeys
- https://club.dns-shop.ru/blog/t-115-klaviaturyi/22596-40-goryachih-klavish-dlya-windows/
- https://zen.yandex.ru/media/id/5abd4b559b403c1eb5c6d8e8/5bf5bc224c5b6c00a9e25a9e
- http://IT-uroki.ru/uroki/samye-poleznye-sochetaniya-klavish-windows.html
- https://derudo.ru/kopirovat_vstavit_tekst.html
- https://comhub.ru/vse-goryachie-klavishi-excel/