
I’m trying to delete all names from an excel workbook using VBA
without using a loop.
I’m currently using the code below, but this is very slow as there are several thousand names in the workbook.
Any suggestions would be appreciated!
Sub deleteAllNames()
Dim xName As Name

For Each xName In Application.ActiveWorkbook.Names
       xName.Delete
Next
End Sub
asked Feb 1, 2017 at 2:08
![]()
2
Not possible without some complicated hacky way or messing with the XML, but this should be faster:
Dim i As Long
Application.Calculation = xlCalculationManual
For i = ThisWorkbook.Names.Count To 1 Step -1
    ThisWorkbook.Names(i).Delete
Next
Application.Calculation = xlCalculationAutomatic
answered Feb 1, 2017 at 2:36
![]()
SlaiSlai
21.8k5 gold badges43 silver badges52 bronze badges
5
I had the same problem deleting all named ranges, the code was running very slowly. You can fix this by turning off the screen update and the calculation while the loop is running.
Sub deleteAllNames()

Application.Calculation = xlCalculationManual
Application.ScreenUpdating = False

Dim xName As Name

For Each xName In Application.ActiveWorkbook.Names
       xName.Delete
Next

Application.Calculation = xlCalculationAutomatic
Application.ScreenUpdating = True

End Sub
answered Mar 8, 2017 at 19:33
![]()
Содержание
- Use the Name Manager in Excel
- Named Ranges in Excel: See All Defined Names (Incl. Hidden Names)
- The problem of hidden defined names
- The built-in Name Manager in Excel doesn’t show all defined names
- Why not showing all names is a problem
- Solution 1: Access named ranges manually
- Solution 2: Use a VBA macro to see all named ranges
- VBA macros to make all names visible
- VBA macro to remove all names
- Deleting All Names but a Few
- How to Delete All Named Ranges in Excel
- Method1: Delete All Named Ranges
- Method2: Delete All Named Ranges with VBA
Use the Name Manager in Excel
Use the Name Manager dialog box to work with all the defined names and table names in a workbook. For example, you may want to find names with errors, confirm the value and reference of a name, view or edit descriptive comments, or determine the scope. You can also sort and filter the list of names, and easily add, change, or delete names from one location.
To open the Name Manager dialog box, on the Formulas tab, in the Defined Names group, click Name Manager.

The Name Manager dialog box displays the following information about each name in a list box:
One of the following:
A defined name, which is indicated by a defined name icon. 
A table name, which is indicated by a table name icon. 
Note: A table name is the name for an Excel table, which is a collection of data about a particular subject stored in records (rows) and fields (columns). Excel creates a default Excel table name of Table1, Table2, and so on, each time you insert an Excel table. You can change a table’s name to make it more meaningful. For more information about Excel tables, see Using structured references with Excel tables.
The current value of the name, such as the results of a formula, a string constant, a cell range, an error, an array of values, or a placeholder if the formula cannot be evaluated. The following are representative examples:
«this is my string constant»
The current reference for the name. The following are representative examples:
A worksheet name, if the scope is the local worksheet level.
«Workbook,» if the scope is the global workbook level. This is the default option.
Additional information about the name up to 255 characters. The following are representative examples:
This value will expire on May 2, 2007.
Don’t delete! Critical name!
Based on the ISO certification exam numbers.
The reference for the selected name.
You can quickly edit the range of a name by modifying the details in the Refers to box. After making the change you can click Commit  to save changes, or click Cancel
  to discard your changes.
You cannot use the Name Manager dialog box while you are changing the contents of a cell.
The Name Manager dialog box does not display names defined in Visual Basic for Applications (VBA), or hidden names (the Visible property of the name is set to False).
On the Formulas tab, in the Defined Names group, click Define Name.
In the New Name dialog box, in the Name box, type the name you want to use for your reference.
Note: Names can be up to 255 characters in length.
The scope automatically defaults to Workbook. To change the name’s scope, in the Scope drop-down list box, select the name of a worksheet.
Optionally, in the Comment box, enter a descriptive comment up to 255 characters.
In the Refers to box, do one of the following:
Click Collapse Dialog  (which temporarily shrinks the dialog box), select the cells on the worksheet, and then click Expand Dialog
  .
.
To enter a constant, type = (equal sign) and then type the constant value.
To enter a formula, type = and then type the formula.
Be careful about using absolute or relative references in your formula. If you create the reference by clicking on the cell you want to refer to, Excel will create an absolute reference, such as «Sheet1!$B$1». If you type a reference, such as «B1», it is a relative reference. If your active cell is A1 when you define the name, then the reference to «B1» really means «the cell in the next column». If you use the defined name in a formula in a cell, the reference will be to the cell in the next column relative to where you enter the formula. For example, if you enter the formula in C10, the reference would be D10, and not B1.
To finish and return to the worksheet, click OK.
Note: To make the New Name dialog box wider or longer, click and drag the grip handle at the bottom.
Источник
Named Ranges in Excel: See All Defined Names (Incl. Hidden Names)

Excel has a useful feature: Named Ranges. You can name single cells or ranges of cells in Excel. Instead of just using the cell link, e.g. =A1, you can refer to the cell (or range of cell) by using the name (e.g. =TaxRate). Excel also provides the “Name Manager” which gives you a list of defined names in your current workbook. The problem: It doesn’t show all names. Why that is a problem and how you can solve it is summarized in this article.
The built-in Name Manager in Excel doesn’t show all defined names
Please take a look at the screenshots below. On the left-hand side you can see the built-in Excel Name Manager (you can access it though Formulas–>Name Manager). The right-hand side is a screenshot of the Excel add-in “Professor Excel Tools” (more to that later). They were both taken with the same Excel workbook.
As you can see, the built-in Name Manager only shows none-hidden names. There are 4 names names in this workbook which are not hidden. But there are thousands more defined names in this particular workbook. Excel just doesn’t show them to you.
Why not showing all names is a problem
The problem with not showing all defined names is that you can’t delete them. Because they are hidden. Let’s talk a little bit about defined names in Excel.
- Defined names are copied with each worksheet. So if your workbook has with thousands of names, they will be copied to a new workbook if you copy one worksheet.
- Even if you delete the worksheet you copied, the defined names stay. That means, the name just keep accumulating.
- Besides that the names enlarge the workbook, you might run into trouble when duplicating worksheets. In worst case, you have to confirm the following dialogue box for each name separately.

Solution 1: Access named ranges manually
The first method is to access the source file of your Excel workbook. Please refer to this article for information about the source contents of an Excel file.
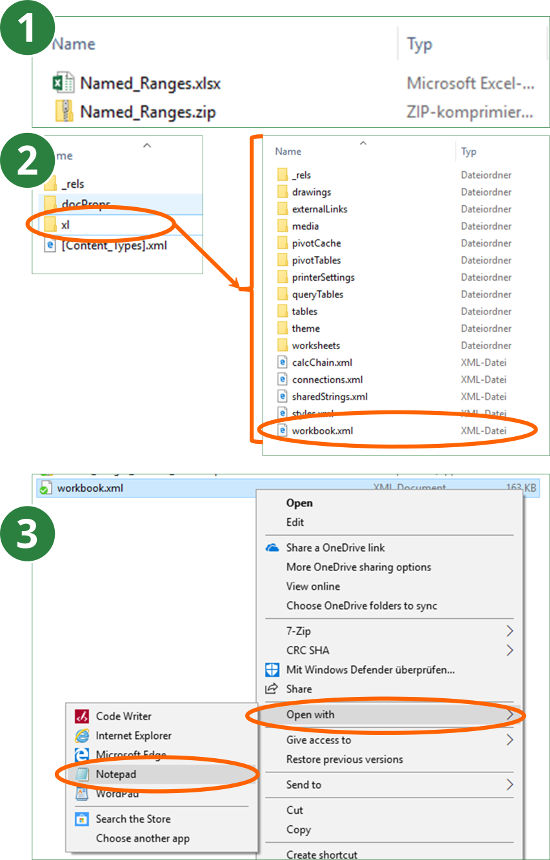
- Create a copy of your Excel workbook and rename it. Delete .xlsx in the end and replace it with .zip.
- Open the file and navigate to the folder “xl”. Copy the file “workbook.xml” and paste it into an empty folder outside the .zip-file.
- Open the “workbook.xml” file with the text editor (right-click on the file and then on “Open with” –> “Notepad”). If you just want to see the named ranges without editing or removing them, you could also just double-click on the file “workbook.xml”. It usually opens in your web browser. The advantage: The layout is much better to read.
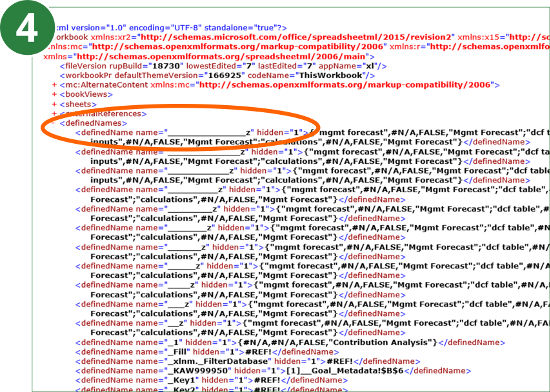
 Now you can see all named ranges. They are listed between and .
Say, you want to remove all named ranges. Then you could delete all the content between and .
After editing the file you should save it and copy it back into the .zip-file. Replace the existing “workbook.xml” file there. Rename the complete .zip-file back to .xlsx. Now you can open it. Excel might notice that you changed the file and ask you if you’d like to recover as much as possible.
 Now you can see all named ranges. They are listed between and .
 Please note: Tempering with the source code of your Excel file might damage the file. So please only work with copies of your file.
Solution 2: Use a VBA macro to see all named ranges
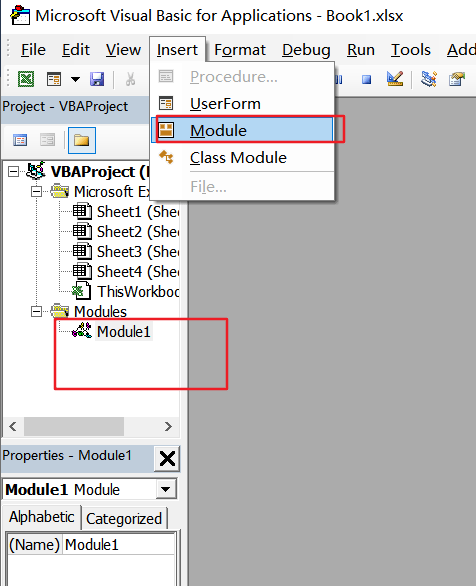
Our next method to edit hidden names in Excel is via VBA macros. We have prepared two VBA macros. Please insert a new VBA module and paste the following codes. If you need assistance concerning macros, please refer to this article.
VBA macros to make all names visible
This first VBA macros makes all defined names visible. You can then edit them within the built-in Name Manager (go to Formulas–>Name Manager). After pasting this code snipped into the new module, place the cursor within the code and click on the play button on the top of the VBA editor (or press F5 on the keyboard).
If you want to hide all names in your current workbook, replace tempName.Visible = True by tempName.Visible = False.
VBA macro to remove all names
The following VBA macros deletes all names in your workbook.
One word of caution: Print ranges and database ranges are also stored as defined names. Before you delete all names, make sure that you really don’t need them any longer.
Источник
Deleting All Names but a Few
![]()
Written by Allen Wyatt (last updated August 19, 2021)
This tip applies to Excel 97, 2000, 2002, and 2003
Do you routinely work with worksheets that contain dozens (or hundreds) of named cells, and most of those names are unnecessary? Cleaning up the names is a huge task, but getting rid of the ones you don’t need can make your workbook smaller and more efficient. The problem is, how do you get rid of a lot of unnecessary names all at once? You can certainly delete them one at a time, but such a process quickly gets tiresome.
One possible solution is to simply create a new workbook and copy the cells from the old workbook to the new one. Highlight the cells in the old workbook, use Ctrl+C to copy them, then paste them into worksheets in the new workbook. This will copy almost everything from the old workbook—formulas, formatting, etc. It does not bring copy over print settings or range names. The only task then remaining is to redefine the few names you want in the new workbook.
If you prefer to work with the old workbook (the one with all the names), it is best to create a macro that will do the name deletion for you. You need a macro that will allow you to delete all the names except those you want to keep. The following is a simple approach that accomplishes this task:
Before using the macro, modify the line that creates the vKeep array. Simply enter the names you want to keep within the array, each name surrounded by quotes and separated by commas. (In the example shown here, the names «Name1» and «Name2» will be kept.) The macro loops through all the names in the workbook and uses the Match function to see if the name is one in the array. If it is not, then it is deleted.
If you prefer to use a third-party solution to managing the names in your workbook, a great choice is the Name Manager add-in, written by Jan Karel Pieterse. You can find more information on the add-in here:
ExcelTips is your source for cost-effective Microsoft Excel training. This tip (2419) applies to Microsoft Excel 97, 2000, 2002, and 2003. You can find a version of this tip for the ribbon interface of Excel (Excel 2007 and later) here: Deleting All Names but a Few.
Author Bio
With more than 50 non-fiction books and numerous magazine articles to his credit, Allen Wyatt is an internationally recognized author. He is president of Sharon Parq Associates, a computer and publishing services company. Learn more about Allen.
Источник
How to Delete All Named Ranges in Excel
This post will guide you how to remove all named ranges from your workbook in Excel. How do I quickly delete all named ranges with VBA in Excel 2013/2016.
- Method1: Delete All Named Ranges
- Method2: Delete All Named Ranges with VBA
Assuming that you have created lots of named ranges in your workbook, and you wish to delete all of them at once, how to do it. You can use an Excel VBA macro to accomplish it. And this post will show you two methods to remove all named ranges.
Method1: Delete All Named Ranges
You can use Name Manager feature to delete all named ranges in your workbook, just see the following steps:
Step1: go to the Formulas tab, click Name Manager command under the Defined Names group. And the Name Manager dialog will open.
Step2: select the first name range in the Name Manager dialog box, and press Shift key to select the all the named ranges.
Step3: click Delete button at the top of the Name Manager dialog box, then a warning box will appear to ask you if you want to delete the selected names. Click Ok button. And all named ranges should be deleted at once.
Method2: Delete All Named Ranges with VBA
You can also use an Excel VBA Macro to remove all named ranges in a workbook. Just do the following steps:
Step1: open your excel workbook and then click on “Visual Basic” command under DEVELOPER Tab, or just press “ALT+F11” shortcut.
Step2: then the “Visual Basic Editor” window will appear.
Step3: click “Insert” ->”Module” to create a new module.
Step4: paste the below VBA code into the code window. Then clicking “Save” button.
Step5: back to the current worksheet, then run the above excel macro. Click Run button.
Источник
Excel for Microsoft 365 Excel 2021 Excel 2019 Excel 2016 Excel 2013 Excel 2010 Excel 2007 Excel Starter 2010 More…Less
Use the Name Manager dialog box to work with all the defined names and table names in a workbook. For example, you may want to find names with errors, confirm the value and reference of a name, view or edit descriptive comments, or determine the scope. You can also sort and filter the list of names, and easily add, change, or delete names from one location.
To open the Name Manager dialog box, on the Formulas tab, in the Defined Names group, click Name Manager.
The Name Manager dialog box displays the following information about each name in a list box:
|
Column Name |
Description |
|---|---|
|
Name |
One of the following:
|
|
Value |
The current value of the name, such as the results of a formula, a string constant, a cell range, an error, an array of values, or a placeholder if the formula cannot be evaluated. The following are representative examples:
|
|
Refers To |
The current reference for the name. The following are representative examples:
|
|
Scope |
|
|
Comment |
Additional information about the name up to 255 characters. The following are representative examples:
|
|
Refers to: |
The reference for the selected name. You can quickly edit the range of a name by modifying the details in the Refers to box. After making the change you can click Commit |
Notes:
-
You cannot use the Name Manager dialog box while you are changing the contents of a cell.
-
The Name Manager dialog box does not display names defined in Visual Basic for Applications (VBA), or hidden names (the Visible property of the name is set to False).
-
On the Formulas tab, in the Defined Names group, click Define Name.
-
In the New Name dialog box, in the Name box, type the name you want to use for your reference.
Note: Names can be up to 255 characters in length.
-
The scope automatically defaults to Workbook. To change the name’s scope, in the Scope drop-down list box, select the name of a worksheet.
-
Optionally, in the Comment box, enter a descriptive comment up to 255 characters.
-
In the Refers to box, do one of the following:
-
Click Collapse Dialog
(which temporarily shrinks the dialog box), select the cells on the worksheet, and then click Expand Dialog . -
To enter a constant, type = (equal sign) and then type the constant value.
-
To enter a formula, type = and then type the formula.
Tips:
-
Be careful about using absolute or relative references in your formula. If you create the reference by clicking on the cell you want to refer to, Excel will create an absolute reference, such as «Sheet1!$B$1». If you type a reference, such as «B1», it is a relative reference. If your active cell is A1 when you define the name, then the reference to «B1» really means «the cell in the next column». If you use the defined name in a formula in a cell, the reference will be to the cell in the next column relative to where you enter the formula. For example, if you enter the formula in C10, the reference would be D10, and not B1.
-
More information — Switch between relative, absolute, and mixed references
-
-
-
To finish and return to the worksheet, click OK.
Note: To make the New Name dialog box wider or longer, click and drag the grip handle at the bottom.
If you modify a defined name or table name, all uses of that name in the workbook are also changed.
-
On the Formulas tab, in the Defined Names group, click Name Manager.
-
In the Name Manager dialog box, double-click the name you want to edit, or, click the name that you want to change, and then click Edit.
-
In the Edit Name dialog box, in the Name box, type the new name for the reference.
-
In the Refers to box, change the reference, and then click OK.
-
In the Name Manager dialog box, in the Refers to box, change the cell, formula, or constant represented by the name.
-
On the Formulas tab, in the Defined Names group, click Name Manager.
-
In the Name Manager dialog box, click the name that you want to change.
-
Select one or more names by doing one of the following:
-
To select a name, click it.
-
To select more than one name in a contiguous group, click and drag the names, or press SHIFT and click the mouse button for each name in the group.
-
To select more than one name in a noncontiguous group, press CTRL and click the mouse button for each name in the group.
-
-
Click Delete.
-
Click OK to confirm the deletion.
Use the commands in the Filter drop-down list to quickly display a subset of names. Selecting each command toggles the filter operation on or off, making it easy to combine or remove different filter operations to get the results you want.
You can filter from the following options:
|
Select |
To |
|---|---|
|
Names Scoped To Worksheet |
Display only those names that are local to a worksheet. |
|
Names Scoped To Workbook |
Display only those names that are global to a workbook. |
|
Names With Errors |
Display only those names with values containing errors (such as #REF, #VALUE, or #NAME). |
|
Names Without Errors |
Display only those names with values that do not contain errors. |
|
Defined Names |
Display only names defined by you or by Excel, such as a print area. |
|
Table Names |
Display only table names. |
-
To sort the list of names in ascending or descending order, click the column header.
-
To automatically size the column to fit the longest value in that column, double-click the right side of the column header.
Need more help?
You can always ask an expert in the Excel Tech Community or get support in the Answers community.
See Also
Why am I seeing the Name Conflict dialog box in Excel?
Create a named range in Excel
Insert a named range into a formula in Excel
Define and use names in formulas
Need more help?
Breen
New Member
- Joined
- Jan 21, 2009
- Messages
- 8
-
#1
Hi all,
I currently have a workbook with over 1000 names defined and I would like to delete all of them at once. I have searched around and tried to use the following macro:
Sub DelNames()
For Each nm In ActiveWorkbook.Names
nm.delete
Next nm
End Sub
However, when I try to run it, I get a runtime error 1004: the name is not valid and it highlights nm.delete.
What am I doing wrong??? I have more than 1 workbook that I need to delete names in and it is a pain to go and delete each one manually.
Help!
Thanks
Excel Facts
What do {} around a formula in the formula bar mean?
{Formula} means the formula was entered using Ctrl+Shift+Enter signifying an old-style array formula.
-
#2
Hi
Use On Error Resume Next to skip over any problem ones:
Code:
Sub DelNames()
On Error Resume Next
    For Each nm In ActiveWorkbook.Names
        nm.delete
    Next nm
End Sub
pgc01
MrExcel MVP
- Joined
- Apr 25, 2006
- Messages
- 19,893
-
#3
Hi Breen
Welcome to the board
Maybe they are not workbook names, but worksheet names?
Breen
New Member
- Joined
- Jan 21, 2009
- Messages
- 8
-
#4
Hi
Use On Error Resume Next to skip over any problem ones:
Code:
Sub DelNames()
On Error Resume Next
    For Each nm In ActiveWorkbook.Names
        nm.delete
    Next nm
End Sub
Thank you so much! This worked!!!!
Similar threads
 Please Note:
This article is written for users of the following Microsoft Excel versions: 97, 2000, 2002, and 2003. If you are using a later version (Excel 2007 or later), this tip may not work for you. For a version of this tip written specifically for later versions of Excel, click here: Deleting All Names but a Few.
![]()
Written by Allen Wyatt (last updated August 19, 2021)
This tip applies to Excel 97, 2000, 2002, and 2003
Do you routinely work with worksheets that contain dozens (or hundreds) of named cells, and most of those names are unnecessary? Cleaning up the names is a huge task, but getting rid of the ones you don’t need can make your workbook smaller and more efficient. The problem is, how do you get rid of a lot of unnecessary names all at once? You can certainly delete them one at a time, but such a process quickly gets tiresome.
One possible solution is to simply create a new workbook and copy the cells from the old workbook to the new one. Highlight the cells in the old workbook, use Ctrl+C to copy them, then paste them into worksheets in the new workbook. This will copy almost everything from the old workbook—formulas, formatting, etc. It does not bring copy over print settings or range names. The only task then remaining is to redefine the few names you want in the new workbook.
If you prefer to work with the old workbook (the one with all the names), it is best to create a macro that will do the name deletion for you. You need a macro that will allow you to delete all the names except those you want to keep. The following is a simple approach that accomplishes this task:
Sub DeleteSomeNames()
    Dim vKeep
    Dim nm As Name
    Dim x As Integer
    Dim AWF As WorksheetFunction

    'Add Names to keep here
    vKeep = Array("Name1", "Name2")

    Set AWF = Application.WorksheetFunction
    For Each nm In ActiveWorkbook.Names
        x = 0
        On Error Resume Next
        x = AWF.Match(nm.Name, vKeep, 0)
        On Error GoTo 0
        If x = 0 Then
            nm.Delete
        End If
    Next
    Set AWF = Nothing
End Sub
Before using the macro, modify the line that creates the vKeep array. Simply enter the names you want to keep within the array, each name surrounded by quotes and separated by commas. (In the example shown here, the names «Name1» and «Name2» will be kept.) The macro loops through all the names in the workbook and uses the Match function to see if the name is one in the array. If it is not, then it is deleted.
If you prefer to use a third-party solution to managing the names in your workbook, a great choice is the Name Manager add-in, written by Jan Karel Pieterse. You can find more information on the add-in here:
http://www.jkp-ads.com/officemarketplacenm-en.asp
If you would like to know how to use the macros described on this page (or on any other page on the ExcelTips sites), I’ve prepared a special page that includes helpful information. Click here to open that special page in a new browser tab.
ExcelTips is your source for cost-effective Microsoft Excel training.
This tip (2419) applies to Microsoft Excel 97, 2000, 2002, and 2003. You can find a version of this tip for the ribbon interface of Excel (Excel 2007 and later) here: Deleting All Names but a Few.
Author Bio
With more than 50 non-fiction books and numerous magazine articles to his credit, Allen Wyatt is an internationally recognized author. He is president of Sharon Parq Associates, a computer and publishing services company. Learn more about Allen…
MORE FROM ALLEN
Increasing the Size of the Draft Font
When looking at your document in Draft view, you may want Word to use a larger font than what it normally does. Here’s …
Discover More
Controlling Chart Gridlines
Gridlines are often added to charts to help improve the readability of the chart itself. Here’s how you can control …
Discover More
Moving Section Breaks
Section breaks are used to divide a document into two or more sections that can be independently formatted. If you want …
Discover More