
Excel for Microsoft 365 Excel 2021 Excel 2019 Excel 2016 Excel 2013 Excel 2010 Excel 2007 More…Less
In Microsoft Excel, workbooks are saved as Excel Workbooks (.xlsx) by default. You can change the default file format to any other file format that is supported in Excel. For example, if you frequently create macros in a workbook, you may want to automatically save a new workbook as an Excel Macro-Enabled Workbook (.xlsm). Or, if you work with others who use earlier versions of Excel, you may want to save a new workbook as an Excel 97-2003 Workbook (.xls).
-
In Excel 2007: Click the Microsoft Office Button
 , and then click Excel Options.
In all other Excel versions: click File > Options.
-
In the Save category, under Save Workbooks, in the Save files in this format list, click the file format that you want to use.
 , and then click Excel Options.
Notes:
-
After you specify the default file format, all new workbooks are saved in the selected file format unless you specify a different format in the Save As dialog box when you save a workbook.
-
Some features and formatting might not be available if you save the workbook in the file format of an earlier version of Microsoft Excel or another spreadsheet program.
For more information, see Excel formatting and features that are not transferred to other file formats.
Need more help?
In our daily life when we launching excel, the default template of worksheet/workbook is loaded. Normally we edit our data base on this default template most of time. But in some situations, we always edit data in a fixed template for example like payroll from accounting department, and we will not want to always re-design our template in worksheet every time. So, we need to save our own worksheet or workbook template in excel, then we can load our own template when launching excel for convenient. Actually, this article aims at to teach you how can we save template in excel for worksheet and workbook, trust me you can find what you want from this article, let’s get started.
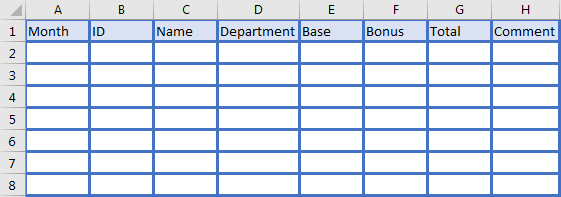
Step 1: Launch excel, select a blank template, open it. Then design your own template on this blank template. For example, we create a simple payroll like below.
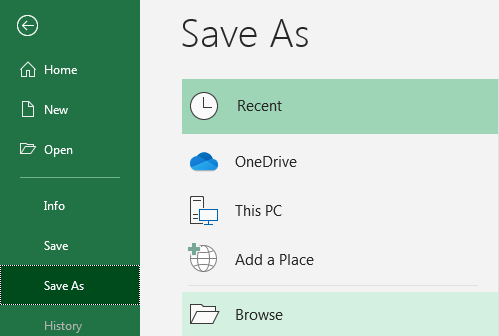
Step 2: In excel ribbon, click File->Save As->Browse.
Step 3: In Save As window (see screenshot below), enter template name in File name textbox. Select template in Save as type.

Step 4: Enter template name as Payroll Template.

Step 5: Select Excel Template from dropdown list.

Step 6: You can change save path or use default path to save your template. The default save path on my PC is C:UsersdevopsDocumentsCustom Office Templates. Then click OK to save template.

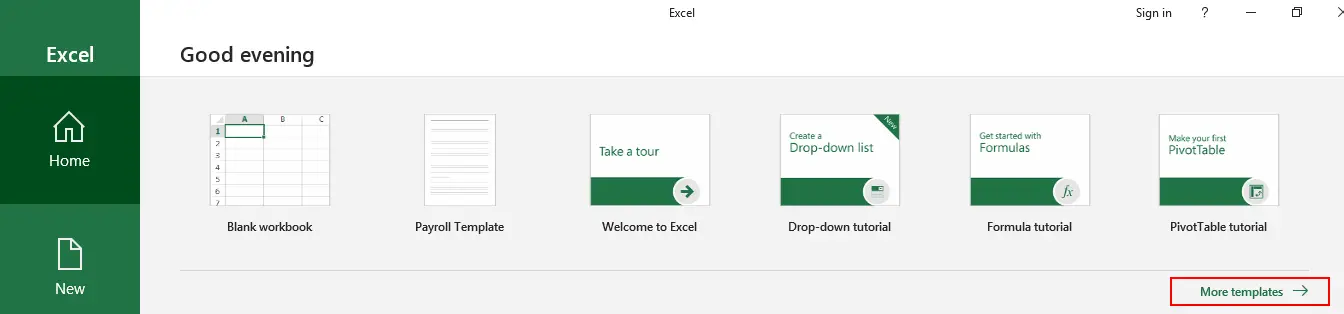
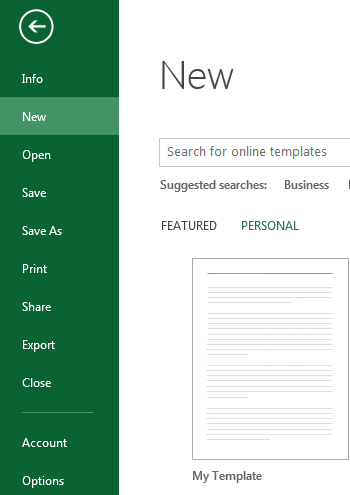
Step 7: Launch Excel again, in Welcome screen, click More templates.
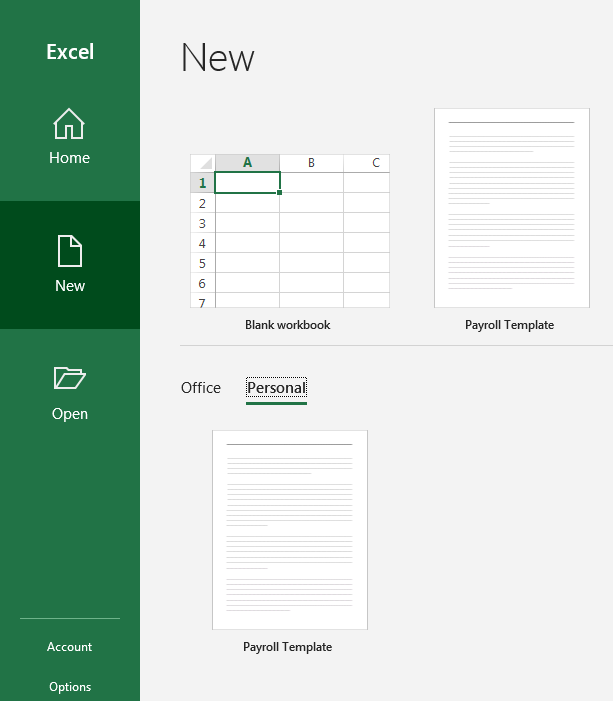
Step 8: Click Personal. Then customed template Payroll template is displayed. Select this template, your table in step#1 is displayed properly.
Change Default Workbook in Excel
If you have multiple different fixed worksheets templates in a workbook, you can save a workbook template (includes these worksheets templates) refer to above steps.
For example, in a workbook we have two worksheets, one is inventory list, another one is broken list. Then have their own templates.
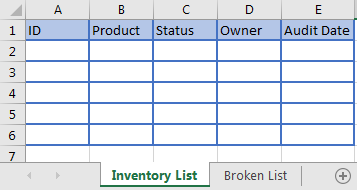
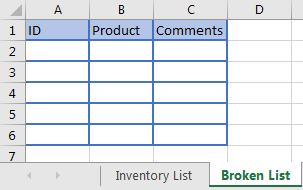
We want to save a workbook template with these two worksheets. We can still follow above steps like save a worksheet template.
Step 1: Click File->Save As->Browse.
Step 2: In Save As window, enter template name in File name textbox, this time we name it as Inventory List. Select Excel Template in Save as type.

Step 3: Use default save path, click OK to save workbook.
Step 4: Re-launch excel, and check Personal template. Verify that Inventory List is listed.
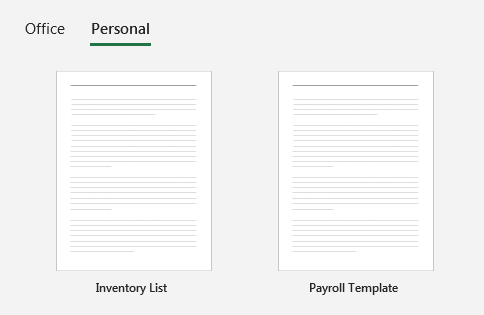
Step 5: Click it to load template. Verify that the two worksheets with template are loaded properly.
Excel users find themselves making the same customizations over and over again. This post demonstrates how to store customizations such as cell formatting, headers, print preferences, the default PivotTable style, and cell styles, in a template workbook. Plus, we’ll see how the name and location of the template determines when it is used, and, if it is used as the default for new workbooks.
Objective
Let’s confirm our goal. Some Excel settings are defined within Excel, the application, and are thus made once and apply going forward. Examples are custom lists, showing the start screen when Excel starts, and the default file location, which can be set in the Excel Options dialog.
Some settings are stored within each Excel workbook (or worksheet), and only apply to that workbook (or worksheet). Examples are print options, headers, and custom and default PivotTable styles. Our goal is to make it fast to apply these customizations without using a macro.
To accomplish our goal, we’ll use an Excel template file. As we’ll discover, the template name and location are important. When we store it in the right spot with the right name, it can be used as the basis for new workbooks created with Ctrl+N. Let’s get to work.
Details
The basic steps are:
- Customize a new workbook
- Save as template
- Create new workbooks
- Modify the template
Customize a new workbook
First up, we need to create a new blank workbook and then make our customizations. This will ultimately become the template file, and thus, the customizations we make here will be applied to new workbooks created from this template.
You can go crazy with your customizations. Make any workbook, worksheet, or cell changes you’d like. You can modify cell styles, create new cell styles, create a PivotTable and then set the default PivotTable style, create a new PivotTable style, enter a default value in A1, apply cell formats, or set print options like scale. Get it all set up, just like you like it.
Once your customizations are made, clean up the workbook. This includes removing any unnecessary cell values, PivotTables, worksheets, etc, that you don’t want to be included each time you create a new workbook based on this file.
Save as template
Once your workbook is looking good, it is time to save it as a template.
A template is a workbook saved in a different format, xltx. Typically, when you open a template file, Excel actually creates a copy of the template file that you can then work with. The original template is left alone, and remains unchanged.
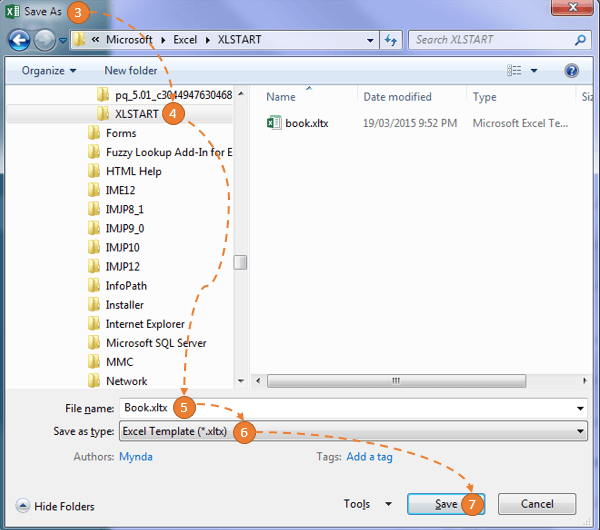
To save your customized workbook as a template, do a standard save. Since it is a new workbook, when you do a standard save, Excel will display the Save As dialog which needs the name, type, and location.

The values we enter for each of these is important, so, let’s discuss.
The first step is to decide how and when you want your new customized workbook to be used. You have two options. You can have Excel use it only when desired, or, you can have Excel use it as the basis for all new workbooks created with Ctrl+N.
If you want to use it as desired, and not as the basis for all new workbooks, then enter any name you’d like and change the type to Excel Template *.xltx. You may notice that when you change the save as type, Excel automatically changes the file location to a special folder that is designed to store user templates.

If you want to use it as the basis for new workbooks, then you have to use a specific name and location. Start by changing the file type to Excel Template *.xltx like before, Now, the file name needs to be book.xltx and the location needs to be the XLSTART folder.

Note that when you change the type to template, Excel automatically changes the path to the user templates folder, so, be sure to update the location to XLSTART after changing the file type to template.
In the previous Excel University post, we talked about how to find the location of the User Startup XLSTART folder using the Excel Options > Trust Center > Trust Center Settings > Trusted Locations.
Note: here is a link to that post if needed: https://www.excel-university.com/macro-toolbox/
To ensure that our new template is used as the basis for new workbooks, we exit and then relaunch Excel.
Now that we have saved our customized workbook as a template, we can use it to create new workbooks.
Create new workbooks
Now that we’ve saved the customized workbook as a template, it is time to use it to create new workbooks.
If you decided to use the template as desired, and not as the basis for all new workbooks, then simply use the File > New command. The New screen will allow you to view Personal templates, where your workbook template will appear. Click it, and a copy of the template is created for you to work with. Your template file is left alone, and will remain unchanged.
If you decided to use your customized workbook as the basis for new workbooks, then you can create a new workbook by using the Ctrl+N keyboard shortcut.

Bam…now you are ready to work, and all of those workbook customizations you used to make manually are already included in this workbook!
Please note that beginning with Excel 2013, the Blank workbook in the New screen is not based on the book.xltx workbook.
This is excellent!
But, there’s one more thing. Let’s differentiate between workbook-level settings and worksheet-level settings. Some of the settings we made above, such as cell styles and PivotTable styles were workbook-level settings, which apply throughout the workbook. But, some of the settings we made above, such as print options and headers, were actually worksheet-level settings. Now that we see this difference, here is a question for you. What happens when we insert a new worksheet into a workbook? Excel uses a blank worksheet, but, the good news is that we can set up a template for new worksheets as well! Just as the book.xltx is used as the basis for new workbooks, sheet.xltx is used as the basis for new worksheets inserted into a workbook. So, that means you can create a new workbook, make your sheet-level customizations, and then save it in the XLSTART folder. This template will be used as the basis for new worksheets.
Modify the template
The last thing is discussing how to make changes to the template file going forward. When you open a template file, Excel creates a copy for you to work with, and the original template file remains unchanged. So, if Excel creates a copy of the template when you open it, how do you make changes to it? Well, the trick is in how you open it.
If you open it with the File > New command or from within Windows Explorer (for example, by double-clicking it) then Excel creates a copy and opens the copy.
However, if you open it from within Excel, using the File > Open command, then, the template file is opened, allowing you to make any changes.
With our snazzy new template file, we are able to quickly apply a handful of customizations without using a macro, just like we wanted!
If you have any other tips about using template files, please share by posting a comment below…thanks!
Additional Notes
- You can also save book.xltx in another folder (besides XLSTART), and then create a shortcut to that file in the XLSTART folder. This technique is discussed in this post: https://www.excel-university.com/macro-toolbox/
Did you know that when Excel opens a new workbook it uses a template called ‘Book’ to create the new file?
This means we can create a custom default Excel workbook by replacing the template file called ‘Book’ with one containing our own formatting.
It’s easy to do.
- Open Excel with a blank workbook.
- Apply the formatting to the blank workbook – colours, fonts, number formats, themes, print set up, page headers/footers etc.
- Save the file: File menu > Save As, or shortcut key F12.
- Set the “Save in” location to the XLSTART folder*. See below for more instructions on finding your XLSTART folder.
- Change the file name to “Book”
- From the “Save as type” drop-down list, select “Excel Template (*.xltx)
- Click Save.
- Close and re-open Excel. The blank workbook should contain the formatting you previously set.
*To find your XLSTART folder :
Windows XP: C:Documents and SettingsUser_nameApplication DataMicrosoftExcelXLSTART
Windows Vista: C:UsersUser_NameAppDataLocalMicrosoftExcelXLSTART
Windows 7, 8 or 10: C:UsersUser_NameAppDataRoamingMicrosoftExcelXLSTART
Replace User_Name with your username on your computer.
Customizing the Default WorkSheet
And if you want any new sheets you insert to have the same formatting, you should also save the file as “Sheet.xltx” in the XLSTART folder.
Tip: make sure your Sheet.xltx file only contains one sheet.
Customizing Excel Options
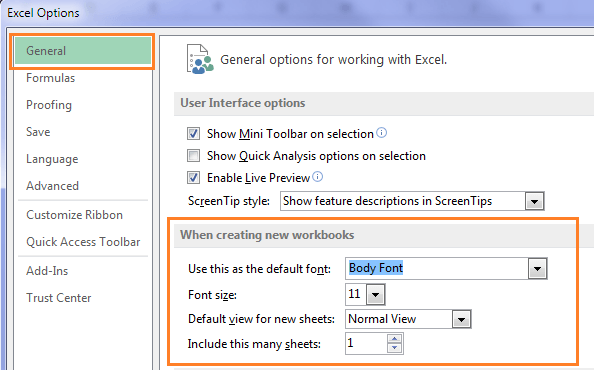
You can also customize how many sheets are in any new files, the font size and view via the Excel Options menu:
Excel 2007 Windows Button > Excel Options > Popular.
Excel 2010 onward File Tab > Options > General:
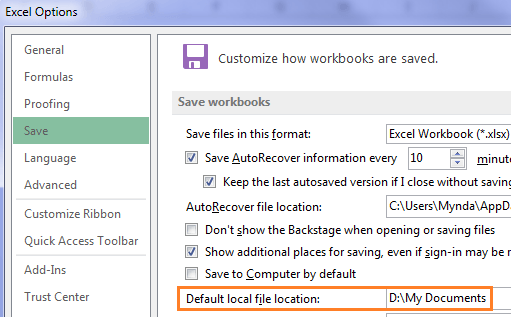
Customize Default Save Location
If you find yourself regularly saving your Excel files to the same folder path you can customize what folder the File Save As dialog box opens at, which is sure to save you a few clicks:
Excel 2007 Windows Button > Excel Options > Save.
Excel 2010 onward File Tab > Options > Save:
Tip: have a poke around in the Options menus as there are loads of things you can customize.
More Customizing
- Customize the Ribbon
- Customize the QAT
- Create your own default Excel Workspace
- Custom Chart Templates
- Default PivotTable Layout
Thanks
Special thanks for Khushnood for reminding me about the Sheet.xltx tip.
 When you create a new Excel workbook, you get a standard default Excel workbook. But what if you don’t like that workbook? Maybe you have a standard header that you always (or almost always) use on pages of your workbook. Or possibly you prefer a different default font style or size, typically use the comma number format, or you often change the layout of column widths when you create a new worksheet. Do you frequently print your worksheets on legal-size paper with a landscape orientation? Does your company require a disclaimer or confidentiality footer on key Excel workbooks? If you frequently change the standard Excel worksheets, customizing the default Excel workbook can be a big time-saver.
As it turns out, Excel gives you quite a bit of control over the look and layout of your worksheets. It’s fairly straightforward to create an entirely customized standard workbook. The trick behind this magic in Microsoft Excel is creating a template file named book.xltx (or book.xltm if your default workbook contains macros), and then save this file to the appropriate location on your hard drive. (This required name assumes English is the interface language). You can’t use book1 or custom or another variation.
Overview: Creating a New Excel Workbook Template
To create a new default Excel workbook template:
- Open a new blank Excel workbook.
- Next, customize the blank workbook exactly as you want it to look.
- Save the workbook with the specific file name in a designated folder. Additional ideas and more detailed steps are provided below.
Some Excel workbook elements you might change:
- Font style and font size: Highlight the portions of the worksheet you want to change and select your preferences for number, alignment, and font formatting from the Font group in the Home tab.
- Print settings: Select one or more worksheets and then choose Page Layout tab > Page Setup group to specify print settings, including the header and footer, margins, and orientation, and indicate other print layout choices.
- Number of sheets: Add or delete worksheets, rename sheet tabs, and even change worksheet tab color.
- Column widths and layout: If you normally prefer different column widths, select the columns or even the entire worksheet and then modify the column width.
- Gridlines: Would you prefer darker gridlines on each of your worksheets? Unlike borders, gridlines only display; they don’t print. To change gridline color, pick File > Options > Advanced. Next, choose Display options for this worksheet and then choose the workbook name from the list. Finally, under Show gridlines, select a different Gridline color.
NOTE: Any new worksheets you insert into your custom default workbook will revert back to the original formatting and layout. You may want to add extra worksheets to the original workbook or reserve an extra or master worksheet you can copy as desired.
Applying Changes to Multiple Cells and/or Worksheets
To add custom formatting changes to every cell, column, or row, first, highlight all cells with Select All (press [Ctrl] + A). When you are done with the cell formatting, press [Ctrl] + [Home] to clear the cell highlights.
To apply changes such as formatting or print settings to multiple worksheets in a workbook, right-click any sheet tab, then left-click on Select All Sheets, which groups the worksheets together for shared actions. When you have finished your changes, left-click again on any sheet tab to clear the worksheet grouping. Find out more about grouping multiple worksheets.
How to Change the Number of Worksheets in a Workbook
You don’t need to create a new default workbook if all you want to do is change the number of worksheets in a new workbook. The default number of worksheets is 1; in Excel 2013 and earlier, the default is 3. To change the default number of worksheets in a new workbook, choose File > Options, pick the General category, and specify the desired number of sheets in the Include this many sheets setting.
Saving Your New Workbook
To save your new default workbook:
- When the new default workbook is set up to your preferences, choose the File tab and then Save As > Excel Workbook.
- In the Save As dialog box, choose the Save As Type drop-down list and select Excel Template (*.xltx).
- Name the file as book.xltx
Excel XLSTART Directory
The file needs to be saved or moved to your XLSTART directory, which is on your local C: drive. The location of this directory varies depending on your version of Windows and Microsoft Office; search your hard drive for the folder. Depending on your version of Excel, examples of the location include:
- C:Users<username>AppDataRoamingMicrosoftExcelXLSTART, where <username> is your Windows login name.
- C:Program FilesMicrosoft OfficerootOffice16XLSTART
How to Locate the XLStart folder
To find out the path of the XLStart folder, check the Trust Center settings:
- Click File > Options.
- Click Trust Center, and then under Microsoft Excel Trust Center, click Trust Center Settings.
- Click Trusted Locations, and then verify the path to the XLStart folder in the list of trusted locations.
Can’t find the XLSTART directory? You may need to create the directory in the above location, or the AppData folder may be hidden.
To show hidden folders in File Explorer:
- Start File Explorer.
- On the View tab of the ribbon, click the upper half of the Options button.
- Activate the View tab of the Folder Options dialog.
- Under Hidden files and folders, select Show hidden files, folders and drives.
- Click OK.
You should now be able to see and navigate to the location of the XLSTART folder.
After you save the template file, you can close it.
- Close Excel.
- Start Excel to see your new workbook.
Using the New Default Excel Workbook
Now, every time you start Excel, the new blank workbook will be based on the template you created. In addition, when you press [Ctrl] + N, the new workbook will be created from your template. Choosing other options for a new workbook may not work as the Excel Start Screen defaults to a different standard workbook.
As always, this or any other workbook can still be individually customized as needed.
Keep in mind that creating and saving a custom default Excel workbook only changes the default workbook on the active computer and does not affect the workbook used by others on your computer network. You can, however, share your default workbook by copying your book.xltx file to the proper location on another computer.
Options When XLSTART Directory Isn’t Available
On some networks with a lot of security restrictions, you may not have access to the XLSTART directory, or you may not have permission to save files. Instead, create a startup directory on your own system with any name you want and store the book.xltx file in this new alternate startup directory. The directory name you choose doesn’t matter, but you will need to tell Excel where it is.
To save your default workbook in an alternate directory:
- Create a new folder on your C: drive where you will store your .xltx file.
- Next, pick File > Options, and then click the Advanced tab.
- Under the General section, type the full path of the folder that you want to use as the alternate startup folder in the At startup, open all files in: option.
- If a workbook with the same name is in both the XLSTART folder and the alternate startup folder, the file in the XLSTART folder opens.
Caution: Because Excel will try to open every file in the alternate startup folder, make sure you specify a folder that contains only files that Excel can open and only files you want to see every time you start Excel.
Create your own custom workbook today to save you time and effort in Microsoft Excel.
Was this helpful? Explore other time-saving Microsoft Excel how-to articles.
© Dawn Bjork, MCT, MOSM, CSP®, The Software Pro®
Microsoft Certified Trainer, Productivity Speaker, Certified Speaking Professional
Dawn Bjorkhttps://www.TheSoftwarePro.com
A Microsoft Certified Trainer (MCT) and Certified Speaking Professional (CSP), Dawn Bjork is known as The Software Pro® for her work as a productivity speaker, software trainer, virtual presenter, and author of numerous training courses and videos. In addition to these credentials, Dawn is also a certified Microsoft Office Specialist Master (MOSM) and Certified Virtual Presenter (CVP).
When she’s not busy sharing her expert knowledge on software with the world, Dawn can be found hiking the Colorado mountains, trying to master Pilates, or attempting to play golf.