
This post will guide you how to convert a given day numbers into Years, Months, Days in Excel. How do I convert days to Years, Months, Days with a formula in Excel. How to convert a general numbers to a standard date in Excel.
- Convert Days to Years, Months, Days
- Convert General Number to Standard Date
Table of Contents
- Convert Days to Years, Months, Days
- Convert General Number to Standard Date
- Related Functions
If you want to convert a given day numbers to Years, Months, Days in your worksheet, you can use an Excel formula based on the DATEDIF function. Like this:
=DATEDIF(0,B1,"y") & " Years " & DATEDIF(0,B1,"ym") & " Months " & DATEDIF(0,B1,"md") & " Days "
You need to type this formula into a blank cell and press Enter key on your keyboard, and then drag the AutoFill Handle over to other cells to apply this formula.
You should see that all days have been converted to Years, Months, Days format in your worksheet.
Convert General Number to Standard Date
#1 select cells that contain 5-digits numbers
#2 go to HOME tab, click Number Format box, and then select Short Date from the drop down menu list.
You would notice that all selected numbers have been converted as a standard date format.
- Excel DATEDIF function
The Excel DATEDIF function returns the number of days, months, or years between tow dates.The syntax of the DATEDIF function is as below:=DATEDIF (start_date,end_date,unit)…
There might be a number of reasons for wanting to convert days to years in Excel.
For example, you might have a count of days that have passed and you might want to calculate how many years it makes.
You might need to find the age of a person given the number of days from their birth to the current date, or you might need to calculate the number of years to a certain date.
Whatever the reason, in this tutorial we will show you some quick tricks to convert days to years in Excel.
Converting Days to Years in Decimal in Excel
If you have the number of days and want to get the number of years in decimal numbers, then there’s a very simple mathematical formula that you can use.
This formula simply makes use of the fact that 1 year contains 365 days.
So if you want to convert the number of days to years, all you need to do is divide the number of days by 365.
Let us say you have the following list of the number of days:

If you want to convert each of the above numbers of days to the corresponding number of years, in decimals, you can use the following formula (assuming that you’re working on the input which is in cell A2):
= A2/365
Let us apply this formula to the given data and see what results we get:

As you can see, in the cells where the number of days is not a multiple of 365, the number of years is shown in decimals.
This does not look realistic, but there are applications, where a notation like this for dates might be useful.
If you want to display the date in the form of years and present the remainder of the days as simply the number of days, you can use the formula shown in the next section.
Also read: How to Remove Year from Date in Excel?
Converting Number of Days to Completed Years and Remaining Days
In this section, we will show you a formula that you can use if you want to convert the number of days to the number of years and days.
Let us use the same list of days to demonstrate this formula:

To convert days to years and days, you can use the following formula (assuming that you’re working on the input which is in cell A2):
=IF(MOD(A2,365)=0,A2/365&" Year(s)",INT(A2/365)&" Year(s) & "&MOD(A2,365)&" Days")
The above formula might look complex, but it uses only an IF statement, simple division, and a set of concatenation operators to get the job done.
Here’s the result we get when the formula is applied to all the cells in the column:

Explanation of the Formula
Let us take a moment to understand the above formula and why it worked.
- The main function of this formula comprises an IF condition. The formula first finds if MOD(A2,365)=0.
- If it is True, then it returns the result A2/365&” Year(s)”.
- If it is False, then it returns the result INT(A2/365)&” Year(s) & “&MOD(A2,365)&” Days”.
Let us understand each of these terms:
- The MOD formula finds the remainder when its first parameter is divided by its second. In this way, the formula MOD(A2,365) =0 can help us find if the first parameter is a multiple of the second. In our example, this MOD function helps us find out if the value in A2 is divisible by 365.
- If the value in A2 is divisible by 365, that means we can neatly divide the number of days into A2/365 years, and we will get an integer (or whole number) in return.
- If the value in A2 is not divisible by 365, that means division by 365 will give a decimal, or a remainder number of days.
- To find out this remainder number of days, we use the formula: MOD(A2,365). This will tell us how many days remain after the value in A2 is divided by 365.
- We combine these results with strings “Year(s)” and “ Days”, in order to get a result as follows: 2 Year(s) & 270 days. When 1002 is divided by 365, we get a quotient of 2 and a remainder of 272. So 1002 days also means 2 years and 272 days!
Also read: How to Get Total Days in Month in Excel?
Converting Number of Days to Years, Months, and Days
Now, what if you want to convert the number of days to years, months and days, instead of just years and days?
Well, you can use the same formula pattern, with a few tweaks.
Let’s see how.
Let us use the same dataset to demonstrate how to convert days to the number of years, months, and days:

To convert days to years, months and days, you can use the following formula (assuming that you’re working on the input which is in cell A2):
=INT(A2/365)&" Year(s), "&INT(MOD(A2,365)/30)&" Month(s) and "&MOD(MOD(A2,365),30)&" Day(s)"
Here’s the result we get when the formula is applied to all the cells in the column:

Explanation of the Formula
This formula is almost similar to the formula that we used in the previous section.
You can choose to add the IF statement, but we chose not to add it so as to keep things simple.
The formula basically combines 3 terms together using concatenation operators (&):
- The first term is INT(A2/365)&” Year(s)”. This divides the number of days by 365, truncates the decimal part of it and keeps just the integer part. Finally it concatenates the string “Year(s)” to the end of the formula’s result. So if the number of days is 1002, this formula returns:
INT(1002/365) Year(s)
=INT(2.745205479) Year(s)
=2 Year(s)
- The second term is INT(MOD(A2,365)/30)&” Month(s)”. This gives us the remaining number of months. The MOD(A2,365) function finds the remainder obtained when the number of days is divided by 365. But this value might be more than 12 (months). So it divides this result by 30, since a month contains 30 days on average. The INT function then truncates the decimal part of the result and keeps just the integer part. Finally it concatenates the string “Month(s)” to the result. So if the number of days is 1002, this formula returns:
INT(MOD(1002,365)/30) Month(s)
=INT(272/30) Month(s)
=INT(9.066666667) Month(s)
=9 Month(s)
- The third term is MOD(MOD(A2,365),30)&” Day(s)”. This gives us the remaining number of days. The MOD(A2,365) function finds the remainder obtained when the number of days is divided by 365. This remainder gives the number of remaining months. The outer MOD function then finds the remainder obtained when this number of months is divided by 30. The remainder obtained is the number of remaining days. Finally the formula concatenates the string “Day(s)” to the result. So if the number of days is 1002, this formula returns:
MOD(MOD(1002,365),30) Day(s)
=MOD(272,30) Day(s)
=2 Day(s)
To sum it up, 1002 days also means 2 years, 9 months, and 2 days.
Also read: How to Add Hours to Time in Excel?
Converting Years to Days in Excel
Now let’s take a look at how to do the reverse – how to convert the number of days back to years.
This is really very simple since we again need to use the same concept of 1 year = 365 days.
So the formula will be:
=A2*365
Converting the Difference Between Two Dates into Years
Most Excel users commonly need to find the number of years between two dates. This is usually the main reason they might want to convert days to years.
They might know that the difference between two dates can be found by simple subtraction, so they might have done that and got the number of days between the two dates.
If you came to this page looking for a way to convert the number of days obtained (after subtraction) to years, we have got an easier and quicker solution for you.
Excel has a special function specifically dedicated to finding out the number of days, months, or years between two specified dates. The function is the DATEDIF function.
The syntax for the DATEDIF function is:
DATEDIF(start_date, end_date, unit)
Here,
- start_date is the starting date to consider in the calculation. This could be a DATE value or a reference to a date value.
- end_date is the ending date to consider in the calculation. This could also be a DATE value or a reference to a date value.
- unit is a string that represents a unit of time. So if you want to find the number of years between the start_date and end_date, the unit string can be specified as “y”.
Note: The unit parameter can be any one of the following:
- “Y” – to show number of years
- “M” – to show number of months
- “D” – to show number of days
- “MD” – to show number of days after subtracting whole months
- “YM” – to show number of months after subtracting whole years
- “YD” – to show number of days after subtracting whole years
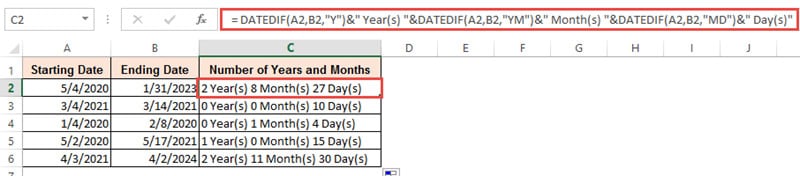
Let us see a few examples to understand how you can use the DATEDIF function. Following is a set of starting and ending dates:

To find the number of days between the two dates, you can use the DATEDIF formula as shown below (assuming that you’re working on the inputs in cells A2 and B2):
=DATEDIF(A2,B2,”D”)

Similarly, to find the number of years between the two dates, use:
=DATEDIF(A2,B2,”Y”)

To find the number of years and days between the two dates, use:
= DATEDIF(A2,B2,”Y”)&” Year(s) ”&DATEDIF(A2,B2,”YD”)&” Day(s)”

To find the number of years and months between the two dates, use:
= DATEDIF(A2,B2,”Y”)&” Year(s) ”&DATEDIF(A2,B2,”YM”)&” Month(s)”

To find the number of years, months, and days between the two dates:
= DATEDIF(A2,B2,”Y”)&” Year(s) ”&DATEDIF(A2,B2,”YM”)&” Month(s) ”&DATEDIF(A2,B2,”MD”)&” Day(s)”
Note that the DATEDIF method provides more accurate results than the methods using MOD and INT (that we showed at the start of this tutorial).
This is because the DATEDIF function automatically takes into consideration the months that have 30 and 31 days (which the first few methods did not take into account, to avoid making the formulae too complex).
In this tutorial, we showed you some quick tricks to convert days to years in Excel.
In case you were looking for a way to find the number of years between two dates, we have also shown how to use the DATEDIF function to get this done quickly. We hope this was helpful.
Other Excel tutorials you may also find useful:
- How to Convert Date to Day of Week in Excel
- How to Add Days to a Date in Excel
- How to Autofill Dates in Excel (Autofill Months/Years)
- How to Convert Month Number to Month Name in Excel
- How to Convert Date to Month and Year in Excel
- Convert Military Time to Standard Time in Excel (Formulas)
- How to Convert Month Name to Number in Excel?
- Find Last Monday of the Month Date in Excel
- Calculate Days Between Two Dates in Excel (Workdays/Weekends)
Содержание
- Add or subtract dates
- Add or subtract days from a date
- Add or subtract months from a date with the EDATE function
- Add or subtract years from a date
- Add or subtract a combination of days, months, and years to/from a date
- Add months to a date
- Subtract months from a date
- How to Convert Days to Years in Excel (Formulas)
- Converting Days to Years in Decimal in Excel
- Converting Number of Days to Completed Years and Remaining Days
- Explanation of the Formula
- Converting Number of Days to Years, Months, and Days
- Explanation of the Formula
- Converting Years to Days in Excel
- Converting the Difference Between Two Dates into Years
Add or subtract dates
Suppose you want to adjust a project’s schedule date by adding two weeks to see what the new completion date will be, or you want to determine how long a single activity will take to complete in a list of project tasks. You can add or subtract a number of days to or from a date by using a simple formula, or you can use worksheet functions that are designed to work specifically with dates in Excel.
Add or subtract days from a date
Suppose that a bill of yours is due on the second Friday of each month. You want to transfer funds to your checking account so that those funds arrive 15 calendar days before that date, so you’ll subtract 15 days from the due date. In the following example, you’ll see how to add and subtract dates by entering positive or negative numbers.
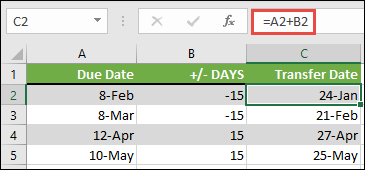
Enter your due dates in column A.
Enter the number of days to add or subtract in column B. You can enter a negative number to subtract days from your start date, and a positive number to add to your date.
In cell C2, enter =A2+B2, and copy down as needed.
Add or subtract months from a date with the EDATE function
You can use the EDATE function to quickly add or subtract months from a date.
The EDATE function requires two arguments: the start date and the number of months that you want to add or subtract. To subtract months, enter a negative number as the second argument. For example, =EDATE(«9/15/19»,-5) returns 4 /15/19.
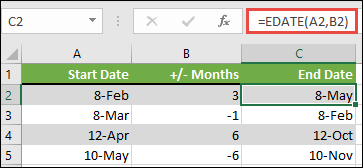
For this example, you can enter your starting dates in column A.
Enter the number of months to add or subtract in column B. To indicate if a month should be subtracted, you can enter a minus sign (-) before the number (e.g. -1).
Enter =EDATE(A2,B2) in cell C2, and copy down as needed.
Depending on the format of the cells that contain the formulas that you entered, Excel might display the results as serial numbers. For example, 8-Feb-2019 might be displayed as 43504.
Excel stores dates as sequential serial numbers so that they can be used in calculations. By default, January 1, 1900 is serial number 1, and January 1, 2010 is serial number 40179 because it is 40,178 days after January 1, 1900.
If your results appear as serial numbers, select the cells in question and continue with the following steps:
Press Ctrl+1 to launch the Format Cells dialog, and click the Number tab.
Under Category, click Date, select the date format you want, and then click OK. The value in each of the cells should appear as a date instead of a serial number.
Add or subtract years from a date
In this example, we’re adding and subtracting years from a starting date with the following formula:
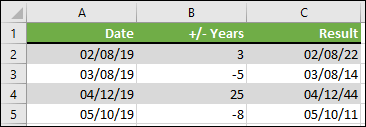
How the formula works:
The YEAR function looks at the date in cell A2, and returns 2019. It then adds 3 years from cell B2, resulting in 2022.
The MONTH and DAY functions only return the original values from cell A2, but the DATE function requires them.
Finally, the DATE function then combines these three values into a date that’s 3 years in the future — 02/08/22.
Add or subtract a combination of days, months, and years to/from a date
In this example, we’re adding and subtracting years, months and days from a starting date with the following formula:
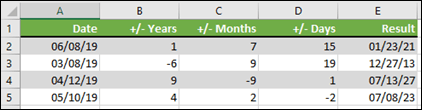
How the formula works:
The YEAR function looks at the date in cell A2, and returns 2019. It then adds 1 year from cell B2, resulting in 2020.
The MONTH function returns 6, then adds 7 to it from cell C2. This gets interesting, because 6 + 7 = 13, which is 1-year and 1-month. In this case, the formula will recognize that and automatically add another year to the result, bumping it from 2020 to 2021.
The DAY function returns 8, and adds 15 to it. This will work similarly to the MONTH portion of the formula if you go over the number of days in a given month.
The DATE function then combines these three values into a date that is 1 year, 7 months, and 15 days in the future — 01/23/21.
Here are some ways you could use a formula or worksheet functions that work with dates to do things like, finding the impact to a project’s schedule if you add two weeks, or time needed to complete a task.
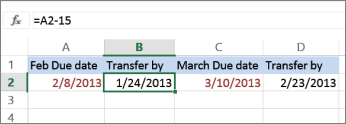
Let’s say your account has a 30-day billing cycle, and you want to have the funds in your account 15 days before the March 2013 billing date. Here’s how you would do that, using a formula or function to work with dates.
In cell A1, type 2/8/13.
In cell B1, type =A1-15.
In cell C1, type =A1+30.
In cell D1, type =C1-15.
Add months to a date
We’ll use the EDATE function and you’ll need the start date and the number of months you want to add. Here’s how to add 16 months to 10/24/13:
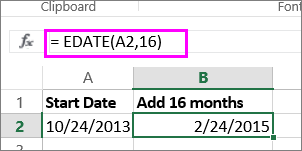
In cell A1, type 10/24/13.
In cell B1, type =EDATE(A1,16).
To format your results as dates, select cell B1. Click the arrow next to Number Format, > Short Date.
Subtract months from a date
We’ll use the same EDATE function to subtract months from a date.
Type a date in Cell A1 and in cell B1, type the formula =EDATE(4/15/2013,-5) .
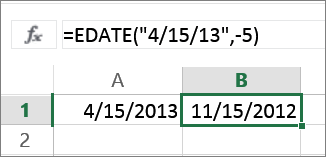
Here, we’re specifying the value of the start date entering a date enclosed in quotation marks.
You can also just refer to a cell that contains a date value or by using the formula =EDATE(A1,-5)for the same result.
Источник
How to Convert Days to Years in Excel (Formulas)
There might be a number of reasons for wanting to convert days to years in Excel.
For example, you might have a count of days that have passed and you might want to calculate how many years it makes.
You might need to find the age of a person given the number of days from their birth to the current date, or you might need to calculate the number of years to a certain date.
Whatever the reason, in this tutorial we will show you some quick tricks to convert days to years in Excel.
Table of Contents
Converting Days to Years in Decimal in Excel
If you have the number of days and want to get the number of years in decimal numbers, then there’s a very simple mathematical formula that you can use.
This formula simply makes use of the fact that 1 year contains 365 days.
So if you want to convert the number of days to years, all you need to do is divide the number of days by 365.
Let us say you have the following list of the number of days:
If you want to convert each of the above numbers of days to the corresponding number of years, in decimals, you can use the following formula (assuming that you’re working on the input which is in cell A2):
Let us apply this formula to the given data and see what results we get:
As you can see, in the cells where the number of days is not a multiple of 365, the number of years is shown in decimals.
This does not look realistic, but there are applications, where a notation like this for dates might be useful.
If you want to display the date in the form of years and present the remainder of the days as simply the number of days, you can use the formula shown in the next section.
Converting Number of Days to Completed Years and Remaining Days
In this section, we will show you a formula that you can use if you want to convert the number of days to the number of years and days.
Let us use the same list of days to demonstrate this formula:
To convert days to years and days, you can use the following formula (assuming that you’re working on the input which is in cell A2):
The above formula might look complex, but it uses only an IF statement, simple division, and a set of concatenation operators to get the job done.
Here’s the result we get when the formula is applied to all the cells in the column:
Explanation of the Formula
Let us take a moment to understand the above formula and why it worked.
- The main function of this formula comprises an IF condition. The formula first finds if MOD(A2,365)=0.
- If it is True, then it returns the result A2/365&” Year(s)”.
- If it is False, then it returns the result INT(A2/365)&” Year(s) & “&MOD(A2,365)&” Days”.
Let us understand each of these terms:
- The MOD formula finds the remainder when its first parameter is divided by its second. In this way, the formula MOD(A2,365) =0 can help us find if the first parameter is a multiple of the second. In our example, this MOD function helps us find out if the value in A2 is divisible by 365.
- If the value in A2 is divisible by 365, that means we can neatly divide the number of days into A2/365 years, and we will get an integer (or whole number) in return.
- If the value in A2 is not divisible by 365, that means division by 365 will give a decimal, or a remainder number of days.
- To find out this remainder number of days, we use the formula: MOD(A2,365). This will tell us how many days remain after the value in A2 is divided by 365.
- We combine these results with strings “Year(s)” and “ Days”, in order to get a result as follows: 2 Year(s) & 270 days. When 1002 is divided by 365, we get a quotient of 2 and a remainder of 272. So 1002 days also means 2 years and 272 days!
Converting Number of Days to Years, Months, and Days
Now, what if you want to convert the number of days to years, months and days, instead of just years and days?
Well, you can use the same formula pattern, with a few tweaks.
Let us use the same dataset to demonstrate how to convert days to the number of years, months, and days:
To convert days to years, months and days, you can use the following formula (assuming that you’re working on the input which is in cell A2):
Here’s the result we get when the formula is applied to all the cells in the column:
Explanation of the Formula
This formula is almost similar to the formula that we used in the previous section.
You can choose to add the IF statement, but we chose not to add it so as to keep things simple.
The formula basically combines 3 terms together using concatenation operators (&):
- The first term is INT(A2/365)&” Year(s)”. This divides the number of days by 365, truncates the decimal part of it and keeps just the integer part. Finally it concatenates the string “Year(s)” to the end of the formula’s result. So if the number of days is 1002, this formula returns:
- The second term is INT(MOD(A2,365)/30)&” Month(s)”. This gives us the remaining number of months. The MOD(A2,365) function finds the remainder obtained when the number of days is divided by 365. But this value might be more than 12 (months). So it divides this result by 30, since a month contains 30 days on average. The INT function then truncates the decimal part of the result and keeps just the integer part. Finally it concatenates the string “Month(s)” to the result. So if the number of days is 1002, this formula returns:
- The third term is MOD(MOD(A2,365),30)&” Day(s)”. This gives us the remaining number of days. The MOD(A2,365) function finds the remainder obtained when the number of days is divided by 365. This remainder gives the number of remaining months. The outer MOD function then finds the remainder obtained when this number of months is divided by 30. The remainder obtained is the number of remaining days. Finally the formula concatenates the string “Day(s)” to the result. So if the number of days is 1002, this formula returns:
To sum it up, 1002 days also means 2 years, 9 months, and 2 days.
Converting Years to Days in Excel
Now let’s take a look at how to do the reverse – how to convert the number of days back to years.
This is really very simple since we again need to use the same concept of 1 year = 365 days.
So the formula will be:
Converting the Difference Between Two Dates into Years
Most Excel users commonly need to find the number of years between two dates. This is usually the main reason they might want to convert days to years.
They might know that the difference between two dates can be found by simple subtraction, so they might have done that and got the number of days between the two dates.
If you came to this page looking for a way to convert the number of days obtained (after subtraction) to years, we have got an easier and quicker solution for you.
Excel has a special function specifically dedicated to finding out the number of days, months, or years between two specified dates. The function is the DATEDIF function.
The syntax for the DATEDIF function is:
- start_date is the starting date to consider in the calculation. This could be a DATE value or a reference to a date value.
- end_date is the ending date to consider in the calculation. This could also be a DATE value or a reference to a date value.
- unit is a string that represents a unit of time. So if you want to find the number of years between the start_date and end_date, the unit string can be specified as “y”.
Note: The unit parameter can be any one of the following:
- “Y” – to show number of years
- “M” – to show number of months
- “D” – to show number of days
- “MD” – to show number of days after subtracting whole months
- “YM” – to show number of months after subtracting whole years
- “YD” – to show number of days after subtracting whole years
Let us see a few examples to understand how you can use the DATEDIF function. Following is a set of starting and ending dates:
To find the number of days between the two dates, you can use the DATEDIF formula as shown below (assuming that you’re working on the inputs in cells A2 and B2):
Similarly, to find the number of years between the two dates, use:
To find the number of years and days between the two dates, use:
To find the number of years and months between the two dates, use:
To find the number of years, months, and days between the two dates:
Note that the DATEDIF method provides more accurate results than the methods using MOD and INT (that we showed at the start of this tutorial).
This is because the DATEDIF function automatically takes into consideration the months that have 30 and 31 days (which the first few methods did not take into account, to avoid making the formulae too complex).
In this tutorial, we showed you some quick tricks to convert days to years in Excel.
In case you were looking for a way to find the number of years between two dates, we have also shown how to use the DATEDIF function to get this done quickly. We hope this was helpful.
Other Excel tutorials you may also find useful:
Источник
In this example, the goal is to output the time between a start date and an end date as a text string that lists years, months, and days separately. For example, given a start date of 1-Jan-2018 and end date of 1-Jul-2018, the result should be a string like this:
"1 years, 6 months, 0 days"
DATEDIF solution
The DATEDIF function is designed to calculate the difference between dates in years, months, and days. There are several variations available (e.g. time in months, time in months ignoring days and years, etc.) and these are set by the «unit» argument in the function. See this page on the DATEDIF function for a full list of available units.
In the example shown, we calculate years, months, and days separately, then «glue» the results together with concatenation. To get whole years, whole months, and days between the dates, we use DATEDIF like this, altering only the unit argument.
DATEDIF(B5,C5,"y") // years
DATEDIF(B5,C5,"ym") // months
DATEDIF(B5,C5,"md") // days
Because we want to create a string that appends the units to each number, we concatenate the number returned by DATEDIF to the unit name with the ampersand (&) operator like this:
DATEDIF(B5,C5,"y")&" years" // years string
DATEDIF(B5,C5,"ym")&" months" // months string
DATEDIF(B5,C5,"md")&" days" // days string
Finally, we need to extend the idea above to include spaces and commas and join everything together in one string:
=DATEDIF(B5,C5,"y")&" years, "&DATEDIF(B5,C5,"ym")&" months, " &DATEDIF(B5,C5,"md")&" days"
Implementing the LET function
The LET function (new in Excel 365) can simplify some formulas by making it possible to define and reuse variables. In order to use the LET function on this formula, we need to think about variables. The main purpose of variables is to define a useful name that can be reused elsewhere in the formula code. Looking at the formula, there are at least five opportunities to declare variables. The first two are the start date and the end date, which are reused throughout the formula. Once we assign values to start and end, we only need to refer to cell C5 and D5 one time. As a first step, we can add line breaks and then define variables for start and end like this:
=LET(
  start,B5,
  end,C5,
  DATEDIF(start,end,"y")&" years, "&
  DATEDIF(start,end,"ym")&" months, "&
  DATEDIF(start,end,"md")&" days"
)
Notice all instances of B5 and C5 in DATEDIF have been replaced by start and end. The result from this formula is the same as the original formula above, but the reference to B5 and C5 occurs only once. The start and end dates are then reused throughout the formula. This makes it easier to read the formula and helps reduce errors.
The next three opportunities for variables are the results from DATEDIF for years, months, and days. If we assign these values to named variables, we can more easily combine them later in different ways, which becomes more useful in the extended version of the formula explained below. Here is the formula updated to include new variables for years, months, and days:
=LET(
  start,B5,
  end,C5,
  years,DATEDIF(start,end,"y"),
  months,DATEDIF(start,end,"ym"),
  days,DATEDIF(start,end,"md"),
  years&" years,"&months &" months," &days &" days"
)
Notice we have assigned results from DATEDIF to the variables years, months, and days, and these values are concatenated together in the last line inside the LET function. With the LET function, the last argument is the calculation or value that returns a final result.
Getting fancy with LET
Once we have the basic LET version working, we can easily extend the formula to do more complex processing, without redundantly running the same calculations over again. For example, one thing we might want to do is make the units plural or singular depending on the actual unit number. The formula below adds three new variables: ys, ms, and ds to hold the strings associated with each unit:
=LET(
  start,B5,
  end,C5,
  years,DATEDIF(start,end,"y"),
  months,DATEDIF(start,end,"ym"),
  days,DATEDIF(start,end,"md"),
  ys,years&" year"&IF(years<>1,"s",""),
  ms,months&" month"&IF(months<>1,"s",""),
  ds,days&" day"&IF(days<>1,"s",""),
  ys&", "&ms&", "&ds
)
The strings start out singular (i.e. » year» not «years»). Then we use the IF function to conditionally tack on an «s» only when the number is not 1. If the number is 1, IF returns an empty string («») and the unit name remains singular. Because we add the unit name to the unit number when we define ys, ms, and ds, the last step inside LET is simpler; we only need to concatenate the units with a comma and space.
See more details about the LET function here. Also, see the Detailed LET function example for another explanation of converting an existing formula to use LET.
Converting days into months can be a useful calculation. It may be used if you have to keep track of time spent on different jobs, or when calculating profit and loss on an annual basis. Excel is probably the best tool for performing calculations like this, because it allows you to enter formulas and perform advanced calculations. In this guide, I will show you how to convert days into months in excel and explain why it is an important calculation that should
be part of your everyday work routine.
How to convert days into months in excel using DATEDIF function
This method works best with versions 2016/2016/mac/online.
1. Now we are going to use a table to show you the usage of this function to convert days into months in excel.
This table contains information about number of days. Now we want to convert days into months in excel. To do so, we must first click cell B2 and then click Insert Function by pressing The Insert Function Key on keyboard or clicking on the Insert Function button on toolbar.
2. Then click on DATEDIF in the Select a Function box that appears and click OK. The Function Arguments dialog box will pop up automatically.
3. The start date is the date we want to
begin calculating, in this case it will be zero so we will simply write zero there.
4. In the end date section, select the cell or range of cells that contains information about the number of days that we want to convert into months. So, we will just select A2 here.
5. A Comparative Unit is the type of information returned by a function. In this case, the required information is represented by three parameters: Years (Y), Months(M) and Days(D). Remember to
add double quotes when entering parameters. Enter Months here;
6.Then click enter and the number of days will be converted into months and will show up in the selected cell.
7. Now drag the selection down to convert rest the cells containing information of the number of days into months.
How to convert days into years in excel using DATEDIF function
This method
works best with versions 2016/2016/mac/online
1. Repeat the same process as explained above to convert days into months in excel in excel and just replace Y with M.
2. Now press OK and the number of days will be converted into years and will appear in the cell.
3. Now drag the selection down to rest the cells containing information of the number of days into years.
How to convert number of days
into years and months in excel using DATEDIF function
This method works best with versions 2016/2016/mac/online
1. First of all, click cell B2 and then type the given formula in the formula bar.
2. Now press OK and the number of days will be converted into years and months will appear in the cell.
3. Now drag the selection down to convert rest the cells containing information of the number
of days into years and months.
Did you learn about how to convert days into months in excel? You can follow WPS Academy to learn more features of Word Document, Excel Spreadsheets and PowerPoint Slides.
You can also download
WPS Office to edit the word documents, excel, PowerPoint for free of cost. Download now! And get an easy and enjoyable working experience.
This post will guide you how to convert a given day numbers into Years, Months, Days in Excel. How do I convert days to Years, Months, Days with a formula in Excel. How to convert a general numbers to a standard date in Excel.
- Convert Days to Years, Months, Days
- Convert General Number to Standard Date
- Convert Days to Years, Months, Days
- Convert General Number to Standard Date
- Related Functions
If you want to convert a given day numbers to
Years, Months, Days in your worksheet, you can use an Excel formula based on the DATEDIF function. Like this:
=DATEDIF(0,B1,"y") & " Years " & DATEDIF(0,B1,"ym") & " Months " & DATEDIF(0,B1,"md") & " Days "
You need to type this formula into a blank cell and press Enter key on your keyboard, and then drag the AutoFill Handle over to other cells to apply this formula.
You should see that all days have been converted to Years, Months, Days format in your worksheet.
Convert General Number to Standard Date
#1 select cells that contain 5-digits numbers
#2 go to HOME tab, click Number Format box, and then select Short Date from the drop down menu list.
You would notice that all selected numbers
have been converted as a standard date format.
Related Functions
- Excel DATEDIF function
The Excel DATEDIF function returns the number of days, months, or years between tow dates.The syntax of the DATEDIF function is as below:=DATEDIF (start_date,end_date,unit)…
How do I convert days into months and years in Excel?
In the Formulas Helper dialog, please select Date from the Formula Type drop-down list, click to highlight Convert days to year month day in the Choose a formula list box, then specify the number cell in the Number box, and finally click the Ok button. Now the calculation result is output in the selected cell.
How do you round days to years in Excel?
So if you want to convert the number of days to years, all you need to do is divide the number of days by 365.
How do I convert a date to month and year format?
Use the following formula involving the TEXT function to extract the month and year from a date:.
=TEXT(B3,»mmm/yy»).
=MONTH(B3).
=YEAR(B3).
=CONCAT(C3,»/»,D3).