
![]()
Download Article
![]()
Download Article
This wikiHow teaches you how to make a calendar in Microsoft Word for Windows and Mac. You can either use a Microsoft calendar template to quickly create a calendar, or you can manually create your own calendar using a table.
-

1
Open Microsoft Word. It’s a dark-blue app with a white «W» on it.
-
2
Click the search bar. It’s at the top of the Word window.
- On Mac, first click File in the upper-left corner, then click New from Template… in the drop-down menu.
Advertisement
-
3
Type in calendar, then press ↵ Enter. Doing so will search the template store for calendar templates.
- You must be connected to the Internet in order to do this.
-
4
Select a calendar template. Click on a calendar that you want to use. The calendar’s page will open.
-
5
Click Create. It’s to the right of the calendar. This will prompt the calendar template to download.
- If you are prompted to enable Macros, select Enable Macros, as this will make it easier to make additional calendars for future months and dates.
-
6
Wait for the calendar to load. Once the template finishes downloading, it will open automatically in Microsoft Word.


Advertisement
-
1
Open Microsoft Word. It’s the dark-blue app with a white «W» on it. The Word home page will open.
-
2
Click Blank document. This option is in the upper-left side of the home page.
- Skip this step on a Mac.
-
3
Enter the month. Type in the name of the month for which you want to create your calendar, then press ↵ Enter. Doing so ensures that your month is above your calendar.
-
4
Click the Insert tab. It’s in the blue ribbon at the top of the Word window. The Insert toolbar will open below the ribbon.
-
5
Click Table. You’ll find this in the «Tables» section of the toolbar.
-
6
Create a table. Drag your mouse cursor seven boxes to the right and five (or six, depending on the month) boxes down, then click. This will create a seven-by-five(or seven-by-six) table to serve as your calendar.
-
7
Enter the days of the week. In the top row of boxes, type in a day of the week for each column.
- For example, you’d put «Sunday» in the top-left box, «Monday» in the box to the right of that, and so on.
-
8
Expand your calendar’s boxes. Starting with the third horizontal line from the top of the calendar, click and drag the line downward to enlarge the second row of boxes. Repeat this process for each row of boxes until your calendar is the right size for you.
-
9
Add day numbers. Click the box in which the first day of your month starts, type in 1, press Tab ↹, and proceed to number the rest of the days.
-
10
Add information to your calendar. Once you’ve numbered the days, you can go back and add events, holidays, appointments, and so on by clicking a day’s box, pressing ↵ Enter to start a new line, and typing in the event’s name or details.
-
11
Create other months. You can add more months to your calendar by clicking below the current month’s calendar, pressing ↵ Enter a couple of times, and then repeating the calendar creation process.
-
12
Save your calendar. Press either Ctrl+S (Windows) or ⌘ Command+S (Mac), then select a save location, enter your calendar’s name, and click Save.


Advertisement
Add New Question
-
Question
How do I go to the following month on the same Word document?

You can copy and paste the document and then change the months and dates. This is an advantage because the boxes are the size you wanted, but you will need to adjust the month name and swap the dates over to the corresponding day.
-
Question
How can I create a calendar that includes pictures?
Yes, just choose one of the calendar templates that includes pictures, and paste or insert the pictures you want. See How to Add an Image in Word if you need help with that.
-
Question
How do I include the dates from my Calendar app?
It depends on what calendar app you have.
See more answers
Ask a Question
200 characters left
Include your email address to get a message when this question is answered.
Submit
Advertisement
Thanks for submitting a tip for review!
About This Article
Thanks to all authors for creating a page that has been read 679,295 times.
Is this article up to date?
Встроенные стили. Первое знакомство
Мы познакомились с понятием Стили текста, научились пользоваться готовыми стилями, создавать собственные стили. Стили, которые мы создаём, называются Пользовательские стили. Но разработчики Word побеспокоились о нас и создали свои стили с готовыми характеристиками, которые встроили в программу и которые так и называются Встроенные стили.
По окончании урока вы сможете:
- Вызвать диалоговое окно Параметры области стилей
- Перечислить режимы отображения стилей и дать характеристику каждому режиму
- Перечислить особенности Встроенных стилей
1. Диалоговое окно Параметры области стилей
- Создайте новый документ (просто запустите Microsoft Word).
- Включите режим Непечатаемые символы.

- Включите область задач Стили


Наверняка вы увидите такую картину:

Вы не забыли, что мы уже настраивали шаблон, (Урок 3. Шаблон документа и его изменение) который открывается при запуске Word? Шрифт у нас Times размером 12 пунктов, и параметры страницы, как заказывали.
Внизу области задач Стили есть группа из трёх кнопок и надпись синим цветом Параметры…

Кнопку Создать стиль мы уже нажимали. О кнопках Инспектор стилей и Управление стилями я расскажу на других уроках. А сейчас нас интересует команда синего цвета Параметры. Нажмите эту команду и на экране появится окно Параметры области стилей.
Из названия можно понять, что это окно настраивает область задач Стили. Мы будем ещё не раз обращаться к этому окну.
2. Режимы отображения стилей и характеристика каждого режима
Нажмите кнопку выпадающего меню, обозначенную красным кружком.

Мы увидели выпадающий список.
Краткая характеристика каждого пункта:
- Рекомендованные
- В области задач будут отображаться стили, которые рекомендуют нам к использованию разработчики программы. Рекомендую не прислушиваться к этим рекомендациям. Разработчики в конце концов живут в другой стране на другом континенте, а у нас свои стандарты и свои национальные особенности.
- Используемые
- Стиль, напомню, это характеристика (или набор форматирования) абзаца. Стили абзацев хранятся в положенном месте, а вот присваивать или не присваивать стили конкретному абзацу – это наше желание. И может случится так, что каким-либо стилем мы не воспользуемся. Так что, выбирая эту команду, мы можем посмотреть, какие конкретно стили используем мы в своём документе. Очень полезная команда.
- В текущем документе
- Если мы выберем эту команду, то в области задач Стили мы увидим все стили, которые заданы в этом документе, как используемые, так и неиспользуемые. Чаще всего я работаю именно в этом режиме, так как тщательно слежу за количеством стилей в документе и не держу попусту лишних стилей. То есть в моём наборе стилей только те, которые я использую в данном документе.
- Все
- Название говорит само за себя.

Выберите эту команду, нажмите ОК и вы увидите:
Я не поленилась, посчитала – 116 встроенных стилей. Готовых, отформатированных. Но пользоваться таким количеством стиле просто нереально. Да и отформатированы эти стили чаще всего не по нашим потребностям.
3. Встроенные стили. Особенности встроенных стилей
- Форматирование Встроенного стиля можно изменять по своему усмотрению (совсем как у собственных стилей, смотри Урок 7. Изменение стиля текста)
- Название Встроенного стиля нельзя заменить. Ваши изменения в названии Встроенного стиля только добавятся к названию Встроенного стиля.
 Автор этого документа очень хотел переименовать встроенные стили и, видимо делал это неоднократно. В результате запутался.
Как переименовывать стили, научимся позже. Ведь может случиться так, что, создавая собственный стиль, мы допустим орфографическую ошибку. В этом случае просто необходимо уметь переименовывать стили - В Word можно удалить любой стиль, созданный пользователем. Word применяет стиль «Обычный» ко всем абзацам, в которых использовался удалённый стиль, и убирает его определение из списка в области задач Стили.
Запомните! Встроенные стили можно удалить из конкретного документа, но нельзя удалить из программы Word! - Встроенные стили можно условно разделить на 4 типа.
 Автор этого документа очень хотел переименовать встроенные стили и, видимо делал это неоднократно. В результате запутался.
4. Встроенные стили. Типы
Тип 1. Стили заголовков

На стили Заголовок 1,2,3 …9 обратите внимание. Заголовки очень важны:
- Определяют структуру документа
- Определяют навигацию в документе
- Соотносятся со структурой презентации в Point’е
Об этом мы будем говорить в следующих уроках
Тип 2. Стили текста

Наиболее распространенными являются стили Обычный и Основной текст, а также их модификации.
Тип 3. Стили списков

Позволяют быстро придать оформление маркированным и нумерованным спискам.
Тип 4. Стили гиперссылок

Стиль Гиперссылка используется для оформления ссылок на web-документы. Стиль Оглавление определяет навигацию в документе.
Теперь вы сможете:
- Вызвать диалоговое окно Параметры области задач
- Дать определение понятию Встроенные стили
- Перечислить режимы отображения стилей и дать характеристику каждому режиму
- Перечислить особенности и типы Встроенных стилей
Word для Microsoft 365 Outlook для Microsoft 365 Word 2021 Outlook 2021 Word 2019 Outlook 2019 Word 2016 Outlook 2016 Word 2013 Outlook 2013 Word 2010 Word 2007 Еще…Меньше
С помощью стилей можно быстро применить набор вариантов форматирования во всем документе. Если вам нужны параметры форматирования, недоступные из встроенных стилей и тем, доступных в Word, вы можете изменить существующий стиль и настроить его в соответствии со своими потребностями. Вы можете изменить форматирование (например, размер шрифта, цвет и отступ текста) в стилях, примененных к заголовкам, заголовкам, абзацам, спискам и так далее. Вы также можете выбрать форматированный текст в документе, чтобы создать новый стиль в коллекции «Стили».
Стили, описанные в этой статье, находятся в коллекции «Стили» на вкладке Главная. Чтобы применить стиль, просто выделите текст, который вы хотите отформатировать, и выберите нужный стиль в коллекции «Стили». Дополнительные сведения см. в статье Применение стиля к тексту в Word.

Изменение существующего стиля
Изменить стиль из коллекции «Стили» можно двумя способами:
-
Обновление стиля в соответствии с форматированием в документе
-
Изменение стиля вручную в диалоговом окне »Изменение стиля»
Обновление стиля в соответствии с форматированием в документе
Если в документе есть текст с нужным стилем, вы можете изменить его форматирование и применить изменения к стилю в коллекции «Стили».
-
Выделите в документе текст, к которому применен стиль, например «Заголовок 1».
При выборе текста, к которому применен стиль, стиль выделяется в коллекции «Стили».
-
Отформатируйте выбранный текст так, как хотите.
Например, вы можете изменить размер шрифта для стиля «Заголовок 1» с 16 до 14 пунктов.
-
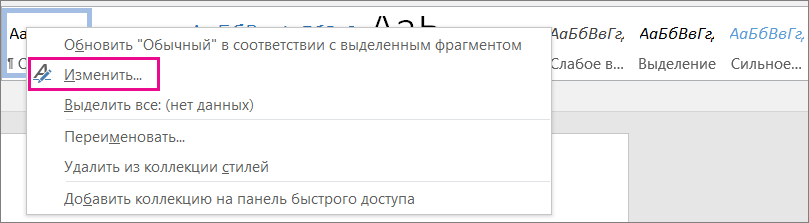
На вкладке Главная в группе Стили щелкните правой кнопкой мыши стиль, который вы хотите изменить, и выберите команду Обновить [название стиля] в соответствии с выделенным фрагментом.
Примечание: Весь текст, к которому применен этот стиль, автоматически изменится.
Изменение стиля вручную в диалоговом окне »Изменение стиля»
Вы можете изменить стиль напрямую в коллекции «Стили», не настраивая текст в документе.
-
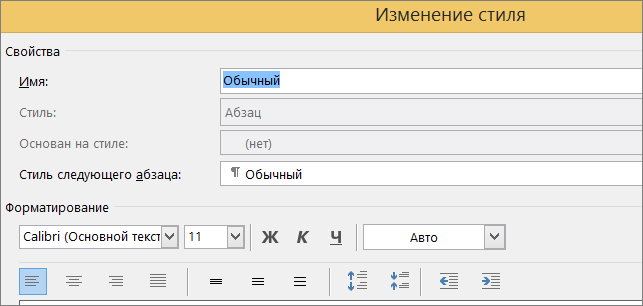
На вкладке Главная щелкните правой кнопкой мыши стиль в коллекции «Стили» и выберите команду Изменить.
-
В разделе Форматирование измените форматирование, например начертание, размер или цвет шрифта, выравнивание, междустрочный интервал и отступы.
-
Выберите, должен ли стиль применяться к текущему документу или же ко всем новым документам.

Создание стиля на основе форматирования документа
Вы можете выбрать отформатированный текст в документе, чтобы создать новый стиль и добавить его в коллекцию «Стили».
-
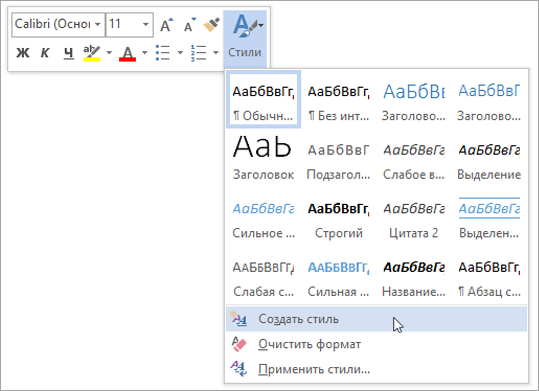
Щелкните правой кнопкой мыши текст, на основе которого вы хотите создать стиль.
-
На мини-панели инструментов нажмите кнопку Стили и щелкните Создать стиль.
-
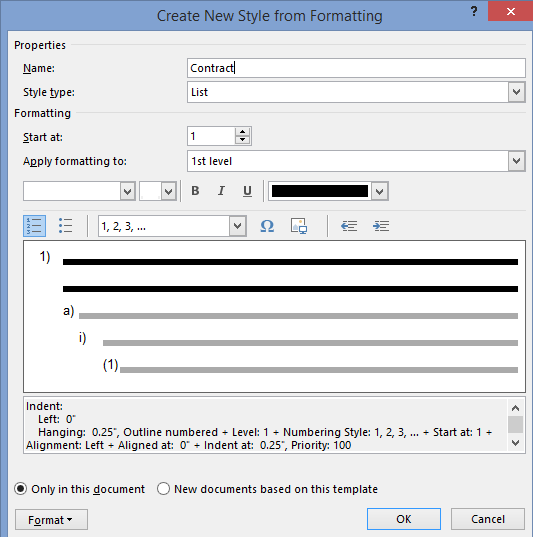
В диалоговом окне Создание стиля введите имя стиля и нажмите кнопку ОК.
Новый стиль появится в коллекции «Стили».
Примечание: Если вы хотите, чтобы новый стиль появился во всех новых Word документах, щелкните его правой кнопкой мыши в коллекции «Стили», выберите изменить ,а затем в нижней части диалогового окна выберите новые документы, основанные на этом шаблоне.
-
Щелкните правой кнопкой мыши текст, выберите Стили и щелкните Сохранить выделенный фрагмент как новый экспресс-стиль.
-
В диалоговом окне Создание стиля введите имя стиля и нажмите кнопку ОК.
Новый стиль появится в коллекции «Стили».
Примечание: Если вы хотите, чтобы новый стиль появился во всех новых Word документах, щелкните его правой кнопкой мыши в коллекции «Стили», выберите изменить ,а затем в нижней части диалогового окна выберите новые документы, основанные на этом шаблоне.
Дополнительные сведения
Применение стиля к тексту в Word
Нужна дополнительная помощь?
Стиль в ворде – это предопределенная комбинация стиля шрифта, его цвета и размера, которая может быть применена к любому тексту документа MS Word. Стили в ворде могут помочь вашим документам достичь более профессионального внешнего вида.
Как применить стиль
- Выберите текст, который вы хотите отформатировать.

Стили в Word – Выделение текста для применения стиля
- В группе «Стили» на вкладке «Главная» нажмите стрелку «Больше».

Стили в Word – Коллекция стилей в ворде
- Выберите нужный стиль в раскрывающемся меню.

Стили в Word – Выбор стиля в ворде
- Текст будет отображаться в выбранном стиле.

Стили в Word – Текст с выбранным стилем
Как применить набор стилей
Наборы стилей в ворде включают сочетание стилей заглавия, заголовка и абзаца. Наборы стилей позволяют вам форматировать все элементы в документе одновременно, а не изменять каждый элемент отдельно.
- На вкладке «Дизайн» нажмите стрелку «Больше» в группе «Форматирование документа».

Стили в Word – Коллекция наборов стилей в ворде
- Выберите понравившийся стиль в раскрывающемся меню.

Стили в Word – Выбор набора стиля
- Выбранный набор стиля будет применен ко всему документу.

Стили в Word – Использование набора стиля в документе
Как изменить стиль
- Найдите и щелкните правой кнопкой мыши стиль, который вы хотите изменить, в группе «Стили», а затем выберите «Изменить…» в раскрывающемся меню.

Стили в Word – Изменить стиль
- Появится диалоговое окно «Изменение стиля». Сделайте необходимые изменения форматирования, такие как стиль шрифта, размер и цвет. Если вы хотите, вы также можете изменить название стиля.
- Нажмите «ОК», чтобы сохранить изменения.

Стили в Word – Окно Изменение стиля
- Стиль в ворде будет изменен.
Как создать стиль
- Нажмите стрелку в нижнем правом углу группы «Стили».

Стили в Word – Параметры стилей
- Появится панель задач «Стили». Выберите кнопку «Создать стиль» в нижней части панели задач.

Стили в Word – Создать стиль
- Появится диалоговое окно «Создание стиля». Введите имя стиля и выберите нужное форматирование текста.
- И для создания стиля нажмите «ОК».

Стили в Word – Окно создание стиля
- Новый стиль появится в группе «Стили».

Стили в Word – Мой стиль
Использование стилей в ворде позволяет сэкономить много времени, при изменении форматирования документа. Также правильное использование стилей и наборов стилей в ворде – лучший способ создать хорошо форматированные документы в Microsoft Word.
Here’s the basics of Styles in Word for paragraph, character or both (Linked) plus Tables and Lists. I know talking about styles in Word makes eyes glaze over but they are a really useful part of Word (plus Excel, PowerPoint and Outlook).
Today I watched an ‘experienced’ Word user reformatting a document. He laboriously worked through the document, selecting paragraphs, phrases and even individual words then clicking on the ribbon to change the look. It took 10 minutes or more. With styles it would have taken a few seconds.
Styles have been around for all of Word’s history. They have changed and expanded over the years but the fundamentals are the same.
In this article we’ll explain the different types of styles including at least one that sneaked in without many people noticing. From just one type in the early days of Word, there’s five different style types in modern Microsoft Word.
What is a Style?
A style is just a collection of formatting settings under a single name.
For example ‘Heading 1’ has these default values in Word (choose Heading 1 style, right-click and choose ‘Modify Style’.
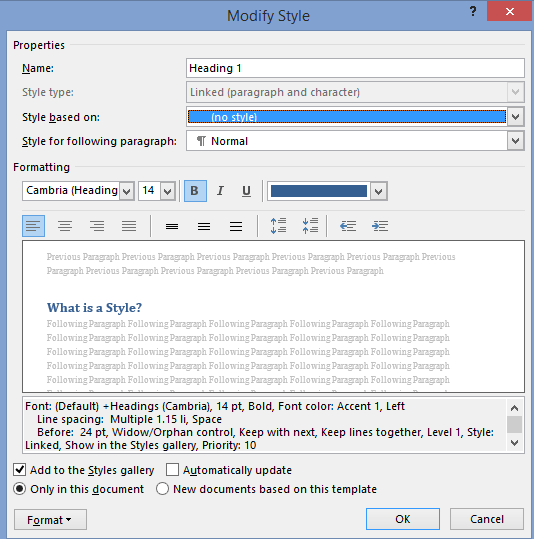
So ‘Heading 1’ means Cambria font, 14pt, Bold with a color setting, Left justified, 1.15 line spacing and 24pt line space before the text, plus other settings.
Instead of having to apply all those separate formatting options for each main heading, just apply the ‘Heading 1’ style.
Even better, if you decide to change the look of the headings, change the ‘Heading 1’ settings and all the headings with that style will be changed automatically.
Paragraph and Character styles
There are different types of style that can be applied to different parts of a document. Originally there were only Paragraph styles – styles you could apply to an entire paragraph.
That was OK but no help if you wanted consistent formatting for words in a paragraph like a product name Office-Watch.com or just emphasis.
So Microsoft added character styles. These are styles that can be applied to a word or even a single letter. A character style could be called ‘Product Name’ to ensure all references to a product or service look consistent.
Character styles have all the attributes of paragraph styles that are applicable to individual characters. Things like font, size, color, bold, italic etc are in both character and paragraph styles. Line spacing, Left/Right/Center/Justify etc. can only apply to entire paragraphs.
Linked styles
Adding character styles created a new problem. Microsoft discovered that users sometimes had two styles with the same name – one as a paragraph style, the other as a character style. Or people would have two styles such as ‘QuoteP’ and QuoteC’ with the same settings, one for paragraphs and another for word/characters.
So Word 2007 introduced ‘Linked Styles‘ which act as both a paragraph style and character style, depending on the situation.
A linked style acts like a paragraph style when a paragraph/s is selected and the style applied.
It acts like a character style when less than a paragraph (a character/word/phrase) is selected and the style applied.
Gone is the need for ‘twin’ styles – now you can have a single style that can applied to any text in a document.
The best example of a linked style is already in Word 2007 and later. All the Heading styles were changed to linked styles. Here’s an example of ‘Heading 1’ style used as both a paragraph and character style at the same time.

Both the paragraph and words were changed to the same style by selecting them and pressing the ‘Heading 1’ shortcut Ctrl + Alt + 1 . The Style Gallery or styles list could have been used to do the same thing.
In the Modify Style dialog you’ll see the style type just under the name.

‘Linked’ isn’t the best choice of terms for this type of style. Most styles are already ‘linked’ to others through style inheritance. ‘Merged’ or ‘Combined’ might have been clearer to most people – but we’re stuck with ‘Linked’.
Which is which?
On the styles list, the three types of style have their own markers.
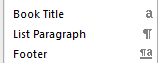
The lower case ‘a’ next to a character style.
The ‘backwards P’ or Pilcrow is used as an end of paragraph mark in Word and also serves to denote a Paragraph style.
The combined pilcrow and a is, unsurprisingly, for a linked style.
Alas, the Style Gallery on the ribbon isn’t as clear. Among various (ignored) complaints about the Style Gallery is the inconsistent marking.
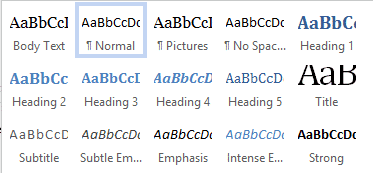
Paragraph styles (e.g. Normal, Pictures etc.) have the pilcrow next to the style name.
Linked paragraphs (Heading styles etc.) have no marking next to the name.
But neither do the character styles! In the above image there’s no way to know that ‘Subtle Emphasis’ is a character style.
Inheritance
A brief mention of style inheritance.
Styles are normally based on an existing style so only changes from the inherited style need to be made. This lets you apply broader changes to a document a lot faster.
For example, here’s settings for Heading 2

Heading 2 is based on the Heading 1 style, so all the settings for Heading 1 are used for Heading 2 as a starting point.
The settings like ’13pt, Not Bold …’ etc. are only the differences between Heading 1 and what’s been changed to the look for Heading 2.
If the font for Heading 1 is changed then the font for Heading 2 will also change due to style inheritance.
In a standard Word document, styles can usually be traced back to some base Word styles like Normal and Default Paragraph Font (paragraph and character styles respectively). However you can create a style ‘from scratch’ with no inheritance. Here’s the same Heading 2 style with the ‘Style based on’ removed.

Now you can see all the formatting attributes in detail.
Unlinking styles might seem like a good idea that makes things simpler, but experienced Word users almost never do it. Style inheritance can be a nuisance at times, but its more helpful than a hindrance.
What’s going on?
Sometimes the formatting can get confusing. What’s a paragraph setting, what’s a character style and what is directly applied with no style? WordPerfect had a ‘Reveal Codes’ feature which Microsoft resisted copying but finally added to Word.
There’s two options for exposing what Word is up to. The Style Inspector (Word 2007 and later) and Reveal Formatting. Here’s both in action side-by-side.
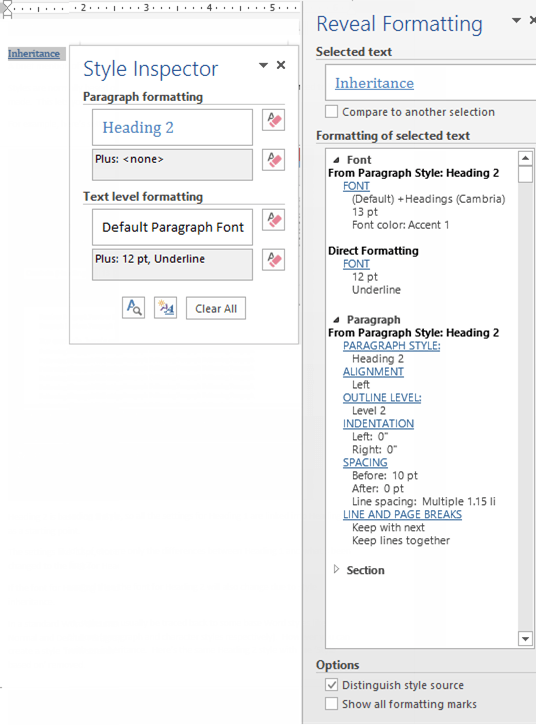
As you can see the Style Inspector is a small box that can be dragged around the screen. Open the Style Inspector from the button at the bottom of the Styles pane:

Reveal Formatting has a lot more detail and sits in the right-hand pane. There’s a button for Reveal Formatting on the Style Inspector box.
The Shift + F1 shortcut will open the Reveal Formatting pane. This shortcut has worked since Word 2002 (XP).
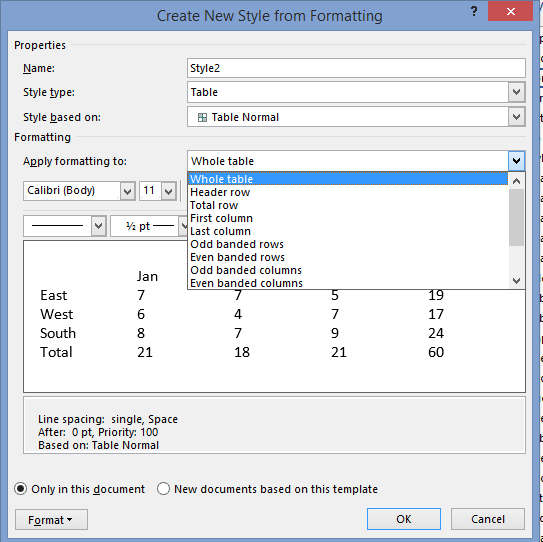
Table and List styles
Added in Word 2007 were two more styles.
Table styles, let you group together all the many formatting options for tables.
Similarly, all the options for list formatting were a nightmare until Word 2007 when List Styles were introduced. Now all the, sometimes complex, choices for lists (numbering, indenting at each level) can be more easily and consistently applied.
Fix your Word Style Gallery
Word style renaming and alias tricks
Show a Word style marked ‘Hide until used’.
What does Word style ‘Automatically update’ really mean?
Change Word style to match current paragraph