
Installing the Date Picker
- Display the Developer tab of the ribbon.
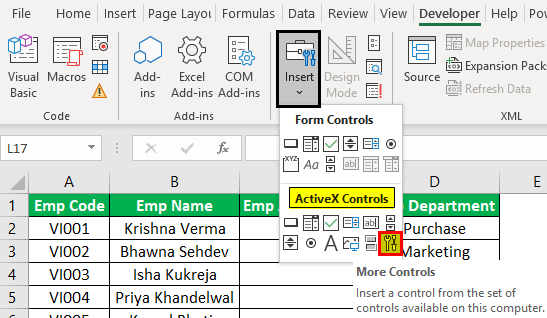
- Click the Insert tool.
- In the ActiveX Controls section of the palette, click the More Controls option.
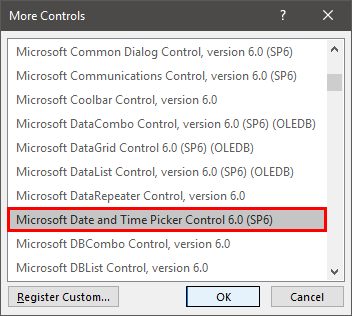
- Scroll through the dialog box until you find the Microsoft Date and Time Picker tool.
- Click OK.
Contents
- 1 How do I activate Date Picker in Excel?
- 2 How do I insert a Date Picker in Excel 2016?
- 3 Does Excel have a date picker?
- 4 How do I install Microsoft Date and Time Picker Control 6.0 SP6?
- 5 How can I tell if Excel is 64 bit?
- 6 How do I insert a Date Picker in Excel 2010?
- 7 How do I insert the date and time picker control in Excel 365?
- 8 How do I insert a date picker in Excel for Mac?
- 9 Where is the Developer tab in Excel?
- 10 Is Excel 64-bit faster?
- 11 Can I install 32bit Office on 64bit Windows 10?
- 12 What is 32bit vs 64bit?
- 13 How do you insert a date picker in numbers?
How do I activate Date Picker in Excel?
Click the Data tab. In the Insert Formula dialog box, click Insert Function. In the Categories list in the Insert Function dialog box, click Date and Time. In the Functions list, click today, and then click OK twice to return to the Date Picker Properties dialog box.
How do I insert a Date Picker in Excel 2016?
2010-2016: Click on File, click on Options, click the Add-ins tab. In the Manage drop-down, choose Excel Add-ins, and click Go. Use “Browse” to select the add-in and then click on OK. Verify that the Date Picker is checked in the add-in list and then click OK.
Does Excel have a date picker?
Date Picker for Excel inserts a pop-up calendar into Microsoft Excel. It works like a drop-down calendar, offering a handy date selector. The picker button is activated automatically when you click a cell that is formatted as date, contains a date value or underneath the text “Date”.
How do I install Microsoft Date and Time Picker Control 6.0 SP6?
In Developer tab, Controls group, click Insert, then bottom right button for More Controls. Scroll down and select Microsoft Date and Time Picker Control 6.0 (SP6) or Microsoft MonthView Control 6.0 (SP6) then click OK.
How can I tell if Excel is 64 bit?
First, select “File” from the main menu. The select “Account” from the left menu. Then select “About Excel” from the box on the right. The text at the top of the dialog will show if Excel is 32 or 64 bit.
How do I insert a Date Picker in Excel 2010?
2010 and up: Click on File, click on Options, click the Add-ins tab. In the Manage drop-down, choose Excel Add-ins, and click Go. Use “Browse” to select the add-in and then click on OK. Verify that the Date Picker is checked in the add-in list and then click OK.
How do I insert the date and time picker control in Excel 365?
Office add-in called Mini Calendar and Date Picker via Insert Start>Options>Get add-ins, please try to check if it could meet your need and i would be happy to find out if I could help.
How do I insert a date picker in Excel for Mac?
Date Picker Add-in for Excel for the Mac
- Double-click on a day to Insert the date and the formatting.
- Use the “Insert Date Only” button to Insert the date only, using the default or existing date format.
- Use the “Insert Week number” button to Insert the week number.
Where is the Developer tab in Excel?
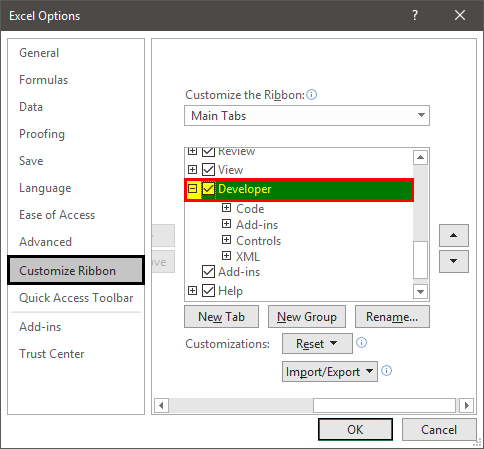
The Developer tab isn’t displayed by default, but you can add it to the ribbon. On the File tab, go to Options > Customize Ribbon. Under Customize the Ribbon and under Main Tabs, select the Developer check box.
Is Excel 64-bit faster?
Installing the 64‐bit version of Excel will certainly make your Excel models run faster and more efficiently but consider whether it’s really necessary before you take the plunge.Increasing to the 64‐bit version of Excel will increase the speed, capacity, and efficiency of working in Excel significantly.
Can I install 32bit Office on 64bit Windows 10?
The 32-bit and 64-bit versions of Office programs aren’t compatible, so you can’t install both on the same computer. You’re developing in-house solutions, like add-ins or document-level customization.
What is 32bit vs 64bit?
A 32-bit system can access 232 different memory addresses, i.e 4 GB of RAM or physical memory ideally, it can access more than 4 GB of RAM also. A 64-bit system can access 264 different memory addresses, i.e actually 18-Quintillion bytes of RAM.
How do you insert a date picker in numbers?
All replies
- Click in cell where you want a date.
- Go to the menu item Insert / Date & Time to insert today’s date & time.
- Click on the date in the cell and a window will pop up that allows you to format the date. It also has the date picker.
- Click on the date picker icon in the window to open the date picker.
Элемент управления пользовательской формы DTPicker (поле с календарем), предназначенный для выбора и ввода даты. Примеры кода VBA Excel с DTPicker.
UserForm.DTPicker – это элемент управления пользовательской формы, представляющий из себя отформатированное текстовое поле с раскрывающимся календарем, клик по выбранной дате в котором записывает ее в текстовое поле.

При вызове календаря пользовательская форма теряет фокус – это видно на изображении. При редактировании даты непосредственно в текстовом поле DTPicker, формат поля позволяет изменять элементы даты (день, месяц, год) по отдельности.
Чтобы перемещаться между элементами даты, необходимо, или выбирать элемент мышью, или нажимать любой знак разделителя («.», «,» или «/») на клавиатуре. А клик по знаку «+» или «-», соответственно, увеличит или уменьшит значение элемента даты на единицу.
Если в элемент «год» ввести однозначное число или двузначное число, не превышающее двузначный остаток текущего года, через пару секунд автоматически добавятся первые две цифры текущего столетия (20). Если вводимое двузначное число превысит двузначный остаток текущего года, автоматически добавятся первые две цифры прошлого столетия (19).
DTPicker – это сокращение от слова DateTimePicker, не являющегося в VBA Excel ключевым словом, как и DatePicker.
Добавление DTPicker на Toolbox
Изначально на панели инструментов Toolbox нет ссылки на элемент управления DTPicker, поэтому ее нужно добавить самостоятельно.
Чтобы добавить DTPicker на панель инструментов Toolbox, кликните по ней правой кнопкой мыши и выберите из контекстного меню ссылку «Additional Controls…»:

В открывшемся окне «Additional Controls» из списка дополнительных элементов управления выберите строку «Microsoft Date and Time Picker Control»:

Нажмите кнопку «OK» и значок элемента управления DTPicker появится на панели инструментов Toolbox:

Свойства поля с календарем
| Свойство | Описание |
|---|---|
| CalendarBackColor | Заливка (фон) календаря без заголовка. |
| CalendarForeColor | Цвет шрифта чисел выбранного в календаре месяца. |
| CalendarTitleBackColor | Заливка заголовка календаря и фон выбранной даты. |
| CalendarTitleForeColor | Цвет шрифта заголовка (месяц и год) и выбранного в календаре числа. |
| CalendarTrailingForeColor | Цвет шрифта чисел предыдущего и следующего месяца. |
| CheckBox | В значении True отображает встроенный в DTPicker элемент управления CheckBox. По умолчанию – False. |
| ControlTipText | Текст всплывающей подсказки при наведении курсора на DTPicker. |
| CustomFormat | Пользовательский формат даты и времени. Работает, когда свойству Format присвоено значение dtpCustom (3). |
| Day (Month, Year) | Задает или возвращает день (месяц, год). |
| DayOfWeek | Задает или возвращает день недели от 1 до 7, отсчет начинается с воскресенья. |
| Enabled | Возможность раскрытия календаря, ввода и редактирования даты/времени. True – все перечисленные опции включены, False – выключены (элемент управления становится серым). |
| Font | Шрифт отображаемого значения в отформатированном поле элемента управления. |
| Format | Формат отображаемого значения в поле элемента управления DTPicker, может принимать следующие значения: dtpCustom (3), dtpLongDate (0), dtpShortDate (1) (по умолчанию) и dtpTime (2). |
| Height | Высота элемента управления DTPicker с нераскрытым календарем. |
| Hour (Minute, Second) | Задает или возвращает часы (минуты, секунды). |
| Left | Расстояние от левого края внутренней границы пользовательской формы до левого края элемента управления. |
| MaxDate | Максимальное значение даты, которое может быть выбрано в элементе управления (по умолчанию – 31.12.9999). |
| MinDate | Минимальное значение даты, которое может быть выбрано в элементе управления (по умолчанию – 01.01.1601). |
| TabIndex | Определяет позицию элемента управления в очереди на получение фокуса при табуляции, вызываемой нажатием клавиш «Tab», «Enter». Отсчет начинается с нуля. |
| Top | Расстояние от верхнего края внутренней границы пользовательской формы до верхнего края элемента управления. |
| UpDown | Отображает счетчик вместо раскрывающегося календаря. True – отображается SpinButton, False – отображается календарь (по умолчанию). |
| Value | Задает или возвращает значение (дата и/или время) элемента управления. |
| Visible | Видимость поля с календарем. True – DTPicker отображается на пользовательской форме, False – DTPicker скрыт. |
| Width | Ширина элемента управления DTPicker с нераскрытым календарем. |
DTPicker – это сокращение от слова DateTimePicker, не являющегося в VBA Excel ключевым словом, как и DatePicker.
Примеры кода VBA Excel с DTPicker
Программное создание DTPicker
Динамическое создание элемента управления DTPicker с помощью кода VBA Excel на пользовательской форме с любым именем:
|
1 2 3 4 5 6 7 8 9 10 11 12 13 14 15 16 17 |
Private Sub UserForm_Initialize() Dim myDTPicker As DTPicker With Me .Height = 100 .Width = 200 ‘Следующая строка создает новый экземпляр DTPicker Set myDTPicker = .Controls.Add(«MSComCtl2.DTPicker», «dtp», True) End With With myDTPicker .Top = 24 .Left = 54 .Height = 18 .Width = 72 .Font.Size = 10 End With Set myDTPicker = Nothing End Sub |
Данный код должен быть размещен в модуле формы. Результат работы кода:

Применение свойства CustomFormat
Чтобы задать элементу управления DTPicker пользовательский формат отображения даты и времени, сначала необходимо присвоить свойству Format значение dtpCustom. Если этого не сделать, то, что бы мы не присвоили свойству CustomFormat, будет применен формат по умолчанию (dtpShortDate) или тот, который присвоен свойству Format.
В данном примере создается пользовательский формат для полей с календарем DTPicker1 и DTPicker2, размещенных на пользовательской форме, и отображаются в них текущие дата и время.
|
Private Sub UserForm_Initialize() With DTPicker1 .Format = dtpCustom .CustomFormat = «Год: yyyy; месяц: M; день: d» .Value = Now End With With DTPicker2 .Format = dtpCustom .CustomFormat = «Часы: H; минуты: m; секунды: s» .Value = Now End With End Sub |
Результат работы кода:

Таблица специальных символов и строк, задающих пользовательский формат даты и времени (регистр символов имеет значение):
| Символы и строки | Описание |
|---|---|
| d | День месяца из одной или двух цифр. |
| dd | День месяца из двух цифр. К числу из одной цифры впереди добавляется ноль. |
| ddd | Сокращенное название дня недели из двух символов (Пн, Вт и т.д.). |
| dddd | Полное название дня недели. |
| h | Час из одной или двух цифр в 12-часовом формате. |
| hh | Час из двух цифр в 12-часовом формате. К часу из одной цифры впереди добавляется ноль. |
| H | Час из одной или двух цифр в 24-часовом формате. |
| HH | Час из двух цифр в 24-часовом формате. К часу из одной цифры впереди добавляется ноль. |
| m | Минута из одной или двух цифр. |
| mm | Минута из двух цифр. К минуте из одной цифры впереди добавляется ноль. |
| M | Месяц из одной или двух цифр. |
| MM | Месяц из двух цифр. К месяцу из одной цифры впереди добавляется ноль. |
| MMM | Сокращенное название месяца из трех символов. |
| MMMM | Полное название месяца. |
| s | Секунда из одной или двух цифр. |
| ss | Секунда из двух цифр. К секунде из одной цифры впереди добавляется ноль. |
| y | Год из одной или двух последних цифр. |
| yy | Год из двух последних цифр. |
| yyyy | Год из четырех цифр. |
Создание границ интервала дат
Простенький пример, как задать интервал дат с начала месяца до текущего дня с помощью двух элементов управления DTPicker:
|
Private Sub UserForm_Initialize() DTPicker1.Value = Now DTPicker1.Day = 1 DTPicker2.Value = Now End Sub |
Результат работы кода, запущенного 23.11.2020:

DTPicker – это сокращение от слова DateTimePicker, не являющегося в VBA Excel ключевым словом, как и DatePicker.
Hi
Okol-Gui,
You had mentioned that,»this seems to be for excel, I’m searchign for VBA though in excel»
Same way you can add the Date picker for VBA in Userform.

You can select it by adding the date picker control from additional controls for user form.
Here, I want to confirm with you, Are you using 32 bit Excel or 64 bit Excel?
If you are using 64 bit Excel then you will not able to use these control as these controls are only available for 32 bit version.
In that case, You need to develop your own Date Picker or you can use any third party Date Picker Control compatible with 64 bit version.
Other thing you had mentioned in your original post ,»Extract mscomct2.ocx from MSCOMCT2.CAB to C:windowssystem32 (windows 32 OS)
or C:windowsSysWOW64 (Windows 64)«
Did you register it using command below in CMD?
regsvr32 c:windowssysWOW64mscomct2.ocx
Note that you need to run the CMD as an administrator. You will get message if it get register successfully.
Then if you are working with 32 bit Excel then you will able to use it.
Regards
Deepak
MSDN Community Support
Please remember to click «Mark as Answer» the responses that resolved your issue, and to click «Unmark as Answer» if not. This can be beneficial to other community members reading this thread. If you have any compliments or complaints to
MSDN Support, feel free to contact MSDNFSF@microsoft.com.
-
Edited by
Tuesday, April 10, 2018 3:13 AM
-
Marked as answer by
Okol-Gui
Tuesday, April 10, 2018 1:58 PM
Выбор даты из всплывающего календаря
Описание работы
Excel позволяет добавить выпадающий календарь в конкретную ячейку, но часто этого не достаточно и приходится вводить большое количество дат в разные ячейки. Не всегда удобно делать это с клавиатуры, так как при вводе хочется параллельно видеть день недели и не ошибиться в выборе даты.
Чтобы вставить дату из всплывающего календаря в любой ячейке Excel можно использовать надстройку VBA-Excel. Для этого:
- Выделить ячейку в которую необходимо вставить дату.
- Перейти на вкладку VBA-Excel.
- Выбрать команду Вставить дату.
- В диалоговом окне Календаря выбрать нужную дату.

Работа с формой календаря
Форма календаря имеет достаточно широкий функционал.
- Можно быстро перейти к текущему числу.
- Быстро переключить месяц путем выбора его из списка.
- Изменять год с помощью переключателей.
- При выборе даты отображаются дни недели и подсвечиваются выходные дни.
- Вы можете вызвать окно ввода даты и продолжать работать с данными. Закрывать окно нет необходимости.
- Закрыть календарь можно в любой момент путем нажатия на крестик в правом верхнем углу.
Всплывающий календарь
Если вам часто приходится вводить даты в ячейки листа, то делать это вручную неудобно. Для ввода именно сегодняшней даты можно воспользоваться функцией СЕГОДНЯ (TODAY), сочетанием клавиш Ctrl+; или макросом, но если нужны разные даты из прошлого или будущего, то вбивать их руками долго.
К сожалению, в стандартном арсенале средств Excel нет встроенного выпадающего календаря (в отличие от Word), да еще и в последних версиях, начиная с Excel 2007, Microsoft зачем-то убрала из стандартного комплекта поставки библиотеку mscalc.osx, которая позволяла быстро создать пользовательскую форму с календарем.
Естественно, это «узкое место» не осталось без внимания опытных пользователей и экспертов Excel MVP, которые оперативно создали несколько интерактивных календарей на макросах для удобного ввода дат. Вот подборка неплохих, на мой взгляд, бесплатных вариантов:
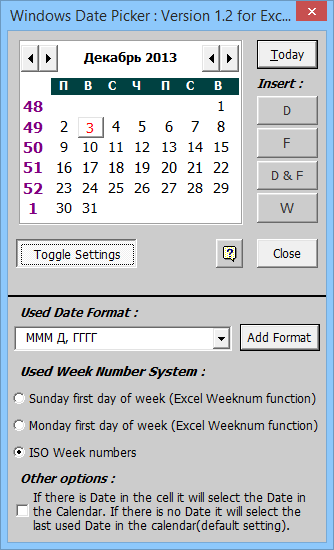
Windows Date Picker
Автор: Ron de Bruin
Цена: бесплатно
Ссылка
- Устанавливается как надстройка (есть версии для старых Excel 200-2003 и для новых Excel 2007-2010 и, отдельно, для Excel 2013.
- Вызывается через контекстное меню ячейки (правой кнопкой мыши по ячейке — Date Picker).
- Позволяет вставлять дату в нескольких форматах, вплоть до номера недели (по разным стандартам).
- Автоматически подстраивается под российский стандарт недели (с понедельника).
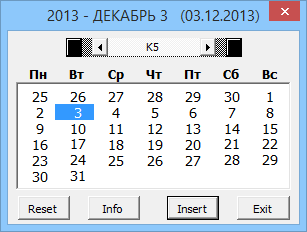
Excel Date Picker
Автор: Jim Cone
Цена: бесплатно
Ссылка
- Макрос (не надстройка!) с открытым кодом VBA — можно посмотреть как всё устроено и модернизировать «под себя». Но надо копировать код в каждый используемый файл и вызывать нажатием на кнопку или сочетанием клавиш, т.е. универсальность хромает.
- Удобная система прокрутки лет и месяцев.
- Российскую неделю (с понедельника) знает.
- Каких-либо настроек нет.
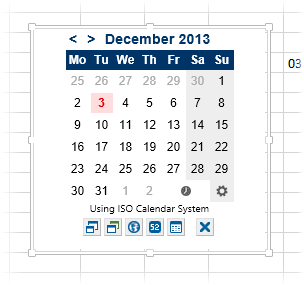
- Работает только в Excel 2013, добавляется через магазин приложений Office App Store на вкладке Вставка — Приложения для Office (Insert — Office Apps Store).
- Вставляется на лист как постоянный графический объект и добавляет выбранную дату в любую выделенную предварительно ячейку.
- Умеет менять стандарты недели, отображать номера недель, вводить не только дату, но и время.
- Есть возможность задавать темы оформления.
- Нет кнопки перехода к текущему дню.

Date Picker
Автор: Sam Radakovitz, руководитель команды программистов Excel в Microsoft
Цена: бесплатно
Сайт автора умер, ссылки не работают, но можно скачать заботливо сохраненную мной когда-то копию здесь.
- Устанавливается как надстройка.
- Вызывается через правую кнопку мыши по ячейке — Pick from calendar или с помощью удобного всплывающего значка календарика справа от ячейки с датой.
- Красивый дизайн, отображение количества дней до выбранной даты от текущей.
- Использует USA-стандарт недели (отображает неделю с воскресенья).
- Настроек нет.
- в Excel 2003 и старше — меню Сервис — Надстройки — Обзор (Tools — Add-ins — Browse)
- в Excel 2007 и новее — Файл — Параметры — Надстройки — Перейти — Обзор (File — Options — Add-ins — Go To — Browse)
Drop Down Calendar in Excel 2016
Question Info

Thank you for your kind feedback and I am glad that you have resolved the problem.
In order to close this thread, and to assist others who may search the forum archives for a solution to a similar problem, I would ask you kindly to mark my response as Answer.
48 people were helped by this reply
Did this solve your problem?
Sorry this didn’t help.
Great! Thanks for marking this as the answer.
How satisfied are you with this reply?
Thanks for your feedback, it helps us improve the site.
How satisfied are you with this response?
Thanks for your feedback.
In Excel 2016, where is the «Microsoft Date and Time Picker Control» option? How can I create a pick calendar? I am not a wiz when it comes to codes and am not very trusting when it comes to adding things from sites for a fix. I did a workaround by adding a drop-down list, but this is not ideal.
See Ron de Bruin’s Use a Calendar control or Date Picker to fill in dates page at:
1 person was helped by this reply
Did this solve your problem?
Sorry this didn’t help.
Great! Thanks for marking this as the answer.
How satisfied are you with this reply?
Thanks for your feedback, it helps us improve the site.
Выпадающий календарь в excel 2016
Выпадающий календарь для ввода дат


Наша задача — добавить в книгу Excel пользовательскую форму (окно) с автоматическим календарем. Вот такое:

Окошко будет появляться при нажатии сочетания клавиш и после выбора в нем нужной даты — она попадает в текущую ячейку листа. Просто и красиво!
Откройте редактор Visual Basic через меню Сервис — Макрос — Редактор Visual Basic (Tools — Macro — Visual Basic Editor).
Создайте в нем новую пустую пользовательску форму, выбрав в меню Insert — User form .
Автоматически должна появиться панель Toolbox :

Если не появилась — жмите в меню View — Toolbox .
На этой панели представлены различные управляющие элементы окон: кнопки, списки, счетчики и т.д. Но нам нужен элемент (календарь), которого пока на панели не видно. Чтобы добавить его, щелкните по серому фону панели правой кнопкой мыши и выберите Additional Controls . Появится вот такое окно:

В нем надо найти и отметить Элемент управления Календарь 11.0 (Calendar Control 11.0). Версии могут отличаться (11.0, 10.0 и т.д.) в зависимости от версии Microsoft Office, это несущественно. После нажатия на ОК на панели появится новая кнопка — Calendar :

Щелкните по ней, а затем нарисуйте календарь на поле формы, удерживая нажатой левую кнопку мыши:

При желании подправьте размеры формы и календаря и введите текст заголовка окна в панели свойств слева.
Теперь переключитесь в режим ввода программного кода созданной формы (меню View — Code ) и скопируйте туда этот текст:
Private Sub Calendar1_Click()
ActiveCell = Calendar1.Value
ActiveCell.NumberFormat=»dd/mm/yy»
End Sub
Private Sub UserForm_Activate()
Me.Calendar1.Value = Date
End Sub
Теперь надо заставить Excel показывать нам созданную форму, когда мы этого захотим. Для этого вставьте новый модуль ( Insert — Module ) и скопируйте туда этот текст:
Sub ShowCalendar()
UserForm1.Show
End Sub
Осталось закрыть редактор Visual Basic и, вернувшись в Excel, назначить созданному макросу ShowCalendar любое подходящее сочетание клавиш (меню Сервис — Макрос — Макросы — кнопка Параметры ).
Если у Вас установлена не полная версия Office, то элемента управления Календарь может не оказаться в списке Additional Controls . Тогда скачайте этот файл (MSCal.ocx.zip) , поместите его в папку C:Windowssystem32 и зарегистрируйте новый элемент управления через меню Пуск — Выполнить , далее набрать Regsvr32 c:windowssystem32mscal.ocx и нажать ОК .
(За дополнение спасибо Vadim )
Если Вы хотите, чтобы календарь автоматически появлялся на экране, когда пользователь выделяет определенные ячейки (диапазон) на листе, то щелкните правой кнопкой мыши по ярлычку этого листа и выберите Исходный текст (View Source). В открывшееся окно редактора Visual Basic скопируйте следующий код:
Private Sub Worksheet_SelectionChange(ByVal Target As Range)
If Target.Cells.Count > 1 Then Exit Sub
If Not Application.Intersect(Range(«A1:A20»), Target) Is Nothing Then
UserForm1.Show
End If
End Sub
Теперь при выделении любой ячейки из диапазона А1:А20 календарь будет автоматически отображаться на экране.
1. Электромагнитная волна (в религиозной терминологии релятивизма — «свет») имеет строго постоянную скорость 300 тыс.км/с, абсурдно не отсчитываемую ни от чего. Реально ЭМ-волны имеют разную скорость в веществе (например,
200 тыс км/с в стекле и
3 млн. км/с в поверхностных слоях металлов, разную скорость в эфире (см. статью «Температура эфира и красные смещения»), разную скорость для разных частот (см. статью «О скорости ЭМ-волн»)
2. В релятивизме «свет» есть мифическое явление само по себе, а не физическая волна, являющаяся волнением определенной физической среды. Релятивистский «свет» — это волнение ничего в ничем. У него нет среды-носителя колебаний.
3. В релятивизме возможны манипуляции со временем (замедление), поэтому там нарушаются основополагающие для любой науки принцип причинности и принцип строгой логичности. В релятивизме при скорости света время останавливается (поэтому в нем абсурдно говорить о частоте фотона). В релятивизме возможны такие насилия над разумом, как утверждение о взаимном превышении возраста близнецов, движущихся с субсветовой скоростью, и прочие издевательства над логикой, присущие любой религии.
4. В гравитационном релятивизме (ОТО) вопреки наблюдаемым фактам утверждается об угловом отклонении ЭМ-волн в пустом пространстве под действием гравитации. Однако астрономам известно, что свет от затменных двойных звезд не подвержен такому отклонению, а те «подтверждающие теорию Эйнштейна факты», которые якобы наблюдались А. Эддингтоном в 1919 году в отношении Солнца, являются фальсификацией. Подробнее читайте в FAQ по эфирной физике.
Выпадающий календарь в excel 2016
Была такая тема писал уже макрос да чтото не могу найти чтобы ссыл кинуть 
А вот файлик остался
Тут вызывается календарь не во всех ячейках а только по столбцам H, J, G (я думаю труда не составит поправить под свои нужды, но если надо переделаю)
На лист 1
Private Sub CommandButton1_Click()
UserForm1.Top = ActiveCell.Top
UserForm1.Left = ActiveCell.Left
UserForm1.Show
End Sub
Private Sub Worksheet_SelectionChange(ByVal Target As Range)
result = False
s = ActiveCell.Address(RowAbsolute:=False, columnabsolute:=False, ReferenceStyle:=xlA1)
result = (s Like «H*») Or (s Like «J*») Or (s Like «G*»)
CommandButton1.Left = ActiveCell.Left + ActiveCell.Width
CommandButton1.Top = ActiveCell.Top
If result = True Then CommandButton1.Visible = True Else CommandButton1.Visible = False
End Sub
Добавляем форму, на нее Calendar Control из комплекта офиса
и код
Private Sub Calendar1_Click()
s1 = Calendar1.Day
s2 = Calendar1.Month
s3 = Calendar1.Year
ActiveCell = DateSerial(s3, s2, s1)
Calendar1.Today
UserForm1.Hide
End Sub
Private Sub UserForm_Initialize()
Load UserForm1
UserForm1.Hide
End Sub
Удачи с экспериментами 
I’m going to make the assumption you’re using this add-in.
If that’s the case, the installation is fairly easy. It depends on what OS you’re using, though.
Here’s what the website states:
1) Download the RDB Date Picker add-in.
2) Copy WinDatePicker.xlam to a unprotected directory on your system.
3) Start Excel and open a workbook.2007: Click the Microsoft Office Button, click Excel Options, click the Add-Ins tab.
2010-2016: Click on File, click on Options, click the Add-ins tab.In the Manage drop-down, choose Excel Add-ins, and click Go. Use «Browse» to select the add-in and then click on OK. Verify that the Date Picker is checked in the add-in list and then click OK.
4) Right click on a worksheet cell and choose Date Picker to open the user form.
That should work, if not, please tell me. Also, tell me if you used another date picker.

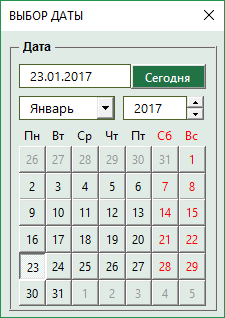
Надстройка samradDatePicker (русифицированная) для облегчения ввода даты в ячейки листа Excel.
Добавляет в контекстное меня ячеек пункт выбора даты, а при выделении ячеек, содержащих дату, справа от ячейки отображает значок календаря.
Поместите файл надстройки из вложения в папку автозагрузки Excel (C:Program FilesMicrosoft OfficeOFFICExxXLSTART).
В контекстном меню ячеек появляется новый пункт — «Выбрать дату из календаря«.
Рядом с ячейками, в которые уже введена дата, будет отображаться маленький календарик, щелчок по которому вызовет большой календарь — для выбора даты.
Второй прикреплённый к статье файл — та же надстройка, только в которой неделя начинается с понедельника (в оригинале надстройки — с воскресенья)
Пароль на проект VBA — 1 (единица)
PS: Этот макрос написал не я (автор — samrad)
Файл с макросом взят на просторах интернета.
Поскольку макрос делал не я, — доработками его я не занимаюсь, никаких гарантий работы дать не могу, по использованию не консультирую.
How to Insert Date Picker in Excel?
In Excel, the drop-down calendar is technically known as Microsoft Date and Time Picker Control. It is inserted with the help of ActiveX Control and is not available for the 64-bit version of MS Excel.
Table of contents
- How to Insert Date Picker in Excel?
- Example 1 –The Date Picker Insertion
- Example 2 –The Code Explanation
- Example 3 – The Date Picker Operation
- Frequently Asked Questions
- Recommended Articles
- The drop-down calendar is technically known as Microsoft Date and Time Picker Control in Excel.
- The Microsoft date picker does not work on the 64-bit version of Excel.
- The drop-down calendar is inserted with the help of ActiveX Controls in the Controls group of the Developer tab.
- The Microsoft Date and Time Picker Control 6.0 (SP6) is selected in the “more controls” box to insert the drop-down calendar.
- The file should be saved with the extension “.xlsm” (macro-enabledTo enable macros simply means to run or execute a macro in a particular file in order to save the time spent on repetitive actions. To enable macros, select “enable all macros” from the “trust center” of the File tab (in the “options” button).
read more) to run the VBA code. - In the drop-down calendar, the date, month, and year can be changed with the help of the various arrow buttons.

You can download this Date Picker Excel Template here – Date Picker Excel Template
Example 1 –The Date Picker Insertion
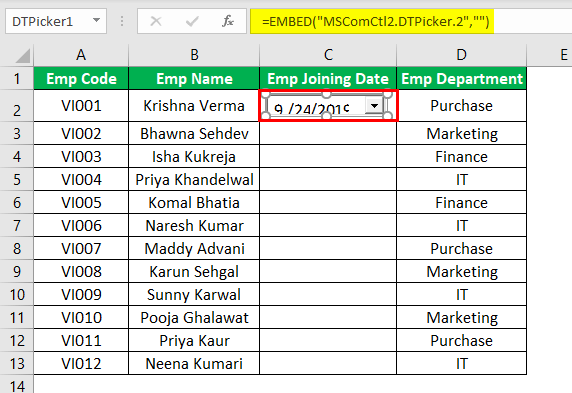
We have the data of the employees of an organization. The different fields are–”employee code,” “employee name,” “employee joining date,” and “employee department.”
The Excel data is in the following format. We need a drop-down calendarThe calendar drop-down in Excel is an effective way of ensuring correct data entry and records, and it can be created with the data validation option to ensure error-free use.read more to enter the joining date of the employee.

A drop-down calendar makes it easy for the user to enter the joining dates. For this, we insert an ActiveX Control named “Microsoft Date and Time Picker Control 6.0 (SP6).”
The steps to create a drop-down calendar are listed as follows (the first three steps make the Developer tab visible):
- Step 1: Under the “file” menu, choose “options.”

- Step 2: A dialog box named “excel options” opens. In the option “customize ribbon” (on the left edge of the dialog box), click on the checkbox for the “developer” tab. Click “Ok.”

- Step 3: The Developer tab appears at the end of the Excel ribbon.

- Step 4: In the Insert tab (under the Controls group), choose “more controls” from ActiveX Controls.

- Step 5: Choose “Microsoft Date and Time Picker Control 6.0 (SP6)” from the list and click “Ok.”

- Step 6: Click anywhere on the worksheet to create the drop-down calendar.

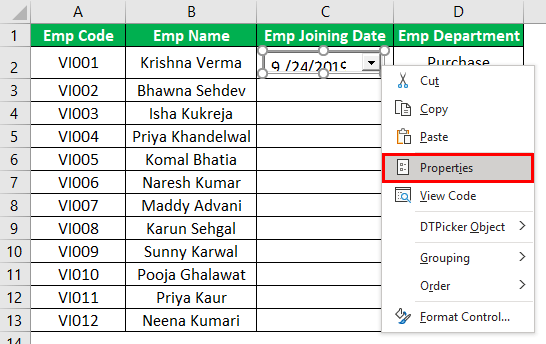
- Step 7: Right-click on the date picker and choose “properties” from the list.

- Step 8: In the “CheckBox” property, change the value from “false” to “true.” This allows the null values to be accepted. Close the “properties” dialog box.

- Step 9: Right-click on the date picker and choose “view code” from the contextual menu.
Step 10: In Visual Basic Editor, a code is already written. Replace this existing code with the following code.


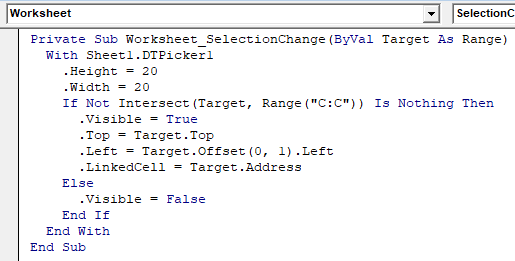
Private Sub Worksheet_SelectionChange(ByVal Target As Range)
With Sheet1.DTPicker1

.Height = 20

.Width = 20

If Not Intersect(Target, Range("C:C")) Is Nothing Then

.Visible = True

.Top = Target.Top

.Left = Target.Offset(0, 1).Left

.LinkedCell = Target.Address

Else

.Visible = False

End If

End With

End Sub
Example 2 –The Code Explanation
The explanation followed by the code within a block is given as follows:
#1 – The first statement tells the Excel compiler to run the code whenever a new cell is selected (i.e., the selection is changed). The selected cell is sent to the sub procedure as “target.”
Private Sub Worksheet_SelectionChange(ByVal Target As Range)
#2 – The next statement sets the height and the width of the date picker to 20 points in Excel.
Note: We use the “with” operator so that we do not refer to “DTPicker1” again and again.
 With Sheet1.DTPicker1
.Height = 20
.Width = 20
#3 – The “If” clause sets the following criteria:
If any cell is selected in column C, only then does the date picker become visible. The “Intersect” function returns the address if a cell is selected in column C; otherwise, the value is null.
If Not Intersect(Target, Range("C:C")) Is Nothing Then
.Visible = True
#4 – The “top” property of the date picker is equal to the “top” property value of the selected cell. This means that it goes along with the upper border of the selected cell.
.Top = Target.Top
#5 – The next statement sets the “left” property of the date picker equal to that of the next right cell (of the selected cell). This is the distance of the left border (of column D) from the extreme left of the worksheet.
Note: To get the reference of the next right cell, we use the “OffsetThe OFFSET function in excel returns the value of a cell or a range (of adjacent cells) which is a particular number of rows and columns from the reference point. read more” function with “0” as the row argument and “1” as the column argument. This gets a reference to the cell in the next column.
.Left = Target.Offset(0, 1).Left
#6 – This statement links the date picker with the target cell. It allows the value selected in the drop-down calendar to be displayed in the cell.
.LinkedCell = Target.Address
#7 – The “else” statement tells the compiler not to display the date picker when a cell other than that in column C is selected.
Else
.Visible = False
#8 – At the end, we close the “If” statement.
End If
#9 – We also close the “with” statement.
End With
#10 – Now, the sub procedure ends.
End Sub
Note: The file should be saved with the extension “.xlsm.” This allows the VBA codeVBA code refers to a set of instructions written by the user in the Visual Basic Applications programming language on a Visual Basic Editor (VBE) to perform a specific task.read more to run when any cell is selected in column C.
Example 3 – The Date Picker Operation
With the selection of a cell in column C, the drop-down calendar appears at the top right corner of the selected cell.
The working of the drop-down calendar is explained as follows:
- The drop-down calendar can be opened by clicking the down arrow.
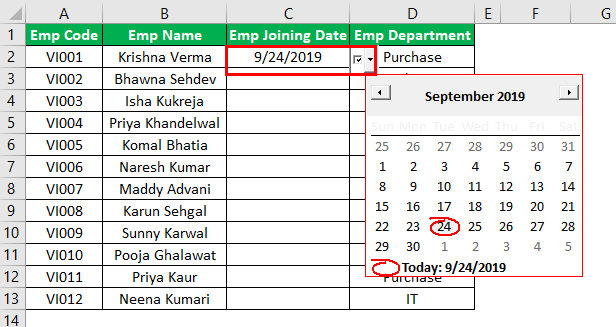
- To enter a date in the selected cell, click on that date from the calendar of the required month.

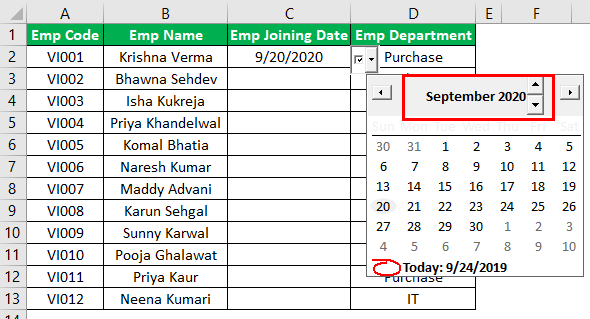
- To go to the previous or the next month, click the arrow buttons placed at the left and the right side of the calendar.

- The month can be chosen from the drop-down calendar by clicking on it.

- The required year can be chosen and changed by clicking the up and down arrow buttons.
Frequently Asked Questions
How to customize the Excel date picker?
The steps to customize the date picker are listed as follows:
1. Select the calendar control and put on the “design mode.” Alternatively, drag a corner of the date picker (design mode on) to resize it.
2. In the “properties” window, set the desired height, width, and font.
3. Drag the control when the cursor changes to a four-point arrow. This moves the date picker to the preferred location.
4. Select the date picker and on the Format menu, make changes to “borders and shading.” This changes the border and the color of the date picker.
When is the Excel date picker used?
The date picker is used in the following situations:
– To display the billing and shipping dates of customer orders
– To show the departure dates of flights on travel request forms
– To show the joining date of employees in the Excel database of an organization
– To display the date of birth on insurance forms
How to select a date range in the Excel date picker?
For selecting the date range, the user has to select the start and the end date of a process. In such cases, the date picker displays two input boxes adjacent to each other.
The date picker control assists the user to insert “to” and “from” dates on a form template. Such range selection in the calendar is often used in flight applications. With the selection of the two dates, the date range is highlighted in the calendar.
Recommended Articles
This has been a guide to the Excel date picker. Here we discuss how to insert the date picker in Excel along with practical examples and a downloadable Excel template. You may learn more about Excel from the following articles –
- MAXIFS Function in ExcelExcel MAXIFS is a function that provides the maximum value in a data set range based on certain criteria or set of conditions like date, number, text, etc. The syntax used in this function is =MAXIFS(max_range, criteria_range1, criteria1, …).read more
- PERCENTRANK Function in ExcelThe PERCENTRANK function gives the rank to each number against overall numbers in percentage numbers.read more
- Calendar Excel TemplateCalendar Template in Excel offers a pre-designed structure of a calendar that can be customized according to one’s needs. Excel calendar can be used for school curriculums, desk calendars etc.read more
- Insert Calendar In ExcelA valuable function in Excel is the ability to insert a calendar. A calendar can be populated with any text, memo, or note. When manually entering data, this saves time.read more
Всплывающий календарь
Если вам часто приходится вводить даты в ячейки листа, то делать это вручную неудобно. Для ввода именно сегодняшней даты можно воспользоваться функцией СЕГОДНЯ (TODAY), сочетанием клавиш Ctrl+; или макросом, но если нужны разные даты из прошлого или будущего, то вбивать их руками долго.
К сожалению, в стандартном арсенале средств Excel нет встроенного выпадающего календаря (в отличие от Word), да еще и в последних версиях, начиная с Excel 2007, Microsoft зачем-то убрала из стандартного комплекта поставки библиотеку mscalc.osx, которая позволяла быстро создать пользовательскую форму с календарем.
Естественно, это «узкое место» не осталось без внимания опытных пользователей и экспертов Excel MVP, которые оперативно создали несколько интерактивных календарей на макросах для удобного ввода дат. Вот подборка неплохих, на мой взгляд, бесплатных вариантов:
| |
Windows Date Picker Автор: Ron de Bruin Цена: бесплатно Ссылка
|
| |
Excel Date Picker Автор: Jim Cone Цена: бесплатно Ссылка
|
| |
Mini Calendar and Date Picker Автор: VERTEX Цена: бесплатно. Ссылка в Office Apps Store
|
| |
Date Picker Автор: Sam Radakovitz, руководитель команды программистов Excel в Microsoft Цена: бесплатно Сайт автора умер, ссылки не работают, но можно скачать заботливо сохраненную мной когда-то копию здесь.
|
P.S.
Установка надстроек:
- в Excel 2003 и старше — меню Сервис — Надстройки — Обзор (Tools — Add-ins — Browse)
- в Excel 2007 и новее — Файл — Параметры — Надстройки — Перейти — Обзор (File — Options — Add-ins — Go To — Browse)
Ссылки по теме
- Всплывающий календарь из надстройки PLEX
- Автоматический ввод даты при изменении ячейки