
I am trying to export data from dataset to excel and save it directly to a given path without giving me the option to open,save or cancel.
![]()
kamaci
72k69 gold badges225 silver badges364 bronze badges
asked Apr 26, 2011 at 12:39
![]()
6
This C# Excel library can also be used to export the dataset. More details about how to export can be found here.
ExcelDocument xls = new ExcelDocument();
xls.easy_WriteXLSFile_FromDataSet("ExcelFile.xls", dataset,
                 new ExcelAutoFormat(Styles.AUTOFORMAT_EASYXLS1), "Sheet Name");
answered Jun 25, 2014 at 11:23
![]()
alex.pulveralex.pulver
2,0892 gold badges32 silver badges31 bronze badges
It’s not the greatest solution but here is what I did, it opens a new excel document then copies what is in the dataset, all you need to do is sort out the columns and save it.
Btw totes my first post to answer a question, hope it helps
        private void cmdExport_Click(object sender, EventArgs e)
        {
            System.Diagnostics.Process.Start("excel.exe");
            try
            {
                copyAlltoClipboard();
                Microsoft.Office.Interop.Excel.Application xlexcel;
                Microsoft.Office.Interop.Excel.Workbook xlWorkBook;
                Microsoft.Office.Interop.Excel.Worksheet xlWorkSheet;
                object misValue = System.Reflection.Missing.Value;
                xlexcel = new Excel.Application();
                xlexcel.Visible = true;
                xlWorkBook = xlexcel.Workbooks.Add(misValue);
                xlWorkSheet = (Excel.Worksheet)xlWorkBook.Worksheets.get_Item(1);
                Excel.Range CR = (Excel.Range)xlWorkSheet.Cells[1, 1];
                CR.Select();
                xlWorkSheet.PasteSpecial(CR, Type.Missing, Type.Missing, Type.Missing, Type.Missing, Type.Missing, true);
            }
            catch (Exception ex)
            {
                MessageBox.Show("Error :" + ex.Message);
            }
        }
        private void copyAlltoClipboard()
        {
            dataGridViewItems.SelectAll();
            DataObject dataObj = dataGridViewItems.GetClipboardContent();
            if (dataObj != null)
                Clipboard.SetDataObject(dataObj);
        }
answered May 28, 2015 at 14:05
![]()
1
Check this DataSetToExcel
and c# (WinForms-App) export DataSet to Excel
In the first link change the code as follows:
Remove the all code that initially starts and try the following
using (StringWriter sw = new StringWriter("Your Path to save"))
{
  using (HtmlTextWriter htw = new HtmlTextWriter(sw))
  {
    // instantiate a datagrid
    DataGrid dg = new DataGrid();
    dg.DataSource = ds.Tables[0];
    dg.DataBind();
    dg.RenderControl(htw);
  }
}
![]()
Samuel Liew♦
75.7k106 gold badges159 silver badges255 bronze badges
answered Apr 26, 2011 at 12:44
![]()
DeveloperDeveloper
8,36040 gold badges127 silver badges235 bronze badges
0
Here’s another C# library, which lets you export from a DataSet to an Excel 2007 .xlsx file, using the OpenXML libraries.
http://www.mikesknowledgebase.com/pages/CSharp/ExportToExcel.htm
All of the source code is provided, free of charge, along with a demo application, and you can use this in your ASP.Net, WPF and WinForms applications.
Once you’ve added the class to your application, it just takes one function call to export your data into an Excel file.
CreateExcelFile.CreateExcelDocument(myDataSet, "C:\Sample.xlsx");
It doesn’t get much easier than that.
Good luck !
answered Dec 5, 2011 at 12:02
![]()
Mike GledhillMike Gledhill
27.4k7 gold badges147 silver badges155 bronze badges
Hi i found a perfect solution Here
Just replace ‘missing.value’ with System.Type.Missing in the code. Also remove
oWB.Close(System.Type.Missing, System.Type.Missing, System.Type.Missing);
and
oXL.Quit();
from the code. Otherwise your excel will get closed automatically as soon as it open.
answered Dec 6, 2012 at 12:23
![]()
hitesh.gawhadehitesh.gawhade
3373 gold badges6 silver badges21 bronze badges

Today, in this article we shall cover simple use cases where we will be connecting the SQL server then we will Export Dataset To Excel file C# .NET examples.
In our last post, we saw the usage of OpenXML SDK (open source SDK from Microsoft) to work with Office Word, Excel, and PowerPoint. We looked at the basic read and write of an excel file using C# in .NET or .NET Core.
Today in this article, we will cover below aspects,
- Getting Started
- Connecting SQL Server
Getting Started
Let’s create a .NET Core project, you can choose any project template. Here we shall use the .NET Core 3.1 Console project.
Please install latest available OpenXML Nuget package,
PM> Install-Package Open-XML-SDK -Version 2.11.3
Or
Please install package from Nuget Package Manager,

Connecting SQL Server
Let’s now connect the SQL server and get the data filled as DataSet.
I have already discussed how to connect to the SQL server using SQLClient or EFCore in the below article.
- Connect SQL Server ADO.NET C# Example
- Getting Started with EFCore in ASP.NET Core
Please use below method which takes Dataset as input and save the each table as separate sheet in the excel sheet.
   public static void SaveDataSetAsExcel(DataSet dataset, string excelFilePath)
        {
            using (SpreadsheetDocument document = SpreadsheetDocument.Create(excelFilePath, SpreadsheetDocumentType.Workbook))
            {
                WorkbookPart workbookPart = document.AddWorkbookPart();
                workbookPart.Workbook = new Workbook();
                Sheets sheets = workbookPart.Workbook.AppendChild(new Sheets());

                foreach (DataTable table in dataset.Tables)
                {
                    UInt32Value sheetCount = 0;
                    sheetCount++;

                    WorksheetPart worksheetPart = workbookPart.AddNewPart<WorksheetPart>();

                    var sheetData = new SheetData();
                    worksheetPart.Worksheet = new Worksheet(sheetData);

                    Sheet sheet = new Sheet() { Id = workbookPart.GetIdOfPart(worksheetPart), SheetId = sheetCount, Name = table.TableName };
                    sheets.AppendChild(sheet);

                    Row headerRow = new Row();

                    List<string> columns = new List<string>();
                    foreach (System.Data.DataColumn column in table.Columns)
                    {
                        columns.Add(column.ColumnName);

                        Cell cell = new Cell();
                        cell.DataType = CellValues.String;
                        cell.CellValue = new CellValue(column.ColumnName);
                        headerRow.AppendChild(cell);
                    }

                    sheetData.AppendChild(headerRow);

                    foreach (DataRow dsrow in table.Rows)
                    {
                        Row newRow = new Row();
                        foreach (String col in columns)
                        {
                            Cell cell = new Cell();
                            cell.DataType = CellValues.String;
                            cell.CellValue = new CellValue(dsrow[col].ToString());
                            newRow.AppendChild(cell);
                        }

                        sheetData.AppendChild(newRow);
                    }


                }
                workbookPart.Workbook.Save();
        }
Finally, you shall see all the tables in the Dataset are saved as different tabs in the excel file.

In the above code, we are creating each sheet as a table name and its data.

References:
- Read Excel as JSON using OpenXML SDK
That’s all! Happy coding!
Does this help you fix your issue?
Do you have any better solutions or suggestions? Please sound off your comments below.
Please bookmark this page and share it with your friends. Please Subscribe to the blog to receive notifications on freshly published best practices and guidelines for software design and development.
The following examples shows how you can export a DataTable object to an Excel sheet or a DataSet object to an Excel file in C# and VB.NET.
GemBox.Spreadsheet uses the same API for all spreadsheet file formats (XLS, XLSX, ODS, CSV), so you can use the same code for filling customer files or your templates of various file formats with different data sources, such as DataTable or DataSet.
Export DataTable to Excel sheet
To insert a DataTable in an Excel sheet simply call the InsertDataTable method. You can use the InsertDataTableOptions to set various options for exporting data from DataTable to ExcelWorksheet such as:
ColumnHeaders— Defines whether to insert column headers.StartRowandStartColumn— Define the position where to insertDataTable.DataTableCellToExcelCellConverting— An event that fires when converting aDataTablecell value to anExcelCellvalue which you can use to apply settings such as cell style.
Try exporting a DataTable online
You can test inserting a DataTable to an empty file with the interactive example below. Just choose an output file format, click Run Example, and download the generated file.
The example creates a DataTable, fills it with data, inserts it into an Excel file and saves The Excel file to a file format of your choice. After clicking on Run example, the C#/VB.NET code will be compiled and executed with only .NET framework and the GemBox.Spreadsheet component.

using System.Data;
using GemBox.Spreadsheet;

class Program
{
    static void Main()
    {
        // If you are using the Professional version, enter your serial key below.
        SpreadsheetInfo.SetLicense("FREE-LIMITED-KEY");

        var workbook = new ExcelFile();
        var worksheet = workbook.Worksheets.Add("DataTable to Sheet");

        var dataTable = new DataTable();

        dataTable.Columns.Add("ID", typeof(int));
        dataTable.Columns.Add("FirstName", typeof(string));
        dataTable.Columns.Add("LastName", typeof(string));

        dataTable.Rows.Add(new object[] { 100, "John", "Doe" });
        dataTable.Rows.Add(new object[] { 101, "Fred", "Nurk" });
        dataTable.Rows.Add(new object[] { 103, "Hans", "Meier" });
        dataTable.Rows.Add(new object[] { 104, "Ivan", "Horvat" });
        dataTable.Rows.Add(new object[] { 105, "Jean", "Dupont" });
        dataTable.Rows.Add(new object[] { 106, "Mario", "Rossi" });

        worksheet.Cells[0, 0].Value = "DataTable insert example:";

        // Insert DataTable to an Excel worksheet.
        worksheet.InsertDataTable(dataTable,
            new InsertDataTableOptions()
            {
                ColumnHeaders = true,
                StartRow = 2
            });

        workbook.Save("DataTable to Sheet.%OutputFileType%");
    }
}
Imports System.Data
Imports GemBox.Spreadsheet
Module Program
Sub Main()
' If you are using the Professional version, enter your serial key below.
SpreadsheetInfo.SetLicense("FREE-LIMITED-KEY")
Dim workbook = New ExcelFile
Dim worksheet = workbook.Worksheets.Add("DataTable to Sheet")
Dim dataTable = New DataTable
dataTable.Columns.Add("ID", Type.GetType("System.Int32"))
dataTable.Columns.Add("FirstName", Type.GetType("System.String"))
dataTable.Columns.Add("LastName", Type.GetType("System.String"))
dataTable.Rows.Add(New Object() {100, "John", "Doe"})
dataTable.Rows.Add(New Object() {101, "Fred", "Nurk"})
dataTable.Rows.Add(New Object() {103, "Hans", "Meier"})
dataTable.Rows.Add(New Object() {104, "Ivan", "Horvat"})
dataTable.Rows.Add(New Object() {105, "Jean", "Dupont"})
dataTable.Rows.Add(New Object() {106, "Mario", "Rossi"})
worksheet.Cells(0, 0).Value = "DataTable insert example:"
' Insert DataTable to an Excel worksheet.
worksheet.InsertDataTable(dataTable,
New InsertDataTableOptions() With
{
.ColumnHeaders = True,
.StartRow = 2
})
workbook.Save("DataTable to Sheet.%OutputFileType%")
End Sub
End ModuleExport DataTable performance
Since GemBox.Spreadsheet is completely written in C# and uses caching techniques, it offers both speed and memory optimizations. Your users will not need to wait for their reports to be generated any more. With GemBox.Spreadsheet you can read and write 1,000,000 rows with less than 256MB RAM and less than 4 seconds. You can try the performance yourself with the Performance example.
Export DataSet to Excel file
The following example shows how you can export a DataSet object to an Excel file in C# or VB.NET.
The process is similar to exporting a DataTable to a sheet. The only difference is that you need to iterate through every DataTable in a DataSet and for each DataTable you should first create an empty sheet, and after that you should insert the DataTable into the sheet.
Try exporting DataSet online
You can test inserting a DataSet to an empty file with the interactive example below. Just choose an output file format, click Run Example, and download the generated file.
The example creates a DataSet, fills it with data, inserts it into an Excel file and saves The Excel file to a file format of your choice. After clicking on Run example, the C#/VB.NET code will be compiled and executed with only .NET framework and the GemBox.Spreadsheet component.

using System.Data;
using GemBox.Spreadsheet;

class Program
{
    static void Main()
    {
        // If you are using the Professional version, enter your serial key below.
        SpreadsheetInfo.SetLicense("FREE-LIMITED-KEY");

        // Create test DataSet with five DataTables
        DataSet dataSet = new DataSet();
        for (int i = 0; i < 5; i++)
        {
            DataTable dataTable = new DataTable("Table " + (i + 1));
            dataTable.Columns.Add("ID", typeof(int));
            dataTable.Columns.Add("FirstName", typeof(string));
            dataTable.Columns.Add("LastName", typeof(string));

            dataTable.Rows.Add(new object[] { 100, "John", "Doe" });
            dataTable.Rows.Add(new object[] { 101, "Fred", "Nurk" });
            dataTable.Rows.Add(new object[] { 103, "Hans", "Meier" });
            dataTable.Rows.Add(new object[] { 104, "Ivan", "Horvat" });
            dataTable.Rows.Add(new object[] { 105, "Jean", "Dupont" });
            dataTable.Rows.Add(new object[] { 106, "Mario", "Rossi" });

            dataSet.Tables.Add(dataTable);
        }

        // Create and fill a sheet for every DataTable in a DataSet
        var workbook = new ExcelFile();
        foreach (DataTable dataTable in dataSet.Tables)
        {
            ExcelWorksheet worksheet = workbook.Worksheets.Add(dataTable.TableName);

            // Insert DataTable to an Excel worksheet.
            worksheet.InsertDataTable(dataTable,
                new InsertDataTableOptions()
                {
                    ColumnHeaders = true
                });
        }

        workbook.Save("DataSet to Excel file.%OutputFileType%");
    }
}
Imports System.Data
Imports GemBox.Spreadsheet
Module Program
Sub Main()
' If you are using the Professional version, enter your serial key below.
SpreadsheetInfo.SetLicense("FREE-LIMITED-KEY")
' Create test DataSet with five DataTables
Dim dataSet = New DataSet
For value As Integer = 0 To 4
Dim dataTable = New DataTable
dataTable.Columns.Add("ID", Type.GetType("System.Int32"))
dataTable.Columns.Add("FirstName", Type.GetType("System.String"))
dataTable.Columns.Add("LastName", Type.GetType("System.String"))
dataTable.Rows.Add(New Object() {100, "John", "Doe"})
dataTable.Rows.Add(New Object() {101, "Fred", "Nurk"})
dataTable.Rows.Add(New Object() {103, "Hans", "Meier"})
dataTable.Rows.Add(New Object() {104, "Ivan", "Horvat"})
dataTable.Rows.Add(New Object() {105, "Jean", "Dupont"})
dataTable.Rows.Add(New Object() {106, "Mario", "Rossi"})
dataSet.Tables.Add(dataTable)
Next
' Create and fill a sheet for every DataTable in a DataSet
Dim workbook = New ExcelFile
For Each dataTable As DataTable In dataSet.Tables
Dim worksheet = workbook.Worksheets.Add(dataTable.TableName)
' Insert DataTable to an Excel worksheet.
worksheet.InsertDataTable(dataTable,
New InsertDataTableOptions() With
{
.ColumnHeaders = True
})
Next
workbook.Save("DataSet to Excel file.%OutputFileType%")
End Sub
End ModuleSupported Excel file formats
With GemBox.Spreadsheet you can also write the following file formats using the same API: XLSX, XLS, PDF, HTML, MHTML, ODS, CSV, TXT, XLSM, XLTX, XLTM, XPS, PNG, JPEG, GIF, BMP, TIFF, WMP.
Saving DataSet or DataTable instace to an Excel spreadsheet with C#
Some time ago I wrote an article on how to export data to Excel from C# code. Essentially it exports data to file which can be opened in Excel but it does not produce the actual Microsoft Office Excel document.
I recently wrote an article on Working with Excel files in .NET without using COM in C#, so I decided to use this approach to create extension methods for DataTable and DataSet classes. The approach is quite simple and it is based on looping though DataTable structure and executing CRUD commands though Microsoft OLEDB driver.
The method is written as a extension method which makes it super easy to use with any instance of DataTable in the code as long as the namespace where extension method is delacred is in use in the code.
using System;
using System.Collections.Generic;
using System.Data;
using System.Linq;
using System.IO;
using System.Data.OleDb;
namespace ExcelExport
{
public static class Extensions
{
public static void ExportToExcel(this DataTable dataTable, String filePath, bool overwiteFile = true)
{
if (File.Exists(filePath) && overwiteFile)
{
File.Delete(filePath);
}
var conn = $"Provider=Microsoft.Jet.OLEDB.4.0;Data Source={filePath};Extended Properties='Excel 8.0;HDR=Yes;IMEX=0';";
using (OleDbConnection connection = new OleDbConnection(conn))
{
connection.Open();
using (OleDbCommand command = new OleDbCommand())
                {
                    command.Connection = connection;

                    List<String> columnNames = new List<string>();
                    foreach (DataColumn dataColumn in dataTable.Columns)
                    {
                        columnNames.Add(dataColumn.ColumnName);
                    }

                    String tableName = !String.IsNullOrWhiteSpace(dataTable.TableName) ? dataTable.TableName : Guid.NewGuid().ToString();
                    command.CommandText = $"CREATE TABLE [{tableName}] ({String.Join(",", columnNames.Select(c => $"[{c}] VARCHAR").ToArray())});";
                    command.ExecuteNonQuery();


                    foreach (DataRow row in dataTable.Rows)
                    {
                        List<String> rowValues = new List<string>();
                        foreach (DataColumn column in dataTable.Columns)
                        {
                            rowValues.Add((row[column] != null && row[column] != DBNull.Value) ? row[column].ToString() : String.Empty);
                        }
                        command.CommandText = $"INSERT INTO [{tableName}]({String.Join(",", columnNames.Select(c => $"[{c}]"))}) VALUES ({String.Join(",", rowValues.Select(r => $"'{r}'").ToArray())});";
                        command.ExecuteNonQuery();
                    }
                }

                connection.Close();
            }
        }
    }
}
The code will generate Excel sheet with the TableName of the DataTable class instance, but since the DataTable instance quite often does not have the TableName defined and since name of the sheet is mandatory as it will be used as a reference for the INSERT commands, default value for the sheet will be taken which is generated Guid string. This will be the actual sheet name in the final output Excel docuemnt. To avoid this and end up with a meaningful name make sure you assign TableName property of the DataTable instance.
For the simplicity, all column data types are set to VARCHAR. In case you want the exact data type for each column in output Excel file, additional mapping between .NET and Excel data types needs to be implemented in code which is not in the scope of this article.
Now to do a quick test with DataTable export to Microsoft Office Excel file
        private static void TestDataTable()
        {
            var dataTable = new DataTable();
            dataTable.TableName = "DC";
            dataTable.Columns.Add("id");
            dataTable.Columns.Add("Name");
            dataTable.Columns.Add("Email");

            var row = dataTable.NewRow();
            row["id"] = Guid.NewGuid().ToString();
            row["Name"] = "Bruce Wayne";
            row["Email"] = "batman@superheroes.com";
            dataTable.Rows.Add(row);

            row = dataTable.NewRow();
            row["id"] = Guid.NewGuid().ToString();
            row["Name"] = "Clark Kent";
            row["Email"] = "superman@superheroes.com";
            dataTable.Rows.Add(row);

            row = dataTable.NewRow();
            row["id"] = Guid.NewGuid().ToString();
            row["Name"] = "Peter Parker";
            row["Email"] = "spiderman@superheroes.com";
            dataTable.Rows.Add(row);

            dataTable.AcceptChanges();

            dataTable.ExportToExcel(@"c:tempexported.xls");
        }
The result Excel file will have one sheet with name DC and sample data from the DataTable

Now the next thing is to export DataSet to Excel. Since DataSet is basically a container for one or more DataTable instances, we can reuse the method for exporting DataTable
        public static void ExportToExcel(this DataSet dataSet, String filePath, bool overwiteFile = true)
        {
            if (File.Exists(filePath) && overwiteFile)
            {
                File.Delete(filePath);
            }

            foreach(DataTable dataTable in dataSet.Tables)
            {
                dataTable.ExportToExcel(filePath, false);
            }

        }
Now to do the test with sample DataSet with some data
private static void TestDataSet()
        {
            var dataSet = new DataSet();

            var dataTable = new DataTable();
            dataTable.TableName = "DC";
            dataTable.Columns.Add("id");
            dataTable.Columns.Add("Name");
            dataTable.Columns.Add("Email");

            var row = dataTable.NewRow();
            row["id"] = Guid.NewGuid().ToString();
            row["Name"] = "Bruce Wayne";
            row["Email"] = "batman@superheroes.com";
            dataTable.Rows.Add(row);

            row = dataTable.NewRow();
            row["id"] = Guid.NewGuid().ToString();
            row["Name"] = "Clark Kent";
            row["Email"] = "superman@superheroes.com";
            dataTable.Rows.Add(row);

            dataTable.AcceptChanges();
            dataSet.Tables.Add(dataTable);


            dataTable = new DataTable();
            dataTable.TableName = "Marvel";
            dataTable.Columns.Add("id");
            dataTable.Columns.Add("Name");
            dataTable.Columns.Add("Email");
            dataTable.Columns.Add("Color");

            row = dataTable.NewRow();
            row["id"] = Guid.NewGuid().ToString();
            row["Name"] = "Bruce Banner";
            row["Email"] = "hulk@superheroes.com";
            row["Color"] = "green";
            dataTable.Rows.Add(row);

            row = dataTable.NewRow();
            row["id"] = Guid.NewGuid().ToString();
            row["Name"] = "Tony Stark";
            row["Email"] = "ironmane@superheroes.com";
            row["Color"] = "red";
            dataTable.Rows.Add(row);

            row = dataTable.NewRow();
            row["id"] = Guid.NewGuid().ToString();
            row["Name"] = "Peter Parker";
            row["Email"] = "spiderman@superheroes.com";
            row["Color"] = "red";
            dataTable.Rows.Add(row);

            dataTable.AcceptChanges();
            dataSet.Tables.Add(dataTable);


            dataSet.ExportToExcel(@"c:tempexported.xls");
        }
The output is Excel document with two sheets name DC and Marvel

References
Disclaimer
Purpose of the code contained in snippets or available for download in this article is solely for learning and demo purposes. Author will not be held responsible for any failure or damages caused due to any other usage.

About the author
DEJAN STOJANOVIC
Dejan is a passionate Software Architect/Developer. He is highly experienced in .NET programming platform including ASP.NET MVC and WebApi. He likes working on new technologies and exciting challenging projects
CONNECT WITH DEJAN ![]()
![]()
![]()
![]()
Hi Dhanalakshmi Periasamy,
Welcome to the MSDN forum.
There are many ways to export Dataset into Excel.
Here is a very simple function to export data without using excel object and other messy stuff.
XSL Transformation is applied to dataset and XML for excel is generated.
You have to pass it the DataSet to export and path to where file should be generated.
public class WorkbookEngine
{
public static void CreateWorkbook(DataSet ds, String path)
{
XmlDataDocument xmlDataDoc = new XmlDataDocument(ds);
XslTransform xt = new XslTransform();
StreamReader reader =new StreamReader(typeof (WorkbookEngine).Assembly.GetManifestResourceStream(typeof (WorkbookEngine), “Excel.xsl”));
XmlTextReader xRdr = new XmlTextReader(reader);
xt.Load(xRdr, null, null);
StringWriter sw = new StringWriter();
xt.Transform(xmlDataDoc, null, sw, null);
StreamWriter myWriter = new StreamWriter (path + “\Report.xls”);
myWriter.Write (sw.ToString());
myWriter.Close ();
}
}
The links below contain more information that may help you:
http://itsrashid.wordpress.com/2007/05/14/export-dataset-to-excel-in-c/
http://social.msdn.microsoft.com/Forums/en-US/csharplanguage/thread/b5376135-75e3-4960-990b-ad16013561f1
Have a nice day.
Bob Shen [MSFT]
MSDN Community Support | Feedback to us
Get or Request Code Sample from Microsoft
Please remember to mark the replies as answers if they help and unmark them if they provide no help.

-
Marked as answer by
Monday, October 31, 2011 2:01 AM
Содержание
- pandas.DataFrame.to_excel#
- Export a DataTable or DataSet to an Excel file in C# and VB.NET
- Export DataTable to Excel sheet
- Try exporting a DataTable online
- Export DataTable performance
- Export DataSet to Excel file
- Try exporting DataSet online
- Supported Excel file formats
- See also
- Next steps
- Our customers
- What do they say
- Export DataSet to Excel file in .NET
- Source code sample
- Formatting cells
- See also:
- How to format Excel cells?
- How to use predefined cells format?
- Export DataSet to XLSX, XLSB, XLSM and XLS files
- See also:
- How to export to XLSX file?
- How to export to XLSM file?
- How to export to XLSB file?
- How to export to XLS file?
- Export DataSet to Excel file with multiple sheets
- Getting started with EasyXLS Excel library
- Dataset to excel sheet
- Answered by:
- Question
- Answers
- All replies
pandas.DataFrame.to_excel#
Write object to an Excel sheet.
To write a single object to an Excel .xlsx file it is only necessary to specify a target file name. To write to multiple sheets it is necessary to create an ExcelWriter object with a target file name, and specify a sheet in the file to write to.
Multiple sheets may be written to by specifying unique sheet_name . With all data written to the file it is necessary to save the changes. Note that creating an ExcelWriter object with a file name that already exists will result in the contents of the existing file being erased.
Parameters excel_writer path-like, file-like, or ExcelWriter object
File path or existing ExcelWriter.
sheet_name str, default вЂSheet1’
Name of sheet which will contain DataFrame.
na_rep str, default вЂвЂ™
Missing data representation.
float_format str, optional
Format string for floating point numbers. For example float_format=»%.2f» will format 0.1234 to 0.12.
columns sequence or list of str, optional
Columns to write.
header bool or list of str, default True
Write out the column names. If a list of string is given it is assumed to be aliases for the column names.
index bool, default True
Write row names (index).
index_label str or sequence, optional
Column label for index column(s) if desired. If not specified, and header and index are True, then the index names are used. A sequence should be given if the DataFrame uses MultiIndex.
startrow int, default 0
Upper left cell row to dump data frame.
startcol int, default 0
Upper left cell column to dump data frame.
engine str, optional
Write engine to use, вЂopenpyxl’ or вЂxlsxwriter’. You can also set this via the options io.excel.xlsx.writer , io.excel.xls.writer , and io.excel.xlsm.writer .
Deprecated since version 1.2.0: As the xlwt package is no longer maintained, the xlwt engine will be removed in a future version of pandas.
Write MultiIndex and Hierarchical Rows as merged cells.
encoding str, optional
Encoding of the resulting excel file. Only necessary for xlwt, other writers support unicode natively.
Deprecated since version 1.5.0: This keyword was not used.
Representation for infinity (there is no native representation for infinity in Excel).
verbose bool, default True
Display more information in the error logs.
Deprecated since version 1.5.0: This keyword was not used.
Specifies the one-based bottommost row and rightmost column that is to be frozen.
storage_options dict, optional
Extra options that make sense for a particular storage connection, e.g. host, port, username, password, etc. For HTTP(S) URLs the key-value pairs are forwarded to urllib.request.Request as header options. For other URLs (e.g. starting with “s3://”, and “gcs://”) the key-value pairs are forwarded to fsspec.open . Please see fsspec and urllib for more details, and for more examples on storage options refer here.
New in version 1.2.0.
Write DataFrame to a comma-separated values (csv) file.
Class for writing DataFrame objects into excel sheets.
Read an Excel file into a pandas DataFrame.
Read a comma-separated values (csv) file into DataFrame.
Add styles to Excel sheet.
For compatibility with to_csv() , to_excel serializes lists and dicts to strings before writing.
Once a workbook has been saved it is not possible to write further data without rewriting the whole workbook.
Create, write to and save a workbook:
To specify the sheet name:
If you wish to write to more than one sheet in the workbook, it is necessary to specify an ExcelWriter object:
ExcelWriter can also be used to append to an existing Excel file:
To set the library that is used to write the Excel file, you can pass the engine keyword (the default engine is automatically chosen depending on the file extension):
Источник
Export a DataTable or DataSet to an Excel file in C# and VB.NET
The following examples shows how you can export a DataTable object to an Excel sheet or a DataSet object to an Excel file in C# and VB.NET.
GemBox.Spreadsheet uses the same API for all spreadsheet file formats (XLS, XLSX, ODS, CSV), so you can use the same code for filling customer files or your templates of various file formats with different data sources, such as DataTable or DataSet .
Export DataTable to Excel sheet
To insert a DataTable in an Excel sheet simply call the InsertDataTable method. You can use the InsertDataTableOptions to set various options for exporting data from DataTable to ExcelWorksheet such as:
- ColumnHeaders — Defines whether to insert column headers.
- StartRow and StartColumn — Define the position where to insert DataTable .
- DataTableCellToExcelCellConverting — An event that fires when converting a DataTable cell value to an ExcelCell value which you can use to apply settings such as cell style.
Try exporting a DataTable online
You can test inserting a DataTable to an empty file with the interactive example below. Just choose an output file format, click Run Example, and download the generated file.
The example creates a DataTable , fills it with data, inserts it into an Excel file and saves The Excel file to a file format of your choice. After clicking on Run example, the C#/VB.NET code will be compiled and executed with only .NET framework and the GemBox.Spreadsheet component.
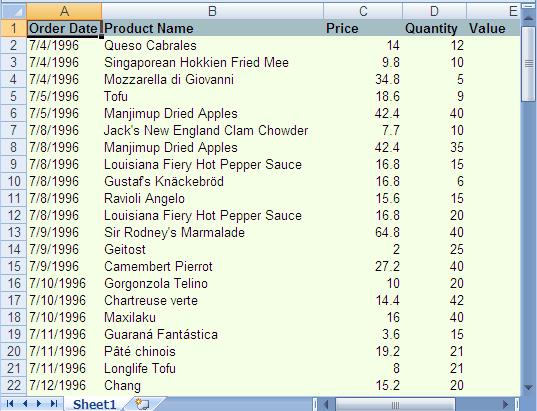
Screenshot of DataTable exported to Excel sheet with GemBox.Spreadsheet
Export DataTable performance
Since GemBox.Spreadsheet is completely written in C# and uses caching techniques, it offers both speed and memory optimizations. Your users will not need to wait for their reports to be generated any more. With GemBox.Spreadsheet you can read and write 1,000,000 rows with less than 256MB RAM and less than 4 seconds. You can try the performance yourself with the Performance example.
Export DataSet to Excel file
The following example shows how you can export a DataSet object to an Excel file in C# or VB.NET.
The process is similar to exporting a DataTable to a sheet. The only difference is that you need to iterate through every DataTable in a DataSet and for each DataTable you should first create an empty sheet, and after that you should insert the DataTable into the sheet.
Try exporting DataSet online
You can test inserting a DataSet to an empty file with the interactive example below. Just choose an output file format, click Run Example, and download the generated file.
The example creates a DataSet , fills it with data, inserts it into an Excel file and saves The Excel file to a file format of your choice. After clicking on Run example, the C#/VB.NET code will be compiled and executed with only .NET framework and the GemBox.Spreadsheet component.
Screenshot of DataSet exported to Excel file with GemBox.Spreadsheet
Supported Excel file formats
With GemBox.Spreadsheet you can also write the following file formats using the same API: XLSX, XLS, PDF, HTML, MHTML, ODS, CSV, TXT, XLSM, XLTX, XLTM, XPS, PNG, JPEG, GIF, BMP, TIFF, WMP.
See also
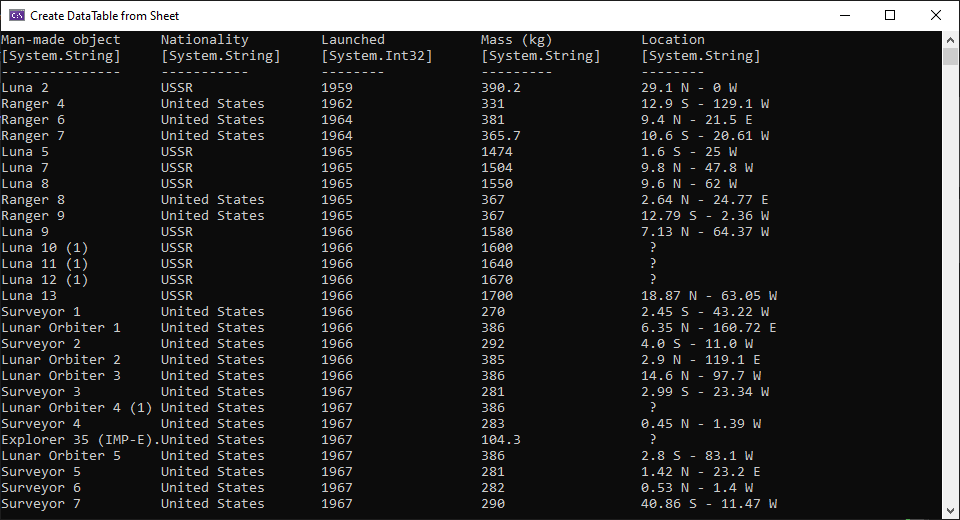
Create DataTable from Excel in C# / VB.NET applications

Export Excel to DataTable from C# / VB.NET applications
Next steps
GemBox.Spreadsheet is a .NET component that enables you to read, write, edit, convert, and print spreadsheet files from your .NET applications using one simple API.
GemBox.Spreadsheet is a .NET component that enables you to read, write, edit, convert, and print spreadsheet files from your .NET applications using one simple API.
Our customers
What do they say
This is the ideal product for anyone looking to easily add spreadsheet generation to their application. Any developer or project manager considering implementing Excel automation needs to download the trial of GemBox.Spreadsheet.
Nathan A. Baylor
Director of Information Technology at Avalon Risk Management, Inc.
Being able to include the product directly in my C# project from the NuGet Package Manager has made its installation incredibly easy. So far it has worked brilliantly with a very intuitive API and easy learning curve.
Ryan Russell
Software Developer at Aventa Systems
Источник
Export DataSet to Excel file in .NET
EasyXLS™ library allows you to export a DataSet to an Excel file. The data in cells can be formatted using predefined formats or user-defined formats.
EasyXLS can be successfully used inclusively to export large Excel files having big volume of data with fast exporting time.
Table of contents
Source code sample
The below example shows how to export DataSet to Excel in C#, VB.NET, C++.NET and J#.
The screen shot below provides an example of exported data to Excel file from a DataSet.
Formatting cells
EasyXLS™ enables you to format cells, rows and columns in order to set the fonts and colors.
See also:
How to format Excel cells?
How to use predefined cells format?
Export DataSet to XLSX, XLSB, XLSM and XLS files
This code sample shows how to export a DataSet to XLSX file. Similarly, you can export a DataSet to XLS file using ExcelDocument. easy_WriteXLSFile_FromDataSet method or export DataSet to XLSB file using ExcelDocument. easy_WriteXLSBFile_FromDataSet method.
See also:
How to export to XLSX file?
How to export to XLSM file?
How to export to XLSB file?
How to export to XLS file?
Export DataSet to Excel file with multiple sheets
EasyXLS offers the option to insert multiple DataSets into one worksheet or into multiple worksheets. The DataSet can be added into a specified worksheet. The column names of the DataSet can be optionally included.
The below source code sample shows how to add a DataSet with a nice formatting into an Excel file with two worksheets
Getting started with EasyXLS Excel library
To download the trial version of EasyXLS Excel Library, press the below button:

If you already own a license key, you may login and download EasyXLS from your account.
Источник
Dataset to excel sheet
![]()
This forum has migrated to Microsoft Q&A. Visit Microsoft Q&A to post new questions.
Answered by:
![]()
Question
![]()
![]()
I am looking for an example to export the data from a dataset to an existing excel speadsheet in vb.net 2005
Or could someone show me me the easiest way to achieve this please.
Answers
![]()
![]()
Something like the following, simply iterating through the dataset and updating the worksheet. This should get you going.
Public Class Form1
Private Sub Button1_Click( ByVal sender As System.Object, ByVal e As System.EventArgs) Handles Button1.Click
‘Set up a DataSet
Dim ds As New DataSet
Dim oXL As Excel.Application
Dim oWB As Excel.Workbook
Dim oSheet As Excel.Worksheet
Dim oRng As Excel.Range
‘On Error GoTo Err_Handler
‘ Start Excel and get Application object.
oXL = New Excel.Application
‘ Get a new workbook.
‘//Write Dataset to Excel Sheet
Dim irow As Integer = 1
For Each dr As DataRow In ds.Tables(0).Rows
Dim icol As Integer = 1
For Each c As String In dr.ItemArray
‘Determine cell to write
oSheet.Cells(irow, icol).Value = c
‘ Make sure Excel is visible and give the user control
‘ of Microsoft Excel’s lifetime.
‘ Make sure you release object references.
Catch ex As Exception
MsgBox(Err.Description, vbCritical, «Error: » & Err.Number)
![]()
![]()
All you need to do is instead of creating a new spreadsheet. Open an existing one using the
Workbooks Open Method.
Instead of the WorkBooks.Add method
![]()
![]()
Something like the following, simply iterating through the dataset and updating the worksheet. This should get you going.
Public Class Form1
Private Sub Button1_Click( ByVal sender As System.Object, ByVal e As System.EventArgs) Handles Button1.Click
‘Set up a DataSet
Dim ds As New DataSet
Dim oXL As Excel.Application
Dim oWB As Excel.Workbook
Dim oSheet As Excel.Worksheet
Dim oRng As Excel.Range
‘On Error GoTo Err_Handler
‘ Start Excel and get Application object.
oXL = New Excel.Application
‘ Get a new workbook.
‘//Write Dataset to Excel Sheet
Dim irow As Integer = 1
For Each dr As DataRow In ds.Tables(0).Rows
Dim icol As Integer = 1
For Each c As String In dr.ItemArray
‘Determine cell to write
oSheet.Cells(irow, icol).Value = c
‘ Make sure Excel is visible and give the user control
‘ of Microsoft Excel’s lifetime.
‘ Make sure you release object references.
Catch ex As Exception
MsgBox(Err.Description, vbCritical, «Error: » & Err.Number)
![]()
![]()
Cheers for that. I am also wondering how i can save this to an existing spreadsheet though.
![]()
![]()
All you need to do is instead of creating a new spreadsheet. Open an existing one using the
Workbooks Open Method.
Instead of the WorkBooks.Add method
![]()
![]()
OK got that.
I am now having trouble referencing «Microsoft.Office.Interop»
I have tried adding the Object Libraries, «Microsoft Excel 11» and «Microsoft Office 11» and all i come up with is «Microsoft.Office.Core»
Am i missing something here?
![]()
![]()
Here i give the URL export the data from a dataset to an existing excel speadsheet in ASP.NET and C#
I hope it will helpful for you..
![]()
![]()
you can easily export DataSet to Excel (existing or new spreadsheet) with this C# / VB.NET Excel component.
Here is a sample VB.NET code how to export DataSet to existing Excel spreadsheet:
![]()
![]()
i know i am about two years late
Private Sub Button1_Click(ByVal sender As System.Object, ByVal e As System.EventArgs) Handles Button1.Click
‘Set up a DataSet
Me.TblDatabaseTableAdapter.Fill(Me.RecordsDataSet.tblDatabase)
Try
Dim oXL As Excel.Application
Dim oWB As Excel.Workbook
Dim oSheet As Excel.Worksheet
Dim oRng As Excel.Range
‘On Error GoTo Err_Handler
‘ Start Excel and get Application object.
oXL = New Excel.Application
oXL.Visible = True
‘ Get a new workbook.
oWB = oXL.Workbooks.Add
oSheet = oWB.ActiveSheet
‘//Write Dataset to Excel Sheet
Dim coll As Integer = 1
Dim irow As Integer = 1
For Each dr As DataRow In RecordsDataSet.Tables(0).Rows
irow += 1
Dim icol As Integer = 1
For Each c As String In dr.ItemArray
icol += 1
‘Determine cell to write
oSheet.Cells(irow, icol).Value = c
Next
Next
‘ Make sure Excel is visible and give the user control
‘ of Microsoft Excel’s lifetime.
oXL.Visible = True
oXL.UserControl = True
‘ Make sure you release object references.
oRng = Nothing
oSheet = Nothing
oWB = Nothing
oXL = Nothing
Catch ex As Exception
MsgBox(Err.Description, vbCritical, «Error: » & Err.Number)
End Try
End Sub
i have use your method and it work great the only problem is i cant get the column name/header
Источник
In this article I will explain with an example, how to export multiple DataTables of a DataSet to multiple Excel Sheets (Worksheets) in ASP.Net using C# and VB.Net.
Records of each DataTable in the DataSet will be exported to a different Sheet (Worksheet) of an Excel file using ClosedXml library in ASP.Net.
Download DocumentFormat.OpenXml and ClosedXML Libraries
You can download the libraries using the following download locations.
Note: You will need to install the OpenXml SDK 2.0 in your Windows Operating System.
Database
For this article I am making use of the Microsoft’s Northwind Database. Download and install instructions are provided in the link below
HTML Markup
The HTML Markup consists of an ASP.Net Button which will be used to export the contents of DataSet to multiple Excel Sheets (Worksheets).
<asp:Button ID=»btnExport» runat=»server» Text=»Export To Excel» OnClick=»ExportExcel» />
Namespaces
You will need to import the following namespaces.
C#
using System.IO;
using System.Data;
using ClosedXML.Excel;
using System.Data.SqlClient;
using System.Configuration;
VB.Net
Imports System.IO
Imports System.Data
Imports ClosedXML.Excel
Imports System.Data.SqlClient
Imports System.Configuration
Exporting DataTables of DataSet to multiple Excel Sheets (Worksheets)
When the Export button is clicked, the following event handler is executed. First the DataSet is populated from records of Customers and Employees tables of the Northwind Database.
Once the DataSet is populated with two DataTables, the name of
each DataTable is set.
Note: The name of the DataTable is important as with the same name the Excel Sheet will be created.
Then a loop is executed and each DataTable of the DataSet is added to the ClosedXML WorkBook object as Worksheet.
Finally the WorkBook object is saved to the MemoryStream and the MemoryStream is written to the Response OutputStream which finally sends the Excel File for download.
C#
protected void ExportExcel(object sender, EventArgs e)
{
string constr = ConfigurationManager.ConnectionStrings[«constr»].ConnectionString;
string query = «SELECT TOP 10 ContactName, City, Country FROM Customers;»;
query += «SELECT TOP 10 (FirstName + ‘ ‘ + LastName) EmployeeName, City, Country FROM Employees»;
using (SqlConnection con = new SqlConnection(constr))
{
using (SqlCommand cmd = new SqlCommand(query))
{
using (SqlDataAdapter sda = new SqlDataAdapter())
{
cmd.Connection = con;
sda.SelectCommand = cmd;
using (DataSet ds = new DataSet())
{
sda.Fill(ds);
//Set Name of DataTables.
ds.Tables[0].TableName = «Customers»;
ds.Tables[1].TableName = «Employees»;
using (XLWorkbook wb = new XLWorkbook())
{
foreach (DataTable dt in ds.Tables)
{
//Add DataTable as Worksheet.
wb.Worksheets.Add(dt);
}
//Export the Excel file.
Response.Clear();
Response.Buffer = true;
Response.Charset = «»;
Response.ContentType = «application/vnd.openxmlformats-officedocument.spreadsheetml.sheet»;
Response.AddHeader(«content-disposition», «attachment;filename=DataSet.xlsx»);
using (MemoryStream MyMemoryStream = new MemoryStream())
{
wb.SaveAs(MyMemoryStream);
MyMemoryStream.WriteTo(Response.OutputStream);
Response.Flush();
Response.End();
}
}
}
}
}
}
}
VB.Net
Protected Sub ExportExcel(sender As Object, e As EventArgs)
Dim constr As String = ConfigurationManager.ConnectionStrings(«constr»).ConnectionString
Dim query As String = «SELECT TOP 10 ContactName, City, Country FROM Customers;»
query &= «SELECT TOP 10 (FirstName + ‘ ‘ + LastName) EmployeeName, City, Country FROM Employees»
Using con As New SqlConnection(constr)
Using cmd As New SqlCommand(query)
Using sda As New SqlDataAdapter()
cmd.Connection = con
sda.SelectCommand = cmd
Using ds As New DataSet()
sda.Fill(ds)
‘Set Name of DataTables.
ds.Tables(0).TableName = «Customers»
ds.Tables(1).TableName = «Employees»
Using wb As New XLWorkbook()
For Each dt As DataTable In ds.Tables
‘Add DataTable as Worksheet.
wb.Worksheets.Add(dt)
Next
‘Export the Excel file.
Response.Clear()
Response.Buffer = True
Response.Charset = «»
Response.ContentType = «application/vnd.openxmlformats-officedocument.spreadsheetml.sheet»
Response.AddHeader(«content-disposition», «attachment;filename=DataSet.xlsx»)
Using MyMemoryStream As New MemoryStream()
wb.SaveAs(MyMemoryStream)
MyMemoryStream.WriteTo(Response.OutputStream)
Response.Flush()
Response.End()
End Using
End Using
End Using
End Using
End Using
End Using
End Sub
Screenshots
DataTables in DataSet
DataTables of DataSet exported to different sheets
Demo
Downloads
In this tutorial, you’ll learn how to save your Pandas DataFrame or DataFrames to Excel files. Being able to save data to this ubiquitous data format is an important skill in many organizations. In this tutorial, you’ll learn how to save a simple DataFrame to Excel, but also how to customize your options to create the report you want!
By the end of this tutorial, you’ll have learned:
- How to save a Pandas DataFrame to Excel
- How to customize the sheet name of your DataFrame in Excel
- How to customize the index and column names when writing to Excel
- How to write multiple DataFrames to Excel in Pandas
- Whether to merge cells or freeze panes when writing to Excel in Pandas
- How to format missing values and infinity values when writing Pandas to Excel
Let’s get started!
The Quick Answer: Use Pandas to_excel
To write a Pandas DataFrame to an Excel file, you can apply the .to_excel() method to the DataFrame, as shown below:
# Saving a Pandas DataFrame to an Excel File
# Without a Sheet Name
df.to_excel(file_name)

# With a Sheet Name
df.to_excel(file_name, sheet_name='My Sheet')

# Without an Index
df.to_excel(file_name, index=False)
Understanding the Pandas to_excel Function
Before diving into any specifics, let’s take a look at the different parameters that the method offers. The method provides a ton of different options, allowing you to customize the output of your DataFrame in many different ways. Let’s take a look:
# The many parameters of the .to_excel() function
df.to_excel(excel_writer, sheet_name='Sheet1', na_rep='', float_format=None, columns=None, header=True, index=True, index_label=None, startrow=0, startcol=0, engine=None, merge_cells=True, encoding=None, inf_rep='inf', verbose=True, freeze_panes=None, storage_options=None)
Let’s break down what each of these parameters does:
| Parameter | Description | Available Options |
|---|---|---|
excel_writer= |
The path of the ExcelWriter to use | path-like, file-like, or ExcelWriter object |
sheet_name= |
The name of the sheet to use | String representing name, default ‘Sheet1’ |
na_rep= |
How to represent missing data | String, default '' |
float_format= |
Allows you to pass in a format string to format floating point values | String |
columns= |
The columns to use when writing to the file | List of strings. If blank, all will be written |
header= |
Accepts either a boolean or a list of values. If a boolean, will either include the header or not. If a list of values is provided, aliases will be used for the column names. | Boolean or list of values |
index= |
Whether to include an index column or not. | Boolean |
index_label= |
Column labels to use for the index. | String or list of strings. |
startrow= |
The upper left cell to start the DataFrame on. | Integer, default 0 |
startcol= |
The upper left column to start the DataFrame on | Integer, default 0 |
engine= |
The engine to use to write. | openpyxl or xlsxwriter |
merge_cells= |
Whether to write multi-index cells or hierarchical rows as merged cells | Boolean, default True |
encoding= |
The encoding of the resulting file. | String |
inf_rep= |
How to represent infinity values (as Excel doesn’t have a representation) | String, default 'inf' |
verbose= |
Whether to display more information in the error logs. | Boolean, default True |
freeze_panes= |
Allows you to pass in a tuple of the row, column to start freezing panes on | Tuple of integers with length 2 |
storage_options= |
Extra options that allow you to save to a particular storage connection | Dictionary |
.to_excel() methodHow to Save a Pandas DataFrame to Excel
The easiest way to save a Pandas DataFrame to an Excel file is by passing a path to the .to_excel() method. This will save the DataFrame to an Excel file at that path, overwriting an Excel file if it exists already.
Let’s take a look at how this works:
# Saving a Pandas DataFrame to an Excel File
import pandas as pd
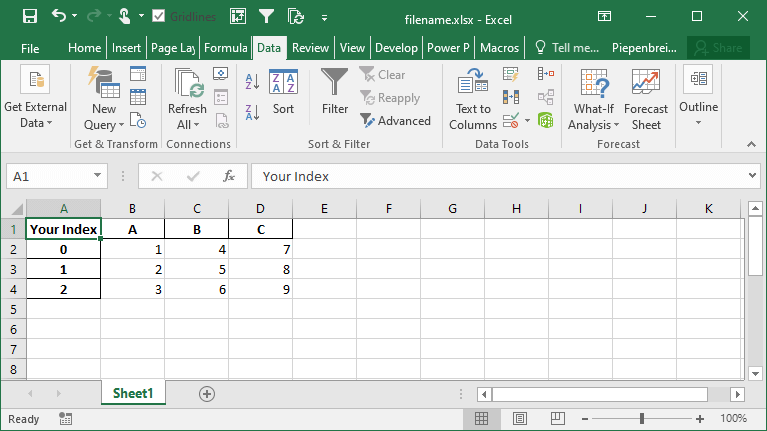
df = pd.DataFrame.from_dict(
{'A': [1, 2, 3], 'B': [4, 5, 6], 'C': [7, 8, 9]}
)
df.to_excel('filename.xlsx')Running the code as shown above will save the file with all other default parameters. This returns the following image:

You can specify a sheetname by using the sheet_name= parameter. By default, Pandas will use 'sheet1'.
# Specifying a Sheet Name When Saving to Excel
import pandas as pd
df = pd.DataFrame.from_dict(
    {'A': [1, 2, 3], 'B': [4, 5, 6], 'C': [7, 8, 9]}
)

df.to_excel('filename.xlsx', sheet_name='Your Sheet')
This returns the following workbook:
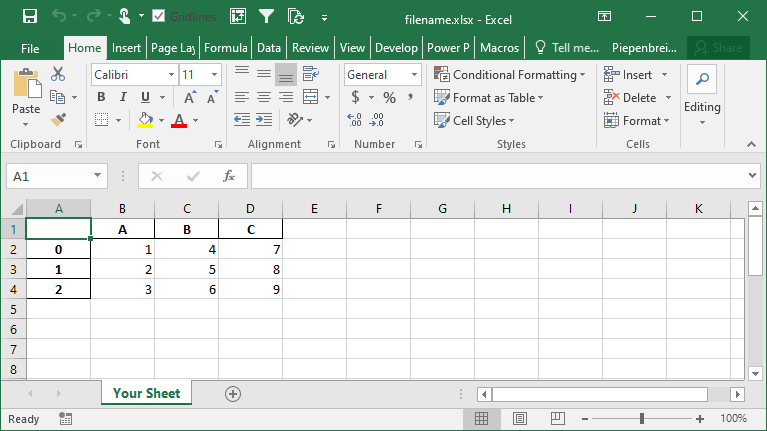
In the following section, you’ll learn how to customize whether to include an index column or not.
How to Include an Index when Saving a Pandas DataFrame to Excel
By default, Pandas will include the index when saving a Pandas Dataframe to an Excel file. This can be helpful when the index is a meaningful index (such as a date and time). However, in many cases, the index will simply represent the values from 0 through to the end of the records.
If you don’t want to include the index in your Excel file, you can use the index= parameter, as shown below:
# How to exclude the index when saving a DataFrame to Excel
import pandas as pd
df = pd.DataFrame.from_dict(
    {'A': [1, 2, 3], 'B': [4, 5, 6], 'C': [7, 8, 9]}
)

df.to_excel('filename.xlsx', index=False)
This returns the following Excel file:
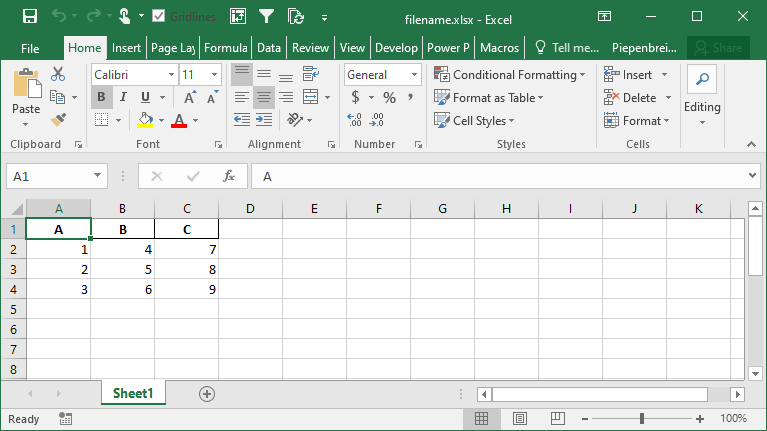
In the following section, you’ll learn how to rename an index when saving a Pandas DataFrame to an Excel file.
How to Rename an Index when Saving a Pandas DataFrame to Excel
By default, Pandas will not named the index of your DataFrame. This, however, can be confusing and can lead to poorer results when trying to manipulate the data in Excel, either by filtering or by pivoting the data. Because of this, it can be helpful to provide a name or names for your indices.
Pandas makes this easy by using the index_label= parameter. This parameter accepts either a single string (for a single index) or a list of strings (for a multi-index). Check out below how you can use this parameter:
# Providing a name for your Pandas index
import pandas as pd
df = pd.DataFrame.from_dict(
    {'A': [1, 2, 3], 'B': [4, 5, 6], 'C': [7, 8, 9]}
)

df.to_excel('filename.xlsx', index_label='Your Index')
This returns the following sheet:
How to Save Multiple DataFrames to Different Sheets in Excel
One of the tasks you may encounter quite frequently is the need to save multi Pandas DataFrames to the same Excel file, but in different sheets. This is where Pandas makes it a less intuitive. If you were to simply write the following code, the second command would overwrite the first command:
# The wrong way to save multiple DataFrames to the same workbook
import pandas as pd
df = pd.DataFrame.from_dict(
    {'A': [1, 2, 3], 'B': [4, 5, 6], 'C': [7, 8, 9]}
)

df.to_excel('filename.xlsx', sheet_name='Sheet1')
df.to_excel('filename.xlsx', sheet_name='Sheet2')
Instead, we need to use a Pandas Excel Writer to manage opening and saving our workbook. This can be done easily by using a context manager, as shown below:
# The Correct Way to Save Multiple DataFrames to the Same Workbook
import pandas as pd
df = pd.DataFrame.from_dict(
    {'A': [1, 2, 3], 'B': [4, 5, 6], 'C': [7, 8, 9]}
)

with pd.ExcelWriter('filename.xlsx') as writer:
    df.to_excel(writer, sheet_name='Sheet1')
    df.to_excel(writer, sheet_name='Sheet2')
This will create multiple sheets in the same workbook. The sheets will be created in the same order as you specify them in the command above.
This returns the following workbook:

How to Save Only Some Columns when Exporting Pandas DataFrames to Excel
When saving a Pandas DataFrame to an Excel file, you may not always want to save every single column. In many cases, the Excel file will be used for reporting and it may be redundant to save every column. Because of this, you can use the columns= parameter to accomplish this.
Let’s see how we can save only a number of columns from our dataset:
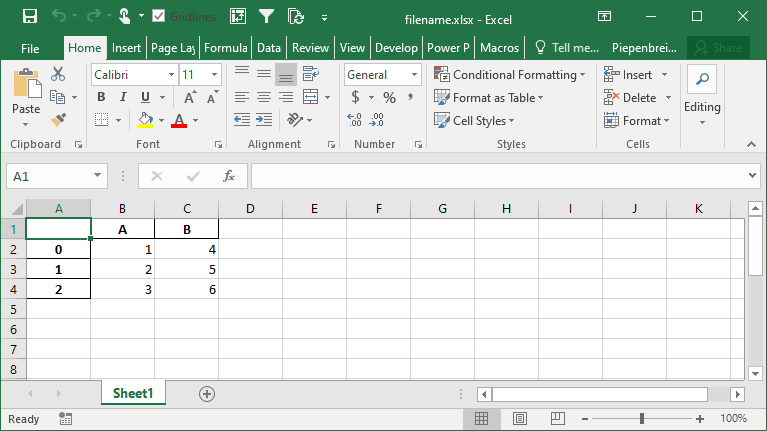
# Saving Only a Subset of Columns to Excel
import pandas as pd
df = pd.DataFrame.from_dict(
    {'A': [1, 2, 3], 'B': [4, 5, 6], 'C': [7, 8, 9]}
)

df.to_excel('filename.xlsx', columns=['A', 'B'])
This returns the following Excel file:
How to Rename Columns when Exporting Pandas DataFrames to Excel
Continuing our discussion about how to handle Pandas DataFrame columns when exporting to Excel, we can also rename our columns in the saved Excel file. The benefit of this is that we can work with aliases in Pandas, which may be easier to write, but then output presentation-ready column names when saving to Excel.
We can accomplish this using the header= parameter. The parameter accepts either a boolean value of a list of values. If a boolean value is passed, you can decide whether to include or a header or not. When a list of strings is provided, then you can modify the column names in the resulting Excel file, as shown below:
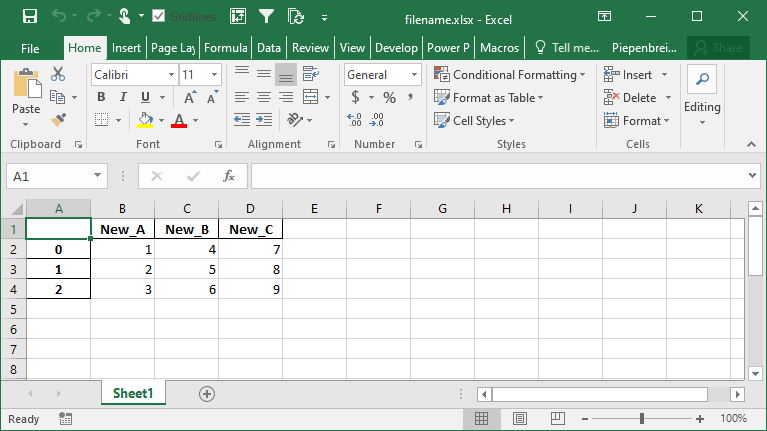
# Modifying Column Names when Exporting a Pandas DataFrame to Excel
import pandas as pd
df = pd.DataFrame.from_dict(
    {'A': [1, 2, 3], 'B': [4, 5, 6], 'C': [7, 8, 9]}
)

df.to_excel('filename.xlsx', header=['New_A', 'New_B', 'New_C'])
This returns the following Excel sheet:
How to Specify Starting Positions when Exporting a Pandas DataFrame to Excel
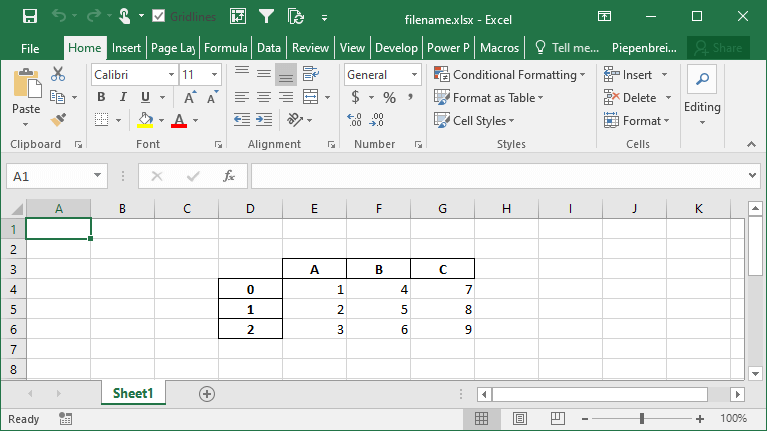
One of the interesting features that Pandas provides is the ability to modify the starting position of where your DataFrame will be saved on the Excel sheet. This can be helpful if you know you’ll be including different rows above your data or a logo of your company.
Let’s see how we can use the startrow= and startcol= parameters to modify this:
# Changing the Start Row and Column When Saving a DataFrame to an Excel File
import pandas as pd
df = pd.DataFrame.from_dict(
    {'A': [1, 2, 3], 'B': [4, 5, 6], 'C': [7, 8, 9]}
)

df.to_excel('filename.xlsx', startcol=3, startrow=2)
This returns the following worksheet:
How to Represent Missing and Infinity Values When Saving Pandas DataFrame to Excel
In this section, you’ll learn how to represent missing data and infinity values when saving a Pandas DataFrame to Excel. Because Excel doesn’t have a way to represent infinity, Pandas will default to the string 'inf' to represent any values of infinity.
In order to modify these behaviors, we can use the na_rep= and inf_rep= parameters to modify the missing and infinity values respectively. Let’s see how we can do this by adding some of these values to our DataFrame:
# Customizing Output of Missing and Infinity Values When Saving to Excel
import pandas as pd
import numpy as np
df = pd.DataFrame.from_dict(
{'A': [1, np.NaN, 3], 'B': [4, 5, np.inf], 'C': [7, 8, 9]}
)
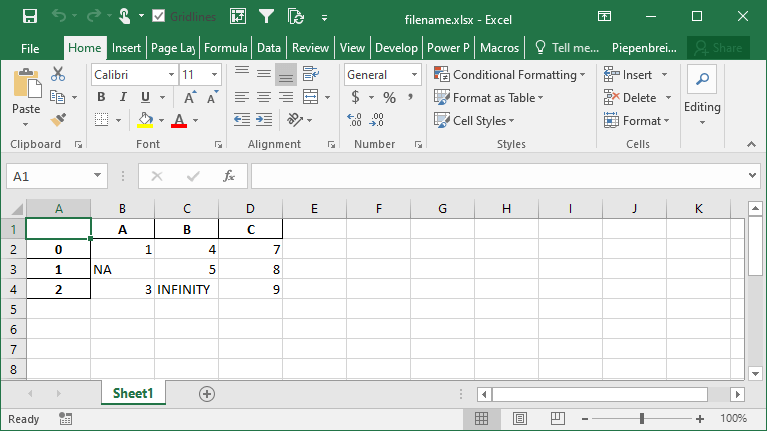
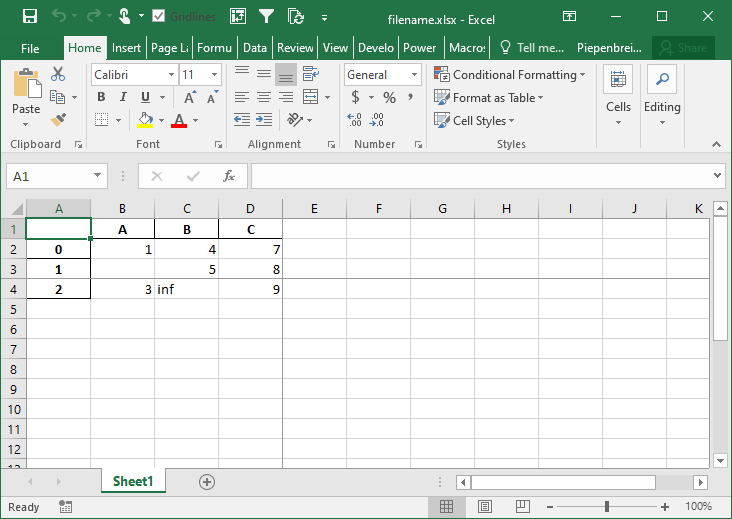
df.to_excel('filename.xlsx', na_rep='NA', inf_rep='INFINITY')This returns the following worksheet:
How to Merge Cells when Writing Multi-Index DataFrames to Excel
In this section, you’ll learn how to modify the behavior of multi-index DataFrames when saved to Excel. By default Pandas will set the merge_cells= parameter to True, meaning that the cells will be merged. Let’s see what happens when we set this behavior to False, indicating that the cells should not be merged:
# Modifying Merge Cell Behavior for Multi-Index DataFrames
import pandas as pd
import numpy as np
from random import choice
df = pd.DataFrame.from_dict({
'A': np.random.randint(0, 10, size=50),
'B': [choice(['a', 'b', 'c']) for i in range(50)],
'C': np.random.randint(0, 3, size=50)})
pivot = df.pivot_table(index=['B', 'C'], values='A')
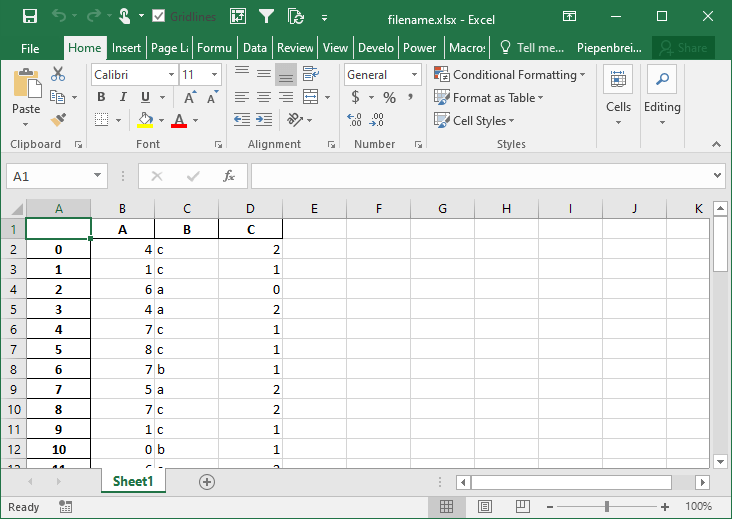
pivot.to_excel('filename.xlsx', merge_cells=False)This returns the Excel worksheet below:
How to Freeze Panes when Saving a Pandas DataFrame to Excel
In this final section, you’ll learn how to freeze panes in your resulting Excel worksheet. This allows you to specify the row and column at which you want Excel to freeze the panes. This can be done using the freeze_panes= parameter. The parameter accepts a tuple of integers (of length 2). The tuple represents the bottommost row and the rightmost column that is to be frozen.
Let’s see how we can use the freeze_panes= parameter to freeze our panes in Excel:
# Freezing Panes in an Excel Workbook Using Pandas
import pandas as pd
import numpy as np

df = pd.DataFrame.from_dict(
    {'A': [1, np.NaN, 3], 'B': [4, 5, np.inf], 'C': [7, 8, 9]}
)

df.to_excel('filename.xlsx', freeze_panes=(3,4))
This returns the following workbook:
Conclusion
In this tutorial, you learned how to save a Pandas DataFrame to an Excel file using the to_excel method. You first explored all of the different parameters that the function had to offer at a high level. Following that, you learned how to use these parameters to gain control over how the resulting Excel file should be saved. For example, you learned how to specify sheet names, index names, and whether to include the index or not. Then you learned how to include only some columns in the resulting file and how to rename the columns of your DataFrame. You also learned how to modify the starting position of the data and how to freeze panes.
Additional Resources
To learn more about related topics, check out the tutorials below:
- How to Use Pandas to Read Excel Files in Python
- Pandas Dataframe to CSV File – Export Using .to_csv()
- Introduction to Pandas for Data Science
- Official Documentation: Pandas to_excel