Use data validation to restrict the type of data or the values that users enter into a cell, like a dropdown list.
Try it!
-
Select the cell(s) you want to create a rule for.
-
Select Data >Data Validation.
-
On the Settings tab, under Allow, select an option:
-
Whole Number — to restrict the cell to accept only whole numbers.
-
Decimal — to restrict the cell to accept only decimal numbers.
-
List — to pick data from the drop-down list.
-
Date — to restrict the cell to accept only date.
-
Time — to restrict the cell to accept only time.
-
Text Length — to restrict the length of the text.
-
Custom – for custom formula.
-
-
Under Data, select a condition.
-
Set the other required values based on what you chose for Allow and Data.
-
Select the Input Message tab and customize a message users will see when entering data.
-
Select the Show input message when cell is selected checkbox to display the message when the user selects or hovers over the selected cell(s).
-
Select the Error Alert tab to customize the error message and to choose a Style.
-
Select OK.
Now, if the user tries to enter a value that is not valid, an Error Alert appears with your customized message.
Download our examples
Download an example workbook with all data validation examples in this article
If you’re creating a sheet that requires users to enter data, you might want to restrict entry to a certain range of dates or numbers, or make sure that only positive whole numbers are entered. Excel can restrict data entry to certain cells by using data validation, prompt users to enter valid data when a cell is selected, and display an error message when a user enters invalid data.
Restrict data entry
-
Select the cells where you want to restrict data entry.
-
On the Data tab, click Data Validation > Data Validation.
Note: If the validation command is unavailable, the sheet might be protected or the workbook might be shared. You cannot change data validation settings if your workbook is shared or your sheet is protected. For more information about workbook protection, see Protect a workbook.
-
In the Allow box, select the type of data you want to allow, and fill in the limiting criteria and values.
Note: The boxes where you enter limiting values will be labeled based on the data and limiting criteria that you have chosen. For example, if you choose Date as your data type, you will be able to enter limiting values in minimum and maximum value boxes labeled Start Date and End Date.
Prompt users for valid entries
When users click in a cell that has data entry requirements, you can display a message that explains what data is valid.
-
Select the cells where you want to prompt users for valid data entries.
-
On the Data tab, click Data Validation > Data Validation.
Note: If the validation command is unavailable, the sheet might be protected or the workbook might be shared. You cannot change data validation settings if your workbook is shared or your sheet is protected. For more information about workbook protection, see Protect a workbook.
-
On the Input Message tab, select the Show input message when cell is selected check box.
-
In the Title box, type a title for your message.
-
In the Input message box, type the message that you want to display.
Display an error message when invalid data is entered
If you have data restrictions in place and a user enters invalid data into a cell, you can display a message that explains the error.
-
Select the cells where you want to display your error message.
-
On the Data tab, click Data Validation > Data Validation.
Note: If the validation command is unavailable, the sheet might be protected or the workbook might be shared. You cannot change data validation settings if your workbook is shared or your sheet is protected. For more information about workbook protection, see Protect a workbook.
-
On the Error Alert tab, in the Title box, type a title for your message.
-
In the Error message box, type the message that you want to display if invalid data is entered.
-
Do one of the following:
To
On the
Style
pop-up menu, selectRequire users to fix the error before proceeding
Stop
Warn users that data is invalid, and require them to select Yes or No to indicate if they want to continue
Warning
Warn users that data is invalid, but allow them to proceed after dismissing the warning message
Important
Add data validation to a cell or a range
Note: The first two steps in this section are for adding any type of data validation. Steps 3-7 are specifically for creating a drop-down list.
-
Select one or more cells to validate.
-
On the Data tab, in the Data Tools group, click Data Validation.
-
On the Settings tab, in the Allow box, select List.
-
In the Source box, type your list values, separated by commas. For example, type Low,Average,High.
-
Make sure that the In-cell dropdown check box is selected. Otherwise, you won’t be able to see the drop-down arrow next to the cell.
-
To specify how you want to handle blank (null) values, select or clear the Ignore blank check box.
-
Test the data validation to make sure that it is working correctly. Try entering both valid and invalid data in the cells to make sure that your settings are working as you intended and your messages are appearing when you expect.
Notes:
-
After you create your drop-down list, make sure it works the way you want. For example, you might want to check to see if the cell is wide enough to show all your entries.
-
Remove data validation — Select the cell or cells that contain the validation you want to delete, then go to Data > Data Validation and in the data validation dialog press the Clear All button, then click OK.
The following table lists other types of data validation and shows you ways to add it to your worksheets.
|
To do this: |
Follow these steps: |
|---|---|
|
Restrict data entry to whole numbers within limits. |
|
|
Restrict data entry to a decimal number within limits. |
|
|
Restrict data entry to a date within range of dates. |
|
|
Restrict data entry to a time within a time frame. |
|
|
Restrict data entry to text of a specified length. |
|
|
Calculate what is allowed based on the content of another cell. |
|
Notes:
-
The following examples use the Custom option where you write formulas to set your conditions. You don’t need to worry about whatever the Data box shows, as that’s disabled with the Custom option.
-
The screen shots in this article were taken in Excel 2016; but the functionality is the same in Excel for the web.
|
To make sure that |
Enter this formula |
|---|---|
|
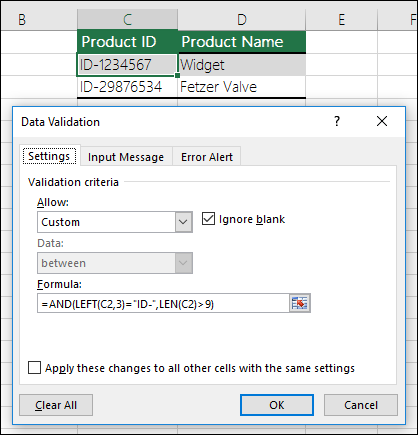
The cell that contains a product ID (C2) always begins with the standard prefix of «ID-» and is at least 10 (greater than 9) characters long. |
=AND(LEFT(C2,3)=»ID-«,LEN(C2)>9) |
|
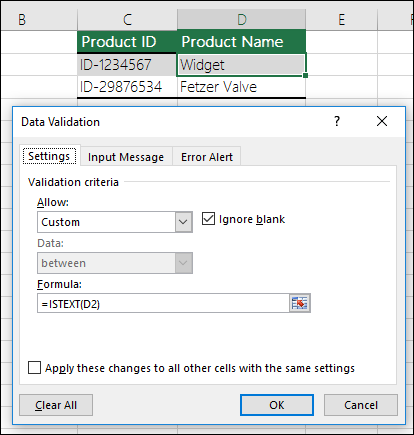
The cell that contains a product name (D2) only contains text. |
=ISTEXT(D2) |
|
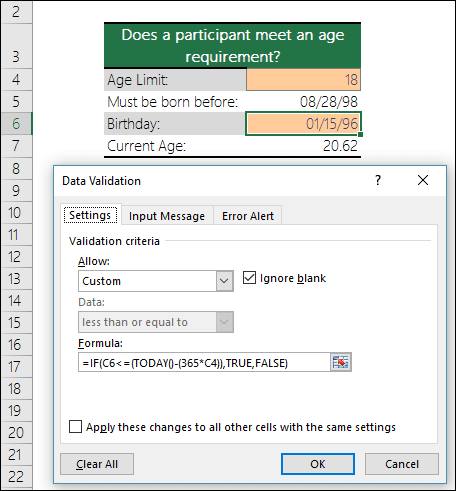
The cell that contains someone’s birthday (B6) has to be greater than the number of years set in cell B4. |
=IF(B6<=(TODAY()-(365*B4)),TRUE,FALSE) |
|
All the data in the cell range A2:A10 contains unique values. |
=COUNTIF($A$2:$A$10,A2)=1 Note: You must enter the data validation formula for cell A2 first, then copy A2 to A3:A10 so that the second argument to the COUNTIF will match the current cell. That is the A2)=1 portion will change to A3)=1, A4)=1 and so on. For more information |
|
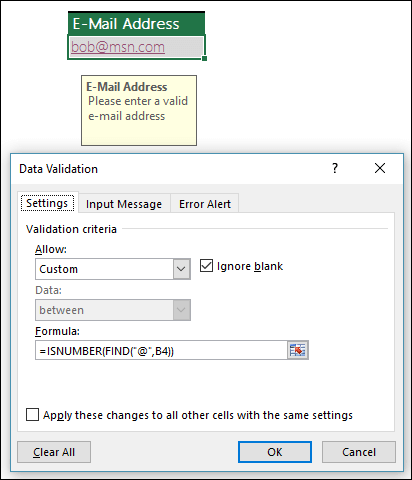
Ensure that an e-mail address entry in cell B4 contains the @ symbol. |
=ISNUMBER(FIND(«@»,B4)) |
Tip: If you’re a small business owner looking for more information on how to get Microsoft 365 set up, visit Small business help & learning.
Want more?

Create a drop-down list
Add or remove items from a drop-down list
More on data validation
Author: Oscar Cronquist Article last updated on October 15, 2019
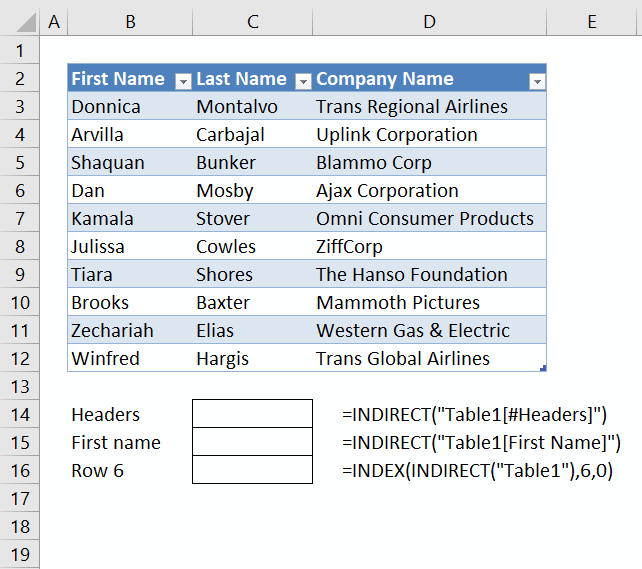
This article demonstrates different ways to reference an Excel defined Table in a drop-down list and Conditional Formatting. There are two approaches, the INDIRECT function or a named range.
The INDIRECT function is a volatile function meaning it recalculates every time Excel recalculates which is not the case with most Excel functions. If used a lot the INDIRECT function may slow down your workbook calculations considerably, be careful.
It is enough to calculate a formula once, there is no need to calculate all cells every time Excel recalculates. This makes your worksheets faster and more efficient, however, this is not the case with a handful of functions and the INDIRECT function is one of them.
Another downside with the INDIRECT function apart from being volatile is that the Excel Table name is «hardcoded» into the formula. The formula will stop working if you change the Excel Table name.
Table of Contents
- Reference Excel Table headers
- Reference an Excel Table using a named range
- Reference Excel Table column
- Reference Excel Table row
- Reference an Excel Table in a Conditional Formatting formula
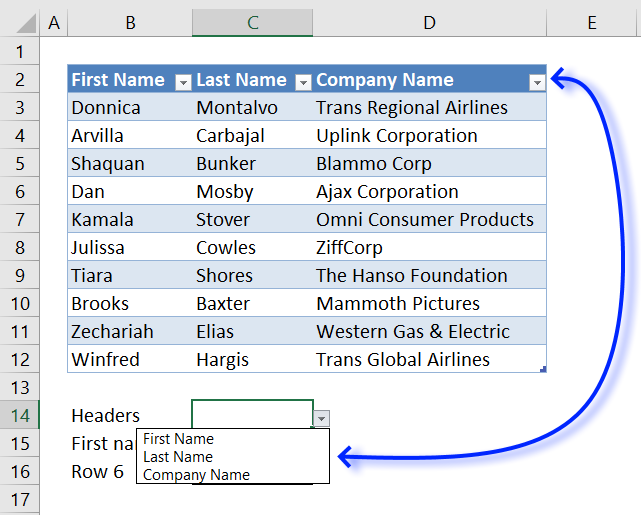
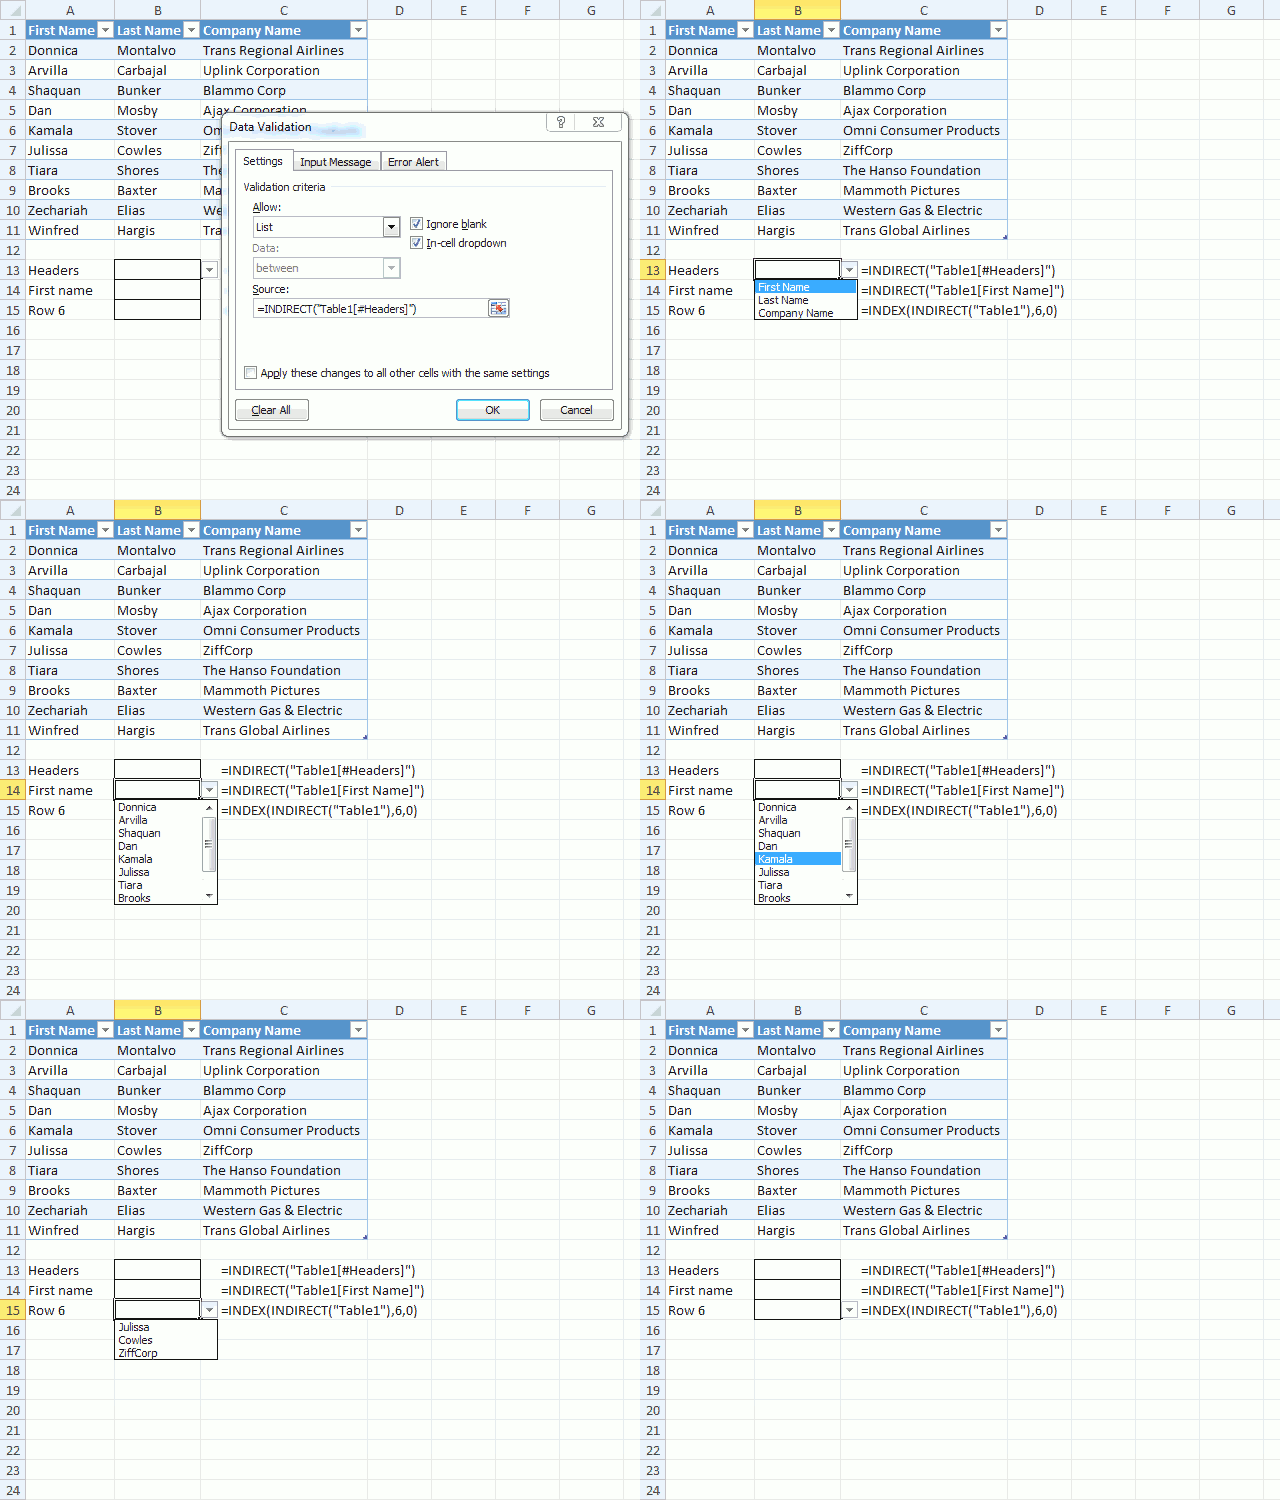
The image above shows a drop-down list populated with Excel Table header values, this formula allows you to use Excel table headers as values in a drop-down list.
=INDIRECT(«Table1[#Headers]»)
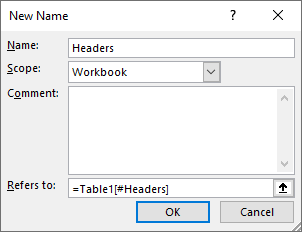
You can also create a named range and reference the headers there.
- Go to tab «Formulas» on the ribbon.
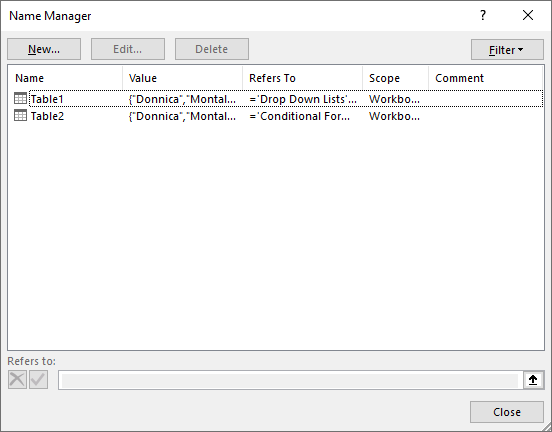
- Press with left mouse button on «Name Manager» button to open the «Name Manager» dialog box.
- Press with left mouse button on the «New» button.
- Type the reference, in this case: =Table1[#Headers]
- Press with left mouse button on OK button.
- Press with left mouse button on Close button.
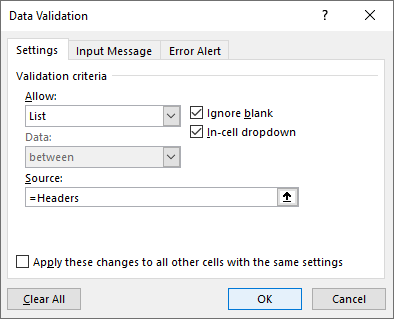
Now use the named range name Headers in the Data Validation dialog box.
Watch this video to learn more
How to populate a drop-down list with values from an Excel Table column?
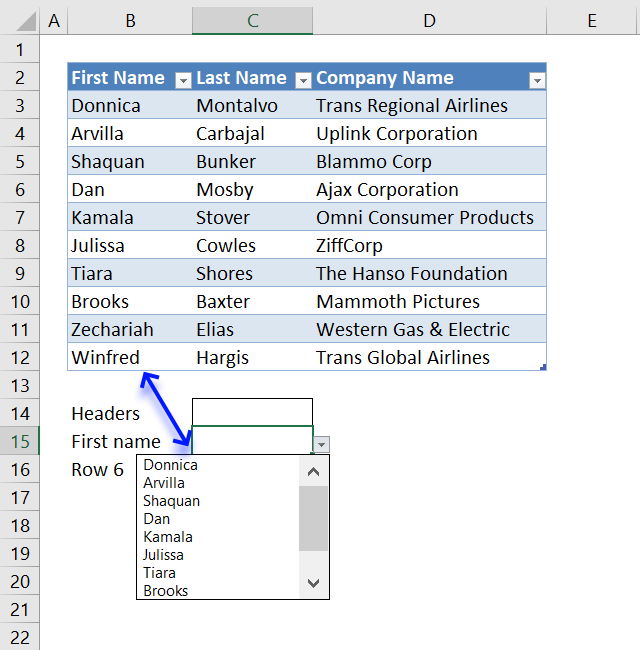
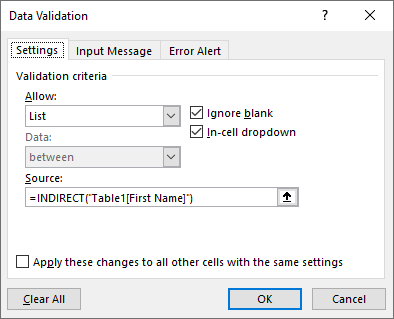
The easiest way is to use the INDIRECT function to create a reference to an Excel Table column. References pointing to an Excel Table are called «structured references», they are different from regular cell references.
Cell B15 contains a drop-down list with this formula:
=INDIRECT(«Table1[First Name]»)
How to populate a drop-down list with values from an Excel Table row?
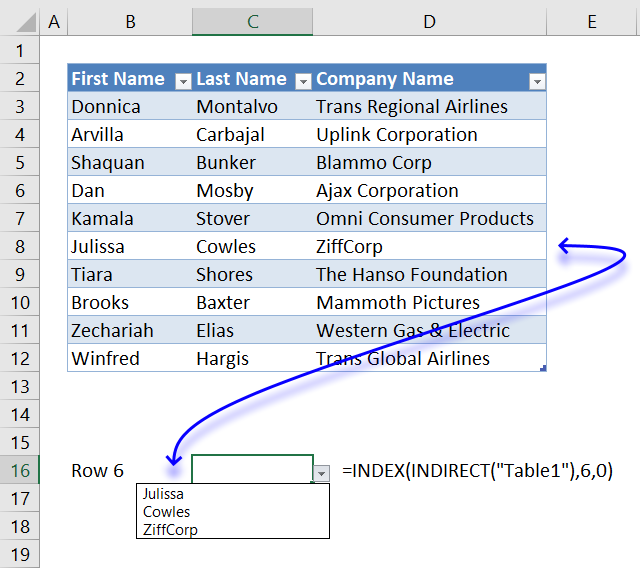
The INDEX function is capable of extracting values in a single row from a cell range, combine it with the INDIRECT function and a reference to the Excel Table, please see formula below.
Reference a table row in a drop down list, cell B15:
=INDEX(INDIRECT(«Table1»),6,0)
Animated image
The animated image above demonstrates the drop-down lists, how they work and what they link to.
How to reference an Excel Table in a Conditional Formatting formula?
Simply add the INDIRECT function to each Excel Table reference in your formula, please see formula below.
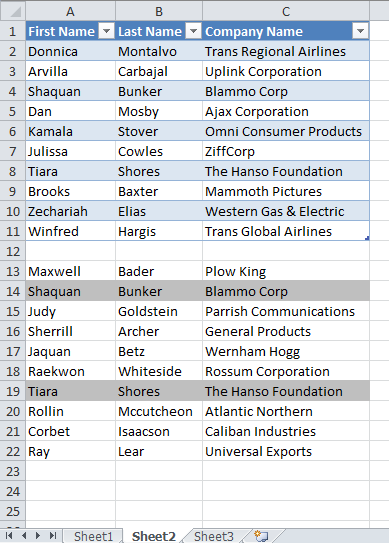
Conditional formatting formula, cell range A13:C22:
=COUNTIFS(INDIRECT(«Table2[First Name]»),$A13,INDIRECT(«Table2[Last Name]»),$B13,INDIRECT(«Table2[Company Name]»),$C13)
The Conditional Formatting formula highlights a row if a record in cell range A13:C22 is equal to at least one record in the Excel defined Table (A1:C11)
Introduction
Data validation is a feature in Excel used to control what a user can enter into a cell. For example, you could use data validation to make sure a value is a number between 1 and 6, make sure a date occurs in the next 30 days, or make sure a text entry is less than 25 characters.
Data validation can simply display a message to a user telling them what is allowed as shown below:
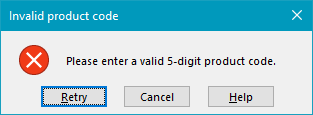
Data validation can also stop invalid user input. For example, if a product code fails validation, you can display a message like this:
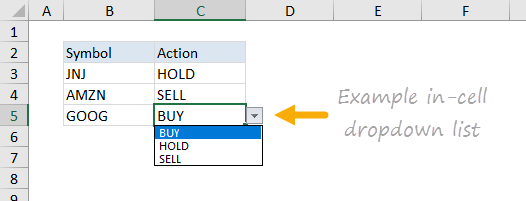
In addition, data validation can be used to present the user with a predefined choice in a dropdown menu:
This can be a convenient way to give a user exactly the values that meet requirements.
Data validation controls
Data validation is implemented via rules defined in Excel’s user interface on the Data tab of the ribbon.
Important limitation
It is important to understand that data validation can be easily defeated. If a user copies data from a cell without validation to a cell with data validation, the validation is destroyed (or replaced). Data validation is a good way to let users know what is allowed or expected, but it is not a foolproof way to guarantee input.
Defining data validation rules
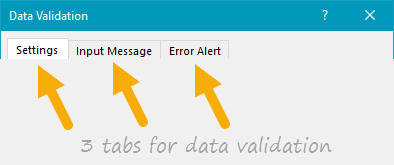
Data validation is defined in a window with 3 tabs: Settings, Input Message, and Error Alert:
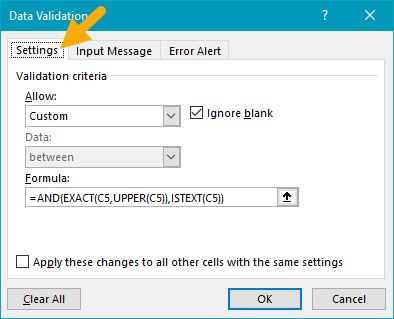
The settings tab is where you enter validation criteria. There are a number of built-in validation rules with various options, or you can select Custom, and use your own formula to validate input as seen below:
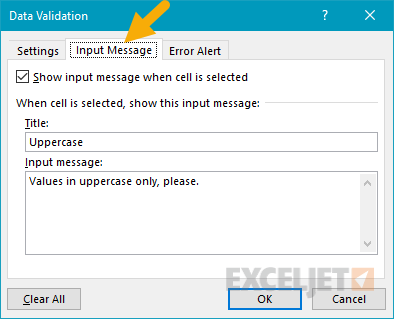
The Input Message tab defines a message to display when a cell with validation rules is selected. This Input Message is completely optional. If no input message is set, no message appears when a user selects a cell with data validation applied. The input message has no effect on what the user can enter — it simply displays a message to let the user know what is allowed or expected.
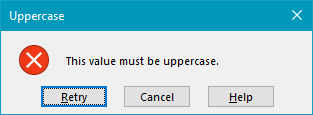
The Error Alert Tab controls how validation is enforced. For example, when style is set to «Stop», invalid data triggers a window with a message, and the input is not allowed.
The user sees a message like this:
When style is set to Information or Warning, a different icon is displayed with a custom message, but the user can ignore the message and enter values that don’t pass validation. The table below summarizes behavior for each error alert option.
| Alert Style | Behavior |
|---|---|
| Stop | Stops users from entering invalid data in a cell. Users can retry, but must enter a value that passes data validation. The Stop alert window has two options: Retry and Cancel. |
| Warning | Warns users that data is invalid. The warning does nothing to stop invalid data. The Warning alert window has three options: Yes (to accept invalid data), No (to edit invalid data) and Cancel (to remove the invalid data). |
| Information | Informs users that data is invalid. This message does nothing to stop invalid data. The Information alert window has 2 options: OK to accept invalid data, and Cancel to remove it. |
Data validation options
When a data validation rule is created, there are eight options available to validate user input:
Any Value — no validation is performed. Note: if data validation was previously applied with a set Input Message, the message will still display when the cell is selected, even when Any Value is selected.
Whole Number — only whole numbers are allowed. Once the whole number option is selected, other options become available to further limit input. For example, you can require a whole number between 1 and 10.
Decimal — works like the whole number option, but allows decimal values. For example, with the Decimal option configured to allow values between 0 and 3, values like .5, 2.5, and 3.1 are all allowed.
List — only values from a predefined list are allowed. The values are presented to the user as a dropdown menu control. Allowed values can be hardcoded directly into the Settings tab, or specified as a range on the worksheet.
Date — only dates are allowed. For example, you can require a date between January 1, 2018 and December 31 2021, or a date after June 1, 2018.
Time — only times are allowed. For example, you can require a time between 9:00 AM and 5:00 PM, or only allow times after 12:00 PM.
Text length — validates input based on number of characters or digits. For example, you could require code that contains 5 digits.
Custom — validates user input using a custom formula. In other words, you can write your own formula to validate input. Custom formulas greatly extend the options for data validation. For example, you could use a formula to ensure a value is uppercase, a value contains «xyz», or a date is a weekday in the next 45 days.
The settings tab also includes two checkboxes:
Ignore blank — tells Excel to not validate cells that contain no value. In practice, this setting seems to affect only the command «circle invalid data». When enabled, blank cells are not circled even if they fail validation.
Apply these changes to other cells with the same settings — this setting will update validation applied to other cells when it matches the (original) validation of the cell(s) being edited.
Note: You can also manually select all cells with data validation applied using Go To + Special, as explained below.
Simple drop down menu
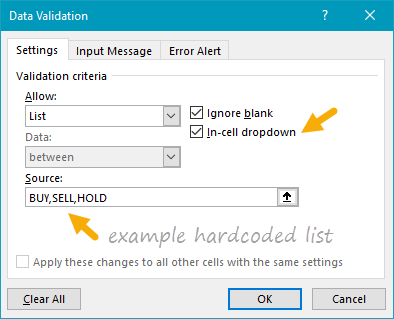
You can provide a dropdown menu of options by hardcoding values into the settings box, or selecting a range on the worksheet. For example, to restrict entries to the actions «BUY», «HOLD», or «SELL» you can enter these values separated with commas as seen below:
When applied to a cell in the worksheet, the dropdown menu works like this:
Another way to supply values to a dropdown menu is to use a worksheet reference. For example, with sizes (i.e. small, medium, etc.) in the range F3:F6, you can supply this range directly inside the data validation settings window:
Note the range is entered as an absolute address to prevent it from changing as the data validation is applied to other cells.
Tip: Click the small arrow icon at the far right of the source field to make a selection directly on the worksheet so you don’t have to enter the range manually.
You can also use named ranges to specify values. For example, with the named range called «sizes» for F3:F7, you can enter the name directly in the window, starting with an equal sign:
Named ranges are automatically absolute, so they won’t change as the data validation is applied to different cells. If named ranges are new to you, this page has a good overview and a number of related tips.
Tip — if you use an Excel Table for dropdown values, Excel will expand or contract the table automatically when dropdown values are added or removed. In other words, Excel will automatically keep the dropdown in sync with values in the table as values are changed, added, or removed. If you’re new to Excel Tables, you can see a demo in this video on Table shortcuts.
Data validation with a custom formula
Data validation formulas must be logical formulas that return TRUE when input is valid and FALSE when input is invalid. For example, to allow any number as input in cell A1, you could use the ISNUMBER function in a formula like this:
=ISNUMBER(A1)
If a user enters a value like 10 in A1, ISNUMBER returns TRUE and data validation succeeds. If they enter a value like «apple» in A1, ISNUMBER returns FALSE and data validation fails.
To enable data validation with a formula, selected «Custom» in the settings tab, then enter a formula in the formula bar beginning with an equal sign (=) as usual.
Troubleshooting formulas
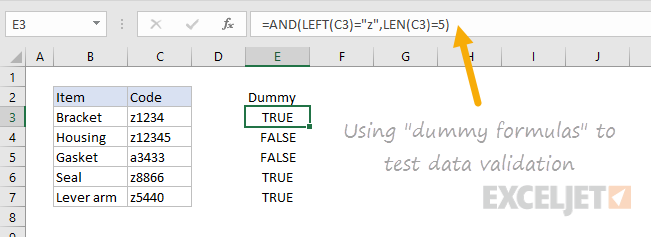
Excel ignores data validation formulas that return errors. If a formula isn’t working, and you can’t figure out why, set up dummy formulas to make sure the formula is performing as you expect. Dummy formulas are simply data validation formulas entered directly on the worksheet so that you can see what they return easily. The screen below shows an example:
Once you get the dummy formula working like you want, simply copy and paste it into the data validation formula area.
If this dummy formula idea is confusing to you, watch this video, which shows how to use dummy formulas to perfect conditional formatting formulas. The concept is exactly the same.
Data validation formula examples
The possibilities for data validation custom formulas are virtually unlimited. Here are a few examples to give you some inspiration:
To allow only 5 character values that begin with «z» you could use:
=AND(LEFT(A1)="z",LEN(A1)=5)
This formula returns TRUE only when a code is 5 digits long and starts with «z». The two circled values return FALSE with this formula.
To allow only a date within 30 days of today:
=AND(A1>TODAY(),A1<=(TODAY()+30))
To allow only unique values:
=COUNTIF(range,A1)<2
To allow only an email address
=ISNUMBER(FIND("@",A1)
Data validation to circle invalid entries
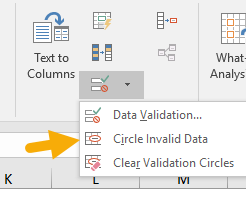
Once data validation is applied, you can ask Excel to circle previously entered invalid values. On the Data tab of the ribbon, click Data Validation and select «Circle Invalid Data»:
For example, the screen below shows values circled that fail validation with this custom formula:
=AND(LEFT(A1)="z",LEN(A1)=5)
Find cells with data validation
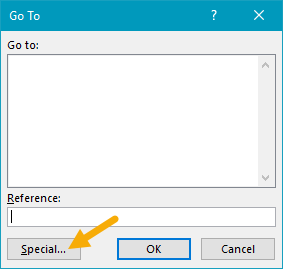
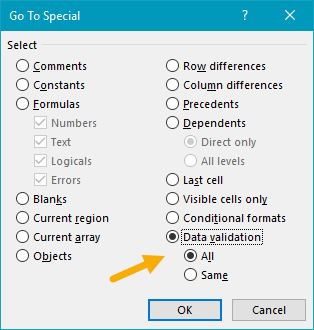
To find cells with data validation applied, you can use the Go To > Special dialog. Type the keyboard shortcut Control + G, then click the Special button. When the Dialog appears, select «Data Validation»:
Copy data validation from one cell to another
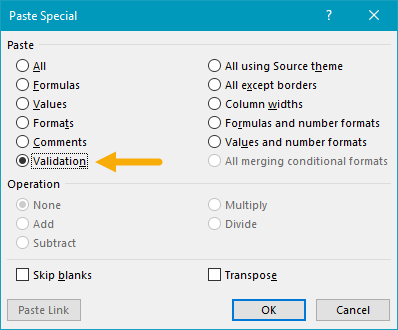
To copy validation from one cell to other cells. Copy the cell(s) normally that contain the data validation you want, then use Paste Special + Validation. Once the dialog appears, type «n» to select validation, or click validation with the mouse.
Note: you can use the keyboard shortcut Control + Alt + V to invoke Paste Special without the mouse.
Clear all data validation
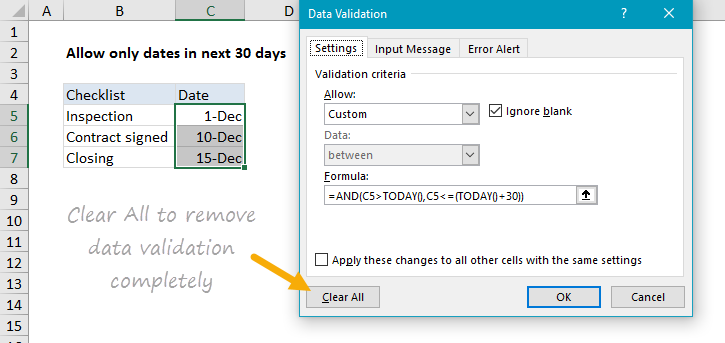
To clear all data validation from a range of cells, make the selection, then click the Data Validation button on the Data tab of the ribbon. Then click the «Clear All» button:
To clear all data validation from a worksheet, select the entire worksheet, then, follow the same steps above.
Skip to content
Мы рассмотрим, как выполнять проверку данных в Excel: создавать правила проверки для чисел, дат или текстовых значений, создавать списки проверки данных, копировать проверку данных в другие ячейки, находить недопустимые записи, исправлять и удалять проверку данных.
При настройке рабочей книги для пользователей часто может потребоваться контролировать ввод информации в определенные ячейки, чтобы убедиться, что все введенные данные точны и непротиворечивы. Кроме того, вы можете захотеть разрешить в ячейке только определенный тип данных, например числа или даты, или ограничить числа определенным диапазоном, а текст — заданной длиной. Возможно, вы даже захотите предоставить заранее определенный список допустимых значений, чтобы исключить возможные ошибки. Проверка данных Excel позволяет выполнять все эти действия во всех версиях Microsoft Excel 365, 2019, 2016, 20013, 2010 и более ранних версиях.
Что такое проверка данных в Excel?
Проверка данных Excel — это функция, которая ограничивает (проверяет) пользовательский ввод на рабочем листе. Технически вы создаете правило проверки, которое контролирует, какие данные можно вводить в определенную ячейку.
Вот лишь несколько примеров того, что может сделать проверка данных в Excel:
- Разрешить только числовые или текстовые значения в ячейке.
- Разрешить только числа в указанном диапазоне.
- Разрешить ввод данных определенной длины.
- Ограничить даты и время вне заданного диапазона.
- Ограничить записи выбором из раскрывающегося списка.
- Проверка вводимого на основе другой ячейки.
- Показать входное сообщение, когда пользователь выбирает ячейку.
- Показывать предупреждающее сообщение при вводе неверных данных.
- Найти неправильные записи в проверенных ячейках.
Например, вы можете настроить правило, которое ограничивает ввод данных 3-значными числами от 100 до 999. Если пользователь вводит что-то другое, Excel покажет предупреждение об ошибке, объясняющее, что было сделано неправильно:
Как сделать проверку данных в Excel
Чтобы добавить проверку данных в Excel, выполните следующие действия.
1. Откройте диалоговое окно «Проверка данных».
Напомним, где находится кнопка проверки данных в Excel. Выбрав одну или несколько ячеек для проверки, перейдите на вкладку «Данные» > группа «Работа с данными» и нажмите кнопку «Проверка данных».
2. Создайте правило проверки Excel.
На вкладке «Параметры» определите критерии проверки в соответствии с вашими потребностями. В критериях вы можете указать любое из следующего:
- Значения — введите числа в поля критериев, как показано на снимке экрана ниже.
- Ссылки на ячейки — создание правила на основе значения или формулы в другой ячейке.
- Формулы — позволяют выразить более сложные условия.
В качестве примера создадим правило, разрешающее пользователям вводить только целое число от 100 до 999:
Настроив правило проверки, нажмите кнопку «ОК», чтобы закрыть окно «Проверка вводимых значений», или переключитесь на другую вкладку, чтобы добавить подсказку по вводу и/или сообщение об ошибке.
3. Подсказка по вводу (необязательно).
Если вы хотите отобразить сообщение, объясняющее пользователю, какие данные разрешены в данной ячейке, откройте соответствующую вкладку и выполните следующие действия:
- Убедитесь, что установлен флажок Отображать подсказку при выборе ячейки.
- Введите заголовок и текст сообщения в соответствующие поля.
- Нажмите OK, чтобы закрыть диалоговое окно.
Как только пользователь выберет проверяемую ячейку, появится следующее сообщение, как на скриншоте ниже:
4. Отображение предупреждения об ошибке (необязательно)
В дополнение к входному сообщению вы можете отобразить одно из следующих предупреждений, когда в ячейку введены недопустимые данные.
| Тип оповещения | Описание |
|---|---|
| Стоп (по умолчанию) |  Самый строгий тип предупреждений, запрещающий пользователям вводить неверные данные. Вы нажимаете «Повторить», чтобы ввести другое значение, или «Отмена», чтобы удалить запись. |
| Предупреждение |  Предупреждает пользователей о том, что данные недействительны, но не препятствует их вводу. Вы нажимаете «Да», чтобы ввести недопустимое значение, «Нет», чтобы изменить его, или «Отмена», чтобы удалить запись. |
| Информация |  Наименее строгий тип оповещения, который информирует пользователей только о неверном вводе данных. Нажмите «ОК», чтобы ввести недопустимое значение, или «Отмена», чтобы удалить его из ячейки. |
Чтобы настроить пользовательское сообщение об ошибке, перейдите на вкладку «Сообщение об ошибке» и задайте следующие параметры:
- Установите флажок Выводить сообщение об ошибке (обычно установлен по умолчанию).
- В поле Вид выберите нужный тип оповещения.
- Введите заголовок и текст сообщения об ошибке в соответствующие поля.
- Нажмите ОК.
И теперь, если пользователь введет недопустимые значения, Excel отобразит специальное предупреждение с объяснением ошибки (как показано в начале этого руководства).
Примечание. Если вы не введете собственное сообщение, появится стандартное предупреждение Stop со следующим текстом: Это значение не соответствует ограничениям проверки данных, установленным для этой ячейки.
Как настроить ограничения проверки данных Excel
При добавлении правила проверки данных в Excel вы можете выбрать один из предопределенных параметров или указать новые критерии на основе собственной формулы. Ниже мы обсудим каждую из встроенных опций.
Как вы уже знаете, критерии проверки определяются на вкладке «Параметры» диалогового окна «Проверка данных» (вкладка «Данные» > «Проверка данных»).
В первую очередь нужно настроить проверку типа записываемых данных.
К примеру, чтобы ограничить ввод данных целым или десятичным числом, выберите соответствующий элемент в поле Тип данных. Затем выберите один из следующих критериев в поле Данные:
- Равно или не равно указанному числу
- Больше или меньше указанного числа
- Между двумя числами или вне, чтобы исключить этот диапазон чисел
Например, вот как выглядят ограничения по проверке данных Excel, которые допускают любое целое число больше 100:
Проверка даты и времени в Excel
Чтобы проверить даты, выберите «Дата» в поле «Тип данных», а затем выберите соответствующий критерий в поле «Значение». Существует довольно много предопределенных параметров на выбор: разрешить только даты между двумя датами, равные, большие или меньшие определенной даты и т. д.
Точно так же, чтобы проверить время, выберите Время в поле Значение, а затем определите необходимые критерии.
Например, чтобы разрешить только даты между датой начала в B1 и датой окончания в B2, примените это правило проверки даты Excel:
Разрешить только будни или выходные
Чтобы разрешить пользователю вводить даты только будних или выходных дней, настройте пользовательское правило проверки на основе функции ДЕНЬНЕД (WEEKDAY).
Если для второго аргумента установлено значение 2, функция возвращает целое число в диапазоне от 1 (понедельник) до 7 (воскресенье). Так, для будних дней (пн-пт) результат формулы должен быть меньше 6, а для выходных (сб и вс) — больше 5.
Таким образом, разрешить только рабочие дни:
=ДЕНЬНЕД( ячейка ; 2)<6
Разрешить только выходные :
=ДЕНЬНЕД( ячейка ; 2)>5
Например, чтобы разрешить ввод только рабочих дней в ячейки C2:C8, используйте следующую формулу:
=ДЕНЬНЕД(A2;2)<6
Проверить даты на основе сегодняшней даты
Во многих случаях может потребоваться использовать сегодняшнюю дату в качестве начальной даты допустимого диапазона дат. Чтобы получить текущую дату, используйте функцию СЕГОДНЯ , а затем добавьте к ней нужное количество дней, чтобы вычислить дату окончания временного периода.
Например, чтобы ограничить ввод данных через 6 дней (7 дней, включая сегодняшний день), мы можем использовать встроенное правило даты с критериями в виде формул:
- Выберите Дата в поле Тип данных
- Выберите в поле Значение – между
- В поле Начальная дата введите выражение =СЕГОДНЯ()
- В поле Конечная дата введите =СЕГОДНЯ() + 6
Аналогичным образом вы можете ограничить пользователей вводом дат до или после сегодняшней даты. Для этого выберите меньше или больше, чем в поле Значение, а затем введите =СЕГОДНЯ() в поле Начальная дата или Конечная дата соответственно.
Проверка времени на основе текущего времени
Чтобы проверить вводимые данные на основе текущего времени, используйте предопределенное правило времени с собственной формулой проверки данных. Для этого сделайте следующее:
В поле Тип данных выберите Время .
В поле Значение выберите «меньше», чтобы разрешить только время до текущего времени, или «больше», чтобы разрешить время после текущего времени.
В поле Время окончания или Время начала (в зависимости от того, какие критерии вы выбрали на предыдущем шаге) введите одну из следующих формул:
Чтобы проверить дату и время на основе текущей даты и времени:
=ТДАТА()
Чтобы проверить время на основе текущего времени, используйте выражение:
=ВРЕМЯ(ЧАС(ТДАТА());МИНУТЫ(ТДАТА());СЕКУНДЫ(ТДАТА()))
Проверка длины текста
Чтобы разрешить ввод данных определенной длины, выберите Длина текста в поле Тип данных и укажите критерии проверки в соответствии с вашей бизнес-логикой.
Например, чтобы ограничить ввод до 15 символов, создайте такое правило:
Примечание. Параметр «Длина текста» ограничивает количество символов, но не тип данных. Это означает, что приведенное выше правило разрешает как текст, так и числа до 15 символов или 15 цифр соответственно.
Список проверки данных Excel (раскрывающийся список)
Чтобы добавить для проверки вводимых данных раскрывающийся список элементов в ячейку или группу ячеек, выберите целевые ячейки и выполните следующие действия:
- Откройте диалоговое окно «Проверка данных» (вкладка «Данные» > «Проверка данных»).
- На вкладке «Настройки» выберите «Список» в поле «Тип данных».
- В поле Источник введите элементы списка проверки Excel, разделенные точкой с запятой. Например, чтобы ограничить пользовательский ввод тремя вариантами, введите Да; Нет; Н/Д.
- Убедитесь, что выбрана опция Список допустимых значений, чтобы стрелка раскрывающегося списка отображалась рядом с ячейкой.
- Нажмите ОК.
Выпадающий список проверки данных Excel будет выглядеть примерно так:
Примечание. Будьте осторожны с опцией «Игнорировать пустые ячейки», которая активна по умолчанию. Если вы создаете раскрывающийся список на основе именованного диапазона, в котором есть хотя бы одна пустая ячейка, установка этого флажка позволит ввести любое значение в проверенную ячейку. Во многих случаях это справедливо и для формул проверки данных: если ячейка, указанная в формуле, пуста, любое значение будет разрешено в проверяемой ячейке.
Другие способы создания списка проверки данных в Excel
Предоставление списков, разделенных точкой с запятой, непосредственно в поле «Источник» — это самый быстрый способ, который хорошо работает для небольших раскрывающихся списков, которые вряд ли когда-либо изменятся. В других сценариях можно действовать одним из следующих способов:
- Создать список проверки данных из диапазона ячеек.
- Создать динамический список проверки данных на основе именованного диапазона.
- Получить список проверки данных Excel из умной таблицы. Лучше всего то, что раскрывающийся список на основе таблицы является динамическим по своей природе и автоматически обновляется при добавлении или удалении элементов из этой таблицы.
Во всех этих случаях вы просто записываете соответствующую ссылку на диапазон либо элемент таблицы в поле Источник.
Разрешить только числа
В дополнение к встроенным правилам проверки данных Excel, обсуждаемым в этом руководстве, вы можете создавать собственные правила с собственными формулами проверки данных.
Удивительно, но ни одно из встроенных правил проверки данных Excel не подходит для очень типичной ситуации, когда вам нужно ограничить пользователей вводом только чисел в определенные ячейки. Но это можно легко сделать с помощью пользовательской формулы проверки данных, основанной на функции ЕЧИСЛО(), например:
=ЕЧИСЛО(C2)
Где C2 — самая верхняя ячейка диапазона, который вы хотите проверить.
Примечание. Функция ЕЧИСЛО допускает любые числовые значения в проверенных ячейках, включая целые числа, десятичные дроби, дроби, а также даты и время, которые также являются числами в Excel.
Разрешить только текст
Если вы ищете обратное — разрешить только текстовые записи в заданном диапазоне ячеек, то создайте собственное правило с функцией ЕТЕКСТ (ISTEXT), например:
=ЕТЕКСТ(B2)
Где B2 — самая верхняя ячейка выбранного диапазона.
Разрешить текст, начинающийся с определенных символов
Если все значения в определенном диапазоне должны начинаться с определенного символа или подстроки, выполните проверку данных Excel на основе функции СЧЁТЕСЛИ с подстановочным знаком:
=СЧЁТЕСЛИ(A2; » текст *»)
Например, чтобы убедиться, что все идентификаторы заказов в столбце A начинаются с префикса «AРТ-», «арт-», «Aрт-» или «aРт-» (без учета регистра), определите пользовательское правило с этой проверкой данных.
=СЧЁТЕСЛИ(A2;»АРТ-*»)
Формула проверки с логикой ИЛИ (несколько критериев)
В случае, если есть 2 или более допустимых префикса, добавьте несколько функций СЧЁТЕСЛИ, чтобы ваше правило проверки данных Excel работало с логикой ИЛИ:
=СЧЁТЕСЛИ(A2;»АРТ-*»)+СЧЁТЕСЛИ(A2;»АБВ-*»)
Проверка ввода с учетом регистра
Если регистр символов имеет значение, используйте СОВПАД (EXACT) в сочетании с функцией ЛЕВСИМВ, чтобы создать формулу проверки с учетом регистра для записей, начинающихся с определенного текста:
=СОВПАД(ЛЕВСИМВ(ячейка; число_символов); текст)
Например, чтобы разрешить только те коды заказов, которые начинаются с «AРТ-» (ни «арт-», ни «Арт-» не допускаются), используйте эту формулу:
=СОВПАД(ЛЕВСИМВ(A2;4);»АРТ-«)
В приведенной выше формуле функция ЛЕВСИМВ извлекает первые 4 символа из ячейки A2, а СОВПАД выполняет сравнение с учетом регистра с жестко заданной подстрокой (в данном примере «AРТ-«). Если две подстроки точно совпадают, формула возвращает ИСТИНА и проверка проходит успешно; в противном случае возвращается ЛОЖЬ и проверка завершается неудачно.
Разрешить только значения, содержащие определенный текст
Чтобы разрешить ввод значений, которые содержат определенный текст в любом месте ячейки (в начале, середине или конце), используйте функцию ЕЧИСЛО (ISNUMBER) в сочетании с НАЙТИ (FIND) или ПОИСК (SEARCH) в зависимости от того, хотите ли вы совпадение с учетом регистра или без учета регистра:
Проверка без учета регистра:
ЕЧИСЛО(ПОИСК( текст ; ячейка ))
Проверка с учетом регистра:
ЕЧИСЛО(НАЙТИ( текст ; ячейка ))
В нашем примере, чтобы разрешить только записи, содержащие текст «AР» в ячейках A2: A8, используйте одну из следующих формул, создав правило проверки в ячейке A2:
Без учета регистра:
=ЕЧИСЛО(ПОИСК(«ар»;A2))
С учетом регистра:
=ЕЧИСЛО(НАЙТИ(«АР»;A2))
Формулы работают по следующей логике:
Вы ищете подстроку «AР» в ячейке A2, используя НАЙТИ или ПОИСК, и оба возвращают позицию первого символа в подстроке. Если текст не найден, возвращается ошибка. Если поиск успешен и «АР» найден в ячейке, мы получаем номер позиции в тексте, где эта подстрока была найдена. Далее функция ЕЧИСЛО возвращает ИСТИНА, и проверка данных проходит успешно. В случае, если подстроку не удалось найти, результатом будет ошибка и ЕЧИСЛО возвращает ЛОЖЬ. Запись не будет разрешена в ячейке.
Разрешить только уникальные записи и запретить дубликаты
В ситуациях, когда определенный столбец или диапазон ячеек не должны содержать дубликатов, настройте пользовательское правило проверки данных, разрешающее только уникальные записи. Для этого мы можем использовать классическую формулу СЧЁТЕСЛИ для выявления дубликатов :
=СЧЁТЕСЛИ( диапазон ; самая верхняя_ячейка )<=1
Например, чтобы убедиться, что в ячейки с A2 по A8 вводятся только уникальные идентификаторы заказов, создайте настраиваемое правило со следующей формулой проверки данных:
=СЧЁТЕСЛИ($A$2:$A$8; A2)<=1
При вводе уникального значения формула возвращает ИСТИНА, и проверка проходит успешно. Если такое же значение уже существует в указанном диапазоне (счетчик больше 1), функция СЧЁТЕСЛИ возвращает ЛОЖЬ, и вводимые данные не проходят проверку.
Обратите внимание, что мы фиксируем диапазон абсолютными ссылками на ячейки (A$2:$A$8) и используем относительную ссылку для верхней ячейки (A2), чтобы формула корректно изменялась для каждой ячейки в проверяемом диапазоне.
Как отредактировать проверку данных в Excel
Чтобы изменить правило проверки Excel, выполните следующие действия:
- Выберите любую из проверенных ячеек.
- Откройте диалоговое окно «Проверка данных» (вкладка «Данные» > «Проверка данных»).
- Внесите необходимые изменения.
- Установите флажок Применить эти изменения ко всем другим ячейкам с теми же параметрами, чтобы скопировать внесенные вами изменения во все остальные ячейки с исходными критериями проверки.
- Нажмите OK, чтобы сохранить изменения.
Например, вы можете отредактировать список проверки данных Excel, добавив или удалив элементы из поля «Источник», и применить эти изменения ко всем другим ячейкам, содержащим тот же раскрывающийся список.
Как скопировать правило проверки данных Excel в другие ячейки
Если вы настроили проверку данных для одной ячейки и хотите проверить другие ячейки с теми же критериями, вам не нужно заново создавать правило с нуля.
Чтобы скопировать правило проверки в Excel, выполните следующие 4 быстрых шага:
- Выберите ячейку, к которой применяется правило проверки, и нажмите Ctrl + С , чтобы скопировать его.
- Выберите другие ячейки, которые вы хотите проверить. Чтобы выделить несмежные ячейки, нажмите и удерживайте клавишу Ctrl при выборе ячеек.
- Щелкните выделенный фрагмент правой кнопкой мыши, выберите «Специальная вставка» и выберите параметр «Условия на значения».
Либо используйте комбинацию клавиш Ctrl + Alt + V, и затем — Н.
- Нажмите ОК.
Подсказка. Вместо того, чтобы копировать проверку данных в другие ячейки, вы можете преобразовать свой набор данных в таблицу Excel. По мере добавления строк в таблицу Excel будет автоматически применять правило проверки к новым строкам.
Как найти ячейки с проверкой данных в Excel
Чтобы быстро найти все проверенные ячейки на текущем листе, перейдите на вкладку «Главная» > группа «Редактирование» и нажмите «Найти и выделить» > «Проверка данных» :
Это выберет все ячейки, к которым применены какие-либо правила проверки данных. Если необходимо, из этих выбранных ячеек вы можете удалить проверку.
Как убрать проверку данных в Excel
В целом, есть два способа удалить проверку в Excel: стандартный подход, разработанный Microsoft, и метод без мыши, разработанный фанатами Excel, которые никогда не отрывают руки от клавиатуры без крайней необходимости (например, чтобы выпить чашку кофе:)
Способ 1: Обычный способ отключить проверку данных
Обычно, чтобы удалить проверку данных на листах Excel, выполните следующие действия:
- Выберите ячейку (ячейки) с проверкой данных.
- На вкладке «Данные» нажмите кнопку «Проверка данных».
- На вкладке «Настройки» нажмите кнопку «Очистить все», а затем нажмите «ОК».
Советы:
- Чтобы удалить проверку данных из всех ячеек на текущем листе, используйте инструмент «Найти и выделить», чтобы выбрать все ячейки с проверкой.
- Чтобы удалить определенное правило проверки данных, выберите любую ячейку с этим правилом, откройте диалоговое окно «Проверка данных», установите флажок «Применить эти изменения ко всем другим ячейкам с такими же настройками» и нажмите кнопку «Очистить все».
Как видите, стандартный метод работает довольно быстро, но требует нескольких щелчков мышью, что, на мой взгляд, не имеет большого значения. Но если вы предпочитаете работать с клавиатурой, а не с мышью, вам может понравиться следующий подход.
Способ 2: Удалить правила проверки данных при помощи Специальной вставки
Изначально специальная вставка Excel предназначена для вставки определенных элементов скопированных ячеек. На самом деле она может делать гораздо больше полезных вещей. Среди прочего, он может быстро удалить правила проверки данных на листе. Вот как:
- Выберите пустую ячейку без проверки данных и нажмите
Ctrl + С, чтобы скопировать ее в буфер обмена. - Выберите ячейки, в которых вы хотите отключить проверку данных.
- Нажмите
Ctrl + Alt + V, и затемН. Эта комбинация клавиш вызовет «Специальная вставка» > «Проверка данных». - Нажимаем ОК.
Советы по проверке данных в Excel
Теперь, когда вы знакомы с основами проверки данных в Excel, позвольте мне поделиться несколькими советами, которые могут сделать ваши правила намного более эффективными.
Проверка данных на основе другой ячейки
Вместо того, чтобы вводить значения непосредственно в поля критериев, вы можете ввести их в некоторые ячейки, а затем ссылаться на эти ячейки. Если вы решите позже изменить условия проверки, вы просто запишете новые значения на рабочем листе, не редактируя правило. Это сэкономит много времени.
Чтобы ввести ссылку на ячейку, либо введите ее в поле, перед которым стоит знак равенства, либо щелкните стрелку рядом с полем, а затем выберите ячейку с помощью мыши. Вы также можете щелкнуть в любом месте поля, а затем выбрать ячейку на листе.
Например, чтобы разрешить любое целое число, находящееся между 100 и 999, выберите критерии «минимум» и «максимум» в вкладке «Параметры» и введите в них адреса ячеек с этими числами:
Рис18
Вы также можете ввести формулу в ячейку, на которую указывает ссылка, и Excel проверит ввод на основе этой формулы.
Например, чтобы запретить пользователям вводить даты после сегодняшней даты, введите формулу =СЕГОДНЯ() в какую-нибудь ячейку, скажем, B1, а затем настройте правило проверки даты на основе этой ячейки:
Или вы можете ввести формулу =СЕГОДНЯ() непосредственно в поле Конечная дата, что будет иметь тот же эффект.
Правила проверки на основе формул
В ситуациях, когда невозможно определить желаемые критерии проверки на основе значения или ссылки на ячейку, вы можете выразить это с помощью формулы.
Например, чтобы ограничить ввод минимальным и максимальным значениями в существующем списке чисел, скажем, A1:A10, используйте следующие формулы:
=МИН($С$2:$С$10)
=МАКС($С$2:$С$10)
Обратите внимание, что мы фиксируем диапазон с помощью знака $ (абсолютная ссылка на ячейки), чтобы наше правило проверки Excel работало правильно для всех выбранных ячеек.
Как найти неверные данные на листе
Хотя Microsoft Excel позволяет применять проверку данных к ячейкам, в которых уже есть данные, он не уведомит вас, если некоторые из уже существующих значений не соответствуют критериям проверки.
Чтобы найти недействительные данные, которые попали в ваши рабочие листы до того, как вы добавили проверку данных, перейдите на вкладку «Данные» и нажмите «Проверка данных» > «Обвести неверные данные».
Это выделит все ячейки, которые не соответствуют критериям проверки.
Как только вы исправите неверную запись, отметка автоматически исчезнет. Чтобы удалить все отметки, перейдите на вкладку «Данные» и нажмите «Проверка данных» > «Удалить обводку неверных данных».
Как поделиться книгой с проверкой данных
Чтобы разрешить нескольким пользователям совместную работу над книгой, обязательно предоставьте к ней общий доступ после проверки данных.
После совместного использования книги ваши правила проверки данных продолжат работать, но вы не сможете ни изменить их, ни добавить новые правила.
Почему проверка данных Excel не работает?
Если проверка данных не работает должным образом на ваших листах, это, скорее всего, происходит по одной из следующих причин.
Проверка данных не работает для скопированных данных
Проверка данных в Excel предназначена для запрета ввода недопустимых данных непосредственно в ячейку, но не может помешать пользователям копировать недопустимые данные.
Хотя нет способа отключить клавиши копирования/вставки (кроме использования VBA), вы можете, по крайней мере, предотвратить копирование данных путем перетаскивания ячеек. Для этого выберите «Файл» > «Параметры» > «Дополнительно» > «Параметры редактирования» и снимите флажок «Включить маркер заполнения и перетаскивания ячеек».
Проверка данных Excel не активна
Кнопка «Проверка данных» не активна (выделена серым цветом), если вы вводите или изменяете данные в ячейке. Закончив редактирование ячейки, нажмите Enter или Esc, чтобы выйти из режима редактирования, а затем выполните проверку данных.
Проверка данных не может быть применена к защищенной или общей книге
Хотя существующие правила проверки продолжают работать в защищенных и общих книгах, невозможно изменить параметры проверки данных или настроить новые правила. Для этого сначала отмените общий доступ и/или снимите защиту с книги.
Неправильные формулы проверки данных
При проверке данных на основе формул в Excel необходимо проверить три важные вещи:
- Формула проверки не возвращает ошибок.
- Формула не ссылается на пустые ячейки.
- Используются правильные ссылки на ячейки.
Ручной пересчет формул включен
Если в Excel включен режим ручного расчета, невычисленные формулы могут помешать правильной проверке данных. Чтобы снова изменить параметр расчета Excel на автоматический, перейдите на вкладку «Формулы» > группу «Расчет», нажмите кнопку «Параметры расчета» и выберите «Автоматически».
Проверьте правильность формулы проверки данных
Для начала скопируйте формулу проверки в какую-нибудь ячейку, чтобы убедиться, что она не возвращает ошибку, такую как #Н/Д, #ЗНАЧ или #ДЕЛ/0!.
Если вы создаете пользовательское правило , формула должна возвращать логические значения ИСТИНА и ЛОЖЬ или приравненные к ним значения 1 и 0 соответственно.
Если вы используете критерий на основе формулы во встроенном правиле (как мы делали для проверки времени на основе текущего времени), он также может возвращать неправильное числовое значение.
Формула проверки данных не должна ссылаться на пустую ячейку
Если вы активируете опцию «Игнорировать пустые ячейки» при определении правила (обычно выбрано по умолчанию), то следите, чтобы ваши формулы или условия не ссылались на пустую ячейку.
В случае, когда одна или несколько ячеек, на которые есть ссылки в вашей формуле, пусты, то в проверяемой ячейке будет разрешено любое значение.
Абсолютные и относительные ссылки на ячейки в формулах проверки
При настройке правила проверки Excel на основе формулы помните, что все ссылки на ячейки в вашей формуле относятся к верхней левой ячейке в выбранном диапазоне.
Если вы создаете правило для нескольких ячеек и ваши критерии проверки содержат адреса конкретных ячеек , обязательно зафиксируйте ячейку в формуле при помощи абсолютной ссылки (со знаком $, например, $A$1), иначе ваше правило будет правильно работать только для первой ячейки.
Чтобы лучше проиллюстрировать это, рассмотрим следующий пример.
Предположим, вы хотите ограничить ввод данных в ячейках с A2 по A8 целыми числами от 100 (минимальное значение) до 999. Чтобы проще было при необходимости изменить критерии проверки, используем ссылки на ячейки с этими значениями, как показано на скриншоте ниже:
Это правило будет корректно выполняться только для первой ячейки диапазона – A2. Для ячейки A3 критерии максимума и минимума изменятся на E3 и F3. Поскольку эти ячейки пусты, то условие ввода теперь – любое число больше либо меньше нуля. Правда, символьные значения и дробные числа вы вводить не сможете, так как продолжает действовать ограничение на тип данных – целые числа.
Чтобы исправить формулу, просто введите «$» перед ссылками на столбцы и строки, чтобы зафиксировать их: =$E$2 и $F$2. Или используйте клавишу F4 для переключения между различными типами ссылок.
Вот как вы можете добавить и использовать проверку данных в Excel. Я благодарю вас за чтение и надеюсь ещё увидеть вас в нашем блоге!
The data validation in excel helps control the kind of input entered by a user in the worksheet. In other words, the input typed in a specific cell must comply with the criteria set for that cell. Data validation also allows providing instructions to the user about the input to be typed. The cell to which the data validation rule is applied is called a validated cell.
For example, the following data validation rules can be created in certain cells of Excel:
- A whole number between 1 (minimum) and 20 (maximum) is allowed.
- A date is allowed to be entered which is greater than September 15, 2000 (start date) or lesser than September 15, 2020 (end date).
- A text entry is allowed which matches any of the values (“yes,” “no,” and “cannot say”) of a drop-down list.
The pointers “a,” “b,” and “c” are the validating criteria defined for certain cells. If the input in these cells does not correspond to the respective pointer (a, b, or c), an error alert message is displayed by Excel.
Apart from setting the criteria, data validation in excel also allows to create a pre-defined range of inputs (drop-down list). In such cases, the user is asked to select the appropriate option (input) from this range. This ensures that all the data entries follow the same format.
Since the entries of all users are standardized, data validation brings about consistency and reduces errors. The “data validation” option is available in the “data tools” group of the Data tab of Excel.
Table of contents
- What is Data Validation in Excel?
- How to Use Data Validation in Excel?
- Example #1–“Data Validation” Window Explained
- Example #2–Decimal Number Validation
- Data Formats in Data validation
- The Different Validation Criteria
- The Different Error Alert Styles
- Purpose of Data Validation in Excel
- The Limitations of Data Validation in Excel
- Frequently Asked Questions
- Recommended Articles
- How to Use Data Validation in Excel?
How to Use Data Validation in Excel?
Let us consider some examples to understand the working of the data validation feature of Excel.
You can download this Data Validation Excel Template here – Data Validation Excel Template
Example #1–“Data Validation” Window Explained
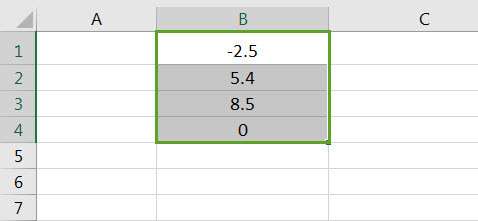
The following image shows a list of numbers in column B. We want to perform the following tasks:
- Show how to create a data validation rule on the range B1:B4.
- Explain the tabs of the “data validation” window.
The steps explaining the creation of a data validation rule in Excel are listed as follows:
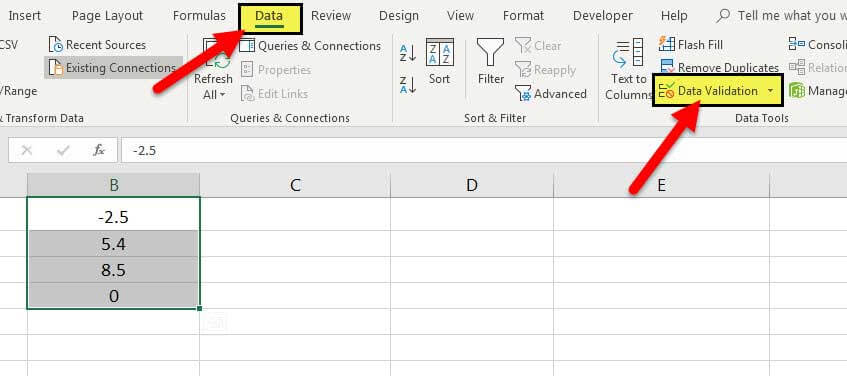
- Select the cells on which the data validation rule has to be created. So, select the range B1:B4.
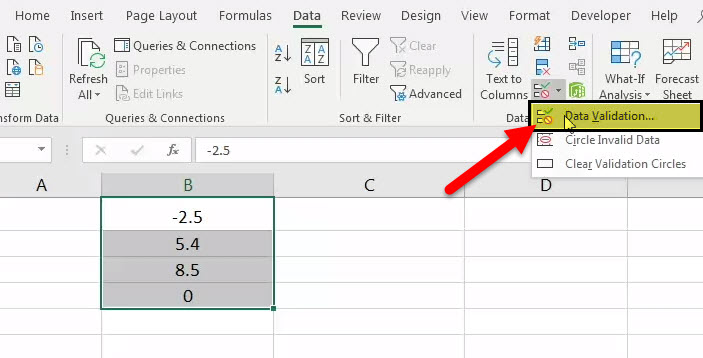
- Click the data validation drop-down (in the “data tools” group) from the Data tab of Excel. The same is shown in the following image.
- Select “data validation” from the drop-down list.
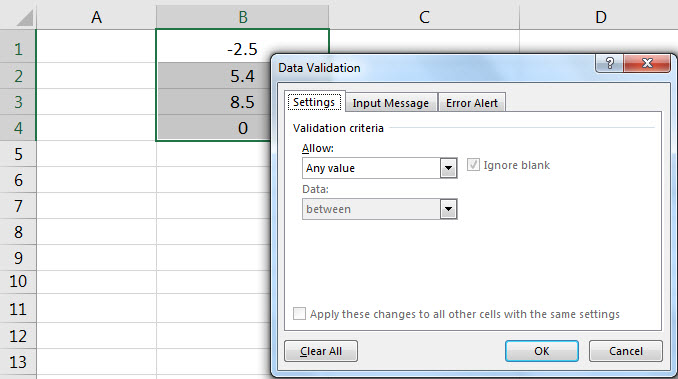
- The “data validation” window appears, as shown in the following image.
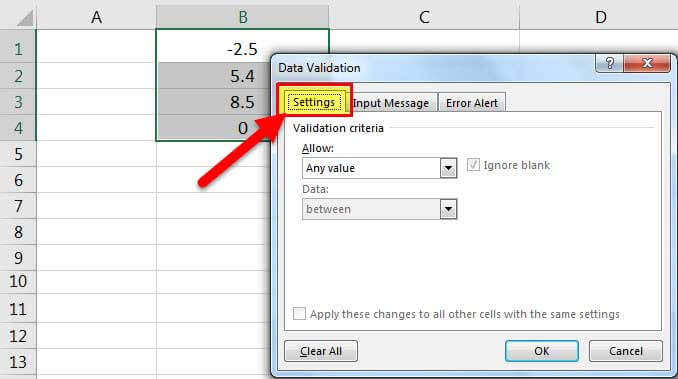
- The first tab is “settings,” which contains the validation criteria. The same is shown in the succeeding image.
From the drop-down list under “allow,” one can select the data format allowed to the users. The drop-down list under “data” is used for defining the criteria.
For instance, if the input should be entered as a whole number, select the same from the drop-down list under “allow.” Once “whole number” is selected, one can choose the minimum and the maximum range between which this number is allowed to be entered.
Likewise, the desired validation criteria can be defined for the user.
Note: Refer to the topics “The Different Data Formats” and “The Different Validation Criteria” of this article for more information on adding validation criteria.
- The checkbox “ignore blank” is selected by default. This selection tells Excel to ignore the blank values.
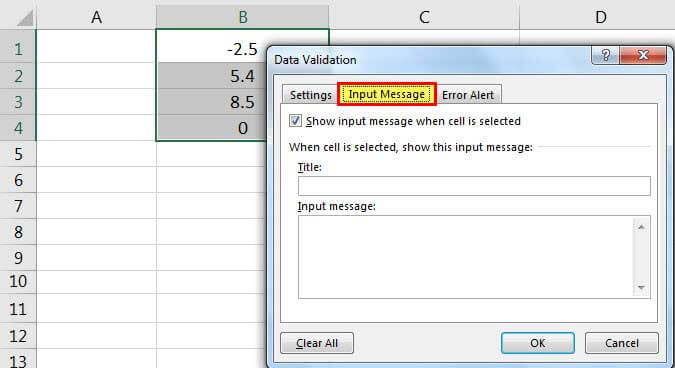
- The second tab is “input message,” as shown in the succeeding image. One can enter the “title” and the “input message,” which are displayed when a validated cell is selected.
Note: An “input message” tells the user about the kind of input allowed in a validated cell. However, it is optional to add an input message. But, if one does add an input message, ensure that the checkbox of “show input message when cell is selected” is checked.
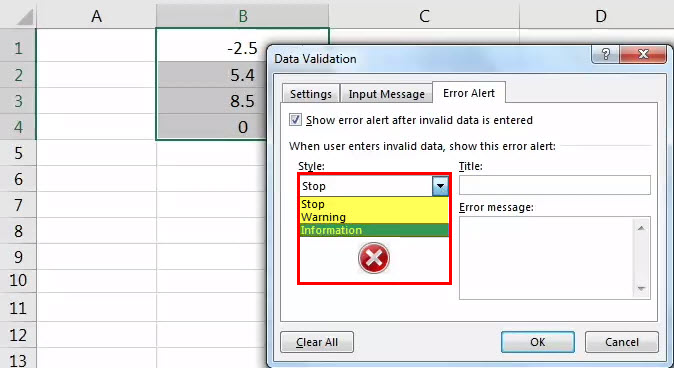
- The third tab is “error alert.” In this tab, one can enter the “title” and the “error message” that are displayed on typing invalid data in the validated cell.
From the “style” drop-down, one can select any of the three options, “stop,” “warning” or “information.” These are shown in the succeeding image.
Note 1: An “error message” is a customized message which tells the user that he/she has made an error while typing data in the validated cell. However, it is optional to add an error message. If an error message is added, ensure that the checkbox of “show error alert after invalid data is entered” is checked.
Note 2: In case an error message is not added, Excel displays the default error message, which states that restrictions have been defined for the validated cell.
Note 3: For more information on the error alert styles, refer to the topic “The Different Error Alert Styles” of this article.
- Once the entries in the three tabs, “settings,” “input message,” and “error alert” have been defined, click “Ok” in the “data validation” window.
The data validation excel rule is applied to the selected range B1:B4. Likewise, one can create a data validation rule by selecting either a single cell or a range of cells in Excel.
Note: For creating a data validation rule, it is mandatory to enter the validation criteria in the “settings” tab (step 5). However, it is optional to define the tabs “input message” (step 7) and “error alert” (step 8).
Example #2–Decimal Number Validation
Working on the data of example #1, we want to perform the following tasks:
- Create a data validation excel rule on cell B1. In this cell, a decimal number greater than or equal to zero is allowed to be entered.
- Define an input message which appears on selecting cell B1. The title should be “negative number detected” and the message should be “enter number greater than zero.”
The steps for performing the stated tasks are listed as follows:
Step 1: Select cell B1 which contains -2.5. From the Data tab of Excel, click the “data validation” drop-down. Select “data validation.”
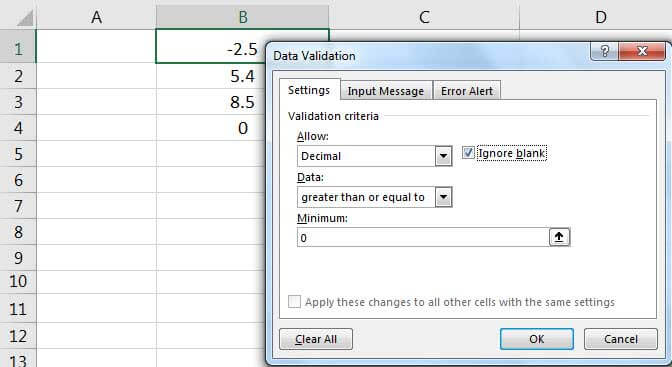
Step 2: The “data validation” window appears, as shown in the following image. In the “settings” tab, select “decimal” under the “allow” drop-down.
Under the “data” drop-down, select “greater than or equal to.” In the box under “minimum,” enter “0” (without the double quotation marks).
Step 3: In the “input message” tab, select the checkbox of “show input message when cell is selected.”
In the box under “title,” type “negative number detected” without the double quotation marks. In the box “input message,” type “enter number greater than zero.” This should also be written without the double quotation marks. Click “Ok.”
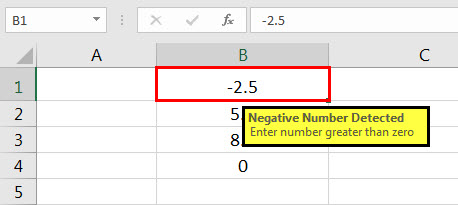
The data validation rule is created on cell B1. To cross-check it, select the validated cell B1. The defined input message appears, as shown in the following image.
The number -2.5 was already there in cell B1 before the creation of the validation rule. This number is not deleted (from cell B1) even after creating a data validation rule.
However, in future, if a number is entered in cell B1, it must conform to the newly created rule. This implies that a decimal number greater than or equal to zero can be entered in cell B1. So, negative numbers are restricted in this cell. In case this rule is not complied with, Excel will display the default error alert.
Data Formats in Data validation
While entering data in a validated cell, there are certain formats that are allowed to the user. The rule creator (who is creating the data validation rule) can pick any of these formats based on which a validation rule can be created.
In the “settings” tab of the “data validation” window, the “allow” drop-down shows the following formats:
- Any value: This implies that no validation will be executed. In case a data validation rule is created and then “any value” is selected, the created validation rule is removed. However, the input message of the created validation rule can be viewed even after “any value” has been selected.
- Whole number: This requires that the user should enter a whole number in the validated cell.
- Decimal: This implies that the data format allowed in the validated cell is decimal numbers.
- List: This implies that the format allowed is a drop-down list. So, a drop-down list consisting of pre-defined values needs to be created. This drop-down list can be created in any of the following ways:
- Supply the values directly in the box under “source.”
- Provide the reference to the range (in the “source” box), which consists of the required values.
- Enter the name of the named range (in the “source” box), which begins with an “equal to” (=) sign.
- Date: This implies that the user can enter only a date in the validated cell.
- Time: This implies that a time value should be entered in the validated cell.
- Text Length: This helps fix the number of digits or text entered in a validated cell. For instance, the user can enter either numbers or text up to 5 digits or 5 characters respectively.
- Custom: This allows one to create a formula. This formula is used to validate (restrict) the input entered by the user. For instance, a formula can be entered to ensure that a text entry ends with certain characters, the text should be in uppercase or the entry must only be numeric, etc.
The Different Validation Criteria
Excel presents different criteria for validating data. The rule creator can select any of these criteria. Based on this selection, one can set the limits within which the input is allowed.
In the “settings” tab of the “data validation” dialog box, the drop-down under “data” shows the following validating criteria:
- Between: This implies that the input should be between the minimum and the maximum numbers specified.
- Not between: This implies that the input should not be between the minimum and the maximum numbers specified.
- Equal to: This implies that the input should be equal to the specified value. In other words, the input should be the same as the specified value.
- Not equal to: This implies that the input should not be equal to the specified value. In other words, the input should be different from the specified value.
- Greater than: This implies that the input should be greater than the minimum number specified.
- Less than: This implies that the input should be lesser than the maximum number specified.
- Greater than or equal to: This implies that the input should be greater than or equal to the minimum number specified.
- Less than or equal to: This implies that the input should be lesser than or equal to the maximum number specified.
The Different Error Alert Styles
There are different error alert styles in Excel. The rule creator can select any of these styles to notify the user that an error has been made while typing data in the validated cell.
In the “error alert” tab of the “data validation” window, the drop-down under “style” presents the following options:
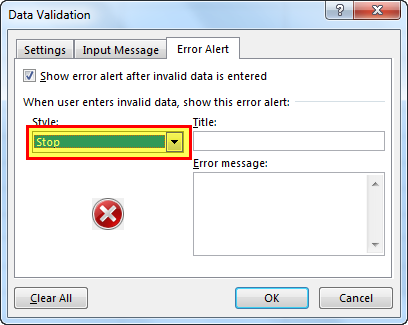
- Stop: This stops the users from entering invalid data in the validated cell. With the “stop” style, the error alert message presents the following main options to the user:
- Retry– Clicking “retry” allows typing a new input.
- Cancel–Clicking “cancel” deletes the invalid input.
The “stop” style is the default error alert style of Excel.
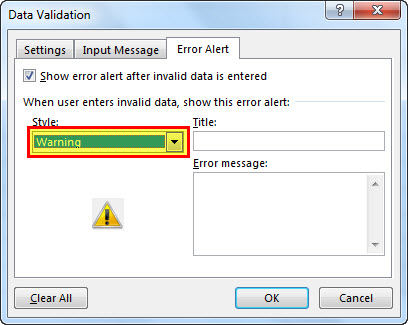
- Warning: This warns the users that an invalid input has been entered. However, it does not stop the user from entering incorrect data. With the “warning” style, the user is presented with the following main options:
- Yes–Clicking “yes” makes Excel accept the invalid input.
- No–Clicking “no” allows typing a new input.
- Cancel–Clicking “cancel” deletes the invalid input.
- Information: This informs the user that the input entered is invalid. Like the “warning” style, this also does not stop the user from entering incorrect data. With the “information” style, the user is presented with the following main options:
- Ok–Clicking “Ok” makes Excel accept the invalid input.
- Cancel–Clicking “cancel” deletes the invalid input.
By selecting a style, its respective icon appears in the error alert message displayed by Excel.
For instance, with the “stop” style, the cross within the red circle is shown (in the error alert message) as the user enters invalid data. Likewise, with the “warning” and “information” styles, the exclamation mark (within a yellow triangle) and the “i” sign (within a blue circle) show up respectively.
Note: Apart from the main options listed (in the preceding pointers 1, 2, and 3), Excel also displays the “help” option in all the error alert messages, irrespective of the style selected.
Purpose of Data Validation in Excel
The objectives of data validation in excel are listed as follows:
- To restrict the users from entering unwanted or incorrect data values in the worksheet
- To sort and study the data obtained with the help of defined criteria
- To suggest the valid data format to the users through customized input messages (displayed when a validated cell is selected)
Excel Data validation is particularly helpful in the following situations:
- When the number of users is large and there is a possibility of entering inputs in different formats
- When the allowed entries need to be defined with a drop-down list
- When an error alert (warning message) needs to be displayed on entering invalid data
The Limitations of Data Validation in Excel
The limitations of data validation in excel are listed as follows:
- Data validation in excel does not prevent a user from copying an incorrect input from a non-validated cell to a validated cell. It can stop one from typing an incorrect input but not from copying the same. Hence, the purpose of data validation can become pointless if a user copies and pastes an invalid input.
- Excel Data validation cannot fully protect a worksheet from invalid data entries. If a user copies an incorrect input from a non-validated cell and pastes it in a validated cell, the validation rule in the latter cell is eliminated. As a result, the validation rule is absent on the copied data.
Frequently Asked Questions
1. Define data validation in Excel.
Data validation restricts (limits) the type of input entered by a user in the worksheet. One can set the criteria for a specific cell and ensure that the input typed (in that cell) complies with it.
For instance, in cell A1, one is allowed to type only a decimal number between 1.5 and 9.5. This is a data validation rule applied to cell A1 of the worksheet.
2. How can a data validation rule be edited in Excel?
Let us say that rule X has been applied to cells A1 and D1. We want to change this to rule Y for both the mentioned cells.
The steps to edit a data validation rule are listed as follows:
a. Select any of the cells to which rule X has been applied.
b. Select “data validation” from the “data validation” drop-down (in the “data tools” group) of the Data tab.
c. In the “settings” tab of the “data validation” window, enter the new criteria as per rule Y.
d. Select the checkbox of “apply these changes to all other cells with the same settings.” This ensures that rule Y is applied to both the cells A1 and D1.
e. Click “Ok.”
The rule Y has been applied to both cells A1 and D1.
Note: The new data validation rule can be applied to all the validated cells only if they all had the same validation criteria initially. In this case, the initial validation criterion (rule X) was the same for both the validated cells (A1 and D1).
3. How can a data validation rule be removed in Excel?
The steps to remove (delete) a data validation rule are listed as follows:
a. Select the validated cell.
b. From the “data validation” drop-down (in the “data tools” group) of the Data tab, select “data validation.”
c. The “data validation” window opens. In the “settings” tab, click “clear all” appearing at the bottom left side.
d. Click “Ok.”
The validation rule will be cleared from the selected cell (selected in step a).
Note: To remove the same validation rule applied to multiple cells, select the checkbox of “apply these changes to all other cells with the same settings.” Thereafter, click “clear all” followed by “Ok.”
Recommended Articles
This has been a guide to data validation in Excel. Here we discuss how to create a data validation rule in Excel along with examples and downloadable Excel templates. You may also look at these useful functions in Excel–
- How to Insert a Checkbox in Excel?A checkbox in excel is a square box used for presenting options (or choices) to the user to choose from.read more
- PERCENTILE Excel FunctionThe PERCENTILE function is responsible for returning the nth percentile from a supplied set of values. read more
- Paste Special ShortcutsPaste special in Excel allows you to paste partial aspects of the data copied. There are several ways to paste special in Excel, including right-clicking on the target cell and selecting paste special, or using a shortcut such as CTRL+ALT+V or ALT+E+S.read more
- Data Table – ExamplesA data table in excel is a type of what-if analysis tool that allows you to compare variables and see how they impact the result and overall data. It can be found under the data tab in the what-if analysis section.read more


 in the Number group on the Home tab.