Import or export text (.txt or .csv) files
There are two ways to import data from a text file with Excel: you can open it in Excel, or you can import it as an external data range. To export data from Excel to a text file, use the Save As command and change the file type from the drop-down menu.
There are two commonly used text file formats:
-
Delimited text files (.txt), in which the TAB character (ASCII character code 009) typically separates each field of text.
-
Comma separated values text files (.csv), in which the comma character (,) typically separates each field of text.
You can change the separator character that is used in both delimited and .csv text files. This may be necessary to make sure that the import or export operation works the way that you want it to.
Note: You can import or export up to 1,048,576 rows and 16,384 columns.
Import a text file by opening it in Excel
You can open a text file that you created in another program as an Excel workbook by using the Open command. Opening a text file in Excel does not change the format of the file — you can see this in the Excel title bar, where the name of the file retains the text file name extension (for example, .txt or .csv).
-
Go to File > Open and browse to the location that contains the text file.
-
Select Text Files in the file type dropdown list in the Open dialog box.
-
Locate and double-click the text file that you want to open.
-
If the file is a text file (.txt), Excel starts the Import Text Wizard. When you are done with the steps, click Finish to complete the import operation. See Text Import Wizard for more information about delimiters and advanced options.
-
If the file is a .csv file, Excel automatically opens the text file and displays the data in a new workbook.
Note: When Excel opens a .csv file, it uses the current default data format settings to interpret how to import each column of data. If you want more flexibility in converting columns to different data formats, you can use the Import Text Wizard. For example, the format of a data column in the .csv file may be MDY, but Excel’s default data format is YMD, or you want to convert a column of numbers that contains leading zeros to text so you can preserve the leading zeros. To force Excel to run the Import Text Wizard, you can change the file name extension from .csv to .txt before you open it, or you can import a text file by connecting to it (for more information, see the following section).
-
Import a text file by connecting to it (Power Query)
You can import data from a text file into an existing worksheet.
-
On the Data tab, in the Get & Transform Data group, click From Text/CSV.
-
In the Import Data dialog box, locate and double-click the text file that you want to import, and click Import.
-
In the preview dialog box, you have several options:
-
Select Load if you want to load the data directly to a new worksheet.
-
Alternatively, select Load to if you want to load the data to a table, PivotTable/PivotChart, an existing/new Excel worksheet, or simply create a connection. You also have the choice of adding your data to the Data Model.
-
Select Transform Data if you want to load the data to Power Query, and edit it before bringing it to Excel.
-
If Excel doesn’t convert a particular column of data to the format that you want, then you can convert the data after you import it. For more information, see Convert numbers stored as text to numbers and Convert dates stored as text to dates.
Export data to a text file by saving it
You can convert an Excel worksheet to a text file by using the Save As command.
-
Go to File > Save As.
-
Click Browse.
-
In the Save As dialog box, under Save as type box, choose the text file format for the worksheet; for example, click Text (Tab delimited) or CSV (Comma delimited).
Note: The different formats support different feature sets. For more information about the feature sets that are supported by the different text file formats, see File formats that are supported in Excel.
-
Browse to the location where you want to save the new text file, and then click Save.
-
A dialog box appears, reminding you that only the current worksheet will be saved to the new file. If you are certain that the current worksheet is the one that you want to save as a text file, click OK. You can save other worksheets as separate text files by repeating this procedure for each worksheet.
You may also see an alert below the ribbon that some features might be lost if you save the workbook in a CSV format.
For more information about saving files in other formats, see Save a workbook in another file format.
Import a text file by connecting to it
You can import data from a text file into an existing worksheet.
-
Click the cell where you want to put the data from the text file.
-
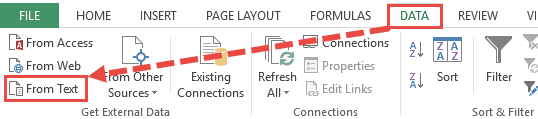
On the Data tab, in the Get External Data group, click From Text.
-
In the Import Data dialog box, locate and double-click the text file that you want to import, and click Import.
Follow the instructions in the Text Import Wizard. Click Help
 on any page of the Text Import Wizard for more information about using the wizard. When you are done with the steps in the wizard, click Finish to complete the import operation.
 -
In the Import Data dialog box, do the following:
-
Under Where do you want to put the data?, do one of the following:
-
To return the data to the location that you selected, click Existing worksheet.
-
To return the data to the upper-left corner of a new worksheet, click New worksheet.
-
-
Optionally, click Properties to set refresh, formatting, and layout options for the imported data.
-
Click OK.
Excel puts the external data range in the location that you specify.
-
 on any page of the Text Import Wizard for more information about using the wizard. When you are done with the steps in the wizard, click Finish to complete the import operation.
If Excel does not convert a column of data to the format that you want, you can convert the data after you import it. For more information, see Convert numbers stored as text to numbers and Convert dates stored as text to dates.
Export data to a text file by saving it
You can convert an Excel worksheet to a text file by using the Save As command.
-
Go to File > Save As.
-
The Save As dialog box appears.
-
In the Save as type box, choose the text file format for the worksheet.
-
For example, click Text (Tab delimited) or CSV (Comma delimited).
-
Note: The different formats support different feature sets. For more information about the feature sets that are supported by the different text file formats, see File formats that are supported in Excel.
-
-
Browse to the location where you want to save the new text file, and then click Save.
-
A dialog box appears, reminding you that only the current worksheet will be saved to the new file. If you are certain that the current worksheet is the one that you want to save as a text file, click OK. You can save other worksheets as separate text files by repeating this procedure for each worksheet.
-
A second dialog box appears, reminding you that your worksheet may contain features that are not supported by text file formats. If you are interested only in saving the worksheet data into the new text file, click Yes. If you are unsure and would like to know more about which Excel features are not supported by text file formats, click Help for more information.
For more information about saving files in other formats, see Save a workbook in another file format.
The way you change the delimiter when importing is different depending on how you import the text.
-
If you use Get & Transform Data > From Text/CSV, after you choose the text file and click Import, choose a character to use from the list under Delimiter. You can see the effect of your new choice immediately in the data preview, so you can be sure you make the choice you want before you proceed.
-
If you use the Text Import Wizard to import a text file, you can change the delimiter that is used for the import operation in Step 2 of the Text Import Wizard. In this step, you can also change the way that consecutive delimiters, such as consecutive quotation marks, are handled.
See Text Import Wizard for more information about delimiters and advanced options.
If you want to use a semi-colon as the default list separator when you Save As .csv, but need to limit the change to Excel, consider changing the default decimal separator to a comma — this forces Excel to use a semi-colon for the list separator. Obviously, this will also change the way decimal numbers are displayed, so also consider changing the Thousands separator to limit any confusion.
-
Clear Excel Options > Advanced > Editing options > Use system separators.
-
Set Decimal separator to , (a comma).
-
Set Thousands separator to . (a period).
When you save a workbook as a .csv file, the default list separator (delimiter) is a comma. You can change this to another separator character using Windows Region settings.
Caution: Changing the Windows setting will cause a global change on your computer, affecting all applications. To only change the delimiter for Excel, see Change the default list separator for saving files as text (.csv) in Excel.
-
In Microsoft Windows 10, right-click the Start button, and then click Settings.
-
Click Time & Language, and then click Region in the left panel.
-
In the main panel, under Regional settings, click Additional date, time, and regional settings.
-
Under Region, click Change date, time, or number formats.
-
In the Region dialog, on the Format tab, click Additional settings.
-
In the Customize Format dialog, on the Numbers tab, type a character to use as the new separator in the List separator box.
-
Click OK twice.
-
In Microsoft Windows, click the Start button, and then click Control Panel.
-
Under Clock, Language, and Region, click Change date, time, or number formats.
-
In the Region dialog, on the Format tab, click Additional settings.
-
In the Customize Format dialog, on the Numbers tab, type a character to use as the new separator in the List separator box.
-
Click OK twice.
Note: After you change the list separator character for your computer, all programs use the new character as a list separator. You can change the character back to the default character by following the same procedure.
Need more help?
You can always ask an expert in the Excel Tech Community or get support in the Answers community.
See Also
Import data from external data sources (Power Query)
Need more help?
TXT to XLSX (EXCEL) Converter
Convert your txt files to xlsx online & free
Drop files here. 100 MB maximum file size or Sign Up
Convert to TXT
txt
Plaintext Text File
TXT is a file format that contains the text, organized in rows. Text files opposed binaries that contain data that is not intended for interpretation as a text (encoded sound or image). The text file can contain both formatted and unformatted text. Since the very simple text files, they are frequently used for storing data.
XLSX Converter
xlsx
Office Open XML Worksheet Sheet
XLSX is a file format created with Microsoft Excel, version from 2007 and younger. This file is a spreadsheet. All data distributed document and stored in the cells. Each cell has a unique address, which is denoted by the letters and Arabic numerals. XLSX file format is based on the Open XML. To reduce the size of the file is compressed ZIP.
How to convert TXT to XLSX
Step 1
Upload txt-file(s)
Select files from Computer, Google Drive, Dropbox, URL or by dragging it on the page.
Step 2
Choose «to xlsx»
Choose xlsx or any other format you need as a result (more than 200 formats supported)
Step 3
Download your xlsx
Let the file convert and you can download your xlsx file right afterwards
TXT to XLSX Quality Rating
4.3 (23,166 votes)
You need to convert and download at least 1 file to provide feedback!
Different applications generate data in different forms.
A SaaS application might generate a report in the form of a PDF, while another application might generate data in the form of a TXT or CSV file.
The challenge lies in consolidating the data into a single application that can work with all the data to produce the required results.
Microsoft Excel is one application that is frequently used for this, owing to its versatility in importing data from files with a wide variety of extensions.
For example, if you have a list of items saved in a Text file (or in Notepad), Excel allows you to import this list so that you can process it further.
In this tutorial we will show you two ways to convert a text file to Excel:
- By using the Text Import Wizard
- By opening the file directly in Excel
What is a Text File?
A Text file is one that contains text with no special formatting (as in bold, italic, images, etc.).
These files are identified with the ‘.txt’ extension and can be opened in any text editor, like Notepad or word processor, like Microsoft Word.
But in many cases, you can have data in a text file that you need to open in Excel and analyze there.
Thankfully, you can easily open text files in Microsoft Excel and then further work on it.
Let’s see how to do that!
Let us look at two ways in which we can convert a Text file (.txt) to Excel.
Method 1: Using the Text Import Wizard to Convert a Text File to Excel
If you have a spreadsheet open in Excel and want to import the contents of a Text file at a specific area of your spreadsheet, the Text Import Wizard might be the best way to go.
This wizard scans your text file and ensures that the data in the file is imported the way you want.
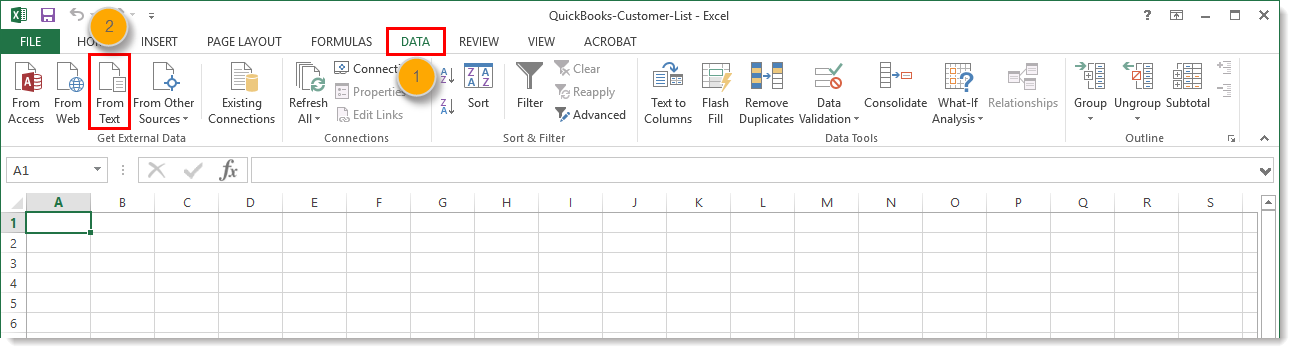
To use the Text Import Wizard, select the Data tab, followed by ‘From Text’ (which you will find under the ‘Get External Data’ group.
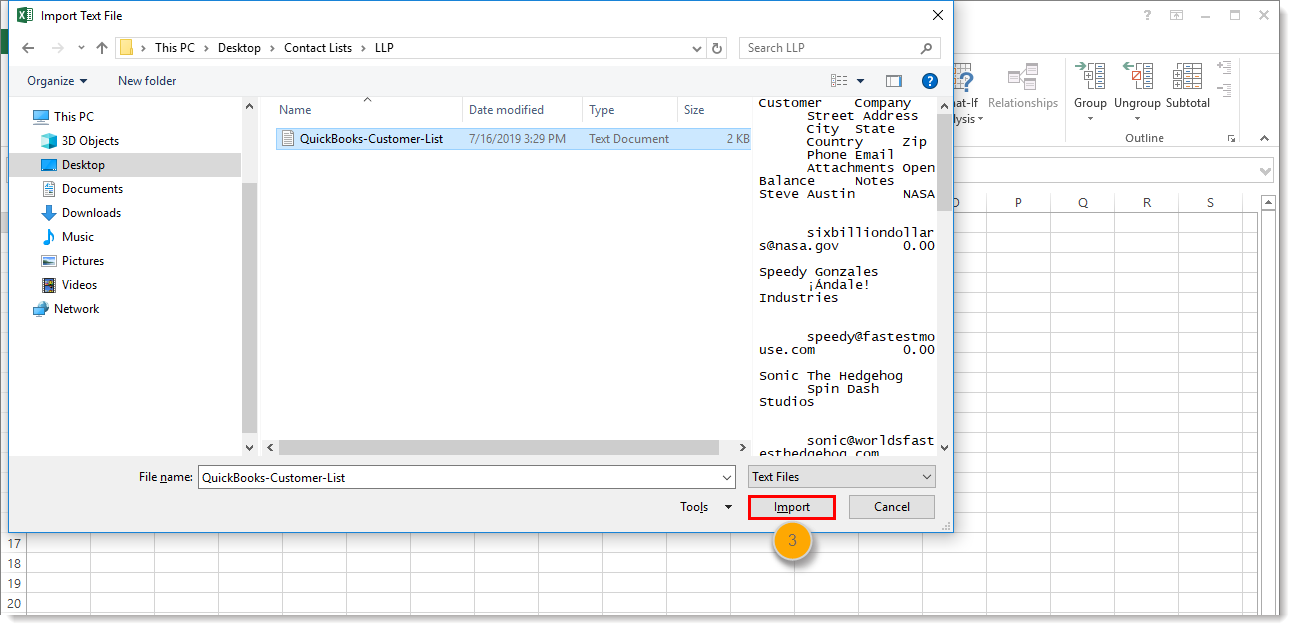
After this, select the text file that you want to import.

Your Text Import Wizard should now open automatically.

The Text Import Wizard guides you in providing the best settings to import your text file data through 3 steps:
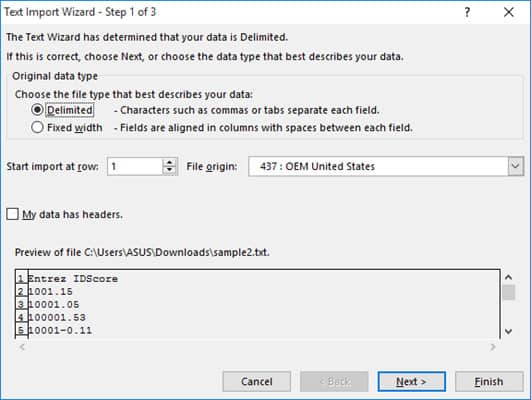
Step 1 of 3
In this step you can provide the settings for the following:
- Original Data Type: Here you can choose how you want your data to be separated into columns. You have two options:
- Delimited: Select this if your text file data is separated by tabs, colons, semicolons or other characters.
- Fixed width: Select this if all items in each column of your data are the same width.
- Start import at row: Type or select the first row of your data from where you want to start importing.
- File origin: Select the character set that your text file uses, for example 437 (for the OEM United States character set). Usually, it’s fine to leave this at the default setting.
- My data has headers: Keep this field checked if your Text file’s dataset contains headers.

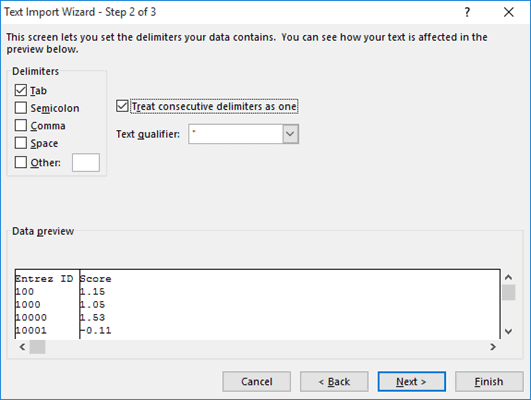
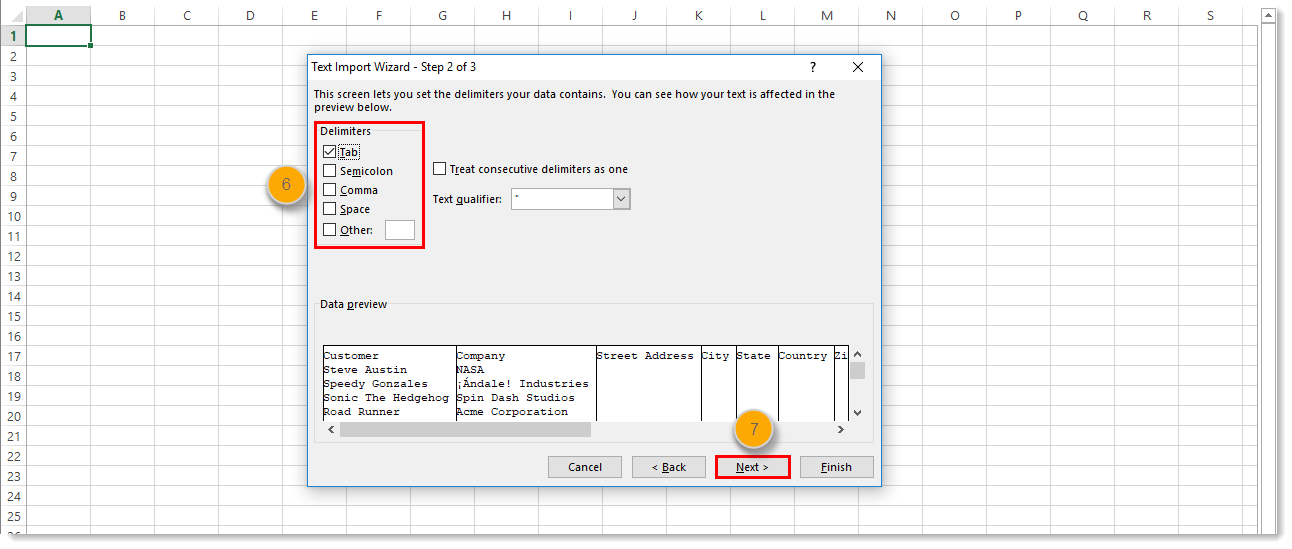
Step 2 of 3
If you had selected the ‘Delimited’ radio button in Step 1, then this step lets you specify the delimiters that your data contains (for example tabs, commas, semicolons, etc.) You can also specify if you want consecutive delimiters to be counted as one.
Moreover, if your text values are enclosed in a special set of characters (for example in single or double quotes), then you can specify the character in this step.
These characters are known as ‘Text qualifiers’ and help specify if you want a set of values to be imported as one.
For example, “Scott, Steve” is imported as a single value, even though the words are separated by a comma delimiter.

At the bottom of the screen, you can see a preview of how your data will get affected in the spreadsheet after conversion.
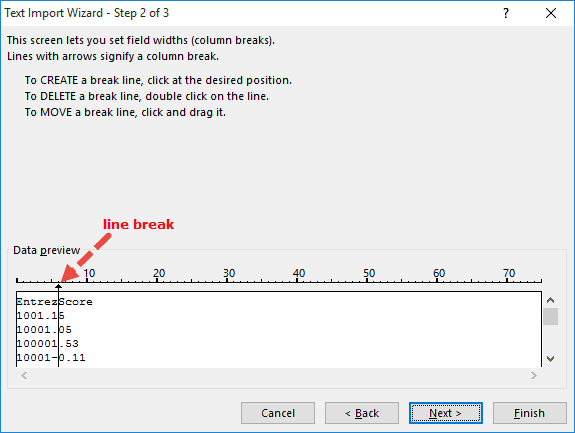
If you had selected the ‘Fixed Width’ radio button in Step 1, on the other hand, then Step 2 lets you specify widths for each column.
You can introduce a new column break in the preview window by simply clicking at the appropriate point on the scale.
A line with an arrow should appear to represent the column break.

Place line breaks wherever you need to in the preview window.
If you want to move a line break, simply drag it across. If you want to remove a line, simply double-click on it.
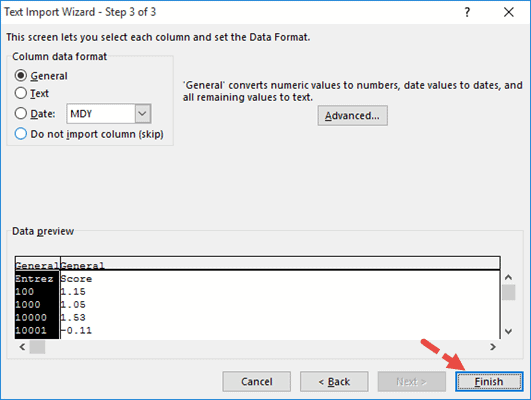
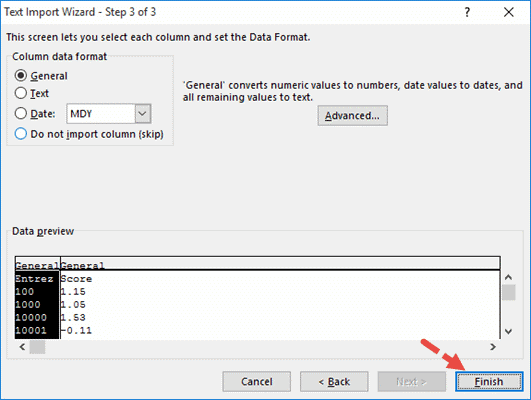
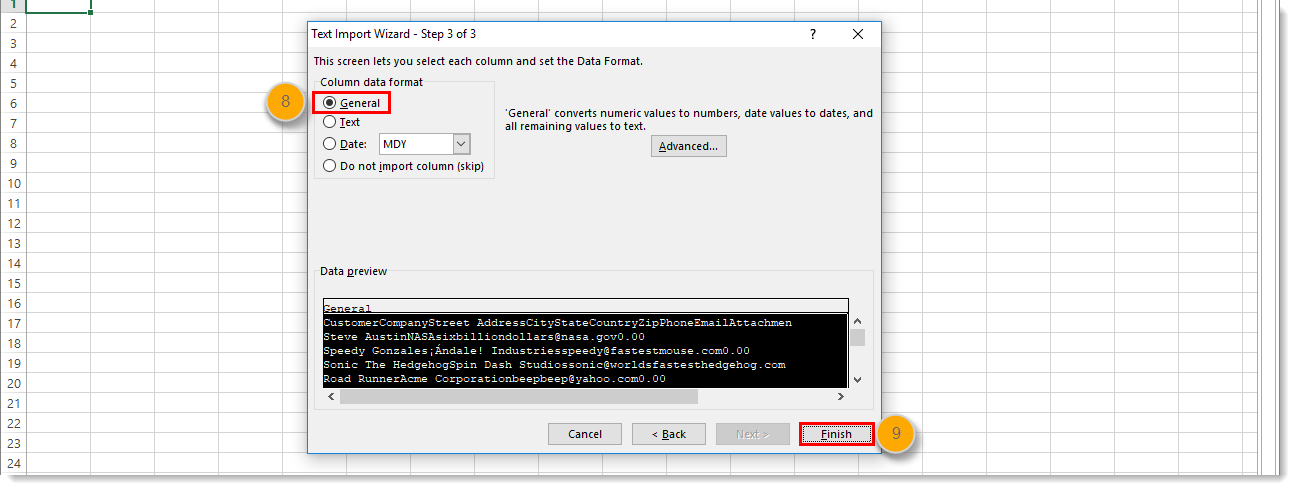
Step 3 of 3
This lets you specify the data format for each column.
You can specify if you want a column to remain in the default format set by the Text Import Wizard or if you want to set the format to be General, Text, or Date.
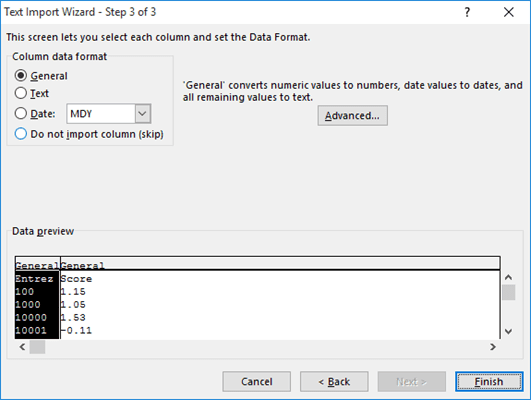
Simply select a column from the preview window and select the format you want.
If you want to remove a selected column, select the last radio button option (which says ‘Do not import column‘).
The Advanced button in this step opens the Advanced Text Import Settings dialog box.
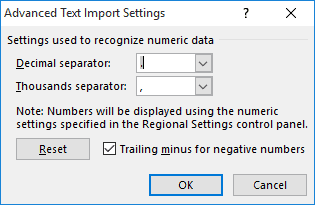
This dialog box lets you specify advanced formatting options.
For example, you can use the Advanced Text Import Settings to specify what decimal or thousands separators have been used in the text file, so that they can be made to match your computer’s regional settings.
Once you’re done providing all the settings for your imported text data, click on the Finish button.
This will open the Import Data dialog box.
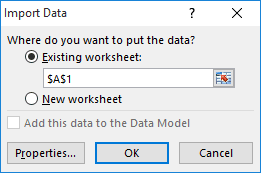
In this box, you can select where you want your text file’s data imported.
If you want to import it into the existing worksheet, you can select or type in a reference to the cell where you want Excel to start displaying the imported data.
If you want to open it in a new worksheet, however, then select the radio button next to ‘New Worksheet’.
Click OK.
Your text file should now get imported to your selected location in Excel, with the format settings that you had specified in the Text Import Wizard.

Also read: How to Open XML Files in Excel?
Method 2: Opening a Text File Directly in Excel
You can also choose to simply open the text file directly in Excel.
While opening, Excel recognizes a text file and automatically converts it into a format that can be displayed in a spreadsheet.
All you need to do is click on the File tab, select Open and then browse and select the text file that you want to open.
One issue that you are likely to face when trying to open a text file directly in Excel is trying to locate the file in the folder.
This is because Excel’s ‘Open File’ dialog box, by default, filters, and displays only Excel files like those with extensions ‘.xls’, ‘.xlsx’, etc.
It also displays CSV files, if your computer is set up to use Excel as the default application to open CSV files.
So if you don’t see your required text file in the folder when trying to open it in Excel, simply select ‘All Files’ from the ‘File Types’ drop-down, as shown below:
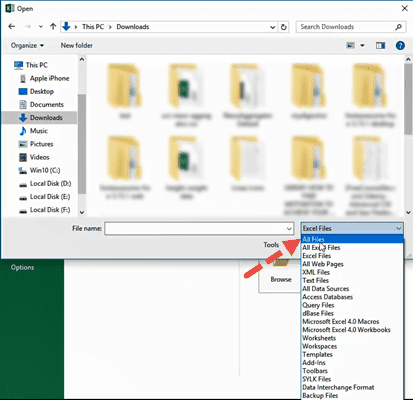
This will display the Text Import Wizard from where you can set up how you want your Text file’s data to be displayed in Excel (as shown in method 1).

You should now see your text file converted and displayed in Excel.
Once the file opens, if you still find some of the columns (or individual cells) not converted to your required format, you can convert them manually.
While this method to open the Text file directly in Excel works well, the benefit of using the first method (using Text Import Wizard) allows you to make some adjustments even before getting the data in Excel.
In this tutorial, we showed you two ways to convert and open a Text file in Excel.
A third method could be by using online tools like Online2pdf, but we did not dwell too much on this because Excel’s Text Import Wizard provides much more flexibility, allowing you to adjust your data, and format them exactly how you want them.
We hope this tutorial was helpful for you.
Other Excel tutorials you may also like:
- How to Convert a CSV File to Excel?
- How to Open VCF File in Excel?
- How to Open Excel File [xls, xlsx] Online (for FREE)
- Why does Excel Open on Startup (and How to Stop it)
- How to Make Excel File Read Only
- How to Insert an Excel file into MS Word
- How to Save Selection in Excel as PDF (3 Easy Methods)
- How to Merge Two Excel Files?
- How to Convert PDF to Excel without Software?
- How to Open DAT Files in Excel?
The Excel Power Query also called the ‘Get & Transform’ feature is an excellent excel tool to extract and import data from various internal or external sources into excel and transform it as per your need. In this tutorial, would learn how to extract, import, and get data from a text file to excel.
This feature is pre-installed in higher excel versions (Excel 2016 and above) but not inbuilt for lower excel versions. However, there is an external power query add-in for Excel 2010 and 2013. To get the power query feature for these versions, follow our tutorial on – Install Power Query in Excel 2010 [Step by Step Guide]. To name a few, the power query feature allows you to extract data from another excel workbook or files, from websites, or from JSON file format, etc.
Table of Contents
- What is Special About Power Query?
- Sample Data – Convert Text File To Excel
- Steps to Import Data from Text File to Excel | Power Query
- Power Query Editor – What Did Happen in Background?
- Lets Take An Example To Understand Power Query Transformation
What is Special About Power Query?
The reason why the power query feature has become so popular amongst excel users is that this feature instantly records and stores (in sequence) everything that you perform on the imported external data in the form of connections. Now, when the source text file updates or changes, you simply have to refresh the connections. On refresh, all the recorded steps are performed exactly in sequence source external file and you finally have updated data in to excel.
Confused ? No need to worry. In the upcoming section of this blog, we would learn to import and also perform some transformation steps on the data, and see what happens on data update.
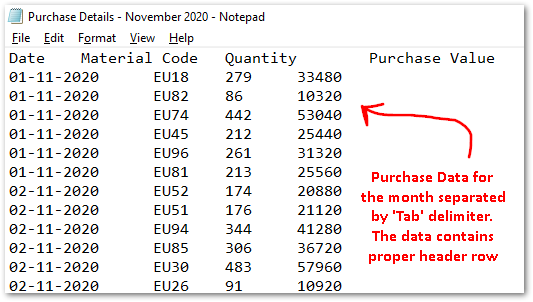
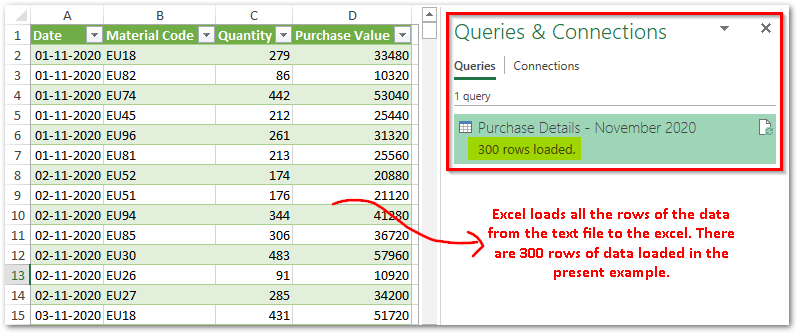
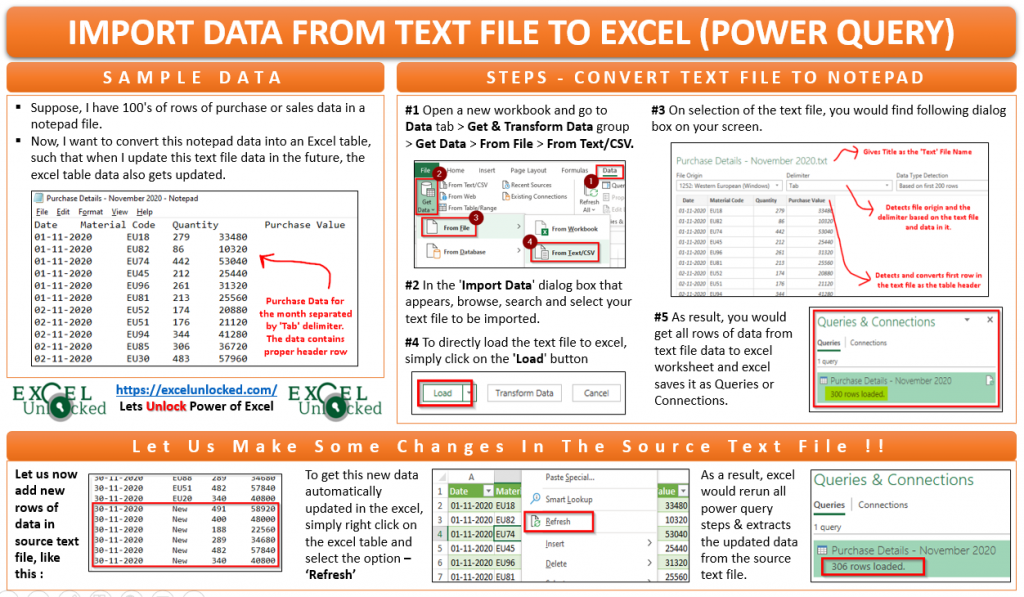
Sample Data – Convert Text File To Excel
Suppose, I have 100’s of rows of purchase or sales data in a notepad file as shown in the image below. Now, I want to convert this notepad data into an Excel table, such that when I update this text file data in the future, the excel table data also gets updated.
You can easily achieve this using the powerful Power Query tool of Excel.
Use ‘Download’ button below to get the above sample text file(s) and practice as you go ahead.
Steps to Import Data from Text File to Excel | Power Query
Below step by step procedure would help you to convert a notepad file to excel:
- Open a new workbook and go to Data tab > Get & Transform Data group > Get Data > From File > From Text/CSV, as shown below:
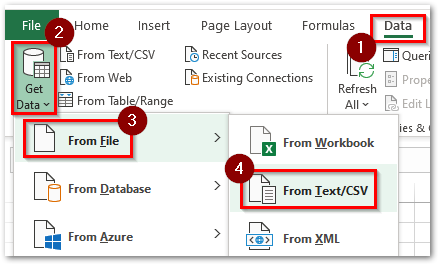
I use the “Excel Office 365” version for my daily excel tasks. If you are using other excel versions, the screen look may be different.
- In the ‘Import Data‘ dialog box that appears, navigate and select the text file.
- As a result, a new window would pop out on your screen with the following details:
- The title of this window is the name of the imported text file.
- It detects the file origin and the text delimiter based on the file and the data in it.
- It shows the preview of the text file data and also detects and converts the first row as the data header row.
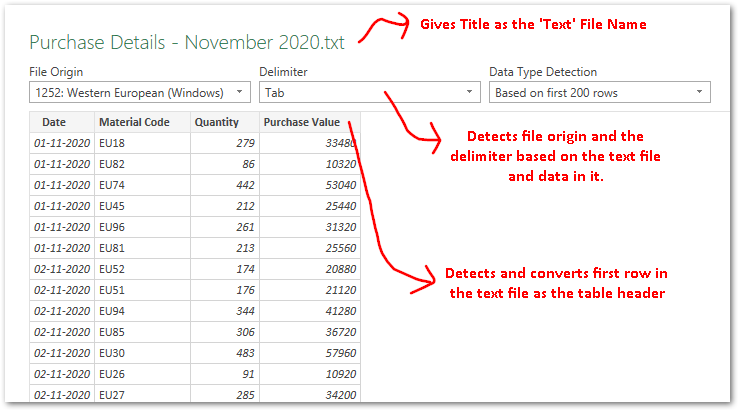
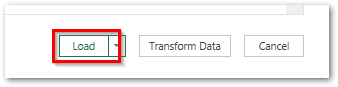
- To directly load the text file to excel, simply click on the ‘Load’ button on the bottom right corner of this window.
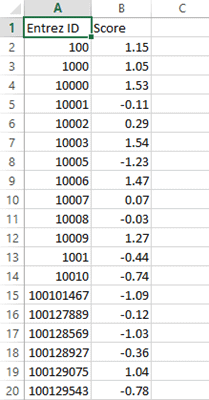
- As a result, you would get all the rows of data from the text file data to excel worksheet. In the present case, there were 300 rows of data in the text file, all loaded to excel now.
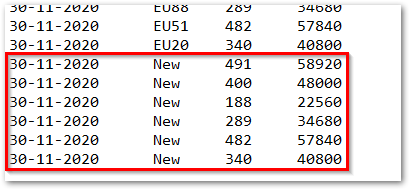
- Let us now make some changes in the source text file. I have, for demonstration purposes, added some new data rows to the text file.
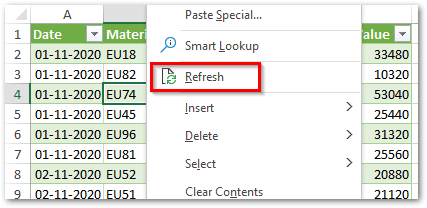
- Now, use the right mouse click on the table and ‘Refresh‘ option (as highlighted below).
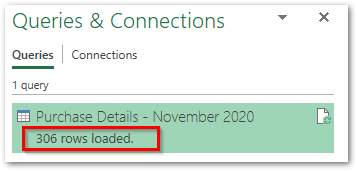
- As a result, excel would rerun all the power query steps and extracts the updated data from the source text file. Excel has now updated 306 rows of data.
Now, let us see what did the excel do in background !!
Power Query Editor – What Did Happen in Background?
The power query feature is no different than an excel macro recorder. It records all the transformation steps that you perform and saves it in form of a query.
Now, just like macro, you can rerun the steps to get the updated source data to excel.
While extracting the text file to excel using power query, excel performed and stored three default power query steps in the background-
- Extracting data from the source text file
- Promoting the first row from the original data as table headers
- Changing the ‘Data Types‘ of the table columns
To check these steps, click anywhere on the data table, and go to Query tab > Edit group > Edit option.

Or you can even double click the query in the ‘Queries & Connections’ pane, as shown below:
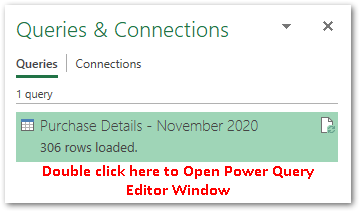
This would open the ‘Power Query Editor‘ window (as shown in the image below). On the right, under the ‘Query Settings‘ pane, you can see the power query name as ‘Purchase Details – November 2020‘ and the default ‘Applied Steps’.
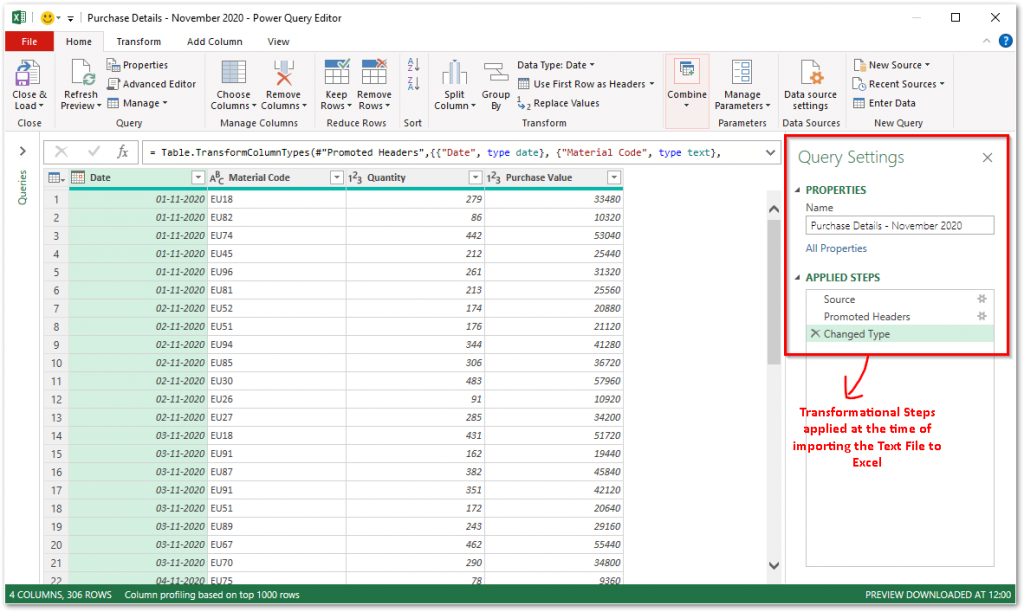
The ‘Power Query Editor’ window has many more data transformation options on its ribbon tabs. As you perform these additional transformation steps, excel records all the steps in sequence and places them in the ‘Applied Steps‘ section (Query Settings pane) one below the other.
Now, when the data in the source files changes, you need to only refresh the power query. On refresh, it reruns all the ‘Applied Steps’ in sequence and gives the output.
Lets Take An Example To Understand Power Query Transformation
Let us now see how the power query behaves when we add more steps to it. Lets perform the following additional transformation:
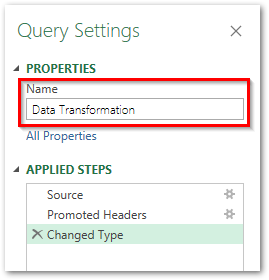
- Rename the Power Query as ‘Data Transformation’
- Create a duplicate column of the column ‘Purchase Value’
- Rename this new column as ‘Net Value’
To rename the power query, simply go to the ‘Power Query Editor’ window. In the ‘Query Settings’ pane to the right, change the default power query name and press Enter to continue.
To create a duplicate of the column, right-click on the ‘Purchase Value’ column header and select the option ‘Duplicate Column’. This would instantly create a copy of the column with the name ‘Purchase Value – Copy’.
Now, just check the ‘Applied Steps’ section. You would notice that a new step gets added with the name ‘Duplicated Column’ as shown in the image below:
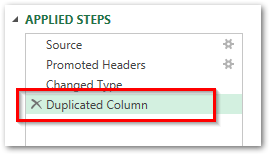
To rename this new column, double click on the new column header, type a nice name and then press Enter.
Check the ‘Applied Steps’ section and you would notice a new step added at the end – ‘Renamed Column’.
Finally load the transformed power query data to excel, using the path – ‘Home’ tab > ‘Close & Load’ option (in Power Query Editor window).
Now, when the source text file gets updated with new rows of data, you need to simply refresh your power query. On refresh, it would perform the ‘Applied Steps’ in the same sequence (from top to down). Meaning, it would extract data from the source > promote its headers > change header data types > create a duplicate of column > And finally, rename the duplicate column.
With this, we have completed the tutorial on ‘How to Import Data from Text File or Notepad to Excel’. Share your thoughts on this tutorial in the comment section below.
RELATED POSTS
-
4 Ways to Refresh Power Query in Excel
-
Combine or Merge All Text Files in Folder in Excel
-
Import Data from Web To Excel Using Power Query
-
Using Fill Down or Fill Up in Excel Power Query
-
How to Convert CSV File To Excel Using Power Query
-
How to Add and Use Index Column in Power Query
Your data could be in any form from PDF, TXT, PNG, JPG, to CSV files. Some applications create files in the form of a PDF whereas other apps generate data files in the form of a TXT or CSV file. On the whole, you must be struggling to convert a Text file to an Excel spreadsheet because switching data into a single file can work differently instead of multiple files.
With Microsoft Excel, you can do this task frequently because it has many features that can help you execute multiple functions. Suppose, you are having a list of items in a TXT file, with Excel you can easily import the list to process it differently.
Here you will get to know exactly how converting a text file to an Excel spreadsheet could be an easygoing thing.
You can do this by:
- Using the Text Import Wizard
- Opening the file directly in Excel
So, before getting into the boat let’s have a look at what a text file basically is?
What is a Text File?
In a text file, as the name shows, you will see the text without special formattings such as italic, bold, images, or other formats. A text file appears with a .txt extension and you can view this file in any text editor such as Notepad or a word processor like Microsoft Word. However, you can open a text file in Excel to make further changes.
Let’s get to know how it all happens:
Converting a Text File to Excel Spreadsheet – How it Works
Normally, two methods exist for this as mentioned earlier:
- Text Import Wizard
- Direct File open in Excel
Using the Text Import Wizard to Convert a Text File to Excel
The Text Import Wizard feature could be one of the best tools when you need to import the data of a text file at some specific place on the spreadsheet of Excel.
Your text file gets scanned using the Wizard tool and it ensures that the data in the file is imported exactly as you want it to.
To make this tool functional, simply choose the Data tab given in the “From Text” menu located under the “Get External Data” group.

Later on, choose the text file you need to import.

Now, you will see the Text Import Wizard appears automatically.
Here are 3 steps that will guide you further to import the text file:
Step 1:
At first, you may need to provide the settings for the following:
Original Data Type:
In this option, you have to choose how your data should be separated into columns. You have two options:
Delimited: If the text file data is being separated using tabs, colons, semicolons, or other characters, you will have to choose this option.
Fixed Width: If each item in the columns of your data has similar width then you should choose this option.
Start Import at Row:
Type or choose the first row of the data right from you want to start importing.
File Origin:
Choose the character set that your text files use such as 437. Generally, you can leave it in the default setting.
My Data has Headers:
If the data set of your Text file has headers, then you have to check this field.
Step 2:
In case, if you had selected the “Delimited” button in the earlier step, then it is the time to indicate the delimiters in your data such as commas, tabs, semicolons, etc. You can even specify the consecutive delimiters in the data to be as one.
Further in this step, you can indicate the character if the text values are covered in a special set of characters such as single or double quotes. Do you know these characters are known as “Text qualifiers” that can help in indicating the set of values to be counted as one? For instance, “Scott, Steve” is considered as a single value, whereas a comma delimiter separates both words.

Once the conversion is done, at the bottom of the screen a preview of how your data is affected in the sheet will appear. In this step, you can identify widths for all columns if you had selected the “Fixed Width” button in the earlier step. If you click at some useful pointers on the scale, you can bring in a new column break in the preview window.
The column break is represented with a line having an arrow. To move a line break, you will have to drag it and if you want to remove it, just double click on it.
Step 3:
Once you are done specifying the values, now you should specify the data format for all columns. It’s up to you whether you need the column to be in the default format that the Text Import Wizard has set for you or you may want to set the format to be General, Text, or Date.
To select the format you need, just select a column from the preview window. To remove a selected column, just choose the last radio button saying, “Do not import column”.
By pressing the “Advanced” button, a dialog box of the Advanced Text Import Settings will pop up.

From this dialog box, you will find options to specify advanced formatting. For instance, to specify what decimal or separators have been used in the text file, you may use the Advanced Text Import Settings. It is because they must be compatible with the regional settings of your computer.
Click on the Finish button once you are done with all the settings for the imported text data.

Clicking on the finish button will pop up the Import Data dialog box.
From this box, you can then choose where you need the data of your text file imported. You have to choose or type in a reference to the cell if you need to import this data into the current worksheet. On the other hand, if you need it to open in a new worksheet, then choose the radio button next to “New Worksheet.”

Now, click on the OK button and the file will start importing to the designated location in Excel.
Using the Direct File Open to Convert a Text or CSV File into Excel
In Excel 2007, 2010, 2013, and 2016, you will see all the steps are similar to importing a TXT or CSV file into Excel.
Go to the Excel spreadsheet that is needed to have the data and click on the Data tab.
Choose the “From Text” option given in the Get External Data group.
Choose the TXT or CSV file that is needed to convert and click on the Import option.
Now, choose “Delimited”. As you know a delimiter is just a new way that explains you TXT file has tabs or the CSV file has commas to separate and group the data.
Choose the Next option.
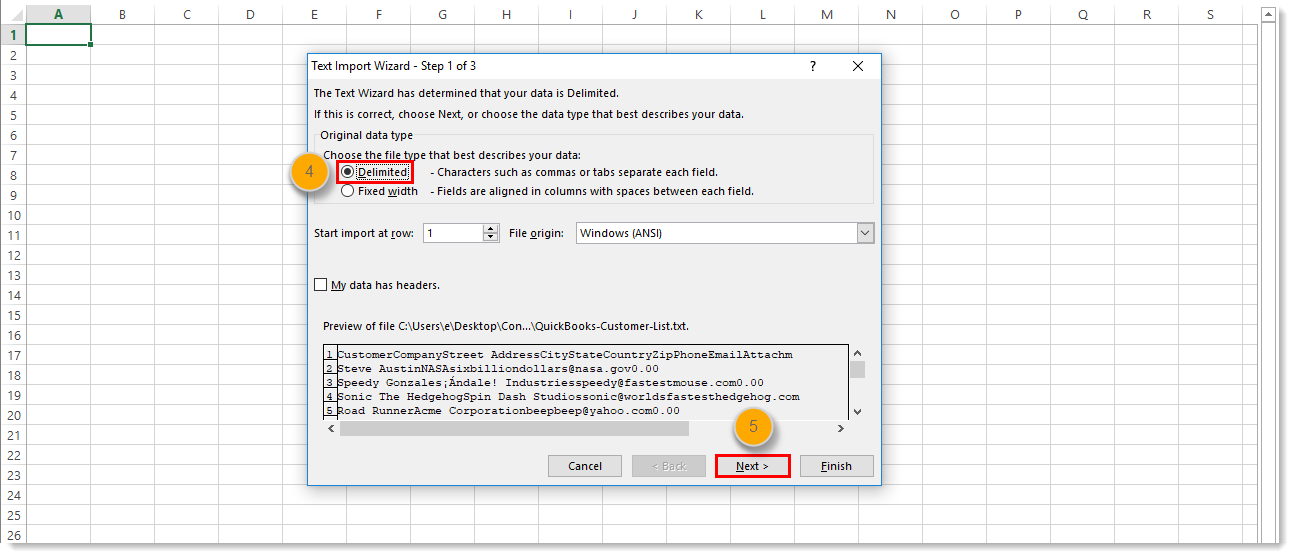
In the Data preview field, choose the delimiter that helps in grouping the data in a separate column. Basically, you have to choose “Tab” while converting a TXT file to Excel spreadsheet and “Comma” while converting a CSV file.
Also, note that selecting the “Space” option could split a single column into multiple columns at times when the header has more than one word.
Now, click on the Next option.
Choose “General”.
Click on the “Finish” button.
Select “Existing Worksheet” and add “=$A$1” to the field. It will make sure that data starts in Row 1, Column A of the spreadsheet. Having a blank row in the sheet could lead to a file import error.
Click on the OK button.

Click Save.