I have been trying to export datatable to excel sheet but now i want to export datatable into word table.
i have a word template file which contains the excel embedded object i want to populate that object using datatable.
here to the code i have been using to export custom values to word file.
Object oMissing = System.Reflection.Missing.Value;
Object oTemplatePath = "D:\Mujahid.dotx";

Application wordApp = new Application();
Document wordDoc = new Document();
wordDoc = wordApp.Documents.Add(ref oTemplatePath, ref oMissing, ref oMissing, ref oMissing);

foreach (Field myMergeField in wordDoc.Fields)
{
    Range rngFieldCode = myMergeField.Code;
    String fieldText = rngFieldCode.Text;

    // ONLY GETTING THE MAILMERGE FIELDS
    if (fieldText.StartsWith(" MERGEFIELD"))
    {
        // THE TEXT COMES IN THE FORMAT OF
        // MERGEFIELD  MyFieldName  \* MERGEFORMAT
        // THIS HAS TO BE EDITED TO GET ONLY THE FIELDNAME "MyFieldName"
        Int32 endMerge = fieldText.IndexOf("\");
        Int32 fieldNameLength = fieldText.Length - endMerge;
        String fieldName = fieldText.Substring(11, endMerge - 11);

        // GIVES THE FIELDNAMES AS THE USER HAD ENTERED IN .dot FILE
        fieldName = fieldName.Trim();

        // **** FIELD REPLACEMENT IMPLEMENTATION GOES HERE ****//
        // THE PROGRAMMER CAN HAVE HIS OWN IMPLEMENTATIONS HERE
        if (fieldName == "SaleID")
        {
            myMergeField.Select();
            wordApp.Selection.TypeText("12345667890");
        }
        else if (fieldName == "date")
        {
            myMergeField.Select();
            wordApp.Selection.TypeText(DateTime.Today.ToShortDateString());
        }
        else if (fieldName == "CustName")
        {
            myMergeField.Select();
            wordApp.Selection.TypeText("Mujahid Niaz");
        }
        else if (fieldName == "CustAddress")
        {
            myMergeField.Select();
            wordApp.Selection.TypeText("House No 113 Street 8B Bilal Colony Shamasabad Rawalpindi");
        }
        else if (fieldName == "CustContact")
        {
            myMergeField.Select();
            wordApp.Selection.TypeText("03137203842");
        }
    }
}
SqlConnection conn= new SqlConnection(@"Data Source=(localdb)Projects;Initial Catalog=SpareParts;Integrated Security=True;Connect Timeout=30;Encrypt=False;TrustServerCertificate=False");
conn.Open();
SqlDataAdapter adp = new SqlDataAdapter("Select* from Items", conn);
DataSet ds = new DataSet();
adp.Fill(ds);
CreateWordTableWithDataTable(ds.Tables[0]);
wordDoc.Merge("D:\M.xlsx");
wordDoc.SaveAs("myfile.doc");
wordApp.Documents.Open("myFile.doc");
John Saunders
160k26 gold badges244 silver badges395 bronze badges
asked Jun 20, 2015 at 23:18
There are few method that you can use to do this. The simplest way is that create a table in word document and assign field to each cell. But, in this way you have to fix the size of number of rows and column in your table.
There are also another two handy methods that you can use it.
using C#.NET
Its a simplest way to create table dynamically from the code. But, once the application is compiled it cannot be changed directly and also it is difficult to debug when the application is running at client side.
How to create table programatically
using VBA
This method is little bit hard and complex but, once you done it you can easily manage the document at client side without re-compiling your C# application.
-
Write down the code in you C# application that exports the data into csv format and stores at where the document is placed. (How to export datatable into csv file format.)
-
Create a macro in your document that reads the data from the csv file and creates a table. (Add Table and fill data to the Word document from the csv.)
-
The last step is executing macro from the C# application. (How to execute VBA macro by C# code)
John Saunders
160k26 gold badges244 silver badges395 bronze badges
answered Jun 21, 2015 at 3:34
ShellShell
6,81010 gold badges39 silver badges70 bronze badges
This is a C# adaptation of the code I wrote to write a datatable to a Microsoft Word document table for vb.net . But that doesn’t really begin to tell the story here. In vb.net we have been accustomed to being allowed to leave parameters empty when automating the creation of a table in Microsoft Word. C# has not permitted me that luxury which to be honest is probably a better code practice. So prepare to meet the Type.Missing object! In addition the default item that we learned to love/hate in Visual Basic for Applications (VBA) code years ago also is not used in C#. Finally in declaring the range object for the table it became an opportunity to use the new dynamic reference type keyword, which was designed for such situations. Check out this video on the subject which is quite excellent.
http://channel9.msdn.com/Shows/Going+Deep/Inside-C-40-dynamic-type-optional-parameters-more-COM-friendly/player?w=512&h=288
For these reasons you will see key differences between the two sets of code. Don’t forget to import Microsoft Word as a COM reference and do your import statements. As always feel free to comment or email. Have a great day!
using Office = Microsoft.Office.Core;
using Word = Microsoft.Office.Interop.Word;
public void CreateWordTableWithDataTable(DataTable dt)
{
int RowCount = dt.Rows.Count; int ColumnCount = dt.Columns.Count;
Object[,] DataArray = new object[RowCount + 1, ColumnCount + 1];
//int RowCount = 0; int ColumnCount = 0;
int r = 0;
for (int c = 0; c <= ColumnCount – 1; c++)
{
DataArray[r, c] = dt.Columns[c].ColumnName;
for (r = 0; r <= RowCount – 1; r++)
{
DataArray[r, c] = dt.Rows[r][c];
} //end row loop
} //end column loop
Word.Document oDoc = new Word.Document();
oDoc.Application.Visible = true;
oDoc.PageSetup.Orientation = Word.WdOrientation.wdOrientLandscape;
dynamic oRange = oDoc.Content.Application.Selection.Range;
String oTemp = “”;
for (r = 0; r <= RowCount – 1; r++)
{
for (int c = 0; c <= ColumnCount – 1; c++)
{
oTemp = oTemp + DataArray[r, c] + “t”;
}
}
oRange.Text = oTemp;
object Separator = Word.WdTableFieldSeparator.wdSeparateByTabs;
object Format = Word.WdTableFormat.wdTableFormatWeb1;
object ApplyBorders = true;
object AutoFit = true;
object AutoFitBehavior = Word.WdAutoFitBehavior.wdAutoFitContent;
oRange.ConvertToTable(ref Separator,
ref RowCount, ref ColumnCount, Type.Missing, ref Format,
ref ApplyBorders, Type.Missing, Type.Missing, Type.Missing,
Type.Missing, Type.Missing, Type.Missing,
Type.Missing, ref AutoFit, ref AutoFitBehavior,
Type.Missing);
oRange.Select();
oDoc.Application.Selection.Tables[1].Select();
oDoc.Application.Selection.Tables[1].Rows.AllowBreakAcrossPages = 0;
oDoc.Application.Selection.Tables[1].Rows.Alignment = 0;
oDoc.Application.Selection.Tables[1].Rows[1].Select();
oDoc.Application.Selection.InsertRowsAbove(1);
oDoc.Application.Selection.Tables[1].Rows[1].Select();
//gotta do the header row manually
for (int c = 0; c <= ColumnCount – 1; c++)
{
oDoc.Application.Selection.Tables[1].Cell(1, c + 1).Range.Text = dt.Columns[c].ColumnName;
}
oDoc.Application.Selection.Tables[1].Rows[1].Select();
oDoc.Application.Selection.Cells.VerticalAlignment = Word.WdCellVerticalAlignment.wdCellAlignVerticalCenter;
}
.NET, .NET Framework, adaptation, addition, Alignment, AllowBreakAcrossPages, Application, Applications, ApplyBorders, Array, AutoFit, AutoFitBehavior, Basic, Cell, Cells, column, ColumnCount, ColumnName, columns, Content, ConvertToTable, Count, creation, csharp, DataTable, Document, Dynamic, Format, header, InsertRowsAbove, Interop, item, Microsoft, Object, Office, Orientation, PageSetup, parameters, Range, reference, RowCount, Rows, Select, Selection, Separator, statements, Table, Tables, Text, Type, vb.net, VerticalAlignment, Visible, Visual, WdAutoFitBehavior, WdCellVerticalAlignment, WdOrientation, WdTableFieldSeparator, WdTableFormat, Word, Write
This entry was posted on August 1, 2011, 1:14 pm and is filed under .NET, C#. You can follow any responses to this entry through RSS 2.0.
You can leave a response, or trackback from your own site.
Many documents present some data in the form of figures or tables. Creating tables is often more efficient than describing the data in the paragraph text, especially when the data is numerical or large. The tabular data presentation makes it easier to read and understand.
A table is a collection of information or data, usually represented by horizontal rows and vertical columns. Each column and each row can have a header. Some tables have only column headings or only row headings. The box at the junction of each column and row is a cell that contains data such as text, numeric information, or images. Some cells can be merged or split (see more about formatting tables). E.g.:

Microsoft Word has many features that make working with tables simple and convenient.
Create a table
There are several ways how to insert or create a table:
- Create a blank table of up to 10 columns and 8 rows,
- Create a blank table with more than 10 columns or more than 8 rows,
- Create a blank table manually (Draw a table),
- Create a table using predefined templates (Quick Tables),
- Create a table from the existing data (Convert Text to Table),
- Insert a Microsoft Excel spreadsheet.
To create a blank table in a Word document, do the following:
1. Place your cursor where you want to insert the table.
2. On the Insert tab, in the Tables group, click the Table button:

3. Do one of the following:
Create a blank table of up to 10 columns and 8 rows
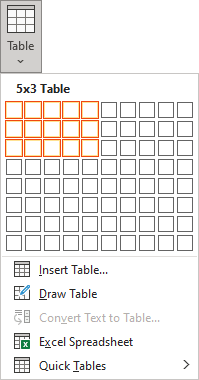
- To create a table of up to 10 columns and 8 rows, move the cursor right (to select columns) and down (to select rows) the grid to select as many cells as you need. E.g., the table of 5 columns and 3 rows (selected cells will turn orange):
Click on a cell in the grid with the expected number of rows and columns (or press Enter) to insert an empty table to fit the width of the text (paragraph).
The table has the specified number of single-line text rows in the current paragraph and equal-width columns. E.g., the table of 3 rows and 5 columns:
Create a blank table with more than 10 columns or more than 8 rows
- To create a table with more than 10 columns or more than 8 rows, do one of the following:
- Create a table with exactly 10 columns or 8 rows, then add as many columns or rows as you need (see below how to customize table).
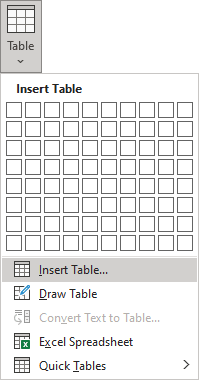
- Click the Insert Table… option:
In the Insert Table dialog box:
- In the Table size group, specify the number of columns and rows,
- In the AutoFit behavior group, specify the width of the table and its columns:
- Select the Fixed column width option to customize width in the appropriate field: select Auto (used by default) or specify width. E.g., 0.75″:
- Select the AutoFit contents option to adjust cell sizes to the document content. E.g.:
- Select the AutoFit to window option to adjust the table’s width to the document content width. E.g.:
- Select the Remember dimension for new tables check box if you want to create tables with the same options later. Word will remember your customization.
Create a blank table manually
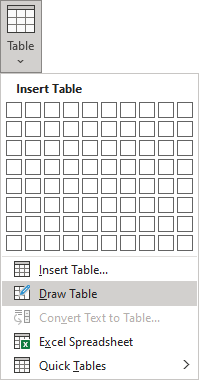
- To manually create an empty table, click the Draw Table option:
After clicking that option, the cursor changes to the pencil
that allows drawing cells directly in the Word document to create a table:
Click anywhere in a document but the table itself by the pencil to stop drawing a table.
Notes:
- To draw additional lines, select a table, then on the Table Layout tab, in the Draw group, click the Draw Table button:
- If you draw a line in the wrong position, click the Eraser button in the Draw group of the Table Layout tab:
- We recommend displaying the rulers or gridlines to help you place the lines correctly.
- To draw additional lines, select a table, then on the Table Layout tab, in the Draw group, click the Draw Table button:
Create a table using predefined templates
To create a table using predefined Word templates of tables and calendars, do the following:
1. Place your cursor where you want to insert the table.
2. On the Insert tab, in the Tables group, click the Table dropdown list, then select Quick Tables list:
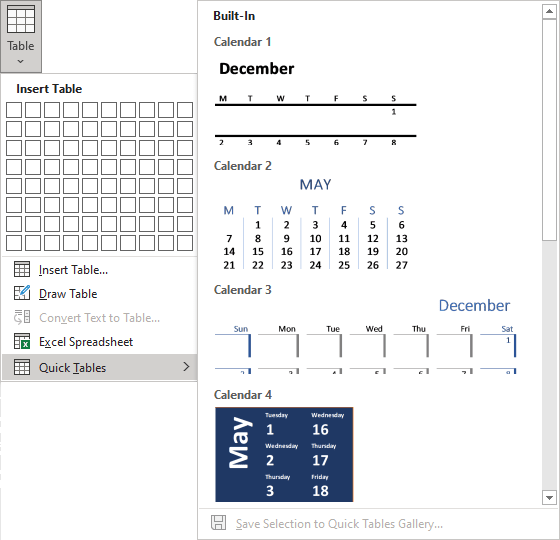
3. From the Quick Tables gallery, select the template you prefer.
For example:

Create a table from the existing data
To create a table from the existing data in a document data (either as regular text or as a tabbed list), do the following:
1. Select the document data you want to shape into a new table.
2. On the Insert tab, in the Tables group, click the Table dropdown list, then select Convert Text to Table…:
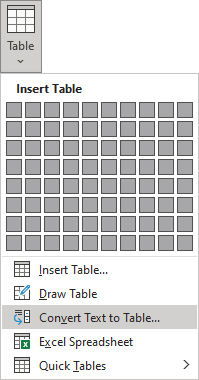
3. In the Convert Text to Table dialog box:

- In the Table size group, specify the number of columns,
- In the AutoFit behavior group, specify whether the width of the columns should be fixed (see details above),
- In the Separate text at group, select the character that separates text into columns in the selected text: paragraph marks, commas, tabs, or some other character.
E.g.:

Insert a Microsoft Excel spreadsheet
Note: It is possible to insert a Microsoft Excel spreadsheet in a document. To do so, on the Insert tab, in the Tables group, click the Table dropdown list, then select Excel Spreadsheet:
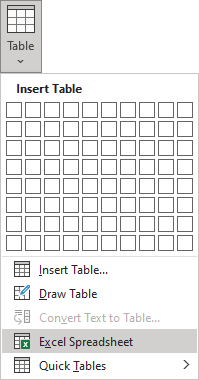
Word opens the Excel spreadsheet where you can enter the data. You can use Excel features such as functions and formulas to create or manipulate the data. Note that it is not a Word table.
Add rows and columns
To add a row and a column to a table, do the following:
1. Position the cursor:
- to a cell in a row above or below which you need to insert a row,
- to a cell in a column left or right which you need to insert a column.
2. Do one of the following:
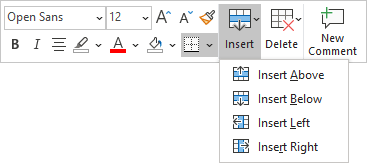
- Click the Insert dropdown list in the Mini toolbar:
- On the Table Layout tab, in the Rows & Columns group:
- Click the Insert Above button to insert a row above the row with the cursor,
- Click the Insert Below button to insert a row below the row with the cursor,
- Click the Insert Left button to insert a column left to the column with the cursor,
- Click the Insert Right button to insert a column right to the column with the cursor.
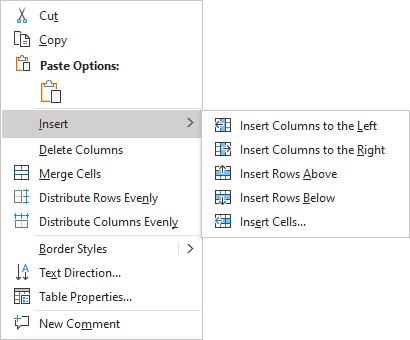
- Right-click and select the Insert list:
Notes:
- To insert rows or columns, move the mouse over the table or left of the table until you see the Insertion indicator, then click the icon:
and
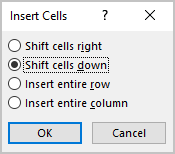
- You can choose the option Insert -> Insert Cells… from the popup menu; Word opens the Insert Cells dialog box:
After selecting the option and clicking the OK button, Word adds an entire row or column, not a cell. Word just moves cells according to the selection.
Delete a table element
To delete a table element, do the following:
1. Select the cell, multiple cells, the entire column or multiple columns, the entire row, or multiple rows.
2. Do one of the following:
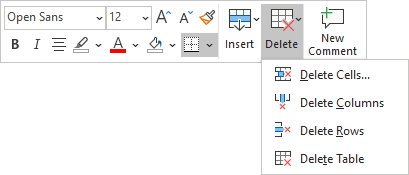
- Click the Delete dropdown list in the Mini toolbar:
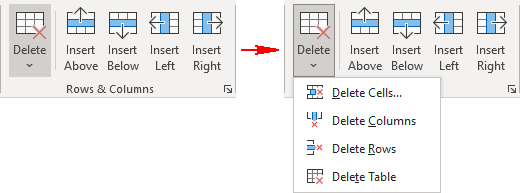
- On the Table Layout tab, in the Rows & Columns group, click the Delete dropdown list, then select one of the options:
3. Select one of the proposed options:
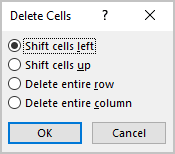
- Delete Cells… opens the Delete Cells dialog box, in which select the option you need:
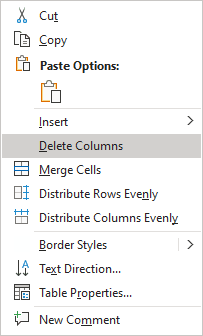
- Delete Columns
- Delete Rows
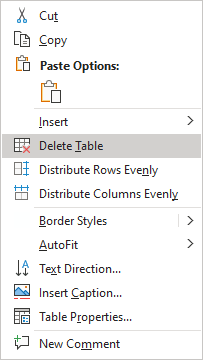
- Delete Table
Note: You can select the element you want to delete, right-click on the selection and select the appropriate item in the popup menu. For example, if the entire table is selected or the column is selected:
Convert a table into text
To convert a table into text in Word, follow the next steps:
1. Click anywhere in the table.
2. On the Layout tab, in the Format group, click the Convert to Text button:

3. In the Convert Table to Text dialog box, select the charter to separate cells data in the text:

4. Click OK.
using System.Data;
using System.Linq;
using GemBox.Document;
using GemBox.Document.Tables;

class Program
{
    static void Main()
    {
        // If using the Professional version, put your serial key below.
        ComponentInfo.SetLicense("FREE-LIMITED-KEY");

        int rowCount = %RowCount%;
        int columnCount = %ColumnCount%;

        // Create DataTable with some sample data.
        var dataTable = new DataTable();
        for (int c = 0; c < columnCount; c++)
            dataTable.Columns.Add($"Column {c + 1}");
        for (int r = 0; r < rowCount; r++)
            dataTable.Rows.Add(Enumerable.Range(0, columnCount).Select(c => $"Cell ({r + 1},{c + 1})").ToArray());

        // Create new document.
        var document = new DocumentModel();

        // Create Table element from DataTable object.
        Table table = new Table(document, rowCount, columnCount,
            (int r, int c) => new TableCell(document, new Paragraph(document, dataTable.Rows[r][c].ToString())));

        // Insert first row as Table's header.
        table.Rows.Insert(0, new TableRow(document, dataTable.Columns.Cast<DataColumn>().Select(
            dataColumn => new TableCell(document, new Paragraph(document, dataColumn.ColumnName)))));

        table.TableFormat.PreferredWidth = new TableWidth(100, TableWidthUnit.Percentage);

        document.Sections.Add(new Section(document, table));

        document.Save("Insert DataTable.%OutputFileType%");
    }
}
Imports System.Data
Imports System.Linq
Imports GemBox.Document
Imports GemBox.Document.Tables
Module Program
Sub Main()
' If using the Professional version, put your serial key below.
ComponentInfo.SetLicense("FREE-LIMITED-KEY")
Dim rowCount As Integer = %RowCount%
Dim columnCount As Integer = %ColumnCount%
' Create DataTable with some sample data.
Dim dataTable As New DataTable()
For c As Integer = 0 To columnCount - 1
dataTable.Columns.Add($"Column {c + 1}")
Next
For i As Integer = 0 To rowCount - 1
Dim r = i
dataTable.Rows.Add(Enumerable.Range(0, columnCount).Select(Function(c) $"Cell ({r + 1},{c + 1})").ToArray())
Next
' Create new document.
Dim document As New DocumentModel()
' Create Table element from DataTable object.
Dim table As New Table(document, rowCount, columnCount,
Function(r, c) New TableCell(document, New Paragraph(document, dataTable.Rows(r)(c).ToString())))
' Insert first row as Table's header.
table.Rows.Insert(0, New TableRow(document, dataTable.Columns.Cast(Of DataColumn)().Select(
Function(dataColumn) New TableCell(document, New Paragraph(document, dataColumn.ColumnName)))))
table.TableFormat.PreferredWidth = New TableWidth(100, TableWidthUnit.Percentage)
document.Sections.Add(New Section(document, table))
document.Save("Insert DataTable.%OutputFileType%")
End Sub
End Module
How to Insert Excel Data Into Word (Tables, Files, Spreadsheets)
Microsoft Word is great for working on documents—but not so great with tables of data.
If you want to put a table into a Microsoft Word document, you can work with Word’s built-in table tools, or you can insert data directly from Excel.
Guess which one is better?
Getting your Excel data into Word is easy, makes it look better, and automatically updates. It’s a no-brainer💡
There are multiple ways of getting data from Excel into Word.
I’ll walk you through the best ones, step-by-step.
Please download my free sample workbook if you want to tag along.
Free video on inserting Excel data in a Word document
Watch my video and learn how to easily copy and paste data from an Excel file to Word.
This video walked you through how to insert an Excel table in Word so it becomes a Microsoft Word table instead.
It’s done with all the classic copy-and-paste options: keep source formatting, match destination styles,
But there are other ways of getting things from Excel to Word.
Let’s dive into those below 🤿
What is an Excel Worksheet object?
Recent versions of Microsoft Office include the capability to insert objects into documents. These objects are either embedded or linked.
Embedded objects don’t update. If you include an embedded Excel object and change data in the Excel sheet you copied it from, no changes will be applied.
Linked objects update automatically. A linked Excel object will update to reflect changes in the original Excel sheet.
You can embed and link things other than Excel worksheets, but we’ll focus on Excel objects here.
It’s worth noting that the linked spreadsheet needs to remain available for this to work.
Also, this process works in reverse, as well: you can link to Word document objects from an Excel spreadsheet and insert them there in a matter of seconds.
Embedding Excel objects in Word
We’ll start with the simpler of the two: embedding an Excel object. Let’s take a look at the example workbook to see how it works.
Open the example workbook and a blank Word document.
On the first worksheet in the Excel file, you’ll see a small table. Select and copy it.

Go to your Word document, and paste the table with Ctrl + V.
You’ll see a table like this one:

If you click into this table, nothing notable will happen—you can edit the names of the months or the numbers, and they’ll change.
If you try inputting an Excel formula, however, it will only display as text.
Head back to the Excel worksheet and copy the table again.
In Word, click the Home tab of the Ribbon, and select Paste > Paste Special. In the resulting pop-up window, click on the Worksheet Object, and click OK.

You’ll now see a table that looks a bit different:

At first, it looks like the distinguishing feature of this table is gridlines.
But if you double-click the table, you’ll get a surprising new interface:

As you can see, this gives you an embedded version of Excel within Microsoft Word.
All because it’s a linked object. Pretty cool, huh?😎
You can do all the things you’re used to in Excel: use and edit formulas, apply conditional formatting, add new rows and columns, sort and filter data, and everything else you’ve come to expect from Excel.
And source formatting (from the Excel worksheet) is transferred to the Word document.
In short, it gives you a lot more table-editing power than you get with the standard Microsoft Word interface.
To exit the Excel interface, click outside of the table, and you’ll go back to the regular editor for your document.
If you go back to the Excel spreadsheet and make an edit in the table, you’ll see that the Excel object doesn’t update. So if your calculations change, or you get new data and add it to the spreadsheet, you’ll need to update your Word document manually.
Let’s fix that.
Linking Excel objects in Word
As I mentioned before, embedded objects don’t automatically update. Linked objects, on the other hand, do.
And this can save you a lot of time.
Fortunately, linking an Excel object in Microsoft Word is easy.
The example workbook we used previously is the source Excel file.
Copy the table from the example workbook, and head back to the Word file. Again, click Paste > Paste Special in the Home tab. Again, select Microsoft Excel Worksheet Object.
This time, however, you’ll need one more click. On the left side of the window, you’ll see two radio buttons. One says Paste, and the other says Paste Link. Click the button next to Paste Link:

After hitting OK, you’ll get another table in your Word document. This one looks the same as the previous one:

There’s an important difference, however ⚠️
Let’s go back to the original Excel file and change one of the values.
We’ll change May’s value from 9 to 10.
Here’s what happens:
It might not be super clear in the GIF above, but the linked table automatically updates to match the Excel spreadsheet, while the embedded table doesn’t.
In other words, the Excel file changes are automatically applied to the Word document.
Insert an Excel worksheet in a Word document
Linking an Excel worksheet is the best way to get Excel data into Word because Excel is the best tool for working with spreadsheets.
If you want to insert a new object, you can insert a new spreadsheet into your Word document and work on it with the in-Word Excel tool.
To be completely honest, I don’t understand why you wouldn’t just work in Excel first, but I thought you might want to know anyway!
To insert a blank Excel worksheet object into the Word file, go to the Insert tab on the Ribbon.
Click the Object button in the Text group, then find the Microsoft Excel Worksheet object option.
This opens up the trusty ol’ object dialog box.

Hit OK, and you’ll get a blank worksheet in your Word document.
When you want to edit it, double-click the worksheet and you’ll open the Excel editor right inside of Word.

As before, you can do all the things you usually do in Excel right from Word in this worksheet.
And that’s an easy way of getting data from Excel to Word by making it an embedded object in the Word doc.
That’s it – Now what?
Linking data from Excel to Word documents is a simple automation that can save you a lot of time.
But obviously, it’s just a small part of Excel vast arsenal of functions and features.
The most important functions, though, are: IF, SUMIF, and VLOOKUP.
You learn all those 3 functions + how to effectively clean data in my free 30-minute Excel course sent straight to your inbox in just a few minutes.
Other relevant resources
If you want to automate your work between Word and Excel, you most definitely need to take a look at my guide to mail merge (I love mail merge💖).
Kasper Langmann2023-01-27T21:19:47+00:00
Page load link







 and
and 
