You can import data into Excel from a wide variety of data sources and the sections that follow show you how. For more information on what to do with your data once it’s imported, see How data journeys through Excel.
You can create a query from an Excel table, named range, or dynamic array in the current workbook. If the selected data is a simple range, it’s converted to a table. Importing dynamic arrays requires a Microsoft 365 subscription. For more information on dynamic arrays, see Dynamic array formulas and spilled array behavior.
-
Select any cell within your data range.
-
Select Data > From Table/Range.
This command is also available from Data > From Other Sources > From Table/Range.
-
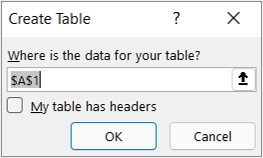
If prompted, in the Create Table dialog box, you can select the Range Selection button to select a specific range to use as a data source.

-
If the table or range of data has column headers, select My table has headers. The header cells are used to define the column names for the query.
-
Select OK.
For more information, see Import from an Excel Table.
-
Select Data > Get Data > From File > From Excel Workbook.
-
In the Excel Browse dialog box, browse for or type a path to the file that you want to query.
-
Select Open.
If your source workbook has named ranges, the name of the range will be available as a data set.
For more information about advanced connector options, see Excel Workbook (docs.com).
The following procedure shows the basic steps. For more detailed coverage, see Import or export text (.txt or .csv) files.
-
Select Data > Get Data > From File > From Text/CSV.
-
In the Comma-Separated Values Browse dialog box, browse for or type a path to the file that you want to query.
-
Select Open.
Note: If you are importing data from a CSV file, Power Query will automatically detect column delimiters including column names and types. For example, if you imported the example CSV file below, Power Query automatically uses the first row as the column names and changes each column data type.
Example CSV file
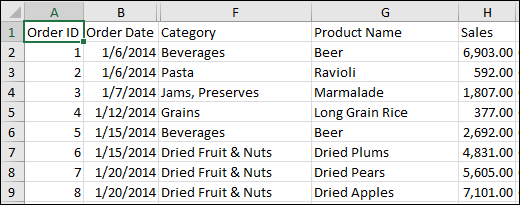
Power Query automatically changes each column data type:
-
Order ID changes to number
-
Order Date changes to date
-
Category remains text (the default column type)
-
Product Name remains text (the default column type)
-
Sales changes to number
For more information about advanced connector options, see Text/CSV (docs.com).
The following procedure shows the basic steps of importing data. For more detailed coverage, see Import XML data.
-
Select Data > Get Data > From File > From XML.
-
In the From XML Browse dialog box, browse for or type a file URL to import or link to a file.
-
Select Open.
After the connection succeeds, use the Navigator pane to browse and preview the collections of items in the XML file in a tabular form.
For more information about advanced connector options, see XML (docs.com).
-
Select Data > Get Data > From File > From JSON. The Import Data dialog box appears.
-
Locate the JSON file, and then select Open.
For more information about advanced connector options, see JSON (docs.com).
Important When you try to import a PDF file, you may get the following PDF message: “This connector requires one or more additional components to be installed before it can be used.” The PDF connector requires .NET Framework 4.5 or higher to be installed on your computer. You can download the latest .NET Framework from here.
-
Select Data > Get Data > From File > From PDF.
-
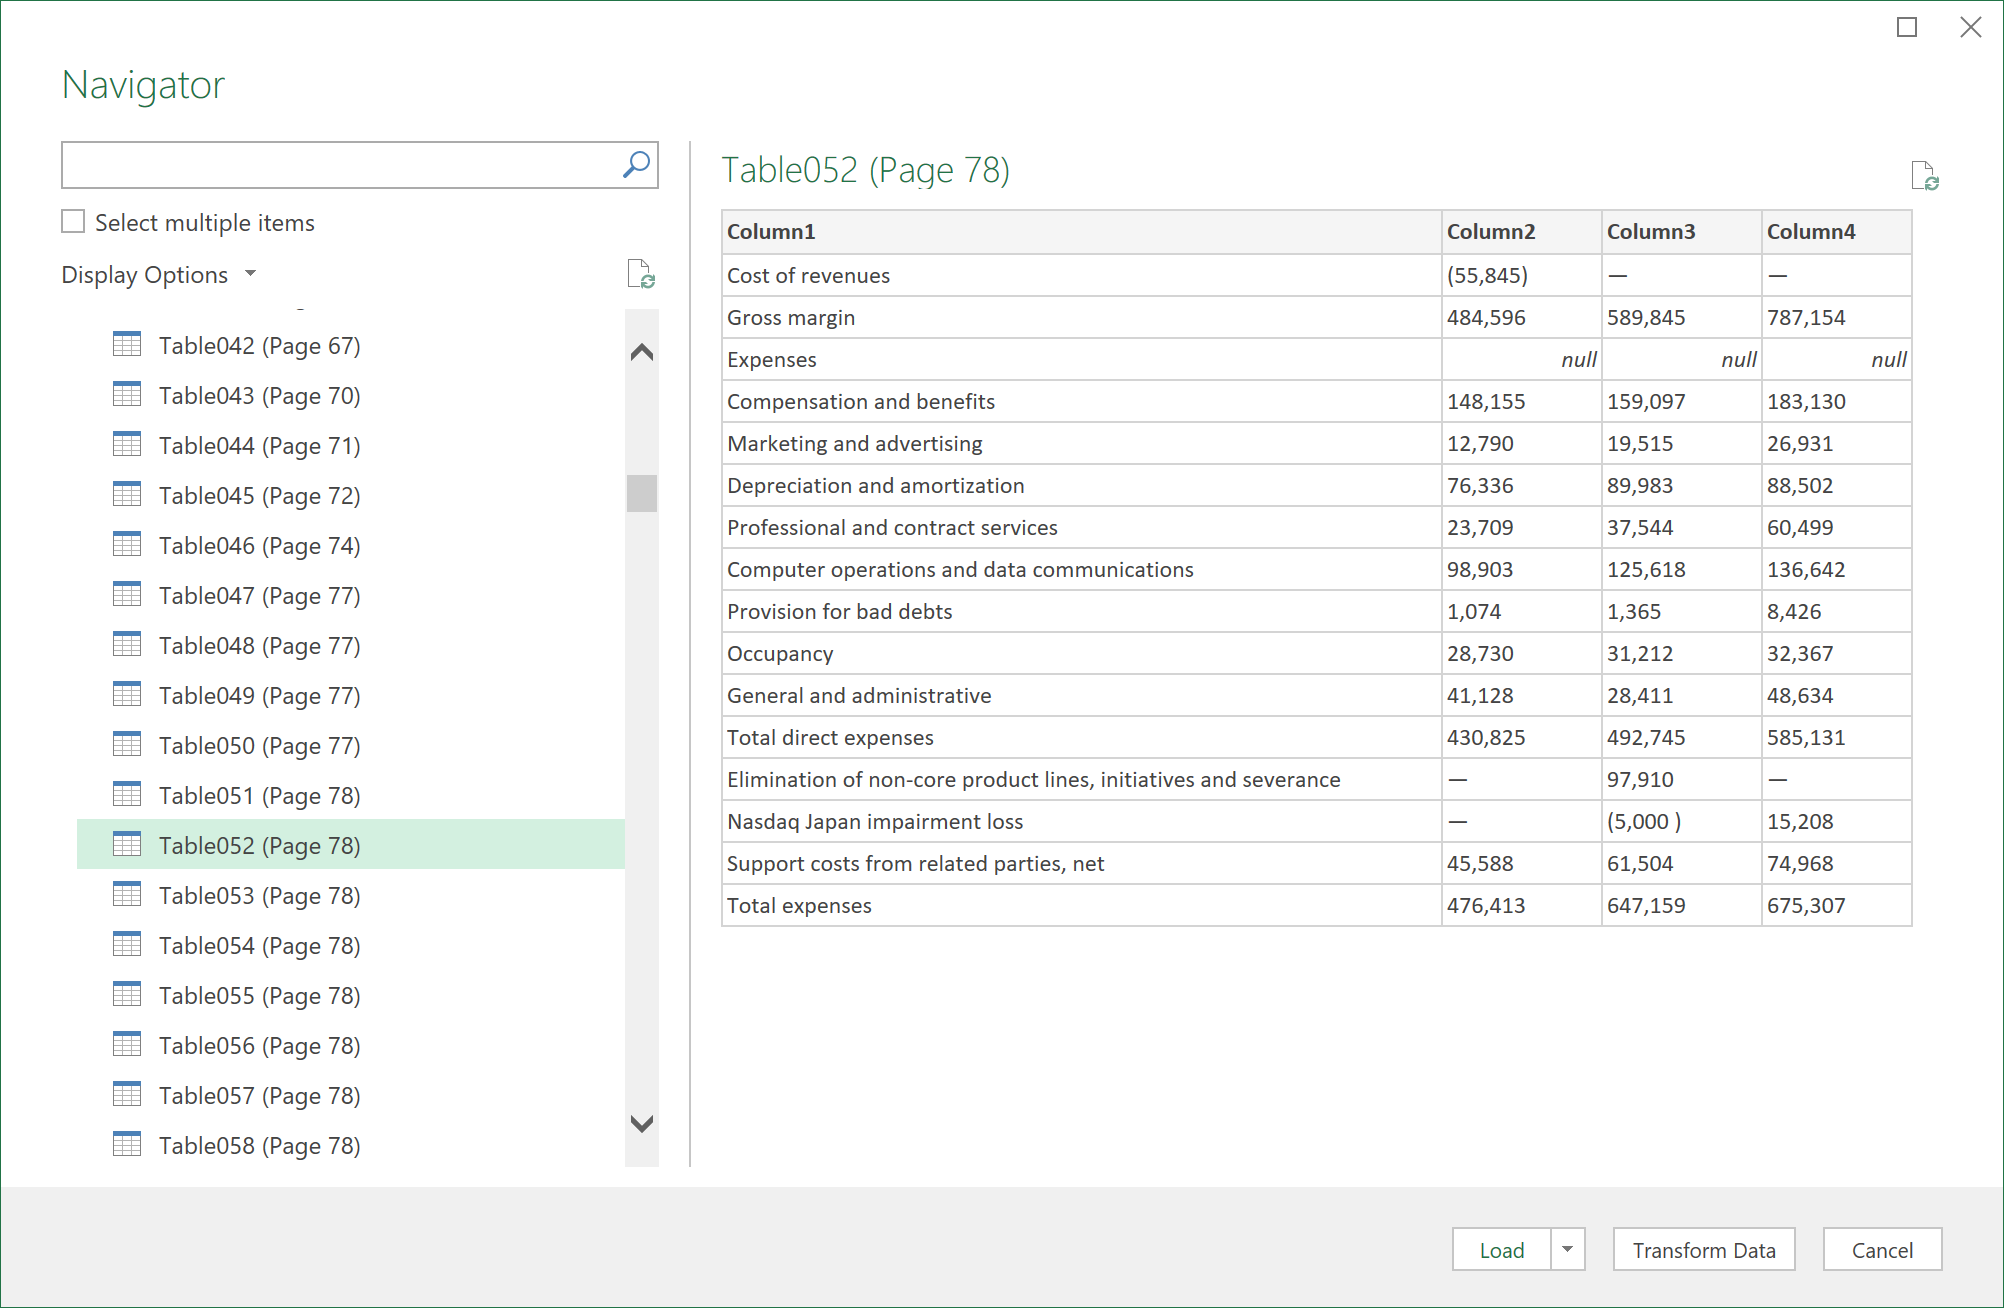
Select your PDF file, and then click Open. The Navigator dialog box opens your PDF and displays available tables.
-
Select the tables you want to import, then do one of the following:
-
To view the data directly in Excel, Select Load > Load or to see the Import dialog box, select Load > Load To.
-
To work with the data in Power Query first, select Transform Data.
-
For more information about advanced connector options, see PDF (docs.com).
You can import data from several files having a similar schema and format from a folder. Then, you can append the data into one table.
-
Select Data > Get Data > From File > From Folder.
-
In the Browse dialog box, locate the folder, and then select Open.
-
For detailed steps, see Import data from a folder with multiple files.
For more information about advanced connector options, see Folder (docs.com).
You can import data from several files having a similar schema and format from a SharePoint library. Then, you can append the data into one table.
-
Select Data > Get Data > From File > From SharePoint Folder.
-
In the SharePoint Folder dialog box, enter the root URL for the SharePoint site not including any reference to a library, and then navigate to the library.
-
For detailed steps, see Import data from a folder with multiple files.
For more information about advanced connector options, see SharePoint folder (docs.com).
-
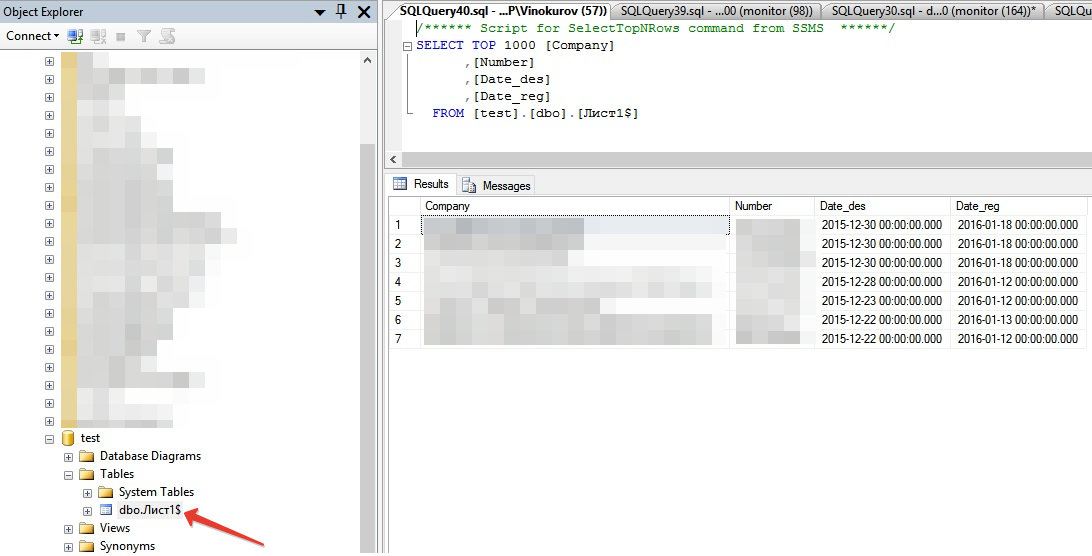
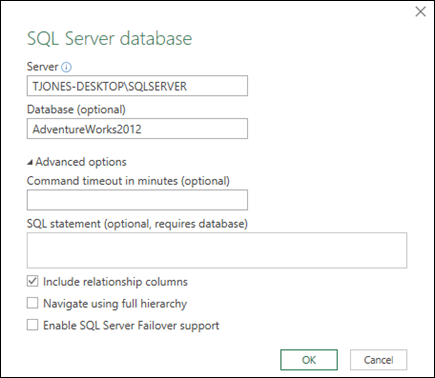
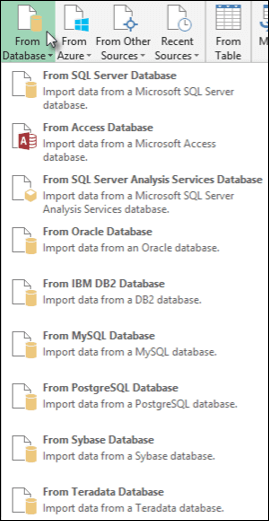
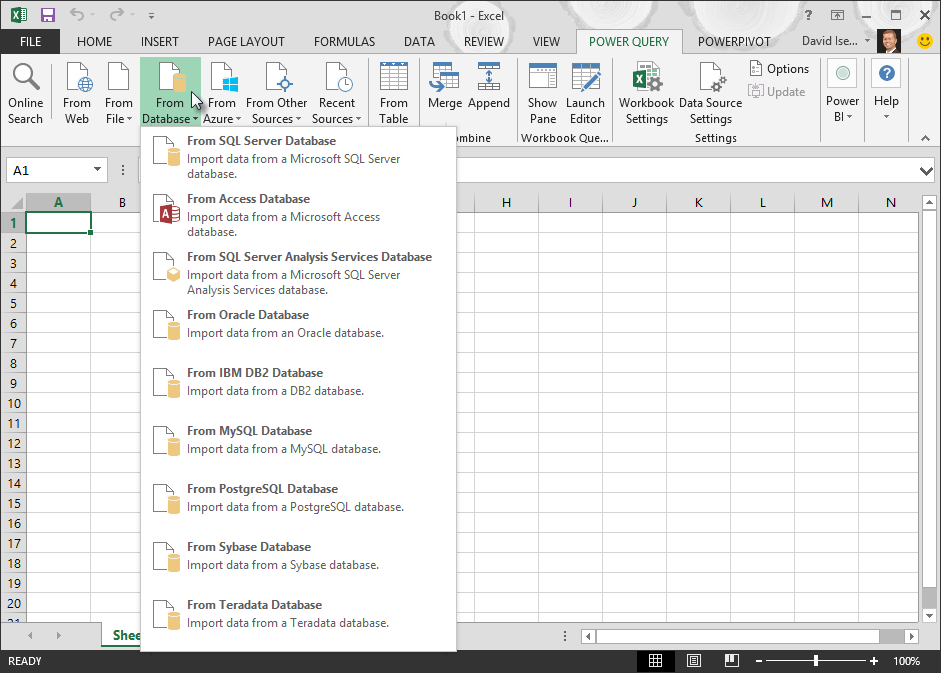
Select Data > Get Data > From Database > From SQL Server Database.
-
In the Microsoft SQL Database dialog box, specify the SQL Server to connect to in the Server Name box. Optionally, you can specify a Database Name as well.
-
If you want to import data using a native database query, specify your query in the SQL Statement box. For more information, see Import Data from Database using Native Database Query.
-
Select OK.
-
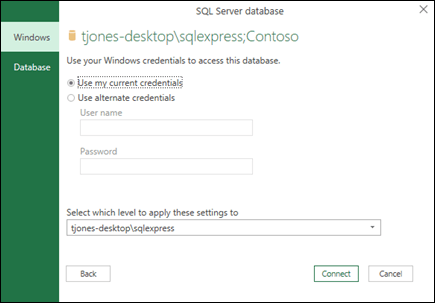
Select the authentication mode to connect to the SQL Server database.
-
Windows This is the default selection. Select this if you want to connect using Windows authentication. -
Database Select this if you want to connect using SQL Server authentication. After you select this, specify a user name and password to connect to your SQL Server instance.
-
-
By default, the Encrypt connection check box is selected to signify that Power Query connects to your database using an encrypted connection. If you do not want to connect using an encrypted connection, clear this check box, and then click Connect.
If a connection to your SQL Server is not established using an encrypted connection, Power Query prompts you to connect using an unencrypted connection. Click OK in the message to connect using an unencrypted connection.
For more information about advanced connector options, see SQL Server database (docs.com).
-
Select Data > Get Data > From Database > From Microsoft Access Database.
-
In the Import Data dialog box, browse for and locate the Access database file (.accdb).
-
Select the file, and then select Open. The Navigator dialog box appears.
-
Select the table or query in the left pane to preview the data in the right pane.
-
If you have many tables and queries, use the Search box to locate an object or use the Display Options along with the Refresh button to filter the list.
-
Select Load or Transform.
For more information about advanced connector options, see Access database (docs.com).
Note When you use a workbook connected to a SQL Server Analysis Services database, you may need additional information to answer specific product questions, such as reference information about multidimensional expressions (MDX), or configuration procedures for an online analytical processing (OLAP) server.
-
Select Data > Get External Data > From Database > From Analysis Services. The first page of the Data Connection Wizard appears. Its title is Connect to Database Server.
-
In the Server name box, enter the name of the OLAP database server.
Tip: If you know the name of the offline cube file that you want to connect to, you can type the complete file path, file name, and extension.
-
Under Log on credentials, do one of the following, then click Next:
-
To use your current Windows user name and password, click Use Windows Authentication.
-
To enter a database user name and password, click Use the following User Name and Password, and then type your user name and password in the corresponding User Name and Password boxes.
Security Note
-
Use strong passwords that combine uppercase and lowercase letters, numbers, and symbols. Weak passwords don’t mix these elements. For example, Y6dh!et5 is a strong password and House27 is a weak password. Passwords should contain 8 or more characters. A pass phrase that uses 14 or more characters is better.
-
It is critical that you remember your password. If you forget your password, Microsoft cannot retrieve it. Store the passwords that you write down in a secure place away from the information that they help protect.
-
-
-
Select Next to go to the second wizard screen. Its title is Select Database and Table.
To connect to a specific cube file in the database, make sure that Connect to a specific cube or table is selected, and then select a cube from the list.
-
In the Select the database that contains the data you want box, select a database, and then click Next.
-
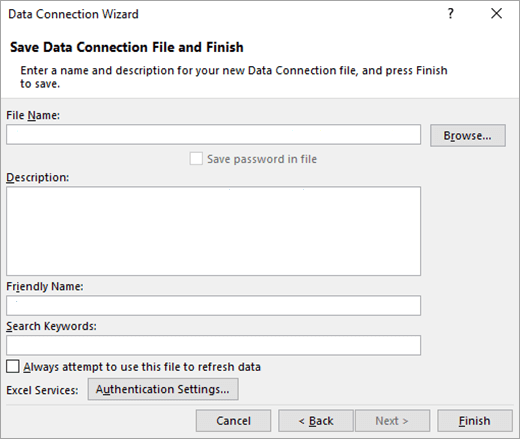
Click Next to go to the third wizard screen. Its titled Save Data Connection File and Finish.
-
In the File Name box, revise the default file name as needed (optional).
-
Click Browse to change the default file location of My Data Sources, or check for existing file names.
-
In the Description, Friendly Name, and Search Keywords boxes, type a description of the file, a friendly name, and common search words (all are optional).
-
To ensure that the connection file is used when the PivotTable is refreshed, click Always attempt to use this file to refresh this data.
Selecting this check box ensures that updates to the connection file will always be used by all workbooks that use that connection file.
-
You can specify how a PivotTable is accessed if the workbook is saved to Excel Services and is opened by using Excel Services.
Note: The authentication setting is only used by Excel Services, and not by Microsoft Office Excel. If you want to ensure that the same data is accessed whether you open the workbook in Excel or Excel Services, make sure that the authentication setting in Excel is the same.
Select Authentication Settings, and select one of the following options to log on to the data source:
-
Windows Authentication Select this option to use the Windows username and password of the current user. This is the most secure method, but it can affect performance when there are many users.
-
SSO Select this option to use Single Sign On, and then enter the appropriate identification string in the SSO ID text box. A site administrator can configure a SharePoint site to use a Single Sign On database where a username and password can be stored. This method can be the most efficient when there are many users.
-
None Select this option to save the username and password in the connection file.
Important: Avoid saving logon information when connecting to data sources. This information may be stored as plain text, and a malicious user could access the information to compromise the security of the data source.
-
-
Select OK.
-
Select Finish to close the Data Connection Wizard. The Import Data dialog box appears.
-
Decide how you want to import the data, and then select OK. For more information about using this dialog box, select the question mark (?).
You can create a dynamic connection between an Excel workbook and a SQL Server Analysis Services Online Analytical Processing (OLAP) database server, then refresh that connection whenever the data changes. You can connect to a specific offline cube file if it has been created on the database server. You can also import data into Excel as either a Table or a PivotTable report.
-
Select Data > Get Data > From Database > From SQL Server Analysis Services Database (Import).
-
Enter the Server name, and then select OK.
Note: You have the option of entering a specific database name, and you can also add an MDX (docs.com) or DAX query.
-
In the Navigator pane select the database, and then select the cube or tables you want to connect.
-
Click Load to load the selected table into a worksheet, or click Edit to perform additional data filters and transformations in the Power Query Editor before loading it.
-
Select Data > Get Data > From Database > From Oracle Database.
-
In the Oracle Database dialog box, in Server Name specify the Oracle Server to connect to. If a SID is required, this can be specified in the form of “ServerName/SID”.
-
If you want to import data using native database query, specify your query in the SQL Statement box. For more information, see Import data from database using Native Database Query.
-
Select OK.
-
If the Oracle server requires database user credentials:
-
In the Access a Database dialog box, enter your username and password.
-
Click Connect.
-
For more information about advanced connector options, see Oracle Database (docs.com).
Warning:
-
Before you can connect to an IBM DB2 database, you need the IBM DB2 Data Server Driver installed on your computer (minimum requirement is the IBM Data Server Driver Package (DS Driver)). Select the driver that matches your Power Query installation (32-bit or 64-bit).
-
There are known issues reported by IBM installing the IBM DB2 Data Server Driver on Windows 8. If you are using Windows 8 and want to connect to IBM DB2 using Power Query, you need to follow additional installation steps. Find more information about the IBM DB2 Data Server Driver on Windows 8.
-
Select Data > Get Data > From Database > From IBM DB2 Database.
-
In the IBM DB2 Database dialog box, in Server Name specify the IBM DB2 Database Server to connect to.
-
If you want to import data using native database query, specify your query in the SQL Statement box. For more information, see Import data from a database using Native Database Query.
-
Select OK.
-
If the IBM DB2 server requires database user credentials:
-
In the Access a Database dialog box, enter your username and password.
-
Click Connect.
-
For more information about advanced connector options, see IBM DB2 database (docs.com).
Note: If receive the message “This connector requires one or more additional components to be installed before it can be used.”, you need to download the appropriate ODBC Driver for MySQL to your Windows device from here. For more information, see MySQL Connectors.
-
Select Data > Get Data > From Database > From MySQL Database.
-
In the MySQL Database dialog box, in Server Name specify the MySQL Database Server to connect to.
-
If you want to import data using native database query, specify your query in the SQL Statement box. For more information, see Import data from a database using Native Database Query.
-
Select OK.
-
If the MySQL server requires database user credentials:
-
In the Access a Database dialog box, enter your username and password.
-
Click Connect.
-
For more information about advanced connector options, see MySQL database (docs.com).
Note: Before you can connect to a PostgreSQL database in Power Query, you need the Ngpsql data provider for PostgreSQL installed on your computer. Select the driver that matches your Office version (32-bit or 64-bit). For more information, see Which version of Office am I using? . Also make sure you have the provider registered in the machine configuration that matches the most recent .NET version on your device.
-
Select Data > Get Data > From Database > From PostgreSQL Database.
-
In the PostgreSQL Database dialog box, specify the PostgreSQL Database Server you want to connect to in the Server Name section.
-
If you want to import data using native database query, specify your query in the SQL Statement box. For more information, see Import data from a database using Native Database Query.
-
Select OK.
-
If the PostgreSQL server requires database user credentials:
-
In the Access a Database dialog box, enter your username and password.
-
Select Connect.
-
For more information about advanced connector options, see PostgreSQL (docs.com).
Note: Before you can connect to an SAP SQL Anywhere database, you need the SAP SQL Anywhere driver installed on your computer. Select the driver that matches your Excel installation (32-bit or 64-bit).
-
Select Data > Get Data > From Database > From Sybase Database.
-
In the Sybase Database dialog box, specify the Sybase Server to connect to in the Server Name box. Optionally, you can specify a Database Name as well.
-
If you want to import data using a native database query, specify your query in the SQL Statement box. For more information, see Import data from a database using Native Database Query.
-
Select OK.
-
By default, the Encrypt connection check box is selected so that Power Query connects to your database using a simple encrypted connection.
-
Select Connect.
For more information, see Sybase database (docs.com).
-
Select Data > Get Data > From Database > From Teradata Database.
-
In the Teradata Database dialog box, in Server Name specify the Teradata Server to connect to.
-
If you want to import data using native database query, specify your query in the SQL Statement box. For more information, see Import data from a database using Native Database Query.
-
Select OK.
-
If the Teradata server requires database user credentials:
-
In the Access a Database dialog box, enter your username and password.
-
Click Save.
-
For more information, see Terabase database (docs.com).
Notes:
-
This feature is only available in Excel for Windows if you have Office 2019 or later, or a Microsoft 365 subscription. If you are a Microsoft 365 subscriber, make sure you have the latest version of Office.
-
Before you can connect to an SAP HANA database using Power Query, you need the SAP HANA ODBC Driver on your computer. Select the driver that matches your Power Query installation (32-bit or 64-bit).
-
You will need an SAP account to login to the website and download the drivers. If you are unsure, contact the SAP administrator in your organization.
To connect to an SAP HANA database:
-
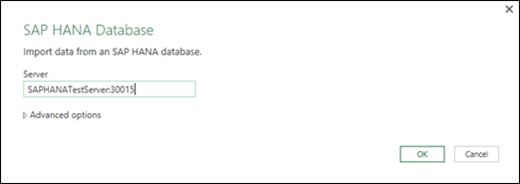
Click Data > New Query > From Database > From SAP HANA Database.
-
In the SAP HANA Database dialog box, specify the server you want to connect to. The server name should follow the format ServerName:Port.
-
Optionally, if you want to import data using native database query, Select Advanced options and in the SQL Statement box enter the query.
-
Select OK.
-
If the SAP HANA server requires database user credentials, then in the Access an SAP HANA database dialog box, do the following:
-
Click the Database tab, and enter your username and password.
-
Click Connect.
-
For more information about advanced connector options, see SAP HANA database (docs.com).
Azure SQL Database is a high-performing, fully managed, scalable relational database built for the cloud and used for mission-critical applications. For more information, see What is Azure SQL? (docs.com).
-
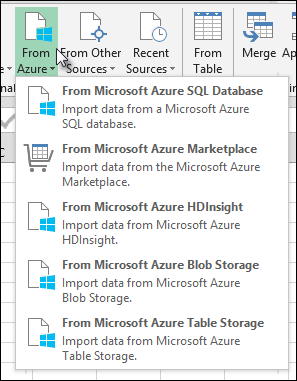
Select Data > Get Data > From Azure > From Azure SQL Database.
-
In the Microsoft SQL Database dialog box, specify the SQL Server to connect to in the Server Name box. Optionally, you can specify a Database Name as well.
-
If you want to import data using a native database query, specify your query in the SQL Statement box. For more information, see Import Data from Database using Native Database Query.
-
Select OK.
-
Select the authentication mode to connect to the SQL Server database.
-
Windows This is the default selection. Select this if you want to connect using Windows authentication. -
Database Select this if you want to connect using SQL Server authentication. After you select this, specify a user name and password to connect to your SQL Server instance.
-
-
By default, the Encrypt connection check box is selected to signify that Power Query connects to your database using an encrypted connection. If you do not want to connect using an encrypted connection, clear this check box, and then click Connect.
If a connection to your SQL Server is not established using an encrypted connection, Power Query prompts you to connect using an unencrypted connection. Click OK in the message to connect using an unencrypted connection.
For more information about advanced connector options, see Azure SQL database (docs.com).
Azure Synapse Analytics combines big data tools and relational queries by using Apache Spark to connect to Azure data services and the Power Platform. You can load millions of rows in no time. Then, you can work with tabular data by using familiar SQL syntax for queries. For more information, see What is Azure Synapse Analytics (docs.com).
-
Select Data > Get Data > From Azure > From Azure Synapse Analytics.
-
In the Microsoft SQL Database dialog box, specify the SQL Server to connect to in the Server Name box. Optionally, you can specify a Database Name as well.
-
If you want to import data using a native database query, specify your query in the SQL Statement box. For more information, see Import Data from Database using Native Database Query.
-
Select OK.
-
Select the authentication mode to connect to the SQL Server database.
-
Windows This is the default selection. Select this if you want to connect using Windows authentication. -
Database Select this if you want to connect using SQL Server authentication. After you select this, specify a user name and password to connect to your SQL Server instance.
-
-
By default, the Encrypt connection check box is selected to signify that Power Query connects to your database using an encrypted connection. If you do not want to connect using an encrypted connection, clear this check box, and then click Connect.
If a connection to your SQL Server is not established using an encrypted connection, Power Query prompts you to connect using an unencrypted connection. Click OK in the message to connect using an unencrypted connection.
For more information about advanced connector options, see Azure Synapse Analytics (docs.com).
Azure HDInsight is used for big data analysis when you need to process large amounts of data. It supports data warehousing and machine learning; you can think of it as a data flow engine. For more information, see What is Azure HDInsight? (docs.com).
-
Select Data > Get Data > From Azure > From Azure HDInsight (HDFS).
-
Enter the Account name or URL of the Microsoft Azure Blob Storage account associated with your HDInsight cluster, and then select OK.
-
In the Access Microsoft Azure HDInsight dialog box, enter your Account Key, and click Connect.
-
Select your cluster in the Navigator dialog, and then find and select a content file.
-
Select Load to load the selected table, or Edit to perform additional data filters and transformations before loading it.
Microsoft Azure Blob Storage is a service for storing large amounts of unstructured data, like images, videos, audio, and documents, which can be accessed from anywhere in the world via HTTP or HTTPS. For more information about Azure Blob Storage service, see How to Use Blob Storage.
-
Select Data > Get Data > From Azure > From Azure Blob Storage.
-
In the Microsoft Azure Blob Storage dialog box, enter your Microsoft Azure storage account name or URL, and then select OK.
-
If you are connecting to the Blob storage service for the first time, you will be prompted to enter and save the storage access key. In the Access Microsoft Azure Blob Storage dialog box, enter your storage access key in the Account Key box, and click Save.
Note: If you need to retrieve your storage access key, browse to the Microsoft Azure Portal, select your storage account, and then select the Manage Access Key icon on the bottom of the page. Select the copy icon to the right of the primary key, and then paste the value in the Account Key box.
-
The Query Editor lists all the available containers in your Microsoft Azure Blob Storage. In the Navigator, select a container from where you want to import data, and then select Apply & Close.
For more information, see Azure Blob Storage (docs.com).
The Azure Storage provides storage services for a variety of data objects. The Table storage component targets NoSQL data stored as key/attribute pairs. For more information, see Introduction to Table storage (docs.com).
-
Select Data > Get Data > From Azure > From Azure Synapse Analytics.
-
Enter the Account name or URL of the Microsoft Azure Table Storage account, and then select OK.
-
Select Data > Get Data > From Azure > From Azure Data Lake Storage.
-
Enter the Account name or URL of the Microsoft Azure Data Lake Storage account, and then select OK.
For example: swebhdfs://contoso.azuredatalake.net/
-
Optionally, enter a value in the Page Size in Bytes box.
For more information, see Azure Data Lake Storage (docs.com).
Azure Data Lake Storage Gen 2 combines different data warehouses into a single, stored environment. You can use a new generation of query tools to explore and analyze data, working with petabytes of data. For more information, see Azure Data Lake Storage (docs.com).
-
In the Azure Data Lake Storage Gen2 dialog box, provide the account URL. URLs for Data Lake Storage Gen2 have the following pattern:
https://<accountname>.dfs.core.windows.net/<container>/<subfolder>
For example, https://contosoadlscdm.dfs.core.windows.net/ -
Select whether you want to use the File System View or the Common Data Model (CDM) Folder View.
-
Select OK.
-
You may need to choose an authentication method.
For example, if you select the Organizational account method, select Sign in to sign into your storage account. You’ll be redirected to your organization’s sign-in page. Follow the prompts to sign into the account. After you’ve successfully signed in, select Connect.
-
In the Navigator dialog box verify the information, and then select either Transform Data to transform the data in Power Query or Load to load the data.
For more information, see Azure Data Lake Storage (docs.com).
Azure Data Explorer is a fast and highly scalable data exploration service for log and telemetry data. It can handle large volumes of diverse data from any data source, such as websites, applications, IoT devices, and more. For more information, see What is Azure Data Explorer (docs.com).
-
Select Data > Get Data > From Azure > From Azure Data Explorer.
-
In the Azure Data Explorer (Kusto) dialog box, enter appropriate values.
Each prompt provides helpful examples to walk you through the process.
-
Select OK.
You can import Datasets from your organization with appropriate permission by selecting them from the Power BI Datasets pane, and then creating a PivotTable in a new worksheet.
-
Select Data > Get Data > From Power BI (<Tenant name>). The Power BI Datasets pane appears. <Tenant name> varies depending on your organization, for example, Power BI (Contoso).
-
If many Datasets are available, use the Search box. Select the arrow next to the box to display keyword filters for versions and environments to target your search.
-
Select a Dataset and create a PivotTable in a new worksheet. For more information, see Overview of PivotTables and PivotCharts.
For more information on Power BI, see Create a PivotTable from Power BI datasets and Data Management Experience in Power BI for Office 365 Help (docs.com).
A dataflow is a data preparation technology that enables ingesting, transforming, and loading data into Microsoft Dataverse environments, Power BI workspaces, or Azure Data Lake. You can trigger dataflows to run either on demand or automatically on a schedule so that data is always kept up to date.
-
Select Data > Get Data > From Power Platform > From Dataflows.
-
If prompted, enter the required credentials, or sign in as a different user. The Navigator pane appears.
-
Select the dataflow in the left pane to preview it in the right pane.
-
Do one of the following:
-
To add the data to a worksheet, select Load.
-
To add the data to the Power Query Editor, select Transform Data.
-
For more information, see An overview of dataflows across Microsoft Power Platform.
Use Dataverse to securely store and manage data in the cloud. You can create or import custom tables specific to your organization, populate them with data by using Power Query, and then use Power Apps or Microsoft Access to build rich business applications.
-
Select Data > Get Data > From Power Platform > From Dataverse.
-
If prompted, enter the required credentials, or sign in as a different user. The Navigator pane appears.
-
Select the data in the left pane to preview it in the right pane.
-
Do one of the following:
-
To add the data to a worksheet, select Load.
-
To add the data to the Power Query Editor, select Transform Data.
-
For more information, see What is Microsoft Dataverse.
-
Select Data > Get Data > From Online Services > From SharePoint Online List.
-
In the SharePoint Folder dialog box, enter the root URL for the SharePoint site not including any reference to a library, and then navigate to the library.
-
Select the 2.0 Beta SharePoint implementation, which enables Advanced options, so you can select a View mode:
All Retrieves all columns from a SharePoint List.
Default Retrieves the columns set in the Default View of a SharePoint List. -
As an alternative to 2.0 Beta, you can select 1.0, which corresponds to the earlier version of SharePoint.
For more information about advanced connector options, see SharePoint Online list (docs.com).
-
Select Data > Get Data > From Online Services from SharePoint Online List.
-
In the Microsoft Exchange dialog box enter your email address in the form of <alias>@<organization>.com
-
If you have many objects, use the Search box to locate an object or use he Display Options along with the Refresh button to filter the list.
-
Select or clear the Skip files with errors checkbox at the bottom of the dialog box.
-
Select the table you want: Calendar, Mail, Meeting Requests, People, and Tasks.
-
Do one of the following:
-
To create a query, and then load to a worksheet, select Load > Load.
-
To create a query, and then display the Import Data dialog box, select Load > Load To.
-
To create a query, and then launch the Power Query Editor, select Transform Data.
-
Select the Environment you want to connect to.
-
In the menu, select the Settings icon > Advanced customizations > Developer resources.
-
Copy the Instance Web API value.
Notes:
-
The url format will be something like https://<tenant>.crm.dynamics.com/api/data/v9.0.
-
The exact format of the URL you will use to connect depends on your region and the version of CDS for Apps you’re using. For more information see: Web API URL and versions (docs.com).
-
-
Select Data > Get Data > From Online Services > From Dynamics 365 (online).
-
In the dialog box, with the Basic option selected, enter the Web API URL for your CDS for Apps connection, and click OK.
-
If you select the Advanced option, you can append certain additional parameters to the query to control what data is returned. For more information see: Query Data using the Web API (docs.com).
-
-
Select Organization account.
-
If you aren’t signed in using the Microsoft Work or School account you use to access Dataverse for Apps, select Sign in and enter the account username and password.
-
-
Select Connect.
-
Within the Navigator dialog, select the data you want to retrieve.
-
Verify the data is correct, and then select Load or Edit to open the Power Query Editor.
-
Select Data > Get Data > From Online Services > From Salesforce Objects. The Salesforce Objects dialog box appears.
-
Select either Production or Custom. If you select Custom, enter the URL of a custom instance.
-
Select or clear Include relationships column.
-
Select OK.
For more information about advanced connector options, see Salesforce Objects (docs.com).
Because Salesforce Reports has API limits retrieving only the first 2,000 rows for each report, consider using the Salesforce Objects connector to work around this limitation if needed.
-
Select Data > Get Data > From Online Services > From Salesforce Reports. The Salesforce Reports dialog box appears.
-
Select either Production or Custom. If you select Custom, enter the URL of a custom instance.
-
Select or clear Include relationships column.
-
Select OK.
For more information about advanced connector options, see Salesforce Reports (docs.com).
Make sure you have the latest version of the Adobe Analytics connector. For more information, see Connect to Adobe Analytics in Power BI Desktop (docs.com).
-
Select Data > Get Data > From Online Services > From Adobe Analytics.
-
Select Continue. The Adobe Account dialog box appears.
-
Sign in with you Adobe Analytics Organizational account, and then select Connect.
For more information about advanced connector options, see Adobe Analytics.
For more information, see From Table/Range.
Important:
-
When you try to import a data from the web, you may get the following message: “This connector requires one or more additional components to be installed before it can be used.” The Web connector requires WebView 2 Framework to be installed on your computer.
-
You can download it from here.

Procedure
-
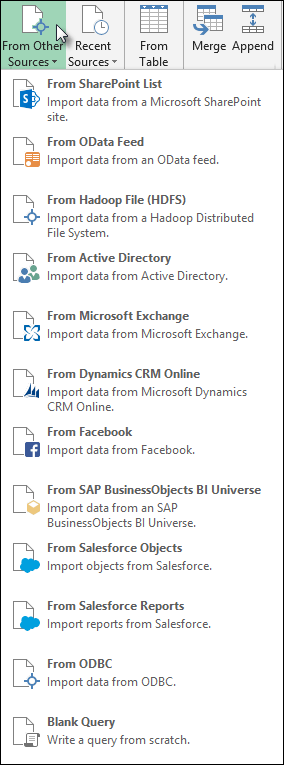
Select Data > New Query > From Other Sources > From Web.
-
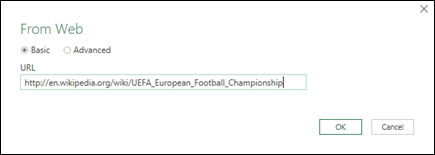
In the From Web dialog box, enter a web page URL, then click OK.
In this case, we’re using: http://en.wikipedia.org/wiki/UEFA_European_Football_Championship.
If the web page requires user credentials:
-
Select Advanced, and then In the Access Web dialog box, enter your credentials.
-
Select Save.
-
-
Select OK.
-
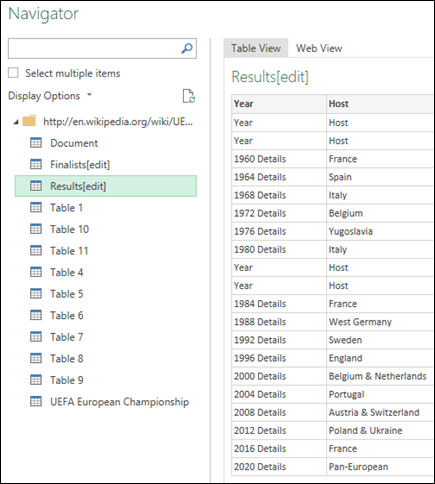
In the Navigator pane, do the following:
Select Table View, such as Results.
Select Web View to see the table as a web page.
-
Select Load to load the data into a worksheet.

For more information about advanced connector options, see Web (docs.com).
-
Select Data > Get Data > From Other Sources > From SharePoint List.
-
In the Microsoft SharePoint Lists dialog box, enter the URL for a SharePoint site.
Note: When connecting to a SharePoint list, enter the site URL instead of the list URL. In the Access SharePoint dialog box, select the most general URL to authenticate against the site correctly. By default, the most general URL is selected.
-
Select OK.
-
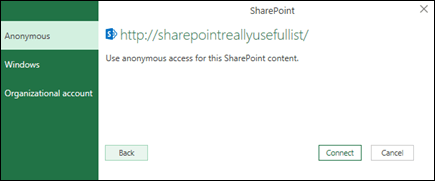
In the Access SharePoint dialog box, select a credentials option:
-
Select Anonymous if the SharePoint Server does not require any credentials.
-
Select Windows if the SharePoint Server requires your Windows credentials.
-
Select Organizational account if the SharePoint Server requires organizational account credentials.
-
-
Select Connect.
For more information about advanced connector options, see SharePoint list (docs.com).
-
Select Data > Get Data > From Other Sources > From OData Feed.
-
In the OData Feed dialog box, enter the URL for an OData feed.
-
Select OK.
-
If the OData feed requires user credentials, in the Access an OData feed dialog box:
-
Select Windows if the OData feed requires Windows Authentication.
-
Select Basic if the OData feed requires your username and password.
-
Select Marketplace key if the OData feed requires a Marketplace account key. You can select the Get your Marketplace Account Key to subscribe to Microsoft Azure Marketplace OData feeds. You can also Sign up for Microsoft Azure Marketplace from the Access an OData Feed dialog box.
-
Click Organizational account if the OData feed requires federated access credentials. For Windows Live ID, log into your account.
-
Select Save.
-
Note: Importing to an OData feed supports the JSON light data service format.
For more information about advanced connector options, see OData feed (docs.com).
Hadoop Distributed File System (HDFS) is designed to store terabytes and even petabytes of data. HDFS connects computer nodes within clusters over which data files are distributed and you can access these data files as one seamless file stream.
-
Select Data > Get Data > From Other Sources > From Hadoop File (HDFS).
-
Enter the name of the server in the Server box, and then select OK.
-
Select Data > Get Data > From Other Sources > From Active Directory.
-
Enter your domain in the Active Directory dialog box.
-
In the Active Directory Domain dialog box for your domain, select Use my current credentials, or select Use alternate credentials and then enter your Username and Password.
-
Select Connect.
-
After the connection succeeds, use the Navigator pane to browse all the domains available within your Active Directory, and then drill down into Active Directory information including Users, Accounts, and Computers.
-
Select Data > Get Data > From Other Sources > From Microsoft Exchange.
-
In the Access an Exchange Server dialog box, enter your Email Address and Password.
-
Select Save.
-
In the Microsoft Exchange Autodiscover Service dialog box, select Allow to allow the Exchange Service to trust your credentials.
-
Select Data > Get Data > From Other Sources > From ODBC.
-
In the From ODBC dialog box, if displayed, select your Data Source Name (DSN).
-
Enter your connection string, and then select OK.
-
In the next dialog box, select from Default or Custom, Windows, or Database connection options, enter your credentials, and then select Connect.
-
In the Navigator pane, select the tables or queries that you want to connect to, then select Load or Edit.
For more information about advanced connector options, see ODBC data source (docs.com).
-
Select Data > Get Data > From Other Sources > From OLEDB.
-
In the From OLE DB dialog box, enter your connection string, and then select OK.
-
In the OLEDB Provider dialog, select from the Default or Custom, Windows, or Database connection options, enter the appropriate credentials, and then select Connect.
-
In the Navigator dialog box, select the database, and tables or queries you want to connect to, and then select Load or Edit.
Important:
Retirement of Facebook data connector notice Import and refresh data from Facebook in Excel will stop working in April, 2020. You will still be able to use the Facebook Power Query (Get & Transform) connector until then, but starting in April, 2020, you will be unable to connect to Facebook and will receive an error message. We recommend revising or removing any existing Power Query (Get & Transform) queries that use the Facebook connector as soon as possible to avoid unexpected results.
Note: If this is the first time you’ve connected to Facebook, you will be asked to provide credentials. Sign in using your Facebook account, and allow access to the Power Query application. You can turn off future prompts by clicking the Don’t warn me again for this connector option.
-
On the Data tab, click Get Data > From Online Services > From Facebook. If you don’t see the Get Data button, click New Query > From Other Sources > From Facebook.
-
In the Facebook dialog box, connect to Facebook using “Me”, your Username, or Object ID.
Note: Your Facebook username is different from your login email.
-
Select a category to connect to from the Connection drop-down list. For example, select Friends to give you access to all information available in your Facebook Friends category.
-
Click OK.
-
If necessary, click Sign in from the Access Facebook dialog, then enter your Facebook email or phone number, and password. You can check the option to remain logged in. Once signed in, click Connect.
-
After the connection succeeds, you will be able to preview a table containing information about the selected category. For instance, if you select the Friends category, Power Query renders a table containing your Facebook friends by name.
-
Click Load or Edit.
You can create a blank query. You might want to enter data to try out some commands, or you can select the source data from Power Query:
-
To change a setting such as credentials or privacy, select Home > Data Source Settings. For more information, see Manage data source settings and permissions.
-
To import an external data source, select Home > New Source. This command is similar to the Get Data command on the Data tab of the Excel ribbon.
-
To import a recent source, select Home > Recent Sources. This command is similar to the Recent Sources command on the Data tab of the Excel ribbon.
When you append two or more queries, the data is added to a query based on the names of the column headers in both tables. If the queries don’t have matching columns, null values are added to the unmatched column. The queries are appended in the order in which they’re selected.
For more information, see Append queries (Power Query) and Append queries (docs.com).
If you are a developer, there are several approaches within Excel that you can take to import data:
-
You can use Visual Basic for Applications to gain access to an external data source. Depending on the data source, you can use either ActiveX Data Objects or Data Access Objects to retrieve the data. You can also define a connection string in your code that specifies the connection information. Using a connection string is useful, for example, when you want to avoid requiring system administrators or users to first create a connection file, or to simplify the installation of your application.
-
If you import data from an SQL Server database, consider using SQL Native Client, which is a standalone data access Application Programming Interface (API) that is used for both OLE DB and ODBC. It combines the SQL OLE DB Provider and the SQL ODBC Driver into one native, dynamic link library (DLL), while also providing new functionality that is separate and distinct from the Microsoft Data Access Components (MDAC). You can use SQL Native Client to create new applications or enhance existing applications that can take advantage of newer SQL Server features, such as Multiple Active Result Sets (MARS), User-Defined Types (UDT), and XML data type support.
-
The RTD function retrieves real-time data from a program that supports COM automation. The RTD COM automation add-in must be created and registered on a local computer.
-
The SQL.REQUEST function connects with an external data source and runs a query from a worksheet. The SQL.REQUEST function then returns the result as an array without the need for macro programming. If this function is not available, you must install the Microsoft Excel ODBC add-in program (XLODBC.XLA). You can install the add-in from Office.com.
For more information about creating Visual Basic for Applications, see Visual Basic Help.
-
Select Data > Get Data (Power Query).
-
In the Choose data source dialog box, select Excel workbook.
-
Select Browse to locate the file you want to connect as the data source.
-
In the File picker dialog box, select the file, review the file details, and then select Get Data and Next.
-
On the left, select the data you want to import, and then on the right, confirm the selection in data preview.
-
At the bottom right, select Load.
-
Select Data > Get Data (Power Query).
-
In the Choose data source dialog box, select Text/CSV.
-
Select Browse to locate the file you want to connect as the data source.
-
In the File picker dialog box, select the file, review the file details, and then select Get Data and Next.
-
Confirm the file origin and delimiter selection in data preview.
-
At the bottom right, select Load.
-
Select Data > Get Data (Power Query).
-
In the Choose data source dialog box, select XML.
-
Select Browse to locate the file you want to connect as the data source.
-
In the File picker dialog box, select the file, review the file details, and then select Get Data and Next.
-
On the left, select the data you want to import, and then on the right, confirm the selection in data preview.
-
At the bottom right, select Load.
-
Select Data > Get Data (Power Query).
-
In the Choose data source dialog box, select JASON.
-
Select Browse to locate the file you want to connect as the data source.
-
In the File picker dialog box, select the file, review the file details, and then select Get Data and Next.
-
At the bottom right, select Close & Load.
-
Select Data > Get Data (Power Query).
-
In the Choose data source dialog box, select SQL Server database.
-
Under Connection settings, enter the name of the server.
-
Under Connection credentials, enter the username and password, decide whether to use an encrypted connection, and then select Next.
-
On the left, select the data you want to import, and then on the right, confirm the selection in data preview.
-
At the bottom right, select Load.
-
Select Data > Get Data (Power Query).
-
In the Choose data source dialog box, select SharePoint Online list.
-
In the Connect to data source dialog box, enter the root URL for the SharePoint site not including any reference to a library, and then sign in to your organizational account.
-
Select the 2.0 SharePoint implementation, which enables Advanced options, so you can select a View mode:
-
All which retrieves all columns from a SharePoint List.
-
Default which retrieves the columns set in the Default View of a SharePoint List.
Note As an alternative to 2.0, you can select 1.0, which corresponds to the earlier version of SharePoint.
-
-
Select Next.
-
On the left, select the data you want to import, and then on the right, confirm the selection in data preview.
-
At the bottom right, select Load.
-
Select Data > Get Data (Power Query).
-
In the Choose data source dialog box, select OData.
-
In the OData Feed dialog box, enter the URL for the OData feed.
-
If the OData feed requires user credentials, in the Connection credentials dialog box under Authentication kind:
-
Select Basic if the OData feed requires your username and password.
-
Select Organizational account if the OData feed requires federated access credentials, and select Sign in.
-
-
Select Next.
-
Select Data > Get Data (Power Query).
-
In the Choose data source dialog box, select Blank table.
-
Enter the desired data to the cells of the table. You can also rename the table under Name at the bottom.
-
Select Next.
-
After editing the query, on the top-right select Close & load.
-
Select Data > Get Data (Power Query).
-
In the Choose data source dialog box, select Blank query.
-
Enter the desired source and commands and then select Next.
-
After editing the query, on the top-right select Close & load.
You can use the Power Query add-in to connect to external data sources and perform advanced data analyses. The following sections provide steps for connecting to your data sources — web pages, text files, databases, online services, and Excel files, tables, and ranges.
Important: Before you can use Power Query in Excel 2013, you must activate it: click File > Options > Add-Ins. In the Manage section at the bottom, choose the COM Add-ins option from the drop-down list, then click Go. Click the Power Query check box, then OK. The Power Query ribbon should appear automatically, but if it doesn’t, close and restart Excel.
Using the Query Editor
Note: The Query Editor appears when you load, edit, or create a new query using Power Query. The following video shows the Query Editor window appearing after editing a query from an Excel workbook. To view the Query Editor without loading or editing an existing workbook query, from the Get External Data section in the Power Query ribbon tab, select From Other Sources > Blank Query. The following video shows one way to display the Query Editor.
-
In the Power Query ribbon tab, click From File > From CSV, or From Text.
-
In the Comma-Separated Values Browse dialog box, browse for or type a path to the file that you want to query.
-
Click Open.
Note: If you are importing data from a CSV file, Power Query will automatically detect column delimiters including column names and types. For example, if you imported the example CSV file below, Power Query automatically uses the first row as the column names and changes each column data type.
Example CSV file
Power Query automatically changes each column data type:
-
Order ID changes to number
-
Order Date changes to date
-
Category remains text (the default column type)
-
Product Name remains text (the default column type)
-
Sales changes to number
In the Query Editor, Power Query automatically applies a FirstRowAsHeader step and ChangeType step. These automatic actions are equivalent to manually promoting a row and manually changing each column type.
After Power Query auto detects columns, you can also use the Query Editor to write formulas for Power Query. For example:
= Csv.Document(File.Contents("C:ExamplesProducts Categories and Orders.csv"),null,",",null,1252)

= Table.PromoteHeaders(Source)

= Table.TransformColumnTypes(FirstRowAsHeader,{{"OrderID", type number}, {"CustomerID", type text}, {"EmployeeID", type number}, {"OrderDate", type date}, {"RequiredDate", type date}, {"ShipName", type text}})
Note: The Query Editor only appears when you load, edit, or create a new query using Power Query. The following video shows the Query Editor window in Excel 2013 appearing after editing a query from an Excel workbook. To view the Query Editor without loading or editing an existing workbook query, from the Get External Data section in the Power Query ribbon tab, select From Other Sources > Blank Query. The following video shows one way to display the Query Editor.
-
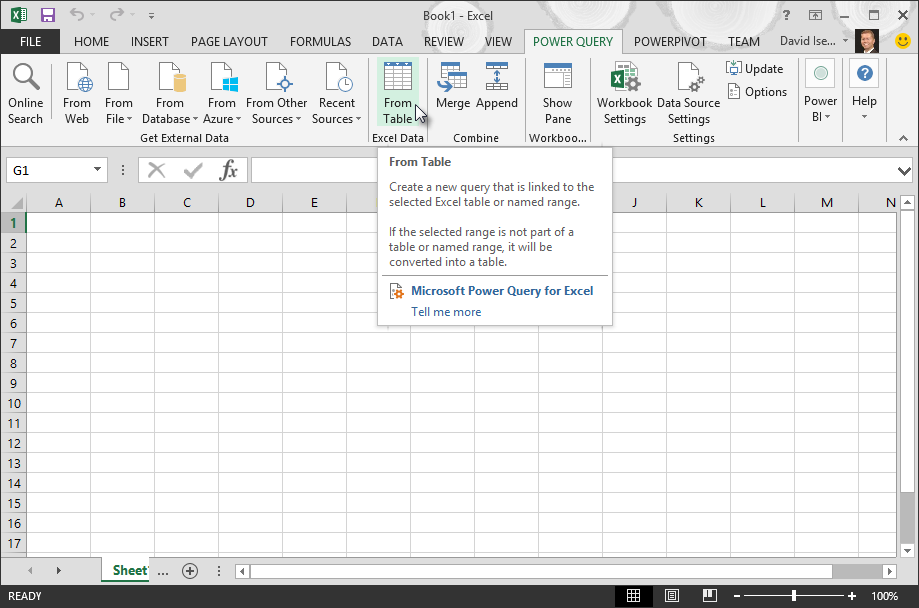
Select any cell within your data range.
-
In the Power Query ribbon tab, click From Table.
-
If prompted, in the From Table dialog box, you can click the Range Selection button to select a specific range to use as a data source.
-
If the range of data has column headers, you can check My table has headers. The range header cells are used to set the column names for the query.
-
In the Query Editor, click Close & Load.
Note: If your data range has been defined as a named range, or is in an Excel table, then Power Query will automatically sense the entire range and load it into the Query Editor for you. Plain data will automatically be converted to a table when it is loaded into the Query Editor.
You can use the Query Editor to write formulas for Power Query.
= Excel.CurrentWorkbook(){[Name="Table1"]}[Content]

Note: The Query Editor only appears when you load, edit, or create a new query using Power Query. The following video shows the Query Editor window appearing after editing a query from an Excel workbook. To view the Query Editor without loading or editing an existing workbook query, from the Get External Data section in the Power Query ribbon tab, select From Other Sources > Blank Query. The following video shows one way to display the Query Editor.
-
In the Power Query ribbon tab, click From File > From Excel.
-
In the Excel Browse dialog box, browse for or type a path to the file that you want to query.
-
Click Open.
If your source workbook has named ranges, the name of the range will be available as a data set.
You can also use the Query Editor to write formulas for Power Query. For example:
= Excel.Workbook
 (File.Contents("C:ExampleProducts and Orders.xlsx"))
Note: The Query Editor only appears when you load, edit, or create a new query using Power Query. The following video shows the Query Editor window in Excel 2013 appearing after editing a query from an Excel workbook. To view the Query Editor without loading or editing an existing workbook query, from the Get External Data section in the Power Query ribbon tab, select From Other Sources > Blank Query. The following video shows one way to display the Query Editor.
Note: While trying to import data from a legacy Excel file or an Access database in certain setups, you may encounter an error that the Microsoft Access Database Engine (Microsoft.ACE.OLEDB.12.0 provider) is not registered on the local machine. The error occurs on systems with only Office 2013 installed. To resolve this error, download the following resources to ensure that you can proceed with the data sources you are trying to access.
-
Microsoft Access Database Engine 2010 Redistributable
-
Access Database Engine 2010 Service Pack 1
-
Click the Power Query ribbon, then From Web.
-
In the From Web dialog box, enter a web page URL, then OK.
In this case, we’re using: http://en.wikipedia.org/wiki/UEFA_European_Football_Championship.
If the web page requires user credentials:
-
In the Access Web dialog box, click a credentials option, and provide authentication values.
-
Click Save.
-
-
Click OK.
-
Power Query will analyze the web page, and load the Navigator pane in Table View.
If you know which table you want to connect to, then click it from the list. For this example, we chose the Results table.
Otherwise, you can switch to the Web View and pick the appropriate table manually. In this case, we’ve selected the Results table.
-
Click Load, and Power Query will load the web data you selected into Excel.
-
In the Power Query ribbon tab, click From Database > From SQL Server Database.
-
In the Microsoft SQL Database dialog box, specify the SQL Server to connect to in the Server Name box. Optionally, you can specify a Database Name as well.
-
If you want to import data using a native database query, specify your query in the SQL Statement box. For more information, see Import Data from Database using Native Database Query.
-
Select OK.
-
Select the authentication mode to connect to the SQL Server database.
-
Windows: This is the default selection. Select this if you want to connect using Windows authentication.
-
Database: Select this if you want to connect using SQL Server authentication. After you select this, specify a user name and password to connect to your SQL Server instance.
-
-
By default, the Encrypt connection check box is selected to signify that Power Query connects to your database using an encrypted connection. If you do not want to connect using an encrypted connection, clear this check box, and then click Connect.
If a connection to your SQL Server is not established using an encrypted connection, Power Query prompts you to connect using an unencrypted connection. Click OK in the message to connect using an unencrypted connection.
Formula Example
You can also use the Query Editor to write formulas for Power Query.
= Sql.Databases(".")
= Sql.Database(".","Contoso")
-
Click the Power Query tab on the Ribbon, then select Get External Data > From Other Sources > From ODBC.
-
In the From ODBC dialog, if displayed, select your Data Source Name (DSN).
-
Enter your connection string, then press OK.
-
In the next dialog box, select from Default or Custom, Windows, or Database connection options, enter your credentials, then press Connect.
-
In the Navigator pane, select the tables or queries that you want to connect to, then press Load or Edit.
-
In the Power Query ribbon tab, select From Database > From Access Database.
-
In the Browse dialog box, browse for or type a file URL to import or link to a file.
-
Follow the steps in the Navigator dialog to connect to the table or query of your choice.
-
Click Load or Edit.

-
In the Power Query ribbon tab, click From File > From XML.
-
In the From XML Browse dialog box, browse for or type a file URL to import or link to a file.
-
Click Open.
After the connection succeeds, you will be able to use the Navigator pane to browse and preview the collections of items in the XML file in a tabular form.

You can also use the Query Editor to write formulas for Power Query. For example:
= Xml.Tables(File.Contents("C:DownloadsXML Example.xml"))
Note: The Query Editor only appears when you load, edit, or create a new query using Power Query. The following video shows the Query Editor window appearing after editing a query from an Excel workbook. To view the Query Editor without loading or editing an existing workbook query, from the Get External Data section in the Power Query ribbon tab, select From Other Sources > Blank Query. The following video shows one way to display the Query Editor.
-
On the Data tab, in the Get External Data group, click From Other Sources, and then click From Analysis Services.
The Data Connection Wizard is displayed. This wizard has three panes.
-
Connect to Database Server
-
Select Database and Table
-
Save Data Connection File and Finish
-
-
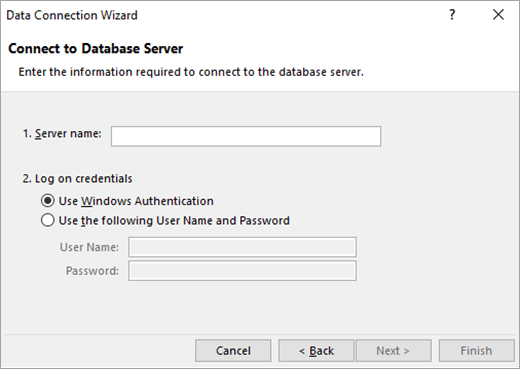
In the Connect to Database Server pane, in the Server name box, type the name of the OLAP database server.
Tip: If you know the name of the offline cube file that you want to connect to, you can type the complete file path, file name, and extension.
-
Under Log on credentials, do one of the following, then click Next:
-
To use your current Windows user name and password, click Use Windows Authentication.
-
To enter a database user name and password, click Use the following User Name and Password, and then type your user name and password in the corresponding User Name and Password boxes.
-
-
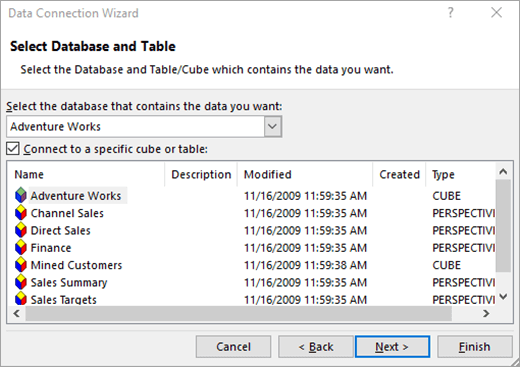
In the Select the database that contains the data you want pane, select a database, then click Next.
To connect to a specific cube in the database, make sure that Connect to a specific cube or table is selected, and then select a cube from the list.
-
In the Save Data Connection File and Finish pane, in the File Name box, revise the default file name as needed (optional).
Click Browse to change the default file location of My Data Sources, or check for existing file names.
-
In the Description, Friendly Name, and Search Keywords boxes, type a description of the file, a friendly name, and common search words (all are optional).
-
To ensure that the connection file is used when the PivotTable is refreshed, click Always attempt to use this file to refresh this data.
Selecting this check box ensures that updates to the connection file will always be used by all workbooks that use that connection file.
-
Click Finish to close the Data Connection Wizard.
-
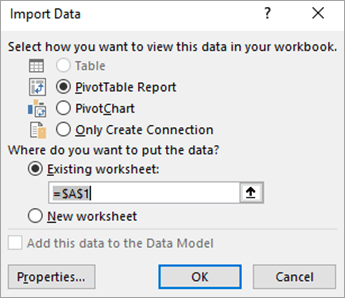
In the Import Data dialog box, under Select how you want to view this data in your workbook, do one of the following:
-
To create just a PivotTable report, click PivotTable Report.
-
To create a PivotTable report and a PivotChart report, click PivotChart and PivotTable Report.
-
To store the selected connection in the workbook for later use, click Only Create Connection. This check box ensures that the connection is used by formulas that contain Cube functions that you create and that you don’t want to create a PivotTable report.
-
-
Under Where do you want to put the data, do one of the following:
-
To place the PivotTable report in an existing worksheet, select Existing worksheet, and then type the cell reference of the first cell in the range of cells where you want to locate the PivotTable report.
You can also click Collapse Dialog
to temporarily hide the dialog box, select the beginning cell on the worksheet that you want to use, and then press Expand Dialog .
-
-
To place the PivotTable report in a new worksheet starting at cell A1, click New worksheet.
-
To verify or change connection properties, click Properties, make the necessary changes in the Connection Properties dialog box, and then click OK.
 to temporarily hide the dialog box, select the beginning cell on the worksheet that you want to use, and then press Expand Dialog
  .
.-
On the Power Query tab, click From Other Sources > Blank Query.
-
In the Query Editor, click Advanced Editor.
-
Input your query string as follows, replacing «C:UsersNameDesktopJSONTest.json» with the path to your JSON file.
let

    Source = Json.Document(File.Contents("C:UsersNameDesktopJSONTest.json")),
    #"Converted to Table" = Record.ToTable(Source)

in

    #"Converted to Table"
-
In the Power Query ribbon tab, click From Database > From Oracle Database.
-
In the Oracle Database dialog box, in Server Name specify the Oracle Server to connect to. If a SID is required, this can be specified in the form of “ServerName/SID”.
-
If you want to import data using native database query, specify your query in the SQL Statement box. For more information, see Import Data from Database using Native Database Query.
-
Click OK.
-
If the Oracle server requires database user credentials:
-
In the Access a Database dialog box, enter your username and password.
-
Click Connect.
-
-
In the Power Query ribbon tab, select From Other Sources > From SharePoint List.
-
In the Microsoft SharePoint Lists dialog box that appears, enter the URL for a SharePoint site.
Note: When connecting to a SharePoint list, enter the site URL instead of the list URL. In the Access SharePoint dialog box, select the most general URL to authenticate against the site correctly. By default, the most general URL is selected.
-
Select OK to continue.
-
In the Access SharePoint dialog box that appears next, select a credentials option:
-
Select Anonymous if the SharePoint Server does not require any credentials.
-
Select Windows if the SharePoint Server requires your Windows credentials.
-
Select Organizational account if the SharePoint Server requires organizational account credentials.
-
-
Select Connect.

-
In the Power Query ribbon tab, select From Other Source > From OData Feed.
-
In the OData Feed dialog box, enter the URL for an OData feed.
-
Select OK.
-
If the OData feed requires user credentials, in the Access an OData feed dialog box:
-
Select Windows if the OData feed requires Windows Authentication.
-
Select Basic if the OData feed requires your username and password.
-
Select Marketplace key if the OData feed requires a Marketplace account key. You can select the Get your Marketplace Account Key to subscribe to Microsoft Azure marketplace OData feeds. You can also Sign up for Microsoft Azure Marketplace from the Access an OData Feed dialog box.
-
Click Organizational account if the OData feed requires federated access credentials. For Windows Live ID, log into your account.
-
Select Save.
-
Note: Connect to an OData feed supports the JSON light data service format.
-
Click the Data tab, then Get Data > From Other Sources > From OLEDB. If you don’t see the Get Data button, follow the Data Connection Wizard instructions below.
-
In the From OLE DB dialog, enter your connection string, then press OK.
-
In the OLEDB Provider dialog, select from the Default or Custom, Windows, or Database connection options, enter the appropriate credentials, then click Connect.
-
In the Navigator dialog, select the Database and tables or queries you want to connect to, then press Load or Edit.
-
In the Power Query Editor, press Close & Load.
-
In the Power Query ribbon tab, click From Database > From MySQL Database.
-
In the MySQL Database dialog box, in Server Name specify the MySQL Database Server to connect to.
-
If you want to import data using native database query, specify your query in the SQL Statement box. For more information, see Import Data from Database using Native Database Query.
-
Click OK.
-
If the MySQL server requires database user credentials:
-
In the Access a Database dialog box, enter your username and password.
-
Click Connect.
-
-
In the Power Query ribbon tab, select From Other Sources > From Microsoft Exchange.
-
In the Access an Exchange Server dialog box, specify your Email Address and Password.
-
Click Save.
-
In the Microsoft Exchange Autodiscover Service dialog box, select Allow to allow the Exchange Service to trust your credentials.
Important: Make sure you have downloaded and installed the Power Query Add-In.
-
In the Power Query ribbon tab, click From Other Sources > From Active Directory.
-
Enter your domain in the Active Directory dialog box.
-
In the Active Directory Domain dialog box for your domain, click Use my current credentials, or Use alternate credentials. For Use alternate credentials authentication, enter your Username and Password.
-
Click Connect.
-
After the connection succeeds, you can use the Navigator pane to browse all the domains available within your Active Directory, and drill down into Active Directory information including Users, Accounts, and Computers.
Warning:
-
Before you can connect to an IBM DB2 database, you need the IBM DB2 Data Server Driver installed on your computer (minimum requirement is the IBM Data Server Driver Package (DS Driver)). Select the driver that matches your Power Query installation (32-bit or 64-bit).
-
There are known issues reported by IBM installing the IBM DB2 Data Server Driver on Windows 8. If you are using Windows 8 and want to connect to IBM DB2 using Power Query, you need to follow additional installation steps. Find more information about the IBM DB2 Data Server Driver on Windows 8.
-
In the Power Query ribbon tab, click From Database > From IBM DB2 Database.
-
In the IBM DB2 Database dialog box, in Server Name specify the IBM DB2 Database Server to connect to.
-
If you want to import data using native database query, specify your query in the SQL Statement box. For more information, see Import Data from Database using Native Database Query.
-
Click OK.
-
If the IBM DB2 server requires database user credentials:
-
In the Access a Database dialog box, enter your username and password.
-
Click Connect.
-
Note: Before you can connect to a PostgreSQL database in Power Query, you need the Ngpsql data provider for PostgreSQL installed on your computer. Select the driver that matches your Office version (32-bit or 64-bit). See: Which version of Office am I using? for more information. Also make sure you have the provider registered in the machine configuration that matches the most recent .NET version on your device.
-
In the Power Query ribbon tab, select From Database > From PostgreSQL Database.
-
In the PostgreSQL Database dialog box, specify the PostgreSQL Database Server you want to connect to in the Server Name section.
-
If you want to import data using native database query, specify your query in the SQL Statement box. For more information, see Import Data from Database using Native Database Query.
-
Select OK.
-
If the PostgreSQL server requires database user credentials:
-
In the Access a Database dialog box, enter your username and password.
-
Select Connect.
-
-
Navigate to https://web.powerapps.com/
-
Select the Environment you want to connect to.
-
In the menu, select the Settings icon > Advanced customizations > Developer resources.
-
Copy the Instance Web API value.
Notes:
-
The url format will be something like https://<tenant>.crm.dynamics.com/api/data/v9.0.
-
The exact format of the URL you will use to connect depends on your region and the version of CDS for Apps you’re using. For more information see: Web API URL and versions (docs.com).
-
-
Select the Data tab, then Get Data > From Online Services > From Dynamics 365 (online).
-
If you don’t see the Get Data button, click New Query > From Other Sources > From Dynamics 365 (online).
-
-
In the dialog box, with the Basic option selected, enter the Web API URL for your CDS for Apps connection, and click OK.
-
If you select the Advanced option, you can append certain additional parameters to the query to control what data is returned. For more information see: Query Data using the Web API.
-
-
Select Organization account.
-
If you aren’t signed in using the Microsoft Work or School account you use to access CDS for Apps, click Sign in and enter the account username and password.
-
-
Click Connect.
-
Within the Navigator dialog, select the data you want to retrieve.
-
If the data is good to be imported as is, then select the Load option, otherwise choose the Edit option to open the Power Query Editor.
Note: The Power Query Editor gives you multiple options to modify the data returned. For instance, you might want to import fewer columns than your source data contains. In that case, go to the Home tab > Manage Columns > Choose Columns, select the columns you want to keep, then click OK. When you’re ready, click Close & Load to return the modified data to Excel.
-
In the Power Query ribbon tab, select From Database > From Teradata Database.
-
In the Teradata Database dialog box, in Server Name specify the Teradata Server to connect to.
-
If you want to import data using native database query, specify your query in the SQL Statement box. For more information, see Import Data from Database using Native Database Query.
-
Select OK.
-
If the Teradata server requires database user credentials:
-
In the Access a Database dialog box, enter your username and password.
-
Click Save.
-
Important:
Retirement of Facebook data connector notice Import and refresh data from Facebook in Excel will stop working in April, 2020. You will still be able to use the Facebook Get & Transform (Power Query) connector until then, but starting in April, 2020, you will be unable to connect to Facebook and will receive an error message. We recommend revising or removing any existing Get & Transform (Power Query) queries that use the Facebook connector as soon as possible to avoid unexpected results.
Note: If this is the first time you’ve connected to Facebook, you will be asked to provide credentials. Sign in using your Facebook account, and allow access to the Power Query application. You can turn off future prompts by clicking the Don’t warn me again for this connector option.
-
In the Power Query ribbon tab, click From Other Sources > From Facebook.
-
In the Facebook dialog box, connect to Facebook using “Me”, your Username, or Object ID.
Note: Your Facebook username is different from your login email.
-
Select a category to connect to from the Connection drop-down list. For example, select Friends to give you access to all information available in your Facebook Friends category.
-
Click OK.
-
If necessary, click Sign in from the Access Facebook dialog, then enter your Facebook email or phone number, and password. You can check the option to remain logged in. Once signed in, click Connect.
-
After the connection succeeds, you will be able to preview a table containing information about the selected category. For instance, if you select the Friends category, Power Query renders a table containing your Facebook friends by name.
-
Click Load or Edit.
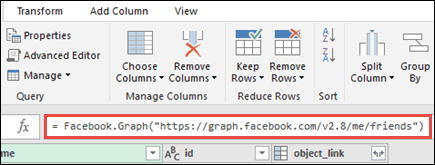
You can use the Query Editor to write formulas for Power Query.
= Facebook.Graph("https://graph.facebook.com/v2.8/me/friends")
Note: The Query Editor only appears when you load, edit, or create a new query using Power Query. The following video shows the Query Editor window appearing after editing a query from an Excel workbook. To view the Query Editor without loading or editing an existing workbook query, from the Get External Data section in the Power Query ribbon tab, select From Other Sources > Blank Query. The following video shows one way to display the Query Editor.
Notes:
-
Before you can connect to an SAP SQL Anywhere database, you need the SAP SQL Anywhere driver installed on your computer. Select the driver that matches your Power Query installation (32-bit or 64-bit).
-
In the POWER QUERY ribbon tab, select From Database > From SAP Sybase SQL Anywhere.
-
In the Sybase Database dialog box, specify the Sybase Server to connect to in the Server Name box. Optionally, you can specify a Database Name as well.
-
If you want to import data using a native database query, specify your query in the SQL Statement box. For more information, see Import Data from Database using Native Database Query.
-
Click OK.
-
By default, the Encrypt connection check box is selected so that Power Query connects to your database using a simple encrypted connection.
-
Click Connect.
Microsoft Azure Blob Storage is a service for storing large amounts of unstructured data, like images, videos, audio, and documents, which can be accessed from anywhere in the world via HTTP or HTTPS. For more information about Azure Blob Storage service, see How to Use Blob Storage.
-
In the Power Query ribbon tab, select From Azure > From Microsoft Azure Blob Storage.
-
In the Microsoft Azure Blob Storage dialog box, enter your Microsoft Azure storage account name or URL, and then click OK.
-
If you are connecting to the Blob storage service for the first time, you will be prompted to enter and save the storage access key. In the Access Microsoft Azure Blob Storage dialog box, enter your storage access key in the Account Key box, and click Save.
Note: If you need to retrieve your storage access key, browse to the Microsoft Azure Portal, select your storage account, and then click on the Manage Access Key icon on the bottom of the page. Click on the copy icon to the right of the primary key, and then paste the value in the Account Key box.
-
The Query Editor lists all the available containers in your Microsoft Azure Blob Storage. In the Navigator, select a container from where you want to import data, and then click Apply & Close.
-
In the POWER QUERY ribbon tab, select From Azure > From Microsoft Azure HDInsight.
-
In the Microsoft Azure HDInsight dialog box, enter an Account Name and click OK.
-
Next, enter your Account Key, and click Connect.
Note: If you need to retrieve your key, return to the Microsoft Azure Portal, select your storage account, and click on the Manage Access Key icon on the bottom of the page. Click on the copy icon to the right of the primary key and paste the value into the wizard.
-
Select your cluster in the Navigator dialog, and then find and select a content file.
-
Click Load to load the selected table, or click Edit to perform additional data filters and transformations before loading it.
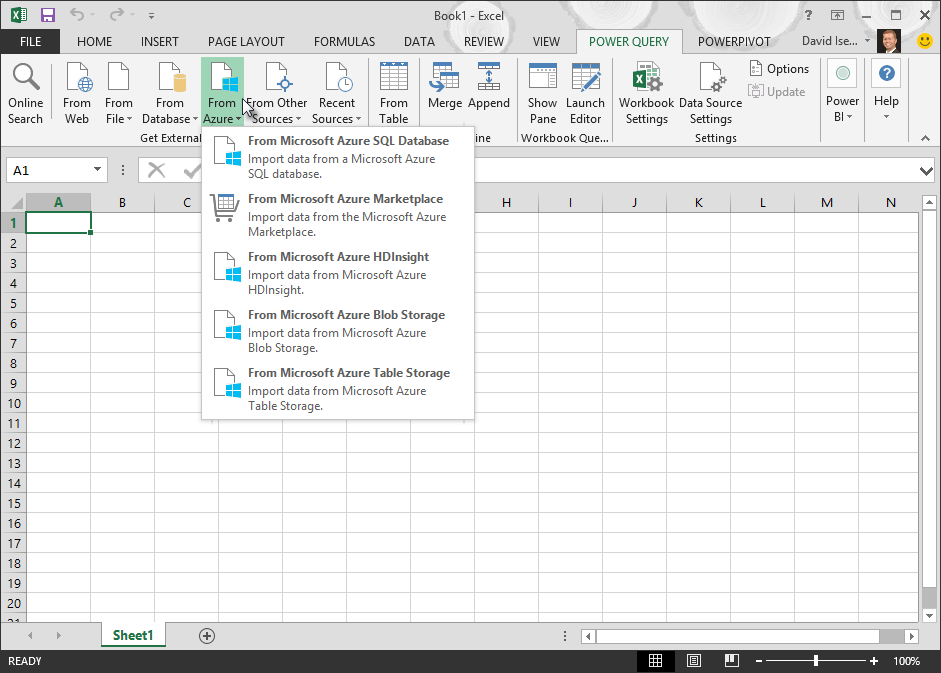
If you are a developer, there are several approaches within Excel that you can take to import data:
-
You can use Visual Basic for Applications to gain access to an external data source. Depending on the data source, you can use either ActiveX Data Objects or Data Access Objects to retrieve the data. You can also define a connection string in your code that specifies the connection information. Using a connection string is useful, for example, when you want to avoid requiring system administrators or users to first create a connection file, or to simplify the installation of your application.
-
If you import data from an SQL Server database, consider using SQL Native Client, which is a standalone data access Application Programming Interface (API) that is used for both OLE DB and ODBC. It combines the SQL OLE DB Provider and the SQL ODBC Driver into one native, dynamic link library (DLL), while also providing new functionality that is separate and distinct from the Microsoft Data Access Components (MDAC). You can use SQL Native Client to create new applications or enhance existing applications that can take advantage of newer SQL Server features, such as Multiple Active Result Sets (MARS), User-Defined Types (UDT), and XML data type support.
-
The RTD function retrieves real-time data from a program that supports COM automation. The RTD COM automation add-in must be created and registered on a local computer.
-
The SQL.REQUEST function connects with an external data source and runs a query from a worksheet. The SQL.REQUEST function then returns the result as an array without the need for macro programming. If this function is not available, you must install the Microsoft Excel ODBC add-in program (XLODBC.XLA). You can install the add-in from Office.com.
For more information about creating Visual Basic for Applications, see Visual Basic Help.
See Also
Power Query for Excel Help
Import data from database using native database query
Use multiple tables to create a PivotTable
Import data from a database in Excel for Mac
Getting data (docs.com)
The data source that extracts data from Microsoft Excel workbooks or CSV files.
Namespace: DevExpress.DataAccess.Excel
Assembly:
DevExpress.DataAccess.v22.2.dll
NuGet Package:
DevExpress.DataAccess
Declaration
- C#
- VB.NET
[ToolboxBitmap(typeof(ExcelDataSource), "ExcelDataSource.bmp")]
[ToolboxSvgImage("DevExpress.DataAccess.Images.ExcelDataSource.svg,DevExpress.DataAccess.v22.2, Version=22.2.99.0, Culture=neutral, PublicKeyToken=c38a27d2243c2672")]
[XRDesigner("DevExpress.DataAccess.UI.Design.XRExcelDataSourceDesigner,DevExpress.DataAccess.v22.2.UI, Version=22.2.99.0, Culture=neutral, PublicKeyToken=c38a27d2243c2672", typeof(IDesigner))]
public class ExcelDataSource :
    DataComponentBase,
    IListSource,
    IListAdapterAsync,
    IListAdapter,
    ISupportFillAsync
The ExcelDataSource component allows you to extract data from Microsoft Excel workbooks (XLS, XLSX or XLSM files) or CSV files stored on the disk or in a stream.

The ExcelDataSource works in read-only mode. It does not evaluate cell formulas, and you cannot read values from cells with formulas.
The ExcelDataSource can only read plain text data from Excel worksheets. It cannot load formatted text, formulas, or floating elements such as images.
You can use the ExcelDataSource to supply data to the GridControl, TreeList, ChartControl or any other DevExpress control that that you can set up with Data Source Configuration Wizard.
Design-Time Specifics
After you add the ExcelDataSource component to an application, you can configure the data connection with commands available in the component’s smart tag.

- Edit
- Invokes the Excel Data Source editor that allows you to select the Excel workbook/CSV file and specify import settings.
- Rebuild Result Schema
- Updates the data source result schema to match the current data source structure.
Run-Time Specifics
Steps to Configure the ExcelDataSource
Do the following to extract data from the specified workbook or CSV file in code:
- Assign the file path to the ExcelDataSource.FileName property. As an alternative, load the required document from a stream using the ExcelDataSource.Stream property. In this case, you should specify the file format with the ExcelDataSource.StreamDocumentFormat property.
- Depending on the target file format, create the ExcelSourceOptions or CsvSourceOptions class instance, specify its settings, and assign the resulting object to the ExcelDataSource.SourceOptions property.
- Call the ExcelDataSource.Fill method to fill the created data source with data.
The following code creates the ExcelDataSource and selects a cell range in the SalesPerson worksheet.
- C#
- VB.NET
ExcelDataSource excelDataSource = new ExcelDataSource();
excelDataSource.Name = "Excel Data Source";
excelDataSource.FileName = HostingEnvironment.MapPath(@"~/App_Data/ExcelDataSource.xlsx");
ExcelWorksheetSettings worksheetSettings = new ExcelWorksheetSettings("SalesPerson", "A1:L2000");
excelDataSource.SourceOptions = new ExcelSourceOptions(worksheetSettings);
excelDataSource.Fill();
How to Implement a Custom Excel Schema Provider
You can use a custom Excel schema provider that implements the IExcelSchemaProvider interface.
You can change settings of the built-in Excel schema provider. For this, create the ExcelSchemaProvider class descendant and override its methods.
The following code registers the MyExcelSchemaProvider custom provider:
- C#
- VB.NET
//...
var serviceContainer = (System.ComponentModel.Design.IServiceContainer)excelDataSource;
serviceContainer.RemoveService(typeof(DevExpress.DataAccess.Excel.IExcelSchemaProvider));
serviceContainer.AddService(typeof(DevExpress.DataAccess.Excel.IExcelSchemaProvider), new MyExcelSchemaProvider());

excelDataSource.Fill();
//...
Web Specifics
In web applications, the Resources.AccessSettings.DataResources option manages access to the source XLS, XLSX, and CSV files for the ExcelDataSource instance.
The DevExpress ASP.NET Project Wizard creates a Web Forms application that specifies the AccessSettings.DataResources option and allows you to use only the Content folder as the data source file location.
Implements
Inheritance
See Also
Addend Analytics is a Microsoft Power BI partner based in Mumbai, India. Apart from being authorized for Power BI implementation plan, Addend has successfully executed Power BI projects for 100+ clients across sectors like Financial Services, Banking, Insurance, Retail, Sales, Manufacturing, Real estate, Logistics, and Healthcare in countries like the US, Europe, Switzerland, and Australia. Get a free consultation now by emailing us at kamal.sharma@addendanalytics.com or Contact us.
Hi Everyone,
Today, I will be showing you how to change the data source from Excel file to MS SQL Server in Power BI. Let’s get started. 😀
We will change the data source by using some basic M language script. The reason we need to do this by using M language is that Power BI data integration source settings does not provide us an option to change the source directly as shown below.

Now to change the via M script we will do the following.
1. Go to “Edit Queries” in the ribbon of Power BI.

2. To get the M script of SQL server database click on New Source and select SQL Server.

3. Provide the server name of the database. Specifying the database name is optional.

4. Provide the login credentials that you use to log in to the database.

5. After logging in successfully you will get a window prompting all the databases and tables that reside into the database so we will select a table from the database and click OK as shown below.

6. Now it will import the selected table, so the next step is to go to the Advanced Editor in the ribbon of Query Editor making sure that we selected the table that we imported from the database as shown below.

7. We will see the M script for the respective table, so copy the M script of the selected section as this contains the data source in M.

8. Click on Done and go to the excel source table that is under Queries.

9. Go to the Advanced Editor of that Excel table it will look like the following.

10. Replace the highlighted code with the copied code ending with a comma as shown below.

11. We need to provide the last step name i.e dbo_Quantity as a reference into the next step i.e #”Inserted Year” the first argument that Table. AddColumn function accepts is the name of the last step applied as shown below.

12. Click on Done
The output of this is shown below.

We will now Close and Apply to check the data source.

Now if you see the data source settings you will notice that our data source is changed from Excel to SQL as shown below.

Looks great! we have changed the source from Excel to SQL. 😀
If you want a video tutorial of changing the source from Excel to SQL you can have a look at this below.
Hope this helps! 🙂
Anik Bhattacharjee
Addend Analytics
https://www.addendanalytics.com/
There are many ways to import data from an Excel file to a SQL Server database using:
- SQL Server Integration Services (SSIS)
- the OPENROWSET and OPENDATASOURCE functions
- SQL Server linked servers
- the SQL Server Import and Export Wizard
In this article, steps for importing data from an Excel file to a SQL Server database will be explained using the SQL Server Import and Export Wizard including some of problems that can occur during the processes.
To start the process of importing data from an Excel file to a SQL Server database using the SQL Server Import and Export Wizard the SQL Server Import and Export Wizard needs to be launched. There are several ways to do that, and this can be seen on the How to import/export data to SQL Server using the SQL Server Import and Export Wizard page
The first page that appears when the SQL Server Import and Export Wizard launched is Welcome page:
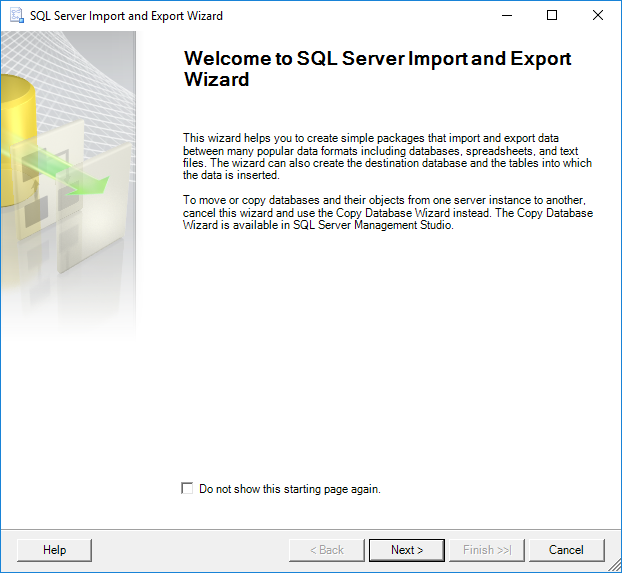
On this page, only a quick introduction of the SQL Server Import and Export Wizard is shown.
Click the Next button to continue. The next page in the SQL Server Import and Export Wizard is Choose a Data Source page:
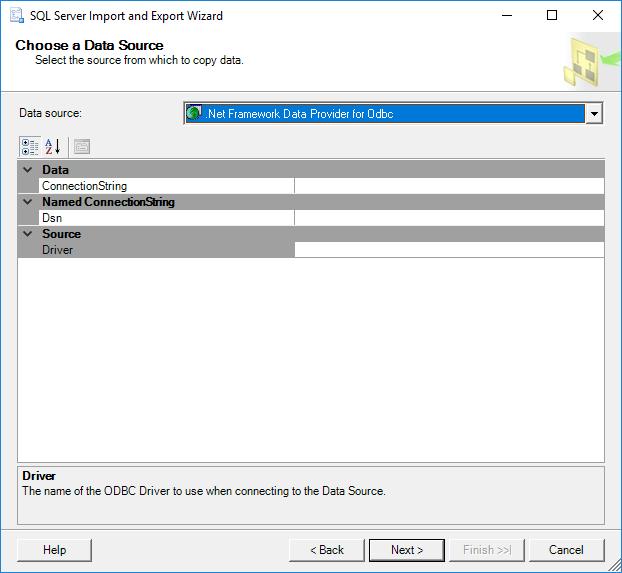
In the Choose a Data Source page, in order to continue with importing data from Excel to SQL Server the data source provider and way of connecting with data source must be provided. In our case, the provider for connecting to the Excel file is the Microsoft Excel provider.
From the Data source drop down box, select the Microsoft Excel provider:
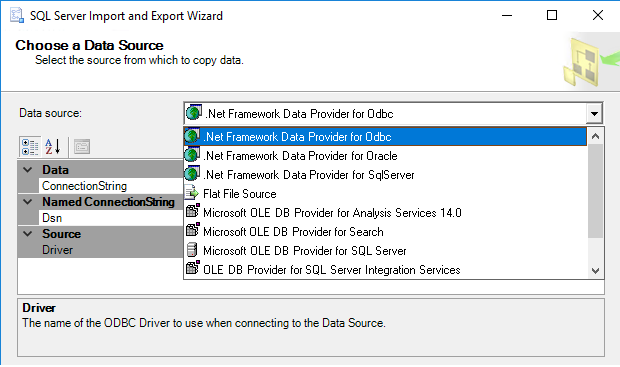
As you can see, there is no Microsoft Excel provider in the list of the Data source drop down box. There are several reasons for this. The first reason could be that Microsoft Office isn’t installed. But there is no need to install Microsoft Office (Microsoft Excel) in order to see the Microsoft Excel provider in the Data source drop down box list.
To see the Microsoft Excel provider in the list, install Microsoft Access Database Engine 2016 Redistributable. The latest version of Microsoft Access Database Engine can open the earlier version of Excel, so make sure that you have the latest one.
The Microsoft Access Database Engine 2016 Redistributable comes with two versions:
- AccessDatabaseEngine.exe is 32-bit version
- AccessDatabaseEngine_X64.exe is 64-bit version
Now, when Microsoft Access Database Engine 2016 Redistributable is installed, we should see the Microsoft Excel provider in the list, but unfortunately the Microsoft Excel provider does not show in the list of the Data source drop down box.
This is because you may run a wrong version of the SQL Server Import and Export Wizard. For example, the AccessDatabaseEngine.exe is installed and the SQL Server Import and Export Wizard 64-bit version is launched. In this case, in order to see the Microsoft Excel provider in the list of the Data source drop down box, launch the SQL Server Import and Export Wizard 32-bit version and the Microsoft Excel provider will appear in the list:
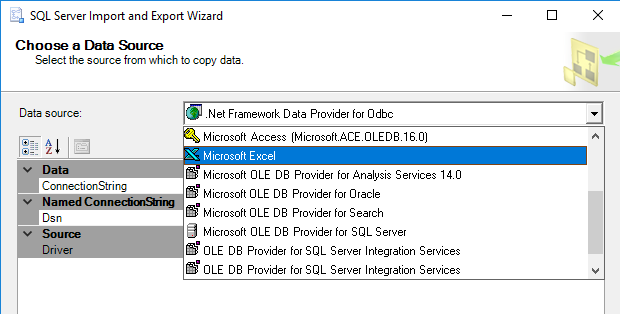
Now, when all is installed, from the list, select the Microsoft Excel provider. On the Choose a Data Source page, additional options appear:
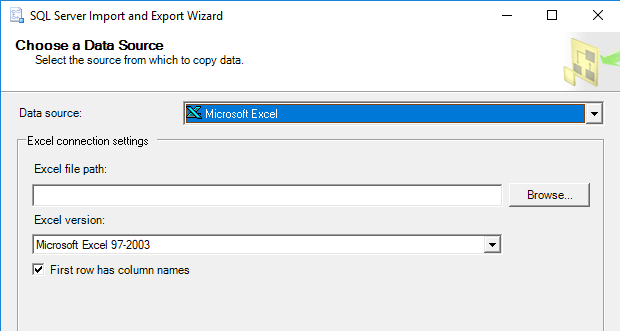
In the Excel file path box, type the location to the Excel file or use the Browse button to navigate to the location:
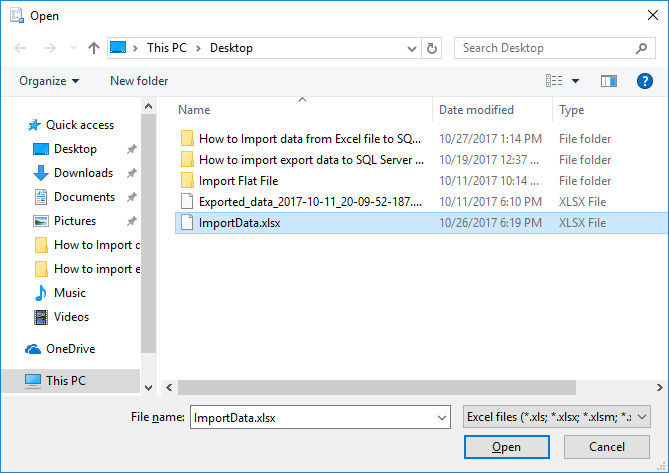
From the Excel version drop down box, choose the version of Excel that uses the source workbook. In our case, that is the Microsoft Excel 2016 version:
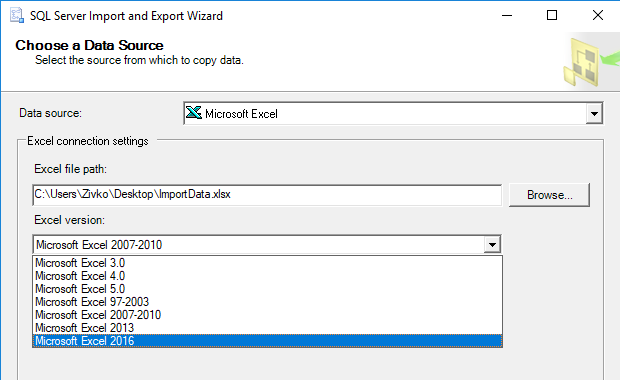
The latest option on this page is the First row has column names check box:
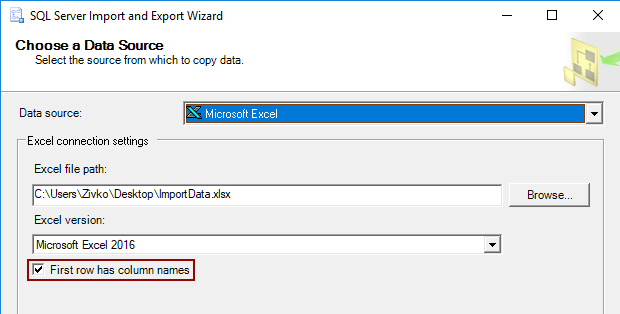
By default, this option is checked. It treads the first rows of the data source as the column names:
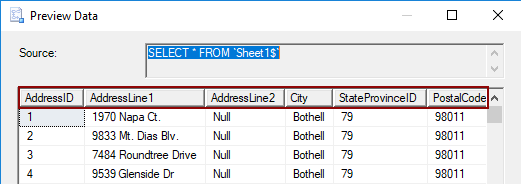
But if this option is enabled and data source does not contain column names, the SQL Server Import and Export Wizard will add the column names, starting with the name F1 for the first column name:
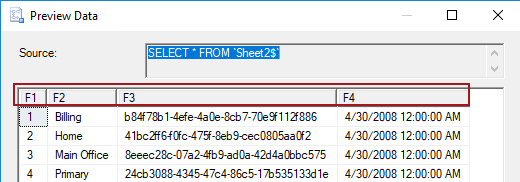
If this option is disabled and data source contain the column names the SQL Server Import and Export Wizard treats these columns as the first row of data:
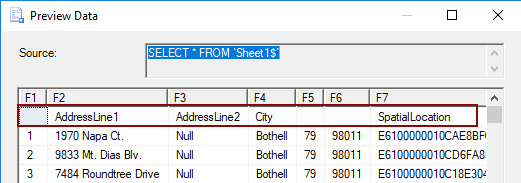
Now, when everything is set on the Choose a Data Source page of the SQL Server Import and Export Wizard, click the Next button to continue.
The following warning message may appear after clicking the Next button:
The operation could not be completed.
Additional information:
The ‘Microsoft.ACE.OLEDB.16.0’ provider is not registered on the local machine. (System.Data)
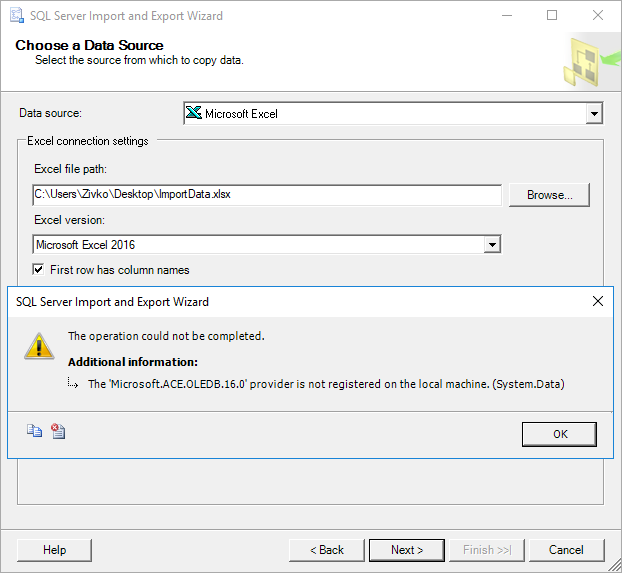
Typically, this warning message appears when the SQL Server Import and Export Wizard is launched via SQL Server Management Studio (SSMS) which is a 32-bit application and the 32-bit version of the SQL Server Import and Export Wizard is launched, but you have installed the Microsoft Access Database Engine 2016 Redistributable 64 bit version.
There are two solutions for resolving this problem:
- The first is to launch the 64-bit version of the SQL Server Import and Export Wizard via the Start menu
- The second resolution is to install the Microsoft Access Database Engine 2016 Redistributable 32 bit version and continue using the SQL Server Import and Export Wizard via SSMS, but first, you need to uninstall the 64-bit version of Microsoft Access Database Engine 2016 Redistributable, otherwise the following warning message will appear when launching the installation package:
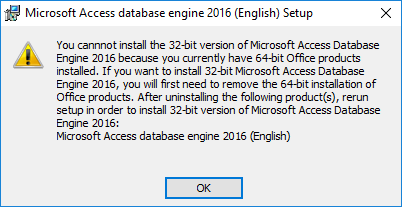
Note: The Microsoft Access Database Engine 2016 Redistributable can be installed in quiet mode.
Open the Command Prompt window and run the following:
For 32-bit version
C:Users<User_Name>DownloadsAccessDatabaseEngine.exe /quiet
For 64-bit version
C:Users<User_Name>DownloadsAccessDatabaseEngine_X64.exe /quiet

The next page on the SQL Server Import and Export Wizard is the Choose a Destination page:
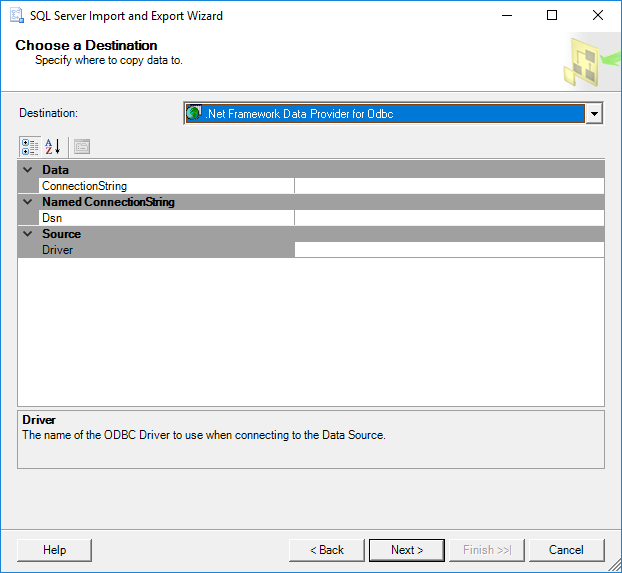
On this page, determine the destination where data from the data source (Excel file) will be placed. In our case, the destination will be a SQL Server database.
Under the Destination drop down box, choose a provider that can connect to a SQL Server database.
One of providers that can connect to SQL Server is:
- .NET Framework Data Provider for SqlServer
- Microsoft OLE DB Provider for SQL Server
- SQL Server Native Client 11.0
In this case, the SQL Server Native Client 11.0 will be selected from the Destination list:
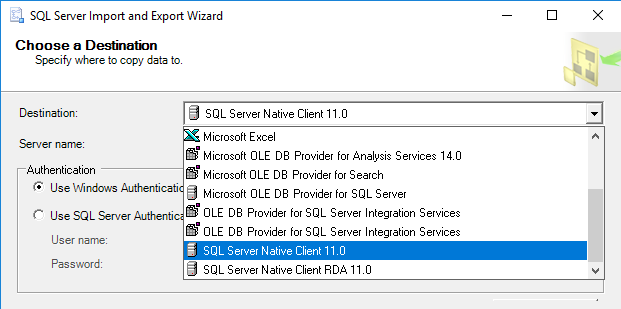
From the Server name combo box, select the SQL Server instance:
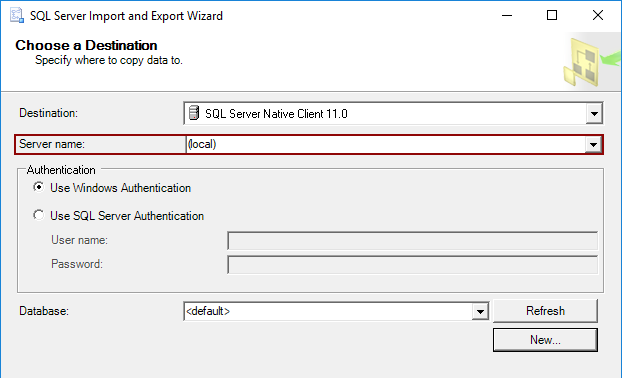
In the Authentication section, determine how it will be connected to SQL Server by using Windows or SQL Server Authentication mode.
From the Database drop down box, pick a database in which data from data source (Excel file) will be placed:
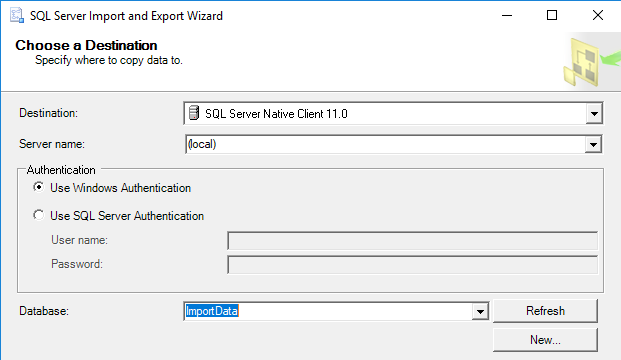
Or, create a new database as a destination for data from data source.
To do that, click the New button and in the Create Database dialog, set the parameters for the new SQL Server destination database:
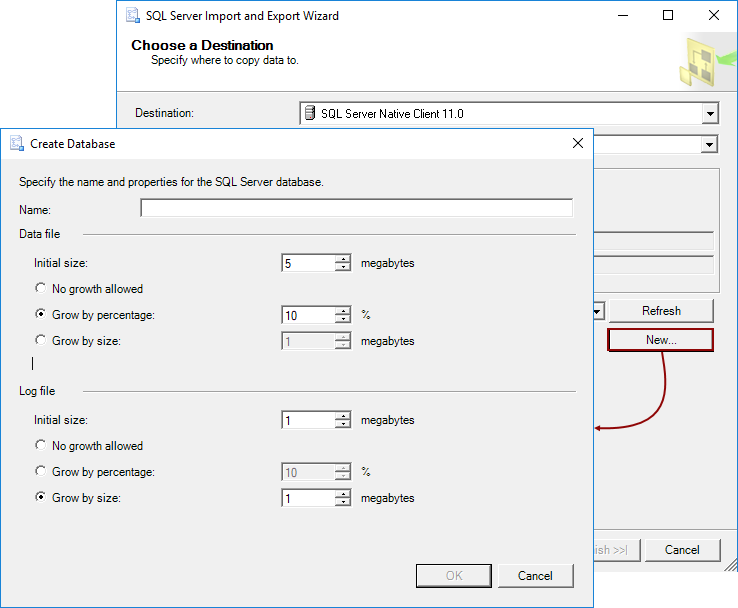
When everything is set on the Choose a Destination page, click the Next button to proceed.
On the Specify Table Copy or Query page, determine how data from the data source will be copied to the destination:
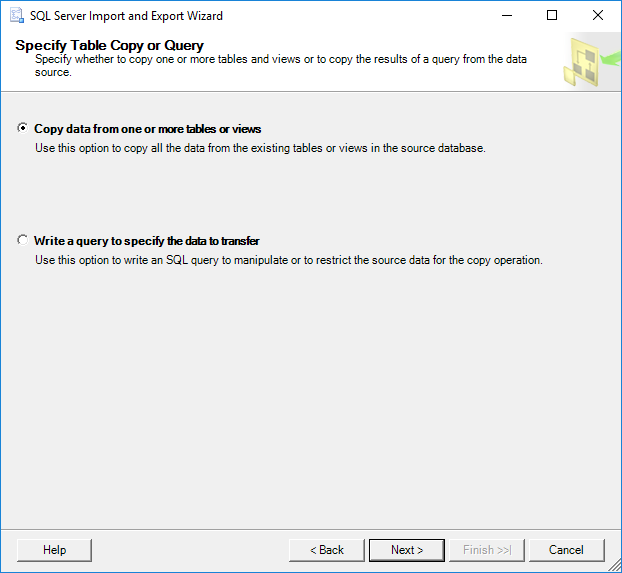
If the Copy data from one or more tables or views radio button is selected then all data from the chosen worksheets will be copied.
If the Write a query to specify the data to transfer is chosen, then only data that are specified in a SQL query will be copied from an Excel worksheet to a destination SQL Server database.
If the Write a query to specify the data to transfer in the Choose a Destination page is chosen, then the Provide a Source Query page will be shown when the Next button is pressed:
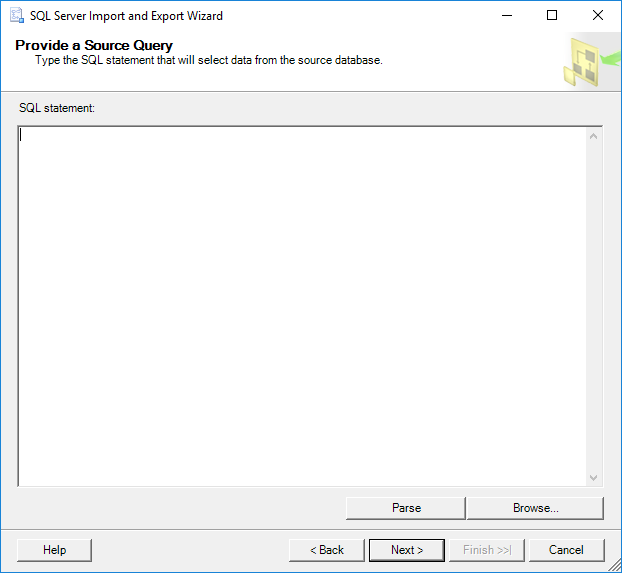
In the SQL statement text box, type the query that will select the data to copy form the Excel file to the SQL Server database or load a query using the Browse button.
To successfully query a worksheet the $ to the end of the sheet name and the brackets around sheet name, ([BusinessEntity$]) must be added, otherwise the following warning messages may appear:
The statement could not be parsed.
Additional information:
The Microsoft Access database engine could not find the object ‘BusinessEntity’. Make sure the object exists and that you spell its name and the path name correctly. If ‘BusinessEntity’ is not a local object, check your network connection or contact the server administrator. (Microsoft Access Database Engine)
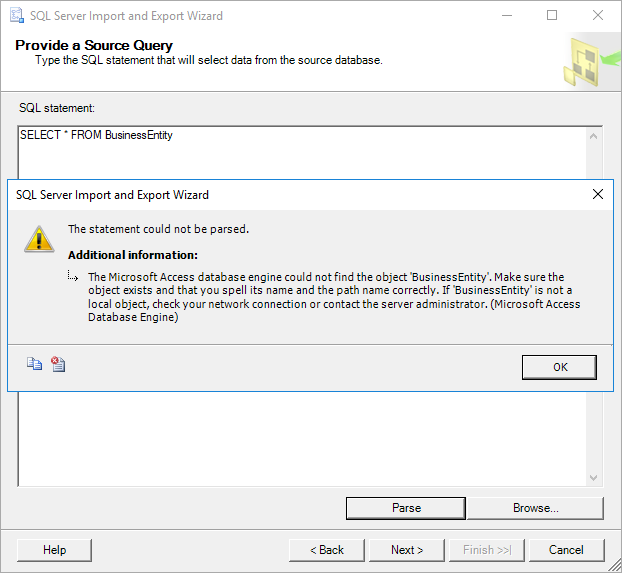
Or this:
The statement could not be parsed.
Additional information:
Syntax error in FROM clause. (Microsoft Access Database Engine)
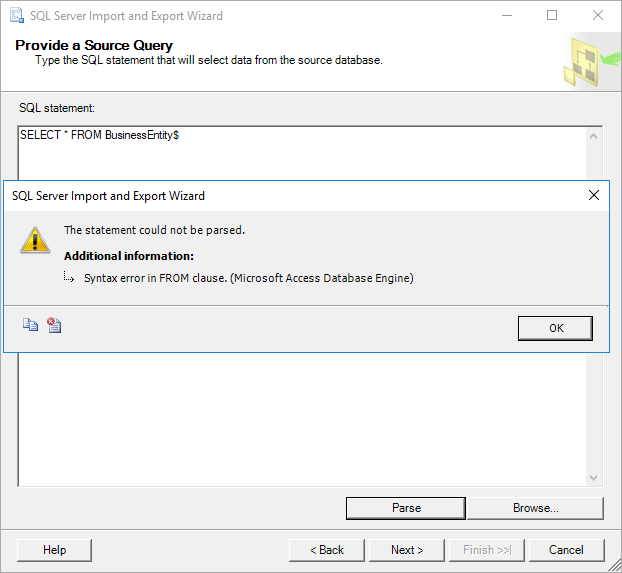
If the Copy data from one or more tables or views radio button is chosen, when the Next button is pressed, the Select Source Tables and Views page will be shown:
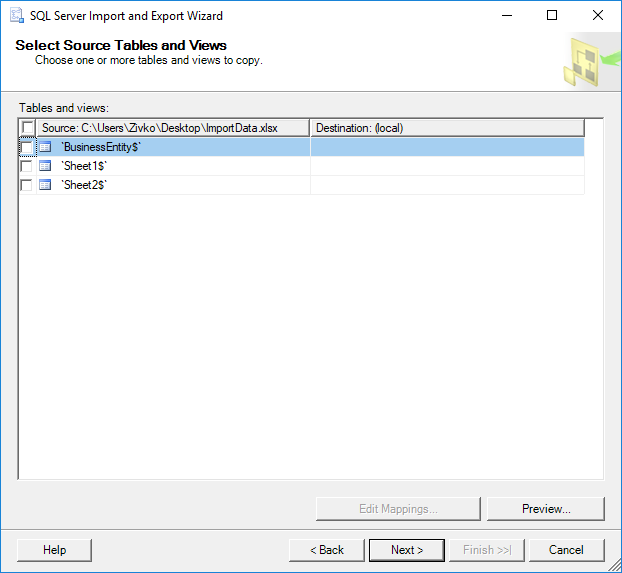
On this page, all worksheets for the Excel file (ImportData.xlsx) will be listed under the Source column. From the Source list, choose from which worksheets you want to import data to the SQL Server database by clicking the check box next to the name of the worksheets. The selected worksheets will appear in the Destination column:
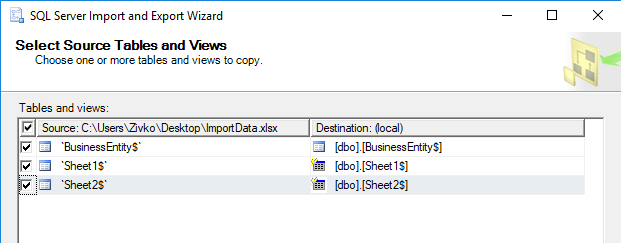
The name of the tables in the SQL Server database by default will be the names of the selected worksheets from the Source column, but these names can be changed by clicking on the name in the Destination column:
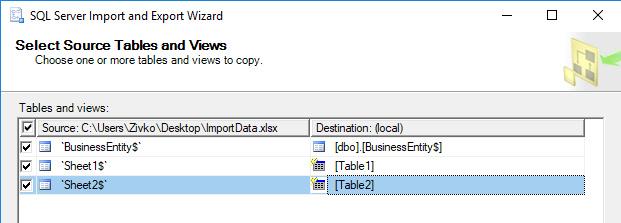
As it may be noticed, the icon in the Destination column for the BusinessEntity$ field is different from the Table1 and Table2 fields. This is because the table in the SQL Server database that is chosen as a destination already exists and for the Table1 and Table2 fields, new tables will be created.
When using an existing table, make sure that the destination table has the same number of columns that have data source, otherwise the columns from the data source that does not have an adequate destination column will be by default ignored (<ignore>) and the data from that columns will not be imported to a destination table:
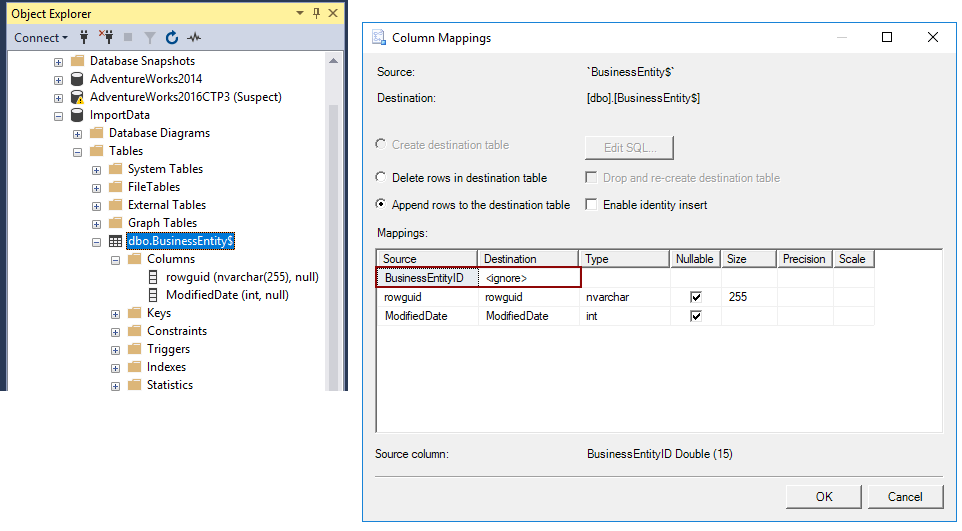
Also, make sure that columns in the destination table have data types that are compatible with the data types in the columns of the source data, otherwise the following error may appear:
Found 1 unknown column type conversion(s) You are only allowed to save the package
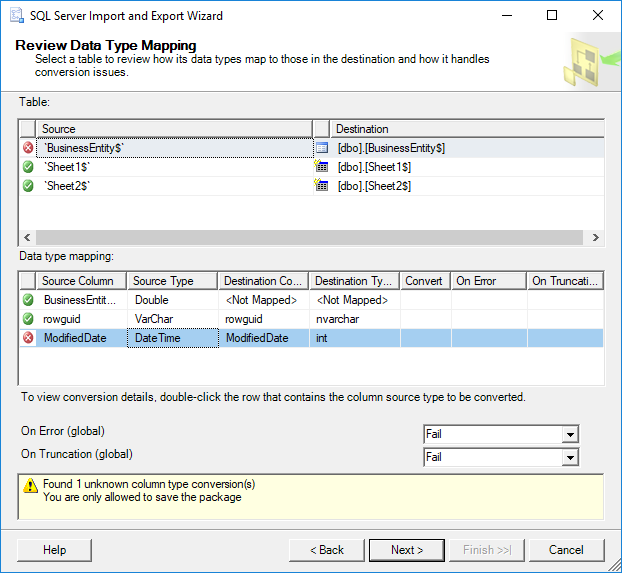
When the appropriate columns and the data types are set, click the Next button, the Save and Run Package page of the SQL Server Import and Export Wizard will appear:
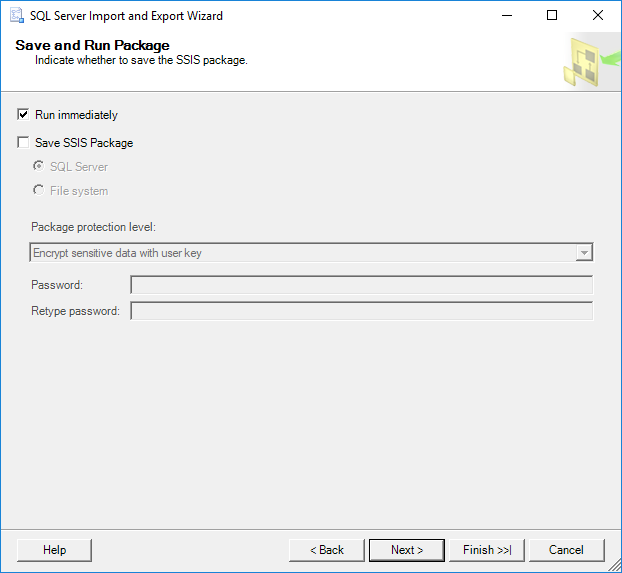
Click the Next button if want to import data from an Excel file to a SQL Server database, but if want to save the SSIS package for the later use, check the Save SSIS Package button.
On the Complete the Wizard page, choices that are made in the previous wizard pages are shown:
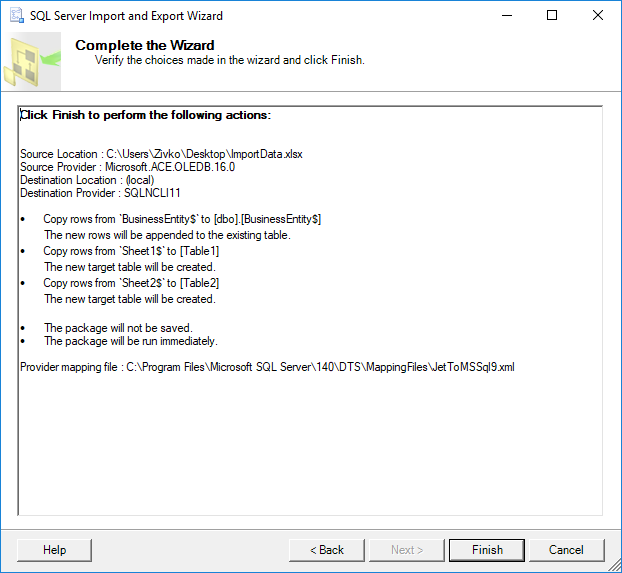
Click the Next button to import data from an Excel file to a SQL Server database. The Performing Operation page shows the status of the importing process if it is finished successfully or with the errors:
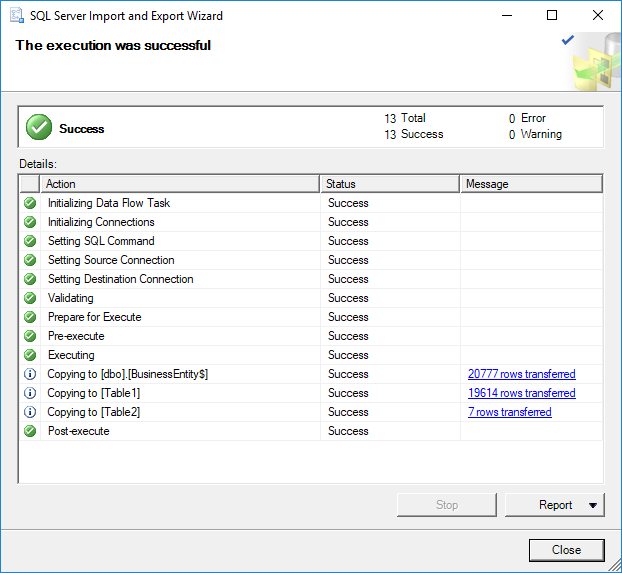
If the error occurs during the process of importing data from Excel file to the SQL Server database the Messages… word will appear in the Message column for the action that failed:
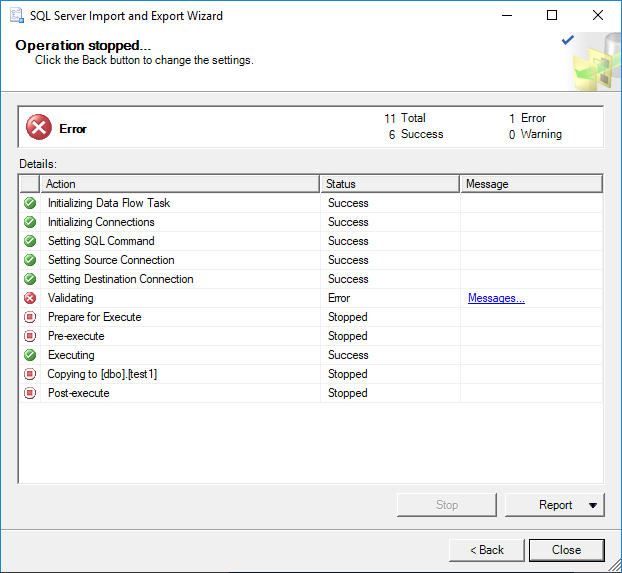
When click on the Messages…, the View Report dialog will appear with detailed information about the error:
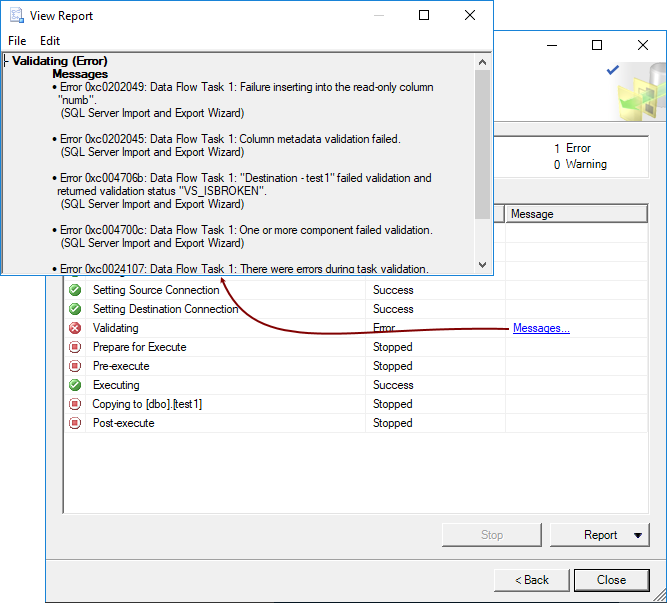
This error:
– Validating (Error)
Messages
- Error 0xc0202049: Data Flow Task 1: Failure inserting into the read-only column “numb”.
(SQL Server Import and Export Wizard)
- Error 0xc0202045: Data Flow Task 1: Column metadata validation failed.
(SQL Server Import and Export Wizard)
- Error 0xc004706b: Data Flow Task 1: “Destination – test1” failed validation and returned validation status “VS_ISBROKEN”.
(SQL Server Import and Export Wizard)
- Error 0xc004700c: Data Flow Task 1: One or more component failed validation.
(SQL Server Import and Export Wizard)
- Error 0xc0024107: Data Flow Task 1: There were errors during task validation.
(SQL Server Import and Export Wizard)
Typically, it appears when the destination table has an IDENTITY column. To resolve this, turn back to the Select Source Tables and Views page, select the tables that have identity property and press the Edit Mappings button. From the Transfer Settings dialog, select the Enable identity insert check box:
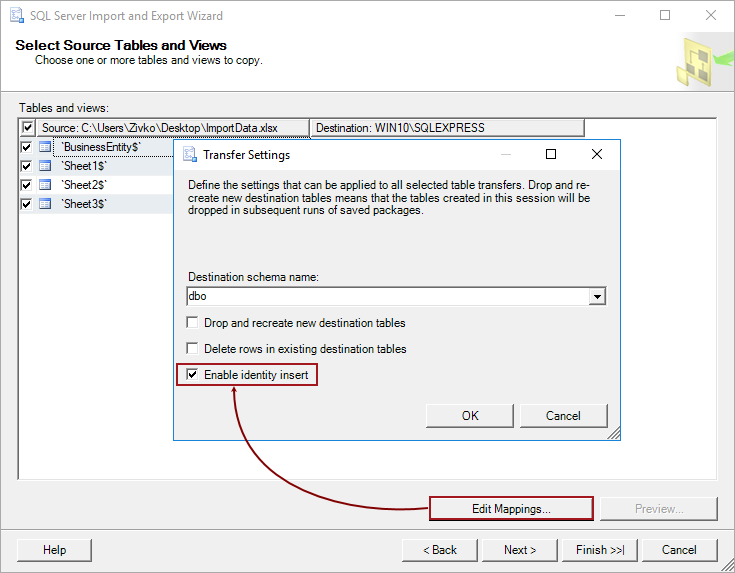
Also, another common problem that may appear when importing data from data source to the destination SQL Server tables is the FOREIGN KEY Constraints problem. In the error below two destination tables test1 and test2 are shown. The test2 table is referenced to the test1 table:
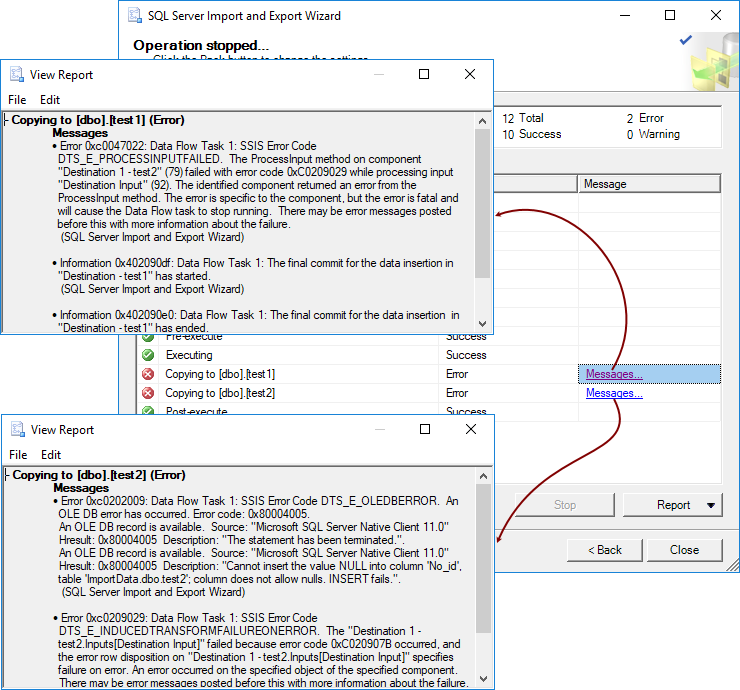
– Copying to [dbo].[test1] (Error)
Messages
- Error 0xc0047022: Data Flow Task 1: SSIS Error Code DTS_E_PROCESSINPUTFAILED. The ProcessInput method on component “Destination 1 – test2” (79) failed with error code 0xC0209029 while processing input “Destination Input” (92). The identified component returned an error from the ProcessInput method. The error is specific to the component, but the error is fatal and will cause the Data Flow task to stop running. There may be error messages posted before this with more information about the failure.
(SQL Server Import and Export Wizard)
- Information 0x402090df: Data Flow Task 1: The final commit for the data insertion in “Destination – test1” has started.
(SQL Server Import and Export Wizard)
- Information 0x402090e0: Data Flow Task 1: The final commit for the data insertion in “Destination – test1” has ended.
(SQL Server Import and Export Wizard)
– Copying to [dbo].[test2] (Error)
Messages
- Error 0xc0202009: Data Flow Task 1: SSIS Error Code DTS_E_OLEDBERROR. An OLE DB error has occurred. Error code: 0x80004005.
An OLE DB record is available. Source: “Microsoft SQL Server Native Client 11.0” Hresult: 0x80004005 Description: “The statement has been terminated.”.
An OLE DB record is available. Source: “Microsoft SQL Server Native Client 11.0” Hresult: 0x80004005 Description: “Cannot insert the value NULL into column ‘No_id’, table ‘ImportData.dbo.test2’; column does not allow nulls. INSERT fails.”.
(SQL Server Import and Export Wizard)
-
Error 0xc0209029: Data Flow Task 1: SSIS Error Code DTS_E_INDUCEDTRANSFORMFAILUREONERROR. The “Destination 1 – test2.Inputs[Destination Input]” failed because error code 0xC020907B occurred, and the error row disposition on “Destination 1 – test2.Inputs[Destination Input]” specifies failure on error. An error occurred on the specified object of the specified component. There may be error messages posted before this with more information about the failure.
(SQL Server Import and Export Wizard)
To resolve this problem, disable constraint for referenced table (test2) by executing the following code in SSMS:
|
ALTER TABLE test2 NOCHECK CONSTRAINT ALL |
After importing data from data source to the destination SQL Server database, execute the following code in SSMS to enable constraint for the test2 table:
|
ALTER TABLE test2 WITH CHECK CHECK CONSTRAINT ALL |
In some cases, the warning message like from the image below may appear:
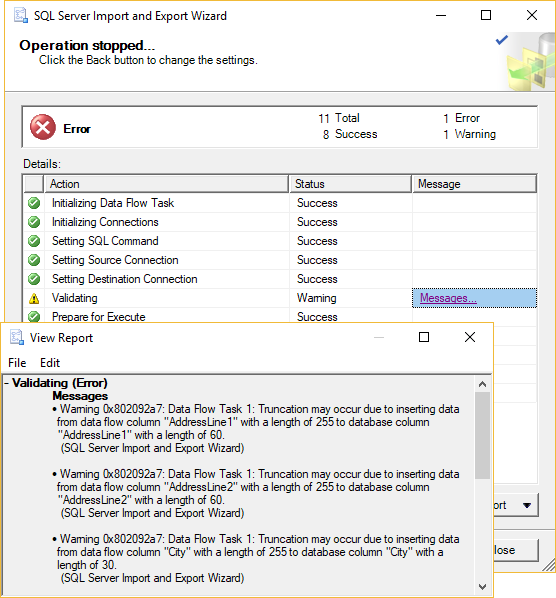
– Validating (Warning)
Messages
- Warning 0x802092a7: Data Flow Task 1: Truncation may occur due to inserting data from data flow column “AddressLine1” with a length of 255 to database column “AddressLine1” with a length of 60.
(SQL Server Import and Export Wizard)
- Warning 0x802092a7: Data Flow Task 1: Truncation may occur due to inserting data from data flow column “AddressLine2” with a length of 255 to database column “AddressLine2” with a length of 60.
(SQL Server Import and Export Wizard)
- Warning 0x802092a7: Data Flow Task 1: Truncation may occur due to inserting data from data flow column “City” with a length of 255 to database column “City” with a length of 30.
(SQL Server Import and Export Wizard)
- Warning 0x80049304: Data Flow Task 1: Warning: Could not open global shared memory to communicate with performance DLL; data flow performance counters are not available. To resolve, run this package as an administrator, or on the system’s console.
(SQL Server Import and Export Wizard)
To resolve this, go to the SQL Server destination table and increase the column size for the columns that are listed in the warning message.
To verify that the data from the Excel file are imported to the SQL Server database, go to SSMS, find the database in which data are imported and list all data from the tables:
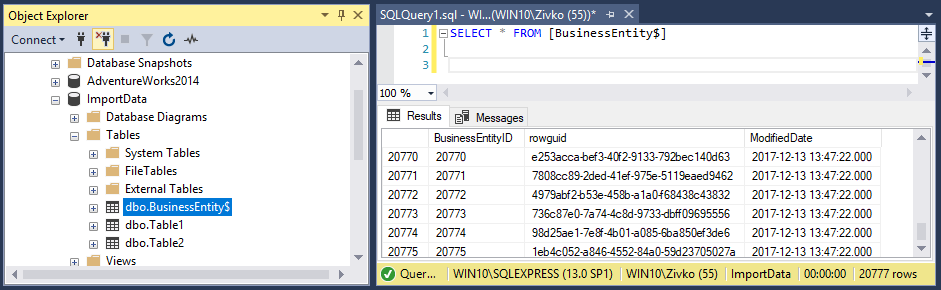
References:
- Import data from Excel to SQL Server or Azure SQL Database
- How to import/export data to SQL Server using the SQL Server Import and Export Wizard
- How to query Excel data using SQL Server linked servers
- Import and Export Data with the SQL Server Import and Export Wizard
- Author
- Recent Posts

Marko aka “Zivko” is a senior software analyst from Nis, Serbia focusing on SQL Server and MySQL as well as client technologies like SSMS, Visual Studio, and VSCode. He has extensive experience with quality assurance, issue escalation/resolution, and product evangelism.
He is a prolific author of authoritative content related to SQL Server including a number of “platinum” articles (top 1% in terms of popularity and engagement). His writing covers a range of topics on MySQL and SQL Server including remote/linked servers, import/export, LocalDB, SSMS, and more.
In his part-time, Zivko likes basketball, foosball (table-soccer), and rock music.
See more about Marko at LinkedIn
View all posts by Marko Zivkovic
![]() Для импорта данных Вам необходима консоль администратора MS SQL Server Managment Studio, которая является компонентой при установке экземпляра MS SQL Server.
Для импорта данных Вам необходима консоль администратора MS SQL Server Managment Studio, которая является компонентой при установке экземпляра MS SQL Server.
Рассмотрим самый простой способ загрузки — через средство экспорта/импорта данных из сторонних форматов. Наиболее распространенная необходимость — это загрузка из файла Excel (.xlsx, .xls).
Для того, чтобы загрузить данные в MS SQL Server из Excel необходимо:
- Открыть консоль MS SQL Server Managment Studio
- Подключиться к серверу:
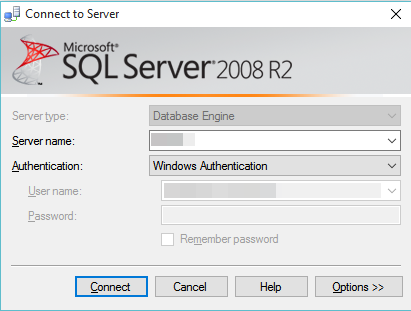
3. На БД, в которую будет производится загрузка данных, нажать правой кнопкой мыши и выбрать пункт Import Data
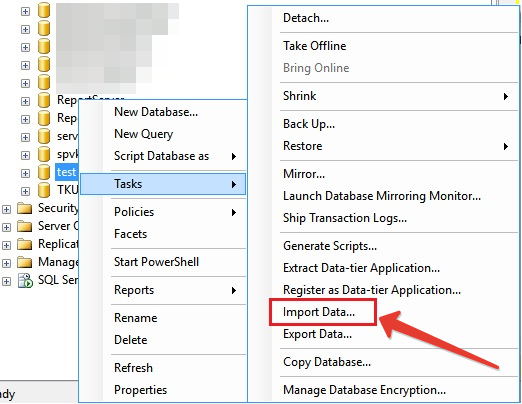
4. В появившемся окне SQL Server Import and Export Wizard нажать кнопку Next
5. В следующем окне необходимо в поле Data Source выбрать из списка значение Microsoft Excel, в поле Excel fale path указать путь к файлу Excel, в поле Excel version выбрать версию файла Excel (.xlsx — соответствует MS Excel 2007, .xls — более ранние версии Excel)
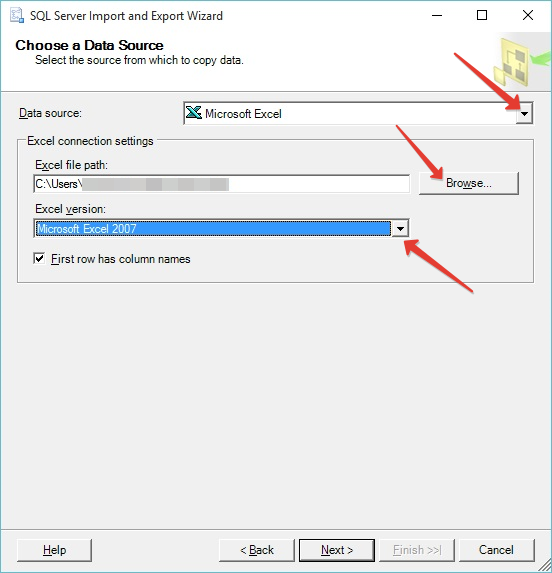
* Если в файле Excel таблица оформлена с шапкой (наименованием столбцов), то необходимо установить галку First row has column names.
Нажать на кнопку Next.
6. В следующем окне необходимо проверить доступа к экземпляру MS SQL Server и БД, в которую будут импортироваться данные
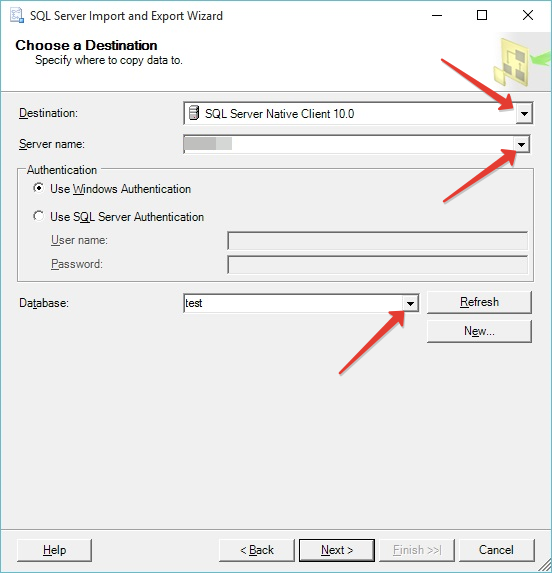
*Есть возможность создать новую БД с помощью кнопки New
Нажать на кнопку Next
7. В следующем окне необходимо выбрать пункт Copy data from one or more tables or views
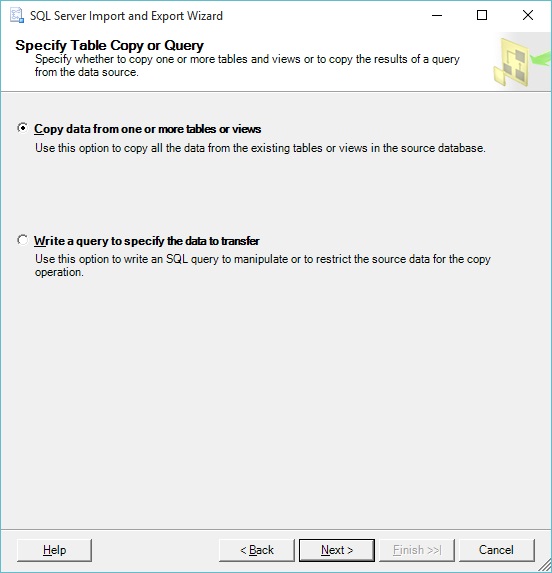
Нажмите кнопку Next
8. В следующем окне необходимо выбрать листы в файле Excel, которые вы хотите импортировать (загрузить). Например, Лист 1
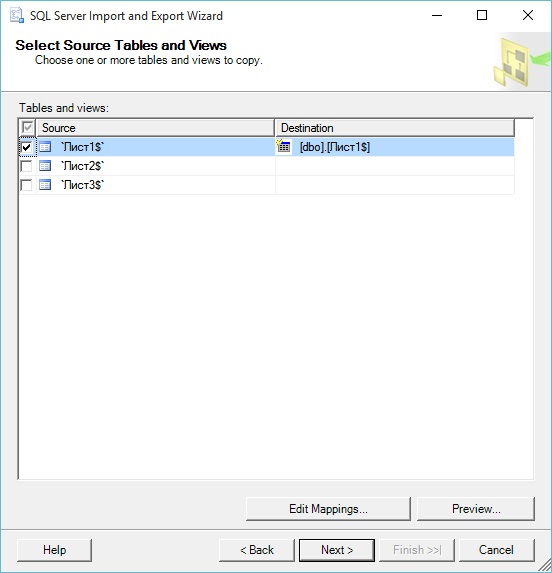
- Есть возможность предварительного просмотра результата загрузки (кнопка Preview)
Нажать на кнопку Next
9. В следующем окне нажмите кнопку Finish. В случае успешной обработки появится окно:

Нажмите на кнопку Close
Теперь данные из таблицы Excel загружены в БД test MS SQL Server