
If data is always on a journey, then Excel is like Grand Central Station. Imagine that data is a train filled with passengers that regularly enters Excel, makes changes, and then leaves. There are dozens of ways to enter Excel, which imports data of all types and the list keeps growing. Once data is in Excel, it’s ready to change shape just the way you want using Power Query. Data, like all of us, also requires «care and feeding» to keep things running smoothly. That’s where connection, query, and data properties come in. Finally, data leaves the Excel train station in many ways: imported by other data sources, shared as reports, charts, and PivotTables, and exported to Power BI and Power Apps.

Here are the main things you can do while data is in the Excel train station:
-
Import You can import data from many different external data sources. These data sources can be on your machine, in the cloud, or half-way around the world. For more information, see Import data from external data sources.
-
Power Query You can use Power Query (previously called Get & Transform) to create queries to shape, transform, and combine data in a variety of ways. You can export your work as a Power Query Template to define a data flow operation in Power Apps. You can even create a data type to supplement linked data types. For more information, see Power Query for Excel Help.
-
Security Data privacy, credentials, and authentication are always an ongoing concern. For more information, see Manage data source settings and permissions and Set privacy levels.
-
Refresh Imported data usually requires a refresh operation to bring in changes, such as additions, updates, and deletes, to Excel. For more information, see Refresh an external data connection in Excel.
-
Connections/Properties Each external data source has assorted connection and property information associated with it that sometimes requires changes depending on your circumstances. For more information, see Manage external data ranges and their properties, Create, edit, and manage connections to external data, and Connection properties.
-
Legacy Traditional methods, such as Legacy Import Wizards and MSQuery, are still available for use. For more information, see Data import and analysis options and Use Microsoft Query to retrieve external data.
The following sections provide more details of what’s going on behind the scenes at this busy, Excel train station.
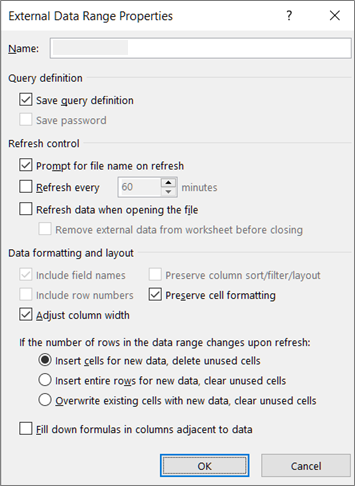
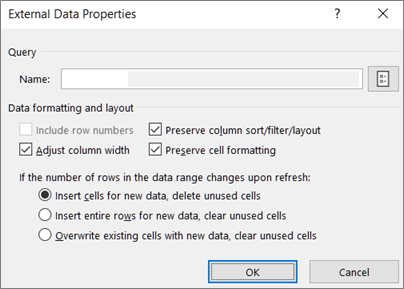
There are connection, query, and external data range properties. Connection and query properties both contain traditional connection information. In a dialog box title, Connection Properties means there is no query associated with it, but Query Properties means there is. External data range properties control the layout and format of data. All data sources have an External Data Properties dialog box, but data sources that have associated credential and refresh information use the larger External Range Data Properties dialog box.
The following information summarizes the most important dialog boxes, panes, command paths, and corresponding help topics.
|
Dialog Box or Pane |
Tabs and tunnels |
Main Help topic |
|---|---|---|
|
Recent sources Data > Recent Sources |
(No tabs) Tunnels to Connect > Navigator dialog box |
Manage data source settings and permissions |
|
Connection Properties Data > Queries & Connections > Connections tab > (right click a connection) > Properties |
Usage tab |
Connection properties |
|
Query Properties
Data > Existing Connections > (right click a connection) > Edit Connection Properties |
Usage tab |
Connection properties |
|
Queries & Connections Data > Queries & Connections |
Queries tab |
Connection properties |
|
Existing Connections Data > Existing Connections |
Connections tab |
Connect to external data |
|
External data properties |
Used in tab (from Connection Properties dialog box) Refresh button on the right tunnels to Query Properties |
Manage external data ranges and their properties |
|
Connection Properties > Definition tab > Export Connection File |
(No tabs) Tunnels to |
Create, edit, and manage connections to external data |
Data in an Excel workbook can come from two different locations. The data may be stored directly in the workbook, or it may be stored in an external data source, such as a text file, a database, or an Online Analytical Processing (OLAP) cube. This external data source is connected to the workbook through a data connection, which is a set of information that describes how to locate, log in to, and access the external data source.
The main benefit of connecting to external data is that you can periodically analyze this data without repeatedly copying the data to your workbook, which is an operation that can be time consuming and prone to error. After connecting to external data, you can also automatically refresh (or update) your Excel workbooks from the original data source whenever the data source is updated with new information.
Connection information is stored in the workbook and can also be stored in a connection file, such as an Office Data Connection (ODC) file (.odc) or a Data Source Name file (.dsn).
To bring external data into Excel, you need access to the data. If the external data source that you want to access is not on your local computer, you may need to contact the administrator of the database for a password, user permissions, or other connection information. If the data source is a database, make sure that the database is not opened in exclusive mode. If the data source is a text file or a spreadsheet, make sure that another user does not have it open for exclusive access.
Many data sources also require an ODBC driver or OLE DB provider to coordinate the flow of data between Excel, the connection file, and the data source.
The following diagram summarizes the key points about data connections.
1. There are a variety of data sources that you can connect to: Analysis Services, SQL Server, Microsoft Access, other OLAP and relational databases, spreadsheets, and text files.
2. Many data sources have an associated ODBC driver or OLE DB provider.
3. A connection file defines all the information that is needed to access and retrieve data from a data source.
4. Connection information is copied from a connection file into a workbook, and the connection information can easily be edited.
5. The data is copied into a workbook so that you can use it just as you use data stored directly in the workbook.
To find connection files, use the Existing Connections dialog box. (Select Data > Existing Connections.) Using this dialog box, you can see the following types of connections:
-
Connections in the workbook
This list displays all the current connections in the workbook. The list is created from connections that you already defined, that you created by using the Select Data Source dialog box of the Data Connection Wizard, or from connections that you previously selected as a connection from this dialog box.
-
Connection files on your computer
This list is created from the My Data Sources folder that is usually stored in the Documents folder.
-
Connection files on the network
This list can be created from a set of folders on your local network, the location of which can be deployed across the network as part of the deployment of Microsoft Office group policies, or a SharePoint library.
You can also use Excel as a connection file editor to create and edit connections to external data sources that are stored in a workbook or in a connection file. If you don’t find the connection that you want, you can create a connection by clicking Browse for More to display the Select Data Source dialog box, and then clicking New Source to start the Data Connection Wizard.
After you create the connection, you can use the Connection Properties dialog box (Select Data > Queries & Connections > Connections tab > (right click a connection) > Properties) to control various settings for connections to external data sources, and to use, reuse, or switch connection files.
Note Sometimes, the Connection Properties dialog box is named the Query Properties dialog box when there is a query created in Power Query (formerly called Get & Transform) associated with it.
If you use a connection file to connect to a data source, Excel copies the connection information from the connection file into the Excel workbook. When you make changes by using the Connection Properties dialog box, you are editing the data connection information that is stored in the current Excel workbook and not the original data connection file that may have been used to create the connection (indicated by the file name that is displayed in the Connection File property on the Definition tab). After you edit the connection information (with the exception of the Connection Name and Connection Description properties), the link to the connection file is removed and the Connection File property is cleared.
To ensure that the connection file is always used when a data source is refreshed, click Always attempt to use this file to refresh this data on the Definition tab. Selecting this check box ensures that updates to the connection file will always be used by all workbooks that use that connection file, which must also have this property set.
By using the Connections dialog box, you can easily manage these connections, including creating, editing, and deleting them (Select Data > Queries & Connections > Connections tab > (right click a connection) > Properties.) You can use this dialog box to do the following:
-
Create, edit, refresh, and delete connections that are in use in the workbook.
-
Verify the source of external data. You may want to do this in case the connection was defined by another user.
-
Show where each connection is used in the current workbook.
-
Diagnose an error message about connections to external data.
-
Redirect a connection to a different server or data source, or replace the connection file for an existing connection.
-
Make it easy to create and share connection files with users.
Connection files are particularly useful for sharing connections on a consistent basis, making connections more discoverable, helping to improve security of connections, and facilitating data source administration. The best way to share connection files is to put them in a secure and trusted location, such as a network folder or SharePoint library, where users can read the file but only designated users can modify the file. For more information, see Share data with ODC.
Using ODC files
You can create Office Data Connection (ODC) files (.odc) by connecting to external data through the Select Data Source dialog box or by using the Data Connection Wizard to connect to new data sources. An ODC file uses custom HTML and XML tags to store the connection information. You can easily view or edit the contents of the file in Excel.
You can share connection files with other people to give them the same access that you have to an external data source. Other users don’t need to set up a data source to open the connection file, but they may need to install the ODBC driver or OLE DB provider required to access the external data on their computer.
ODC files are the recommended method for connecting to data and sharing data. You can easily convert other traditional connection files (DSN, UDL, and query files) to an ODC file by opening the connection file and then clicking the Export Connection File button on the Definition tab of the Connection Properties dialog box.
Using query files
Query files are text files that contain data source information, including the name of the server where the data is located and the connection information that you provide when you create a data source. Query files are a traditional way for sharing queries with other Excel users.
Using .dqy query files You can use Microsoft Query to save .dqy files that contain queries for data from relational databases or text files. When you open these files in Microsoft Query, you can view the data returned by the query and modify the query to retrieve different results. You can save a .dqy file for any query that you create, either by using the Query Wizard or directly in Microsoft Query.
Using .oqy query files You can save .oqy files to connect to data in an OLAP database, either on a server or in an offline cube file (.cub). When you use the Multi-Dimensional Connection Wizard in Microsoft Query to create a data source for an OLAP database or cube, an .oqy file is created automatically. Because OLAP databases aren’t organized in records or tables, you can’t create queries or .dqy files to access these databases.
Using .rqy query files Excel can open query files in .rqy format to support OLE DB data source drivers that use this format. For more information, see the documentation for your driver.
Using .qry query files Microsoft Query can open and save query files in .qry format for use with earlier versions of Microsoft Query that cannot open .dqy files. If you have a query file in .qry format that you want to use in Excel, open the file in Microsoft Query, and then save it as a .dqy file. For information about saving .dqy files, see Microsoft Query Help.
Using .iqy Web query files Excel can open .iqy Web query files to retrieve data from the Web. For more information, see Export to Excel from SharePoint.
An external data range (also called a query table) is a defined name or table name that defines the location of the data brought into a worksheet. When you connect to external data, Excel automatically creates an external data range. The only exception to this is a PivotTable report connected to a data source, which does not create an external data range. In Excel, you can format and lay out an external data range or use it in calculations, as with any other data.
Excel automatically names an external data range as follows:
-
External data ranges from Office Data Connection (ODC) files are given the same name as the file name.
-
External data ranges from databases are named with the name of the query. By default Query_from_source is the name of the data source that you used to create the query.
-
External data ranges from text files are named with the text file name.
-
External data ranges from Web queries are named with the name of the Web page from which the data was retrieved.
If your worksheet has more than one external data range from the same source, the ranges are numbered. For example, MyText, MyText_1, MyText_2, and so on.
An external data range has additional properties (not to be confused with connection properties) that you can use to control the data, such as the preservation of cell formatting and column width. You can change these external data range properties by clicking Properties in the Connections group on the Data tab, and then making your changes in the External Data Range Properties or External Data Properties dialog boxes.
|
|
|
There are several data objects (such as an external data range and PivotTable report) that you can use to connect to different data sources. However, the type of data source that you can connect to is different between each data object.
You can use and refresh connected data in Excel Services. As with any external data source, you may need to authenticate your access. For more information, see Refresh an external data connection in Excel. For more information about credentials, see Excel Services Authentication Settings.
The following table summarizes which data sources are supported for each data object in Excel.
|
Excel |
Creates |
OLE |
ODBC |
Text |
HTML |
XML |
SharePoint |
|
|
Import Text Wizard |
Yes |
No |
No |
Yes |
No |
No |
No |
|
|
PivotTable report |
No |
Yes |
Yes |
Yes |
No |
No |
Yes |
|
|
PivotTable report |
No |
Yes |
No |
No |
No |
No |
No |
|
|
Excel Table |
Yes |
Yes |
Yes |
No |
No |
Yes |
Yes |
|
|
XML Map |
Yes |
No |
No |
No |
No |
Yes |
No |
|
|
Web Query |
Yes |
No |
No |
No |
Yes |
Yes |
No |
|
|
Data Connection Wizard |
Yes |
Yes |
Yes |
Yes |
Yes |
Yes |
Yes |
|
|
Microsoft Query |
Yes |
No |
Yes |
Yes |
No |
No |
No |
|
Note: These files, a text file imported by using the Import Text Wizard, an XML file imported by using an XML Map, and an HTML or XML file imported by using a Web Query, do not use an ODBC driver or OLE DB provider to make the connection to the data source.
Excel Services workaround for Excel tables and named ranges
If you want to display an Excel workbook in Excel Services, you can connect to and refresh data, but you must use a PivotTable report. Excel Services does not support external data ranges, which means that Excel Services does not support an Excel Table connected to a data source, a Web query, an XML map, or Microsoft Query.
However, you can work around this limitation by using a PivotTable to connect to the data source, and then design and layout the PivotTable as a two-dimensional table without levels, groups, or subtotals so that all desired row and column values are displayed.
Let’s take a trip down database memory lane.
About MDAC, OLE DB, and OBC
First of all, apologies for all the acronyms. Microsoft Data Access Components (MDAC) 2.8 is included with Microsoft Windows . With MDAC, you can connect to and use data from a wide variety of relational and nonrelational data sources. You can connect to many different data sources by using Open Database Connectivity (ODBC) drivers or OLE DB providers, which are either built and shipped by Microsoft or developed by various third parties. When you install Microsoft Office, additional ODBC drivers and OLE DB providers are added to your computer.
To see a complete list of OLE DB providers installed on your computer, display the Data Link Properties dialog box from a Data Link file, and then click the Provider tab.
To see a complete list of ODBC providers installed on your computer, display the ODBC Database Administrator dialog box, and then click the Drivers tab.
You can also use ODBC drivers and OLE DB providers from other manufacturers to get information from sources other than Microsoft data sources, including other types of ODBC and OLE DB databases. For information about installing these ODBC drivers or OLE DB providers, check the documentation for the database, or contact your database vendor.
Using ODBC to connect to data sources
In the ODBC architecture, an application (such as Excel) connects to the ODBC Driver Manager, which in turn uses a specific ODBC driver (such as the Microsoft SQL ODBC driver) to connect to a data source (such as a Microsoft SQL Server database).
To connect to ODBC data sources, do the following:
-
Ensure that the appropriate ODBC driver is installed on the computer that contains the data source.
-
Define a data source name (DSN) by using either the ODBC Data Source Administrator to store the connection information in the registry or a DSN file, or a connect string in Microsoft Visual Basic code to pass the connection information directly to the ODBC Driver Manager.
To define a data source, in Windows click the Start button and then click Control Panel. Click System and Maintenance, and then click Administrative Tools. Click Performance and Maintenance, click Administrative Tools. and then click Data Sources (ODBC). For more information about the different options, click the Help button in each dialog box.
Machine data sources
Machine data sources store connection information in the registry, on a specific computer, with a user-defined name. You can use machine data sources only on the computer they are defined on. There are two types of machine data sources — user and system. User data sources can be used only by the current user and are visible only to that user. System data sources can be used by all users on a computer and are visible to all users on the computer.
A machine data source is especially useful when you want to provide added security, because it helps ensure that only users who are logged on can view a machine data source, and a machine data source cannot be copied by a remote user to another computer.
File data sources
File data sources (also called DSN files) store connection information in a text file, not the registry, and are generally more flexible to use than machine data sources. For example, you can copy a file data source to any computer with the correct ODBC driver, so that your application can rely on consistent and accurate connection information to all the computers it uses. Or you can place the file data source on a single server, share it between many computers on the network, and easily maintain the connection information in one location.
A file data source can also be unshareable. An unshareable file data source resides on a single computer and points to a machine data source. You can use unshareable file data sources to access existing machine data sources from file data sources.
Using OLE DB to connect to data sources
In the OLE DB architecture, the application that accesses the data is called a data consumer (such as Excel), and the program that allows native access to the data is called a database provider (such as Microsoft OLE DB Provider for SQL Server).
A Universal Data Link file (.udl) contains the connection information that a data consumer uses to access a data source through the OLE DB provider of that data source. You can create the connection information by doing one of the following:
-
In the Data Connection Wizard, use the Data Link Properties dialog box to define a data link for an OLE DB provider.
-
Create a blank text file with a .udl file name extension, and then edit the file, which displays the Data Link Properties dialog box.
See Also
Power Query for Excel Help
Need more help?
Want more options?
Explore subscription benefits, browse training courses, learn how to secure your device, and more.
Communities help you ask and answer questions, give feedback, and hear from experts with rich knowledge.
The data source that extracts data from Microsoft Excel workbooks or CSV files.
Namespace: DevExpress.DataAccess.Excel
Assembly:
DevExpress.DataAccess.v22.2.dll
NuGet Package:
DevExpress.DataAccess
Declaration
- C#
- VB.NET
[ToolboxBitmap(typeof(ExcelDataSource), "ExcelDataSource.bmp")]
[ToolboxSvgImage("DevExpress.DataAccess.Images.ExcelDataSource.svg,DevExpress.DataAccess.v22.2, Version=22.2.99.0, Culture=neutral, PublicKeyToken=c38a27d2243c2672")]
[XRDesigner("DevExpress.DataAccess.UI.Design.XRExcelDataSourceDesigner,DevExpress.DataAccess.v22.2.UI, Version=22.2.99.0, Culture=neutral, PublicKeyToken=c38a27d2243c2672", typeof(IDesigner))]
public class ExcelDataSource :
    DataComponentBase,
    IListSource,
    IListAdapterAsync,
    IListAdapter,
    ISupportFillAsync
The ExcelDataSource component allows you to extract data from Microsoft Excel workbooks (XLS, XLSX or XLSM files) or CSV files stored on the disk or in a stream.

The ExcelDataSource works in read-only mode. It does not evaluate cell formulas, and you cannot read values from cells with formulas.
The ExcelDataSource can only read plain text data from Excel worksheets. It cannot load formatted text, formulas, or floating elements such as images.
You can use the ExcelDataSource to supply data to the GridControl, TreeList, ChartControl or any other DevExpress control that that you can set up with Data Source Configuration Wizard.
Design-Time Specifics
After you add the ExcelDataSource component to an application, you can configure the data connection with commands available in the component’s smart tag.

- Edit
- Invokes the Excel Data Source editor that allows you to select the Excel workbook/CSV file and specify import settings.
- Rebuild Result Schema
- Updates the data source result schema to match the current data source structure.
Run-Time Specifics
Steps to Configure the ExcelDataSource
Do the following to extract data from the specified workbook or CSV file in code:
- Assign the file path to the ExcelDataSource.FileName property. As an alternative, load the required document from a stream using the ExcelDataSource.Stream property. In this case, you should specify the file format with the ExcelDataSource.StreamDocumentFormat property.
- Depending on the target file format, create the ExcelSourceOptions or CsvSourceOptions class instance, specify its settings, and assign the resulting object to the ExcelDataSource.SourceOptions property.
- Call the ExcelDataSource.Fill method to fill the created data source with data.
The following code creates the ExcelDataSource and selects a cell range in the SalesPerson worksheet.
- C#
- VB.NET
ExcelDataSource excelDataSource = new ExcelDataSource();
excelDataSource.Name = "Excel Data Source";
excelDataSource.FileName = HostingEnvironment.MapPath(@"~/App_Data/ExcelDataSource.xlsx");
ExcelWorksheetSettings worksheetSettings = new ExcelWorksheetSettings("SalesPerson", "A1:L2000");
excelDataSource.SourceOptions = new ExcelSourceOptions(worksheetSettings);
excelDataSource.Fill();
How to Implement a Custom Excel Schema Provider
You can use a custom Excel schema provider that implements the IExcelSchemaProvider interface.
You can change settings of the built-in Excel schema provider. For this, create the ExcelSchemaProvider class descendant and override its methods.
The following code registers the MyExcelSchemaProvider custom provider:
- C#
- VB.NET
//...
var serviceContainer = (System.ComponentModel.Design.IServiceContainer)excelDataSource;
serviceContainer.RemoveService(typeof(DevExpress.DataAccess.Excel.IExcelSchemaProvider));
serviceContainer.AddService(typeof(DevExpress.DataAccess.Excel.IExcelSchemaProvider), new MyExcelSchemaProvider());

excelDataSource.Fill();
//...
Web Specifics
In web applications, the Resources.AccessSettings.DataResources option manages access to the source XLS, XLSX, and CSV files for the ExcelDataSource instance.
The DevExpress ASP.NET Project Wizard creates a Web Forms application that specifies the AccessSettings.DataResources option and allows you to use only the Content folder as the data source file location.
Implements
Inheritance
See Also
Excel is a preferred option for many people when it comes to processing data. Any calculations can be done with the help of Excel formulas, while Excel macros leave much space for all kinds of automatization.
But not all the data is stored in the form of spreadsheets. There are plenty of systems and tools for data collection and management. Thankfully, Excel is extremely flexible in terms of data importing. This article will explain how you can export data from the most popular sources to Excel.
Importing web data to Excel
Who needs to import data from the web to Excel
It’s not a secret that the internet is made of data. Thanks to the development of broadband networks and wireless technologies, all that data is available at your fingertips at any moment.
But sometimes, you may need to go beyond just reading the information. For example, when you are working on research and want to analyze large amounts of data. In this case, it would be helpful to import web data into specialized software, such as Excel.
How to import data from HTML to Excel
Of course, the simplest way to import data from a website to Excel is to copy-paste it from an HTML page by using a web browser. Sometimes that works pretty well; the simpler, the better. But what if the required data is on hundreds of pages? Or maybe, you don’t need all the information, but only specific fields. In such cases, the simple method will consume an unreasonable amount of time.
Excel has a built-in feature for scraping tables from web pages. To import data from a web source:
- On the Data tab, select New Query > From Other Sources > From Web:
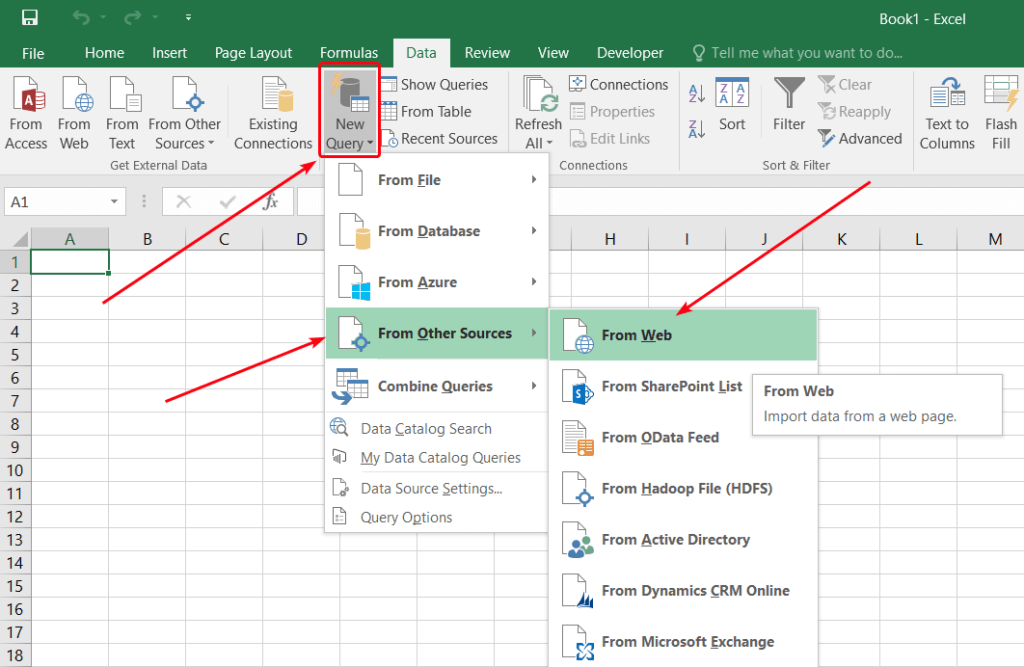
- Enter the web page URL and click OK:

Excel will look for tables on the page.
- In the Navigator window that opens, select the table that you want to import:

Use the Select multiple items checkbox if you want to import several tables. Click Load when you are ready to start the import.
- Excel will insert the imported table into the current worksheet. You can refresh data by clicking the refresh button in the Workbook Queries task pane:

How to automatically import live data into Excel
Data is relevant as long as it’s fresh. If you need to update the information frequently to keep it up-to-date, manual data import will bring nothing but pain.
Thankfully, many websites provide REST API for accessing their data. Sometimes you have to pay for API access, sometimes it’s free. You need to make a request to get the data. The details on making requests can be found in the API reference of the data provider. API responses usually contain data in JSON format. There are free services that allow you to import JSON data to Excel. The best ones will even make API requests for you. Let’s see how you can use Coupler.io for such tasks.
Coupler.io is a data integration solution for importing data into Excel from different apps. You can load records from Shopify, HubSpot, Pipedrive, and many other sources. In addition to Excel, you can use Google Sheets or BigQuery as a destination for your data.
- Sign in to Coupler.io with your Microsoft account.
- Go to Importers and click Add new importer.
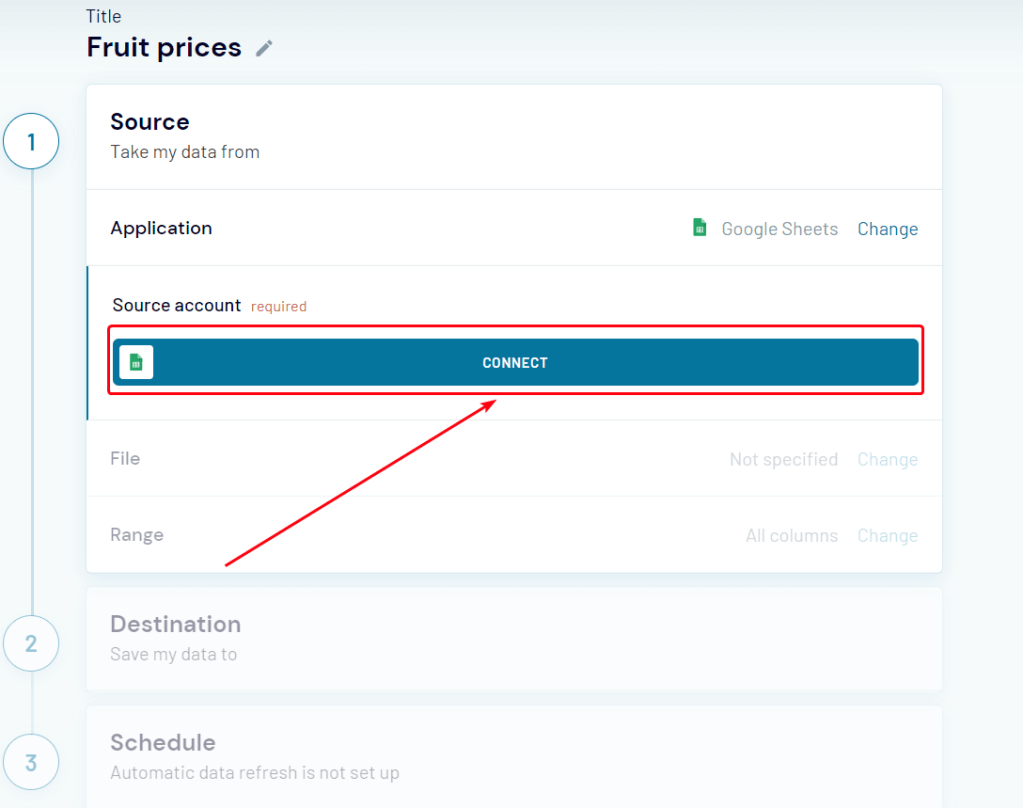
- Select JSON as Source, and provide the request URL with your API key (if required):

Refer to the data provider documentation for details on available requests and how you can obtain an API key.
- Specify API call parameters, as described in the API documentation. The only required parameter is HTTP method, which will be ‘GET’ in most cases.
- In Destination, select Microsoft Excel:

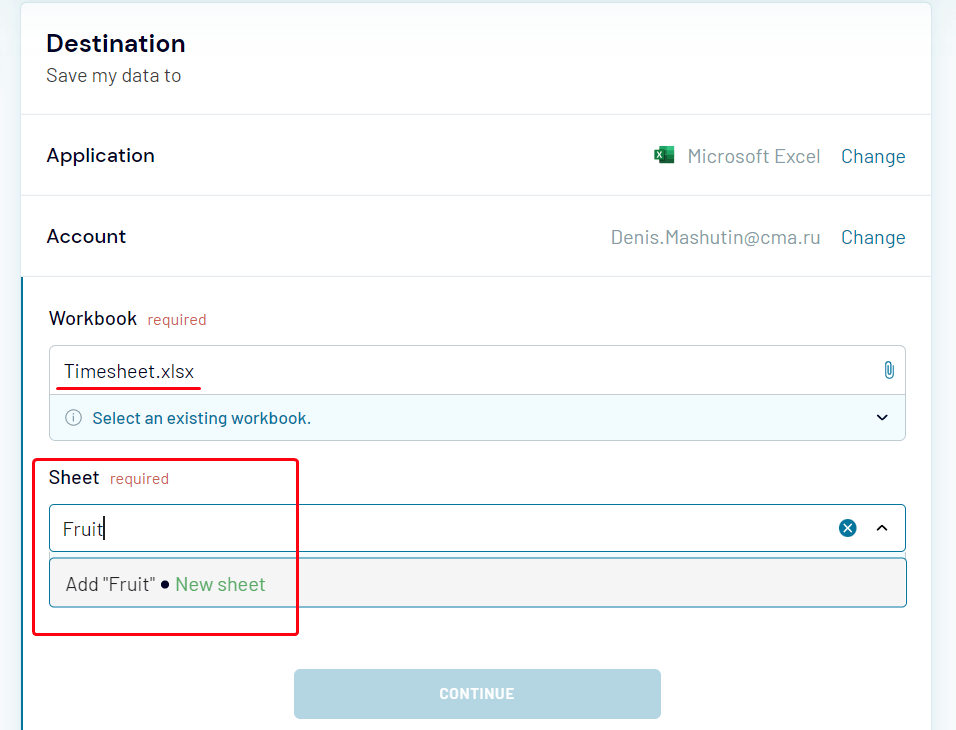
- Connect to your Microsoft Office account, and then select an existing workbook for import. You can specify an existing sheet or create a new one by typing its name:

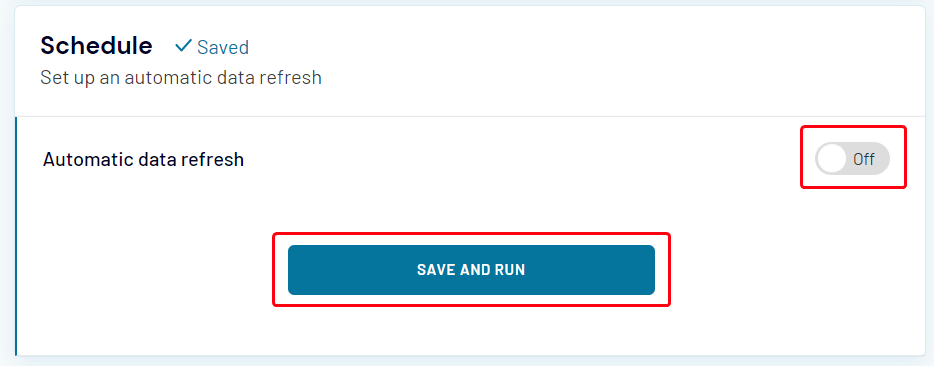
- Toggle the Automatic data refresh switch to set up the schedule for automatic data updates. When you are done with settings, click Save and Run:

Synchronizing the spreadsheets
How to sync data between Excel files
If you want to transfer data from one Excel workbook to another, copy-pasting is a good option. But that will not work if you want to keep the data up-to-date with the other file. There are several ways to sync data between Excel files.
You can use formulas for that. To fill a cell with data from another Excel workbook:
- Make sure that the other workbook is open.
- Select the cell to sync, then click the Formula Bar and type
=.

- Switch to the other workbook, click the cell that you want to import data from, and press Enter.
Excel will switch you back to the first workbook and fill the cell with the synced data. If the content of the cell in the other workbook changes, the synced cell will be updated.
If you see #REF! in the synced cell, it means that the other workbook is not open. Open it to enable data synchronization. Try another method if you are not comfortable with the formula bar.
- In the source file, i.e. the workbook that you want to import data from, select the cell, and then click Copy or press
Ctrl-C:

- Switch to the target workbook, select the cell, and then select Paste > Other Paste Options > Paste Link.
The formula for that cell will be filled with the link to the source cell in the other workbook.
There are many other options for syncing Excel data that you can learn in our guide on linking Excel files.
Besides the standard Excel features, there are online tools that allow you to import data from Excel to Excel, and let you synchronize your data in a more flexible way.
How to import data from Google Sheets to Excel
Google Sheets is almost as powerful as Excel in terms of data processing. But certain very important features are still available only in Excel. If you need these functions, you can transfer your data in several ways.
Import data from Google Sheets to Excel automatically
First of all, try using Coupler.io. It is an online tool that can import data from Google Sheets to Excel.
- Sign in to your Coupler.io account and click Add New in the Importers section.
- Select Google Sheets as Source, click Connect, and sign in to your Google account:
- Select the workbook and the sheet that you would like to export data from:

- Select the range of cells, or skip this step to export all the data.
- In Destination, select Microsoft Excel, click Continue, and then sign in to your Microsoft account.
- Select an existing workbook and the worksheet. If you want to create a new worksheet, just type its name:
- Specify the cell address or keep the default ‘A1’ value.
- Specify the import mode. The default option is ‘Replace’.
- Now you can click Save and Run to start the import immediately.
Or you can toggle Automatic data refresh to configure automatic data updates:
Import data from Google Sheets to Excel as HTML
The second option is to use the built-in data import feature of Excel:
- In your Google spreadsheet, go to File > Share > Publish to web:
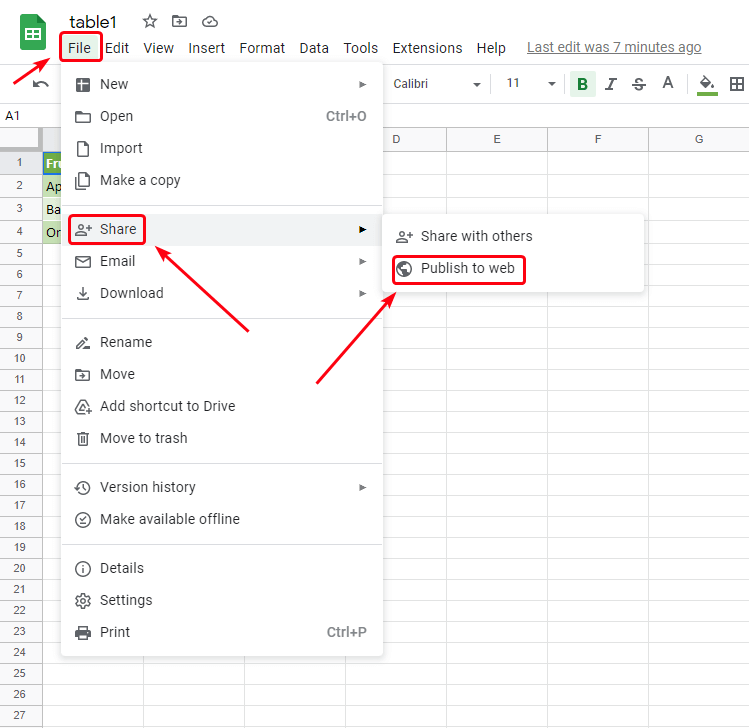
- Select the sheet that contains the table, and specify Comma-separated values (.csv).
If you want the data in Excel to be updated when the Google sheet is changed, select the Automatically republish when changes are made checkbox:

- Press
Ctrl-Cto copy the link. - Go to your Excel workbook and perform the steps described in the section about importing data from HTML above.
If you choose the second option, keep in mind that your data will become accessible by others. If the information is confidential or sensitive, using Coupler.io is preferred.
Importing data from other sources
How to import data from SQL server to Excel
If your data is stored in databases at an SQL server, the simplest way to make it accessible to a wide spectrum of users is to export it to Excel. You can use the native Excel query function.
- In the Data tab, select New Query > From Database > From SQL Server Database:
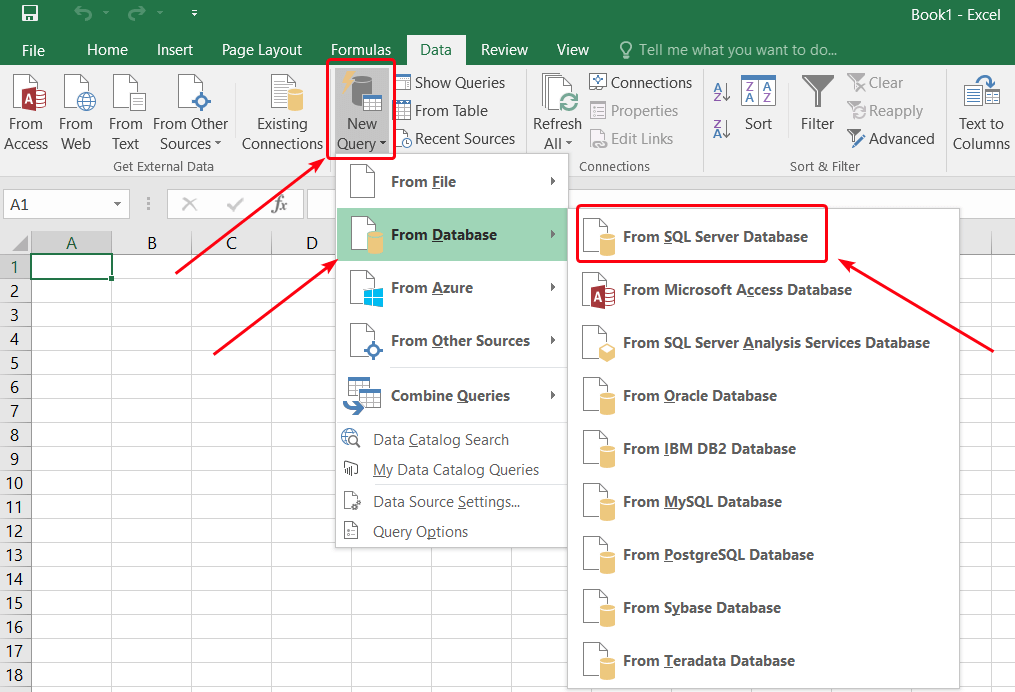
- Specify the name of the server and the database (or you will be able to specify it later):

You can also provide an SQL statement to narrow the range of exported data.
- Choose to use your current window credentials to access the database, or provide the username and the password. Click Connect.
- In the next window, select the database and tables that you want to export.
- Select the name for the new data connection file, and then click Finish.
- In the next window, you can select where to insert the imported data. Select Existing worksheet and provide the cell address, if needed.
The data will be imported and pasted into the worksheet.
If you use SQL Server Management Studio (SSMS), there is a feature for exporting data to various destinations, including Excel spreadsheets.
- In Object Explorer, right-click the database with the source data, and then select Tasks > Export Data.
- In the SQL Server Import and Export Wizard window that opens, click Next.
- Select SQL Server Native Client 11.0 in the Data source drop-down box.
- Select Use Windows Authentication in the Authentication area, and then click Next.
- In the Choose a destination window, specify Microsoft Excel as the destination, browse to the target file in the Excel file path, and select the output file format.
- In the next window, you can choose to write a query for data export. If you want to copy the tables without changes, just click Next.
- The list of tables available for export will be displayed. Select the tables that you want to export. In the Destination column, you can specify the name of the worksheet for each table.
- In the Save and Run Package window, select Run immediately and click Next.
- Make sure that all parameters are correct, and then click Finish.
The selected data will be exported to the Excel workbook. When the wizard finishes all the tasks, click Close.
How to import data from a text file to Excel
The tables can also be stored in plain text. Such files are similar to regular text files with the only exception that commas have a special function there — they separate cells from each other. The format is called CSV — comma-separated values.
Excel can open .csv files directly. The content of such a file will be rendered as a table. If you edit a CSV file in Excel and then try to save it, you will see the following warning:

Click Yes if you want to continue using this file as CSV in the future. If you click No, the Save as dialogue will be opened, where you will be able to select the format and the destination for the file.
There are other delimiters that can be used to store tables in text format: tabs, pipes (‘|’), spaces, semicolons, etc. To open such files with Excel, instead of trying to open them directly, use the Power Query function.
- Go to Data > New Query > From File > From Text.
- Select the text file and click Import.
- The Query Editor window will open. Make sure that the table looks good and click Close & Load:

The imported table will be inserted into your current worksheet.
How to import data to Excel from PDF
If your tables are in PDF, but you want them in Excel, you can try to import them.
- Go to the Data tab, and then select New Query > From File > From PDF.
- Select the tables that you want to import in the Navigator window, and then click Load.
The tables will be extracted from PDF and pasted into your Excel workbook. If you don’t have the From PDF option on the menu, you can use the following workaround to import data from PDF into Excel:
- Copy the table text in the PDF file by selecting it and pressing
Ctrl-C. - Open Microsoft Word and press
Ctrl-V. - Check if Word managed to render the text data correctly:
- Press
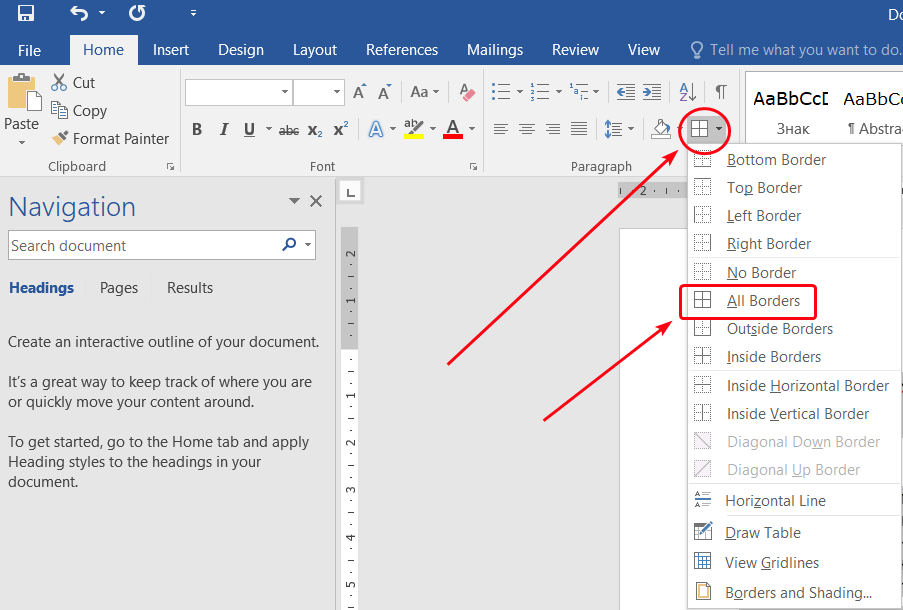
Ctrl-Ato select everything. - On the Home tab, click the table menu, and then select All borders:
- Press
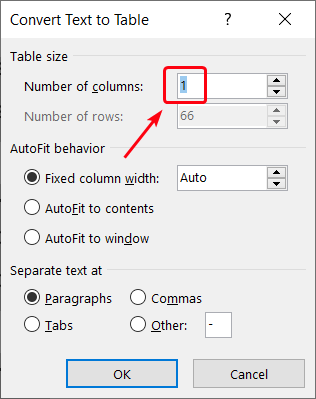
- If the table looks good, proceed to the final step. Otherwise, go to the Insert tab, and then select Table > Convert Text to Table:

- Specify the number of columns in the original table, and then click OK:
- Copy the entire table, go to Excel, and press
Ctrl-V.
The table will be inserted into the current worksheet. If you opt for this workaround, no automatic data synchronization will be available.
Discover many other sources for importing data to Excel
Excel provides you with many powerful features for data processing. You can bring virtually any data to Excel by importing it from various sources. If you didn’t find a good solution in this article, discover other Microsoft Excel integrations to pick what fits your needs best.
-

Lead Analytics Engineer at Railsware and Coupler.io. I make data accessible and useful for everyone in a team. During the last 7 years, I built dashboards, analyzed user journeys, and even caught criminals 🕵🏿♀️ Besides data, I also like doing yoga, cooking, and hiking 🤗

Back to Blog
Focus on your business
goals while we take care of your data!
Try Coupler.io
Not all data will come from a SQL Server database when you are creating reports in SSRS. There will be times you will need to create a data source to .CSV files, Excel spreadsheets, and MS Access databases.
Recently, I had a customer request setting up sample data sources to these types of files to help the developers complete a migration project.
Items Needed to be Installed on the SSRS Server
The first thing you will need are executables from Microsoft to enable OLEDB and ODBC connections to the source data. SSRS will not be able to use ODBC or OLEDB until the specific drivers for these types of files are installed on the server.
You will need to download and install the following on your SSRS server. While these look to be just for MS Access, they include the drivers for connecting to Flat files and MS Excel as well.
- AccessDatabaseEngine_x64.exe
- AccessDatabaseEngine.exe
Located at: http://www.microsoft.com/en-us/download/details.aspx?id=13255 (at the time this was written)
NOTE: I would recommend installing the 64 bit version first, and then the 32 bit version to help save some time troubleshooting the issue of trying to install a 64 bit version once the 32 bit version is already installed.
For Testing
The system is ready to set up the data sources once the drivers are installed on the server. For testing purposes, I have a folder containing sample files for the different types of data sources I would like to connect to:

How to Create a Data Source for MS Excel Files (.xls, .xlsx)
We will need to create an ODBC connection on the server to the Excel file before creating a data source in Report Manager.
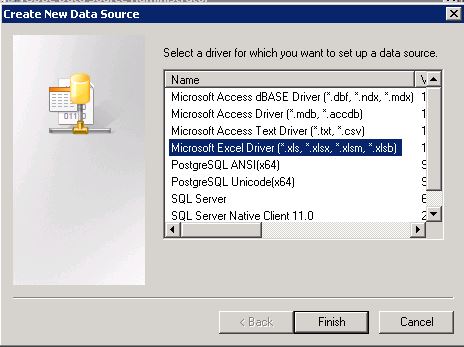
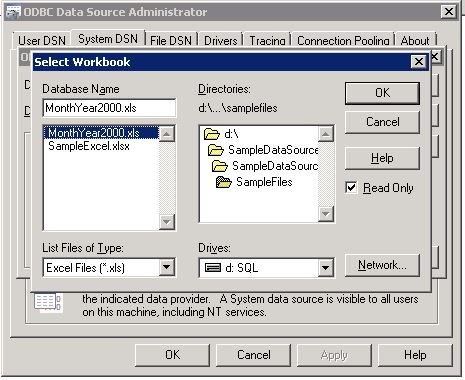
1. Create a system DNS using the Microsoft Excel Driver (*.xls)
2. Create a meaningful name for your data source. The name will be used later in SSRS when creating the connection string.
3. Make sure to select the correct version of Excel you are wanting to connect and then select Workbook button:

4. Navigate to the location of the document and select the file. Complete the process of creating the system DSN.
You will now be able to create and test your data source in SSRS.
Creating the Data Source in SSRS
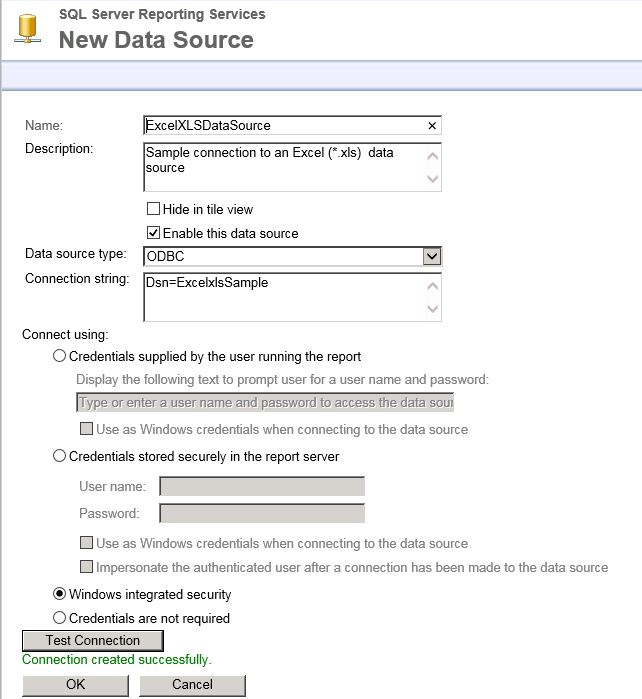
1. Open the Report Manager and navigate to the folder structure of where you would like to save your data source. Select “New Data Source”.
2. Give your data source a descriptive name. Create a good description of the data source for documentation purposes.
3. Select ODBC as your Data Source Type from the drop down menu.
4. Your connection string is “Dns=xxx”, where xxx is the name you gave your system DSN.
5. Make sure to test your connection, and then select OK.
When writing your query for the report, you will reference your sheet in the excel file which has the data you are wishing to display on the report.
Example: “select * from [Sheet1$]”
Creating a Data source to .CSV file
For this process, you will use OLEDB to connect to the data source. The main item to note is the data source is defined to look a directory instead of a physical file. If you use a central location for all the .csv files to be located, you will only need to create one data source in SSRS. The queries inside your report will dictate which file the report is pulled from. If you are worried about security, you could set up multiple locations for the files and create individual data sources for the structure.
Unlike connecting to a MS Excel file, you will not need to create a SYSTEM DNS before creating your data source in SSRS.
Navigate to the location you would like your data source to be stored in Report Manager and select new data source.
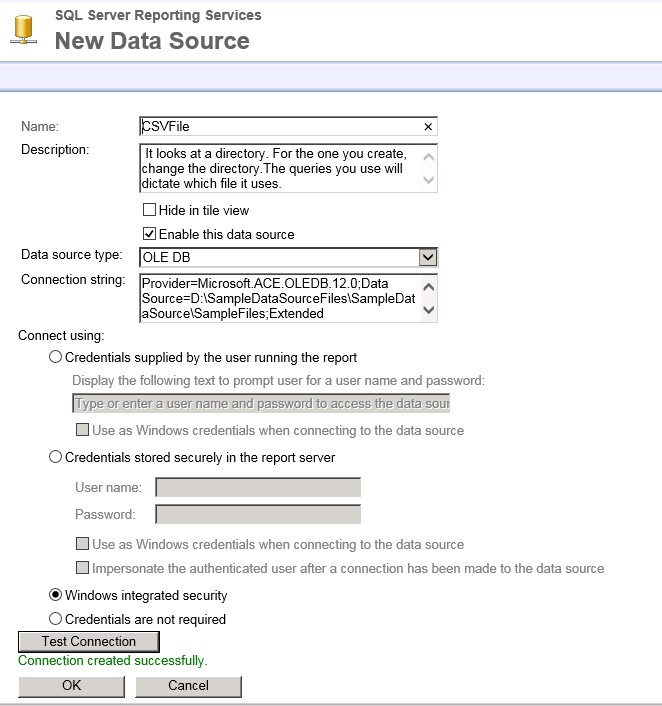
Give your data source a meaningful name and don’t forget to provide a description for documentation purposes.
For your ‘Data Source Type’ select OLEDB. You will be using the Microsoft.ACE.OLEDB.12.0 provider which was installed with the executables during the system set up listed above.
For your connection string, your provider is Microsoft.ACE.OLEDB.12.0 and the source is the path to the folder which contains your file. For this example, we are assuming the file does not contain a header row. (HDR=No in the properties)
Your connection string will look something like this.
Provider=Microsoft.ACE.OLEDB.12.0;Data Source=D:SampleDataSourceFilesSampleDataSourceSampleFiles;Extended Properties=”text;HDR=No;FMT=Delimited”
Once your Data source connection has been created, you can test it by creating a simple report. Below is an example of a query you would use in Report Builder to display the information from a file called “samplecsv.csv”.
Example: select * from samplecsv.csv
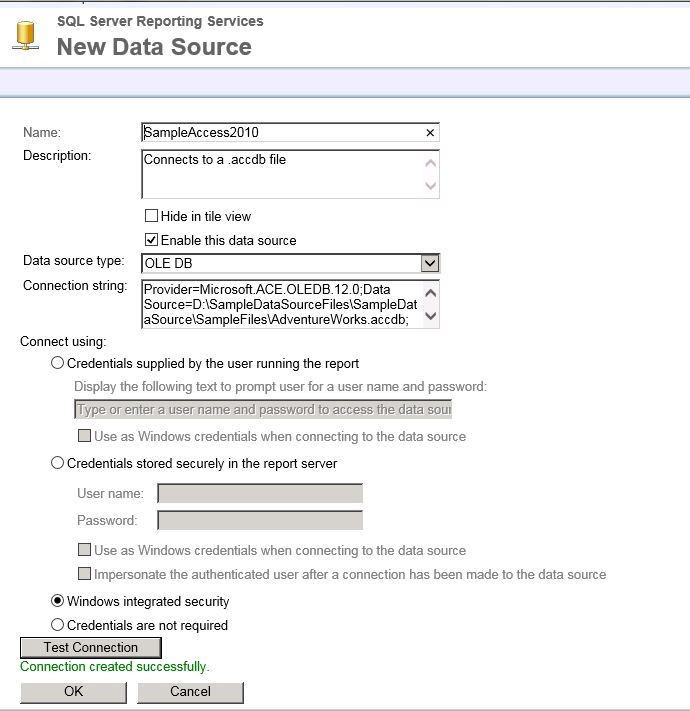
To Create a Data Source to an MS Access database (*.accdb files)
To create a data source to an MS Access database, you will use OLEDB Data source type. The sample shown below is a connection to the MS Access 2010 version of the Adventureworks database.
For your connection string, your provider will be “Microsoft.ACE.OLEDB.12.0” and your source will be the physical location of the .accdb file.
After the Data sources have been setup, I always like to create a couple of quick same reports to insure they are working as expected.
This process was testing on the following architecture:
Windows 2012R2, SQL Server 2014, Reporting Services 2014
Windows 2008r2 SP1, SQL Server 2012, Reporting Services 2012
Thanks for taking the time to read this post. Feedback is always welcome.
If you have questions on getting Data Sources set up in SSRS or need assistance with configuring SSRS for performance or SQL Server in general, reach out to us! XTIVIA can assist you with your Reporting Service needs.
When creating an Excel Pivot Table, what happens if your data source is in another location?
Would you have to copy your data into the same spreadsheet?
Well, NO! You can simply use the External Data Sources feature in your Pivot Table and Excel will magically import the data for you!
You can import data into your Pivot Table from the following data sources:
- Excel workbook
- Microsoft Access database
- SQL Server
- Analysis Services
- Windows Azure Marketplace
- OData Data Feed
For our example, we will import data using two data sources, an Excel workbook and an Access file.

Want to know how to Import Data into Microsoft Excel?
*** Watch our video and step by step guide below with free downloadable Excel workbook to practice ***
Watch it on YouTube and give it a thumbs-up!
*** Watch our video and step by step guide below with free downloadable Excel workbook to practice ***
Watch it on YouTube and give it a thumbs-up!
Import from another Excel Workbook:

Import From Microsoft Access and into Excel:

Wondering how this is even possible? Read on!
DOWNLOAD FILES
Import from another Excel Workbook:
STEP 1: Go to Insert > Tables > PivotTable

STEP 2: Select Use an external data source and click Choose Connection.

STEP 3: Select Browse for More.

STEP 4: Select the Excel file with your data. Click Open.

STEP 5: Select the first option and click OK.

STEP 6: Click OK.

STEP 7: In the VALUES area put in the Sales field, for the COLUMNS area put in the Financial Year field, and for the ROWS area put in the Sales Month field
Your Pivot Table is ready from the Excel data source!

Import From Microsoft Access and into Excel:
STEP 1: Now let us try for an Access data source!
Go to Data > Get External Data > From Access

STEP 2: Select the Access Database Source file in your desktop or company file path. Click Open.

STEP 3: Select PivotTable Report and click OK.

STEP 4: In the VALUES area put in the Sales field, for the COLUMNS area put in the Financial Year field, and for the ROWS area put in the Sales Month field
Your Pivot Table is ready from the Access data source!

More Ways to Import External Data into an Excel Pivot Table:
You can also use this functionality to get data from other source types: SQL Server, Analysis Services, Windows Azure, and oData Data Feed

How to Use an External Data Source with Excel Pivot Tables
About The Author
Bryan
Bryan is a best-selling book author of the 101 Excel Series paperback books.