
Содержание
- Logically Proven .
- Thursday, 26 February 2015
- How to create a LOG file in excel and access — VBA
- How to make an external log using Excel VBA?
- Version 2.01
- Windmill Software Ltd Data Acquisition Intelligence
- Connect Sensors and Instruments to Excel
- Importing Logged Data into Excel
- Acquiring Live Data in Excel
- Copying and Pasting Live DDE Data Links
- Using Macros for Analysis and Control with Excel
- Reading data from one channel
- Sending Data to an Analogue or Digital Output
- Reading Data from All the Instruments’ Channels
- Data Acquisition Example
- How to Transform Data in Excel (Log, Square Root, Cube Root)
- Log Transformation in Excel
- Square Root Transformation in Excel
- Cube Root Transformation in Excel
- How to Transform Data in Excel? Ultimate Guide
- What is data transformation in Excel?
- In what cases may data transformation in Excel be needed?
- What can you use to transform data in Excel?
- Excel functions
- Power Query
- Power Pivot
- Power View
- Coupler.io
- What are the data transformation functions in Excel?
- Example of transforming data in Excel
- Examples of transforming data using Excel functions and tools
- How to transform data into log in Excel?
- How to square root transform data in Excel?
- How to make cube root Excel data transformation?
- How to arcsine transform data in Excel?
- How to transform data in Excel from columns to rows?
- How to transform into numeric data in Excel?
- How to transform data range in Excel?
- Main ideas for data transformation in Excel
- Basic Excel data transformation rules
- What to do if transform data in Excel fails?
Logically Proven .
Thursday, 26 February 2015
How to create a LOG file in excel and access — VBA
Welcome to Logically Proven blog.
This post demonstrates how to create a log file in excel or access using VBA (Visual Basic for Applications) code.
Consider a scenario, the application is logging the user details into the log file who are accessing the application.
Here is application may be excel or access which is located in the network location which is accessed by the multiple users.
The log data contains the application name, who are accessing the application and the application accessed date.
In the below example I am considering the excel application which logs the data into the LOG file. The application appends the data to the LOG file every time the application is accessed.
Achieving this functionality by logging the user details when the workbook is opened.
So, the workbook open event code looks like this —
LogInfo is the sub-routine which saves the application name, user name and the access date of an application.
If the log file doesn’t exist, the application creates automatically at the run-time. But the path should be valid and exists otherwise the application runs into error. And make sure the application is having the permissions to create and write into the log file.
This method takes one argument which is the message that you want to write into the log file.
This method appends the log message every time the application is accessed.
This way the application logs the user details who are accessing the application. You can add the same functionality in many cases for example when user modifies something in the excel or access database you can trigger the code to save the user details and what modifications did.
LOG file is very useful to analyse the application. So keep logging your application.
Please write your comments if you find anything is incorrect or do you want to share more information about the topic discussed above.
Logically Proven
Learn, Teach, Share

Computer Science graduate, Techie, Founder of logicallyproven, Love to Share and Read About pprogramming related things.
Источник
How to make an external log using Excel VBA?
The code has been updated to reference the changes below.
This log system create an external document for Excel called Log.txt, it will create a line in the log.txt file that looks like this:
11:27:20 AM Matthew Ridge changed cell $N$55 from ss to
This will not tell you if someone entered a new line of code into the sheet, but if the code demands an answer, it will tell you what cell that answer is in. This codes below should work for both Mac and PC systems combined. If people find it doesn’t please say.
This code was created with the help of people here, and other forms, so I can’t take sole proprietorship of the document, but I can take ownership of the concept. So thanks to those who helped, without this there now wouldn’t be a viable logging system for Excel in my opinion 😉
BTW, before anyone freaks out and asks where does this code go, it isn’t obvious to the general/new end user. You need to go to the Developer Tab open it up, click on Visual Basic, and when the new window opens look for Microsoft Excel Object; under that folder should be your workbook. You can either put it under ThisWorkbook or inside any of the sheets by double clicking on the sheet you want the code to be in.
Once the sheet is open on the right panel, you will see Option Explicit, if you don’t it is best if you activate it by making sure the Require Variable Declaration is checked. This is found at the Visual Basic window again, and follow this path:
Tools-> Options -> Editor.
If it is checked then you have no worry, if not then you check it. Option Explicit is a good thing for you code, it forces you to declare variables, which is a good practice to begin with.
After it is verified, you can copy the code below to either paste it in your Workbook, or a specific sheet depending on your needs.
Version 2.01
As time goes by, I will attempt to update this code to add more features to it as I deem fit.
Again thanks to all that helped, it is greatly appreciated to make this possible.
Источник
Windmill Software Ltd
Data Acquisition Intelligence
Connect Sensors and Instruments to Excel
Windmill software collects data from instruments and devices connected to your PC. We have a range of drivers for many types of equipment, and now offer our newsletter subscribers free software to log data from instruments connected over RS232, RS485, Modbus and TCP/IP. This means that you can connect these instruments to Excel.
Using Excel you could average readings over time or a number of sampling points; calculate control outputs; or put data directly into reports. You can collect data with the Windmill Logger trial or free ComDebug application, and after collection has finished import it into your Excel spreadsheet. Alternatively you can transfer live data, using dynamic data exchange.
Importing Logged Data into Excel
The easiest way to get data into Excel is to open a logged data file after collection has finished. Windmill Logger can periodically close one data file and start another without pausing data collection, so no need to interrupt your tests or experiments to see the data.
- In Excel, from the File menu select Open.
- Select «All Files» as the file type.
- Choose your Logger *.wl file from the Windmill folder. (Or your WM Collect file if using the Microlink 840 Data Logger.)
- Excel will recognise this as a tab separated value file. Use the default options offered by the spreadsheet for importing the data.
- Save the data as an Excel file.
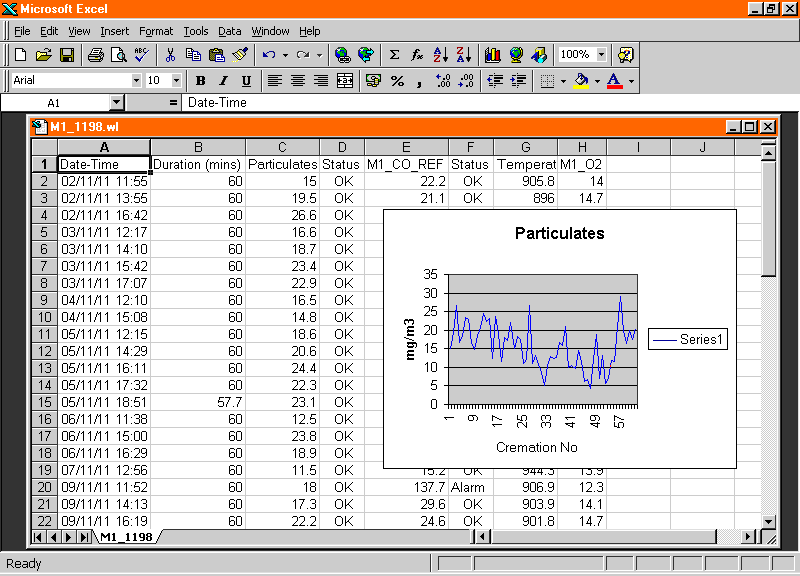
Example of data logged by Windmill being analysed in Excel
Acquiring Live Data in Excel
Windmill 7 lets you aquire live data in Excel using DDE. Just copy and paste data links which will continually update with live values. For more sophisticated tasks you can use a macro to grab data from Windmill. Some examples are given below
Copying and Pasting Live DDE Data Links
The Windmill DDE Panel lets you copy and paste live data into Excel.
- In DDE Panel, press the Copy to Clipboard button
- Choose the type of information you want to copy: data values, channel names, data units, alarm settings, etc.
- Move to Excel and select Paste Special from the Edit menu.
- Choose to paste as a link. Continually updating live data will appear in Excel.
For more sophisticated tasks, or to log live data in Excel, you can use macros.
Using Macros for Analysis and Control with Excel
Excel offers you analytical capabilities and lets you calculate control values to send back to the hardware.
To try out data acquisition into Excel
- Load Windmill DDE Panel and start collecting data from your instrument.
- Load Excel with a clean sheet, and then choose Record New Macro from the
Tools > Macro menu. Create an empty macro and then copy and paste the example macros given below into it.
We have three example macros. The first reads data from one channel, for example the current temperature reading. The second shows how to send data to an analogue or digital output. The third reads data from all instruments’ channels.
Reading data from one channel
To read data from one channel called Chan_00 and place it into a cell in the spreadsheet, create the following VBA code. (A channel holds one type of data. For a laboratory scale, you might have one channel holding the current weight. For a GPS receiver you might have two channels: one holding latitude and one holding longitude.)
Sending Data to an Analogue or Digital Output
Reading Data from All the Instruments’ Channels
This macro repeatedly samples data from all the instruments’ channels and stores the data in the Excel worksheet (by default Sheet 1). When the macro is run the operator chooses how many times to sample all the channels, and the interval between taking sets of samples. The macro loops until the required amount of samples have been collected. Make sure DDE Panel is running before starting the macro. You can quickly check DDE links by Copying them to Clipboard in DDE Panel and using Paste Special in Excel, before running the macro.
Another good macro for logging data, this time only logging when new data arrives, is given in Issue 56 of Monitor. Many more example macros are given in our Excel Tips and Tricks page.
Data Acquisition Example
In the example below Excel is reading data from the Windmill DDE Panel and storing it in cells B4 — B8. These cells are updated automatically whenever DDE Panel takes new samples, at which point Excel calculates the average and standard deviation and stores them in cells B10 and B11.
Источник
How to Transform Data in Excel (Log, Square Root, Cube Root)
Many statistical tests make the assumption that datasets are normally distributed.
However, this assumption is often violated in practice. One way to address this issue is to transform the values of the dataset using one of the following three transformations:
1. Log Transformation: Transform the values from y to log(y).
2. Square Root Transformation: Transform the values from y to √ y .
3. Cube Root Transformation: Transform the values from y to y 1/3 .
By performing these transformations, the data typically becomes closer to normally distributed. The following examples show how to perform these transformations in Excel.
Log Transformation in Excel
To apply a log transformation to a dataset in Excel, we can use the =LOG10() function.
The following screenshot shows how to apply a log transformation to a dataset in Excel:
![]()
To determine if this transformation made the dataset more normally distributed, we can perform a Jarque-Bera normality test in Excel.
The test statistic for this test is defined as:
JB =(n/6) * (S 2 + (C 2 /4))
- n: the number of observations in the sample
- S: the sample skewness
- C: the sample kurtosis
Under the null hypothesis of normality, JB
If the p-value that corresponds to the test statistic is less than some significance level (e.g. α = .05), then we can reject the null hypothesis and conclude that the data is not normally distributed.
The following screenshot shows how to perform a Jarque-Bera test for the raw data and the transformed data:
![]()
Notice that the p-value for the raw data is less than .05, which indicates that it is not normally distributed.
However, the p-value for the transformed data is not less than .05, so we can assume that it is normally distributed. This tells us that the log transformation worked.
Square Root Transformation in Excel
To apply a square root transformation to a dataset in Excel, we can use the =SQRT() function.
The following screenshot shows how to apply a square root transformation to a dataset in Excel:
![]()
Notice that the p-value of the Jarque-Bera normality test for the transformed data is not less than .05, which indicates that the square root transformation was effective.
Cube Root Transformation in Excel
To apply a cube root transformation to a dataset in Excel, we can use the =DATA^(1/3) function.
The following screenshot shows how to apply a cube root transformation to a dataset in Excel:
![]()
The p-value of the Jarque-Bera normality test for the transformed data is not less than .05, which indicates that the cube root transformation was effective.
All three data transformations effectively made the raw data more normally distributed.
Out of the three transformations, the log transformation resulted in the largest p-value in the Jarque-Bera normality test, which tells us that it likely made the data the “most” normally distributed out of the three transformation methods.
Источник
How to Transform Data in Excel? Ultimate Guide
Excel is a popular and handy tool for storing mathematical, statistical, and other information. Does Excel provide any functionalities for data transformation? Of course, it does! To transform data in Excel, you can use multiple functions, as well as native and third-party tools to automate processes. Read on to learn about all the available options.
What is data transformation in Excel?
According to Wikipedia:
Data transformation is the process of converting data from one format or structure into another format or structure.
So, you basically change the format without changing the information content of the data. The goal of data transformation is to present the data so that it can be used most effectively.
Data transformation in Excel means the same process but implemented in Excel and with the help of Excel functions and tools. For example, you can remove a column, change the data type, or filter rows. Each of these operations means data transformation.
In what cases may data transformation in Excel be needed?
Often, simply arranging data alphabetically, in ascending order, or transforming non-normal data in Excel is not enough. To understand the information, sometimes more complex transformations are required.
After conducting any sociological research, the collected data needs to be grouped in one place, and a detailed analysis should be carried out. Entrepreneurs use Excel data transformation to create reports or optimize their work. These can be companies that are engaged in sales or even tour operators.
If we talk about mathematics or physics, the systematization of data allows them to simplify the work as much as possible. And if, when working with data, you can immediately calculate the square root or raise a number to a power, it makes the work faster. It is almost impossible to list all areas where data transformation in Excel can be used, but to name a few:
- Reporting
- Analysis of statistical data
- Performing mathematical operations with a large amount of data
- Compiling financial data
- Business analytics, and many others
Each specialty can use data transformation in different ways, depending on their goals and needs.
What can you use to transform data in Excel?
Suppose you are planning to transform data values in Excel. In that case, you can take advantage of the numerous Excel functions, as well as built-in and third-party tools.
Excel functions
As for data transformation, Excel itself has a vast number of functions that allow you to transform data, change the spreadsheet’s appearance, perform various mathematical operations, and many others. These functions are more than enough to help you structure and organize your data in most simple cases.
Power Query
Power Query is a popular Excel tool used to extract, transform, and load data. It can be used as part of a self-service ETL solution to perform the following tasks:
- Extract data from the source.
- Transform your data to prepare it for analysis.
- Load the transformed data into a worksheet or data model.
Its massive popularity is in part due to its easy use. All steps are performed automatically, and the final results are recorded in a spreadsheet already familiar to you.
Power Pivot
This is an Excel-like user interface to a full-fledged SQL database installed on your computer and is a powerful tool for processing vast amounts of data. Power Pivot allows you to:
- Link imported spreadsheets by key columns.
- Filter and sort them.
- Perform mathematical and logical operations using more than 150 functions of the built-in DAX language.
Power View
Power View made its way into Excel 2013 from SharePoint. It primarily provides the user with tools for quickly creating live visual reports using pivot spreadsheets and database-based charts.
You can add totals to the report in a simple spreadsheet, a pivot spreadsheet, and various types of charts. Power View allows you to link data from spreadsheets even to Bing maps.
Coupler.io
Coupler.io is not a data transformation tool but a solution for importing data from different apps and sources to Excel. However, you can use it for data transformation purposes in many ways since it allows you to:
- Merge data from different spreadsheets.
- Select columns or a data range for import.
- Import queries (for specific data sources), and many more.
Check out the list of available Excel integrations and find the one you need.
Note: if you did not find the desired source, please fill out this form to let us know which application you would like to import data from.
What are the data transformation functions in Excel?
There are a considerable number of Excel data transformation functions. Here are 10 of the most popular ones:
| Function | Description |
|---|---|
| LOG10 | Allows you to calculate the logarithm to base 10. |
| ASIN | Allows you to calculate the arcsine. |
| SQRT | Allows you to calculate the square root. |
| ABS | Returns the absolute value of a number |
| LET | Assigns names to the results of calculations to allow storage of intermediate calculations, values, or name definitions in a formula. |
| ARABIC | Converts Roman numerals to Arabic numerals as a number. |
| DATE | Returns the sequential serial number that represents a particular date. |
| DAYS | Returns the number of days between two dates. |
| DEGREES | Converts radians to degrees. |
| ISO.CEILING | Rounds a number up to the nearest integer or multiple. |
Each function can perform one or more actions. You are unlikely to have to use all the existing functions. On average, one person uses 3 to 10 different functions, depending on what field of activity they work in.
Example of transforming data in Excel
One of the simplest examples of data transformation in Excel is removing duplicates. In Excel, you can do this either with Power Query if you’re getting data from an external source or with a button if your data set is already in Excel. Here is an example of a data set with duplicate records.

To remove these duplicates, click the Remove Duplicates button on the Data tab, then select the columns that contain duplicates.


Examples of transforming data using Excel functions and tools
How to transform data into log in Excel?
Users working with stats or scientists or other researchers need to calculate the logarithm of a certain number. It can be quickly done if you use a calculator, but what if there is a large amount of data, and you need to do everything as soon as possible? Then, use log transform data in Excel. To convert the required data to a logarithm, you can use two functions: LOG and LOG 10.
- LOG10 is the function to return the base-10 logarithm of a number.
- LOG is the function to return the logarithm of a number to the base you specify. The default base value is 10.
For example, here are two log transform formulas:
![]()
How to square root transform data in Excel?
To apply the square root transformation to a data set in Excel, you can use the SQRT function.
![]()
How to make cube root Excel data transformation?
There is no dedicated function in Excel for cube root transformation. However, you can apply the following formula:
![]()
According to this principle, you can perform root transformations of any degree, replacing 3 with the degree you need.
How to arcsine transform data in Excel?
The arcsine is the angle whose sine is the number. The arcsine transform can be used to stretch points between 0 and 1, for example, when working with proportions or fractions.
The arcsine transformation or the angular transformation is calculated as two times the arcsine of the square root of the proportion. To transform such data, use a combination of two functions: ASIN, which returns the inverse sine of a number, and SQRT.
For example, it looks like this:
![]()
The formula only works for the values in the range from 0 to 1. For example, it returned a #NUM! error for value 2. To avoid this, you will need to convert values to fit the 0 to 1 range. For this, divide each value by the max value into the data set using the following formula:

Nest this formula with the arcise one and you’ll get the proper result, for example:

How to transform data in Excel from columns to rows?
Use the transpose function if you have a worksheet with data in columns that need to be rotated to change its row order. With it, you can quickly switch data from columns to rows or vice versa.
Suppose you had a data set like this:
![]()
The transpose function rearranges the data set so that it looks like this:
![]()
To perform this transformation, you should select the range of data you want to reorder, including any row or column labels, and press Ctrl+C.
Next, you need to select a new location on the worksheet to insert the transposed data set (make sure you have enough space). The new data set that you insert here will completely overwrite any data/formatting already there.
Right-click the top-left cell to paste the transposed data set, then select Transpose.
Once you’ve transformed data in Excel, you can delete the original data set, and the data in the new one will remain intact.
How to transform into numeric data in Excel?
Sometimes, data in Excel is textual, which can lead to some problems. Fixing this is easy enough. You should select the cells and click on the diamond icon with an exclamation mark to select the conversion option to get started. You can perform such actions if this button is not available.

You should select the column where this problem occurs (if you don’t want to convert the entire column, you can select multiple cells instead).
On the Data tab, click Text to Columns.
The Text to Columns button is typically used to split a column, but it can also be used to convert a single column of text to numbers.
The remaining steps of the Text to Columns functionality are best for splitting a column. Since you’re just converting text in a column, you can click Apply right away, and Excel will convert the cells.

Press CTRL + 1 (or ⌘ + 1 on Mac). Then choose any format.
How to transform data range in Excel?
At any moment, you can convert the table to a normal range of data on a worksheet.

Right click on the table, select Table => Convert to range.

Main ideas for data transformation in Excel
The value of data transformation in Excel is difficult to overestimate. It can be used in various fields, such as sociology, mathematics, physics, and many other sciences. It solves several problems:
- Transforms data so that it is easier to do calculations
- Allows you to modify tables so that it is more convenient to work with them
- Simplifies data analysis
- Facilitates the creation of various reports and monitoring
Sometimes, it is impossible to perform calculations correctly since the values can be measured in different physical quantities (for example, radians and degrees), or vice versa; we need to perform some rounding. To not do all the conversions manually, you can use the special features of Excel. It allows you to save a lot of time, effort, and energy to deal with more complex and important processes, while computer technology is doing monotonous work.
Basic Excel data transformation rules
When transforming data in Excel, you need to remember the rules for using this spreadsheet:
- Any action can be reversed, so you should never panic.
- Using formulas when working with Excel simplifies working with a spreadsheet, but if you wish, you can do without them in some cases.
- If you work with Google Excel, there is no need to save permanently, but the interface and functions may differ slightly.
- Some add-ons may already be built into your version of the spreadsheet, while others may need to be downloaded. In the second case, use only trusted sites to avoid downloading a computer virus.
The above rules are not complex, and you can easily remember them even before working with a spreadsheet.
What to do if transform data in Excel fails?
In the process of data transformation, you may lose the data partly or entirely, and this may be very problematic. To mitigate losses, it is good to have a backup of the data.
Источник
Posted 18 Apr 2020
by Nikolay with 9 Comments

Script for logging machine data (variables) from WinCC TIA Runtime (SCADA) to Excel file (CSV).
This is a simple script which shows how we can log data coming from our machine or some important information that is visualized on the SCADA in a data file, like Excel table or some or simple text file (*.txt).
In the first step we need to generate PC-Station (runtime application) in TIA.

Figure 1. PC Station project in TIA.
Then we create the variables which are going to be logged into the file. For this example, I have generated internal variables (they are not connected to PLC). I have generated variables of type real, but you can do it with integer, bool, etc.

Figure 2. Internal variables in TIA WinCC.
Because the variables are not coming from any PLC, I am going to need input fields from which to change their values. For this I generated three input/output fields and one button to trigger the logging script.

Figure 3. Input fields and log button.
The most essential part is of course is the script. Under scripts we generate a test script which in my case I called tmpExport_1. 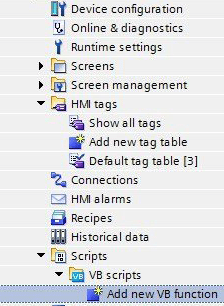
Figure 4. Adding new VB script.
Sub tmpExport_1()
Dim FolderPath, ObjectPath, Filename, File, FileExist, Columns, Row
FolderPath = «C:_DOC»
Filename = «test_log.csv»
Set ObjectPath = CreateObject(«Scripting.FilesystemObject»)
‘Check if folder exists
If Not ObjectPath.FolderExists(FolderPath) Then
ObjectPath.CreateFolder FolderPath
End If
‘ Check if file exists
Set File = CreateObject(«Scripting.FilesystemObject»)
FileExist = File.FileExists(FolderPath & «» & Filename)
If FileExist = False Then
File.CreateTextFile(FolderPath & «» & Filename)
Set Columns = File.OpenTextFile(FolderPath & «» & Filename, 
Columns.WriteLine(«Data1 ; Data2 ; Data3»)
Columns.Close
Set File = Nothing
End If
‘Write data to file
Set File = CreateObject(«Scripting.FilesystemObject»)
Set Row = File.OpenTextFile(FolderPath & «» & Filename,
Row.WriteLine(SmartTags(«zLogReal1») & «;» & SmartTags(«zLogReal2») & «;» & SmartTags(«zLogReal3») & «;»)
Row.Close
Set File = Nothing ‘Here we are releasing the file.
End Sub
Script elements explained:
- Dim — here we are declaring the variable which are used in the script.
- Variable FolderPath – define the folder on you hard disk where the lo file is going to be saved.
- Filename – the name + extension of the file
- ObjectPath – creates object for the folder and after that we are checking if the Path exists, if not it will be created.
- FileExist – check if file exits, if not we create it and define the structure of the columns.
- In the next steps we set the file for writing.
Set Row = File.OpenTextFile(FolderPath & «» & Filename,
The 8 at the end tells the script to write at the end of the file, so we don’t overwrite the existing information.
- WriteLine(SmartTags(«zLogReal1») & «;» & SmartTags(«zLogReal2») & «;» & SmartTags(«zLogReal3») & «;»)
Whit this command we start to write the variable values in the file. - Row.Close ans Set File = Nothing are used to close the file and release it so it can be opened from other application after we finish the data logging in it.
The script is ready and now to trigger it I will add event to the button that I created before.
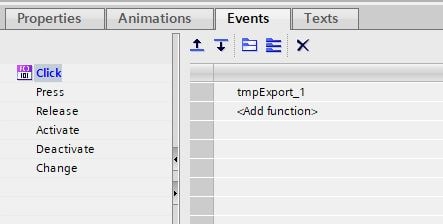
Figure 5. WinCC TIA button Click event.
To test the script we start the runtime, enter values and press the logging button.
Figure 6. Variables to log.When we press the button the script is going to be executed and the log file is created in the predefined folder. All the values that were in the input/output fields are written to the file. To log new values we have to press the button and execute the script again. Zou can connect the execution of the script to a variable event. For example, if variable changes from 0 to 1.
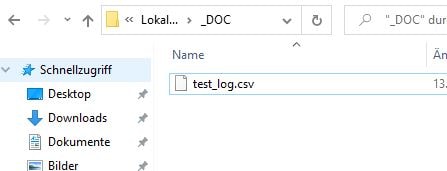
Figure 7. Log file.
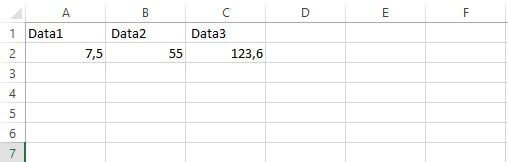
Figure 8. Variable logged in excel file.
You actually describe two kinds of functionality here — logging and reporting.
Excel file is by no means a realtime data storage. It’s suitable for reporting, but not for logging.
I would suggest accumulating data somewhere else, for example in a relational database or just in csv files, depending on your reliability and scalability needs, and aggregate the excel files for closed time periods, for example: dayly, hourly, every minute.
If you absolutely need to add many items to different excel sheet at runtime, you can use Microsoft OleDb driver:
        const string connectionString =
             @"Provider=Microsoft.ACE.OLEDB.12.0;Extended Properties=Excel 12.0 XML;Data Source=C:sourceMyExcel.xlsx;";
        using (var conn = new OleDbConnection(connectionString))
        {
            conn.Open();

            foreach (var sheet in new[] { "sheet1", "sheet2", "sheet3" })
            {
                using (var cmd = new OleDbCommand())
                {
                    cmd.Connection = conn;

                    try
                    {
                        cmd.CommandText = "CREATE TABLE [" + sheet + "] (id INT, datecol DATE );";
                        cmd.ExecuteNonQuery();
                    }
                    catch (Exception) // TODO: find better way to determine existing sheet
                    {
                        Console.WriteLine("Can't create {0}", sheet);
                    }
                }

                for (var i = 0; i < 1000; i++)
                {
                    using (var cmd = new OleDbCommand())
                    {
                        cmd.Connection = conn;
                        var datecol = DateTime.Now;
                        var id =  i;
                        cmd.CommandText = "INSERT INTO [" + sheet + "](id, datecol) VALUES(@id,@datecol);";
                        cmd.Parameters.Add("@id", OleDbType.Integer).Value = id;
                        cmd.Parameters.Add("@datecol", OleDbType.Date).Value = datecol;
                        cmd.ExecuteNonQuery();
                    }
                }
            }
            conn.Close();
        }
In this article, we’ll explore how to use Microsoft Excel for data-logging using the RIO Pocket PLC and an Ethernet connection. I’ll explain the steps necessary to get from a blank spreadsheet to a useful data logging application in about 15 minutes.
There are a few things needed for this to work. The first thing is a RIO-471×0 (although any DMC motion controller with Ethernet capability will also work) and the second thing is to install GalilTools($195) or GalilTools-Lite (free).
After installing GalilTools software, you should assign an IP address to the RIO. In this example, I’m using 10.0.6.47 but you should assign an IP address that is compliant with your network settings. After assigning an IP address – connect up to the controller in GalilTools to verify that communication is working.
Part 1: A Simple Application
We’ll start with a simple example of sending a command to query the built in “TIME” variable on the controller. This variable is constantly updated inside the controller to reflect a running time in milliseconds. To get this value, we need to send down the string “MG TIME” and that tells the controller to return the value of TIME.
To do this, turn on the View -> Toolbars ->“Control Toolbox”
![]()
and make sure you are in “Design Mode” by enabling the icon on the far left.
Next, add a button to your Excel spreadsheet by clicking on the button icon and dragging it on to your spreadsheet. Right Click on the button and choose Properties. Modify the Properties to name the button and give it a caption.

Your sheet should look something like this:

Now, double click on the button and the Visual Basic Editor window will pop up. Go to Tools-References and enable the checkbox for “Galil” as shown below.
 If there is no Galil checkbox, click “Browse” and choose the file C:Program FilesGalilGalilTools-x86libIGalil.tlb. Click OK.
Now add the following text to your Button Click Function:
Private Sub GetTIME_Click() Dim g As New Galil.Galil g.Address = "10.0.6.47" 'Connect to IP address of RIO Pocket PLC Sheet1.Cells(4, 4) = g.Command("MG TIME") 'Send Command MG TIME End Sub
But replace the IP address with the IP address of your RIO unit. Go back to Sheet1 and click the icon on the Control Toolbox to “Exit Design Mode”. Now click on the button and you should get a value in cell D4 like this:

You can build an entire application from the simple steps shown above to achieve an interactive user interface to the RIO. This simple example allows you to send commands and receive responses via an Excel spreadsheet. However, for a data logging application – this just isn’t going to cut it so Part 2 of this article is going to look at some more advanced features such as accessing the internal Data Record of the controller. So go grab a cup of coffee because you’ll want to be awake for the next part.
Part 2: Using the Data Record
Now that we’ve gotten the Excel spreadsheet communicating to the controller, its time to grab some data! Create a new Excel workbook and follow the same steps as Part1 to add a button named GetDataRecord and include the Reference to IGalil.tlb. For all Galil controllers, there is a «snapshot» of all the internal values that can be sent out at a regular interval. This snapshot is called the DataRecord and you can see exactly what values are stored by looking at Chapter 3 in the User Manual of the controller. The code below runs a loop that grabs all the values from the DataRecord and stores them into successive rows of the Excel spreadsheet.
In your Code View window, add the following code:
Private Declare Sub Sleep Lib "kernel32" (ByVal dwMilliseconds As Long) Private Sub GetDataRecord_Click() Sheet1.Range("A1:BH100").Clear 'clear spreadsheet 'Make sure to add the Reference to IGalil.tlb under Tools - Add Reference 'Security level in Excel should be set to Medium to allow macros Dim g As New Galil.Galil g.Address = "10.0.6.47" 'Connect to IP address of RIO Pocket PLC Dim i As Integer i = 1 For j = 0 To 60 'For loop to list sources and the units Sheet1.Cells(1, j + 1) = g.sources(j) Sheet1.Cells(2, j + 1) = g.Source("Units", g.sources(j)) Next j j = 0 Dim DataRecord As Variant 'Data starts at row 3 and we are collecting 25 samples For i = 3 To 50 DataRecord = g.record For j = 0 To 60 'gets each datapoint Sheet1.Cells(i, j + 1) = g.sourceValue(DataRecord, g.sources(j)) Next j DoEvents 'allows user to do other things during loop Sleep (25) 'sleep for 25 msec Next i End Sub
The first statement just declares a Sleep function. The GetDataRecord_Click() subroutine is what runs the code to grab the RIO datarecord and display it to the screen. Adjust the values of the For loop to the desired number of samples and the Sleep timer can adjust the desired sample rate.
Clicking on the Button should fill up Sheet1 with data like this:

The next step is to take advantage of the many chart & report functions of Excel that display the data in a format that’s easier to read. Here’s an example of graphing the analog output while it is performing a sine wave. The dmc code used to generate the sine wave on the analog output is located under the I/O section of the sample code library here: http://www.galil.com/learn/sample-dmc-code
(Click to see video)
 As a last step, for Excel to allow the VB code to run, the Macro Security level needs to be set to «Medium». To do this, go to Tools -> Macro -> Security…. and then click on the «Medium» level as shown here:
  Although using Microsoft Excel does have its limitations, the big benefit of using this method to build a data-logging application is that it is quick and easy and allows the user to be generating graphs from their I/O in just a few minutes.
Welcome to Logically Proven blog.
This post demonstrates how to create a log file in excel or access using VBA (Visual Basic for Applications) code.
Consider a scenario, the application is logging the user details into the log file who are accessing the application.
Here is application may be excel or access which is located in the network location which is accessed by the multiple users.
The log data contains the application name, who are accessing the application and the application accessed date.
In the below example I am considering the excel application which logs the data into the LOG file. The application appends the data to the LOG file every time the application is accessed.
Achieving this functionality by logging the user details when the workbook is opened.
So, the workbook open event code looks like this —
Private Sub Workbook_Open()
    LogInfo ThisWorkbook.Name & " opened by " & _
        Application.UserName & " " & Format(Date, "yyyy-mm-dd hh:mm")
End Sub
LogInfo is the sub-routine which saves the application name, user name and the access date of an application.
LogInfo sub-routine :
Sub LogInfo(LogMessage As String)

    'set path and name of the log file where you want to save
    'the log file
    Const LogFileName As String = "D:LogDataLogFile.LOG"
    Dim FileNum As Integer

    FileNum = FreeFile ' next file number
    Open LogFileName For Append As #FileNum ' creates the file if it doesn't exist
    Print #FileNum, LogMessage ' write information at the end of the text file
    Close #FileNum ' close the file

End Sub
If the log file doesn’t exist, the application creates automatically at the run-time. But the path should be valid and exists otherwise the application runs into error. And make sure the application is having the permissions to create and write into the log file.
This method takes one argument which is the message that you want to write into the log file.
This method appends the log message every time the application is accessed.
This way the application logs the user details who are accessing the application. You can add the same functionality in many cases for example when user modifies something in the excel or access database you can trigger the code to save the user details and what modifications did.
LOG file is very useful to analyse the application. So keep logging your application.
Please write your comments if you find anything is incorrect or do you want to share more information about the topic discussed above.
Logically Proven
Learn, Teach, Share
Karthik Byggari
Author & Editor
Computer Science graduate, Techie, Founder of logicallyproven, Love to Share and Read About pprogramming related things.