
Although it is possible to copy and paste data from one Excel file to another, you can also create a link between two files or workbooks. When you create a link between files, the copied data updates when the original data changes. It’s also possible to create a link between a chart located in an Excel workbook and a Microsoft Word file or PowerPoint slide.
Information in this article applies to Word, Excel, and PowerPoint in Office 2019, 2016, 2013, 2010; Microsoft 365, and Office for Mac.
Paste Links Between Excel and Word Files
When data from an Excel file is linked to a Word document, the data is pasted into the document as a table. The table can then be formatted using Word’s formatting features.
This link is created using the Paste Link option. For paste link operations, the file containing the original data is known as the source file and the second file or workbook containing the link formula is the destination file.
Link Single Cells in Excel With a Formula
Links can also be created between individual cells in separate Excel workbooks using a formula. Use this method to create a live link for formulas or data, but it only works for single cells.
-
Select the cell in the destination workbook where you want the data to display.
-
Press the equal sign ( = ) on the keyboard to start the formula.
-
Switch to the source workbook and select the cell containing the data to be linked.
-
Press Enter. Excel switches back to the destination file. The linked data displays in the selected cell.
-
Select the linked data to display the link formula in the Formula Bar above the worksheet.
Paste Link Options in Word and Excel
When pasting a link for data, Word allows you to choose whether to format the linked data using the current settings for either the source or destination files. Excel does not offer these options. Excel automatically applies the current formatting settings in the destination file.
Link Data Between Word and Excel
To link data between Word and Excel:
-
Open the Excel workbook containing the data to be linked (the source file).
-
Open the destination file. This can be either an Excel workbook or a Word document.
-
In the source file, highlight the data to be copied.
-
In the source file, select Home > Copy. The selected data is surrounded by a dotted line.
-
In the destination file, select the location where the linked data will be displayed. In Excel, select the cell that will be in the upper left corner of the pasted data.
-
Go to Home and select the Paste dropdown arrow to display a list of Paste Options.
-
Choose a Link option. The linked data appears in the destination file.
If both files are open when data is updated in the source file, the destination file updates immediately.
If the destination file is closed when the source data is changed, the data in the destination cells updates the next time that file is opened.
If the source file is closed when the destination file is opened, an alert box may open to indicate that the document contains links to external files. You’ll be asked to Update or Don’t Update the links.
View the Link Formula in Excel
The link formula displays differently in older versions of Excel:
- If you select the linked data in the destination file, a formula such as =[Book1]Sheet1!A1 appears in the formula bar above the worksheet.
- In Excel 2007, the linking formula displays as {=Excel.Sheet.12|Book1!’!Sheet1!R1C1′} in the formula bar.
In the 2007 formula, the absolute cell reference is written in the style R1C1, which stands for row 1 column 1 and which is equivalent to the more common cell reference style SAS1.
In both formulas, Book1 indicates the name of the source file.
View Link Information in Microsoft Word
To view information about the linked data (such as the source file, the linked data, and the update method) in Word:
-
Right-click on the linked data to open the context menu.
-
Select Linked Worksheet Object > Links to open the Links dialog box.
-
If there is more than one link in the current document, all links are listed in the window at the top of the dialog box. Select a link to display information about that link below the window.
Paste a Link Between an Excel Chart and PowerPoint or Word
In addition to creating a link for text data or formulas, it is also possible to use Paste Link to connect a chart located in one Excel workbook with a copy in a second workbook. You can also use this method to link an Excel chart to a PowerPoint or Word file.
Once linked, changes to the data in the source file are reflected in both the original chart and the copy located in the destination file.
Choose Source or Destination Formatting
When pasting a link between charts, PowerPoint, Word, and Excel allow you to choose whether to format the linked chart using the current formatting theme for either the source or destination files.
Link Charts in Excel and PowerPoint
The following example shows how to link between a chart in an Excel workbook (the source file) and a slide in a PowerPoint presentation (the destination file).
-
Open the workbook containing the chart to be copied.
-
Open the destination presentation file.
-
In the Excel workbook, select the chart.
-
In Excel, select Home > Copy.
-
In PowerPoint, select the slide where the linked chart will be displayed.
-
In PowerPoint, select the Paste dropdown arrow to diaplay a list of choices.
-
Choose either Use Destination Theme or Keep Source Formatting to paste the linked chart into PowerPoint.
If the two files containing the linked charts are both open, changes to the source data update immediately in both charts.
When opening a PowerPoint presentation containing linked data, an alert box may open to indicate a potential security concern. You’ll be asked if you want to update the linked data.
Thanks for letting us know!
Get the Latest Tech News Delivered Every Day
Subscribe
When you insert content as an object, you create a dynamic link between the content that you insert and the content that was created in another Microsoft Office program. Unlike when you paste content (such as by pressing CTRL+V), when you insert it as a linked or embedded object, you can work with it in the original program.
For example, if you insert worksheet cells into the document as an Excel object, Microsoft Office Word runs Excel when you double-click the cells, and you can use Excel commands to work with the worksheet content.
Understand the differences between linked objects and embedded objects
The main differences between linked objects and embedded objects are where the data is stored and how you update the data after you place it in the Word file.
You place either a link to the object or a copy of the object in the document. You can insert objects this way from any program that supports the technology of linking and embedding objects (object linking and embedding, or OLE).
For example, a monthly status report may contain information that is separately maintained in an Excel worksheet. If you link the report to the worksheet, the data in the report can be updated whenever the source file is updated. If you embed the worksheet in the report, your report contains a static copy of the data.
1. Embedded object
2. Linked object
3. Source file
Linked objects
When an object is linked, information can be updated if the source file is modified. Linked data is stored in the source file. The Word file, or destination file, stores only the location of the source file, and it displays a representation of the linked data. Use linked objects if file size is a consideration.
Linking is also useful when you want to include information that is maintained independently, such as data collected by a different department, and when you need to keep that information up-to-date in a Word document.
Embedded objects
When you embed an Excel object, information in the Word file doesn’t change if you modify the source Excel file. Embedded objects become part of the Word file and, after they are inserted, they are no longer part of the source file.
Because the information is totally contained in one Word document, embedding is useful when you don’t want the information to reflect changes in the source file, or when you don’t want the document recipients to be concerned with updating the linked information.
Need more help?
Use Word’s Edit Links to Files to Break, Update or Change Excel Links
by Avantix Learning Team | Updated May 1, 2020
Applies to: Microsoft® Excel® 2010, 2013, 2016, 2019 and 365 (Windows)
If you want to break, update or change links to Excel charts or worksheets in Microsoft Word, you’ll need to use the Edit Links to Files command. Unfortunately, this command is difficult to find. To make it easier to access, you can add Edit Links to Files to the Quick Access Toolbar. If you decide that you want to break links to external Excel files, be sure to make a copy of the file first because you can’t undo the break links command.
In this article, we’ll access Edit Links to Files in Microsoft Word in 3 ways – through the Ribbon, by right-clicking (displaying the context menu) or by adding a button to the Quick Access Toolbar.
Note: The links discussed here are not hyperlinks. For more information on hyperlinks, check out the article How to Insert, Edit and Remove Hyperlinks in Microsoft Word.
Recommended article: How to Compress Microsoft Word File Size (10 Ways to Reduce the Size of Large Word Documents)
Finding Word’s Edit Links to Files command in the Ribbon
To access Edit Links to Files in the Ribbon:
- Save the Word document.
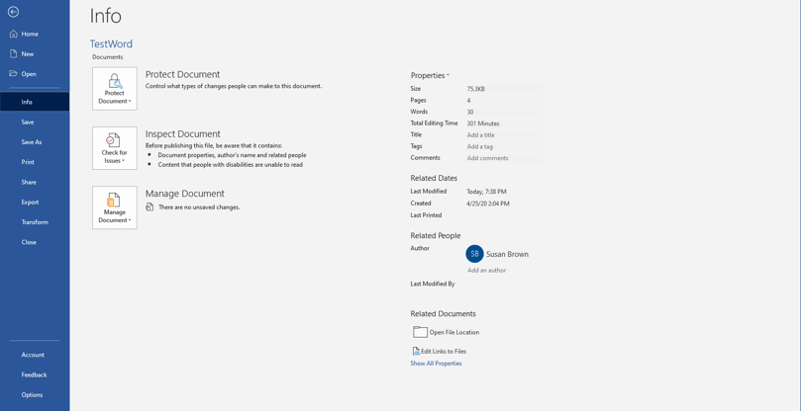
- Click the File tab in the Ribbon and then click Info.
- In the bottom right corner or the window, under Related Documents, click Edit Links to Files. This command will appear only if external links exist and you have saved the file.
Below is the Edit Links to Files command in Word:
Adding Edit Links to Files to the Quick Access Toolbar
If you’re going to work with external links regularly, you may want to add Edit Links to Files to the Quick Access Toolbar:
- Click the arrow on the right side of the Quick Access Toolbar (this toolbar appears above or below the Ribbon).
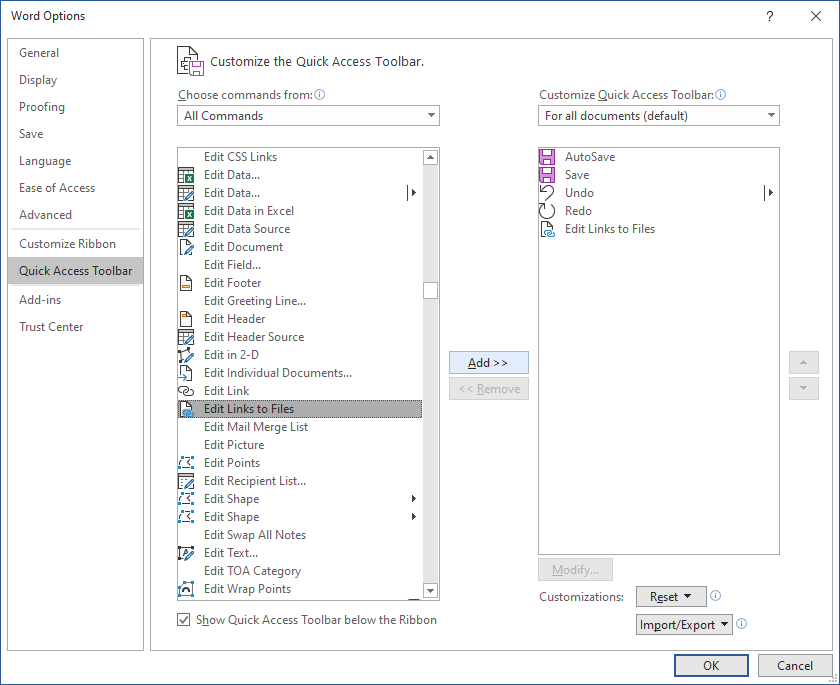
- Select More Commands. The Options dialog box appears.
- From the drop-down menu below Choose commands from, select All Commands.
- In the list of commands on the left, click Edit Links to Files.
- Click Add.
- Click OK.
Edit Links to Files will appear on the Quick Access Toolbar. It will become active when you have inserted a linked chart, worksheet data or other object and saved the file.
Below is the Options dialog box in Word (which is similar in all versions):
Accessing Edit Links to Files in the context menu
You can also access Edit Links to Files in the context menu in Word for linked objects or HTML linked tables.
To access the Edit Links to Files command in the context menu:
- Save the Word document.
- Click on a linked object or in an HTML linked table.
- Right-click the linked worksheet object or table. A drop-down menu (context menu) appears. You can also press Shift + F10 or press the Context button on your keyboard if you have one.
- In the drop-down menu, select Linked Worksheet Object or Linked Binary Worksheet Object and then select Links from the sub-menu. The Links dialog box appears. Note: You can’t use this method with charts.
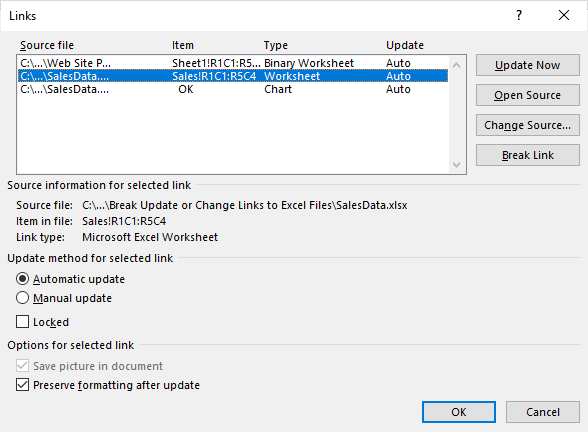
Automatic linking or manual linking
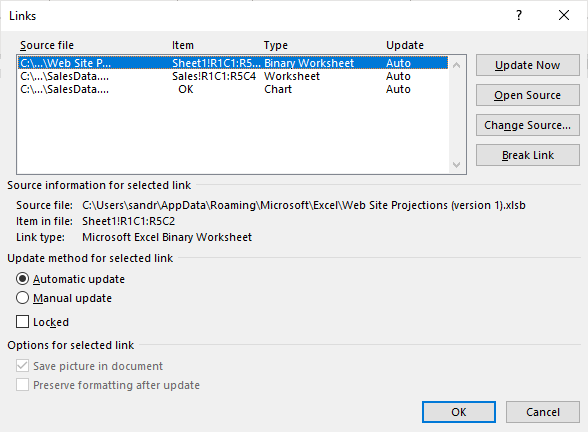
In the Links dialog box, you can click Automatic or Manual for each link as the update method. The default is Automatic so that when you open a document, links can be automatically updated (a prompt appears asking you to update the links).
Some users may select Manual as the type of update if the Word document is large and there are alot of links to Excel charts or worksheet data that are slowing down the Word file. Manual links are usually updated using the Links dialog box.
The Links dialog box appears as follows:
Locking and unlocking
In the Links dialog box, you can also check the Locked option for a link. If a link is locked, it cannot be updated. You will need to select the link and uncheck Locked if you want to unlock it.
Preserving formatting for HTML tables
If you have copied worksheet data into Word as HTML format, you should select the linked table and then select Preserve formatting after update in the Links dialog box so you don’t lose formatting when the link(s) are updated.
In the example below, the Preserve Formatting option is available for an HTML linked table:
Breaking links
To break a link:
- Save a copy of the Word document (always save a copy before breaking links).
- In the copy, click the File tab in the Ribbon and select Edit Links to Files, click Edit Links to Files in the Quick Access Toolbar, or right-click a linked worksheet object or HTML table and select Linked Worksheet Object or Linked Binary Worksheet Object from the drop-down menu and then select Links from the sub-menu. The Links dialog box appears.
- Click the link you want to break. You can also click the first link and then Shift-click a link to select contiguous links or Ctrl-click links to select non-contiguous links.
- Click Break Link. A dialog box appears asking if you want to break the link.
- Click OK.
- Click Close.
Updating links
You will normally be prompted to update links when you open a file with Links. Click Update Links in the dialog box that appears when you open a file to update the links. Automatic links will be updated.
You can also update links when a file is open.
To update a link:
- Save the Word document.
- Right-click the linked worksheet object or HTML table. A drop-down menu appears.
- Select Update Now.
To update one or multiple links:
- Save the Word document.
- Click the File tab in the Ribbon and select Edit Links to Files, click Edit Links to Files in the Quick Access Toolbar, or right-click a linked worksheet object or HTML table and select Linked Worksheet Object or Linked Binary Worksheet Object from the drop-down menu and then select Links from the sub-menu. The Links dialog box appears.
- Click the link you want to update. You can also click the first link and then Shift-click a link to select contiguous links or Ctrl-click links to select non-contiguous links.
- Click Update Now. Select the Automatic Update checkbox to automatically update for future changes when you close or open the file. If you select Manual Update, you will need to update links using Update Now.
- Click Close.
Changing the source of a link
If the source file has been moved or renamed, you will need to change the source.
To change the source of a link:
- Save the Word document.
- Click the File tab in the Ribbon and select Edit Links to Files, click Edit Links to Files in the Quick Access Toolbar, or right-click and select Linked Worksheet Object or Linked Binary Worksheet Object (for worksheet data only) from the drop-down menu and then select Links from the sub-menu. The Links dialog box appears.
- Click the link you want to change.
- Click Change Source.
- Navigate to the new location of the file and click it.
- Click Open. You can also double-click it.
- Click Close.
If you choose to link to Excel files in Word, you’ll often need to manage the links. Before you send files to clients or coworkers, you may also want to break the links. Always break links in a copy so you can retain the original file with the links.
Subscribe to get more articles like this one
Did you find this article helpful? If you would like to receive new articles, join our email list
Related
14+ Word Selection Shortcuts to Quickly Select Text
How to Remove Hard Returns in Word Documents
How to Superscipt or Subscript in Word (with Shortcuts)
Recommended courses
Microsoft Word: Intermediate / Advanced
Microsoft Excel: Intermediate / Advanced
Microsoft PowerPoint: Intermediate / Advanced
Microsoft Visio: Introduction
VIEW MORE COURSES >
Copyright 2023 Avantix® Learning
Our instructor-led courses are delivered in virtual classroom format or at our downtown Toronto location at 18 King Street East, Suite 1400, Toronto, Ontario, Canada (some in-person classroom courses may also be delivered at an alternate downtown Toronto location). Contact us at info@avantixlearning.ca if you’d like to arrange custom instructor-led virtual classroom or onsite training on a date that’s convenient for you.
Microsoft, the Microsoft logo, Microsoft Office and related Microsoft applications and logos are registered trademarks of Microsoft Corporation in Canada, US and other countries. All other trademarks are the property of the registered owners.
Avantix Learning |18 King Street East, Suite 1400, Toronto, Ontario, Canada M5C 1C4 | Contact us at info@avantixlearning.ca
Many of us use Microsoft Word and Excel every single day. Both apps are part of Microsoft’s Office suite of productivity tools. It’s even more powerful when you learn how to embed Excel into Word for tight integration.


There are several options for embedding Excel in Word. You’ll see in this tutorial that there are multiple ways to embed Excel files in Word that stay connected to the original data. Let’s learn how to link Word to Excel and keep your data and docs in sync.
Why Link Word to Excel?
Word is a powerful word processor used to edit and format text. Excel is a leading spreadsheet app to work with numbers and data. Each app has a very different purpose. But they can work together seamlessly!
This is a productivity tool that you should be using now. When you learn how to link Word to Excel, you’ll find yourself working smarter. Why? Because although each app is different, they’ve got complementary purposes. One app can make your work in the other better and easier.
Think of Word as a communication tool. It’s where you create documents to share. With a full suite of graphics features, Word helps you create stylish written files. It’s geared towards text. You won’t use Word to do data analysis. But Word is the perfect way to share your conclusions.


Similarly, Excel is a data-heavy tool. With less emphasis on visuals, Excel is meant to analyze large volumes of information. Microsoft Word and Excel have separate, but related, functions. Keeping that in mind, why should we learn how to link Word to Excel?
Because Word documents can benefit from Excel’s data prowess. While Word isn’t built for data analysis, you may want to include that in your work. When you get a document written, it’s often helpful to share supporting data. With embedded Excel in Word, you can do exactly that.
Word offers several ways to insert or link to Excel files. All are easy, and you can find the one that works best for you. It depends on the level of control and flexibility that you need. Let’s learn how, in just a few quick steps.
How to Paste Excel Tables in Word
One embed Excel file in Word technique is to paste the table right into Word. It takes only a few clicks, and you can easily move large volumes of data in seconds. But that doesn’t mean you sacrifice creative control. Using Word’s paste options, you can manage exactly how data appears and performs.
In Word, there are two main ways to paste Excel tables by linking them. Let’s look at each. We’ll explore the advantages of both and showcase the end results.
The tips in this section were written using Windows and Office 365. If you’ve got a different operating system or a different version of Excel or Word, your steps may be slightly different.
1. Link and Keep Source Formatting
Linking is how to link Word to Excel by building a connection. In other words, it adds Excel data to Word that’ll update in real-time. If you make a change in Excel, it’ll automatically reflect in your Word doc. There won’t be any need to continually paste or type in new values when you make a change.
The first paste technique is to link and keep source formatting. This means that the table in Word looks exactly like it does in Excel. If you’ve added style elements like borders or font effects, they’ll carry over into Word.


To make an embedded Excel in Word this way, begin by opening an Excel spreadsheet. Find the table that you want to paste into Word. Click and drag your cursor over the table to select it. Then, press Ctrl + C on your keyboard. This copies the Excel table onto your clipboard. It’s ready to paste between Microsoft Word and Excel.
Then, go to your open Word file. Place your cursor in the open spot where you want to paste the Excel table. Then, right-click once. On the menu that appears, notice the Paste Options section. In it, you’ll see an array of buttons. These control how your Excel table will paste into Word.


To link and keep source formatting, you’ll want the third option from the left. Hovering over it, you’ll see that it’s labeled Link & Keep Source Formatting. Click this, and your Excel table will paste onto your Word document.
As you can see, the styles applied in Excel effortlessly transfer over. This keeps styles synced between Microsoft Word and Excel. You won’t have to redo any formatting work.
2. Link and Use Destination Styles
We’ve just learned a great way to link Microsoft Word and Excel. In the example, styles and design formatting copied from Excel into Word. Now, imagine that you want your table to blend in with your Word document’s existing styles. But you don’t want to spend a long time redoing the format of the table by hand.
Fortunately, Word has you covered. To learn how, repeat the earlier step of selecting an Excel table and copying it to your clipboard. But this time, when you right-click to paste, choose a different option.
Try out the fourth option, Link & Use Destination Styles. The table will paste into Word, and the design updates to fit the style aesthetic that you’ve built in Word.


No matter the paste and linking option you select, Word updates the table values if you make a change in Excel. It’s easy to demonstrate. Simply type a new value into one of the table’s cells in Excel. This is how to link Word to Excel for realtime data.
Then, return to Word. You’ll see that the Word table has automatically changed to show the latest data.
How to Paste Without Connection
In the options above, we learned to paste Excel tables into Word by linking them. Changes made in Excel after pasting reflect in Word by default when you use this method.
Sometimes, it’s useful to paste in static data. In other words, you may not want Microsoft Word to update the table values, even if you change them in Excel. This way, you can share a snapshot of your table in Word from a moment in time. It won’t change unless you physically make an edit in Word itself.
I like to use this technique when building Word docs, and it’s amazingly easy. You’ll start by doing the exact same copying process that we used above — select your table in Excel, and press Ctrl + C.
When you return to Word and right-click, you’ll want to use the first two thumbnails in Paste Options. These are labeled Keep Source Formatting and Use Destination Styles.
Just like before, this controls how your table displays in Word. Using Keep Source Formatting, you’ll get a visual copy of the Excel table. But with Use Destination Styles, the design and format merge into the Word doc’s own design.


Again, the process here is the same. But these techniques merely paste data values from Excel. They don’t link, meaning the Word table won’t update if you change the Excel version. Microsoft Word and Excel disconnect with this option.
For updates, you’ll need to paste the table again, or type the values into Word. It’s another top option when you think of how to add Excel to Word document files in 2022.
How to Embed an Excel File in Word
You’ve already learned how to link Word to Excel using the suite of paste features. These methods give you precise control over your data and how it appears in Word. Another option is to embed an Excel file directly into Word without pasting.
Consider times where you don’t actually want to display an Excel table. Imagine for example that you’ve got a Word document describing a study that you performed with thousands of data points. Putting all this data in the file would be too complex, but there’s another option.
This is a case where embedding an Excel file in Word is a winning choice. You can include your Excel data in Word, without actually displaying it. Instead, readers see an Excel thumbnail that they can click on to view an entire spreadsheet.
To embed Excel files in Word, find the Insert tab on Word’s ribbon. If you’re unfamiliar, the ribbon is the series of menus across the top of the screen: Home, Insert, Draw, and so on. Choose Insert and look at the options. On the right, you’ll see the Text group, specifically the Object dropdown arrow.
Click on the Object dropdown, then choose Object. The Object window launches with an array of choices. We’ll embed an Excel file in Word with the Create from File tab.


Once there, choose Browse. Find an Excel file that you’ve got saved on your computer, click it once, and press Insert. Finally, click on the Display as Icon checkbox to activate it. Then, click OK.
This is how to embed Excel into Word. You (and other users) see an Excel spreadsheet icon within Word. Double-clicking it launches the spreadsheet in Excel. Your data isn’t shown, but with an embed Excel file in Word option, it’s available behind the scenes.


This way, your spreadsheet data is easily accessible. But it won’t clutter up your Word doc. Use an embedded excel in Word when it’s simply too much info for the doc itself. As you can see, this is another fast way to connect Microsoft Word and Excel.
The Best Microsoft Word and Office Templates (With Unlimited Use)
No matter what Microsoft Office app you’re using, premium templates are your best friend. Stylish Word documents help you share content in style. And premium PowerPoint decks let you present with confidence.
The top source for premium templates in 2022 is Envato Elements. For a low monthly rate, you’ve got unlimited downloads of Word templates, PPT decks, and so much more. With thousands of options, you’re certain to find the perfect one for all of your projects.
Explore Word Templates


What’s more: Elements includes fonts, stock photos, and so much more. When you choose templates from Envato Elements, you’ll enjoy these key advantages:
- Expertly-crafted styles. Each template is handmade by a creative expert.
- Design inspiration. With fill-in-the-blank templates, you won’t have to create designs from scratch. You can simply drop in your own content.
- Premium features you won’t find anywhere else. Explore infographics, sleek image placeholders, and so much more.
Envato Elements is your best friend as a creative in 2022. With unlimited downloads come unlimited possibilities. So why wait? Join Envato Elements today and start downloading your favorite templates.
Now You Know How to Embed Excel Into Word
With our tips, you now know how to add Excel to Word documents for data-driven files. Whether you use an embedded Excel in Word or connect a table, your documents are more helpful.
Now, it’s your turn! You know how to link Word to Excel with a few methods. Practice using embedded Excel in Word with a sample document. Soon, you’ll see the power of how to link Word to Excel.
Did you find this post useful?

I believe that life is too short to do just one thing. In college, I studied Accounting and Finance but continue to scratch my creative itch with my work for Envato Tuts+ and other clients. By day, I enjoy my career in corporate finance, using data and analysis to make decisions.
I cover a variety of topics for Tuts+, including photo editing software like Adobe Lightroom, PowerPoint, Keynote, and more. What I enjoy most is teaching people to use software to solve everyday problems, excel in their career, and complete work efficiently. Feel free to reach out to me on my website.
How to Insert Excel Data Into Word (Tables, Files, Spreadsheets)
Microsoft Word is great for working on documents—but not so great with tables of data.
If you want to put a table into a Microsoft Word document, you can work with Word’s built-in table tools, or you can insert data directly from Excel.
Guess which one is better?
Getting your Excel data into Word is easy, makes it look better, and automatically updates. It’s a no-brainer💡
There are multiple ways of getting data from Excel into Word.
I’ll walk you through the best ones, step-by-step.
Please download my free sample workbook if you want to tag along.
Free video on inserting Excel data in a Word document
Watch my video and learn how to easily copy and paste data from an Excel file to Word.
This video walked you through how to insert an Excel table in Word so it becomes a Microsoft Word table instead.
It’s done with all the classic copy-and-paste options: keep source formatting, match destination styles,
But there are other ways of getting things from Excel to Word.
Let’s dive into those below 🤿
What is an Excel Worksheet object?
Recent versions of Microsoft Office include the capability to insert objects into documents. These objects are either embedded or linked.
Embedded objects don’t update. If you include an embedded Excel object and change data in the Excel sheet you copied it from, no changes will be applied.
Linked objects update automatically. A linked Excel object will update to reflect changes in the original Excel sheet.
You can embed and link things other than Excel worksheets, but we’ll focus on Excel objects here.
It’s worth noting that the linked spreadsheet needs to remain available for this to work.
Also, this process works in reverse, as well: you can link to Word document objects from an Excel spreadsheet and insert them there in a matter of seconds.
Embedding Excel objects in Word
We’ll start with the simpler of the two: embedding an Excel object. Let’s take a look at the example workbook to see how it works.
Open the example workbook and a blank Word document.
On the first worksheet in the Excel file, you’ll see a small table. Select and copy it.

Go to your Word document, and paste the table with Ctrl + V.
You’ll see a table like this one:

If you click into this table, nothing notable will happen—you can edit the names of the months or the numbers, and they’ll change.
If you try inputting an Excel formula, however, it will only display as text.
Head back to the Excel worksheet and copy the table again.
In Word, click the Home tab of the Ribbon, and select Paste > Paste Special. In the resulting pop-up window, click on the Worksheet Object, and click OK.

You’ll now see a table that looks a bit different:

At first, it looks like the distinguishing feature of this table is gridlines.
But if you double-click the table, you’ll get a surprising new interface:

As you can see, this gives you an embedded version of Excel within Microsoft Word.
All because it’s a linked object. Pretty cool, huh?😎
You can do all the things you’re used to in Excel: use and edit formulas, apply conditional formatting, add new rows and columns, sort and filter data, and everything else you’ve come to expect from Excel.
And source formatting (from the Excel worksheet) is transferred to the Word document.
In short, it gives you a lot more table-editing power than you get with the standard Microsoft Word interface.
To exit the Excel interface, click outside of the table, and you’ll go back to the regular editor for your document.
If you go back to the Excel spreadsheet and make an edit in the table, you’ll see that the Excel object doesn’t update. So if your calculations change, or you get new data and add it to the spreadsheet, you’ll need to update your Word document manually.
Let’s fix that.
Linking Excel objects in Word
As I mentioned before, embedded objects don’t automatically update. Linked objects, on the other hand, do.
And this can save you a lot of time.
Fortunately, linking an Excel object in Microsoft Word is easy.
The example workbook we used previously is the source Excel file.
Copy the table from the example workbook, and head back to the Word file. Again, click Paste > Paste Special in the Home tab. Again, select Microsoft Excel Worksheet Object.
This time, however, you’ll need one more click. On the left side of the window, you’ll see two radio buttons. One says Paste, and the other says Paste Link. Click the button next to Paste Link:

After hitting OK, you’ll get another table in your Word document. This one looks the same as the previous one:

There’s an important difference, however ⚠️
Let’s go back to the original Excel file and change one of the values.
We’ll change May’s value from 9 to 10.
Here’s what happens:
It might not be super clear in the GIF above, but the linked table automatically updates to match the Excel spreadsheet, while the embedded table doesn’t.
In other words, the Excel file changes are automatically applied to the Word document.
Insert an Excel worksheet in a Word document
Linking an Excel worksheet is the best way to get Excel data into Word because Excel is the best tool for working with spreadsheets.
If you want to insert a new object, you can insert a new spreadsheet into your Word document and work on it with the in-Word Excel tool.
To be completely honest, I don’t understand why you wouldn’t just work in Excel first, but I thought you might want to know anyway!
To insert a blank Excel worksheet object into the Word file, go to the Insert tab on the Ribbon.
Click the Object button in the Text group, then find the Microsoft Excel Worksheet object option.
This opens up the trusty ol’ object dialog box.

Hit OK, and you’ll get a blank worksheet in your Word document.
When you want to edit it, double-click the worksheet and you’ll open the Excel editor right inside of Word.

As before, you can do all the things you usually do in Excel right from Word in this worksheet.
And that’s an easy way of getting data from Excel to Word by making it an embedded object in the Word doc.
That’s it – Now what?
Linking data from Excel to Word documents is a simple automation that can save you a lot of time.
But obviously, it’s just a small part of Excel vast arsenal of functions and features.
The most important functions, though, are: IF, SUMIF, and VLOOKUP.
You learn all those 3 functions + how to effectively clean data in my free 30-minute Excel course sent straight to your inbox in just a few minutes.
Other relevant resources
If you want to automate your work between Word and Excel, you most definitely need to take a look at my guide to mail merge (I love mail merge💖).
Kasper Langmann2023-01-27T21:19:47+00:00
Page load link