
The XML file format is quite commonly used on the web, and there is a possibility that sometimes you may have to work with the data in the XML file.
Now you can’t use the XML file directly, as it’s not meant to be read by humans (but machines).
In such a case, it would help to know how to convert the XML file to Excel so you can easily work with the data and analyze it.
In this tutorial, I will show you two really simple ways to import an XML file into Excel using Power Query.
What is an XML File?
XML stands for Extensible Markup Language. An XML file can hold data in a format that can easily be read by apps and systems.
But it’s not as easy to read for humans, which is why we may have to transform it into a format that’s easier to use.
If it contains a lot of text data, then you can use a text editor to read the XML file, and if it contains data, then you can import that XML file into Excel and then work with the data.
XML is quite widely accepted as a file format to store and transmit data over the web.
A lot of popular file formats, such as Microsoft Office Open XML, LibreOffice, OpenDocument, XHTML, and SVG, also use the XML file format.
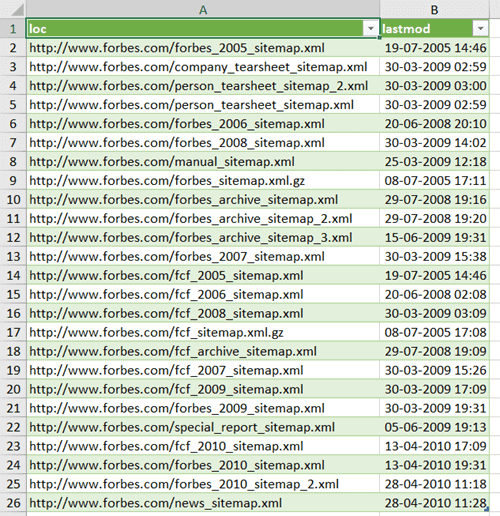
Most popular websites on the Internet have their sitemap in an XML format.
This is a file that contains the details of all the important pages and categories on a website. Here is an example of the sitemap from Forbes.
Now let’s see how to convert an XML file to Excel using Power Query.
Import XML File to Excel
If you already have an XML file (either downloaded on your system or a link to it on the web), you can easily convert it into data in an Excel file.
Thanks to Power Query (now called ‘Get & Transform’)
Import XML File that is Saved On your System
For the purpose of this tutorial, I’ll use an XML file that contains the sitemap for Forbes. You can download the file by going to this link, then right-click and save the file.
Once you have the XML file on your system, follow the below steps to get the XML file data into Excel:
- Open the Excel file where you want to get the data from the XML file
- Click the Data tab

- In the ‘Get & Transform’ data group, click on the ‘Get Data’ option

- Go to the ‘From file’ option
- Click on ‘From XML’

- In the input data dialog box that opens up, locate the XML file that you want to import and select it
- Click Import. This will import the XML file into power query and open the Navigator dialog box
- Select the data from the XML file that you want to import. In this case, I would click on ‘sitemap’ in the left pane

- [Optional] Click on the Transform Data button, if you want to transform the data before loading it into Excel (such as change the column names or remove some columns)
- Click on Load


The above steps would insert a new worksheet in the Excel file, and load all the data from the XML file into the new worksheet.
The great thing about using Power Query to fetch the data from an XML file into Excel is that in case the XML file updates and there are new records in it, you don’t have to repeat the same process.
You can simply right-click on any cell in the table and refresh the query.

Import XML File into Excel using the web URL
In the above example, we first downloaded the XML file on the system and then imported the data into Excel.
In case you have a web URL that contains the XML file (such as this one – https://www.forbes.com/sitemap_index.xml), you don’t even need to download the file. you can connect Power Query to that URL and extract the XML data into Excel.
Below are the steps to connect power query do a web URL that contains the XML data and import that data into Excel:
- Open the Excel file where you want to import the data
- Click the Data tab
- In the Get & Transform group, click on the ‘Get Data’ option
- Go to the ‘From Other Sources’ option
- Click on ‘From Web’

- In the ‘From Web’ dialog box, copy and paste the URL that has the XML data

- Click OK. This will open the Navigator dialog box where you can choose which XML data to import
- Click on ‘sitemap’, which is the XML data that I want in Excel

- [Optional] Click on the Transform Data button, if you want to transform the data before loading it into Excel (such as change the column names or remove some columns)
- Click on Load


The above steps would insert a new worksheet in the Excel file, and load all the data from the XML file into the new worksheet.
And again, in case the data updates in this URL, simply refresh the query to get the new data in Excel.
So these are two simple ways that you can use to convert an XML file into Excel.
If you have the XML file on your system, you can import the data easily using Power Query. And if you have a web URL of the XML file, then you can also fetch that data into Excel.
I hope you found this tutorial useful.
Other Excel tutorials you may also like:
- 8 Ways to Reduce Excel File Size (that actually work)
- How to Automatically Open Specific Excel File on Startup
- How to Recover Unsaved Excel Files [All Options + Precautions]
- Microsoft Excel Won’t Open – How to Fix it! (6 Possible Solutions)
- How to Convert Excel to PDF Using VBA
- Split Each Excel Sheet Into Separate Files (Step-by-Step)
- Combine Data from Multiple Workbooks in Excel (using Power Query)
If you previously created an XML Map, you can use it to import XML data into cells that are mapped, but there also are several methods and commands for importing XML data without an XML Map.
If you have an XML Map, do this to import XML data into mapped cells:
-
In the XML Map, select one of the mapped cells.
-
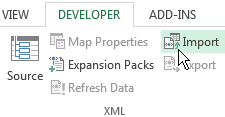
Click Developer > Import.
If you don’t see the Developer tab, see Show the Developer tab.
-
In the Import XML dialog box, locate and select the XML data file (.xml) you want to import, and click Import.
Other ways to import XML data
-
Import an XML data file as an XML table
-
Import multiple XML data files
-
Import multiple XML data files as external data
-
Open an XML data file to import its data
For more information about issues, see Common issues with importing XML data at the end of this article.
Import an XML data file as an XML table
-
Click Developer > Import.
If you don’t see the Developer tab, see Show the Developer tab.
-
In the Import XML dialog box, locate and select the XML data file (.xml) you want to import, and click Import.
If the XML data file doesn’t refer to a schema, Excel infers the schema from the XML data file.
-
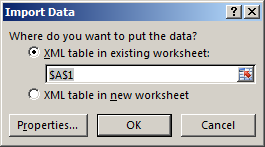
In the Import Data dialog box, do one of the following:
-
Select XML table in existing worksheet to import the contents of the XML data file into an XML table in your worksheet at the specified cell location.
-
Select XML table in new worksheet to import the contents of the file into an XML table in a new worksheet starting at cell A1. The schema of the XML data file is displayed in the XML Source task pane.
-
-
If the XML data file doesn’t refer to a schema, then Excel infers the schema from the XML data file.
-
To control the behavior of XML data (such as data binding, format, and layout), click Properties, which displays the XML Map properties dialog box. For example, existing data in a mapped range will be overwritten when you import data by default, but you can change this.
Import multiple XML data files
-
Select a mapped cell to import multiple XML files into a single set of mapped cells.
If you want to import multiple XML files into multiple sets of mapped cells, click a cell anywhere on the worksheet that isn’t mapped.
-
Click Developer > Import.
If you don’t see the Developer tab, see Show the Developer tab.
-
In the Import XML dialog box, locate and select the XML data file (.xml) you want to import.
-
If the files are contiguous, press Shift, and click the first and the last file in the list. All of the data from the XML files will be imported and appended to the mapped cells.
-
If the files aren’t contiguous, press and hold Ctrl, and click each file you want to import in the list.
-
-
Click Import.
If you selected files that aren’t contiguous, the Importing <filename>.xml dialog box appears. Select the XML Map that corresponds to the XML data file you’re importing for each file.
To use a single map for all of the selected files that aren’t yet imported, select Use this XML Map for all selected files of this schema.
Import multiple XML data files as external data
To import multiple XML files that use the same namespace but different XML schemas, you can use the From XML Data Import command. Excel creates a unique XML Map for each XML data file you import.
Note: If you’re importing multiple XML files that don’t define a namespace, these XML files are treated as if they use the same namespace.
-
If you’re using Excel with a Microsoft 365 subscription, click Data > Get Data > From File > From XML.
If you’re using Excel 2016 or earlier, click Data > From Other Sources > From XML Data Import.
-
Go to the drive, folder, or Internet location that has the XML data file (.xml) you want to import.
-
Select the file and click Open.
-
In the Import Data dialog box, do one of the following:
-
XML table in existing worksheet The contents of the file are imported into a new XML table in a new worksheet. If the XML data file doesn’t refer to a schema, Excel infers the schema from the XML data file.
-
Existing worksheet The XML data is imported in a two-dimensional table with rows and columns that shows XML tags as column headings, and data in rows below the column headings. The first element (the root node) is used like a title and is displayed in the specified cell location. The rest of the tags are sorted alphabetically across the second row. In this case, Excel doesn’t infer a schema, and you can’t use an XML Map.
-
New worksheet Excel adds a new worksheet to your workbook and automatically puts the XML data in the upper-left corner of the new worksheet. If the XML data file doesn’t refer to a schema, Excel infers the schema from the XML data file.
-
-
To control the behavior of XML data, such as data binding, format, and layout, click Properties, which displays the XML Map properties dialog box. For example, existing data in a mapped range is overwritten when you import data by default, but you can change this.
Open an XML data file to import its data
-
Click File > Open.
If you’re using Excel 2007, click Microsoft Office Button
 > Open.
 -
In the Open dialog box, click the drive, folder, or Internet location that has the file that you want to open.
-
Select the file and click Open.
-
If the Import XML dialog box appears, the file you opened refers to one or more Extensible Stylesheet Language Transformation (XSLT) style sheets, so you can click one of the following options:
-
Open the file without applying a style sheet The XML data is imported in a two-dimensional table with rows and columns that shows XML tags as column headings, and data in rows below the column headings. The first element (the root node) is used like a title and is displayed in the specified cell location. The rest of the tags are sorted alphabetically across the second row. In this case, Excel doesn’t infer a schema, and you can’t use an XML Map.
-
Open the file with the following style sheet applied (select one) Select the style sheet that you want to apply, and then click OK. The XML data is formatted according to the style sheet that you selected.
Note: The XML data is opened as read-only in Excel so that you don’t accidentally save your original source file in the Excel Macro-Enabled Workbook file format (.xlsm). In this case, Excel doesn’t infer a schema, and you can’t use an XML Map.
-
-
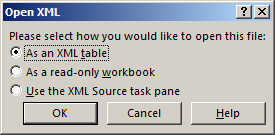
If the Open XML dialog box appears, the XML file doesn’t have any XSLT style sheet references. To open the file, click one of the following options:
-
Click As an XML table to create an XML table in a new workbook.
The contents of the file are imported into the XML table. If the XML data file doesn’t refer to a schema, Excel infers the schema from the XML data file.
-
Click As a read-only workbook.
The XML data is imported in a two-dimensional table with rows and columns that shows XML tags as column headings, and data in rows below the column headings. The first element (the root node) is used like a title and is displayed in the specified cell location. The rest of the tags are sorted alphabetically across the second row. In this case, Excel doesn’t infer a schema, and you can’t use an XML Map.
The XML data is opened as read-only in Excel so that you don’t accidentally save your original source file in the Excel Macro-Enabled Workbook file format (.xlsm). In this case, Excel doesn’t infer a schema, and you can’t use an XML Map.
-
Click Use the XML Source task pane.
The schema of the XML data file is displayed in the XML Source task pane. You can then drag elements of the schema to the worksheet to map those elements to the worksheet.
If the XML data file doesn’t refer to a schema, Excel infers the schema from the XML data file.
-
 > Open.
Common issues with importing XML data
Excel displays the XML Import Error dialog box when it can’t validate data according to the XML Map. In this dialog box, click Details for additional information about each error. The following table lists some common import errors:
|
Error |
What happened |
|
Failed schema validation |
When you clicked Validate data against schema for import and export in the XML Map Properties dialog box, the data was imported, but the data wasn’t validated against the specified XML Map. |
|
Some data was imported as text |
Some or all of the data you imported was converted from its declared data type to text. To use this data in a calculation, you’ll need to convert the data from text to numbers or dates. For example, a date value converted to text won’t work as intended in the YEAR function until you convert it to the Date data type. Excel converts data to text when:
|
|
XML parse error |
The XML parser can’t open the specified XML file. Make sure the XML file doesn’t have syntax errors, and that the XML is well-formed. |
|
Can’t find an XML Map that corresponds to the data |
This problem can occur when you select more than one XML data file to import, and Excel can’t find a matching XML Map for one of the files. For the file named in the title bar of the dialog box, import an appropriate schema first, and then try importing the file again. |
|
An XML table can’t be resized to accommodate data |
You’re attempting to add rows by importing or appending data to the XML table, but there’s no room for the table to expand. An XML table can only expand from the bottom down. For example, there may be an object, such as a picture or another table, immediately below the XML table that prevents the XML table from expanding. Or, for the XML table to expand, it will exceed the Excel row limit of 1,048,576. To fix this problem, rearrange the tables and objects on the worksheet to allow the XML table to expand from the bottom down. |
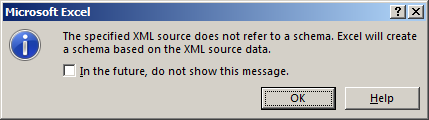
The specified XML file doesn’t refer to a schema
The XML file you’re trying to open doesn’t refer to an XML schema. To work with the XML data that’s in the file, Excel needs a schema based on the contents of the XML file. If that schema is incorrect or insufficient, remove it from your workbook. Then create an XML schema file and edit the XML data file so that the XML data file refers to the schema. For more information, see Map XML elements to cells in an XML Map.
Note: You can’t export the Excel inferred schema as a separate XML schema data file (.xsd). Although there are XML schema editors and other methods for creating an XML schema file, you may not have convenient access to them or know how to use them.
Follow these steps to remove the schema that Excel created from your workbook:
-
Click Developer > Source.
If you don’t see the Developer tab, see Show the Developer tab.
-
In the XML Source task pane, click XML Maps.
-
In the XML Maps dialog box, click the XML Map Excel created, and click Delete.
Importing multiple XML files that use the same namespace but different schemas doesn’t work as expected
When you work with multiple XML data files and XML schemas, you typically create an XML Map for each schema, map the elements you want, and then import each XML data file to the appropriate XML Map. Using the Import command to open multiple XML files with the same namespace, you can only use one XML schema. When you use this command to open multiple XML files that use the same namespace but different schemas, you can get unexpected results. For example, data may get overwritten, or the files won’t open.
To import multiple XML files that use the same namespace but different XML schemas, try use the From XML Data Import command (click Data > From Other Sources). This command allows multiple XML files with the same namespace to use multiple XML schemas. Excel creates a unique XML Map for each XML data file you want to import.
Note: If you’re importing multiple XML files that don’t define a namespace, these XML files are treated as if they use the same namespace.
Show the Developer tab
If you don’t see the Developer tab, do the following to display it:
-
In Excel 2013 and Excel 2010:
-
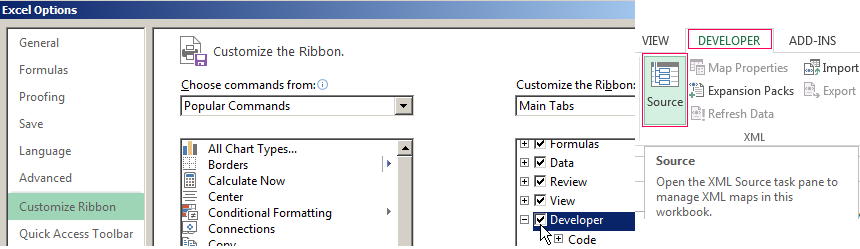
Click File > Options.
-
Click the Customize Ribbon category.
-
Under Main Tabs, check the Developer box, and click OK.
-
-
In Excel 2007:
-
Click the Microsoft Office Button
> Excel Options. -
Click the Popular category.
-
Under Top options for working with Excel, check the Show Developer tab in the Ribbon box, and click OK.
-
See Also
Over view of XML in Excel
Map XML elements to cells in an XML Map
Export XML data
Microsoft Excel is a useful instrument for organizing and structuring very different data. It can be used to process information by various methods and edit data arrays.
Let us see its tools for generation and processing web applications files. Using a particular example, we will learn the basics of work with XML in Excel.
How to create XML-file in Excel
XML is a file standard for transferring files over the Internet. Excel supports its export and import.
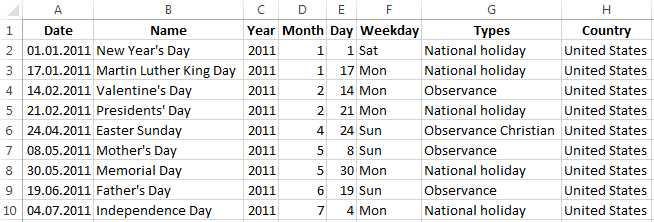
We are going to look through the process of creation an XML-file using factory calendar as a particular example.
- Create a table on which you want to create an XML file in Excel and fill it with data.
- Create and insert a map with the required XML document structure.
- Export the table data in XML format.
Altogether.
- Our table is a Holiday calendar.
- Create any text editor (such as «Notepad») the desired XML structure to generate a map file is saved. In this example, use the map structure:
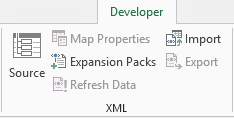
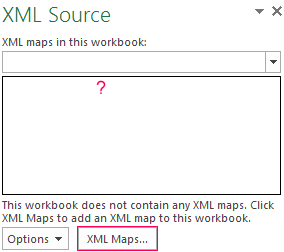
- Open the tool «DEVELOPER». Choose the dialog box «Source» in the XML tab.
- If Excel cannot see XML maps, they have to be added. Press «XML Maps» button.
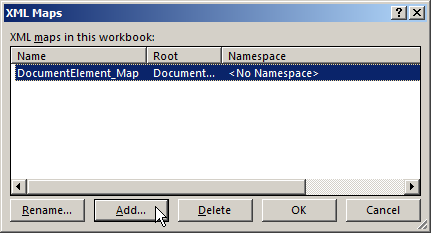
- Press «Add». Find your XML file – press ОК.
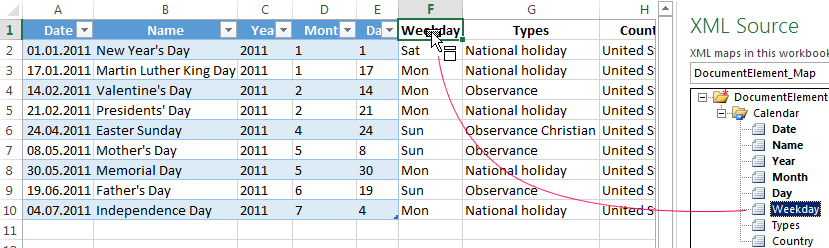
- Elements of the schema will appear in the right column. They have to be dragged to the corresponding column names of the table.
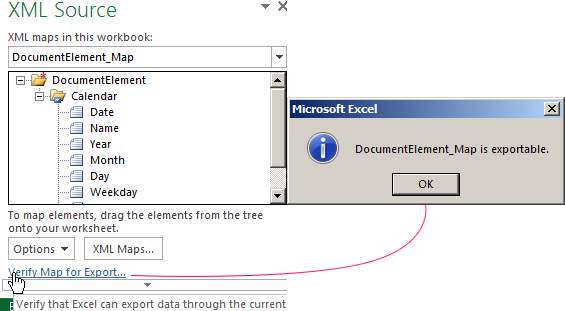
- Check whether the export is possible.
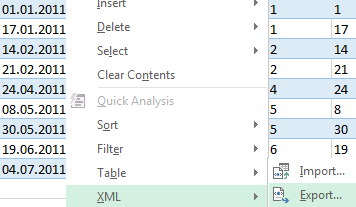
- When all of the elements will be associated, right click any cell on the table and choose XML – Export.
Save the file.
How to save an Excel file in XML format
One of the options:
- Press CTRL+S, choose «Save as» — «Other formats».
- Set the name. Choose the file destination and type – XML.
Press «Save» button.
If you get any errors, try to save the workbook as XML 2003 table or web page. Usually, there are no problems with these formats.
Other options:
- Download XLC to XML converter, or find a service, which exports files online.
- Download XML Tools Add-in from the official Microsoft web site. It is available free of charge.
- Open a new workbook. Press CTRL+O «Open».
How to open an XML file in Excel
- Change the format to XML file. Choose the desired file. Press CTRL+O.
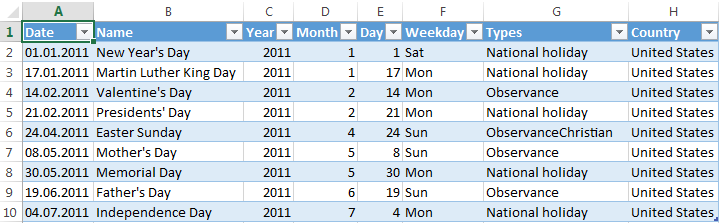
- Open it as an XML-table. Press OK.
- Similar notification will appear.
- Press OK. You can work with this table the same way as with any Excel file.
How to convert XML file to Excel
- Open the tool «DEVELOPER». Choose the dialog box «Import».
- Choose a file in the dialog box, that you want to convert.
- Press «Import». Excel will offer to create a scheme automatically based on the data received. Press OK. A window will open, where you will need to choose a destination for the importing file.
- Set the range for import. It is better to add extra cells for future entries. Press «OK».
From now on, the created table is being edited and saved in Excel format.
How to collect data from XML-files to Excel
The principle of collecting data from several XML-files is the same as the principle of conversion. When we import data to Excel, the XML map transfers at the same time. You can also transfer other data in this schema.
Each new file will be linked to the existing map. Every element of the table structure binds to an element from XML map. Only one data link is allowed.
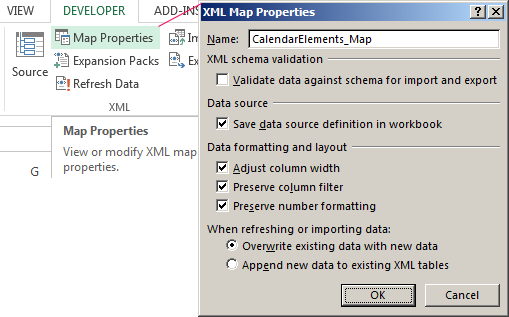
In order to configure binding settings, in the «DEVELOPER» menu choose the «Map Proparties» instrument.
Features:
- Excel will check every new file for compliance with the existing map (if you check the box next to this line).
- The data can be update. Also, new information can be added to the existing table (it makes sense, if you need to collect data from similar files).
Other ways to get structure data (schema):
- Download it from a database of a specialized business application. Commercial sites and services may provide schemas. Simple options are in the public domain.
- Use prepared examples in order to validate the maps. Examples contain the basic elements and structure data. Copy and paste it into the program «Notepad» – and save it with the desired extension.
These are all manual methods of import and export files structure data.
Добавить это приложение в закладки
Нажмите Ctrl + D, чтобы добавить эту страницу в избранное, или Esc, чтобы отменить действие.
Отправьте ссылку для скачивания на
Отправьте нам свой отзыв
Ой! Произошла ошибка.
Недопустимый файл. Убедитесь, что загружается правильный файл.
Ошибка успешно зарегистрирована.
Вы успешно сообщили об ошибке. Вы получите уведомление по электронной почте, когда ошибка будет исправлена.
Нажмите эту ссылку, чтобы посетить форумы.
Немедленно удалите загруженные и обработанные файлы.
Вы уверены, что хотите удалить файлы?
Введите адрес
![]()
Download Article
![]()
Download Article
Do you need to convert an XML file to the XLSX or CSV format? Converting XML data files to Excel is super easy—you’ll just need to import the data into a workbook and save the file. As long as you’re using a recent version of Excel (2016 & later for Windows, or 2019 & later for Mac), you can also use Power Query to transform your XML data before making a conversion. This wikiHow will teach you two simple ways to convert any XML file in Excel, including a quick trick you can use if you don’t have Microsoft Excel on your computer.
Things You Should Know
- You can use Excel’s Power Query tool to transform XML data before saving the file in the XLSX format.
- If you’re using Windows, you can import XML files from the web in addition to files already on your computer.
- If Microsoft Excel isn’t installed on your PC or Mac, you can copy and paste the contents of an XML file from a text editor into a web-based converter.
-
1
Open a new blank workbook in Microsoft Excel. You’ll find Excel in your Windows Start menu or your Mac’s Applications. Click Blank workbook on the welcome screen to start fresh.
-
2
Click the Data tab. You’ll see it at the top of Excel.
Advertisement
-
3
Click Get Data. This icon is on the left side of the toolbar at the top of Excel for Windows.
-
4
Select From File (Windows) or Text/CSV (Mac). Choosing this option allows you to select an XML file from your computer or any connected network and cloud drives.
- If you’re using Windows, you can import an XML file from the web instead. Instead of choosing From File, select From Other Sources > From Web, enter the direct URL to the XML file, and then click OK. Then, skip to Step 7.
- If you’re using a Mac, make sure the XML file you want to convert is already saved to your computer. Unlike in Windows, you won’t be able to open XML files from the web in Excel.
-
5
Select From XML (Windows only). This opens your file browser.
-
6
Select the XML file and click Import (Windows) or Next (Mac). The Navigator window will expand.
-
7
Select the XML table name click Load. Choose the file name that has a table icon to its left—you’ll see a preview of the data from that table. When you click Load, the data from the XML file will appear in a brand new sheet in your workbook.
- Windows: If you want to modify anything about the data first, such as column headers, you can click Transform Data instead. Then, make your changes in the Power Query window and click Close & Load at the top-left corner to add the data to a new worksheet.
- Mac: If you want to modify anything about the XML data, click Load first, then launch Power Query by clicking the down-arrow next to the «Get Data» icon in the toolbar and selecting Launch Power Query Editor…. Make changes to your data, then click Close & Load on the Home tab.
-
8
Save the file. You can save the file as an XLSX (Excel Workbook), CSV, or other format. Here’s how:
- Click the File menu and choose Save As.
- Click Browse (Windows) or On My Mac (Mac), then choose a folder.[1]
- Type a name for your workbook.
- If you want to save the file as an Excel XLSX file, choose Excel Workbook from the «Save as type» or «File Format» menu. You can choose any of the formats in the list, including CSV (Comma Delimited).
- Click Save to save the file.


Advertisement
-
1
Go to https://wtools.io/convert-xml-to-excel in a web browser. This free tool makes it easy to convert XML files to the Excel XLSX format even if you don’t have Microsoft Excel installed.
-
2
Open the contents of your XML file in a text editor. To use the online converter, you’ll need to copy the data from the XML file into the form in your browser. Double-clicking the XML file will open it in your default web browser, but the info may not copy correctly this way. To open the file in a text editor, right-click the file, select Open With, then choose a text editor like Notepad (Windows) or TextEdit (Mac).
-
3
Copy the contents of the XML file. To do this, click anywhere in the text editor, then press Control + A (PC) or Command + A (Mac) to highlight everything in the file. Then, press Control + C (PC) or Command + C (Mac) to copy.
-
4
Paste the copied data into the web form. You can do this easily by right-clicking the form and selecting Paste.
-
5
Click the CONVERT & DOWNLOAD button below the form. This creates an XLSX file and downloads the file to your computer.
- Depending on your settings, you might have to select a save location and click Save or OK to start the download.


Advertisement
Our Most Loved Articles & Quizzes
Ask a Question
200 characters left
Include your email address to get a message when this question is answered.
Submit
Advertisement
Video
Thanks for submitting a tip for review!
About This Article
Article SummaryX
1. Open the file in Excel.
2. Click File.
3. Click Save As.
4. Change the file type to .CSV.
5. Click Save.
Did this summary help you?
Thanks to all authors for creating a page that has been read 247,430 times.