
708
708 people found this article helpful
How to Print Labels From Excel
Make labels in Excel in a snap
What to Know
- Prepare your worksheet, set up labels in Microsoft Word, then connect the worksheet to the labels.
- Open a blank Word document > go to Mailings > Start Mail Merge > Labels. Choose brand and product number.
- Add mail merge fields: In Word, go to Mailings > in Write & Insert Fields, go to Address Block and add fields.
This guide explains how to create and print labels from Excel using the mail merge feature in Microsoft Word. Instructions apply to Excel and Word 2019, 2016, and 2013 and Excel and Word for Microsoft 365.
How to Print Labels From Excel
You can print mailing labels from Excel in a matter of minutes using the mail merge feature in Word. With neat columns and rows, sorting abilities, and data entry features, Excel might be the perfect application for entering and storing information like contact lists. Once you have created a detailed list, you can use it with other Microsoft 365 applications for numerous tasks.
Prepare the Worksheet and Enter the Data
To make mailing labels from Excel, you need to add descriptive column headings so everything prints out correctly. For example, you might have the following column headings:
- Title (Mr./Ms./Dr.)
- First Name
- Last Name
- Street Address
- City
- State
- ZIP Code
-
Type in a heading in the first cell of each column describing the data. Make a column for each element you want to include on the labels.
Lifewire
-
Type the names and addresses or other data you’re planning to print on labels.
Make sure each item is in the correct column.
Avoid leaving blank columns or rows within the list.
Lifewire
-
Save the worksheet when you have finished.
Set Up Labels in Word
Next, you need to choose the size and type of the labels you’re printing.
-
Open a blank Word document.
-
Go to the Mailings tab.
-
Choose Start Mail Merge > Labels.
-
Choose the brand in the Label Vendors box and then choose the product number, which is listed on the label package. You can also select New Label if you want to enter custom label dimensions.
-
Click OK when you are ready to proceed.
Connect the Worksheet to the Labels
Before performing the merge to print address labels from Excel, you must connect the Word document to the worksheet containing your list. The first time you connect to an Excel worksheet from Word, you must enable a setting that allows you to convert files between the two programs.
-
In Word, click File.
-
Scroll down, and select Options at the bottom of the left pane.
-
Click Advanced in the left pane of the Word Options window and then scroll down to the General section.
-
Make sure the Confirm file format conversion on open is selected and click OK.
-
From Mailings, in the Start Mail Merge group, choose Select Recipients > Use an Existing List.
-
Navigate to the Excel worksheet containing your list in the Select Data Source window that opens and click Open.
-
Click OK to confirm that you want to use the list and click OK again to select the table containing your list. The page will now be filled with labels that say «Next Record».
Add Mail Merge Fields and Perform the Merge
After you’ve organized the data, you need to add mail merge fields before you can complete the merge. This is where those headings you added to your Excel worksheet will come in handy.
-
Click on the first label on the page and then select Address Block in the Write & Insert Fields section of the Mailings tab.
-
Click the Match Fields button on the Insert Address Block dialog box that appears.
Make sure your headings correspond with the required fields. If any of them are incorrect, use the drop-down arrow beside it to match up to the correct field.
-
Click OK. Click OK again to close the dialog box.
-
Select Mailings > Write & Insert Fields > Update Labels.
-
Once you have the Excel spreadsheet and the Word document set up, you can merge the information and print your labels. Click Finish & Merge in the Finish group on the Mailings tab.
-
Click Edit Individual Documents to preview how your printed labels will appear. Select All > OK.
-
A new document opens with the mailing labels from your Excel worksheet. You can edit, print, and save the labels just as you would any other Word document.
FAQ
-
How do I label an axis in Excel?
To label chart axes in Excel, select a blank area of the chart, then select the Plus (+) in the upper-right. Check the Axis title box, select the right arrow beside it, then choose an axis to label.
-
How do I label a legend in Excel?
To label legends in Excel, select a blank area of the chart. In the upper-right, select the Plus (+) > check the Legend checkbox. Then, select the cell containing the legend and enter a new name.
-
How do I label a series in Excel?
To label a series in Excel, right-click the chart with data series > Select Data. Under Legend Entries (Series), select the data series, then select Edit. In the Series name field, enter a name.
-
How do I apply label filters in Excel?
To apply filters to a pivot table in Excel, select the Column Labels down-arrow to open the filter’s drop-down list, uncheck Select All, then choose your desired filters.
Thanks for letting us know!
Get the Latest Tech News Delivered Every Day
Subscribe
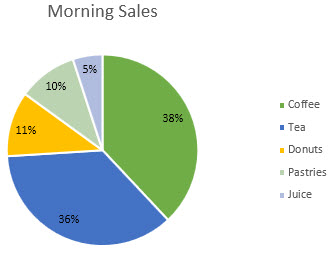
Data labels make a chart easier to understand because they show details about a data series or its individual data points. For example, in the pie chart below, without the data labels it would be difficult to tell that coffee was 38% of total sales. Depending on what you want to highlight on a chart, you can add labels to one series, all the series (the whole chart), or one data point.
Note: The following procedures apply to Office 2013 and newer versions. Looking for Office 2010 steps?
Add data labels to a chart
-
Click the data series or chart. To label one data point, after clicking the series, click that data point.
-
In the upper right corner, next to the chart, click Add Chart Element
 > Data Labels.
 -
To change the location, click the arrow, and choose an option.
-
If you want to show your data label inside a text bubble shape, click Data Callout.
 > Data Labels.
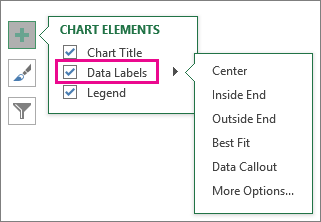
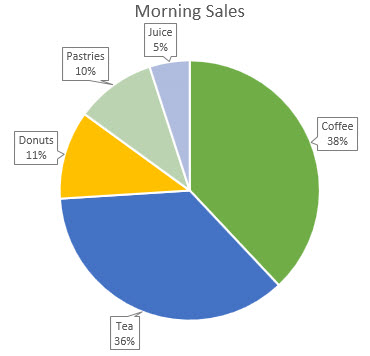
To make data labels easier to read, you can move them inside the data points or even outside of the chart. To move a data label, drag it to the location you want.
If you decide the labels make your chart look too cluttered, you can remove any or all of them by clicking the data labels and then pressing Delete.
Tip: If the text inside the data labels is too hard to read, resize the data labels by clicking them, and then dragging them to the size you want.
Change the look of the data labels
-
Right-click the data series or data label to display more data for, and then click Format Data Labels.
-
Click Label Options and under Label Contains, pick the options you want.
Use cell values as data labels
You can use cell values as data labels for your chart.
-
Right-click the data series or data label to display more data for, and then click Format Data Labels.
-
Click Label Options and under Label Contains, select the Values From Cells checkbox.
-
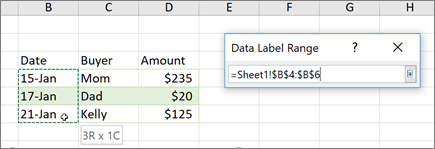
When the Data Label Range dialog box appears, go back to the spreadsheet and select the range for which you want the cell values to display as data labels. When you do that, the selected range will appear in the Data Label Range dialog box. Then click OK.
The cell values will now display as data labels in your chart.
Change the text displayed in the data labels
-
Click the data label with the text to change and then click it again, so that it’s the only data label selected.
-
Select the existing text and then type the replacement text.
-
Click anywhere outside the data label.
Tip: If you want to add a comment about your chart or have only one data label, you can use a textbox.
Remove data labels from a chart
-
Click the chart from which you want to remove data labels.
This displays the Chart Tools, adding the Design, and Format tabs.
-
Do one of the following:
-
On the Design tab, in the Chart Layouts group, click Add Chart Element, choose Data Labels, and then click None.
-
Click a data label one time to select all data labels in a data series or two times to select just one data label that you want to delete, and then press DELETE.
-
Right-click a data label, and then click Delete.
Note: This removes all data labels from a data series.
-
-
You can also remove data labels immediately after you add them by clicking Undo
on the Quick Access Toolbar, or by pressing CTRL+Z.
 on the Quick Access Toolbar, or by pressing CTRL+Z.
Add or remove data labels in a chart in Office 2010
-
On a chart, do one of the following:
-
To add a data label to all data points of all data series, click the chart area.
-
To add a data label to all data points of a data series, click one time to select the data series that you want to label.
-
To add a data label to a single data point in a data series, click the data series that contains the data point that you want to label, and then click the data point again.
This displays the Chart Tools, adding the Design, Layout, and Format tabs.
-
-
On the Layout tab, in the Labels group, click Data Labels, and then click the display option that you want.
Depending on the chart type that you used, different data label options will be available.
-
On a chart, do one of the following:
-
To display additional label entries for all data points of a series, click a data label one time to select all data labels of the data series.
-
To display additional label entries for a single data point, click the data label in the data point that you want to change, and then click the data label again.
This displays the Chart Tools, adding the Design, Layout, and Format tabs.
-
-
On the Format tab, in the Current Selection group, click Format Selection.
You can also right-click the selected label or labels on the chart, and then click Format Data Label or Format Data Labels.
-
Click Label Options if it’s not selected, and then under Label Contains, select the check box for the label entries that you want to add.
The label options that are available depend on the chart type of your chart. For example, in a pie chart, data labels can contain percentages and leader lines.
-
To change the separator between the data label entries, select the separator that you want to use or type a custom separator in the Separator box.
-
To adjust the label position to better present the additional text, select the option that you want under Label Position.
If you have entered custom label text but want to display the data label entries that are linked to worksheet values again, you can click Reset Label Text.
-
On a chart, click the data label in the data point that you want to change, and then click the data label again to select just that label.
-
Click inside the data label box to start edit mode.
-
Do one of the following:
-
To enter new text, drag to select the text that you want to change, and then type the text that you want.
-
To link a data label to text or values on the worksheet, drag to select the text that you want to change, and then do the following:
-
On the worksheet, click in the formula bar, and then type an equal sign (=).
-
Select the worksheet cell that contains the data or text that you want to display in your chart.
You can also type the reference to the worksheet cell in the formula bar. Include an equal sign, the sheet name, followed by an exclamation point; for example, =Sheet1!F2
-
Press ENTER.
Tip: You can use either method to enter percentages — manually if you know what they are, or by linking to percentages on the worksheet. Percentages are not calculated in the chart, but you can calculate percentages on the worksheet by using the equation amount / total = percentage. For example, if you calculate 10 / 100 = 0.1, and then format 0.1 as a percentage, the number will be correctly displayed as 10%. For more information about how to calculate percentages, see Calculate percentages.
-
-
The size of the data label box adjusts to the size of the text. You cannot resize the data label box, and the text may become truncated if it does not fit in the maximum size. To accommodate more text, you may want to use a text box instead. For more information, see Add a text box to a chart.
You can change the position of a single data label by dragging it. You can also place data labels in a standard position relative to their data markers. Depending on the chart type, you can choose from a variety of positioning options.
-
On a chart, do one of the following:
-
To reposition all data labels for a whole data series, click a data label one time to select the data series.
-
To reposition a specific data label, click that data label two times to select it.
This displays the Chart Tools, adding the Design, Layout, and Format tabs.
-
-
On the Layout tab, in the Labels group, click Data Labels, and then click the option that you want.
For additional data label options, click More Data Label Options, click Label Options if it’s not selected, and then select the options that you want.
-
Click the chart from which you want to remove data labels.
This displays the Chart Tools, adding the Design, Layout, and Format tabs.
-
Do one of the following:
-
On the Layout tab, in the Labels group, click Data Labels, and then click None.
-
Click a data label one time to select all data labels in a data series or two times to select just one data label that you want to delete, and then press DELETE.
-
Right-click a data label, and then click Delete.
Note: This removes all data labels from a data series.
-
-
You can also remove data labels immediately after you add them by clicking Undo
on the Quick Access Toolbar, or by pressing CTRL+Z.
Data labels make a chart easier to understand because they show details about a data series or its individual data points. For example, in the pie chart below, without the data labels it would be difficult to tell that coffee was 38% of total sales. Depending on what you want to highlight on a chart, you can add labels to one series, all the series (the whole chart), or one data point.
Add data labels
You can add data labels to show the data point values from the Excel sheet in the chart.
-
This step applies to Word for Mac only: On the View menu, click Print Layout.
-
Click the chart, and then click the Chart Design tab.
-
Click Add Chart Element and select Data Labels, and then select a location for the data label option.
Note: The options will differ depending on your chart type.
-
If you want to show your data label inside a text bubble shape, click Data Callout.
To make data labels easier to read, you can move them inside the data points or even outside of the chart. To move a data label, drag it to the location you want.
Note: If the text inside the data labels is too hard to read, resize the data labels by clicking them, and then dragging them to the size you want.
Click More Data Label Options to change the look of the data labels.
Change the look of your data labels
-
Right-click on any data label and select Format Data Labels.
-
Click Label Options and under Label Contains, pick the options you want.
Change the text displayed in the data labels
-
Click the data label with the text to change and then click it again, so that it’s the only data label selected.
-
Select the existing text and then type the replacement text.
-
Click anywhere outside the data label.
Tip: If you want to add a comment about your chart or have only one data label, you can use a textbox.
Remove data labels
If you decide the labels make your chart look too cluttered, you can remove any or all of them by clicking the data labels and then pressing Delete.
Note: This removes all data labels from a data series.
Use cell values as data labels
You can use cell values as data labels for your chart.
-
Right-click the data series or data label to display more data for, and then click Format Data Labels.
-
Click Label Options and under Label Contains, select the Values From Cells checkbox.
-
When the Data Label Range dialog box appears, go back to the spreadsheet and select the range for which you want the cell values to display as data labels. When you do that, the selected range will appear in the Data Label Range dialog box. Then click OK.
The cell values will now display as data labels in your chart.
i Hemera Technologies/AbleStock.com/Getty Images
Excel spreadsheets enable users to organize contact information for mailing lists in columns containing the category or field name. Users may update information on the spreadsheet or create labels for mailing or shipping from the Excel spreadsheet (also called a worksheet). Since data on spreadsheets cannot be directly converted to labels, consider using the Microsoft Word label templates and mail merge function to generate labels. Labels created in MS Word can contain data from an Excel spreadsheet and then printed on pre-cut sheets available from office supply stores.
Step 1
Open your Excel spreadsheet and confirm that the first row contains column headings for each category (such as First Name, Last Name, Street Address, etc.). If no categories are listed in row 1, then click the first cell (A1) and select «Row» under «Insert» in the top menu bar and type a category name for each column.
Step 2
Sort your data, if desired, by selecting the diamond at the top left corner of your spreadsheet (or choose «Select All» under «Edit» in the top menu bar), select «Sort» under «Tools» in the top menu bar. Specify that the worksheet has a header row by selecting that option in the dialog box; select the sorting criteria using the drop down menus and click the «OK» button.
Step 3
Save the latest version of the spreadsheet by selecting «Save» under «File» in the top menu bar.
Step 4
Open a new blank document in Microsoft Word and select «Labels» under «Tools in the top menu bar. Note: in Microsoft Word 2007, this function is under the «Mailing» tab.
Step 5
Click the «Options» button in the «Label» section and choose your label format according to the label manufacturer and product number. Note: the dialog box displays a summary of the label description for the highlighted label (e.g., type of label, label size and page size) so that you can select a label configuration if desired.
Step 6
Click the «OK» button to return to the main label set-up window. Select the option, «Single label» under the section, «Number of Labels» to specify that each record will be placed on a label (instead of all labels with the same information).
Step 7
Click the «Data Merge» button and check that a «Data Merge Manager» toolbar is displayed with a new document.
Step 8
Select «Open Data Source» in the Data Merge Manager toolbar, under «Data Source.»
Step 9
Select the Excel worksheet updated in step 3 and click the «Open» button.
Step 10
Select the worksheet tab from the drop down menu under the «Open Document in Workbook» section and click the «OK» button to open an «Edit Labels» wizard.
Step 11
Click the «Insert Merge Field» button and select the desired category from the worksheet (identified in step 1). If desired, press the «Space» key to insert a space between categories (such as between First Name and Last Name) and type additional standard information (such as a comma between City and State, or the «Enter» key for a line break). Repeat this step to insert each category as a field and then press the «OK» button to close the Edit Label wizard.
Step 12
Select the «Merge to New Document» button under the «Merge» section of the Data Merge Manager Toolbox to create a new document containing the Excel worksheet information as labels.
Step 13
Save the new document containing pages of labels by selecting «Save As» under «File» in the top menu bar and type the desired document name in the field before clicking the «Save» button.
Step 14
Insert the sheets of labels into the printer paper tray, if desired, and select the Print function to print labels (the Print function is accessed by selecting «Print» under «File» in the top menu bar).
Download PC Repair Tool to quickly find & fix Windows errors automatically
When it comes down to creating print or mail labels, the best tools to use are Microsoft Word and Microsoft Excel. Many have decided to go with Word exclusively, but did you know it is possible to store the label data in Excel and then use Word to fetch the data in order to print the labels? If not, well, you should not worry because this article will explain everything you need to know. Now, if you are an amateur, we suggest using the latest version of Microsoft Office because that’s what this article is based on.
The ability to create labels in Microsoft Word from an Excel list is easier than you might think. Still, it will take some effort on your part and the steps involved are as follows:
- Use Microsoft Excel to enter data for your labels
- Put together the labels in Microsoft Word
- Import the Excel data into your Word document
- Add the labels from Excel to Microsoft Word
- Create the labels from Excel in Word
- Save the document as PDF
1] Use Microsoft Excel to enter data for your labels

To begin, we must first create an Excel spreadsheet and then inject the relevant data. An applicable header must then be assigned to each data field as this is important for retrieving the headers in Microsoft Word
- Launch Excel: Open Microsoft Excel on your computer, whether it be Windows or the Mac variety. From there, create a new spreadsheet.
- Add a name: When the spreadsheet screen appears, click within the first cell via the first row and type First Name.
- Add a last name among other things: From the B column, you will want to select the first cell and type, Last Name. Now, in terms of the C, D, E, and F columns, add Street Address, City, State, and ZIP Code to the first rows respectively.
- Populate the headers with data: It is now time to add the relevant data under each teacher you’ve just created.
- Save your spreadsheet: After you’ve added all the required data, click on File at the top of the document and from there, save your spreadsheet.
2] Put together the labels in Microsoft Word
OK, so the next thing to accomplish here is to set up the dimensions of your labels from within Microsoft Word. You do not have to do a lot here since there are quite a few predefined label layouts available. However, if you want to go the custom route, well, we will leave that up to you.
- Launch Microsoft Word: Open the Microsoft Word app on your Windows or Mac device, and once you’ve done that, go on ahead and create a new document.
- Navigate to the Mailings tab: Look to the tabbed section from within the document area and select Mailings.

- Select Start Mail Merge: If you’ve done all things correctly, you should now come across several options. Please avoid all and only choose Start Mail Merge, and from the dropdown menu, click on Labels.
- Choose a Label Vendor: From the newly opened Label Options window, you must choose a Label Vendor from the list. The default vendor is Microsoft so you can stick with that if you want.

- Select a Label Type: Look to the Product Number list and choose a label type that fits your requirement, then complete it by hitting the OK button. Your label layout is now created, but ensure not to close the document.
3] Import the Excel data into your Word document
With your labels created and ready to be used, it is now time to import the Excel spreadsheet information. There is no need to launch Excel to get this done, so for now, focus your time on Word.
- Go to the Mailings tab: Return to the Word document and select the Mailings tab.
- Use Existing List: Click on Select Recipients via the Ribbon where a dropdown menu will be revealed. From this menu, please click on Use an Existing List.
- Import Excel spreadsheet into Word: From the File Explorer window, search for the Excel spreadsheet we’ve created earlier, select it, then import the document into Word.
- Select the spreadsheet from a list: A window with the name, Select Table should now appear. From there, choose the spreadsheet that holds the label data, and then tick First row of data containing column headers.
- Select OK: Click the OK button right away.
4] Add the labels from Excel to Microsoft Word
It is now time to specify the fields you’d prefer to use in your labels when added to the Word document.
- Go to Address Block: From the same Word document, click on the Mailings tab again then select Address Block from the Write & Insert Fields section on the Ribbon.
- Select Match Fields: When the Insert Address Block window appears, please click on the Match Fields button promptly.
- All fields must match Excel data: From the newly opened window, ensure that all fields match the heading data from the Excel document.
- Hit OK: Once the information is confirmed as legit, click the OK button.
- View preview of your work: You should now be looking at a preview of the labels. If you’re satisfied with the possible outcome, hit the OK button located below the window.
- Go over to Update Labels: Again, click the Mailings tab and then promptly select Update Labels.
- View your label: Every label in your document should now read, <<AddressBlock>>.
5] Create the labels from Excel in Word

At this point, Microsoft Word should have all the data needed to generate labels. With all this information, Word will showcase the data for each label inside.
- Edit Documents: Via the Mailings tab, click on Finish & Merge, then select Edit Individual Documents.
- Choose the All option: From the Merge to New Document window, select All > OK.
6] Save the document as a PDF
Finally, we suggest saving the entire Word document with the labels as a PDF.
Read: Convert JSON to Excel using free online converter tools
Is there a label template in Word?
There are multiple label templates in Microsoft Word that are available to use for free. Simply open Word, then click on More templates. Finally, search for the word, Label, and you’ll see several show up in the results.
How to print labels in Word?
That is super easy. Once you’ve accomplished the task of creating your labels, go ahead and select File > Print. Choose your printer, then hit the Print button to complete the job.

Shantel has studied Data Operations, Records Management, and Computer Information Systems. She is quite proficient in using Office software. Her goal is to become a Database Administrator or a System Administrator.

You may be using Microsoft Excel to organize a mailing list neatly. However, when you get ready to print mailing labels, you’ll need to use mail merge to create them in Word from your Excel list. Here’s how.
Step One: Prepare your Mailing List
If you have already created a mailing list in Excel, then you can safely skip this test. If you haven’t created the list yet, despite Excel’s lack of the mailing label function, we still highly recommend you use Excel since it’s better for organizing and maintaining data than using a Word table.
The first thing you need to do is create a column header respective to the data that goes in each column. Place those headers in the first row of each column.
Which headers you include depends on which information you plan to use in the mailing labels. Titles are always nice, but it’s important that you know which title a person goes by before creating the labels. Also, if your list is for companies and not individual people, you can omit the “First Name” and “Last Name” header and just go with “Company Name” instead. To properly illustrate the steps, we’ll go with a personal mailing list in this example. Our list will include the following headers:
- First Name
- Last Name
- Street Address
- City
- State
- ZIP Code
This is the standard information you’ll find on mailing labels. You can even insert images in the mailing labels if you want, but that step would come later in Word.
RELATED: How to Create and Print Labels in Word
Once you’ve finished creating the headers, go ahead and input the data. Once you’re finished, your list should look something like this:

Go ahead and save your list and let’s head over to Microsoft Word.
Step Two: Set Up Labels in Word
Open up a blank Word document. Next, head over to the “Mailings” tab and select “Start Mail Merge.”
In the drop-down menu that appears, select “Labels.”
The “Label Options” window will appear. Here, you can select your label brand and product number. Once finished, click “OK.”
Your label outlines will now appear in Word.
Note: If your label outlines aren’t showing, go to Design > Borders, and select “View Gridlines.”
Step Three: Connect your Worksheet to Word’s Labels
Before you can transfer the data from Excel to your labels in Word, you must connect the two. Back in the “Mailings” tab in the Word document, select the “Select Recipients” option.
A drop-down menu will appear. Select “Use an Existing List.”
Windows File Explorer will appear. Use it to locate and select your mailing list file. With the file selected, click “Open.”
The “Select Table” window will appear. If you have multiple sheets in your workbook, they’ll appear here. Select the one containing your list. Make sure to enable the “First row of data contains column headers” option if it’s not already and then click “OK.”
Your labels are now connected with your worksheet.
Step Four: Add Mail Merge Fields to the Labels
Now it’s time to add your mail merge fields in Word’s labels. Select the first label, switch to the “Mailings” tab, and then click “Address Block.”
In the “Insert Address Block” window that appears, click the “Match Fields” button.
The “Match Fields” window will appear. In the “Required for Address Block” group, make sure each setting matches the column in your workbook. For example, “First Name” should match with “First Name,” and so on. Once you’ve confirmed everything is set properly, click “OK.”
Back at the “Insert Address Block” window, check out the preview to make sure everything looks good and then click “OK.”
<<AddressBlock>> will now appear in your first label.
Head back over to the “Mailings” tab and then click “Update Labels.”
Once selected, <<AddressBlock>> should appear in every label.
Now, you’re now ready to perform the mail merge.
Step Five: Performing the Mail Merge
Now to watch the magic happen. On the “Mailings” tab, click “Finish & Merge.”
From the drop-down menu that appears, select “Edit Individual Documents.”
The “Merge to New Document” window will appear. Select “All” and then click “OK.”
Your list from Excel will now be merged into the labels in Word.
All that’s left to do now is print out your labels and send out your mail!
READ NEXT
- › How to Make Name Tags in Microsoft Word
- › The Easiest Way to Create a Mail Merge in Microsoft Word
- › Expand Your Tech Career Skills With Courses From Udemy
- › Google Chrome Is Getting Faster
- › BLUETTI Slashed Hundreds off Its Best Power Stations for Easter Sale
- › Mozilla Wants Your Feature Suggestions for Thunderbird
- › How to Adjust and Change Discord Fonts
- › The New NVIDIA GeForce RTX 4070 Is Like an RTX 3080 for $599