
You can export data from your Access database to a Microsoft Word document by using the Export — RTF File Wizard. This article explains how to use the Export — RTF File Wizard and how to save your export settings as a specification for later reuse.
In this article
-
Exporting data to Word: the basics
-
Export data to Word
-
Understand how Access exports objects to Word
-
What else should I know?
Exporting data to Word: the basics
You can export a table, query, form, or report to Microsoft Word. When you export an object by using the Export — RTF File Wizard, Access creates a copy of the object’s data in a Microsoft Word Rich Text Format file (*.rtf). For tables, queries, and forms, the visible fields and records appear as a table in the Word document. When you export a report, the wizard exports the report data and layout — it tries to make the Word document resemble the report as closely as possible.
-
Start the operation from Access To export data from Access to Word, you need to work in Access. There is no functionality in Word that can import data from an Access database. You also cannot save an Access database or table as a Word document by using the Save As command in Access.
-
Objects you can export You can export a table, query, form, or report. You can also export only the records selected in a view. You cannot export macros and modules. When you export a form or datasheet that contains subforms or subdatasheets, only the main form or datasheet is exported. You need to repeat the export operation for each subform and subdatasheet that you want to view in Word. Conversely, when you export a report, subforms and subreports that are included in the report are exported, along with the main report.
-
Outcome of the operation The Export — RTF File Wizard always exports formatted data. This means that only the fields and records that are visible in an object or view are exported along with the display format settings. Columns and records that are hidden, due to filter settings, are not exported. For a report, the layout of the report is also preserved when it is exported.
-
Merging with an existing document When you export from Access to a Word document, the data is always exported into a new Word file. If you want the data to be inserted into an existing Word document, you must first export it from Access into a new Word document, and then copy the data from the new Word document and paste it into the existing document. Alternatively, you can copy rows directly from an Access table, query, form, or report, and then paste them into your existing document.
Export data to Word
The process of exporting data to a Word document follows these broad steps:
-
Prepare your source data for the export. As part of this step, you make sure that your data does not contain errors, and you decide whether to export some or all of the data in your source table.
-
Run the Export — RTF File Wizard.
-
Optionally save your settings as an export specification for later reuse.
The steps in the following sections explain how to perform each task.
Prepare for the export
-
Open the source Access database.
-
In the Navigation Pane, select the object that contains the data you want to export.
You can export a table, query, form, or report.
-
Review the source data to ensure that it does not contain error indicators (green triangles) or error values, such as #Num.
Ensure that you have resolved any errors before you export the data to Word. Otherwise, you will find that such values are replaced with a null value.
-
If the destination Word document exists and is open, close it before you continue. The wizard prompts you before overwriting the document.
Note: You cannot append data to an existing Word document.
-
In the Access database, if you want to export only a portion of a table, query, or form, open the object and select just the records you want.
Export the data
-
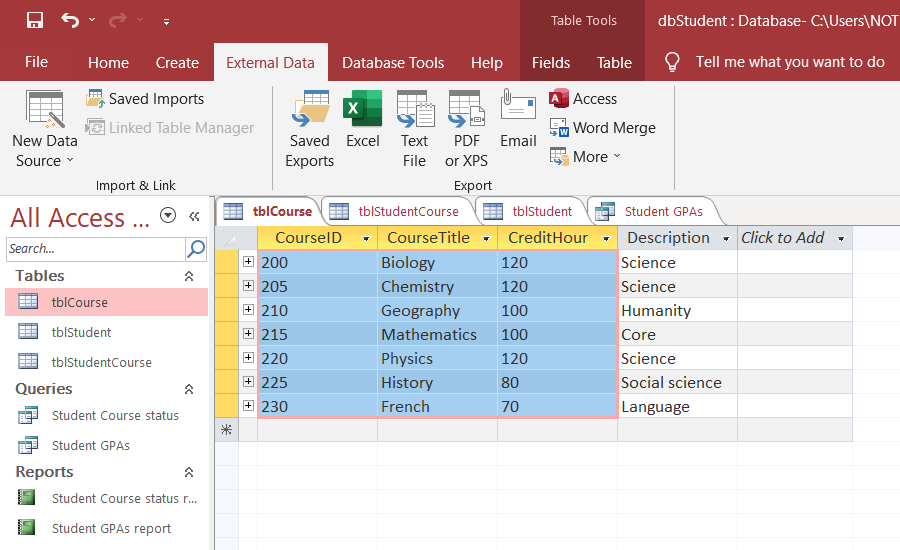
On the External Data tab, in the Export group, click Word.
-
The Export — RTF File export wizard opens.

Note: The Export commands are available only when a database is open.
-
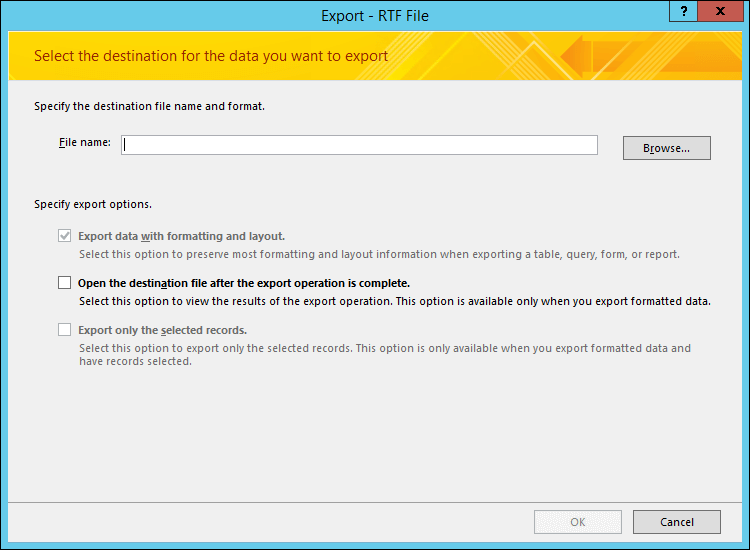
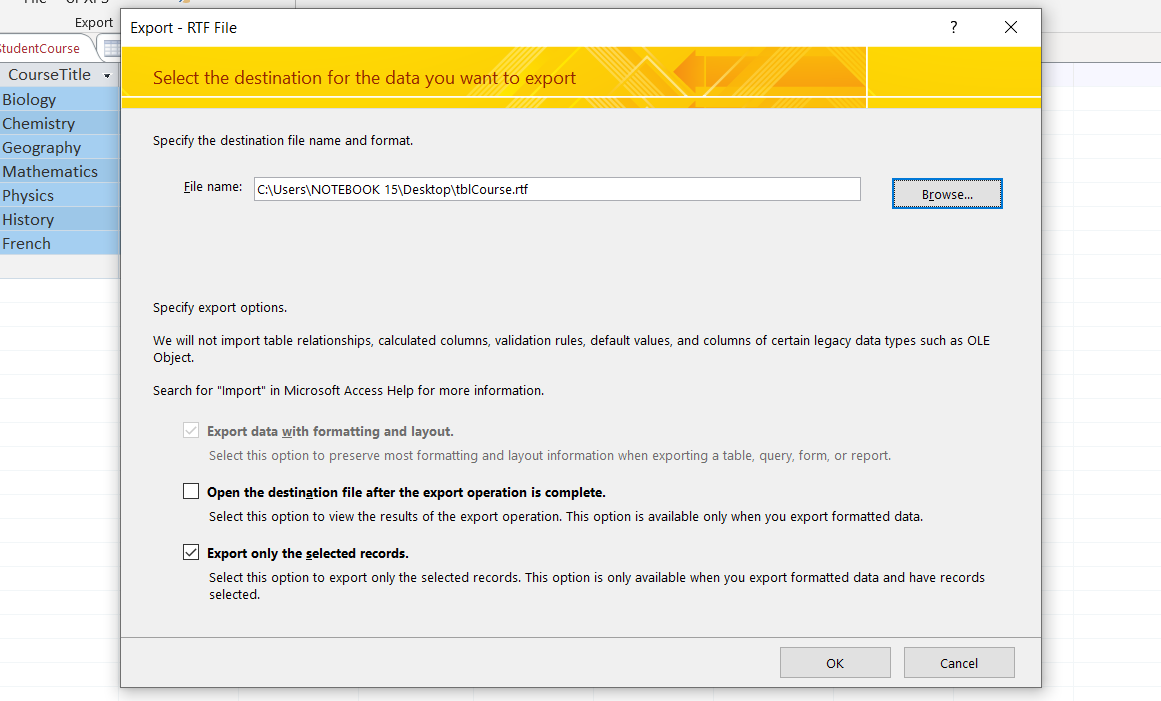
In the Export — RTF File wizard, specify the name of the destination file.
-
The wizard always exports formatted data. If you want to view the Word document after the export operation is complete, select the Open the destination file after the export operation is complete check box.
-
If you selected the records that you want to export before you started the export operation, you can select the Export only the selected records check box. However, if you want to export all the records in the view, leave the check box cleared.
Note: This check box appears unavailable (dimmed) if no records are selected.
-
Click OK.
-
If the destination document exists, you are prompted to click Yes to overwrite the file. Click No to change the name of the destination file, and then click OK again.
Access exports the data and opens the destination document in Word, depending on the export options you specified in the wizard. Access also displays the status of the operation on the final page of the wizard.
Understand how Access exports objects to Word
The following table describes how Access exports various objects and values to Word. This can help you determine what is going wrong if the export operation is not working the way you expect.
|
Item |
Export considerations |
|
Field names |
When you export a table, a query, or a form, the field names are placed in the first row of the table in the Word document. When you export a report, the placement of the field names in the Word document varies with the report layout. |
|
Multivalued fields |
A field in Access that supports multiple values is exported to a single column in Word. The values are separated by commas (,). |
|
Pictures, objects, and attachments |
All graphical elements — logos, data in OLE object fields, and attachments that are part of the source data — are not exported. |
|
Graphs |
Microsoft Graph objects are not exported. |
|
Expressions |
Expressions are not exported to the Word document. Only the results of the expressions are exported. |
|
Subforms and subdatasheets |
When you export a form or datasheet, only the main form or datasheet is exported. You must repeat the export operation for each subform and subdatasheet. |
What else should I know?
-
For information on how to save the details of your export into a specification that you can reuse later, see the article Save the details of an import or export operation as a specification.
-
For information on how to run saved export specifications, see the article Run a saved import or export operation.
-
For information on how to schedule specifications to run at specific times, see the article Schedule an import or export operation.
-
For information on how to change a specification name, delete specifications, or update the names of source files in specifications, see the article Manage Data Tasks.
Top of Page
You can export data from your Access database to a Microsoft Word document by using the Export — RTF File Wizard. This article explains how to use the Export — RTF File Wizard and how to save your export settings as a specification for later reuse.
In this article
-
Exporting data to Word: the basics
-
Export data to Word
-
Understand how Access exports objects to Word
-
What else should I know?
Exporting data to Word: the basics
You can export a table, query, form, or report to Microsoft Word. When you export an object by using the Export — RTF File Wizard, Access creates a copy of the object’s data in a Microsoft Word Rich Text Format file (*.rtf). For tables, queries, and forms, the visible fields and records appear as a table in the Word document. When you export a report, the wizard exports the report data and layout — it tries to make the Word document resemble the report as closely as possible.
-
Start the operation from Access To export data from Access to Word, you need to work in Access. There is no functionality in Word that can import data from an Access database. You also cannot save an Access database or table as a Word document by using the Save As command in Access.
-
Objects you can export You can export a table, query, form, or report. You can also export only the records selected in a view. You cannot export macros and modules. When you export a form or datasheet that contains subforms or subdatasheets, only the main form or datasheet is exported. You need to repeat the export operation for each subform and subdatasheet that you want to view in Word. Conversely, when you export a report, subforms and subreports that are included in the report are exported, along with the main report.
-
Outcome of the operation The Export — RTF File Wizard always exports formatted data. This means that only the fields and records that are visible in an object or view are exported along with the display format settings. Columns and records that are hidden, due to filter settings, are not exported. For a report, the layout of the report is also preserved when it is exported.
-
Merging with an existing document When you export from Access to a Word document, the data is always exported into a new Word file. If you want the data to be inserted into an existing Word document, you must first export it from Access into a new Word document, and then copy the data from the new Word document and paste it into the existing document. Alternatively, you can copy rows directly from an Access table, query, form, or report, and then paste them into your existing document.
Export data to Word
The process of exporting data to a Word document follows these broad steps:
-
Prepare your source data for the export. As part of this step, you make sure that your data does not contain errors, and you decide whether to export some or all of the data in your source table.
-
Run the Export — RTF File Wizard.
-
Optionally save your settings as an export specification for later reuse.
The steps in the following sections explain how to perform each task.
Prepare for the export
-
Open the source Access database.
-
In the Navigation Pane, select the object that contains the data you want to export.
You can export a table, query, form, or report.
-
Review the source data to ensure that it does not contain error indicators (green triangles) or error values, such as #Num.
Ensure that you have resolved any errors before you export the data to Word. Otherwise, you will find that such values are replaced with a null value.
-
If the destination Word document exists and is open, close it before you continue. The wizard prompts you before overwriting the document.
Note: You cannot append data to an existing Word document.
-
In the Access database, if you want to export only a portion of a table, query, or form, open the object and select just the records you want.
Export the data
-
On the External Data tab, in the Export group, click Word.
-
The Export — RTF File export wizard opens.
Note: The Export commands are available only when a database is open.
-
In the Export — RTF File wizard, specify the name of the destination file.
-
The wizard always exports formatted data. If you want to view the Word document after the export operation is complete, select the Open the destination file after the export operation is complete check box.
-
If you selected the records that you want to export before you started the export operation, you can select the Export only the selected records check box. However, if you want to export all the records in the view, leave the check box cleared.
Note: This check box appears unavailable (dimmed) if no records are selected.
-
Click OK.
-
If the destination document exists, you are prompted to click Yes to overwrite the file. Click No to change the name of the destination file, and then click OK again.
Access exports the data and opens the destination document in Word, depending on the export options you specified in the wizard. Access also displays the status of the operation on the final page of the wizard.
Understand how Access exports objects to Word
The following table describes how Access exports various objects and values to Word. This can help you determine what is going wrong if the export operation is not working the way you expect.
|
Item |
Export considerations |
|
Field names |
When you export a table, a query, or a form, the field names are placed in the first row of the table in the Word document. When you export a report, the placement of the field names in the Word document varies with the report layout. |
|
Multivalued fields |
A field in Access that supports multiple values is exported to a single column in Word. The values are separated by commas (,). |
|
Pictures, objects, and attachments |
All graphical elements — logos, data in OLE object fields, and attachments that are part of the source data — are not exported. |
|
Graphs |
Microsoft Graph objects are not exported. |
|
Expressions |
Expressions are not exported to the Word document. Only the results of the expressions are exported. |
|
Subforms and subdatasheets |
When you export a form or datasheet, only the main form or datasheet is exported. You must repeat the export operation for each subform and subdatasheet. |
What else should I know?
-
For information on how to save the details of your export into a specification that you can reuse later, see the article Save the details of an import or export operation as a specification.
-
For information on how to run saved export specifications, see the article Run a saved import or export operation.
-
For information on how to schedule specifications to run at specific times, see the article Schedule an import or export operation.
-
For information on how to change a specification name, delete specifications, or update the names of source files in specifications, see the article Manage Data Tasks.
Top of Page
Microsoft Access is a database solution that makes compiling data simple. But what if you wanted to export it as a Word document? Here’s how to do it!

Microsoft’s Office suite has different apps for different tasks. So, for instance, if you want to create a database, Microsoft Access has your back. Access provides most of the features you would expect from a relational database management system. You can create tables, forms, queries, relations, reports, macros, modules, to name a few.
But from time to time, you might want to export data from Microsoft Access to Word. If you’re looking for an easy way to export Access data into Word, you’re in the right place.
How Access Exports Objects to Word
Before showing you how to export data from Microsoft Access to Word, you need to understand some basics. First, you cannot export all types of objects from Access to Word.
Currently, you can only export tables, queries, forms, and reports. However, each object still has some limitations. Starting with records, Access only exports those that are in a selected view. The application will not include all the hidden data in a report. Similarly, Access is only able to export forms and data sheets with subforms and sub-data sheets.
The only way around this is to export every subform and sub data sheet. If you export the main report, you can export multiple subforms and subreports.
Secondly, you can’t export relationships, macros, modules, and graphical objects like pictures and Microsoft Graph objects from Access to Word. Additionally, Access will only export results from expressions and not expressions themselves.
Lastly, there’s no way to import data from Microsoft Access to Word. You must start in Access, export your data to a new document, then copy the contents and paste them into your existing Word document.
How to Export Access Data to a Word Document
Exporting Access data to Word uses a built-in Export—RTF File Wizard tool. Sure, the tool has many limitations around exporting Access data, but it’s better than nothing.
But if that’s overly limiting, you can look out for some of the best free Microsoft Access alternatives for a possible replacement. Otherwise, follow these steps to export your data from Access to Word:
- Open your Access database.
- Select the object you want to export in the Navigation Pane.
- Examine the table, query, form, or report to ensure it’s error-free. Access typically includes error indicators whenever it recognizes an error. This can include green triangles and a variety of error numbers. This step is important since Access will automatically replace error locations with a null value after exporting your data.
- Select the view or portion of the data to export. The best way to select data to export from multiple tables is by running MS Access queries. If you want to export all the data from an object, skip this step.

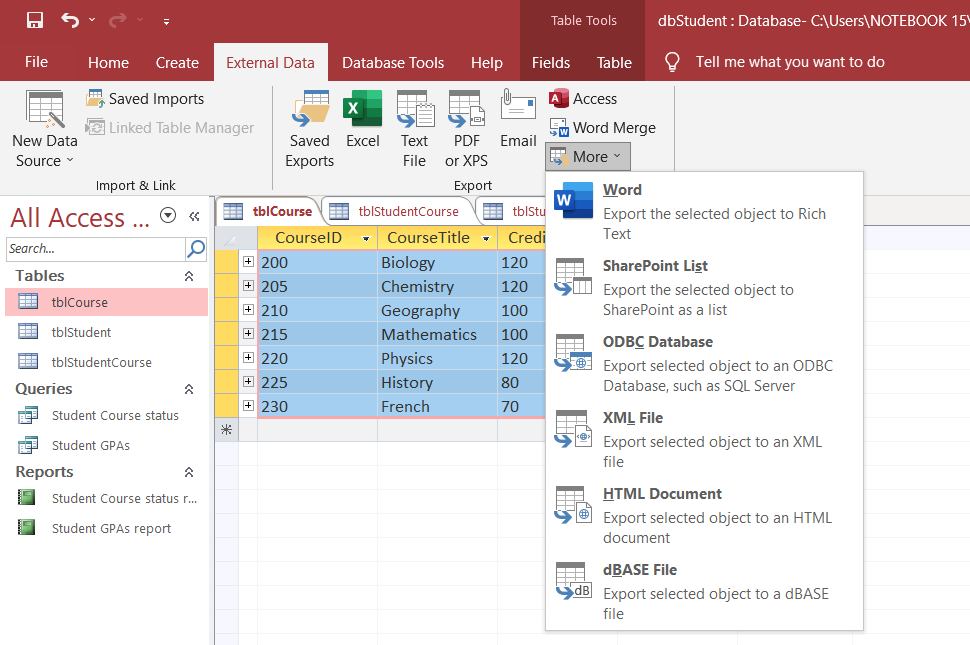
- Click the External Data tab and select More > Word. The Export—RTF File export wizard tool will open.

- In the Export—RTF File export wizard pop-up, enter your file name and select a destination.

- Check the Open the destination file after the export operation is complete check box if you need to.
- If you selected certain data to export, check the Export only the selected records check box. Otherwise, leave the checkbox to export all the data in the object.
- Click OK to start the export process.
If a file with a similar name exists, you can select whether Access should overwrite it or not. Select Yes to overwrite the file, or No to choose a new name for your file in the pop-up.
By default, Access will create a Microsoft Word Rich Text Format file with an RTF extension. To add your Access data to a Word document, follow these steps:
- Open the RTF document.
- Copy all the contents of the document.
- Paste the data in your Word document.
If you find the Export—RTF File export wizard tool tedious to use, there’s an easier way out. Copy data from your Access table, query, form, or report and paste it directly into your Word document.
Export Access Data to Word Without Hassle
Databases are a great way to store data. If you need to export your Access data to other apps like Word or Excel, the built-in Export—RTF File Wizard makes the whole process seamless, albeit with some limitations.
If you have extensive data to work with, Access forms offer a more powerful way to add more data to your database. They are easier to work with when editing tables and adding more data.
Всем привет, сегодня мы поговорим о том, как можно выгрузить данные из Access в такие приложения как Word и Excel. Но не о стандартном способе, который есть в Access (связь с Office), а о способе, который позволяет выгружать данные в заданный шаблон как в Word, так и в Excel.
Другими словами, это нужно тогда, когда создать отчет в Access по шаблону, который уже существует, например, в Word, невозможно или слишком трудоемко. Как Вы знаете, отчет в Access может выводиться просто коряво или, самый распространенный вариант, это когда много текста, который в отчете Access не так хорошо форматируется как в Word, а данных не так много, но отчет необходимо автоматизировать, например это какие-то договора, заявления и так далее.
Использование слияния из самого Word-а не очень удобно, поэтому сегодня я расскажу, как можно заполнять такие шаблоны напрямую из Access, путем нажатия на одну кнопку.
Кроме выгрузки в шаблон Word, иногда возникает и необходимость выгрузки в шаблон Excel, и этот способ мы тоже сегодня рассмотрим.
Содержание
- Экспорт данных из Access в шаблон Word
- Код VBA для выгрузки данных в шаблон Word
- Экспорт данных из Access в шаблон Excel
- Код VBA для выгрузки данных в шаблон Excel
Вся разработка делится на две части, это:
- Настройка шаблона Word;
- Настройка выгрузки данных в шаблон.
Суть настройки шаблона заключается в том, чтобы проставить необходимые поля в тех местах шаблона, где нужно выводить те или иные данные. Это делается с помощью полей формы.
Примечание! Я использую Microsoft Word 2003.
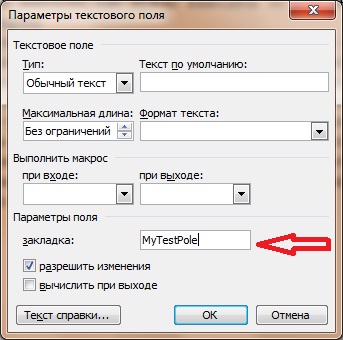
Открываем шаблон Word, для начала добавим необходимую панель инструментов, для этого нажимаем «Вид -> Панель инструментов» и ставим галочку «Формы». Теперь у Вас отобразилась панель инструментом «Формы». Все, что осталось сделать — это вставить в местах, в которых необходимо выводить данные, элементы «Текстовое поле», которые доступны на только что добавленной панели инструментов.
После добавления поля, у Вас появится серая область, которая свидетельствует о том, что поле добавлено. Теперь необходимо задать имя этого поля, для того чтобы потом из access вставлять в него значения (стандартное названия не очень удобное). Для этого щелкните правой кнопкой мыши по полю и нажмите «Свойства». В поле закладка напишите желаемое имя этого поля, я в примере назвал его MyTestPole.

Создайте столько полей, сколько Вам нужно.
На этом настройка шаблона закончена, рекомендую сделать этот шаблон только для чтения, а то пользователь возьмет, сформирует документ и сохранит его, и шаблон тем самым потеряется, а если сделать его только для чтения, то у него такой возможности не будет, только сохранять через «Сохранить как».
Переходим к более интересной задачи, это к реализации самой выгрузки из Access в этот шаблон на VBA.
Примечание! Я использую Access в связке с MS SQL 2008, поэтому и данные буду брать от туда.
Код VBA для выгрузки данных в шаблон Word
Допустим, у Вас есть форма, сделайте на ней кнопку (я назвал ее testbutton) и в событие нажатие кнопки вставьте следующий код VBA:
   Private Sub testbutton_Click()

   'Объявляем переменные
   Dim FileDialog As FileDialog
   Dim rsd As ADODB.Recordset
   Dim strSQL As String
   Dim WordApOb As Object
   Dim WordOb As Object
   Dim path As String
   Set rsd = New ADODB.Recordset

   'запрос к базе данных для получения необходимых данных
   strSQL = "select * from dbo.table where KOD = " & Me.kod & ""
   rsd.open strSQL, CurrentProject.Connection

  'Выбираем шаблон
   Set FileDialog = Application.FileDialog(msoFileDialogOpen)

   'убираем множественный выбор, он нам не нужен
   FileDialog.AllowMultiSelect = False

  'очистим и установим фильтры
   FileDialog.Filters.Clear
   FileDialog.Filters.add "Word", "*.doc"

   'установим фильтр по умолчанию
   FileDialog.FilterIndex = 1

   'проверяем, что сделал user, если выбрал шаблон, то начинаем работу
   If FileDialog.Show = False Then
     'Если нет, то выходим
     Set dlgFile = Nothing
     Exit Sub
   End If

   'получаем путь к файлу
   path = Trim(FileDialog.SelectedItems(1))

   'Очистим переменную
   Set FileDialog = Nothing
   If path <> "" Then

   'Будем отслеживать ошибки
   On Error GoTo Err_testbutton_Click

   'Создаем объект Word
   Set WordOb = CreateObject("Word.document")

   'Задаем нашему документу значение из шаблона
   Set WordOb = GetObject(path)

   'Задаем значение объекту word.Application
   Set WordApOb = WordOb.Parent

   'делаем приложение word видимым
   WordApOb.Visible = True

   'ищем наше поле в шаблоне
   WordOb.Bookmarks("mytestpole").Select

   'задаем ему новое значение из нашего Recordset
   WordApOb.Selection.TypeText Text:=Nz(rsd.Fields("field").Value, " ")
   'и так далее по всем полям

   'в конце перейдем на начало нашего документа
   WordApOb.Selection.Goto wdGoToFirst
   'и активируем его
   WordApOb.Activate

   'Очистим переменные
   Set WordOb = Nothing
   Set WordApOb = Nothing

   Exit_testbutton_Click:
     Exit Sub

   Err_testbutton_Click:
     MsgBox Err.Description
     'в случае ошибки будем делать следующие
     'закроем word без сохранения
     WordOb.Close (wddonotsavechanges)
     WordApOb.Quit
    'и также очистим переменные
     Set WordOb = Nothing
     Set WordApOb = Nothing
     Resume Exit_testbutton_Click
    End If

   End Sub
Код прокомментирован, поэтому сложностей возникнуть не должно. Здесь весь смысл сводится к созданию объекта word.document и word.application. А после мы уже работаем с нашими объектами, т.е. заполняем их.
Экспорт данных из Access в шаблон Excel
В шаблоне Excel уже не нужно создавать поля как в Word, так как здесь мы уже будем ориентироваться по адресам ячеек.
Существует несколько способов, как заполнять Excel шаблон, я опишу два, первый — это тогда, когда Вам просто необходимо проставить несколько полей, т.е. в источнике данных будет всего одна строка с несколькими столбцами. Второй — это когда строк будет уже несколько, причем Вы не знаете, сколько именно (в зависимости от каких то условий). В шаблоне по умолчанию отведено для этого все пару строк, поэтому мы будем нужные нам строки добавлять, для того чтобы наши данные не накладывалась на строки ниже (допустим там примечание, подпись руководителя и т.д.). И совет, я здесь, для примера, использую всего один источник данных, а Вы, если Вам необходимо заполнить шапку, примечание и некое количество строк (т.е. область данных), можете использовать несколько источников (Recordset).
Код VBA для выгрузки данных в шаблон Excel
Сначала добавьте кнопку на форму (я ее назвал testexcel) и вставьте следующий код в событие «Нажатие кнопки».
   Private Sub testexcel_Click()

   'Объявляем переменные
   Dim XL As Object
   Dim XLT As Object
   Dim newrow As Object
   Dim rsd As ADODB.Recordset
   Dim strSQL As String
   Set rsd = New ADODB.Recordset

   'Запрос к базе данных
   strSQL = "select * from dbo.table where kod = " & Me.kod & ""
   rsd.open strSQL, CurrentProject.Connection

   'Создаем необходимые объекты
   Set XL = CreateObject("Excel.Application")
   'для примера показываю, как можно сразу загружать шаблон без выбора
   Set XLT = XL.Workbooks.open("C:testfile.xls")

   '1 способ - если в источнике данных всего одна строка
   With XLT.Worksheets("Лист1")
              .[a1] = rsd.Fields("field1")
              .[b1] = rsd.Fields("field2")
              .[c1] = rsd.Fields("field3")
              .[d1] = rsd.Fields("field4")
            End With

   '2 способ - если строк в источнике несколько
   'причем мы учтем то, что у нас есть шапка и примечание в Excel
   'и мы не знаем, сколько строк у нас вставится
   'и поэтому строки будем добавлять в случае необходимости
   'зададим, с какой строки будем начинать вставлять данные
   Rowss = 10
   'для нумерации
   numrow = 1
   'запускаем цикл, он будет работать до тех пор, пока не закончатся строки в нашем источнике
   While Not (rsd.EOF)
      'смотрим, если строк больше чем мы задали в шаблоне
      If Rowss >= 12 Then
          'то добавляем строку
         XLT.Worksheets("Лист1").Rows(Rowss).Insert
          'Запомним нашу строку
         Set newrow = XLT.Worksheets("Лист1").Rows(Rowss)
          'и вставим туда копию предыдущей строки
          'для того если вдруг у вас там есть объединенные ячейки или какие-то нужные данные
          'так как новая строка создастся без всяких объединений и значений
         XLT.Worksheets("Лист1").Rows(Rowss - 1).Copy newrow
          'это просто для примера как можно очистить некий диапазон внутри документа
       'XLT.Worksheets("Лист1").Range("A10:F10").ClearContents
       'динамически формируем адрес нужной ячейки
          cell = "a" & Rowss
          'и задаем ей значение
         XLT.Worksheets("Лист1").Range(cell) = numrow
         cell = "b" & Rowss
         XLT.Worksheets("Лист1").Range(cell) = rsd.Fields("field5").Value
         'переходим на следующую строку
          Rowss = Rowss + 1
          'переходим на следующую строку в источнике данных
         rsd.MoveNext
      Else
          'а это выполняется до тех пор, пока не закончатся заданные строки в шаблоне
          'т.е. если строк в источнике всего 1, то в код, который выше мы даже не попадем
         cell = "a" & Rowss
         XLT.Worksheets("Лист1").Range(cell) = numrow
         cell = "b" & Rowss
         XLT.Worksheets("Лист1").Range(cell) = rsd.Fields("field5").Value
         Rowss = Rowss + 1
         rsd.MoveNext
      End If

        'для нумерации
        numrow = numrow + 1
   'конец цикла
   Wend

   'это просто пример как можно удалить строку целиком
   'XLT.Worksheets("Лист1").Rows(20).Delete

   'делаем Excel видимым
   XL.Visible = True

   'Очищаем переменные
   Set XL = Nothing
   Set XLT = Nothing
   Set newrow = Nothing

   End Sub
Здесь я также все подробно прокомментировал, но если есть вопросы, то задавайте их в комментариях к данной статье.
Для сведения, я здесь при создании объекта и Word.Application и Excel.Application использовал позднее связывание, для того чтобы не добавлять необходимые библиотеки и обеспечить совместимость.
Надеюсь, мои примеры Вам помогут!

One of the advantages offered by this program Microsoft Word, is it going to allow you submit your Access reports through different platforms without the need to resort to third party software for it. Actually your databases can be converted to be read in programs like Excel, PDF, migrate data to Database & SharePoint or just open them in a Word document.
Without a doubt, all this offers you a great number of benefits, especially since not all users have Microsoft Access on their computers, for what can save your databases in a more recognized program format it will always be very important. Especially since this will offer you new alternatives to access your data.
That is why this procedure of export information from a database to a Microsoft Word document it has become so important to most of the people. Therefore, here we are going to teach you how to perform this procedure in an easy and fast wayTo do this, follow in detail everything that we will teach you next in the post.
What should I keep in mind before exporting Access data to Microsoft Word?

Luckily for most users each of your Access databases they can be easily exported to Microsoft Word, in this case you can export both a query, report, form, or table. All this process is carried out through the export wizard where file output as RTF, in this case Access is responsible for creating a copy of the object data in a text format file to be read in Word.
Therefore, when exporting data from Access to Word, the following aspects must be taken into account:
The operation must always be started from Access
At the moment of wanting export your database data to Word, you must do it directly from Access, this is because Microsoft Word does not have any option that allows import data from a database, it is not possible either save an Access database as a word document using the command “Save as”.
Take into account which objects can be exported
In this case the user has the opportunity to export both tables, queries, forms or reportsas well as all the selected records in a view. What can not export are macros or modules.
If you decide exporting a form that contains subforms will only be exporting the main form, This means that in order to extract the subforms to Word the process must be repeated for each of them. Now if what is being exported is a report, then subforms and subreports that are included in said reports will also be export together with the main report. In this case it will not be necessary to repeat the process.
Operation result
In this case the export wizard: RTF file always allows export formatted data, in this way both the fields as the records I know in a The object or view is exported along with the display format settings. In addition, both the columns as the records that are found hidden will not be exported.
Merge with another existing document
When an Access database is exported to Word, the data will always be extract to a new Word file, but it may happen that you want the data that they are going to export are inserted into an existing Word document, either to complete some report or document.
In order to achieve this result it is necessary first extract the entire database to a new Word document, once the information is already there, now what you should do is copy all data what do you need and copy them into the existing document. Finally, as an alternative to all this, you can try to copy the rows directly from a Access table, report, form, or query and then paste them on the existing document where you need the information to be.
Learn step by step how to export items and information from an Access database to Word

Carrying out this process should not mean no complication for the user, since it is very simple and easy to do.
To do this, you need to follow these steps:
- The first thing you should do is prepare the source data for export, at this point it is necessary that make sure the data does not have any errors and you must also decide if they are going to export all or only some of the data from the source table.
- The following will be run the export wizard: RTF file.
- Finally, and optionally you can save settings as an export specification for later use.
Taking into account the steps to be carried out, now we are going to teach you how to execute each of them:
Prepare process
To start with this procedure the first thing will be prepare the export process from Access.
To do this, follow each of these steps:
- The first thing will be to open the source Access database.
- Now in the navigation panel you must select the object that contains the data that you want to export. Keep in mind that you can export either a table, form, query and report.
- Then they must review the source data and verify that all is correct, as this will ensure that the export of them is correctly. In the case that there is an error like #Num, you should make sure all have been resolved before extract them to Word. Keep in mind that yes your database is exported with an error or more these will appear with a null value in the new document.
- If he word document where are they going to extract data already exists and it is open, it is important that you close it to continue. Here the wizard will ask you before overwrite document.
- Finally, in the database you must specify if you only want extract a part of the form, query or table, if so, you must open the object and select only the records you want to send to the new document.
Start process
Once all of the above is done, the next thing will be to start the export process.
To do this, follow these steps:
- Now from the tab “External data” in the section “To export” you must click on the option “Word”.
- The export wizard will open here “Export: RTF file”.
- In the export wizard you must specify the name of the destination file.
- Keep in mind that this assistant will always export formatted data, This means that in order to see the word document when the data extraction procedure is completed you must check the box “Open the destination file at the end of the export operation.”

- If before starting this procedure you selected the records you want to export, then you must activate the checkbox “Export only selected records” this in case you do not want to extract all the information from the table, report or query.
- The next thing will be to click on “To accept”.
- If the destination document exists, then you must click “Yes” so that you can overwrite the file, and if not, then simply select “Not” for rename the destination file and then click “To accept”.
- After all this, Access exports the data in its entirety and automatically open the word document, this will depend on the functions that have been activated previously. The user can also view the operation status on the wizard page.
How does Access data look in a Word document? Understand the export result

Once all the necessary information to Word, it is very important to understand the result that has been obtained there. Being able to understand this will help you determine the cause of a possible error that occurred there.
Therefore, here are the main elements that you must understand in the result of the data export:
Name of the elements
When a query, report, form or table is exported, the field names are placed in the first row of the table in the new Word document. When export a report the location of field names in Word they will vary depending on the design of the report.
Multivalued fields
In the case of Access allows to have different values in the same field, therefore, these fields are exported in a single column in Word, and the values will be found separated by commas (,).
Pictures, objects, and attachments
In the case of graphic elements such as logos, attachments, data from OLE object fields, and images that are part of the source data they will not be exported to Word.
Graphics
In the case of objects of Microsoft Graph they are not exported.
Expressions
Expressions are not going to export to word document, in this case only will export the results of the expressions.
Subforms and Subdatasheets
When export a form or datasheet, only the main one will be exported, that is, subforms and child sheets do not. In order to get exporting them it is necessary repeat the process of export for each of them.