Я создал таблицу в qt designer и вывожу данные с нее в массив. Но, как сделать так чтоб данные автоматические вставлялись в уже готовый документ word в определенные ячейки в таблице?
pattern_gui.py
from PySide2.QtCore import *
from PySide2.QtGui import *
from PySide2.QtWidgets import *


class Ui_MainWindow(object):
    def setupUi(self, MainWindow):
        if not MainWindow.objectName():
            MainWindow.setObjectName(u"MainWindow")
        MainWindow.resize(640, 475)
        self.centralwidget = QWidget(MainWindow)
        self.centralwidget.setObjectName(u"centralwidget")
        self.gridLayout = QGridLayout(self.centralwidget)
        self.gridLayout.setObjectName(u"gridLayout")
        self.tabWidget = QTabWidget(self.centralwidget)
        self.tabWidget.setObjectName(u"tabWidget")
        self.tab = QWidget()
        self.tab.setObjectName(u"tab")
        self.gridLayout_5 = QGridLayout(self.tab)
        self.gridLayout_5.setObjectName(u"gridLayout_5")
        self.gridLayout_3 = QGridLayout()
        self.gridLayout_3.setObjectName(u"gridLayout_3")
        self.pushButton_2 = QPushButton(self.tab)
        self.pushButton_2.setObjectName(u"pushButton_2")

        self.gridLayout_3.addWidget(self.pushButton_2, 5, 0, 1, 1)

        self.lineEdit = QLineEdit(self.tab)
        self.lineEdit.setObjectName(u"lineEdit")

        self.gridLayout_3.addWidget(self.lineEdit, 1, 0, 1, 1)

        self.label_2 = QLabel(self.tab)
        self.label_2.setObjectName(u"label_2")

        self.gridLayout_3.addWidget(self.label_2, 2, 0, 1, 1)

        self.label = QLabel(self.tab)
        self.label.setObjectName(u"label")

        self.gridLayout_3.addWidget(self.label, 0, 0, 1, 1)

        self.lineEdit_2 = QLineEdit(self.tab)
        self.lineEdit_2.setObjectName(u"lineEdit_2")

        self.gridLayout_3.addWidget(self.lineEdit_2, 3, 0, 1, 1)

        self.pushButton = QPushButton(self.tab)
        self.pushButton.setObjectName(u"pushButton")

        self.gridLayout_3.addWidget(self.pushButton, 4, 0, 1, 1)

        self.verticalSpacer = QSpacerItem(20, 40, QSizePolicy.Minimum, QSizePolicy.Expanding)

        self.gridLayout_3.addItem(self.verticalSpacer, 6, 0, 1, 1)


        self.gridLayout_5.addLayout(self.gridLayout_3, 0, 2, 1, 1)

        self.gridLayout_4 = QGridLayout()
        self.gridLayout_4.setObjectName(u"gridLayout_4")
        self.lineEdit_3 = QLineEdit(self.tab)
        self.lineEdit_3.setObjectName(u"lineEdit_3")

        self.gridLayout_4.addWidget(self.lineEdit_3, 1, 0, 1, 1)

        self.label_4 = QLabel(self.tab)
        self.label_4.setObjectName(u"label_4")

        self.gridLayout_4.addWidget(self.label_4, 2, 0, 1, 1)

        self.lineEdit_4 = QLineEdit(self.tab)
        self.lineEdit_4.setObjectName(u"lineEdit_4")

        self.gridLayout_4.addWidget(self.lineEdit_4, 3, 0, 1, 1)

        self.lineEdit_5 = QLineEdit(self.tab)
        self.lineEdit_5.setObjectName(u"lineEdit_5")

        self.gridLayout_4.addWidget(self.lineEdit_5, 5, 0, 1, 1)

        self.label_5 = QLabel(self.tab)
        self.label_5.setObjectName(u"label_5")

        self.gridLayout_4.addWidget(self.label_5, 4, 0, 1, 1)

        self.label_6 = QLabel(self.tab)
        self.label_6.setObjectName(u"label_6")

        self.gridLayout_4.addWidget(self.label_6, 6, 0, 1, 1)

        self.label_3 = QLabel(self.tab)
        self.label_3.setObjectName(u"label_3")

        self.gridLayout_4.addWidget(self.label_3, 0, 0, 1, 1)

        self.lineEdit_6 = QLineEdit(self.tab)
        self.lineEdit_6.setObjectName(u"lineEdit_6")

        self.gridLayout_4.addWidget(self.lineEdit_6, 7, 0, 1, 1)

        self.label_7 = QLabel(self.tab)
        self.label_7.setObjectName(u"label_7")

        self.gridLayout_4.addWidget(self.label_7, 8, 0, 1, 1)

        self.lineEdit_7 = QLineEdit(self.tab)
        self.lineEdit_7.setObjectName(u"lineEdit_7")

        self.gridLayout_4.addWidget(self.lineEdit_7, 9, 0, 1, 1)


        self.gridLayout_5.addLayout(self.gridLayout_4, 0, 0, 1, 1)

        self.horizontalSpacer = QSpacerItem(40, 20, QSizePolicy.Expanding, QSizePolicy.Minimum)

        self.gridLayout_5.addItem(self.horizontalSpacer, 0, 1, 1, 1)

        self.tabWidget.addTab(self.tab, "")
        self.tab_2 = QWidget()
        self.tab_2.setObjectName(u"tab_2")
        self.gridLayout_2 = QGridLayout(self.tab_2)
        self.gridLayout_2.setObjectName(u"gridLayout_2")
        self.tableWidget = QTableWidget(self.tab_2)
        if (self.tableWidget.columnCount() < 10):
            self.tableWidget.setColumnCount(10)
        __qtablewidgetitem = QTableWidgetItem()
        self.tableWidget.setHorizontalHeaderItem(0, __qtablewidgetitem)
        __qtablewidgetitem1 = QTableWidgetItem()
        self.tableWidget.setHorizontalHeaderItem(1, __qtablewidgetitem1)
        __qtablewidgetitem2 = QTableWidgetItem()
        self.tableWidget.setHorizontalHeaderItem(2, __qtablewidgetitem2)
        __qtablewidgetitem3 = QTableWidgetItem()
        self.tableWidget.setHorizontalHeaderItem(3, __qtablewidgetitem3)
        __qtablewidgetitem4 = QTableWidgetItem()
        self.tableWidget.setHorizontalHeaderItem(4, __qtablewidgetitem4)
        __qtablewidgetitem5 = QTableWidgetItem()
        self.tableWidget.setHorizontalHeaderItem(5, __qtablewidgetitem5)
        __qtablewidgetitem6 = QTableWidgetItem()
        self.tableWidget.setHorizontalHeaderItem(6, __qtablewidgetitem6)
        __qtablewidgetitem7 = QTableWidgetItem()
        self.tableWidget.setHorizontalHeaderItem(7, __qtablewidgetitem7)
        __qtablewidgetitem8 = QTableWidgetItem()
        self.tableWidget.setHorizontalHeaderItem(8, __qtablewidgetitem8)
        __qtablewidgetitem9 = QTableWidgetItem()
        self.tableWidget.setHorizontalHeaderItem(9, __qtablewidgetitem9)
        if (self.tableWidget.rowCount() < 10):
            self.tableWidget.setRowCount(10)
        __qtablewidgetitem10 = QTableWidgetItem()
        self.tableWidget.setVerticalHeaderItem(0, __qtablewidgetitem10)
        __qtablewidgetitem11 = QTableWidgetItem()
        self.tableWidget.setVerticalHeaderItem(1, __qtablewidgetitem11)
        __qtablewidgetitem12 = QTableWidgetItem()
        self.tableWidget.setVerticalHeaderItem(2, __qtablewidgetitem12)
        __qtablewidgetitem13 = QTableWidgetItem()
        self.tableWidget.setVerticalHeaderItem(3, __qtablewidgetitem13)
        __qtablewidgetitem14 = QTableWidgetItem()
        self.tableWidget.setVerticalHeaderItem(4, __qtablewidgetitem14)
        __qtablewidgetitem15 = QTableWidgetItem()
        self.tableWidget.setVerticalHeaderItem(5, __qtablewidgetitem15)
        __qtablewidgetitem16 = QTableWidgetItem()
        self.tableWidget.setVerticalHeaderItem(6, __qtablewidgetitem16)
        __qtablewidgetitem17 = QTableWidgetItem()
        self.tableWidget.setVerticalHeaderItem(7, __qtablewidgetitem17)
        __qtablewidgetitem18 = QTableWidgetItem()
        self.tableWidget.setVerticalHeaderItem(8, __qtablewidgetitem18)
        __qtablewidgetitem19 = QTableWidgetItem()
        self.tableWidget.setVerticalHeaderItem(9, __qtablewidgetitem19)
        self.tableWidget.setObjectName(u"tableWidget")
        self.tableWidget.horizontalHeader().setDefaultSectionSize(125)

        self.gridLayout_2.addWidget(self.tableWidget, 0, 0, 1, 1)

        self.tabWidget.addTab(self.tab_2, "")
        self.tab_3 = QWidget()
        self.tab_3.setObjectName(u"tab_3")
        self.gridLayout_6 = QGridLayout(self.tab_3)
        self.gridLayout_6.setObjectName(u"gridLayout_6")
        self.widget = QWidget(self.tab_3)
        self.widget.setObjectName(u"widget")

        self.gridLayout_6.addWidget(self.widget, 0, 0, 1, 1)

        self.tabWidget.addTab(self.tab_3, "")

        self.gridLayout.addWidget(self.tabWidget, 0, 0, 1, 1)

        MainWindow.setCentralWidget(self.centralwidget)
        self.menubar = QMenuBar(MainWindow)
        self.menubar.setObjectName(u"menubar")
        self.menubar.setGeometry(QRect(0, 0, 640, 21))
        MainWindow.setMenuBar(self.menubar)
        self.statusbar = QStatusBar(MainWindow)
        self.statusbar.setObjectName(u"statusbar")
        MainWindow.setStatusBar(self.statusbar)

        self.retranslateUi(MainWindow)

        self.tabWidget.setCurrentIndex(1)


        QMetaObject.connectSlotsByName(MainWindow)
    # setupUi

    def retranslateUi(self, MainWindow):
        MainWindow.setWindowTitle(QCoreApplication.translate("MainWindow", u"MainWindow", None))
        self.pushButton_2.setText(QCoreApplication.translate("MainWindow", u"u0417u0430u0433u0440u0443u0437u0438u0442u044c u0434u0430u043du043du044bu0435 u0432 u0448u0430u0431u043bu043eu043d", None))
        self.label_2.setText(QCoreApplication.translate("MainWindow", u"u0414u0438u0440u0435u043au0442u043eu0440u0438u044f u0441u043eu0445u0440u0430u043du0435u043du0438u044f:", None))
        self.label.setText(QCoreApplication.translate("MainWindow", u"u0418u043cu044f u0444u0430u0439u043bu0430:", None))
        self.pushButton.setText(QCoreApplication.translate("MainWindow", u"u0421u043eu0445u0440u0430u043du0438u0442u044c", None))
        self.label_4.setText(QCoreApplication.translate("MainWindow", u"u0414u0430u0442u0430:", None))
        self.label_5.setText(QCoreApplication.translate("MainWindow", u"u0417u0430u044fu0432u043au0430/u0434u0430u0442u0430 u043fu043eu043bu0443u0447u0435u043du0438u044f u043eu0431u0440u0430u0437u0446u043eu0432", None))
        self.label_6.setText(QCoreApplication.translate("MainWindow", u"u041eu0431u044cu0435u043au0442 u0438u0441u043fu044bu0442u0430u043du0438u044f:", None))
        self.label_3.setText(QCoreApplication.translate("MainWindow", u"u041du043eu043cu0435u0440 u043fu0440u043eu0442u043eu043au043eu043bu0430:", None))
        self.label_7.setText(QCoreApplication.translate("MainWindow", u"u041cu0430u0440u043au0438u0440u043eu0432u043au0430:", None))
        self.tabWidget.setTabText(self.tabWidget.indexOf(self.tab), QCoreApplication.translate("MainWindow", u"u041eu0441u043du043eu0432u043du044bu0435 u0434u0430u043du043du044bu0435", None))
        ___qtablewidgetitem = self.tableWidget.horizontalHeaderItem(0)
        ___qtablewidgetitem.setText(QCoreApplication.translate("MainWindow", u"u0414u0430u0442u0430", None));
        ___qtablewidgetitem1 = self.tableWidget.horizontalHeaderItem(1)
        ___qtablewidgetitem1.setText(QCoreApplication.translate("MainWindow", u"u041eu0431u0449u0435u0435 u0432u0440u0435u043cu044f, u0447u0430u0441", None));
        ___qtablewidgetitem2 = self.tableWidget.horizontalHeaderItem(2)
        ___qtablewidgetitem2.setText(QCoreApplication.translate("MainWindow", u" pH,n"
"u0435u0434. pHn"
"", None));
        ___qtablewidgetitem3 = self.tableWidget.horizontalHeaderItem(3)
        ___qtablewidgetitem3.setText(QCoreApplication.translate("MainWindow", u"u043fu043eu0433u0440u0435u0448u043du043eu0441u0442u044c u00b1u0394,n"
"u0435u0434. pH n"
"", None));
        ___qtablewidgetitem4 = self.tableWidget.horizontalHeaderItem(4)
        ___qtablewidgetitem4.setText(QCoreApplication.translate("MainWindow", u" u0421(Fe u043eu0431u0449.),n"
"u043cu0433/u0434u043c3n"
"", None));
        ___qtablewidgetitem5 = self.tableWidget.horizontalHeaderItem(5)
        ___qtablewidgetitem5.setText(QCoreApplication.translate("MainWindow", u"u043fu043eu0433u0440u0435u0448u043du043eu0441u0442u044c u00b1u0394,n"
" u043cu0433/u0434u043c3n"
"", None));
        ___qtablewidgetitem6 = self.tableWidget.horizontalHeaderItem(6)
        ___qtablewidgetitem6.setText(QCoreApplication.translate("MainWindow", u"u0421(u0421u041e2),n"
"u043cu0433/u0434u043c3n"
"", None));
        ___qtablewidgetitem7 = self.tableWidget.horizontalHeaderItem(7)
        ___qtablewidgetitem7.setText(QCoreApplication.translate("MainWindow", u"u043fu043eu0433u0440u0435u0448u043du043eu0441u0442u044c u00b1u0394,n"
"u043cu0433/u0434u043c3 n"
"", None));
        ___qtablewidgetitem8 = self.tableWidget.horizontalHeaderItem(9)
        ___qtablewidgetitem8.setText(QCoreApplication.translate("MainWindow", u"u043fu043eu0433u0440u0435u0448u043du043eu0441u0442u044c u00b1u0394,", None));
        ___qtablewidgetitem9 = self.tableWidget.verticalHeaderItem(0)
        ___qtablewidgetitem9.setText(QCoreApplication.translate("MainWindow", u"1", None));
        ___qtablewidgetitem10 = self.tableWidget.verticalHeaderItem(1)
        ___qtablewidgetitem10.setText(QCoreApplication.translate("MainWindow", u"2", None));
        ___qtablewidgetitem11 = self.tableWidget.verticalHeaderItem(2)
        ___qtablewidgetitem11.setText(QCoreApplication.translate("MainWindow", u"3", None));
        ___qtablewidgetitem12 = self.tableWidget.verticalHeaderItem(3)
        ___qtablewidgetitem12.setText(QCoreApplication.translate("MainWindow", u"4", None));
        ___qtablewidgetitem13 = self.tableWidget.verticalHeaderItem(4)
        ___qtablewidgetitem13.setText(QCoreApplication.translate("MainWindow", u"5", None));
        ___qtablewidgetitem14 = self.tableWidget.verticalHeaderItem(5)
        ___qtablewidgetitem14.setText(QCoreApplication.translate("MainWindow", u"6", None));
        ___qtablewidgetitem15 = self.tableWidget.verticalHeaderItem(6)
        ___qtablewidgetitem15.setText(QCoreApplication.translate("MainWindow", u"7", None));
        ___qtablewidgetitem16 = self.tableWidget.verticalHeaderItem(7)
        ___qtablewidgetitem16.setText(QCoreApplication.translate("MainWindow", u"8", None));
        ___qtablewidgetitem17 = self.tableWidget.verticalHeaderItem(8)
        ___qtablewidgetitem17.setText(QCoreApplication.translate("MainWindow", u"9", None));
        ___qtablewidgetitem18 = self.tableWidget.verticalHeaderItem(9)
        ___qtablewidgetitem18.setText(QCoreApplication.translate("MainWindow", u"10", None));
        self.tabWidget.setTabText(self.tabWidget.indexOf(self.tab_2), QCoreApplication.translate("MainWindow", u"u0422u0430u0431u043bu0438u0446u0430", None))
        self.tabWidget.setTabText(self.tabWidget.indexOf(self.tab_3), QCoreApplication.translate("MainWindow", u"u0413u0440u0430u0444u0438u043a", None))
    # retranslateUi
Имеющиеся логика:
pattern_log.py
# Импорт библиотек
import os
import sys
from PySide2.QtCore import *
from PySide2.QtGui import *
from PySide2.QtWidgets import *
from pattern_gui import Ui_MainWindow
from docxtpl import DocxTemplate
import docx
# Новый экземпляр QApplication
app = QApplication(sys.argv)

Window = QMainWindow()
ui = Ui_MainWindow()
ui.setupUi(Window)
Window.setFixedSize(640, 480)
Window.show()

def buttonLoader():
    rows = ui.tableWidget.rowCount()
    cols = ui.tableWidget.columnCount()
    data = []
    for row in range(rows):
        tmp = []
        for col in range(cols):
            try:
                tmp.append(ui.tableWidget.item(row, col).text())
            except:
                tmp.append('')
        data.append(tmp)

    data_for_word = []
    # for i in data: print(i)

    for i in data:
        if i[0] != '':
            data_for_word.append(i)

            # добавляем таблицу
        doc = docx.Document()
        table = doc.add_table(rows=len(data_for_word), cols=3)
        # применяем стиль для таблицы
        table.style = 'Table Grid'

        # заполняем таблицу данными
        for row in range(len(data_for_word)):
            for col in range(3):
                print(str(data_for_word[row][col]))
                # получаем ячейку таблицы
                cell = table.cell(row, col)
                # записываем в ячейку данные
                cell.text = str(data_for_word[row][col])

        doc.save('table.docx')

ui.pushButton_2.clicked.connect(buttonLoader)

# Закрытие программы
sys.exit(app.exec_())
Если кто знает то покажите на моем коде или на своем примере как сделать так как я писал выше. Таблица вот такого вида:
Many documents present some data in the form of figures or tables. Creating tables is often more efficient than describing the data in the paragraph text, especially when the data is numerical or large. The tabular data presentation makes it easier to read and understand.
A table is a collection of information or data, usually represented by horizontal rows and vertical columns. Each column and each row can have a header. Some tables have only column headings or only row headings. The box at the junction of each column and row is a cell that contains data such as text, numeric information, or images. Some cells can be merged or split (see more about formatting tables). E.g.:

Microsoft Word has many features that make working with tables simple and convenient.
Create a table
There are several ways how to insert or create a table:
- Create a blank table of up to 10 columns and 8 rows,
- Create a blank table with more than 10 columns or more than 8 rows,
- Create a blank table manually (Draw a table),
- Create a table using predefined templates (Quick Tables),
- Create a table from the existing data (Convert Text to Table),
- Insert a Microsoft Excel spreadsheet.
To create a blank table in a Word document, do the following:
1. Place your cursor where you want to insert the table.
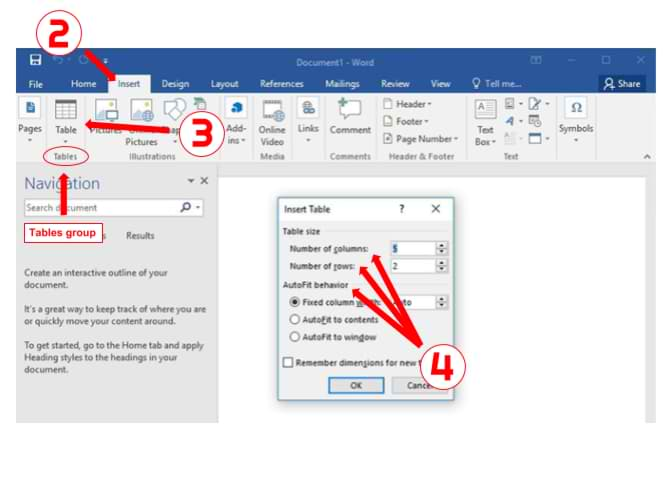
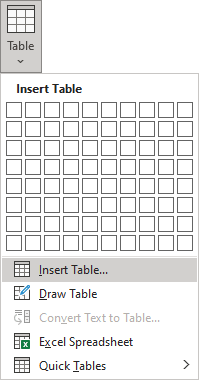
2. On the Insert tab, in the Tables group, click the Table button:

3. Do one of the following:
Create a blank table of up to 10 columns and 8 rows
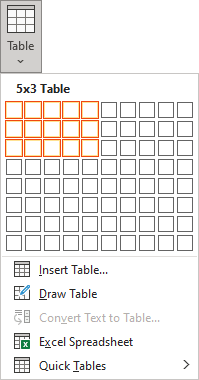
- To create a table of up to 10 columns and 8 rows, move the cursor right (to select columns) and down (to select rows) the grid to select as many cells as you need. E.g., the table of 5 columns and 3 rows (selected cells will turn orange):
Click on a cell in the grid with the expected number of rows and columns (or press Enter) to insert an empty table to fit the width of the text (paragraph).
The table has the specified number of single-line text rows in the current paragraph and equal-width columns. E.g., the table of 3 rows and 5 columns:
Create a blank table with more than 10 columns or more than 8 rows
- To create a table with more than 10 columns or more than 8 rows, do one of the following:
- Create a table with exactly 10 columns or 8 rows, then add as many columns or rows as you need (see below how to customize table).
- Click the Insert Table… option:
In the Insert Table dialog box:
- In the Table size group, specify the number of columns and rows,
- In the AutoFit behavior group, specify the width of the table and its columns:
- Select the Fixed column width option to customize width in the appropriate field: select Auto (used by default) or specify width. E.g., 0.75″:
- Select the AutoFit contents option to adjust cell sizes to the document content. E.g.:
- Select the AutoFit to window option to adjust the table’s width to the document content width. E.g.:
- Select the Remember dimension for new tables check box if you want to create tables with the same options later. Word will remember your customization.
Create a blank table manually
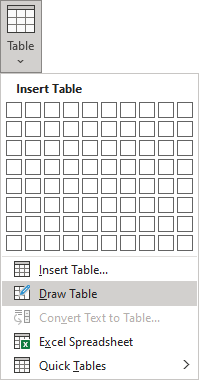
- To manually create an empty table, click the Draw Table option:
After clicking that option, the cursor changes to the pencil
that allows drawing cells directly in the Word document to create a table:
Click anywhere in a document but the table itself by the pencil to stop drawing a table.
Notes:
- To draw additional lines, select a table, then on the Table Layout tab, in the Draw group, click the Draw Table button:
- If you draw a line in the wrong position, click the Eraser button in the Draw group of the Table Layout tab:
- We recommend displaying the rulers or gridlines to help you place the lines correctly.
- To draw additional lines, select a table, then on the Table Layout tab, in the Draw group, click the Draw Table button:
Create a table using predefined templates
To create a table using predefined Word templates of tables and calendars, do the following:
1. Place your cursor where you want to insert the table.
2. On the Insert tab, in the Tables group, click the Table dropdown list, then select Quick Tables list:
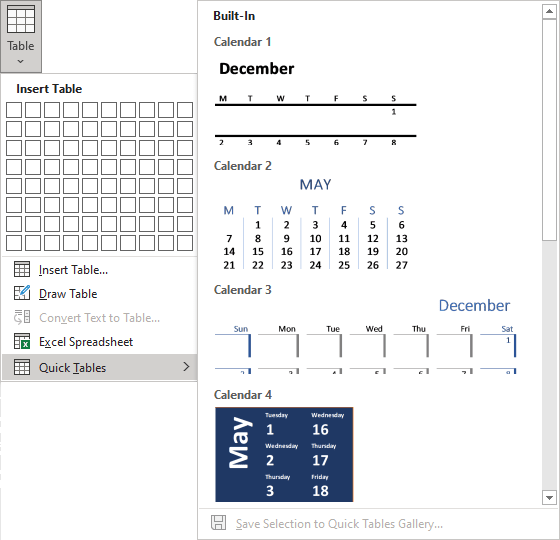
3. From the Quick Tables gallery, select the template you prefer.
For example:

Create a table from the existing data
To create a table from the existing data in a document data (either as regular text or as a tabbed list), do the following:
1. Select the document data you want to shape into a new table.
2. On the Insert tab, in the Tables group, click the Table dropdown list, then select Convert Text to Table…:
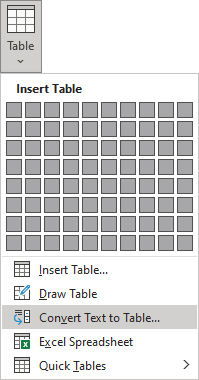
3. In the Convert Text to Table dialog box:

- In the Table size group, specify the number of columns,
- In the AutoFit behavior group, specify whether the width of the columns should be fixed (see details above),
- In the Separate text at group, select the character that separates text into columns in the selected text: paragraph marks, commas, tabs, or some other character.
E.g.:

Insert a Microsoft Excel spreadsheet
Note: It is possible to insert a Microsoft Excel spreadsheet in a document. To do so, on the Insert tab, in the Tables group, click the Table dropdown list, then select Excel Spreadsheet:
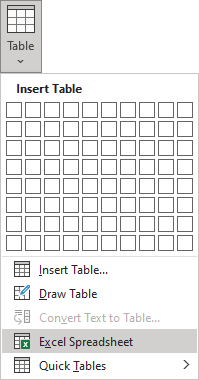
Word opens the Excel spreadsheet where you can enter the data. You can use Excel features such as functions and formulas to create or manipulate the data. Note that it is not a Word table.
Add rows and columns
To add a row and a column to a table, do the following:
1. Position the cursor:
- to a cell in a row above or below which you need to insert a row,
- to a cell in a column left or right which you need to insert a column.
2. Do one of the following:
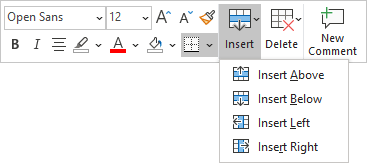
- Click the Insert dropdown list in the Mini toolbar:
- On the Table Layout tab, in the Rows & Columns group:
- Click the Insert Above button to insert a row above the row with the cursor,
- Click the Insert Below button to insert a row below the row with the cursor,
- Click the Insert Left button to insert a column left to the column with the cursor,
- Click the Insert Right button to insert a column right to the column with the cursor.
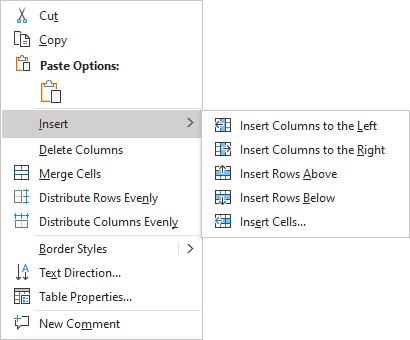
- Right-click and select the Insert list:
Notes:
- To insert rows or columns, move the mouse over the table or left of the table until you see the Insertion indicator, then click the icon:
and
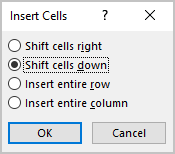
- You can choose the option Insert -> Insert Cells… from the popup menu; Word opens the Insert Cells dialog box:
After selecting the option and clicking the OK button, Word adds an entire row or column, not a cell. Word just moves cells according to the selection.
Delete a table element
To delete a table element, do the following:
1. Select the cell, multiple cells, the entire column or multiple columns, the entire row, or multiple rows.
2. Do one of the following:
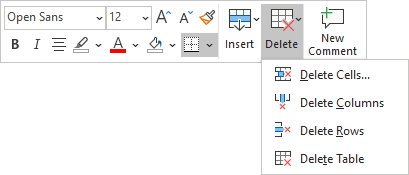
- Click the Delete dropdown list in the Mini toolbar:
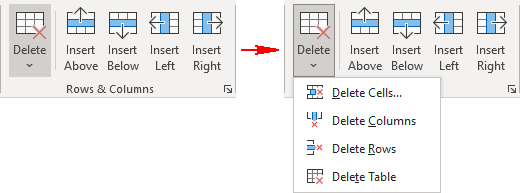
- On the Table Layout tab, in the Rows & Columns group, click the Delete dropdown list, then select one of the options:
3. Select one of the proposed options:
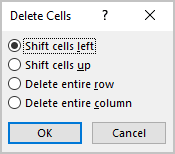
- Delete Cells… opens the Delete Cells dialog box, in which select the option you need:
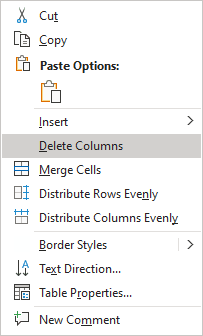
- Delete Columns
- Delete Rows
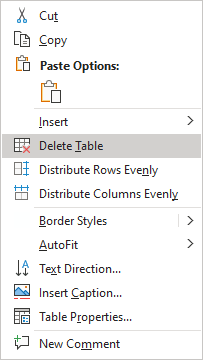
- Delete Table
Note: You can select the element you want to delete, right-click on the selection and select the appropriate item in the popup menu. For example, if the entire table is selected or the column is selected:
Convert a table into text
To convert a table into text in Word, follow the next steps:
1. Click anywhere in the table.
2. On the Layout tab, in the Format group, click the Convert to Text button:

3. In the Convert Table to Text dialog box, select the charter to separate cells data in the text:

4. Click OK.
How to Import Excel Data into a Word Table
This help page will show you how to import data from Excel into a Microsoft Word table.
- Open a new or existing document in Microsoft Word.
- Click the «Insert» tab > Locate the «Tables» group.
- Select the «Table» icon > Choose the «Insert Table…» option.
- Set the «Number of columns,» «Number of rows,» and «AutoFit behavior» to your desired specifications > Click [OK].
- Open the Excel file and use your mouse to select the data you wish to import.
- Right-click on the range of cells you have highlighted and select «Copy.»
- Switch back to Word and highlight the table cells where you want to import the Excel data.
- Right-click on the Word table and click the option you want under «Paste Options.»
Note:
If you select the table in Word, the «Table Tools» tab will appear at the top of the page. Use this tab to format the «Design» and «Layout» of the table to meet your preferences.
Keywords: transfer, convert, change, Excel to Word, export, move, copy, import, Excel 2007, Word 2007, Microsoft, micro soft
Share This Post
-
Facebook
-
Twitter
-
LinkedIn
Data is an important part of any application. Most of the time, data comes from a database or a file. To make our data easy to read and understand, we display it in a table.
Being developers, we often create dynamic and complex Word documents. We may generate complex tables that need to be filled from a data source, and we may not be sure about the exact rows and columns. Manually filling tables with data every time is a tedious task.
Our Syncfusion Java Word Library (Essential DocIO) is a feature-rich and high-performance library. It allows you to fill data in a Word table programmatically without Microsoft Word or any other interop dependencies on your side. We can generate a table at runtime by either using mail merge or appending the values one by one.
For example, if there is a need to generate a table in a Word document based on the data retrieved from a Web API, but we’re not sure about the rows and columns, then you can frame the data as a table using our Java Word Library.
You can then save the resultant document as a Word document (DOCX, WordML), or in HTML or RTF formats.
In this blog, we will see the following approaches to fill data in a table using the Java Word Library:
- Fill data in a Word table dynamically by appending the values one by one.
- Fill data in a Word table dynamically by using mail merge.
Note: If you are new to our Java Word Library (Essential DocIO), we highly recommend you take a look at our Getting Started guide.
How to configure the Syncfusion Java packages from the Maven repository in the Gradle project
First, we have to configure the Syncfusion Java packages from the Maven repository in the Gradle project:
Step 1: Create a new Gradle project.
Step 2: The New Gradle Project dialog will open. In that, provide the name for your project and click Finish.

plugins
{
    // Apply the java-library plugin to add support for Java Library.
    id 'java-library'
}

repositories
{
    // Use jcenter for resolving your dependencies.
    jcenter()
    // You can declare any Maven/Ivy/file repository here.
    maven
    {
        // Maven repository to download the artifacts.
        url "https://jars.syncfusion.com/repository/maven-public/"
    }
}
dependencies {
    implementation 'com.syncfusion:syncfusion-javahelper:19.2.0.55'
    implementation 'com.syncfusion:syncfusion-docio:19.2.0.55'
}
Enter fullscreen mode
Exit fullscreen mode
Step 4: Now, the following Syncfusion .jar files will be downloaded from the Maven repository and added to your project, as shown in the following screenshot.
- syncfusion-javahelper
- syncfusion-docio

Fill data in a Word table dynamically by appending the values one by one
One of the simplest ways to construct a table at run time by appending the rows and cells is by using the addRow() and addCell() APIs.
The following code example illustrates filling the data in a Word table programmatically using the Java Word Library.
Include the javax.xml package in your project to process the XML documents.
import java.io.*;
import java.util.List;
import javax.xml.bind.*;
import com.syncfusion.docio.*;
import com.syncfusion.javahelper.system.*;
public static void main(String[] args) throws Exception
{
    // Loads the XML file.
    File file = new File(getDataDir("StockDetails.xml"));
    // Create a new instance for the JAXBContext.
    JAXBContext jaxbContext = JAXBContext.newInstance(StockMarket.class);
    // Reads the XML file.
    Unmarshaller jaxbUnmarshaller = jaxbContext.createUnmarshaller();
    StockMarket stockMarket = (StockMarket) jaxbUnmarshaller.unmarshal(file);
    // Gets the list of stock details.
    List<StockDetails> list = stockMarket.getStockDetails();
    ListSupport<StockDetails> stockDetails = new ListSupport<StockDetails>(StockDetails.class);
    for(StockDetails stock : list)
    {
        //Add all items in the list to ListSupport to perform mail merge.
        stockDetails.add(stock);
    }
    // Loads the template document.
    WordDocument document = new WordDocument(getDataDir ("Template.docx"), FormatType.Docx);
    MailMergeDataTable dataTable = new MailMergeDataTable("StockDetails", stockDetails);
    // Executes Mail Merge with group.
    document.getMailMerge().executeGroup(dataTable);
    // Saves and closes the document.
    document.save("Result.docx", FormatType.Docx);
    document.close();
}
Enter fullscreen mode
Exit fullscreen mode
The following code example illustrates the helper class to hold the data from the XML file.
import java.util.List;
import javax.xml.bind.annotation.*;
@XmlRootElement(name = "Employees")
public class Employees
{
    private List<Employee> Employee;

    /**
     * Gets the list of employees.
     */
    @XmlElement(name = "Employee")
    public List<Employee> getEmployees() {
        return Employee;
    }

    /**
     * Sets the list of employees.
     *
     * @param employee List of employee.
     */
    public void setEmployees(List<Employee> employee) {
        this.Employee = employee;
    }

    /**
     * Initializes a new instance of the Employees class.
     */
    public Employees() {
    }

    /**
     * Initializes a new instance of the Employees class with the specified list of
     * employees.
     *
     * @param employees List of employee.
     */
    public Employees(List<Employee> employees) {
        this.Employee = employees;
    }
}

import javax.xml.bind.annotation.*;
public class Employee
{
    private String Name;
    private String Title;
    private String Address;
    private String HomePhone;
    private String Photo;

    @XmlElement(name = "Name")
    /**
     * Gets the employee name.
     */
    public String getName() {
        return Name;
    }

    /**
     * Sets the employee name.
     *
     * @param name Name of the employee.
     */
    public void setName(String name) {
        this.Name = name;
    }

    @XmlElement(name = "Title")
    /**
     * Gets the designation of the employee.
     */
    public String getTitle() {
        return Title;
    }

    /**
     * Sets the designation of the employee.
     *
     * @param title Designation of the employee.
     */
    public void setTitle(String title) {
        this.Title = title;
    }

    @XmlElement(name = "Address")
    /**
     * Gets the address of the employee.
     */
    public String getAddress() {
        return Address;
    }

    /**
     * Sets the address of the employee.
     *
     * @param address Address of the employee.
     */
    public void setAddress(String address) {
        this.Address = address;
    }

    @XmlElement(name = "HomePhone")
    /**
     * Gets the contact number of the employee.
     */
    public String getHomePhone() {
        return HomePhone;
    }

    /**
     * Sets the contact number of the employee.
     *
     * @param homePhone Contact number of the employee.
     */
    public void setHomePhone(String homePhone) {
        this.HomePhone = homePhone;
    }

    @XmlElement(name = "Photo")
    /**
     * Gets the photo of the employee.
     */
    public String getPhoto() {
        return Photo;
    }

    /**
     * Sets the photo of the employee.
     *
     * @param photo Photo of the employee.
     */
    public void setPhoto(String photo) {
        this.Photo = photo;
    }

    /**
     * Initializes a new instance of the Employee class with the specified name,
     * title, address, contact number, and photo.
     *
     * @param name Name of the employee.
     * @param title Designation of the employee.
     * @param address Address of the employee.
     * @param homePhone Contact number of the employee.
     * @param photo Photo of the employee.
     *
     */
    public Employee(String name, String title, String address, String homePhone, String photo) {
        this.Name = name;
        this.Title = title;
        this.Address = address;
        this.HomePhone = homePhone;
        this.Photo = photo;
    }

    /**
     * Initializes a new instance of the Employee class.
     */
    public Employee() {
    }
}
Enter fullscreen mode
Exit fullscreen mode
By executing the previous code example, we will get a Word document like in the following screenshot.
Note: For more details, you can download the complete working example for Dynamic Table in Java Word Library.
Fill data in a Word table dynamically by using mail merge
You can also fill data in a table using the mail merge facility in our Java Word Library. It is useful when you generate reports like invoices, payroll, etc.
Take a moment to peruse the Working with mail merge documentation for more information about the mail merge functionality in the Syncfusion Java Word Library.
Mail merge process
The mail merge process involves three things:
- Template Word document: This document contains the static or templated text and graphics along with the merge fields (placeholders) for replacing dynamic data.
- Data source: Files or databases containing data to replace the merge fields in the template Word document.
- Final merged document: This resultant document is a combination of the template Word document and the data from a data source. The mail merge process pulls the information from the data source and replaces the merge fields (placeholders) in your template Word document.
Let’s see how to generate a table through the mail merge process in a Java Word document using Syncfusion’s mail merge API.
Create a template Word document
We can create a template document in two ways:
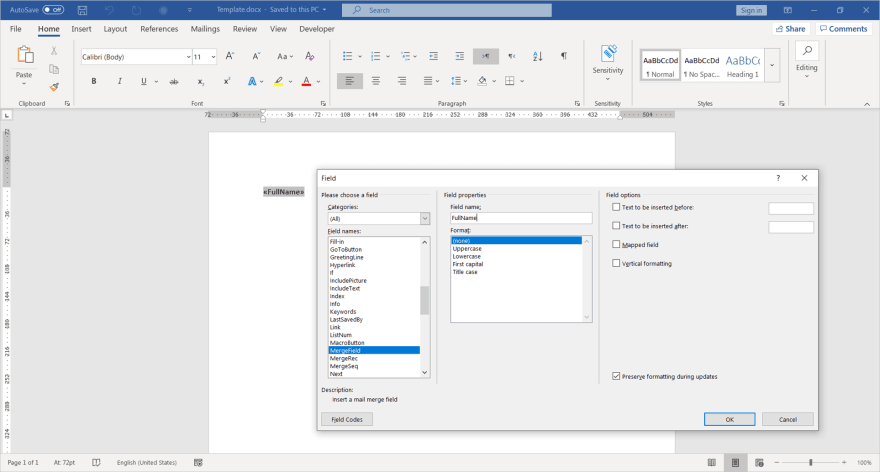
- Using a word editor application like Microsoft Word to insert the merge fields like in the following screenshot.
- Using the Java Word Library to create a template document programmatically like in the following code example.
//Creates an instance of a WordDocument.
WordDocument document = new WordDocument();
//Adds one section and one paragraph to the document.
document.ensureMinimal();
//Sets page margins to the last section of the document.
document.getLastSection().getPageSetup().getMargins().setAll(72);
//Appends text to the last paragraph.
document.getLastParagraph().getParagraphFormat().setHorizontalAlignment(HorizontalAlignment.Center);
document.getLastParagraph().applyStyle(BuiltinStyle.Heading1);
document.getLastParagraph().appendText("Stock Market exchange report.").getCharacterFormat().setFontSize(14);
IWTable table = document.getLastSection().addTable();
table.resetCells(2, 6);
//Appends text to the cells.
table.getRows().get(0).getRowFormat().setBackColor(ColorSupport.fromArgb(24, 53,94));
table.get(0, 0).addParagraph().appendText("Trade No");
table.get(0, 1).addParagraph().appendText("Company name");
table.get(0, 2).addParagraph().appendText("Cost Price of a Share");
table.get(0, 3).addParagraph().appendText("Number of Shares");
table.get(0, 4).addParagraph().appendText("Sales Price of a Share");
table.get(0, 5).addParagraph().appendText("Net Profit/Loss");
table.getRows().get(1).getRowFormat().setBackColor(ColorSupport.fromArgb(219,229,241));
table.get(1, 0).addParagraph().appendField("TableStart:StockDetails", FieldType.FieldMergeField);
//Append merge field to the cells.
table.get(1, 0).getLastParagraph().appendField("TradeNo", FieldType.FieldMergeField);
table.get(1, 1).addParagraph().appendField("CompanyName", FieldType.FieldMergeField);
table.get(1, 2).addParagraph().appendText("$");
table.get(1, 2).getLastParagraph().appendField("CostPrice", FieldType.FieldMergeField);
table.get(1, 3).addParagraph().appendField("SharesCount", FieldType.FieldMergeField);
table.get(1, 4).addParagraph().appendText("$");
table.get(1, 4).getLastParagraph().appendField("SalesPrice", FieldType.FieldMergeField);
table.get(1, 5).addParagraph().appendText("Net Profit/Loss");
table.get(1, 5).getLastParagraph().appendField("TableEnd:StockDetails", FieldType.FieldMergeField);
//Saves the Word document.
document.save("Template.docx", FormatType.Docx);
//Closes the Word document.
document.close();
Enter fullscreen mode
Exit fullscreen mode
The following screenshot illustrates the template Word document used to generate a table through mail merge functionality.
Execute mail merge
The following code example illustrates how to execute mail merge in the template Word document to generate a Word table at run time.
Include the javax.xml package in your project for processing the XML documents.
import java.io.*;
import java.util.List;
import javax.xml.bind.*;
import com.syncfusion.docio.*;
import com.syncfusion.javahelper.system.*;
public static void main(String[] args) throws Exception
{
    // Loads the XML file.
    File file = new File(getDataDir("EmployeesList.xml"));
    // Creates a new instance for the JAXBContext.
    JAXBContext jaxbContext = JAXBContext.newInstance(Employees.class);
    // Reads the XML file.
    Unmarshaller jaxbUnmarshaller = jaxbContext.createUnmarshaller();
    Employees employees = (Employees) jaxbUnmarshaller.unmarshal(file);
    // Gets the list of employee details.
    List<Employee> employeeList = employees.getEmployees();
    // Loads the template document.
    WordDocument document = new WordDocument(getDataDir("WordTable_Template.docx"));
    // Iterates each item in the list.
    for (Employee employee : employeeList)
    {
        // Accesses the table in the document.
        IWTable table = document.getSections().get(0).getTables().get(0);
        // Initializes the paragraph and adds new row to the table.
        IWParagraph paragraph = null;
        table.addRow();
        // Gets the employee photo and converts that base64 string to bytes.
        byte[] bytes = ConvertSupport.fromBase64String(employee.getPhoto());
        ByteArrayInputStream stream = new ByteArrayInputStream(bytes);
        int index = table.getRows().getCount();
        // Appends the picture to the first cell.
        table.getRows().get(index - 1).getCells().get(0).addParagraph().appendPicture(stream);
        // Appends the employee details in the second cell.
        paragraph = table.getRows().get(index - 1).getCells().get(1).addParagraph();
        paragraph.appendText(employee.getName() + "n" + employee.getTitle() + "n" + employee.getAddress() + "n"
                    + employee.getHomePhone());
    }
    // Saves and closes the document.
    document.save("Result.docx");
    document.close();
}
Enter fullscreen mode
Exit fullscreen mode
The following code example illustrates the helper class to hold the data from the XML file.
import java.util.List;
import javax.xml.bind.annotation.*;
@XmlRootElement(name = "StockMarket")
public class StockMarket
{
    private List<StockDetails> StockDetails;

    @XmlElement(name = "StockDetails")
    /**
     * Gets the list of stock details.
     */
    public List<StockDetails> getStockDetails() {
        return StockDetails;
    }

    /**
     * Sets the list of stock details.
     *
     * @param stockDetails List of stock details.
     */
    public void setStockDetails(List<StockDetails> listStockDetails) {
        this.StockDetails = listStockDetails;
    }

    /**
     * Initializes a new instance of the StockMarket class.
     */
    public StockMarket() {
    }

    /**
     * Initializes a new instance of the StockMarket class with a specified list of
     * stock details.
     *
     * @param stockDetails List of stock details.
     */
    public StockMarket(List<StockDetails> stockDetails) {
        this.StockDetails = stockDetails;
    }
}

import javax.xml.bind.annotation.XmlElement;
public class StockDetails
{
    private String TradeNo;
    private String CompanyName;
    private String CostPrice;
    private String SharesCount;
    private String SalesPrice;

    @XmlElement(name = "TradeNo")
    /**
     * Gets the trade number of the share.
     */
    public String getTradeNo() {
        return TradeNo;
    }

    /**
     * Sets the trade number of the share.
     *
     * @param tradeNo Trade number of the share.
     */
    public void setTradeNo(String tradeNo) {
        this.TradeNo = tradeNo;
    }

    @XmlElement(name = "CompanyName")
    /**
     * Gets the company name of the share.
     */
    public String getCompanyName() {
        return CompanyName;
    }

    /**
     * Sets the company name of the share.
     *
     * @param companyName Company name of the share.
     */
    public void setCompanyName(String companyName) {
        this.CompanyName = companyName;
    }

    @XmlElement(name = "SharesCount")
    /**
     * Gets the total shares count.
     */
    public String getSharesCount() {
        return SharesCount;
    }

    /**
     * Sets the total shares count.
     *
     * @param sharesCount Total shares count.
     */
    public void setSharesCount(String sharesCount) {
        this.SharesCount = sharesCount;
    }

    @XmlElement(name = "CostPrice")
    /**
     * Gets the cost price of the share.
     */
    public String getCostPrice() {
        return CostPrice;
    }

    /**
     * Sets the cost price of the share.
     *
     * @param costPrice Cost price of the share.
     */
    public void setCostPrice(String costPrice) {
        this.CostPrice = costPrice;
    }

    @XmlElement(name = "SalesPrice")
    /**
     * Gets the sales price of the share.
     */
    public String getSalesPrice() {
        return SalesPrice;
    }

    /**
     * Sets the sales price of the share.
     *
     * @param salesPrice Sales price of the share.
     */
    public void setSalesPrice(String salesPrice) {
        this.SalesPrice = salesPrice;
    }

    /**
     * Initializes a new instance of the StockDetails class.
     */
    public StockDetails() throws Exception {
    }

    /**
     * Initializes a new instance of the StockDetails class with the specified trade
     * number, company name, cost price, share count, and sales price.
     *
     * @param tradeNo Trade number of the share.
     * @param companyName Company name of the share.
     * @param costPrice Cost price of the share.
     * @param sharesCount Total share count.
     * @param salesPrice Sales price of the share.
     */
    public StockDetails(String tradeNo, String companyName, String costPrice, String sharesCount, String salesPrice)
            throws Exception {
        this.TradeNo = tradeNo;
        this.CompanyName = companyName;
        this.CostPrice = costPrice;
        this.SharesCount = sharesCount;
        this.SalesPrice = salesPrice;
    }
}
Enter fullscreen mode
Exit fullscreen mode
By executing the previous code example, we will get a Word document like in the following screenshot.
Note: For more details, you can download a complete example for Dynamic table using mail merge in the Java Word Library demo.
Summary
Thanks for reading! In this blog, we have seen how to fill data in a Word table using the Syncfusion Java Word Library (DocIO). Take a moment to peruse the Working with Tables in Word document, where you’ll find other options and features, all with accompanying code examples. Try out the steps given in this blog post and leave your feedback in the comments section below!
Are you already a Syncfusion user? You can download the product setup here. If not, you can download a free, 30-day trial.
You can contact us through our support forums, Direct-Trac, or feedback portal. We are always happy to assist you!
If you like this blog post, we think you’ll also like the following articles:
- 7 Smart Ways to Find and Replace Text in a Word Document Using Java [Blog]
- Introducing the New Java Word Processing Library [Blog]
- Gradle Succinctly [Ebook]
- Java Succinctly Part 1 [Ebook]
- Java Succinctly Part 2 [Ebook]
Время прочтения: 3 мин.
Отчёт – это особая форма представления данных. Он позволяет пользователю познакомиться с отобранными, агрегированными и особо оформленными данными. На сегодняшний день формирование и представление отчетов все еще является актуальной формой доведения до пользователя информации.
В этой статье рассматривается один из способов автоматического формирования отчета в формате файла MS WORD, начиная от непосредственного запроса к данным БД MSSQL и заканчивая его оформлением. В качестве инструментария используется python и модуль docx.
Для начала ознакомимся с используемыми данными. В БД имеются 3 таблицы с данными о товарах, покупателях и продажах.
Для начала нам понадобится импортировать в код необходимые модули:
from docx import Document
import pandas as pd
import pandas.io.sql as psql
import matplotlib.pyplot as plt
from io import BytesIO
import pyodbc
Создаем соединение и формируем запрос. На данном этапе пользователю следует определиться с составом запрашиваемых запросом данных исходя из имеющейся задачи, т.е. на каком этапе производятся расчеты, агрегирование и/или фильтрация данных. В нашем случае будут запрашиваться данные всех продаж с привязкой к ФИО покупателя и данным о товаре. Обработка данных будет производится с помощью модуля pandas.
cnxn = pyodbc.connect("Driver={SQL Server Native Client 11.0};"
                        "Server=S1;"
                        "Database=test;"
                        "uid=sa;pwd=pass;"
                        "Trusted_Connection=yes;")
cursor = cnxn.cursor()

sql = '''select
                 c.name
                ,p.*
                from [dbo].[sales] s

                join [dbo].[customers] c
                on c.id = s.customer

                join [dbo].[product] p
                on s.product = p.id'''
Полученные данные отправляем в dataframe, закрываем соединение
df = psql.read_sql_query(sql,cnxn)
cnxn.close()
del df['id']  # ненужный столбец df
Следующий этап – непосредственно создание документа.
document = Document() # создается объект

# добавляем первый заголовок
document.add_heading('Отчет о продажах', 0)

# добавляем простой текст с переменными из
# данных таблицы (названия магазинов)
shop_list = ', '.join(df['shop'].unique().tolist())

p = document.add_paragraph('Отчет о продажах в магазинах: ')

# к тексту добавим сам список, выделяем жирным шрифтом
p.add_run(shop_list).bold = True
Формируем таблицу о всех продажах – аналог входных данных запроса.
document.add_heading('Общие продажи', level=1) # заголовок

rows, columns = df.shape  # размеры dataframe
table = document.add_table(rows=1, cols=columns) # создаем таблицу
table.style = "Colorful List Accent 1" # определяем стиль

# формируем заголовки таблицы
hdr_cells = table.rows[0].cells
for i in range(columns):
    hdr_cells[i].text = list(df.columns.values)[i]

# заполняем данными из dataframe
for row in range(rows):
    row_cells = table.add_row().cells
    row_data = df.iloc[row].tolist()
    for column in range(columns):
        row_cells[column].text = str(row_data[column])
На выходе получается следующий документ.
Какой же отчет бывает без графиков. Для примера, создадим график затрат в разрезе клиентов.
# заголовок
document.add_heading(' ', 0)
document.add_heading('График общих затрат покупателей', 0)

# пустой объект, куда будет помещен plot
memfile = BytesIO()
fig = plt.figure()
# данные для графика: клиенты и суммы затрат
plt.plot(df.groupby('name')['price'].sum())
fig.savefig(memfile)
document.add_picture(memfile) # размещение в документе
document.save('demo.docx') # публикация в файловой системе
На выходе получаем.
Это далеко не все возможности модуля docx, позволяющие произвести верстку документа «на лету» с использованием данных, взятых непосредственно из БД и агрегированных с помощью Python. Более подробную информацию о верстке, использовании стилей, вставке объектов и т.п. можно ознакомится на сайте разработчиков https://python-docx.readthedocs.io.








 and
and 
