
Excel does not have the data management capabilities of relational database programs such as SQL Server and Microsoft Access. What it can do, however, is serve as a simple database that fills data management requirements.
In Excel, data is organized using the rows and columns in a worksheet. The table feature makes it easy to enter, edit, and manipulate data.
These instructions apply to Excel versions 2019, 2016, 2013, 2010, and Excel for Microsoft 365.
Database Terms: Records, and Fields
A database is a collection of related information stored in one or more computer files. Often the data is organized into tables in such a way that it can easily be updated, sorted, corrected, and filtered.
A simple database, such as Excel, holds all information about one subject in a single table. Relational databases, on the other hand, consist of many tables with each one containing information about different, but related topics.
Records
In database terminology, a record holds all the information or data about one specific object in the database. In Excel, each cell in a worksheet contains one item of information or value.
Fields
Each item of information in a database record, such as a telephone number or street number, is referred to as a field. In Excel, the individual cells of a worksheet serve as fields, since each cell can contain a single piece of information about an object.
Field Names
It is vital to organize a database so that you can sort or filter the data to find specific information. Adding column headings, known as field names, makes it easier to enter data in the same order for each record.
Sample Database
In the image above, each student has a separate row in the table which contains all available information about them.
Each cell in a row is a field containing one piece of information. The field names in the header row help ensure that the data stays organized by keeping all the data on a specific topic, such as name or age, in the same column for all students.
Excel’s Data Management Tools
Additionally, Microsoft has several data tools to make it easier to work with vast amounts of data stored in Excel tables and to help keep it in good condition.
Using a Form for Records
One of those tools is the data form. You can use it to find, edit, enter, or delete records, in tables containing up to 32 fields or columns.
The default form includes a list of field names in the order they are arranged in the table, to ensure that users enter records correctly. Next to each field name is a text box for entering or editing the individual fields of data.
While it is possible to create custom forms, creating and using the default form is often all that is needed.
Remove Duplicate Data Records
A common problem with all databases is data errors. In addition to simple spelling mistakes or missing fields of data, duplicate data records can be a concern as a data table grows in size.
Another of Excel’s data tools can be used to remove these duplicate records — either exact or partial duplicates.
Sorting Data in Excel
Sorting means to reorganize data according to a specific property, such as sorting a table alphabetically by last names or chronologically from oldest to youngest.
Excel’s sort options include sorting by one or more fields, custom sorting, such as by date or time, and sorting by rows which makes it possible to reorder the fields in a table.
Thanks for letting us know!
Get the Latest Tech News Delivered Every Day
Subscribe
Watch the Video on Using Data Entry Forms in Excel
Below is a detailed written tutorial about Excel Data Entry form in case you prefer reading over watching a video.
Excel has many useful features when it comes to data entry.
And one such feature is the Data Entry Form.
In this tutorial, I will show you what are data entry forms and how to create and use them in Excel.
Why Do You Need to Know About Data Entry Forms?
Maybe you don’t!
But if data entry is a part of your daily work, I recommend you check out this feature and see how it can help you save time (and make you more efficient).
There are two common issues that I have faced (and seen people face) when it comes to data entry in Excel:
- It’s time-consuming. You need to enter the data in one cell, then go to the next cell and enter the data for it. Sometimes, you need to scroll up and see which column it is and what data needs to be entered. Or scroll to the right and then come back to the beginning in case there are many columns.
- It’s error-prone. If you have a huge data set which needs 40 entries, there is a possibility you may end up entering something that was not intended for that cell.
A data entry form can help by making the process faster and less error-prone.
Before I show you how to create a data entry form in Excel, let me quickly show you what it does.
Below is a data set that is typically maintained by the hiring team in an organization.
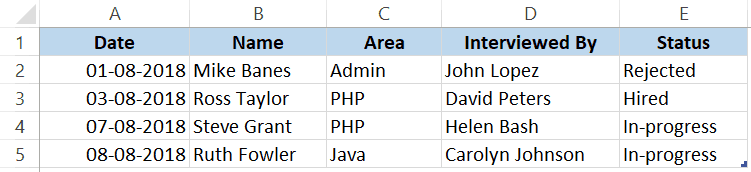
Every time a user has to add a new record, he/she will have to select the cell in the next empty row and then go cell by cell to make the entry for each column.
While this is a perfectly fine way of doing it, a more efficient way would be to use a Data Entry Form in Excel.
Below is a data entry form that you can use to make entries to this data set.
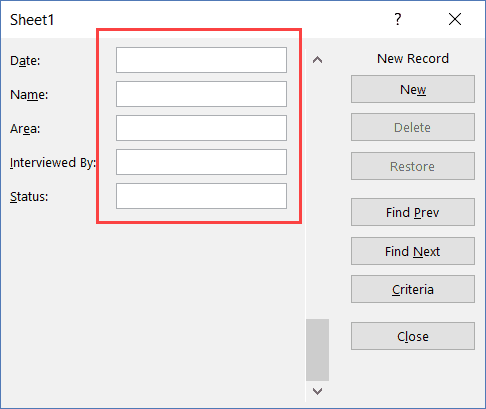
The highlighted fields are where you would enter the data. Once done, hit the Enter key to make the data a part of the table and move on to the next entry.
Below is a demo of how it works:
As you can see, this is easier than regular data entry as it has everything in a single dialog box.
Data Entry Form in Excel
Using a data entry form in Excel needs a little pre-work.
You would notice that there is no option to use a data entry form in Excel (not in any tab in the ribbon).
To use it, you will have to first add it to the Quick Access Toolbar (or the ribbon).
Adding Data Entry Form Option To Quick Access Toolbar
Below are the steps to add the data entry form option to the Quick Access Toolbar:
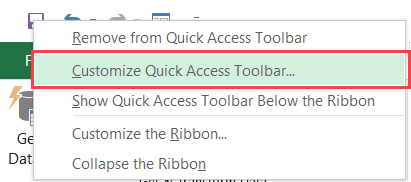
- Right-click on any of the existing icons in the Quick Access Toolbar.
- Click on ‘Customize Quick Access Toolbar’.

- In the ‘Excel Options’ dialog box that opens, select the ‘All Commands’ option from the drop-down.

- Scroll down the list of commands and select ‘Form’.

- Click on the ‘Add’ button.

- Click OK.

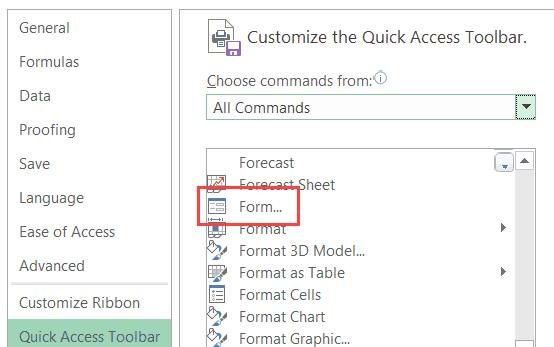

The above steps would add the Form icon to the Quick Access Toolbar (as shown below).
![]()
Once you have it in QAT, you can click any cell in your dataset (in which you want to make the entry) and click on the Form icon.
Note: For Data Entry Form to work, your data should be in an Excel Table. If it isn’t already, you’ll have to convert it into an Excel Table (keyboard shortcut – Control + T).
Parts of the Data Entry Form
A Data Entry Form in Excel has many different buttons (as you can see below).
Here is a brief description of what each button is about:
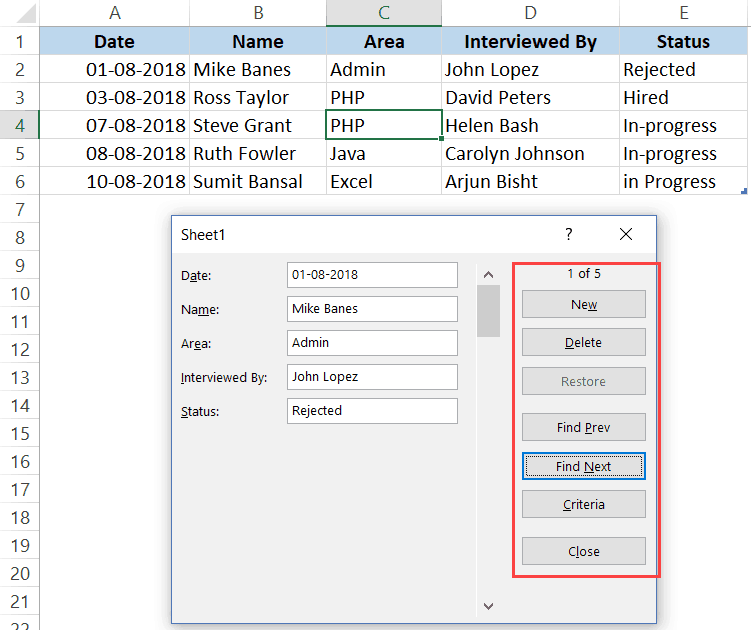
- New: This will clear any existing data in the form and allows you to create a new record.
- Delete: This will allow you to delete an existing record. For example, if I hit the Delete key in the above example, it will delete the record for Mike Banes.
- Restore: If you’re editing an existing entry, you can restore the previous data in the form (if you haven’t clicked New or hit Enter).
- Find Prev: This will find the previous entry.
- Find Next: This will find the next entry.
- Criteria: This allows you to find specific records. For example, if I am looking for all the records, where the candidate was Hired, I need to click the Criteria button, enter ‘Hired’ in the Status field and then use the find buttons. Example of this is covered later in this tutorial.
- Close: This will close the form.
- Scroll Bar: You can use the scroll bar to go through the records.
Now let’s go through all the things you can do with a Data Entry form in Excel.
Note that you need to convert your data into an Excel Table and select any cell in the table to be able to open the Data Entry form dialog box.
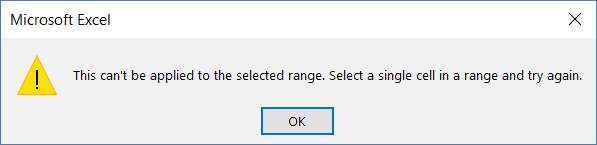
If you haven’t selected a cell in the Excel Table, it will show a prompt as shown below:
Creating a New Entry
Below are the steps to create a new entry using the Data Entry Form in Excel:
- Select any cell in the Excel Table.
- Click on the Form icon in the Quick Access Toolbar.

- Enter the data in the form fields.
- Hit the Enter key (or click the New button) to enter the record in the table and get a blank form for next record.
Navigating Through Existing Records
One of the benefits of using Data Entry Form is that you can easily navigate and edit the records without ever leaving the dialog box.
This can be especially useful if you have a dataset with many columns. This can save you a lot of scrolling and the process of going back and forth.
Below are the steps to navigate and edit the records using a data entry form:
- Select any cell in the Excel Table.
- Click on the Form icon in the Quick Access Toolbar.
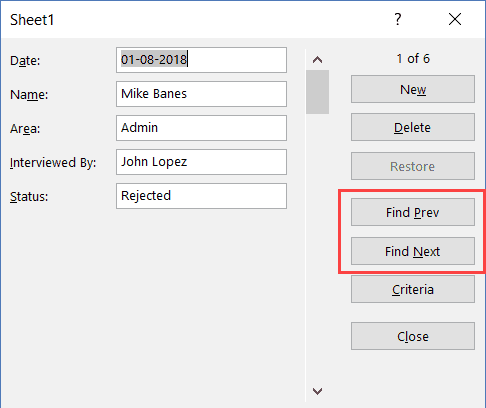
- To go to the next entry, click on the ‘Find Next’ button and to go to the previous entry, click the ‘Find Prev’ button.

- To edit an entry, simply make the change and hit enter. In case you want to revert to the original entry (if you haven’t hit the enter key), click the ‘Restore’ button.
You can also use the scroll bar to navigate through entries one-by-one.
The above snapshot shows basic navigation where you are going through all the records one after the other.
But you can also quickly navigate through all the records based on criteria.
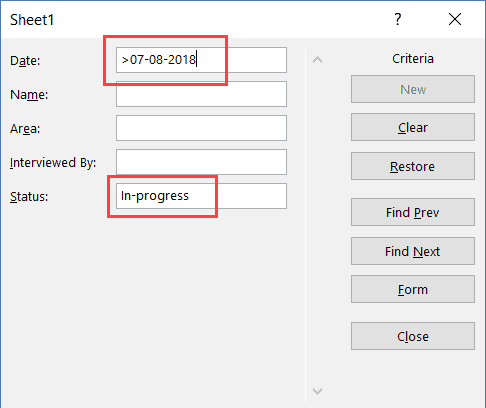
For example, if you want to go through all the entries where the status is ‘In-progress’, you can do that using the below steps:
Criteria is a very useful feature when you have a huge dataset, and you want to quickly go through those records that meet a given set of criteria.
Note that you can use multiple criteria fields to navigate through the data.
For example, if you want to go through all the ‘In-progress’ records after 07-08-2018, you can use ‘>07-08-2018’ in the criteria for ‘Date’ field and ‘In-progress’ as the value in the status field. Now when you navigate using Find Prev/Find Next buttons, it will only show records after 07-08-2018 where the status is In-progress.
You can also use wildcard characters in criteria.
For example, if you have been inconsistent in entering the data and have used variations of a word (such as In progress, in-progress, in progress, and inprogress), then you need to use wildcard characters to get these records.
Below are the steps to do this:
- Select any cell in the Excel table.
- Click on the Form icon in the Quick Access Toolbar.
- Click the Criteria button.
- In the Status field, enter *progress
- Use the Find Prev/Find Next buttons to navigate through the entries where the status is In-Progress.

This works as an asterisk (*) is a wildcard character that can represent any number of characters in Excel. So if the status contains the ‘progress’, it will be picked up by Find Prev/Find Next buttons no matter what is before it).
Deleting a Record
You can delete records from the Data Entry form itself.
This can be useful when you want to find a specific type of records and delete these.
Below are the steps to delete a record using Data Entry Form:
- Select any cell in the Excel table.
- Click on the Form icon in the Quick Access Toolbar.
- Navigate to the record you want to delete
- Click the Delete button.

While you may feel that this all looks like a lot of work just to enter and navigate through records, it saves a lot of time if you’re working with lots of data and have to do data entry quite often.
Restricting Data Entry Based on Rules
You can use data validation in cells to make sure the data entered conforms to a few rules.
For example, if you want to make sure that the date column only accepts a date during data entry, you can create a data validation rule to only allow dates.
If a user enters a data that is not a date, it will not be allowed and the user will be shown an error.
Here is how to create these rules when doing data entry:
- Select the cells (or even the entire column) where you want to create a data validation rule. In this example, I have selected column A.
- Click the Data tab.

- Click the Data Validation option.

- In the ‘Data Validation’ dialog box, within the ‘Settings’ tab, select ‘Date’ from the ‘Allow’ drop down.

- Specify the start and the end date. Entries within this date range would be valid and rest all would be denied.
- Click OK.


Now, if you use the data entry form to enter data in the Date column, and if it isn’t a date, then it will not be allowed.
You will see a message as shown below:
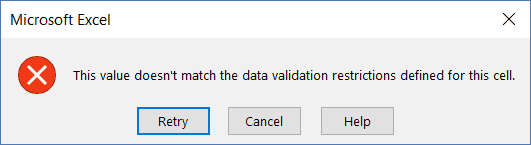
Similarly, you can use data validation with data entry forms to make sure users don’t end up entering the wrong data. Some examples where you can use this is numbers, text length, dates, etc.
Here are a few important things to know about Excel Data Entry Form:
- You can use wildcard characters while navigating through the records (through criteria option).
- You need to have an Excel table to be able to use the Data Entry Form. Also, you need to have a cell selected in it to use the form. There is one exception to this though. If you have a named range with the name ‘Database’, then the Excel Form will also refer to this named range, even if you have an Excel table.
- The field width in the Data Entry form is dependent on the column width of the data. If your column width is too narrow, the same would be reflected in the form.
- You can also insert bullet points in the data entry form. To do this, use the keyboard shortcut ALT + 7 or ALT + 9 from your numeric keypad. Here is a video about bullet points.
You May Also Like the Following Excel Tutorials:
- 100+ Excel Interview Questions.
- Drop Down Lists in Excel.
- Find and Remove Duplicates in Excel.
- Excel Text to Columns.
Data fields are fundamental building blocks of data. They are so essential that analysts in various disciplines have appropriated them to meet the needs of their use cases. Though these applications are a testament to the value of a data field, they create confusion as to the precise meaning behind them.
The purpose of this article is to (1) clearly define data fields, (2) list different types, (3) show how they are applied in databases and programming languages, and (4) clear up confusion around “data field” and “field data.”
If you work with data in any way — from data entry to data science — this article is for you.
Don’t forget, you can get the free 67 data skills and concepts checklist to cover all the essentials (including data fields).
A data field is a location for a predetermined type of data that — collectively with other data fields — describes the place it is stored. The most common example is a column in a data table that describes the row with which it intersects, and others include class variables in programming languages such as Java.
A simple way to think about data fields is to imagine an object and describe multiple instances of it. For example, let’s take beds. One bed is king sized, made of wood, and uses spring suspension. Another bed in queen sized, made of metal, and uses elastic suspension.
Beds are the object, while size, material, and suspension type describe the beds. When we write these down on paper or enter them in a database, we’ve created a location for the three descriptions, and they are now fields.
Data fields are also known as data attributes, data traits, and data characteristics.
Data Field in a Database
The fundamental form of data is data tables. They consist of rows that we call records (or “tuples” if you’re fancy) and columns. The first column consists of unique IDs of the objects we are going to describe, and the columns contain information about it.
NOTE: there is some dispute as to whether the first column should be considered a field or simply the “unique ID.” Since by definition fields describe the location they are stored, we could consider the unique ID either a titular description of itself, but it’s more intuitive to assume it’s simply the place described by the fields.
Using our example of beds, here’s a sample table:
| Bed (Unique ID) | Size (Field) | Material (Field) | Suspension (Field) |
|---|---|---|---|
| Bed 1 | King | Wood | Spring |
| Bed 2 | Queen | Metal | Elastic |
| Bed 3 | Twin | Metal | Spring |
| Bed 4 | Double | Metal | Spring |
| Bed 5 | Crib | Wood | Spring |
Now it should be clear what a data field is, so let’s revisit our definition: a location for a predetermined type of data that — collectively with other data fields — describes the place it is stored.
In this example, the location is a column, the type is size/material/suspension, the collective is those three together, and the place described is the row’s bed.
It’s important to note that a field is NOT the individual data entries (“King,” “Metal,” “Spring”). It is the column as a whole, in this case the size field, material field, and suspension field.
In the context of a database, columns and fields are synonyms.
Examples of Data Fields
Simple examples of data fields include weight, color, date, sales, averages, member ID, promotional code, status, file type, keyword, and rainfall. Any piece of information that can be used to describe an object, event, or idea can be a data field.
That may sound silly, but it’s actually what makes data fields so flexible and so valuable — almost anything in the natural and human worlds can be a data field.
Data Field in Excel
In Excel, a data field is a column in any data table structure built with cells. It is easiest to identify when we’re using the Excel’s Data Table function (Insert > Tables > Table), but any column in a row-by-column table can be a data field — even a simple range.
Data Fields and Data Records
The two dimensions of a data table consist, as we know, of rows and columns. Rows are referred to as records because they consist of one instance of the unique ID and each field.
You’ve probably heard the word “record” used all your life without realizing that this is what it refers to.
A record is nothing more than a complete row of data. Police records, sports records, school records, and geographic records are all examples are rows in a database. A school record might look like this:
| Student Name | GPA | Attendance (out of 180) | Average tardiness | # of extra curriculars |
|---|---|---|---|---|
| Jane Doe | 3.5 | 175 | 5 min | 3 |
The first (top) row is known as the header because it shows the “head” of the body of information in all of the following rows. This is important because it moves our focus from the whole table towards rows. A record is one instance of what the table tells us — the base of the table.
If we only saw one record, we could infer the rest of the data table. However, if we only saw one field, we would not be able to infer the rest.
Collection of Data Fields
You may have heard the phrase “a collection of data fields.” A row is a collection of data fields in a data table. The cell where a field intersects with a record is the “place” it describes — the unique ID of that record. In this sense, a record is a “group” of fields.
Types of Database Fields
Database fields are not all made the same. In general, they fall into six types: (1) dates (2) numbers, (3) strings, (4) Unicode, (5) Binary, and (6) miscellaneous. In most cases, this is what you will encounter as a data analyst since the differnet subtypes tend to be complex and require knowledge of computer systems. However, for the sake of completeness I list them all below. Here’s a list of different data types with short descriptions:
- Numeric Data Item Types
- Integer – any number that is not a decimal. Examples include -11, 34, 0, 100.
- Tinyint – an integer, but only numbers from 0 to 255
- Bigint – an integer bigger than 1 trillion
- Float – the number of significant digits after the decimal is relative to the total number of digits, contrary to fixed-point numbers where the number of digits is predetermined by the user. Fixed-point number could be 1.28 and 1.94, whereas the equivalent floating numbers could be 1.28 and 1.9457683, since the second has more digits in it’s raw form.
- Real – any fixed point on a number line
- Date and Time Data Item Types
- Date – the date sorted in different forms, including “mm/dd/yyyy” (US), “dd/mm/yyyy” (Europe), “mmmm dd, yyyy”, and “mm-dd-yy” among many more.
- Time – the time of day, broken down as far as milliseconds
- Date time – the date and time value of an event
- Timestamp – stores number of seconds passed since 1970-01-01 00:00:00’ UTC
- Year – stores years ranging from 1901 to 2155 in two-digit or four-digit ranges
- Character and String Data Item Types
- Char – fixed length of characters, with a maximum of 8,000
- Varchar – max of 8,000 characters like char, but each entry can differ in length (variable)
- Text – similar to varchar, but the maximum is 2GB instead of a specific length
- Unicode Character and String Item Types – unicode is a way of structuring data in the form of U+0000, where the 0’s can be any number. For example, “U+0021” translates to the exclamation point “!”.
- nchar – fixed length with maximum length of 8,000 characters
- nvarchar – variable length with maximum of 8,000 characters
- ntext – variable length storage, only now the maximum is 1GB rather than a specific length
- Binary Data Item Types – a combination of 0s and 1s
- binary – fixed length with maximum of 8,000 bytes
- varbinary – variable length storage with maximum bytes, topped at 8,000
- Miscellaneous Data Item Types
- clob – also known as Character Large Object, is a type of sub-character that carries Unicode texts up to 2GB
- blob – carries big binary objects
- xml – a specific data type that stores XML data. XML stands for extensible markups language, and is common in data bases
All Values in a Field are the Same Type
All values in a given field will be the same type. This is a fundamental principle of data quality. If your fields contain data of different types, then you cannot filter on attributes or manipulate measures.
Numeric Fields Are Measures, Not Attributes
Numeric field types are special because they behave differently from the other types. Text and other data types are considered attributes because they cannot be manipulated across or down the data table. We can only count the number of times they appear or filter the data on them.
Numbers, however, can be added, subtracted, multiplied, and divided across and down the table. This means they are dynamic, and we refer to them as measures rather than attributes.
For example, imagine we add another field to our dataset on beds for weight as shown below. We could add the weights of Bed 1 and Bed 2 to arrive at a new value, 185, because it is a measure. However, we cannot manipulate words to arrive at new values. We can only consolidate rows based on them, which makes them attributes.
| Bed (Unique ID) | Size (Field) | Material (Field) | Suspension (Field) | Weight in KG (Measure) |
|---|---|---|---|---|
| Bed 1 | King | Wood | Spring | 90 |
| Bed 2 | Queen | Metal | Elastic | 95 |
| Bed 3 | Twin | Metal | Spring | 85 |
| Bed 4 | Double | Metal | Spring | 80 |
| Bed 5 | Crib | Wood | Spring | 50 |
Data Field Mapping
Sometimes we want to consolidate multiple data tables into one, and these tables concern the same unique IDs but are not labelled or normalized in the same way. Data field mapping is an activity that outlines how the fields from two or more starting tables will be consolidated into a new table.
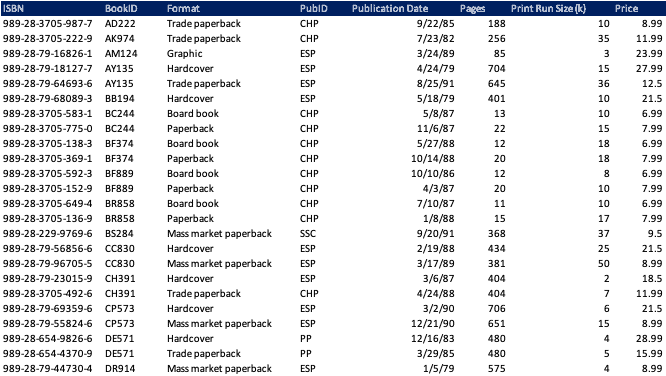
For example, consider the following two tables from a book store database. In the first, we see that BookID is repeated multiple times to accommodate the months when it was checked out. This means BookID + Month is the unique ID for this table, since we could otherwise simply add the number of checkouts per book.
In the second, we can see that BookID is sometimes repeated for multiple editions, such as AY135 in row 4. This means that the ISBN number is the unique ID for column 2.

In order to combine these two tables, we need to map which fields can and should be included. To figure out how this could work, we need to identify the coarser of the two unique IDs — that is, which one provides the most detail and can therefore be combined with all of the other database’s fields.
In this example, the coarser of the two unique IDs is BookID + Month. We can thus map all of the fields from the second table into the first table. The result would look like the following:
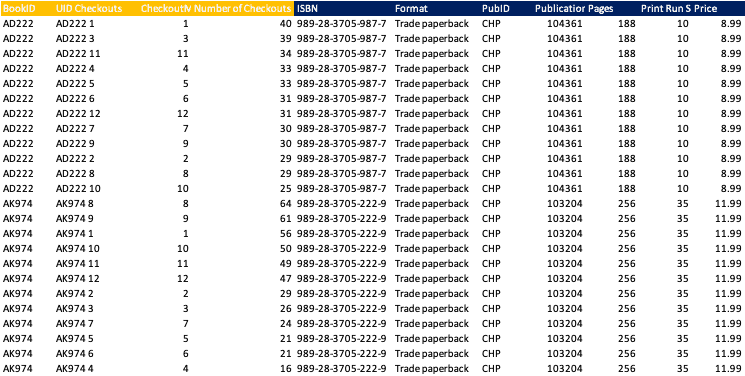
You’ll see that the fields from the second database are duplicated for each UID Checkouts ID. This is a necessary to ensure each row has the correct data from each field, although it is redundant and takes up space.
However, note that this table is based on a choice to include only the books that were checked out. It is possible that some of the ISBNs from table two were never checked out. If they weren’t, then we do not see their information in the combo table (since the checkout unique IDs do not include book records if they weren’t sold).
In this way, field mapping involved choosing the information you wish to see. Had we wanted to see the checkouts for all ISBNs, even those without any checkouts, we would need to first map the UID Checkouts to ISBN, then create a new unique ID for that table. This new unique ID would be used to map all fields from both tables into a new one.
Data Field Definition Document: Data Dictionaries
In this article, we’ve only looked at data fields with intuitive names. In many cases, especially in scientific fields, codes or special jargon may be used as the title for a field. The problem with this is that, well, nobody else can understand it!
Data dictionaries are the solution. A data dictionary describes a table’s columns based on common traits (i.e name, definition, data type) within another table.
Imagine, for example, you have the following table about customers:
| C | C_Weight_KG | CA |
|---|---|---|
| C1 | 65 | 24 |
| C2 | 72 | 20 |
| C3 | 47 | NULL |
| C4 | 50 | 18 |
| C5 | 55 | 21 |
| C6 | 62 | 23 |
| C7 | 73 | NULL |
| C8 | 59 | 28 |
The following data dictionary describes certain details about that field, including its definition, the data type, possible values, and whether it is required. “CA” means nothing to the reader, but when we see that is represents “Customer age,” we understand.
| Field name | Definition | Data type | Possible values | Required? |
|---|---|---|---|---|
| CA | Customer age | Integer | 15, 18, 20, 23, NULL | No |
Data Fields Programming (and Mockup) Languages
Data fields in programming languages are different from those in data tables because they often exist as a single entry of information that describes an object.
Let’s go back to the definition of data field: a location for a predetermined type of data that — collectively with other data fields — describes the place it is stored. A data field in programming is most often a function or characteristic of an object. I’m not a programmer, but it’s easy to see how fields come into play in these languages. Let’s look at this in HTML and Java.
Data-field HTML
HTML is not a programming language per se. It’s a mockup language. Still, we use fields to add specific traits to objects in the code. For example, the line “<input type="text"> defines a single-line text input field1.
Java
In Java, you can specify traits about an object class. One example would be “height = frameDim.height”.
While we often consider code to be data itself, it is merely an alternative form of data. Behind every line of code is a database that stores unique IDs and fields in a standard table format. This is part of the reason why there is confusion around the precise meaning of data fields.
Not to be Confused with Field Data (comes from being “in the field”)
A common misconception, albeit a silly one, is mistaking “data field” for “field data.” Field data refers to information that is collected outside of a lab of office. For example, if I have to go survey people to collect data, we can say that data is collected “in the field.”
Obviously, the field data will include rows and columns, so it includes data fields. But the two terms refer to different ideas.
Conclusion
If you like this article, check out more free content at the AnalystAnswers.com home page!
- W3Schools [↩]
I hate inputting data. It’s mind-numbing and given a chance, I’ll make mistakes. One way to speed up Excel data entry and reduce errors is to use an Excel form. These data entry forms are especially beneficial when your records span across many columns. In this tutorial, I’ll show you how to create a data entry form in Excel.
I’ll admit Excel data entry isn’t difficult. You type in one cell and move to the next. However, I had a project where each record spanned past my monitor’s width, so I had a horizontal scrollbar. And several cells contained a paragraph of pasted text. I wanted an Excel data entry form that would allow me to focus on one entry. This would also make it easier to copy and paste information from a source document into the required textbox.
The problem with using the default data entry method is that it’s easy to lose sight of your target. You also have to navigate to the next row. An Excel form can solve these issues.
What is an Excel Data Form?
A data form is simply a modal dialog box with the fields for one record. The form sits on top of your Excel spreadsheet. It allows you to enter up to 32 fields per record on a cell-by-cell basis. On the right side, you have a series of navigation buttons and functional buttons. You might think of it as an on-screen form or template designed for data entry.
Your column headers become the form field names. This is different than a custom Excel form a developer might create using VBA. You don’t need to do any coding.

Five Main Differences with the Excel Forms
- The form isolates one record or row.
- Your orientation is vertical, not horizontal.
- Some fields have keyboard shortcuts allowing you to jump within the form.
- You have a series of Form buttons on the right-side to control navigation and filters.
- The whole record is committed as opposed to each cell.
Using the form, I can enter data faster, and when I Tab to the end of the form, I can hit the Enter key to start another record. I can navigate through the records either using the controls on the right side or the vertical scrollbar.
How to Create a Data Entry Form in Excel
In this example, I’ll create a form based on an existing worksheet with 6 fields. Once the form is created, I can use it to add or edit records.
- Open your Microsoft Excel spreadsheet
- Adjust Column A’s width to be a suitable width for all form columns. The form will use this column width as the default size for all form fields.

Set Column A to be wide
- Verify all your columns have a column heading.
- Highlight your data range including your column labels.
- From the Data tab, click the Form button.
Tip: You can click cell A1 and then Ctrl + Shift + → + ↓. to select your sheet range.
In earlier versions of Microsoft Excel, this function was on the Data menu. You may need to add the Form… command back to the Excel Ribbon or Quick Access toolbar. For this tutorial, I added the command to my Data tab, but some people prefer to create a new Forms tab.
If you have existing records, you will see a form for each record. The record count shows above the New button. If your spreadsheet is new, you’ll see a blank form with your labels.
You can use the Close button to shut down the form. To open again, click any cell within your defined range and click the Form button again on your ribbon or toolbar. You will see the form related to the clicked cell.
Improving Forms with Data Validation
Many seasoned Excel users like to use a feature called data validation. As the name suggests, this feature checks a cell’s value against a validation rule. There are many validation rules, such as time formats, number ranges, text length, etc. However, one item that can cause problems is when you use an Excel-dependent list.
For example, in the screen snap below, I have a validation rule that checks whether the cell’s entry is contained on a “state” list. You’ll also see a drop-down arrow to the cell’s right, which shows valid entries and a scroll bar.
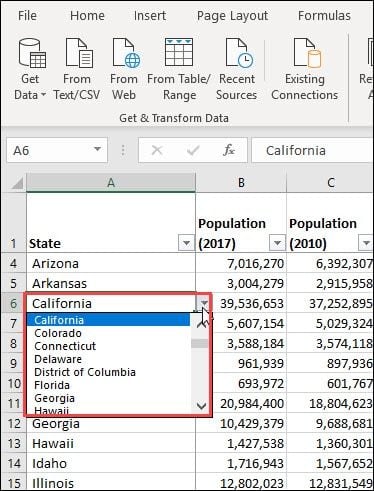
While I can use data validation with my data form, I will not see the drop-down list. Instead of choosing from a pick list, I’ll need to type my entry. The issue here is that you might make errors. In the example below, you’ll see I’ve tried to add Disneyland as a state.
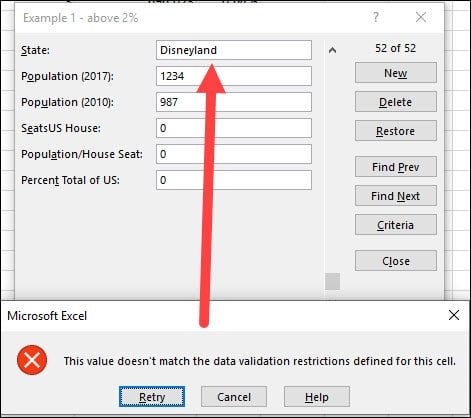
The validation logic is working, but the user might not know how to correct it. This is a case where you’d want to add a custom error message to help the user.
Finding and Filtering Data Records
Data forms do have rudimentary filtering features. These can be found by clicking the Criteria button on the right side. The form will clear any values and allow you to enter some values including wildcard characters such as ?, *, and ~. The button label also changes to Form so you can toggle back and forth.
In the example below, I’m looking to find any states that have more than 10 members in the US House. In the text box, I typed >10.

While this search works, it’s going to return one matching record at a time. To navigate to the others, you will use the Find Prev and Find Next buttons. Apart from number searches, you can also use wildcards as well. A question mark will represent any single character, and an asterisk will represent any number of characters.
Data Form Limitations
As much as I like this form functionality, there are some limitations.
- If you get an error saying too many fields in the data form, you may have more than 32 columns. If so, try using a smaller range.
- If you get an error that states, “This can’t be applied to the selected range,” you probably clicked a cell outside the range.
- If your sheet has dependent lists, they won’t show in the data form. However, the logic will still work.
- You can’t print a data form record. Instead, you could use SnagIt or some other screen capture program.
- You can’t enter an Excel formula into a data form field.
If you need more than 32 fields, you can use a 3rd party utility. John Walkenbach had one which can be found using the Internet Archive.
The data entry process in Excel can be a tedious and frustrating experience for many users. If you are tired of spending hours entering information or dealing with errors, give an Excel data form a try.
Since the start of Excel, one cell could only contain one piece of data.
With Excel’s new rich data type feature, this is no longer the case. We now have multiple data fields inside one cell!
When you think of data types you might be thinking about text, numbers, dates or Boolean values, but these new data types are quite different. They are really connections to an online data source that provides more information about the data.
At present there are two data types available in Excel; Stocks and Geography.
For example, with the new stock data type our cell might display the name of a company, but will also contain information like the current share price, trading volume, market capitalization, employee head count, and year of incorporation for that company.
The connections to the additional data are live, which is especially relevant for the stock data. Since data like the share price is constantly changing, you can always get the latest data by refreshing the connection.
Caution: The stock data is provided by a third party. Data is delayed, and the delay depends on which stock exchange the data is from. Information about the level of delay for each stock exchange can be found here.
The data connection for the geography data type is also live and can be refreshed, but these values should change very infrequently.
Video Tutorial
Converting Text To Rich Data Types
Whichever data type you want to use, converting cells into a data type is the same process. As you might expect, the new data types have been placed in the Data tab of the Excel ribbon in a section called Data Types.
At present the two available data types fit nicely into the space. But you can click on the lower right area to expand this space, which seems to suggest more data types are on their way!
You will need to select the range of cells with your text data and go to the Data tab and click on either the Stock or Geography data type. This will convert the plain text into a rich data type.
Warning: You can’t convert cells containing formula to data types.
You can easily tell when a cell contains a data type as there will be a small icon on the left inside the cell. The Federal Hall icon indicates a Stock data type and the map icon indicates a Geography data type.
Right Click Data Type Menu
The right click menu has a contextual option which is only available when the right click is performed on a cell or range containing data types. This is where you’ll find most commands related to data types.
Automatic Data Type Conversion
If you want to add to your list of data type cells, all you need to do is type in the cell directly below a data type and Excel will automatically convert it to the same data type as above.
Correcting Missing Data Types
Excel will try and convert your text with the best match, but it might not always find a suitable match or there might be some ambiguity. When this happens, a question mark icon will appear in the cell. You can click on this icon to help Excel find the best match.
Click on the question mark icon and this will open the Data Selector window pane. You can use the search bar to try and locate the desired result and then click on the Select button to accept one of the options presented.
Changing Data Types
In case Excel made the wrong choice, you can also change a data type. You right click on the data and choose Data Type then Change from the menu. This will also open the Data Selector window pane.
Currency & Cryptocurrency Data
With the stock data type, you can get more than just stocks from a company name. The stock data type can also be used for currency and cryptocurrency conversions.
Currency Exchange Rate Pairs
You can convert pairs of currencies into data types to get exchange rates.
Cryptocurrency Exchange Rate Pairs
You can convert cryptocurrency/currency pairs into data types too. Exchange rates between cryptocurrencies are currently not supported.
Country, State, Province, County & City Data
The geography data type supports most types of geographies. Countries, states, provinces, counties and cities will all work.
The fields available for each type of geography will vary. For example, a country, state, province, or county might have a capital city field, but this field will not be available for a city.
Data Cards
There is a pretty cool way to view the data contained inside a cell that’s been. When you click on the icon for any data type a Data Card will appear.
This is also accessible through the rick click menu. Right click then choose Data Type from the menu then choose Data Card.
Data cards will show all the available data for that cell and may also include a picture related to the data such as a company logo or a country’s flag.
Each piece of data displayed in the card also comes with an Extract to grid button that becomes visible when you hover the mouse cursor over that area. This will extract the data into the next blank cell to the right of the data type.
In the lower right corner of the card, there’s a flag icon. This allows you to report any bad data that might be displayed in the card back to Microsoft.
Extracting Data
The data cards are nice for viewing the data inside a cell, but how can you use this data? There are Extract to grid buttons for each piece of data inside the data cards, but these will only extract data for one cell. What if you want to extract data from many cells?
When you select a range of cells containing data types, an Extract to grid icon will appear at the top right of the selected range. When you click on this, Excel will show a list of all the available data that can be extracted. Unfortunately, you’ll only be able to select one piece of data at a time.
A handy feature with extracting data, is that Excel takes care of the number formatting. Whether you’re extracting a percent, number, currency, date or time, Excel will apply the relevant formatting.
Dot Formulas & FIELDVALUE Function
Extract is probably not the best word to use for the Extract to grid button. If you check the contents of the extracted data, you’ll see it’s a formula reference to the data type cell.
Dot Formula Notation
In fact, you don’t need to use the extract to grid button to create these formulas. You can write them just like any other Excel formula.
= B3.PopulationThe above formula will return the population of Canada.
= B3.Population / B3.AreaThe above formula will give us a density calculation and return 3.7 people per square kilometer.
Thankfully, Excel’s formula IntelliSense will show you all the available fields when you create a cell reference to a data type cell followed by a period. This makes writing data type formulas easy!
Note: When the field name contains spaces, the field reference needs to be encased with square braces.
Formulas only support one dot.
= B3.CapitalThe above formula will return the capital of Canada, which is geographical data.
= B3.Capital.PopulationBut the above formula won’t return the population of the capital city of Canada. To get this information, you would need to extract the capital, then copy and paste the result as a value, then convert that value to a data type, then extract the population.
FIELDVALUE Function
The FIELDVALUE function was introduced with data types and can be used to get the exact same results from a data type cell.
= FIELDVALUE(Value, Field)This new function has two arguments:
- Value is a reference to a data type.
- Field is the name of a field in the data type.
Warning: The FIELDVALUE function does not have IntelliSense for the available fields in a data type.
= FIELDVALUE(B3, "Population")The previous example to return the population of Canada can be written as above using the FIELDVALUE function.
= FIELDVALUE(B3, "Population") / FIELDVALUE(B3, "Area")The previous example to return the population density can be written as above using the FIELDVALUE function.
New FIELD Error Type
A new #FIELD! error has been added to Excel for the dot formulas and FIELDVALUE function. This error can be returned for several reasons.
- The field does not exist for the data type.
- The value referenced in the formula is not a data type.
- The data does not exist in the online service for the combination of value and field.
In the above example, Ireland is returning a #FIELD! error for the abbreviation because this data is missing online.
Refreshing Data
How do you refresh data? Using the Refresh and Refresh All commands found in the Data tab will refresh any data types you have in your spreadsheet.
This means you can use the keyboard shortcuts Alt + F5 (refresh) and Ctrl + Alt + F5 (refresh all) to refresh data types.
Using the Refresh command will refresh all cells in the workbook that are the same data type as your active cell.
The Refresh All command will refresh all cells of any data type.
Warning: Refresh All will also refresh all other connections in the workbook such as pivot tables and power queries.
There is also a refresh method that is proprietary to data types. If you select a cell with a data type, you can right click and choose Data Type from the menu then choose Refresh. This will refresh all cells in the workbook that are the same data type as the selected cell and won’t refresh any other connections like pivot tables or power query.
Unlinking Data
If you no longer want your data connected, you can unlink the data by converting it back to regular text. The only way to do this is to right click on the selected range of data then choose Data Type from the menu and select Change to Text.
Warning: Linking and unlinking data might change your data.
When you convert text to a data type and then convert it back to text, you might not get your original text back exactly as it was. It’s best to create a copy of any text data before converting to a data type so you always have the original text.
Using Tables With Data Types
You don’t need to use Excel tables with data types, but there is a nice bonus feature with tables when extracting data. Excel will create the column headings for you.
Note: You can create an Excel table from the Insert tab with the Table command or using the keyboard shortcut Ctrl + T.
Learn more about Excel tables: Everything You Need to Know About Excel Tables
The Extract to grid button will appear anytime the active cell is inside a table containing data types. The active cell does not need to be on a cell containing a data type.
When there are two or more columns with data type inside a table, the Extract to grid button will be based on the right most column. Unfortunately, this means you can’t extract from any other columns.
Using Sort & Filter With Data Types
Sorting and filtering data types has a nice feature that allows you to sort and filter based on any field even if it hasn’t been extracted.
Note: Turn on the sort and filter toggles for any table or list by using the Ctrl + Shift + L keyboard shortcut.
When you click on the sort and filter toggle of a column of data types, you will be able to select a field from a drop down at the top of the menu. This will change the field which sorting and filtering is based on.
For example, we could select the Year incorporated field and sort our list of companies from oldest to newest, or filter out any company incorporated after the year 2000.
Finding Data Types In A Workbook
Data types are visually distinct because of the icons in cell, so distinguishing between a regular cell and a data type cell is easy. But what if you want to locate all the data type cells in a large workbook? Visual inspection might not be practical.
Since data types are not supported by earlier versions of Excel, the easiest way to locate them in a workbook is with Excel’s check compatibility feature.
Note: Check compatibility can be found in the File tab ➜ Info ➜ Check for Issues ➜ Check Compatibility.
The compatibility checker will list out all the features in the workbook that are not backwards compatible with prior version of Excel. To find any data types, you can look for the words “This workbook contains data types…” in the summary. Each summary will also have a Find hyperlink that will take you to the location and select those cells.
Note: Selecting only Excel 2016 from the Select versions to show button will reduce the results in the compatibility checker and make finding the data types easier.
Conclusions
With rich Data Types you can now get more from your data without leaving Excel to use your favourite search engine.
You can quickly and easily get current financial data, currency rates, cryptocurrency values and geographical data with a couple clicks.
This is a very powerful feature in Excel you need to start using, and with the hint of more data types to come, will become even more useful.
About the Author
John is a Microsoft MVP and qualified actuary with over 15 years of experience. He has worked in a variety of industries, including insurance, ad tech, and most recently Power Platform consulting. He is a keen problem solver and has a passion for using technology to make businesses more efficient.