
If you are looking for Excel based Data Entry form with multi-users functionalities then this post is going to be very helpful for you. In this post, we will discuss User Interface (UI) design and VBA coding to develop the Multi-user Data Entry Form.
Why do we need to develop Multi-user Data Entry Form in Excel?
Microsoft Excel is one of the most utilized tool in any company. Due to availability and dynamic features of Excel, we can use this tool to automate any complex data entry operation. There is no need to hire programmers and install a separate language. MS Excel has an inbuilt integrated development environment (IDE). Visual Basic for Applications (VBA) is the programming language for Microsoft Office and its associated applications e.g. Excel, Word, Power Point etc. We can leverage the power of VBA language and develop the multi-user data entry form without any additional cost.
In this Multi-User Data Entry form, we have two separate Excel files. One is fulfilling the purpose of Database and other is for Data Entry Form to transfer the data to database workbook.
To use this tool, you just need to keep the parent folder at any shared location and ask your team and users to open the Data Entry Form and start submitting the data. Excel VBA code will handle all the required functionalities e.g. accessing database, validating entry, transferring inputs etc.
Creating Multi-user Data Entry Form in Excel
Follow the below steps to create this Automated Data Entry form in Excel.
- Create a folder named ‘Multi-user Data Entry Form’ at the shared drive.
2. Create a new Workbook and save the file with the name ‘Database.xlsm” in ‘Multi-user Data Entry Form folder’.
3. Rename the ‘Sheet1’ to ‘Database’ and add the below mentioned column headers and format the the headers accordingly in ‘Database.xlsm’ file.
4. Create a new Workbook and save the file with the name ‘Multiuser Data Entry Form in Excel.xlsm’ in ‘Database’ folder.
5. Rename the ‘Sheet1’ to ‘Home’. Remove the Gridlines ( View – Gridlines) and add a rounded rectangle and fill the color with Blue and enter the text ‘Data Entry Form’. Please see the below image.
6. Now go to Develop Tab and click on Visual Basic to visit Visual Basic Application window.
7. In Visual Basic for Application window, click on Insert menu and then select ‘UserForm’.
8. Set the properties of the userform and add required controls. Add label, texboxes, image control, option button, combobox and command button as per below image.
Labels: Employee Registration Form (Top headers), Name, Date of Birth, Gender, Qualification, Mobile Number, Email ID, Address
TextBox: Name – txtName; Date of Birth – txtDOB; Mobile Number – txtMobile; Email-txtEmail; Address:txtAddress
Image: Calendar- imgCalendar
Option Buttons: Gender – Female – optFemale; Male-optMale
Combobox: Qualification- cmbQualification
Command Buttons: Submit- cmdSubmit; Reset-cmdReset
9. Set the Tab order for each and every cotnrols.
10. Import the custom calendar from the support file. Link has been provided at the bottom of the page.
11. Insert a module and rename it to ‘mdDataEntry’.
12. In Module code window, start writing the code to handle Reset, Validate Email, Validate Fields, Transfer Data and Call Form.
Code to Reset the Form
Sub Reset_Form()

    With frmDataEntry

        .txtName.Text = ""
        .txtName.BackColor = vbWhite

        .txtDOB.Text = ""
        .txtDOB.BackColor = vbWhite

        .optFemale.Value = False
        .optMale.Value = False

        .txtMobile.Value = ""
        .txtMobile.BackColor = vbWhite

        .txtEmail.Value = ""
        .txtEmail.BackColor = vbWhite

        .txtAddress.Value = ""
        .txtAddress.BackColor = vbWhite

        .cmbQualification.Clear
        .cmbQualification.BackColor = vbWhite

        .cmbQualification.AddItem "10+2"
        .cmbQualification.AddItem "Bachelor Degree"
        .cmbQualification.AddItem "Master Degree"
        .cmbQualification.AddItem "PHD"

        .cmbQualification.Value = ""

    End With


End Sub
Code to Validate Email ID
Function ValidEmail(email As String) As Boolean
 Dim oRegEx As Object
 Set oRegEx = CreateObject("VBScript.RegExp")
 With oRegEx
    .Pattern = "^[w-.]{1,}@([da-zA-Z-]{1,}.){1,}[da-zA-Z-]{2,3}$"
    ValidEmail = .Test(email)
 End With
 Set oRegEx = Nothing
End Function
Code to Validate Data Entry by User
Function ValidEntry() As Boolean
ValidEntry = True

With frmDataEntry

    'Default Color
    .txtName.BackColor = vbWhite
    .txtDOB.Text = vbWhite
    .txtMobile.BackColor = vbWhite
    .txtEmail.BackColor = vbWhite
    .txtAddress.BackColor = vbWhite
    .cmbQualification.BackColor = vbWhite

    'Validating Name

    If Trim(.txtName.Value) = "" Then
        MsgBox "Name is blank. Please enter a correct name.", vbOKOnly + vbInformation, "Invalid Entry"
        .txtName.BackColor = vbRed
        ValidEntry = False
        Exit Function
    End If

    'Validating DOB

    If Trim(.txtDOB.Value) = "" Then
        MsgBox "DOB is blank. Please enter DOB.", vbOKOnly + vbInformation, "Invalid Entry"
        .txtDOB.BackColor = vbRed
        ValidEntry = False
        Exit Function
    End If


    'Validating DOB

    If .optFemale.Value = False And .optMale.Value = False Then
        MsgBox "Please select gender.", vbOKOnly + vbInformation, "Invalid Entry"
        ValidEntry = False
        Exit Function
    End If

    'Validating Qualification

    If Trim(.cmbQualification.Value) = "" Then
        MsgBox "Please select the Qualification from drop-down.", vbOKOnly + vbInformation, "Invalid Entry"
        .cmbQualification.BackColor = vbRed
        ValidEntry = False
        Exit Function
    End If

    'Validating Mobile Number

    If Trim(.txtMobile.Value) = "" Or Len(.txtMobile.Value) < 10 Or Not IsNumeric(.txtMobile.Value) Then
        MsgBox "Please enter a valid mobile number.", vbOKOnly + vbInformation, "Invalid Entry"
        .txtMobile.BackColor = vbRed
        ValidEntry = False
        Exit Function
    End If

    'Validating Email

    If ValidEmail(Trim(.txtEmail.Value)) = False Then
        MsgBox "Please enter a valid email address.", vbOKOnly + vbInformation, "Invalid Entry"
        .txtEmail.BackColor = vbRed
        ValidEntry = False
        Exit Function
    End If

    'Validating Address

    If Trim(.txtAddress.Value) = "" Then
        MsgBox "Address is blank. Please enter a valid address.", vbOKOnly + vbInformation, "Invalid Entry"
        .txtAddress.BackColor = vbRed
        ValidEntry = False
        Exit Function
    End If

End With
End Function
Code to Transfer the Data from Form to Database
Sub Submit_Data()
Application.ScreenUpdating = False

Dim App As New Excel.Application
Dim wBook As Excel.Workbook

Dim FileName As String

Dim iRow As Long

FileName = ThisWorkbook.Path & "Database.xlsm"

'Check File Exist or Not

If Dir(FileName) = "" Then

    MsgBox "Database File is missing. Unable to proceed.", vbOKOnly + vbCritical, "Error"
    Exit Sub

End If

Set wBook = App.Workbooks.Open(FileName)

App.Visible = False

If wBook.ReadOnly = True Then
    MsgBox "Database is in use. Please try after sometimes.", vbOKOnly + vbCritical, "Database Busy"
    Exit Sub
End If

'Transfer the Data

With wBook.Sheets("Database")

    iRow = .Range("A" & Application.Rows.Count).End(xlUp).Row + 1

    .Range("A" & iRow).Value = iRow - 1

    .Range("B" & iRow).Value = frmDataEntry.txtName.Value   'Name

    .Range("C" & iRow).Value = frmDataEntry.txtDOB.Value   'DOB

    .Range("D" & iRow).Value = IIf(frmDataEntry.optFemale.Value = True, "Female", "Male") 'Gender

    .Range("E" & iRow).Value = frmDataEntry.cmbQualification.Value   'Qualification

    .Range("F" & iRow).Value = frmDataEntry.txtMobile.Value   'Mobile Number

    .Range("G" & iRow).Value = frmDataEntry.txtEmail.Value   'Email

    .Range("H" & iRow).Value = frmDataEntry.txtAddress.Value   'Address

    .Range("I" & iRow).Value = Application.UserName   'Submitted By

    .Range("J" & iRow).Value = Format([Now()], "DD-MMM-YYYY HH:MM:SS")  'Submitted On


End With

wBook.Close Savechanges:=True

App.Quit

Set App = Nothing

'Reset the form

Call Reset_Form

Application.ScreenUpdating = True

MsgBox "Data submitted successfully!"
End Sub
Code to show the UserForm
Sub Show_Form()
    frmDataEntry.Show
End Sub
13. Let’s write the coding on Form Initialization, Command Button events and Image click events.
Code on Form Initializtion
Private Sub UserForm_Initialize()
    Call Reset_Form
End Sub
Code on click events for Calendar image
Private Sub imgCalendar_Click()
Application.ScreenUpdating = False

Dim sDate As String

On Error Resume Next

sDate = MyCalendar.DatePicker(Me.txtDOB)

Me.txtDOB.Value = Format(sDate, "DD-MMM-YYYY")

On Error GoTo 0

Application.ScreenUpdating = True
End Sub
Code for click events on Submit and Reset buttons
Private Sub cmdSubmit_Click()
Dim i As VbMsgBoxResult

i = MsgBox("Do you want to submit the data?", vbYesNo + vbQuestion, "Submit Data")

If i = vbNo Then Exit Sub

If ValidEntry Then

    Call Submit_Data

End If
End Sub
Private Sub cmdReset_Click()
Dim i As VbMsgBoxResult
i = MsgBox("Do you want to reset the form?", vbYesNo + vbQuestion, "Reset")
If i = vbNo Then Exit Sub
Call Reset_Form
End Sub14. Move to Excel window and assign the macro on ‘Data Entry Form’ button available on Home sheet.
Right click on Button, select ‘Assign Macro’ and select ‘Show_Form’ as macro name and click on ‘OK’.
Now, Multi-User Data Entry form is ready. You can ask your team members to start using this tool to submit the data in shared environment.
Please watch our YouTube tutorial to learn how to create Multi-user Data Entry form in Excel (step by step).
Click here to download the Multi-user Data Entry Form.
Click here to download the support files (calendar icon, custom calendar form and email code) used in tutorial .
Please visit the below mentioned pages to learn more about Data Entry Forms and Automated Tools in Excel. Thanks!
Annual Leave Tracker
Employee Activities Tracker in Excel
Data Entry Form
Advanced Data Entry Form in Excel
Fully Automated Data Entry Form
If data is always on a journey, then Excel is like Grand Central Station. Imagine that data is a train filled with passengers that regularly enters Excel, makes changes, and then leaves. There are dozens of ways to enter Excel, which imports data of all types and the list keeps growing. Once data is in Excel, it’s ready to change shape just the way you want using Power Query. Data, like all of us, also requires «care and feeding» to keep things running smoothly. That’s where connection, query, and data properties come in. Finally, data leaves the Excel train station in many ways: imported by other data sources, shared as reports, charts, and PivotTables, and exported to Power BI and Power Apps.

Here are the main things you can do while data is in the Excel train station:
-
Import You can import data from many different external data sources. These data sources can be on your machine, in the cloud, or half-way around the world. For more information, see Import data from external data sources.
-
Power Query You can use Power Query (previously called Get & Transform) to create queries to shape, transform, and combine data in a variety of ways. You can export your work as a Power Query Template to define a data flow operation in Power Apps. You can even create a data type to supplement linked data types. For more information, see Power Query for Excel Help.
-
Security Data privacy, credentials, and authentication are always an ongoing concern. For more information, see Manage data source settings and permissions and Set privacy levels.
-
Refresh Imported data usually requires a refresh operation to bring in changes, such as additions, updates, and deletes, to Excel. For more information, see Refresh an external data connection in Excel.
-
Connections/Properties Each external data source has assorted connection and property information associated with it that sometimes requires changes depending on your circumstances. For more information, see Manage external data ranges and their properties, Create, edit, and manage connections to external data, and Connection properties.
-
Legacy Traditional methods, such as Legacy Import Wizards and MSQuery, are still available for use. For more information, see Data import and analysis options and Use Microsoft Query to retrieve external data.
The following sections provide more details of what’s going on behind the scenes at this busy, Excel train station.
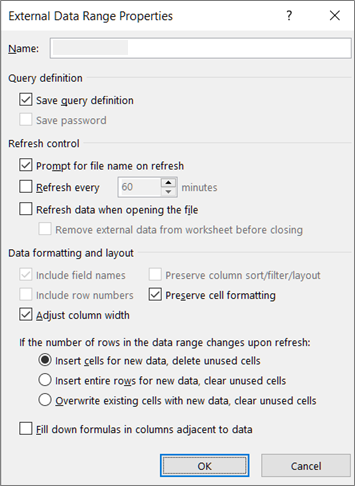
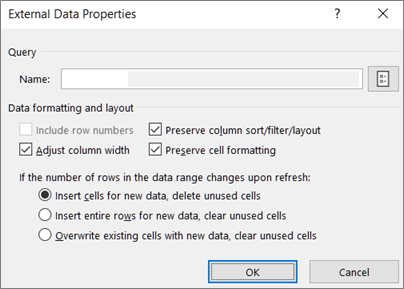
There are connection, query, and external data range properties. Connection and query properties both contain traditional connection information. In a dialog box title, Connection Properties means there is no query associated with it, but Query Properties means there is. External data range properties control the layout and format of data. All data sources have an External Data Properties dialog box, but data sources that have associated credential and refresh information use the larger External Range Data Properties dialog box.
The following information summarizes the most important dialog boxes, panes, command paths, and corresponding help topics.
|
Dialog Box or Pane |
Tabs and tunnels |
Main Help topic |
|---|---|---|
|
Recent sources Data > Recent Sources |
(No tabs) Tunnels to Connect > Navigator dialog box |
Manage data source settings and permissions |
|
Connection Properties Data > Queries & Connections > Connections tab > (right click a connection) > Properties |
Usage tab |
Connection properties |
|
Query Properties
Data > Existing Connections > (right click a connection) > Edit Connection Properties |
Usage tab |
Connection properties |
|
Queries & Connections Data > Queries & Connections |
Queries tab |
Connection properties |
|
Existing Connections Data > Existing Connections |
Connections tab |
Connect to external data |
|
External data properties |
Used in tab (from Connection Properties dialog box) Refresh button on the right tunnels to Query Properties |
Manage external data ranges and their properties |
|
Connection Properties > Definition tab > Export Connection File |
(No tabs) Tunnels to |
Create, edit, and manage connections to external data |
Data in an Excel workbook can come from two different locations. The data may be stored directly in the workbook, or it may be stored in an external data source, such as a text file, a database, or an Online Analytical Processing (OLAP) cube. This external data source is connected to the workbook through a data connection, which is a set of information that describes how to locate, log in to, and access the external data source.
The main benefit of connecting to external data is that you can periodically analyze this data without repeatedly copying the data to your workbook, which is an operation that can be time consuming and prone to error. After connecting to external data, you can also automatically refresh (or update) your Excel workbooks from the original data source whenever the data source is updated with new information.
Connection information is stored in the workbook and can also be stored in a connection file, such as an Office Data Connection (ODC) file (.odc) or a Data Source Name file (.dsn).
To bring external data into Excel, you need access to the data. If the external data source that you want to access is not on your local computer, you may need to contact the administrator of the database for a password, user permissions, or other connection information. If the data source is a database, make sure that the database is not opened in exclusive mode. If the data source is a text file or a spreadsheet, make sure that another user does not have it open for exclusive access.
Many data sources also require an ODBC driver or OLE DB provider to coordinate the flow of data between Excel, the connection file, and the data source.
The following diagram summarizes the key points about data connections.
1. There are a variety of data sources that you can connect to: Analysis Services, SQL Server, Microsoft Access, other OLAP and relational databases, spreadsheets, and text files.
2. Many data sources have an associated ODBC driver or OLE DB provider.
3. A connection file defines all the information that is needed to access and retrieve data from a data source.
4. Connection information is copied from a connection file into a workbook, and the connection information can easily be edited.
5. The data is copied into a workbook so that you can use it just as you use data stored directly in the workbook.
To find connection files, use the Existing Connections dialog box. (Select Data > Existing Connections.) Using this dialog box, you can see the following types of connections:
-
Connections in the workbook
This list displays all the current connections in the workbook. The list is created from connections that you already defined, that you created by using the Select Data Source dialog box of the Data Connection Wizard, or from connections that you previously selected as a connection from this dialog box.
-
Connection files on your computer
This list is created from the My Data Sources folder that is usually stored in the Documents folder.
-
Connection files on the network
This list can be created from a set of folders on your local network, the location of which can be deployed across the network as part of the deployment of Microsoft Office group policies, or a SharePoint library.
You can also use Excel as a connection file editor to create and edit connections to external data sources that are stored in a workbook or in a connection file. If you don’t find the connection that you want, you can create a connection by clicking Browse for More to display the Select Data Source dialog box, and then clicking New Source to start the Data Connection Wizard.
After you create the connection, you can use the Connection Properties dialog box (Select Data > Queries & Connections > Connections tab > (right click a connection) > Properties) to control various settings for connections to external data sources, and to use, reuse, or switch connection files.
Note Sometimes, the Connection Properties dialog box is named the Query Properties dialog box when there is a query created in Power Query (formerly called Get & Transform) associated with it.
If you use a connection file to connect to a data source, Excel copies the connection information from the connection file into the Excel workbook. When you make changes by using the Connection Properties dialog box, you are editing the data connection information that is stored in the current Excel workbook and not the original data connection file that may have been used to create the connection (indicated by the file name that is displayed in the Connection File property on the Definition tab). After you edit the connection information (with the exception of the Connection Name and Connection Description properties), the link to the connection file is removed and the Connection File property is cleared.
To ensure that the connection file is always used when a data source is refreshed, click Always attempt to use this file to refresh this data on the Definition tab. Selecting this check box ensures that updates to the connection file will always be used by all workbooks that use that connection file, which must also have this property set.
By using the Connections dialog box, you can easily manage these connections, including creating, editing, and deleting them (Select Data > Queries & Connections > Connections tab > (right click a connection) > Properties.) You can use this dialog box to do the following:
-
Create, edit, refresh, and delete connections that are in use in the workbook.
-
Verify the source of external data. You may want to do this in case the connection was defined by another user.
-
Show where each connection is used in the current workbook.
-
Diagnose an error message about connections to external data.
-
Redirect a connection to a different server or data source, or replace the connection file for an existing connection.
-
Make it easy to create and share connection files with users.
Connection files are particularly useful for sharing connections on a consistent basis, making connections more discoverable, helping to improve security of connections, and facilitating data source administration. The best way to share connection files is to put them in a secure and trusted location, such as a network folder or SharePoint library, where users can read the file but only designated users can modify the file. For more information, see Share data with ODC.
Using ODC files
You can create Office Data Connection (ODC) files (.odc) by connecting to external data through the Select Data Source dialog box or by using the Data Connection Wizard to connect to new data sources. An ODC file uses custom HTML and XML tags to store the connection information. You can easily view or edit the contents of the file in Excel.
You can share connection files with other people to give them the same access that you have to an external data source. Other users don’t need to set up a data source to open the connection file, but they may need to install the ODBC driver or OLE DB provider required to access the external data on their computer.
ODC files are the recommended method for connecting to data and sharing data. You can easily convert other traditional connection files (DSN, UDL, and query files) to an ODC file by opening the connection file and then clicking the Export Connection File button on the Definition tab of the Connection Properties dialog box.
Using query files
Query files are text files that contain data source information, including the name of the server where the data is located and the connection information that you provide when you create a data source. Query files are a traditional way for sharing queries with other Excel users.
Using .dqy query files You can use Microsoft Query to save .dqy files that contain queries for data from relational databases or text files. When you open these files in Microsoft Query, you can view the data returned by the query and modify the query to retrieve different results. You can save a .dqy file for any query that you create, either by using the Query Wizard or directly in Microsoft Query.
Using .oqy query files You can save .oqy files to connect to data in an OLAP database, either on a server or in an offline cube file (.cub). When you use the Multi-Dimensional Connection Wizard in Microsoft Query to create a data source for an OLAP database or cube, an .oqy file is created automatically. Because OLAP databases aren’t organized in records or tables, you can’t create queries or .dqy files to access these databases.
Using .rqy query files Excel can open query files in .rqy format to support OLE DB data source drivers that use this format. For more information, see the documentation for your driver.
Using .qry query files Microsoft Query can open and save query files in .qry format for use with earlier versions of Microsoft Query that cannot open .dqy files. If you have a query file in .qry format that you want to use in Excel, open the file in Microsoft Query, and then save it as a .dqy file. For information about saving .dqy files, see Microsoft Query Help.
Using .iqy Web query files Excel can open .iqy Web query files to retrieve data from the Web. For more information, see Export to Excel from SharePoint.
An external data range (also called a query table) is a defined name or table name that defines the location of the data brought into a worksheet. When you connect to external data, Excel automatically creates an external data range. The only exception to this is a PivotTable report connected to a data source, which does not create an external data range. In Excel, you can format and lay out an external data range or use it in calculations, as with any other data.
Excel automatically names an external data range as follows:
-
External data ranges from Office Data Connection (ODC) files are given the same name as the file name.
-
External data ranges from databases are named with the name of the query. By default Query_from_source is the name of the data source that you used to create the query.
-
External data ranges from text files are named with the text file name.
-
External data ranges from Web queries are named with the name of the Web page from which the data was retrieved.
If your worksheet has more than one external data range from the same source, the ranges are numbered. For example, MyText, MyText_1, MyText_2, and so on.
An external data range has additional properties (not to be confused with connection properties) that you can use to control the data, such as the preservation of cell formatting and column width. You can change these external data range properties by clicking Properties in the Connections group on the Data tab, and then making your changes in the External Data Range Properties or External Data Properties dialog boxes.
|
|
|
There are several data objects (such as an external data range and PivotTable report) that you can use to connect to different data sources. However, the type of data source that you can connect to is different between each data object.
You can use and refresh connected data in Excel Services. As with any external data source, you may need to authenticate your access. For more information, see Refresh an external data connection in Excel. For more information about credentials, see Excel Services Authentication Settings.
The following table summarizes which data sources are supported for each data object in Excel.
|
Excel |
Creates |
OLE |
ODBC |
Text |
HTML |
XML |
SharePoint |
|
|
Import Text Wizard |
Yes |
No |
No |
Yes |
No |
No |
No |
|
|
PivotTable report |
No |
Yes |
Yes |
Yes |
No |
No |
Yes |
|
|
PivotTable report |
No |
Yes |
No |
No |
No |
No |
No |
|
|
Excel Table |
Yes |
Yes |
Yes |
No |
No |
Yes |
Yes |
|
|
XML Map |
Yes |
No |
No |
No |
No |
Yes |
No |
|
|
Web Query |
Yes |
No |
No |
No |
Yes |
Yes |
No |
|
|
Data Connection Wizard |
Yes |
Yes |
Yes |
Yes |
Yes |
Yes |
Yes |
|
|
Microsoft Query |
Yes |
No |
Yes |
Yes |
No |
No |
No |
|
Note: These files, a text file imported by using the Import Text Wizard, an XML file imported by using an XML Map, and an HTML or XML file imported by using a Web Query, do not use an ODBC driver or OLE DB provider to make the connection to the data source.
Excel Services workaround for Excel tables and named ranges
If you want to display an Excel workbook in Excel Services, you can connect to and refresh data, but you must use a PivotTable report. Excel Services does not support external data ranges, which means that Excel Services does not support an Excel Table connected to a data source, a Web query, an XML map, or Microsoft Query.
However, you can work around this limitation by using a PivotTable to connect to the data source, and then design and layout the PivotTable as a two-dimensional table without levels, groups, or subtotals so that all desired row and column values are displayed.
Let’s take a trip down database memory lane.
About MDAC, OLE DB, and OBC
First of all, apologies for all the acronyms. Microsoft Data Access Components (MDAC) 2.8 is included with Microsoft Windows . With MDAC, you can connect to and use data from a wide variety of relational and nonrelational data sources. You can connect to many different data sources by using Open Database Connectivity (ODBC) drivers or OLE DB providers, which are either built and shipped by Microsoft or developed by various third parties. When you install Microsoft Office, additional ODBC drivers and OLE DB providers are added to your computer.
To see a complete list of OLE DB providers installed on your computer, display the Data Link Properties dialog box from a Data Link file, and then click the Provider tab.
To see a complete list of ODBC providers installed on your computer, display the ODBC Database Administrator dialog box, and then click the Drivers tab.
You can also use ODBC drivers and OLE DB providers from other manufacturers to get information from sources other than Microsoft data sources, including other types of ODBC and OLE DB databases. For information about installing these ODBC drivers or OLE DB providers, check the documentation for the database, or contact your database vendor.
Using ODBC to connect to data sources
In the ODBC architecture, an application (such as Excel) connects to the ODBC Driver Manager, which in turn uses a specific ODBC driver (such as the Microsoft SQL ODBC driver) to connect to a data source (such as a Microsoft SQL Server database).
To connect to ODBC data sources, do the following:
-
Ensure that the appropriate ODBC driver is installed on the computer that contains the data source.
-
Define a data source name (DSN) by using either the ODBC Data Source Administrator to store the connection information in the registry or a DSN file, or a connect string in Microsoft Visual Basic code to pass the connection information directly to the ODBC Driver Manager.
To define a data source, in Windows click the Start button and then click Control Panel. Click System and Maintenance, and then click Administrative Tools. Click Performance and Maintenance, click Administrative Tools. and then click Data Sources (ODBC). For more information about the different options, click the Help button in each dialog box.
Machine data sources
Machine data sources store connection information in the registry, on a specific computer, with a user-defined name. You can use machine data sources only on the computer they are defined on. There are two types of machine data sources — user and system. User data sources can be used only by the current user and are visible only to that user. System data sources can be used by all users on a computer and are visible to all users on the computer.
A machine data source is especially useful when you want to provide added security, because it helps ensure that only users who are logged on can view a machine data source, and a machine data source cannot be copied by a remote user to another computer.
File data sources
File data sources (also called DSN files) store connection information in a text file, not the registry, and are generally more flexible to use than machine data sources. For example, you can copy a file data source to any computer with the correct ODBC driver, so that your application can rely on consistent and accurate connection information to all the computers it uses. Or you can place the file data source on a single server, share it between many computers on the network, and easily maintain the connection information in one location.
A file data source can also be unshareable. An unshareable file data source resides on a single computer and points to a machine data source. You can use unshareable file data sources to access existing machine data sources from file data sources.
Using OLE DB to connect to data sources
In the OLE DB architecture, the application that accesses the data is called a data consumer (such as Excel), and the program that allows native access to the data is called a database provider (such as Microsoft OLE DB Provider for SQL Server).
A Universal Data Link file (.udl) contains the connection information that a data consumer uses to access a data source through the OLE DB provider of that data source. You can create the connection information by doing one of the following:
-
In the Data Connection Wizard, use the Data Link Properties dialog box to define a data link for an OLE DB provider.
-
Create a blank text file with a .udl file name extension, and then edit the file, which displays the Data Link Properties dialog box.
See Also
Power Query for Excel Help
Need more help?
Want more options?
Explore subscription benefits, browse training courses, learn how to secure your device, and more.
Communities help you ask and answer questions, give feedback, and hear from experts with rich knowledge.
Содержание
- AppData – что лежит в этом таинственном каталоге и как избавиться от всего ненужного в нем
- AppData – что лежит в этом таинственном каталоге и как избавиться от всего ненужного в нем
- Windows 11
- Не отображается текст в ячейке Excel
- Как отобразить строки в Excel
- Как закрыть Эксель, если не закрывается
- Как сделать, чтобы Эксель не округлял числа
- Восстановление документов Excel, которые были закрыты без сохранения
- Решения ошибки 0xc004f017 при активации Microsoft Office
- Что нужно попробовать?
- 1) Полная переустановка
- 2) Восстановить Microsoft Office
- 3) Очистить временные файлы Центра обновления Windows
- 4) Подправить реестр
- 5) Через командную строку
- Как найти и открыть папку AppData в Windows 7 или Windows 10
- Как найти скрытые папки и папку AppData
- Папка AppData, можно ли удалять как найти в Windows 10?
- Как открыть папку AppData в Windows 10?
- Можно ли удалить папку AppData в операционной системе Windows 10?
AppData – что лежит в этом таинственном каталоге и как избавиться от всего ненужного в нем

AppData – что лежит в этом таинственном каталоге и как избавиться от всего ненужного в нем

Windows 11

Не отображается текст в ячейке Excel

Как отобразить строки в Excel

Как закрыть Эксель, если не закрывается

Как сделать, чтобы Эксель не округлял числа

Операционная система Windows скрывает в себе множество тайн, но некоторые из них более интересны, чем другие, и если вы возьметесь их распутывать, то можете получить неоспоримую пользу.
Возьмем, к примеру, каталог, который впервые появился в Windows Vista и о существовании которого мало кто подозревает. Причина заключается в том, что он скрыт от глаз пользователей, так как в нем хранится исключительно важная системная информация. Однако понимание его природы может помочь вам сэкономить драгоценное дисковое пространство на вашем основном разделе и, возможно, повысить производительность всей системы.
AppData (или Application Data) – это скрытая (по умолчанию) системная папка, подкаталог папки Users с личными файлами всех зарегистрированных пользователей. Папка содержит всю информацию, порожденную установленными программами на компьютере и невидима для пользователей, потому что (по крайней мере, в теории) хранящиеся в ней файлы не должны представлять для них никакого интереса.
Тем не менее, реальность часто расходится с первоначальным замыслом Microsoft. При продолжительном и активном использовании Windows без переустановки системы размер этой папки будет стремительно расти, и вскоре вы можете столкнуться с недостатком свободного пространства на системном разделе – особенно если вы используете SSD-устройство относительно скромного объема, на котором каждый мегабайт имеет значение.
Давайте подробно рассмотрим структуру AppData и выясним, какие из файлов, хранящихся в этой папке, имеют критическое значение, а какие нет.
Как уже упоминалось, AppData по умолчанию скрыта, поэтому, чтобы добраться до нее, вы должны будете изменить некоторые системные настройки Windows. Для этого откройте «Панель управления» и перейдите в раздел «Оформление и персонализация». Затем откройте диалоговое окно «Параметры папок» и на вкладке «Вид» в списке параметров найдите опцию «Скрытые файлы и папки». Теперь просто измените настройки по умолчанию («Не показывать скрытые файлы, папки и диски») на «Показывать скрытые файлы, папки и диски».

Это сделает видимой не только AppData, но и ряд других системных каталогов и файлов, а также файлы и папки, которые были скрыты вами.
AppData находится в папке C:Users, но обратите внимание, что каждый зарегистрированный в системе пользователь имеет свой собственный каталог AppData, так что ищите папку в директории с вашим именем пользователя.
По умолчанию в этом каталоге находятся три подкаталога: Local, LocalLow и Roaming. Каждый из них хранит данные различных профилей.
Local содержит файлы, созданные в процессе работы установленных программ. Эта информация строго специфична для конкретного пользователя компьютера и не может быть перемещена на новую машину. Здесь вы найдете и папку с именем Microsoft, содержащую историю всей активности Windows.
В Local находится и папка с временными файлами (Temp), созданными во время работы различных приложений. Ее содержимое (временные файлы) можно удалить полностью, так как очень часто эти записи являются ненужными и только занимают место на диске.
Папка Roaming хранит определенные пользовательские файлы, которые могут быть перенесены с компьютера на компьютер.
Папка LocalLow предназначена в основном для буферных данных, генерируемых Internet Explorer, Java и программами от Adobe.
Очень часто в этих подкаталогах AppData накапливается довольно много софтверных «отходов», которые со временем могут разрастись до невероятных размеров. Для очистки системы от всех этих мусорных файлов вовсе не обязательно лезть в глубины AppData. До папки с временными файлами, подлежащими удалению, можно добраться и более простым способом.
Если в адресной строке проводника написать shell:history и нажать Enter, вы мгновенно окажитесь в папке с историей Internet Explorer. shell:cache открывает директорию с офлайн буфером браузера, shell:cookies показывает все записанные файлы «куки», а с shell:sendto вы можете удалять и добавлять ярлыки в меню «Отправить».

Ну а самый простой и лучший способ очистки не только AppData, но и всего ненужного на жестком диске, по-прежнему заключается в периодическом сканировании системы чудесным инструментом CCleaner от Piriform.
Источник
Восстановление документов Excel, которые были закрыты без сохранения
Могу ли я гарантировать, что если я по ошибке закрыть документ Microsoft Excel без сохранения последней версии, что я могу восстановить часть работы я сделал?
Я использую Excel 2003.
Ищите любые файлы в следующем:
C: Documents и Settings имя пользователя Application Data Microsoft Excel
В моем случае, я нашел странствующий файл здесь:
C: Documents и Settings имя пользователя Application Data Microsoft Excel
Для файла Excel 2003 в нашем офисе локальной сети компьютер синий просеивают и все изменения были потеряны в документе. Я нашел файл отображается в строке выше и правая кнопка мыши, Открыть с помощью Excel и вуаля, там был файл со всеми моими изменениями.
Сразу же сохранил его с новым именем и вернуться к работе.
ar. xar являются файлы для восстановления (если это возможно)!
Относится к Excel 2007 (и, возможно, 2003) на Windows 7.
У меня была похожая ситуация, но кто-то работал на сервере нашей компании через удаленный рабочий стол. Кто-то порекомендовал следующее дерево файлов, которое было полезно:
Я на самом деле нашел файлы на сервере с помощью подобного дерева файлов с фантастическим Неправительственными первенствует расширение файла и, в то время как я не мог двойной щелчок и открытым, я смог открыть его просто отлично от уже запущенного программного обеспечения Excel и, наконец, сохранить его в виде таблицы.
Источник
Решения ошибки 0xc004f017 при активации Microsoft Office
Код ошибки 0xc004f017 всегда появляется при попытке активировать свой Microsoft Office. Она возникает во всех версиях офисного пакета, например, в Office 2013, Office 2016, Office 2019 и Office 365. При чем ошибка может отобразиться как при вводе лицензионного ключа, так и при попытке активировать софт с помощью KMS Auto. Конечно, мы не одобряем пиратское использование программ. Наша текущая цель – разобраться с ошибкой 0xc004f017, а она затрагивает и пользователей лицензионного программного обеспечения.
У вас может отобразиться одна из разновидностей ошибки:
ТЕКСТ ОШИБКИ: Служба лицензирования программного обеспечения сообщила, что лицензия не установлена.
Error: 0xC004F074 The Software Licensing Service reported that the computer could not be activated. The Key Management Service (KMS) is unavailable
Что нужно попробовать?
1) Полная переустановка
Часть людей пишут, что не могут активировать Microsoft Office даже после переустановки, но главная их ошибка – не удалить остатки приложения. После простой деинсталляции софта всегда остаются данные пользователя, конфиги, временные файлы. Это сделано для того, чтобы сохранить личные настройки приложений, но в случае с Word, Excel и другими компонентами офисного пакета, это не так уж важно.
Как исправить ошибку 0xC004F017:
2) Восстановить Microsoft Office
В сам инсталлер вшит инструмент сканирования состояния Microsoft Office, и он достаточно неплохо справляется со своими задачами. Он автоматически исправляет множество проблем, в том числе с активацией.

3) Очистить временные файлы Центра обновления Windows
Чтобы Windows позволила удалить ее кэшированные файлы, нужно службу обязательно отключить, иначе они будут зарезервированы системой. Ниже пошаговая инструкция:
4) Подправить реестр
Есть в реестре несколько параметров, которые содержат пути для установки Microsoft Office, из-за них может появляться ошибка с кодом 0xC004F017.
5) Через командную строку
Данная процедура применима для тех, кто пытается активировать MS Office через консоль командой slmgr.vbs /ato. Она возвращает error 0xC004F074.
Перечисленные процедуры применимы ко всем способам активации Microsoft Office, ранее вызывавших 0xC004F074, как через ввод лицензионного ключа, так и консоль, дополнительный софт.
Источник
Как найти и открыть папку AppData в Windows 7 или Windows 10

Папка AppData используется многими программами и компьютерными играми для хранения своих настроек и других данных, которые им нужны для работы.
Например, при установке веб-браузера Opera, сама программа устанавливается в папку Program Files, но при этом профиль пользователя находится в папке AppDataRoamingOpera. В то же время веб-браузер Google Chrome полностью устанавливается в папку AppDataLocalGoogle. Аналогичная ситуация и со многими играми. Например, популярная компьютерная игра Minecraft хранит свои настройки и моды в папке AppDataRoaming.minecraft.
В данной статье вы сможете узнать, как найти и открыть папку AppData. Статья будет актуальна для всех современных версий Windows, включая Windows XP, Windows 7, Windows 8 и Windows 10.
Способ № 1. Открытие папки AppData через меню «Выполнить».
Самый простой и быстрый способ открыть папку AppData это воспользоваться меню «Выполнить». Для этого необходимо сначала открыть меню «Выполнить». Если вы пользуетесь Windows XP, то для этого достаточно открыть меню «Пуск» и выбрать пункт «Выполнить».

Если же у вас Windows 7, Windows 8 или Windows 10, то для того чтобы открыть меню «Выполнить» просто нажмите комбинацию клавиш Windows-R.

Так или иначе, перед вами появится меню «Выполнить». Для того чтобы открыть папку AppData вам необходимо ввести команду %appdata% (со знаками процента) и нажать на клавишу ввода. После этого перед вами сразу откроется папка AppData.

Кстати, подобным образом можно открывать и другие системные папки. Например, вы можете ввести %systemroot% для того чтобы открыть папку Windows. Для того чтобы узнать весь список подобных команд, откройте командную строку и введите команду «set».
Способ № 2. Открытие папки AppData вручную.
Также вы можете найти и открыть папку AppData вручную. Для этого сначала необходимо включить отображение скрытых и системных папок. В Windows 7 для этого необходимо открыть любую папку, нажать на кнопку ALT, открыть меню «Сервис» и выбрать там «Параметры папок».

В Windows 8 или Windows 10 для этого необходимо открыть любую папку, перейти на вкладку «Вид» и нажать на кнопку «Параметры».

Так или иначе, перед вами появится окно «Параметры папок». В этом окне необходимо сразу перейти на вкладку «Вид».

На вкладке «Вид» есть список дополнительных параметров. В этом списке необходимо отключить функцию «Скрывать защищенные системные файлы» и включить функцию «Показывать скрытые папки и диски». После чего необходимо сохранить настройки с помощью кнопки «Ok».

После этого можно приступать к поиску папки AppData. В Windows XP данная папка обычно доступна по адресу «C:Documents and SettingsИмя пользователяApplication Data». В Windows 7 и более новых версиях папка AppData находится по адресу «C:UsersИмя пользователяAppData».
Как найти скрытые папки и папку AppData
Источник
Папка AppData, можно ли удалять как найти в Windows 10?
Добра всем, на связи Алексей! Продолжаем разговор о системных папках. Так уж получается, что для полноценной работы в операционной системе нужно знать некоторые несложные тонкости и хитрости. Потому что рано или поздно все пригодится — особенно когда приходиться заниматься компьютером постоянно.
Часть приложений и программ прописываются в «специальную» системную скрытую папку при установке. Сегодня расскажу, как найти эту папку и для чего она нужна на наглядном примере программы 1с Бухгалтерия 8.2 или 8.3
Как открыть папку AppData в Windows 10?
Для чего нужно бывает открывать эту папку? Некоторые приложения и программы проставляют в эту системную папку файлы установки, обновления программ, файлы различных справочников, инструкции по установке, драйвера защиты, лицензирования и т.д. Словом, все то, что нам необходимо бывает знать.
И для того, чтобы например обновить справочники ОКТМО или ОКПО в 1с нужно сначала установить обновления, а потом указать путь к этой папке для обновления системных справочников. С этим возникают затруднения у тех, кто начинает срочно обслуживать программу самостоятельно — в квартальные даты это как правило бухгалтера.
Папка AppData (данные приложений) является системной, а еще и скрытой. Это значит, что пользователь ее не увидит, если не знает, как изменять настройки отображения скрытых файлов и папок.

В разделе «Параметры проводника» переходим по ссылке «Показ скрытых файлов и папок»…

Делаем настройки как на фото ниже и применяем их. Теперь мы можем увидеть на любом диске скрытый файл или папку:

Можно ли удалить папку AppData в операционной системе Windows 10?
Папка AppData находится по пути C:ПользователиИМЯ_ПОЛЬЗОВАТЕЛЯAppData. Для чего так было сделано? Дело в разграничении полномочий. Можно установить программу так, что она будет доступна всем пользователям компьютера, а можно так, что будет доступна только одному пользователю.
В каждом «пользователе» есть своя папка AppData. Что создает некоторые проблемы — со временем количество установленных релизов начинает занимать много места. Но удалять папку ни в коем случае нельзя! Удаляем только внутреннее содержимое — выборочно.
В случае с 1с бухгалтерией при обычной установке обновлений релизы (и все сопутствующие файлы) проставляются в расположение…

…C:UsersИмяПользователяAppDataRoaming1C1Cv82tmplts В папке с релизом можно найти необходимую сопутствующую информацию — актуальные справочники, информацию об обновлении, драйвера защиты и все что бывает необходимо.

Со временем накапливается в папке AppData большое количество релизов, и папку AppData можно чистить например один раз в год. Для этого выделяем нужные папки сочетанием клавиш Ctl + Папка (для выборочного удаления) либо сочетанием клавиш Ctrl+A (все папки) …

… и аккуратно удаляем. Видно что в папке AppData конкретного пользователя установлены и другие программы:

Их удалять вышеописанным способом нельзя. Сначала удаляем программу через «Панель управления» — «Программы»- «удаление программы», И только после этого если видим что в AppData что-то от нее осталось (такое бывает) — только тогда удаляем папку программы с этого расположения.
Действуйте аккуратно, по порядку и тогда вам удастся корректно очистить компьютер от лишнего! Успехов и добра всем!
Источник
Анализ данных • 23 ноября 2022 • 5 мин чтения
4 инструмента быстрого и простого анализа данных в Microsoft Excel
Обычно аналитики работают со специфическими программами, но в некоторых случаях эффективнее использовать простой инструмент — Microsoft Excel.
Продакт-менеджер, эксперт бесплатного курса по Excel
- Настройка анализа данных в Excel
- Техники анализа данных в Microsoft Excel
- Совет эксперта
-
1. Сводные таблицы
-
2. Лист прогноза в Excel
-
3. Быстрый анализ в Excel
-
4. 3D-карты
Практически все инструменты для анализа данных уже встроены в Excel, и специально настраивать их не нужно. Эти инструменты находятся в главном меню программы в разделе «Данные».

Здесь лежат инструменты для сортировки, фильтрации, прогнозирования и других действий с данными таблицы
В других разделах они тоже встречаются — например, отображение географически привязанных данных на глобусе находится в разделе «Вставка → 3D-карта».
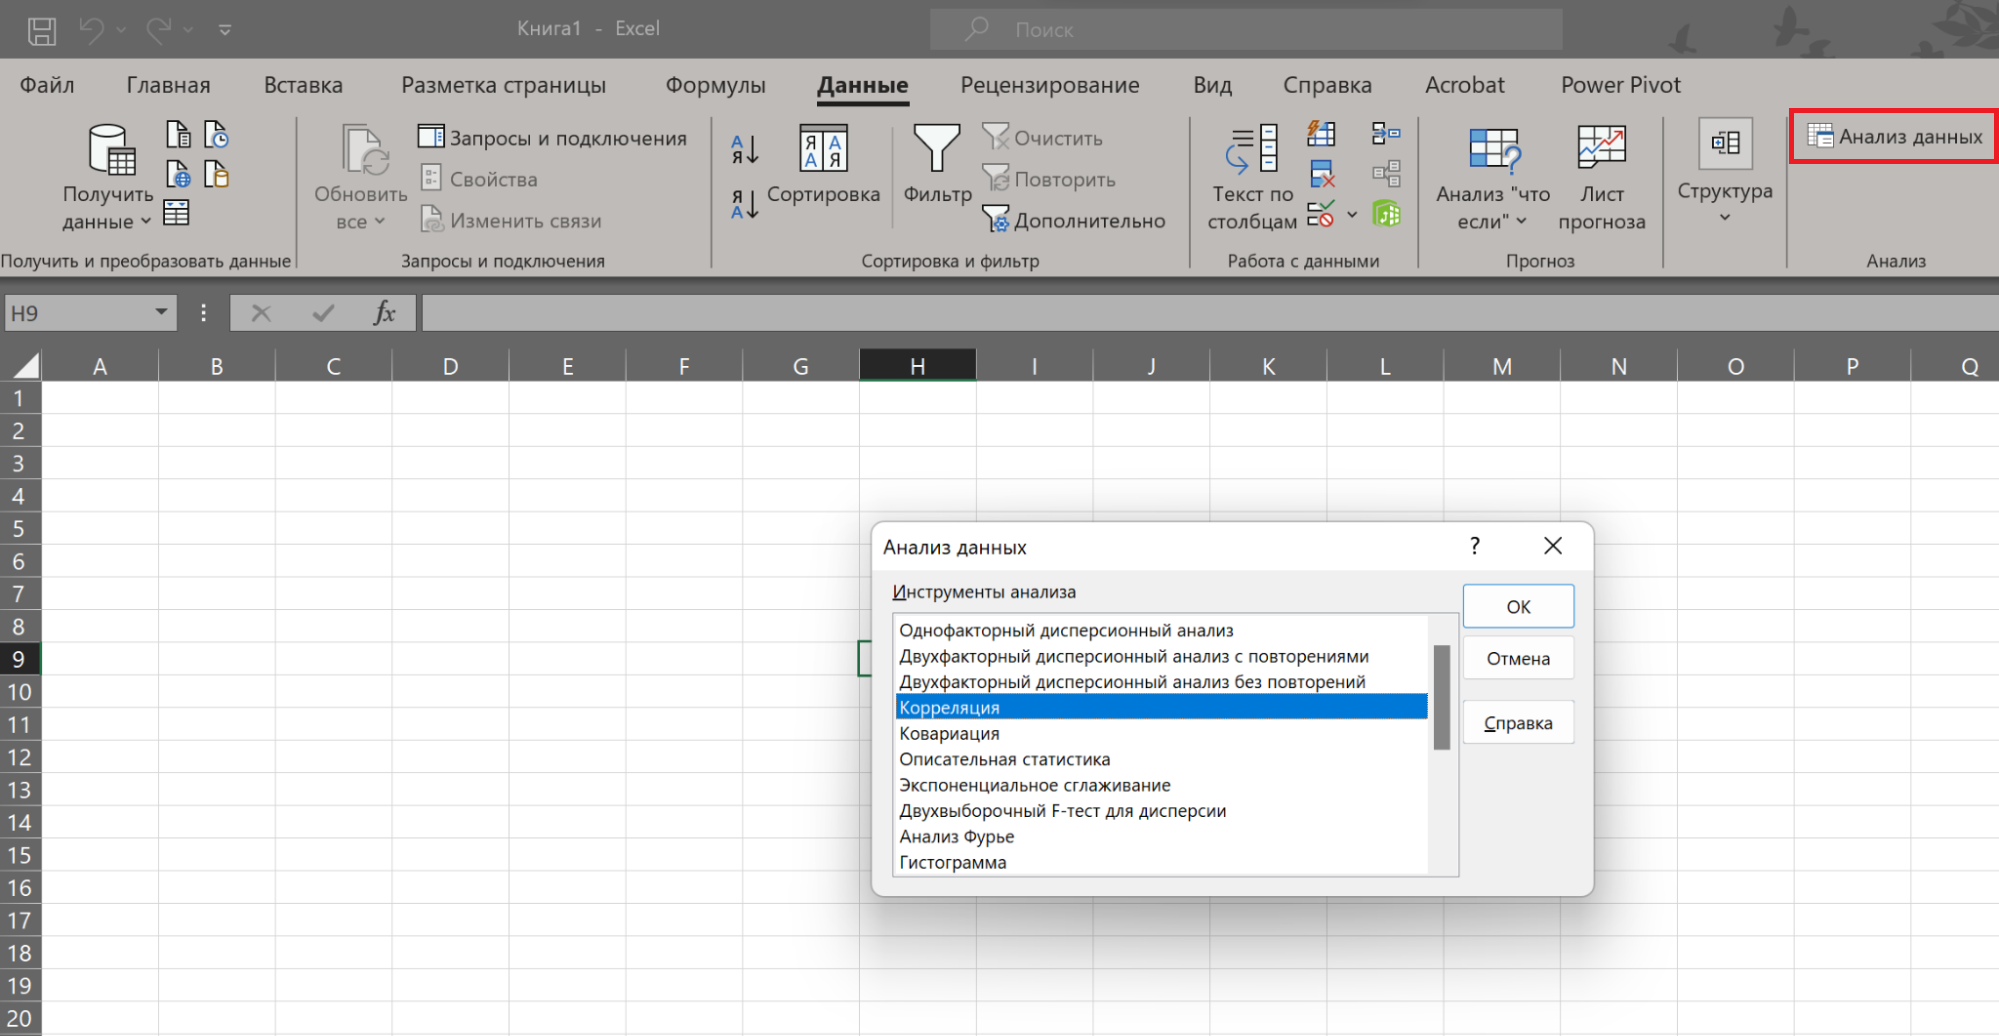
В Excel есть инструменты, которые нужно подключать отдельно. К таким относится анализ корреляций между значениями. Чтобы его использовать, нужно нажать «Файл → Параметры → Надстройки».

Затем в выпадающем списке «Управление» выбрать «Настройки Excel» и нажать «Перейти». Откроется список надстроек.
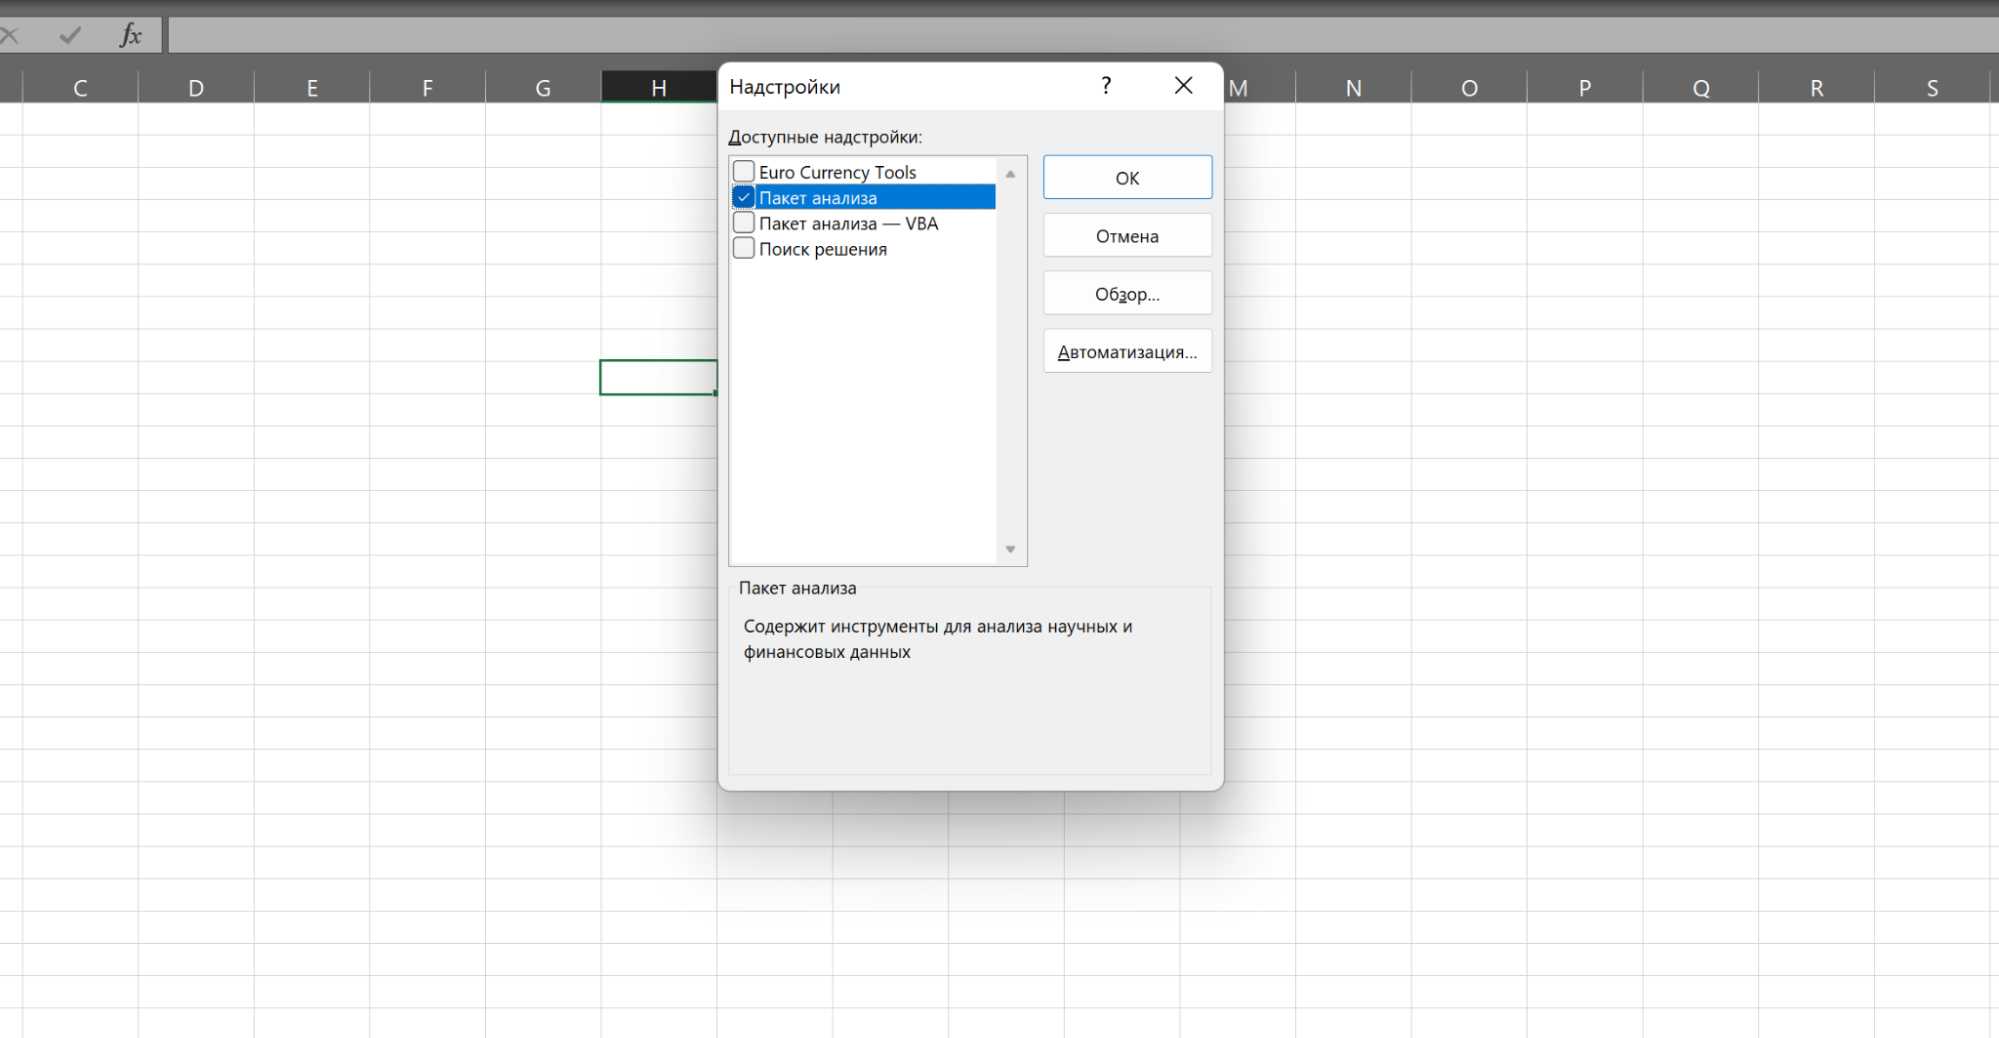
Нужно поставить галочку на «Пакет анализа» и нажать «ОК». После этого в разделе меню «Данные» появится пункт «Анализ данных» с доступными инструментами для анализа.
Инструменты для анализа данных в Excel простые в освоении, но плохо подходят для сложных задач. Тут аналитикам пригодится специальное ПО, аналитические базы данных и код на Python. Работать с этими инструментами учат на курсе «Аналитик данных».
Повышайте прибыль компании с помощью данных
Научитесь анализировать большие данные, строить гипотезы и соберите 13 проектов в портфолио за 6 месяцев, а не 1,5 года. Сделайте первый шаг к новой профессии в бесплатной вводной части курса «Аналитик данных».

Техники анализа данных в Microsoft Excel
Разберём несколько техник, которые позволят быстро изучить информацию, собранную в таблицу Excel.
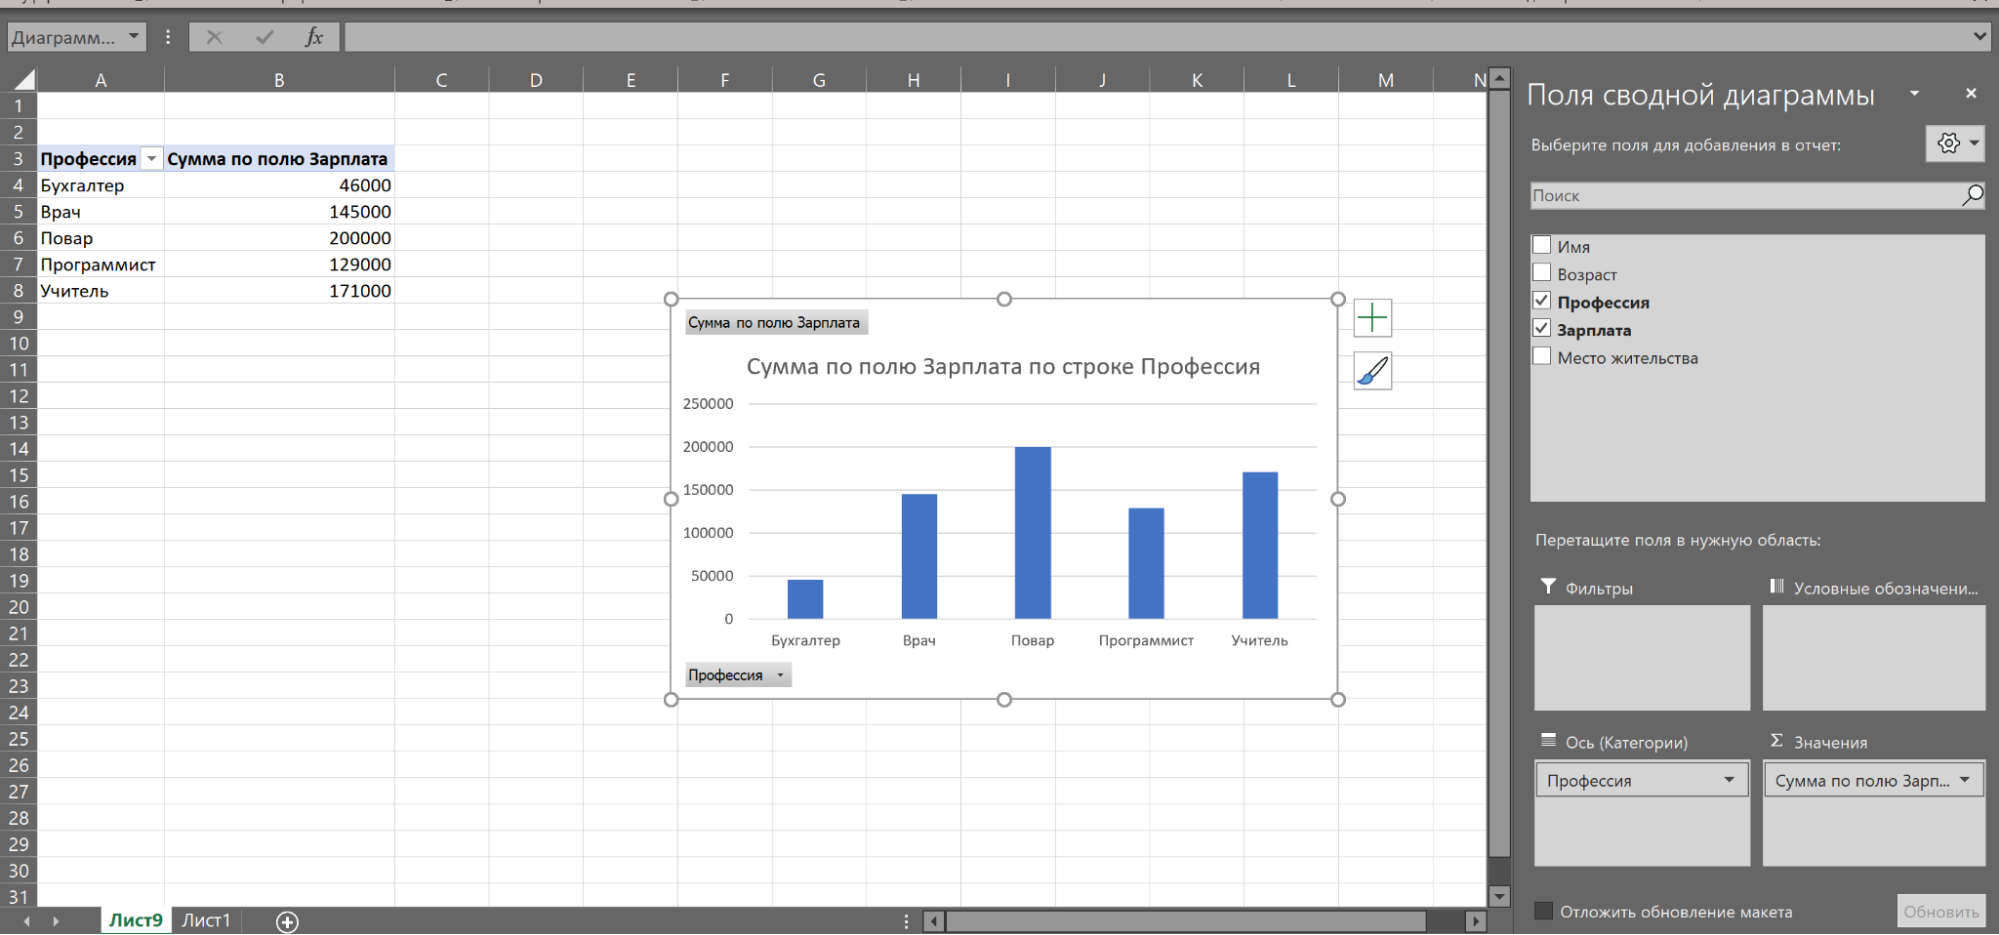
Нужны для того, чтобы сводить данные, то есть смотреть, как соотносится информация в разных столбцах и строках исходной таблицы. Например, есть данные по профессиям и зарплатам разных специалистов. Сводная таблица покажет, сколько в среднем зарабатывает представитель каждой профессии или какая из профессий популярнее.
Чтобы создать сводную таблицу для анализа данных в Microsoft Excel, сначала нужно сделать простую. Затем выделить все данные для анализа и нажать «Вставка» → «Сводная таблица». Excel предложит опции.
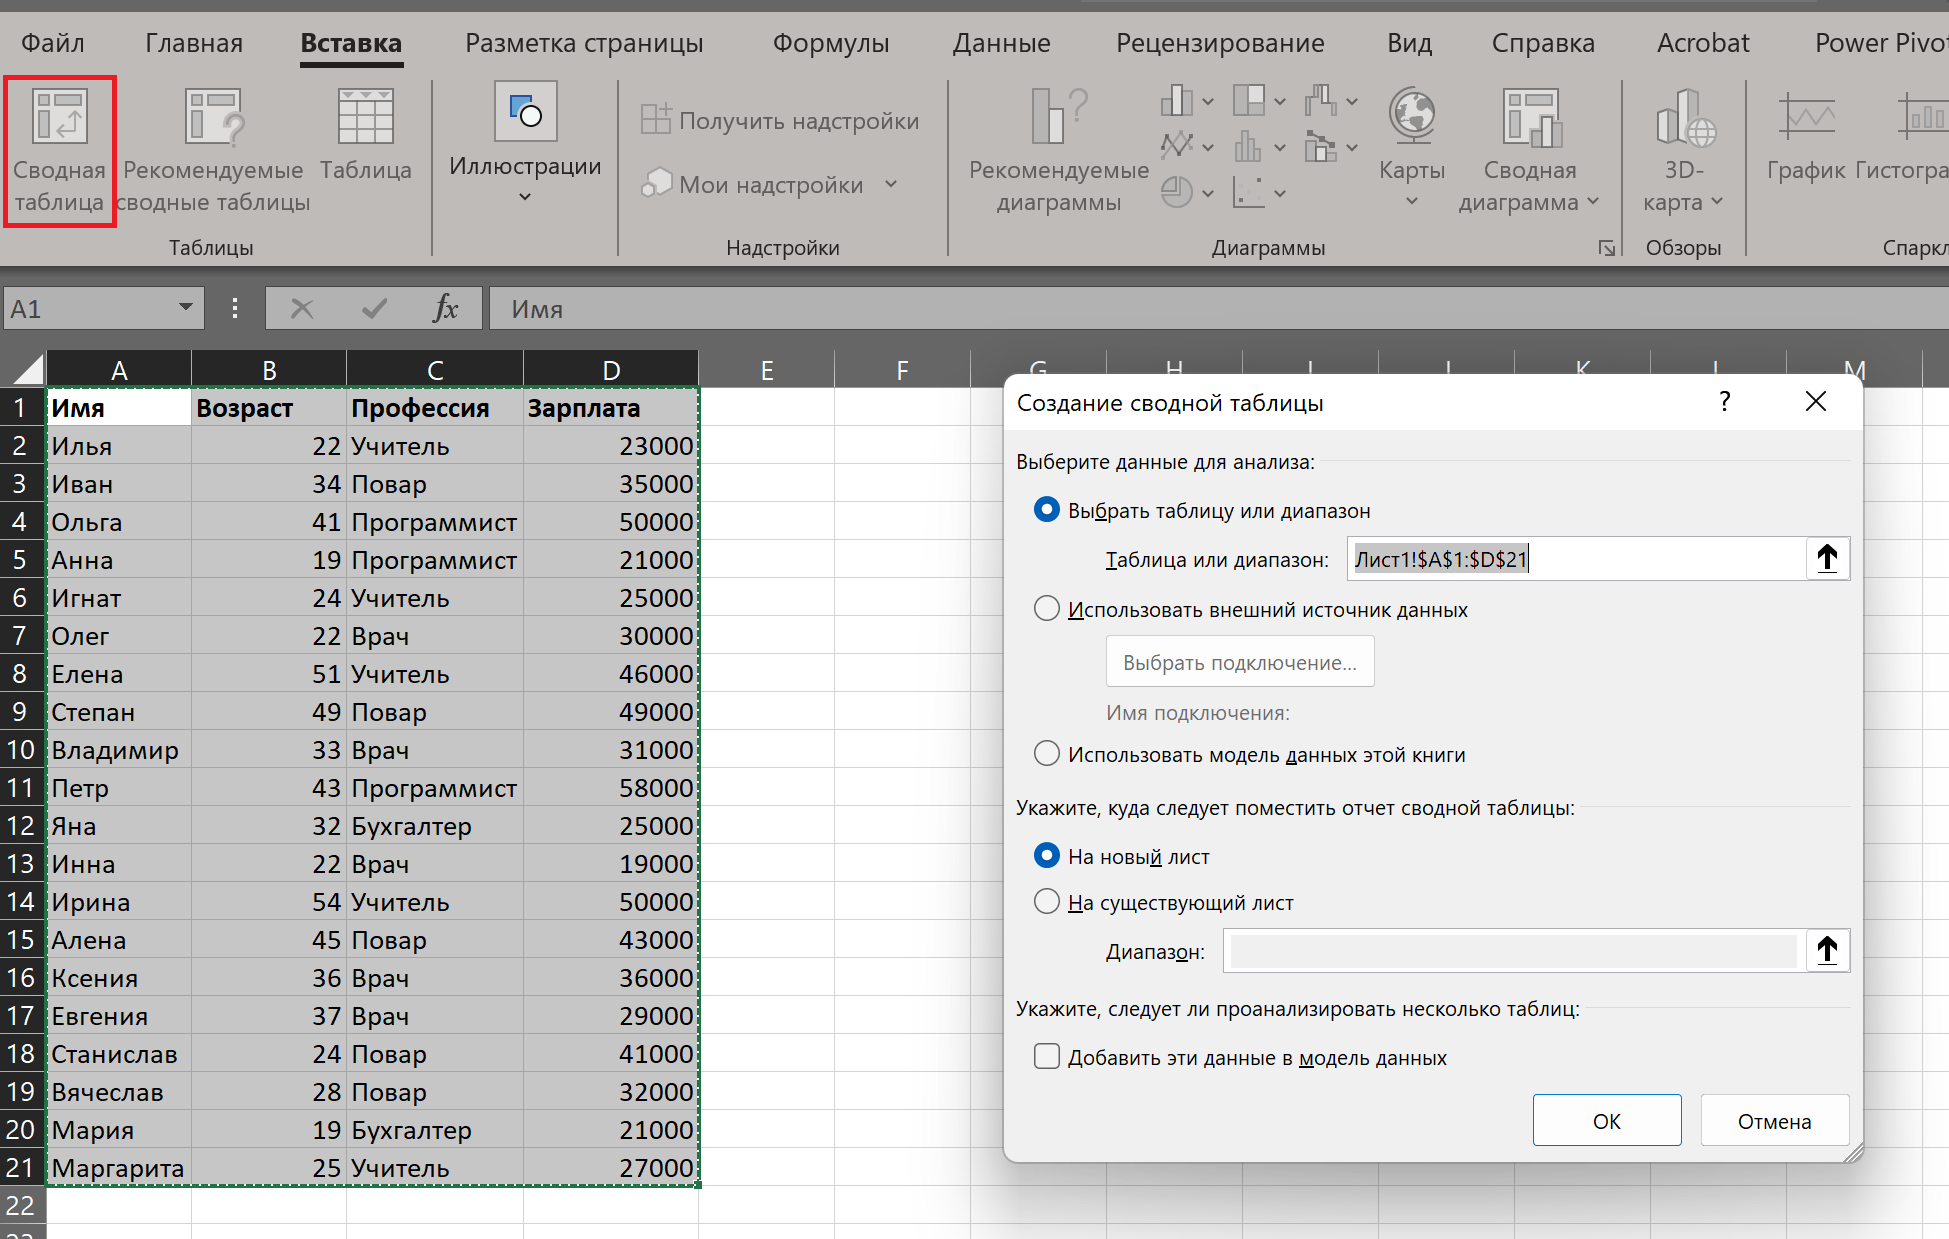
В этом окне можно задать диапазон, а также указать, куда именно вставить новую сводную таблицу — на новый или на этот же лист.
Затем появится новый лист, пока ещё пустой. В окне справа нужно задать поля сводной таблицы.
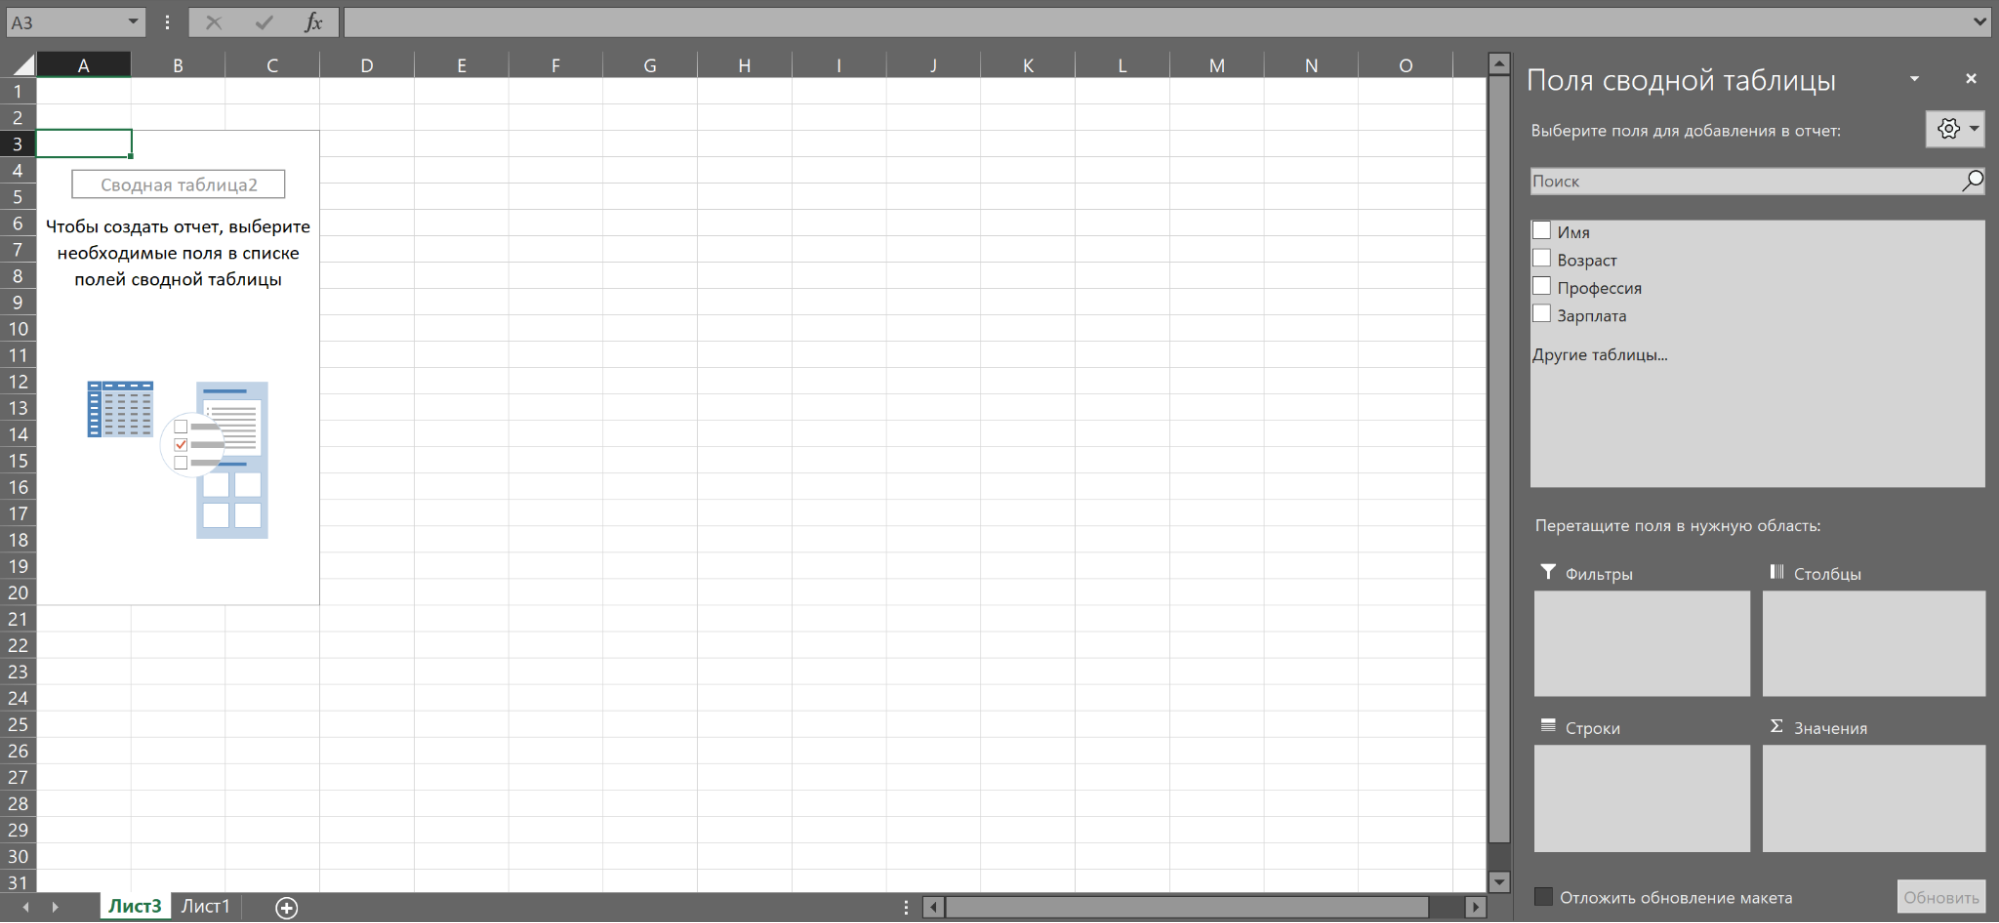
Например, зададим поля «Профессия» и «Зарплата».

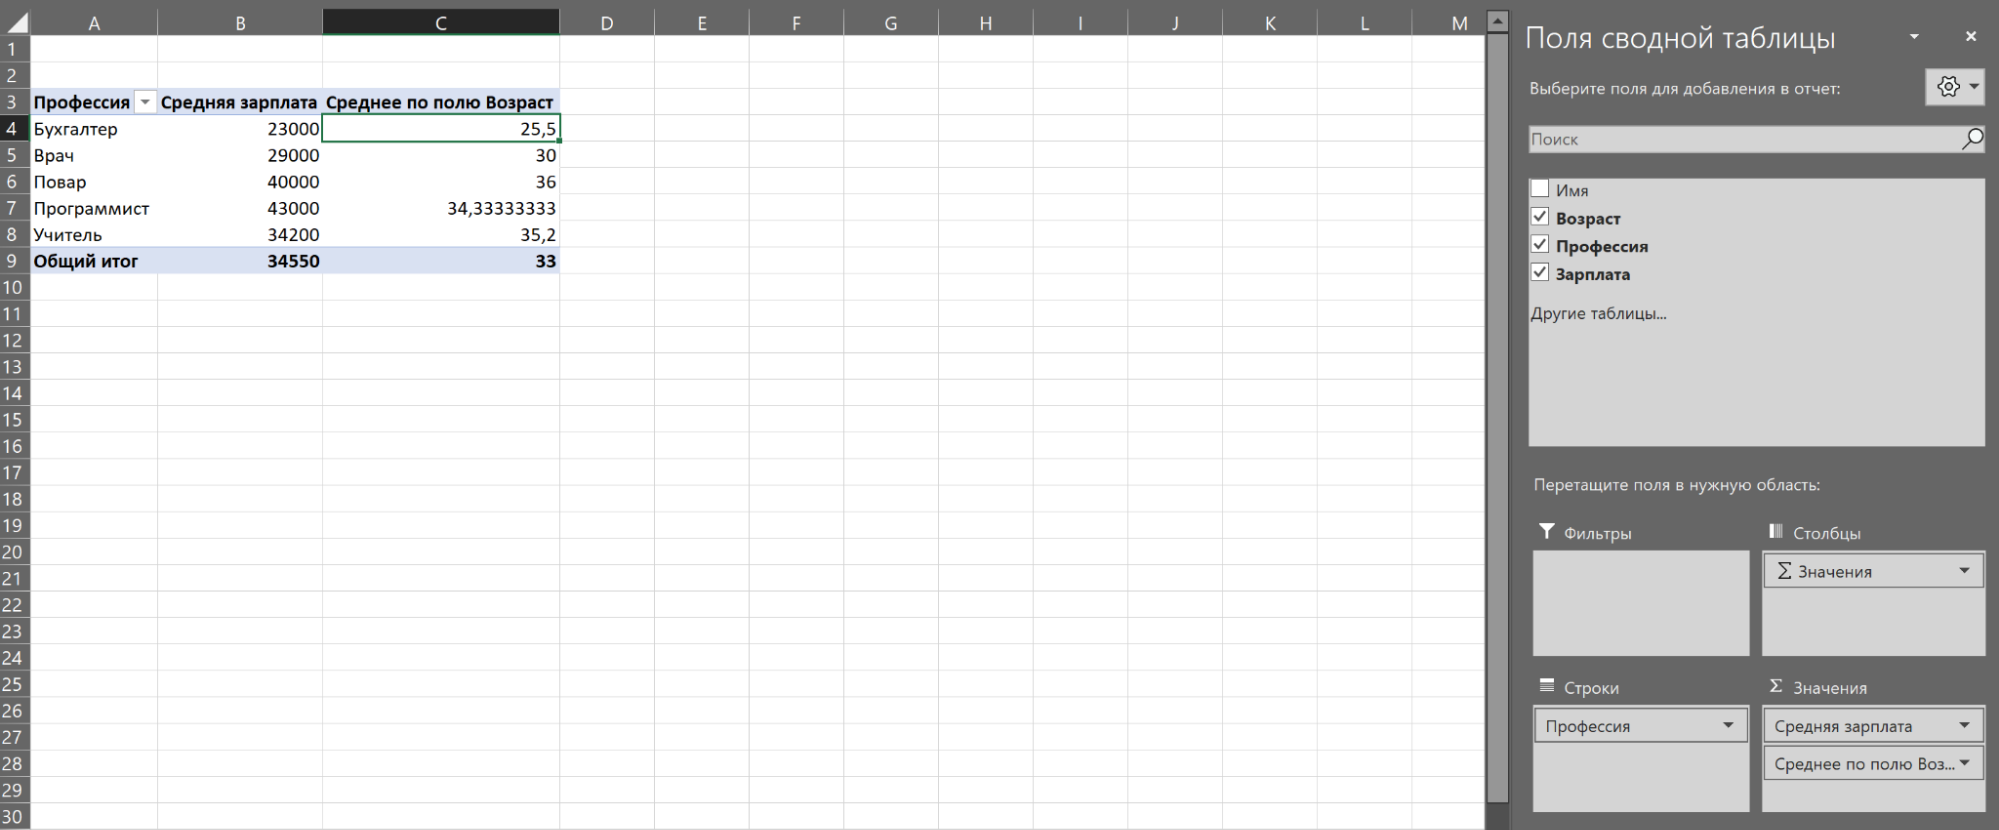
По умолчанию Excel выбирает для числовых данных «Сумму по полю», то есть показывает сумму всех значений. Это можно скорректировать в графе значения, нажав на строку «Сумма по полю» → «Параметры поля значений».

Здесь можно выбрать новое имя для колонки и задать нужную операцию, например вычисление среднего. Получится следующая таблица.

В таблицу можно добавлять дополнительные значения. Допустим, поставить галочку в графе «Возраст», чтобы узнать средний возраст представителей профессии.
Если перетащить графу «Возраст» из раздела «Значений» в «Строки», получится средняя зарплата по профессиям для каждого возраста.

Чтобы вычислить самую популярную профессию, нужно распределить все по столбцам и посчитать, сколько раз они встречаются в таблице.
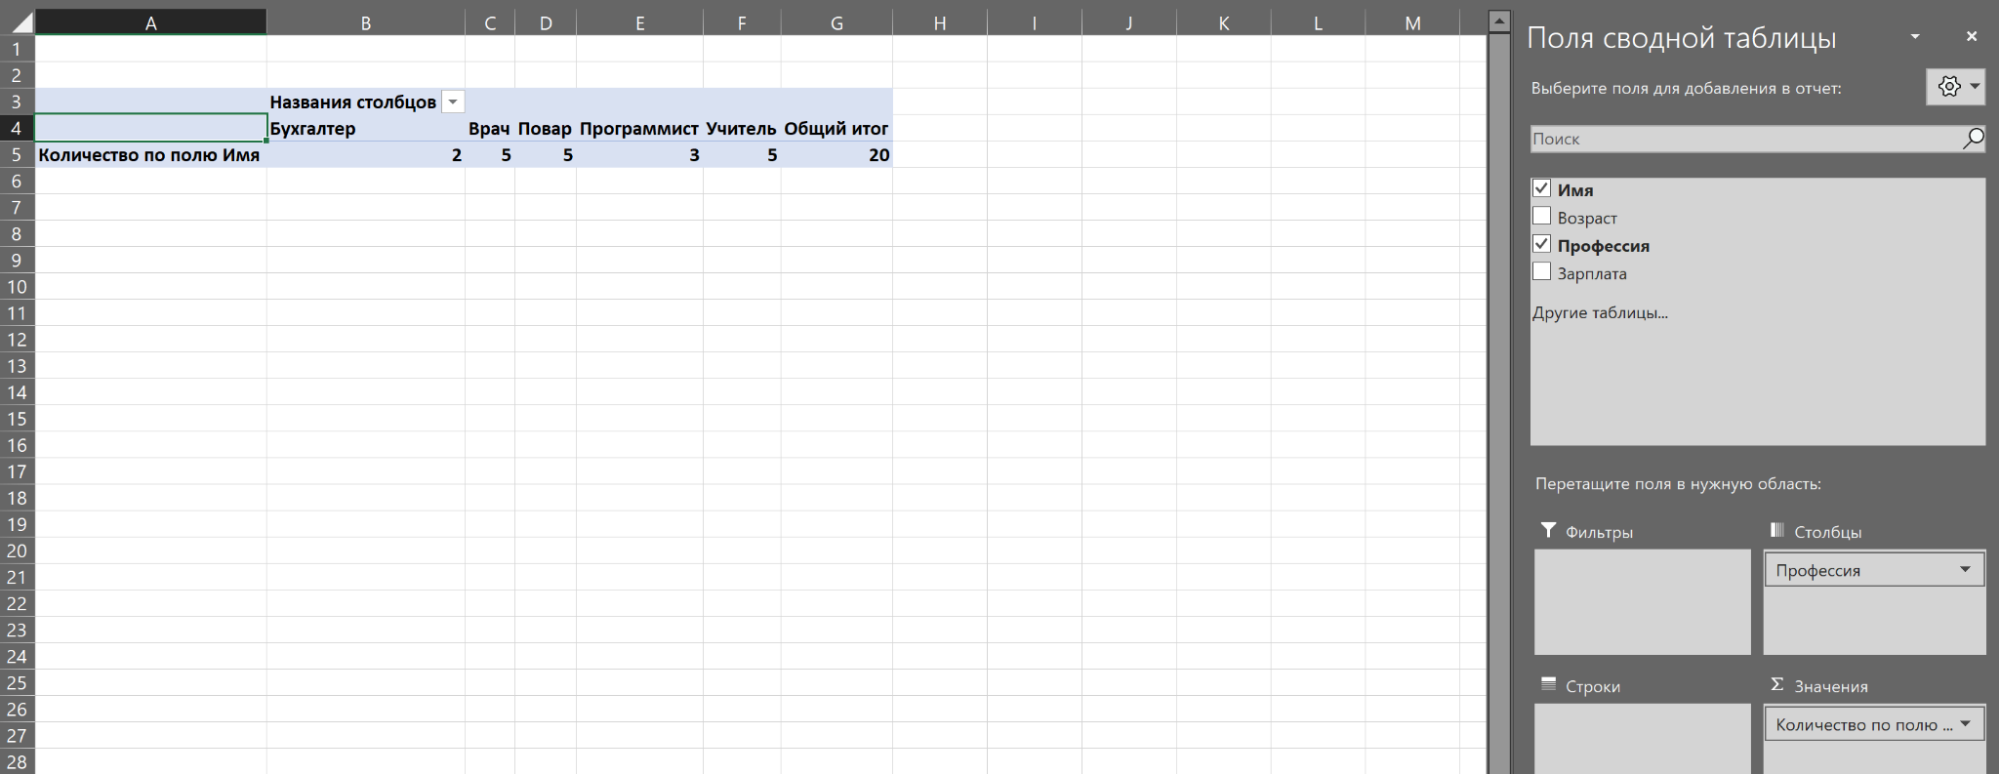
Инструмент «Сводные таблицы» позволяет сопоставлять самые разные значения друг с другом и делать простые вычисления. Часто для базового анализа данных большего и не требуется.
С чем работает аналитик данных: 10 популярных инструментов

2. Лист прогноза в Excel
Это средство анализа данных в MS Excel позволяет взять набор изменяющихся данных и спрогнозировать, как они будут изменяться дальше. Для этого понадобится как можно больший набор данных за прошлые периоды, причём равные — неделю, месяц, год.
Для примера возьмём динамику зарплат за два года.
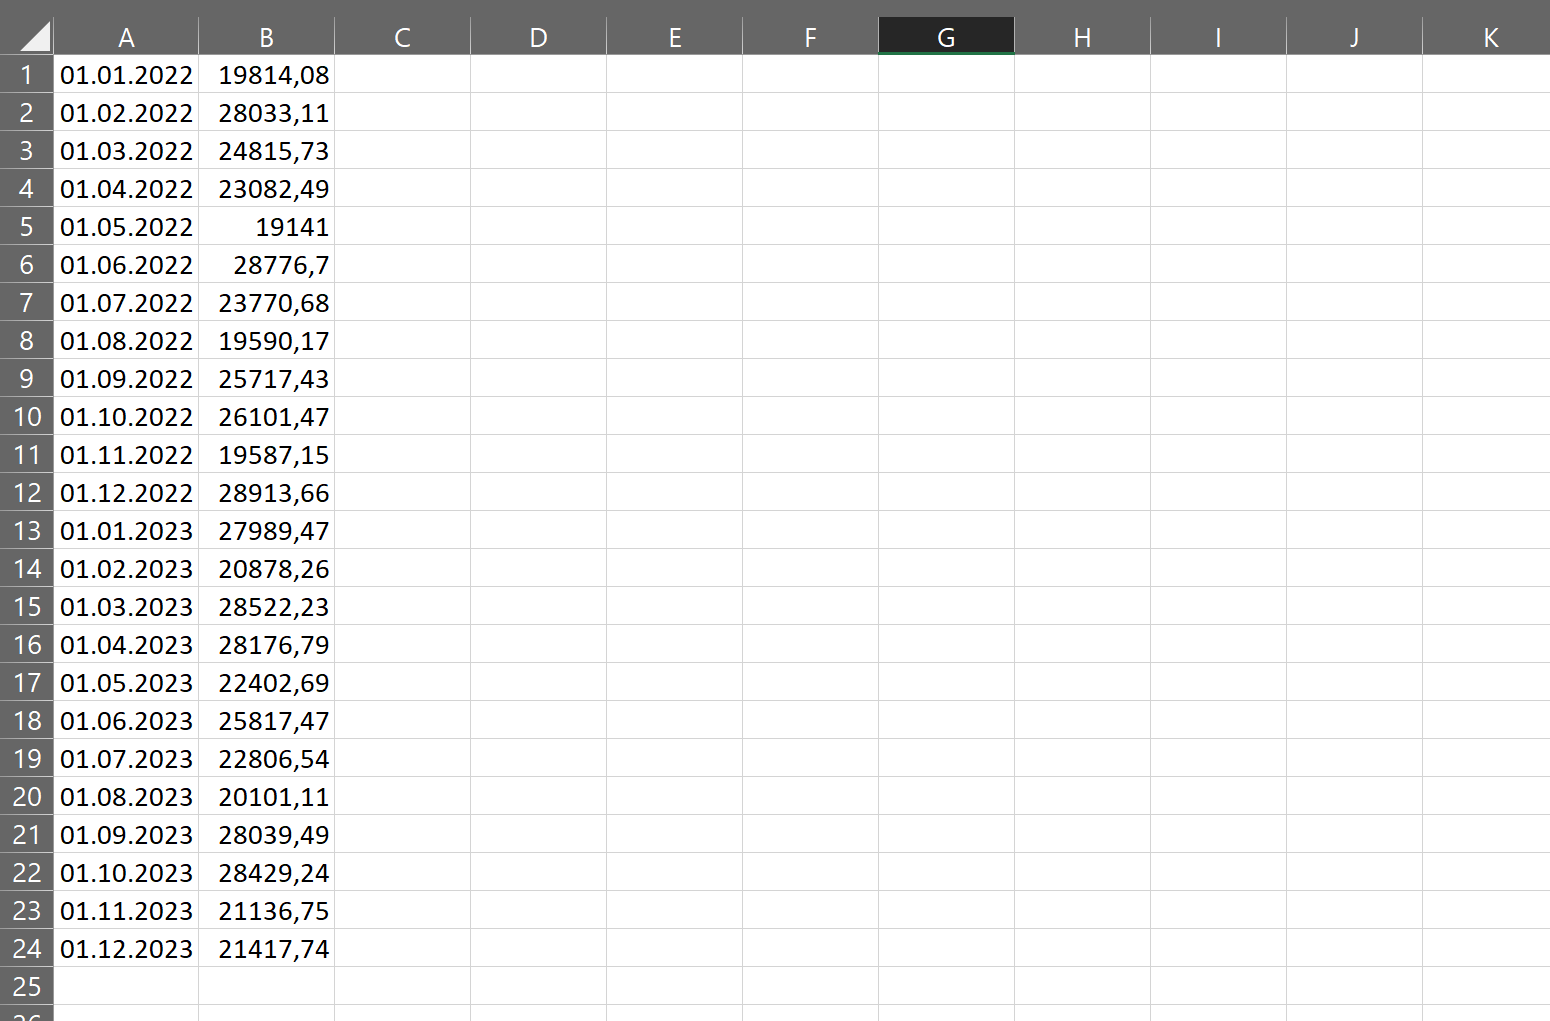
Посчитаем, какой примерно будет зарплата в течение следующего года. Для этого нужно выделить данные для анализа и нажать «Данные» → «Лист прогноза». Появится диалоговое окно.
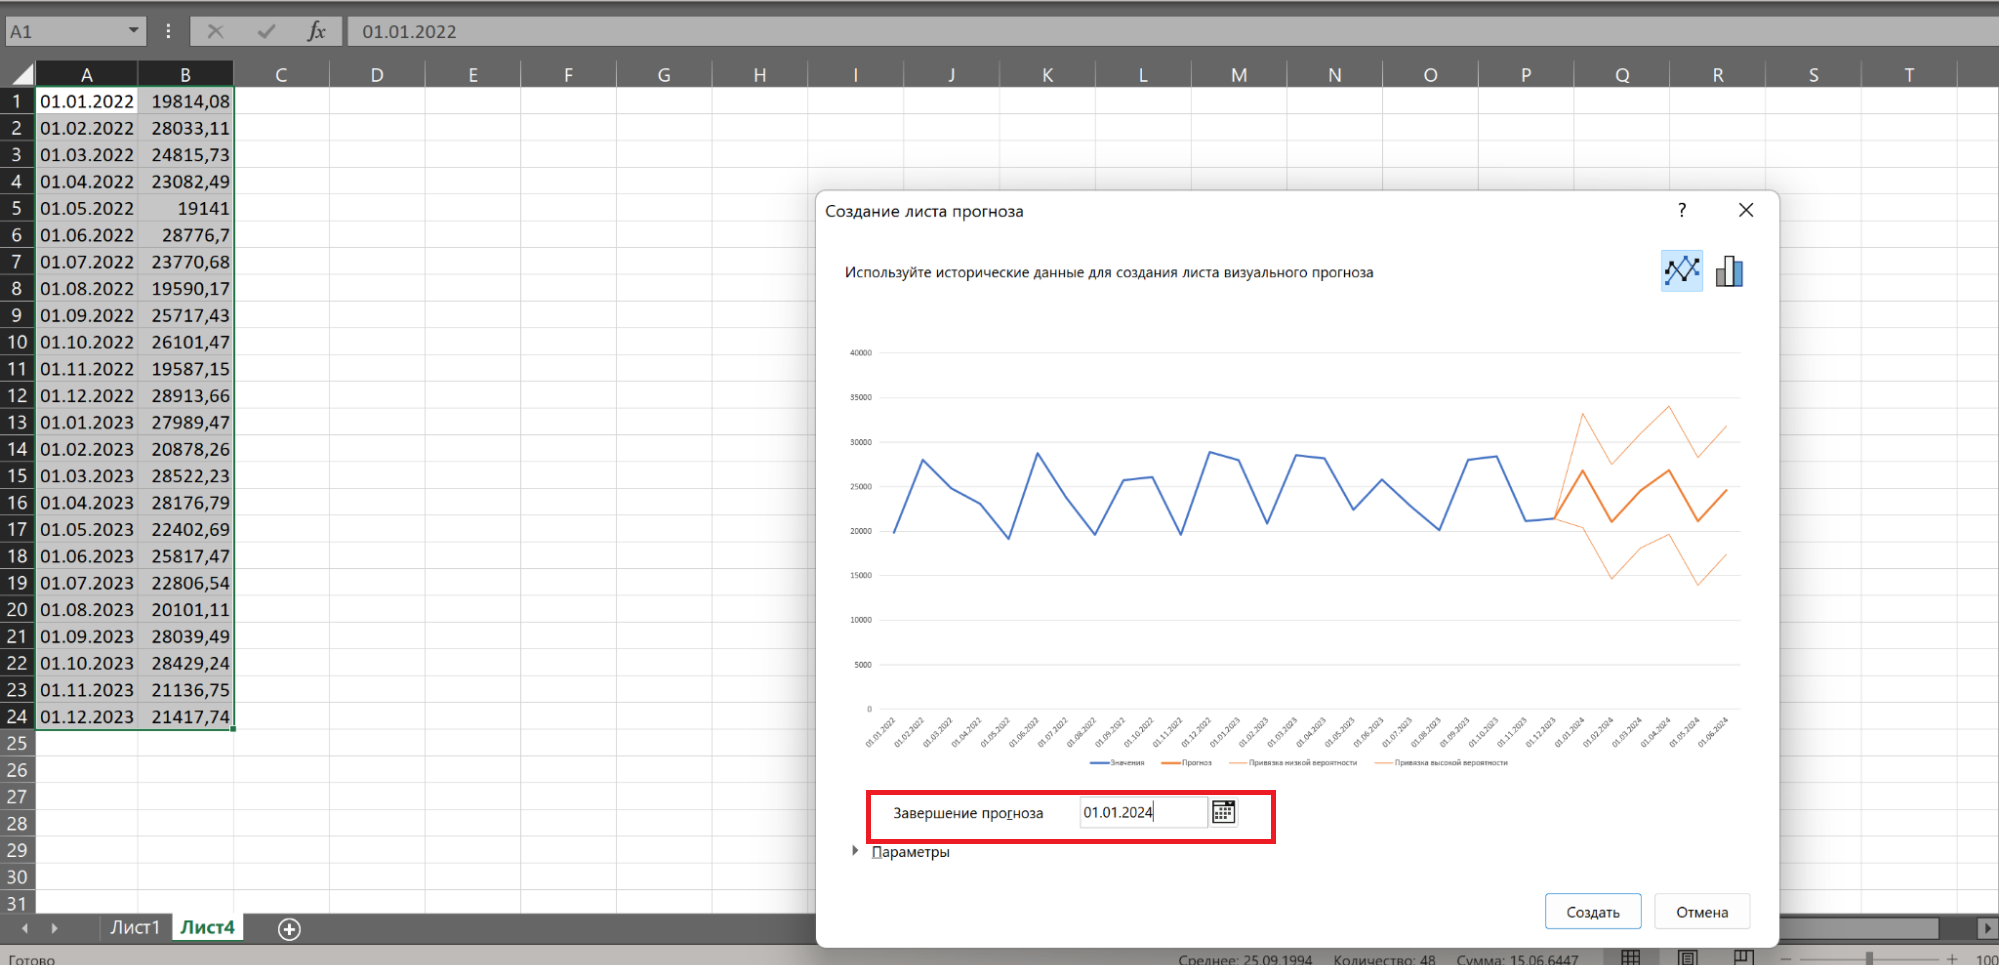
В нём можно выставить конечную точку и сразу увидеть примерный график. После нажатия кнопки «Создать» Excel создаст отдельный лист с прогнозируемыми данными.
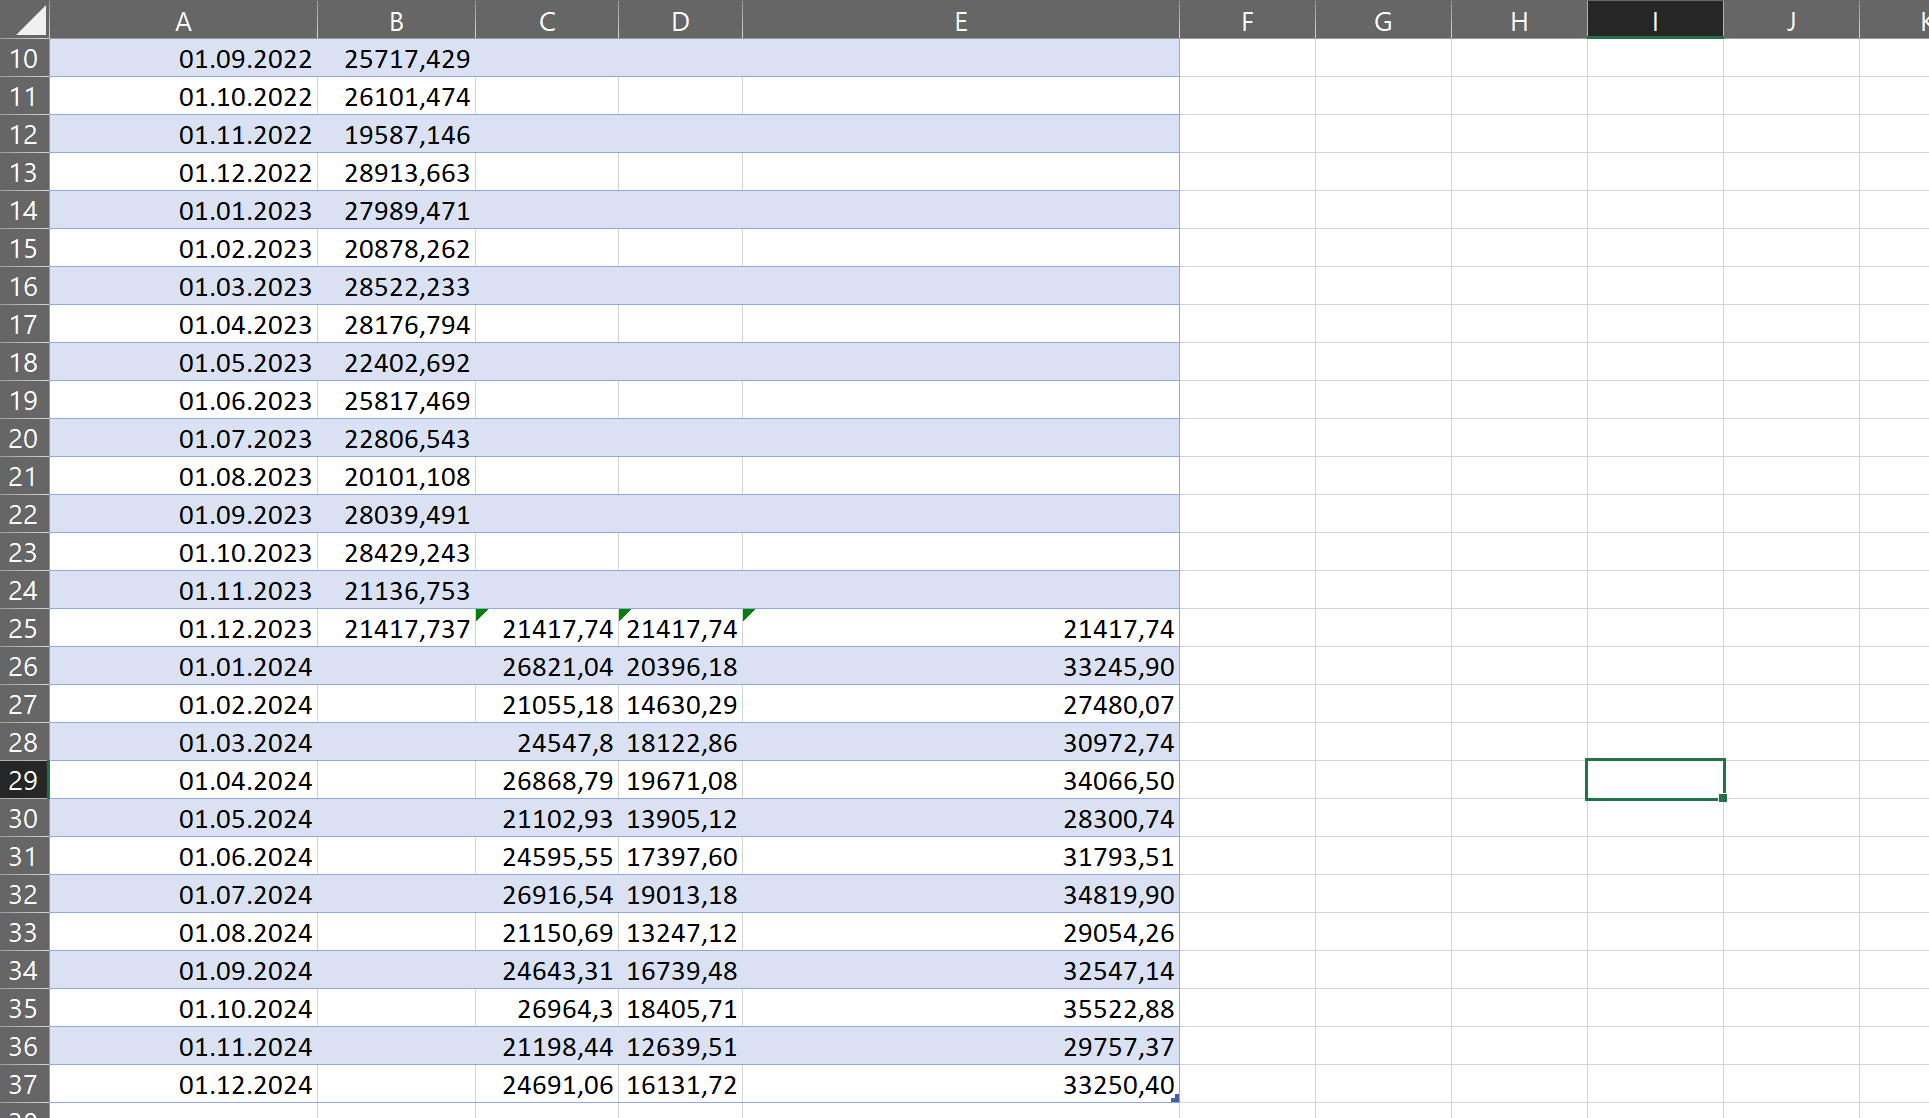
Также на листе будет график, на котором можно визуально отследить примерные изменения.

Чем больше значений для анализа, тем точнее будет прогноз. Разумеется, он построен на простом математическом анализе, а не на моделях машинного обучения, поэтому не может учитывать нюансы и сложные факторы. Однако для простых примерных прогнозов подойдёт.
3. Быстрый анализ в Excel
Этот набор инструментов отвечает на вопрос «Как сделать анализ данных в Excel быстро?». В Microsoft Office 365 он называется экспресс-анализом. Инструмент появляется в нижнем правом углу, если выделить диапазон данных. У быстрого анализа чуть меньший набор опций, однако он позволяет в пару кликов проводить большинство стандартных аналитических операций.
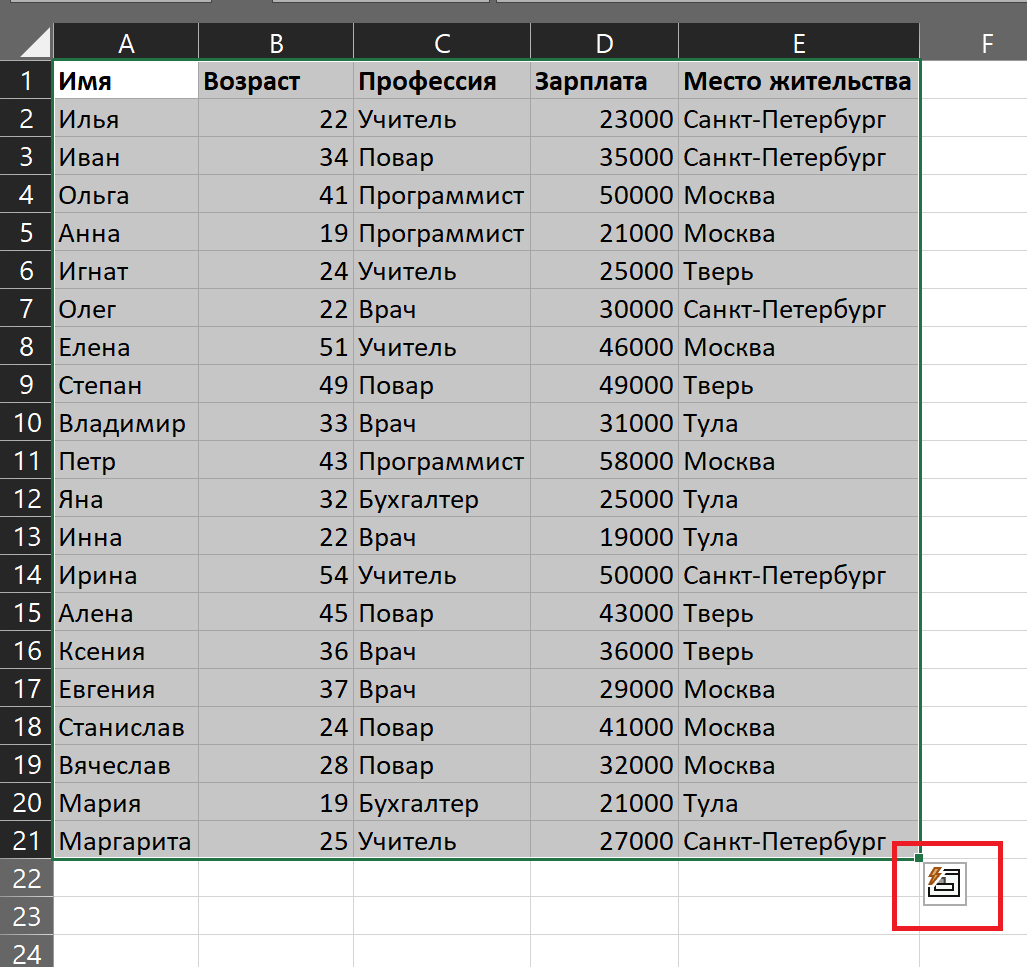
Если нажать на кнопку с иконкой в виде молнии либо сочетание клавиш CTRL+Q, открывается большой набор инструментов для анализа и визуализации.
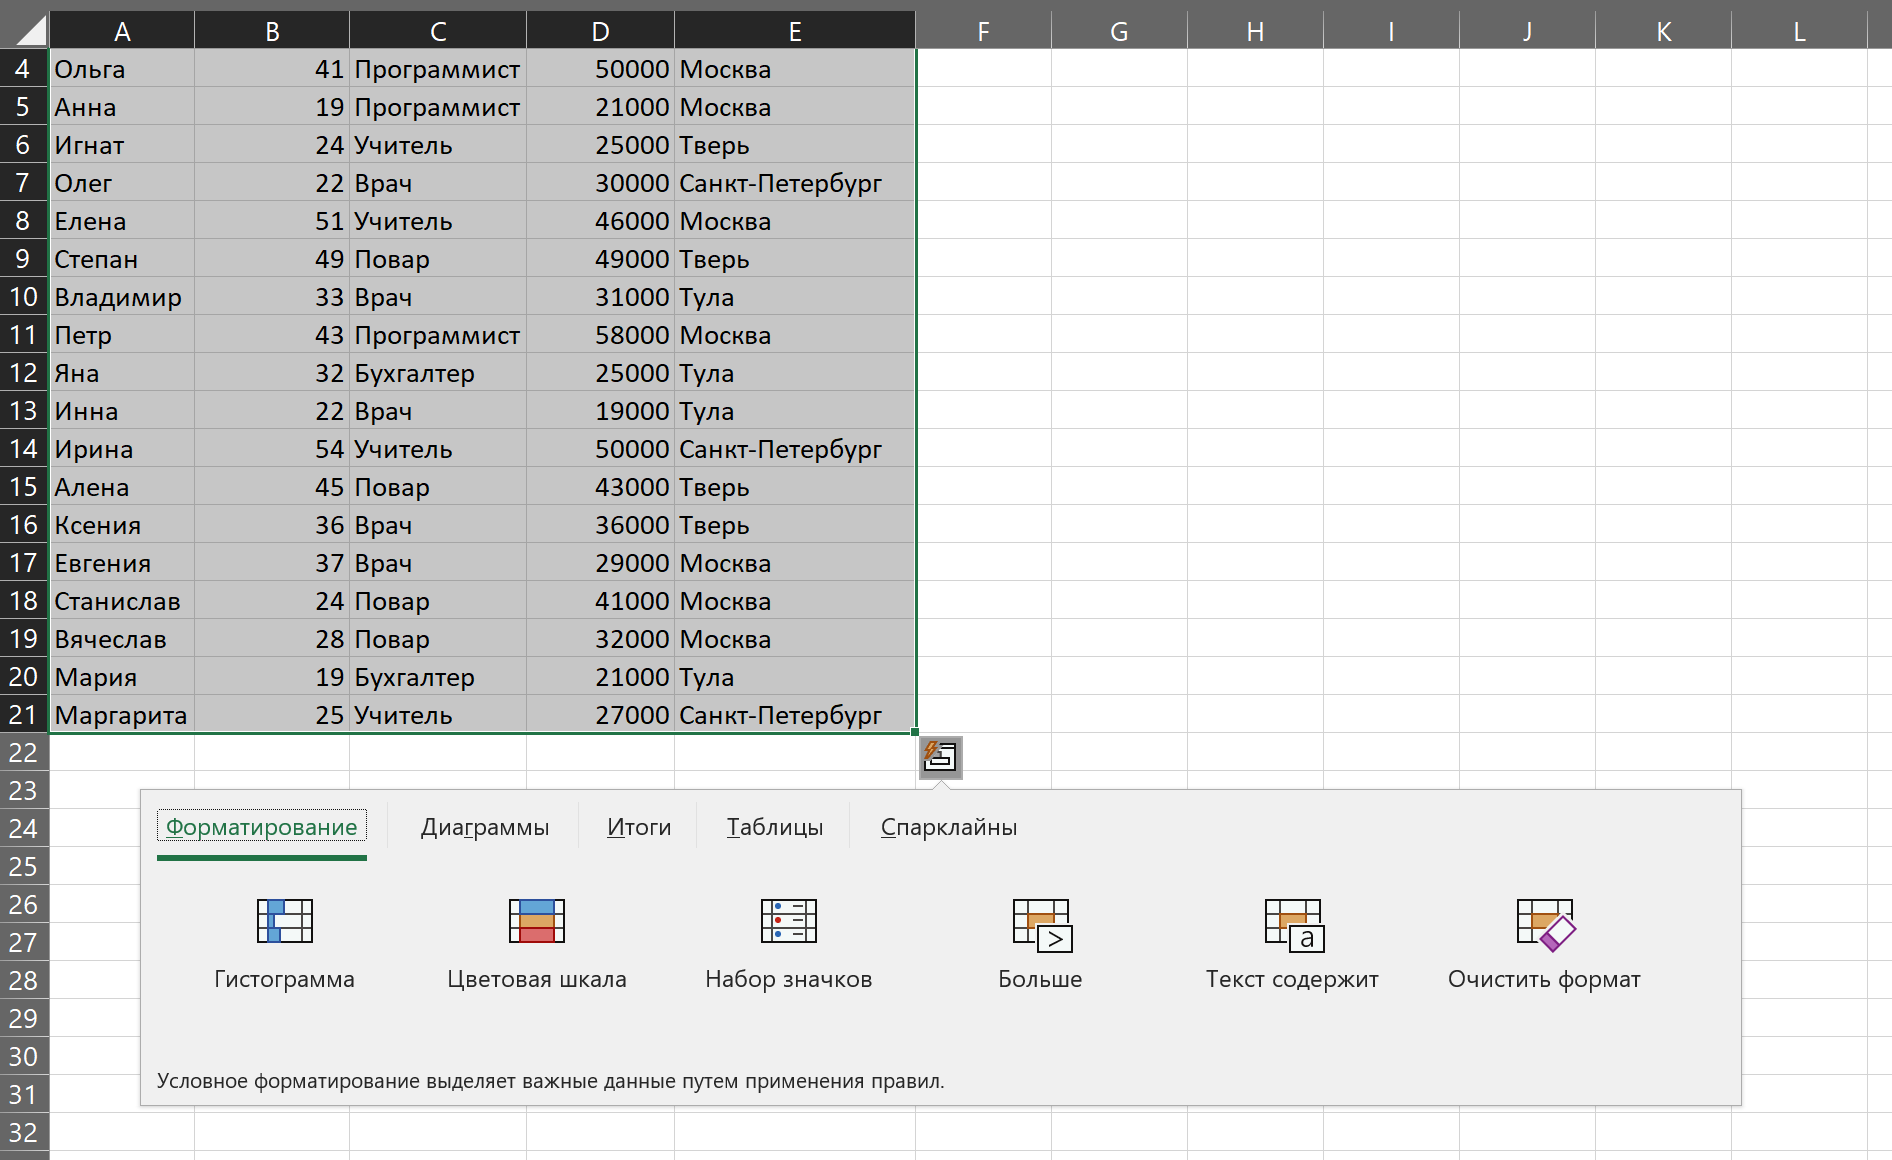
Например, если выбрать «Форматирование» → «Гистограмма», Excel прямо
внутри ячеек для сравнения наглядно отобразит, насколько одни значения больше других.
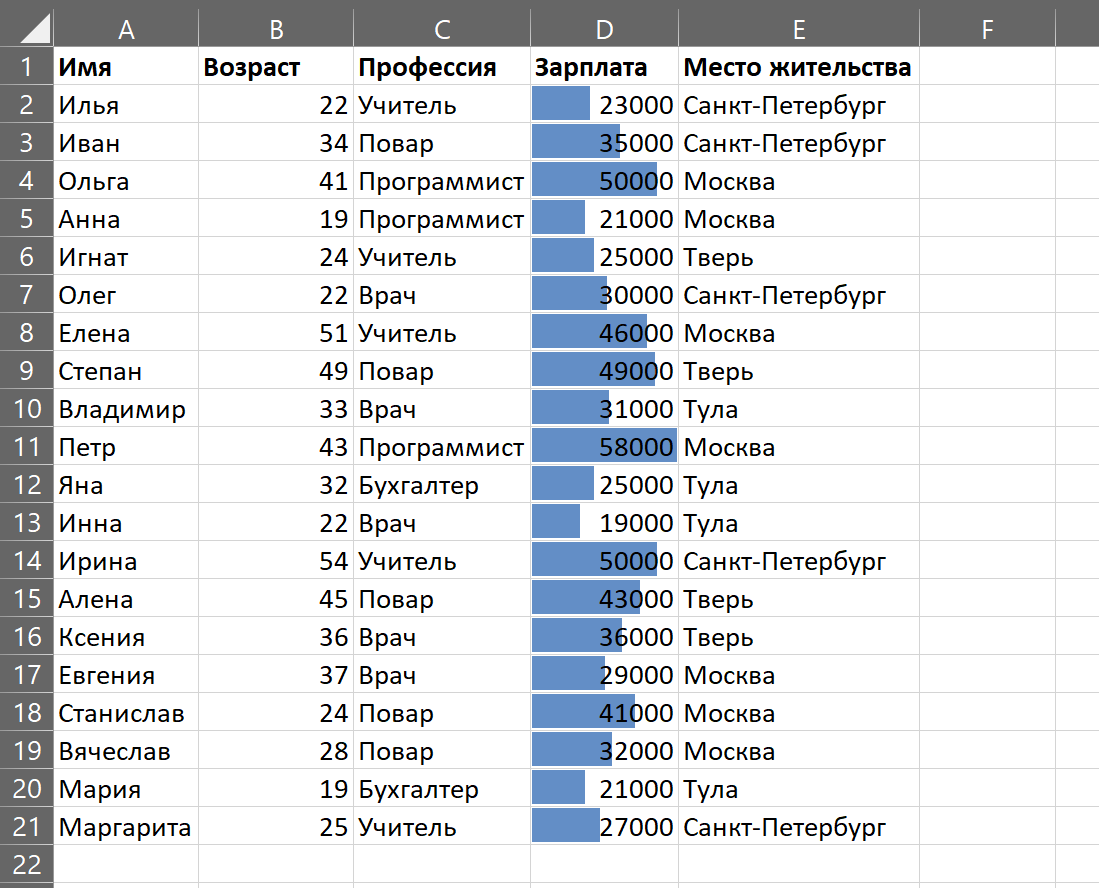
При выборе «Диаграмма» Excel отобразит предварительный результат.
Затем создаст отдельный лист с настраиваемой диаграммой, в которой можно задавать свои параметры.
Прямо здесь можно вычислить среднее с автоматическим добавлением строки с результатами.

Инструмент быстрого анализа позволяет составить сводную таблицу без перехода в отдельные пункты меню.

Этот инструмент позволяет с помощью MS Excel провести анализ данных, в которых есть указание города или страны. Работает только в последних версиях Excel старше 2019 года, без интернета недоступен.
Возьмём таблицу с профессиями и зарплатами и добавим в неё новую колонку — город проживания. Далее нужно выделить диапазон данных и нажать «Вставка» → «3D-карта». В отдельном окне откроется карта.

Слева можно выбрать параметры отображения. Например, задать высоту столбцов в зависимости от нужного показателя. Возьмём «Зарплату», выставим среднее значение и посмотрим, как это отобразится на 3D-карте.

Высота столбцов изменится в зависимости от средней зарплаты в регионе — Excel посчитает это самостоятельно. Можно задать категории, например «Профессию».
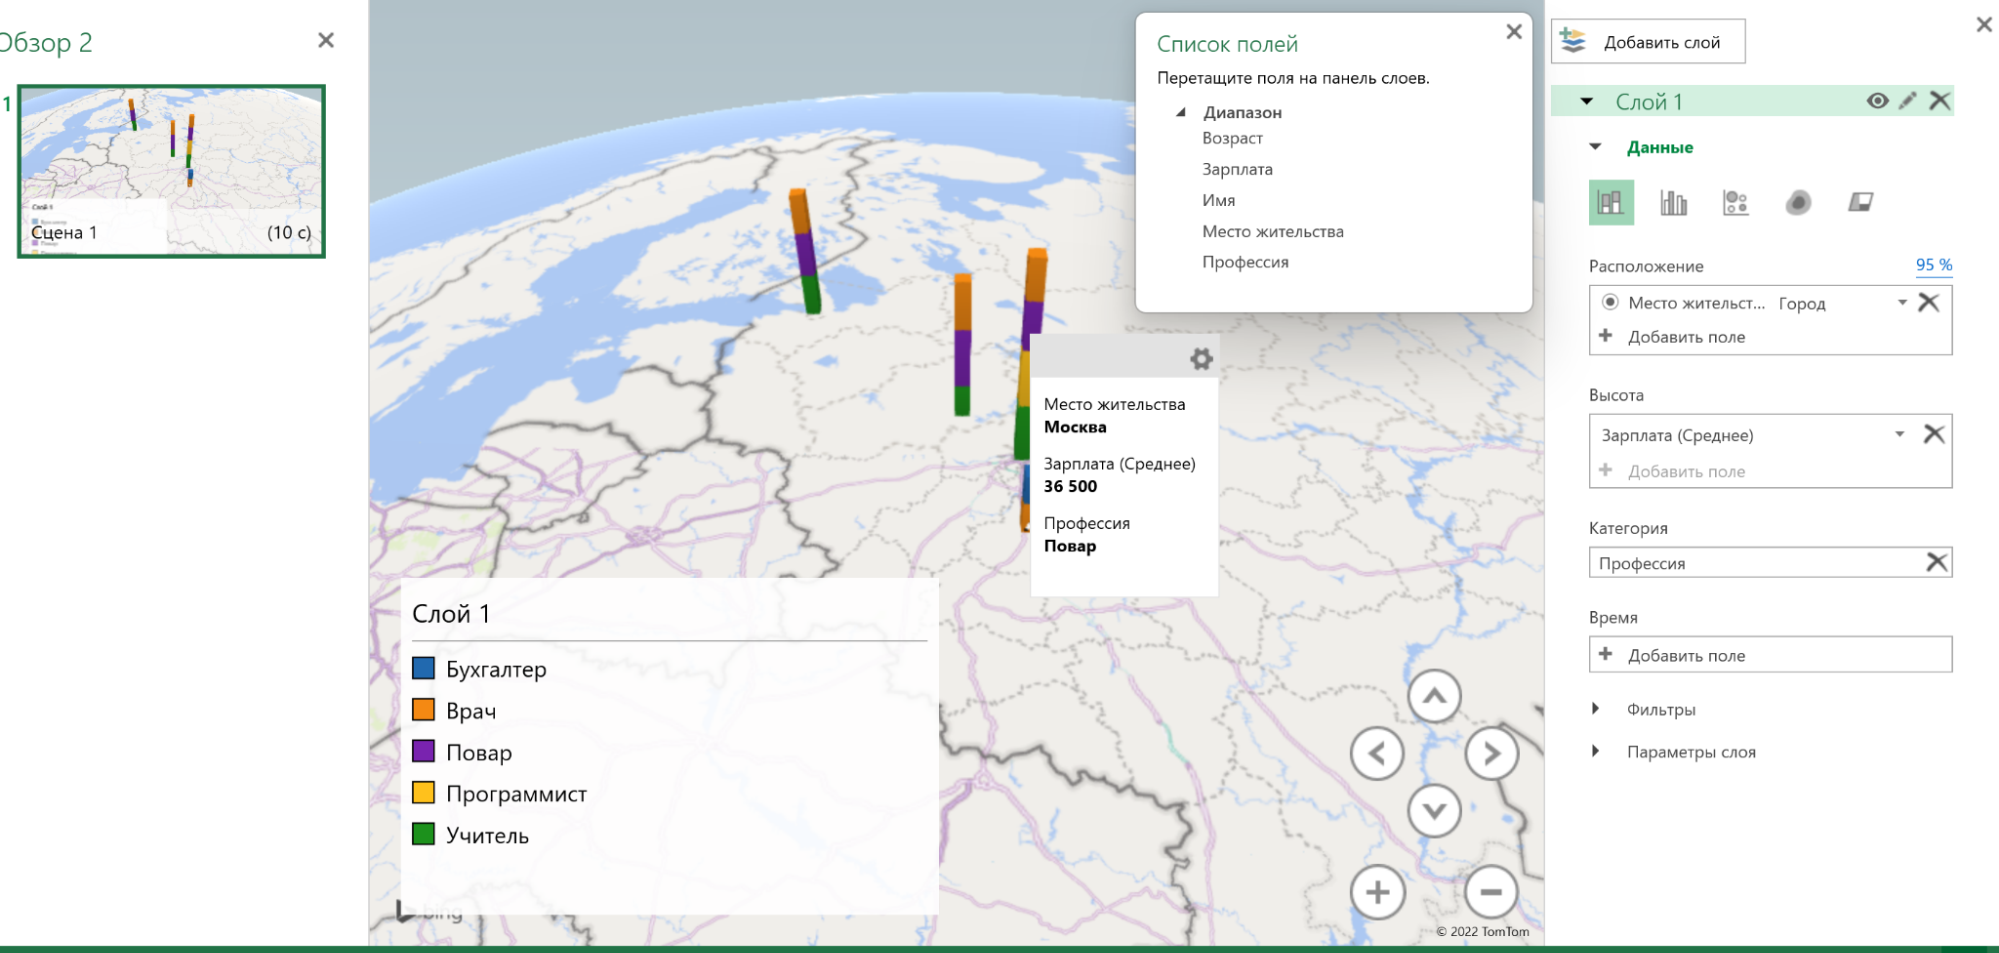
Excel раскрасит столбики в зависимости от того, сколько представителей каждой профессии живёт в конкретном городе.

При наведении на конкретный элемент столбика можно увидеть город, профессию и среднюю зарплату.
3D-карты пригодятся, когда в таблице очень много данных и их география имеет большое значение. Этот инструмент подойдёт как для анализа, так и для быстрой визуализации. Внутри инструмента можно изменить параметры отображения и быстро создать видео для презентации результатов анализа.
Совет эксперта
Настя Шушурина
Вышеописанные функции и лайфхаки — только часть инструментария Excel. Ими можно воспользоваться, когда нужно быстро провести агрегацию данных, найти ответ на вопрос или просто сравнить ряд данных и добавить пару классных визуализаций в презентацию. В Excel есть и множество других инструментов, которые позволяют делать интересные вещи и проводить быстрые манипуляции с данными без умения писать код.

Как пересечение и объединение множеств используются в анализе данных

С чем работает аналитик данных: 10 популярных инструментов
Many users are actively using Excel to generate reports for their subsequent editing. Reports are using for easy viewing of information and a complete control over data management during working with the program.
Table is the interface of the workspace of the program. A relational database structures the information in the rows and columns. Despite the fact that the standard package MS Office has a standalone application for creating and maintaining databases named Microsoft Access, users are actively using Microsoft Excel for the same purpose. After all program features allow you to: sort; format; filter; edit; organize and structure the information.
That is all that you need for working with databases. The only caveat: the Excel program is a versatile analytical tool that is more suitable for complex calculations, computations, sorting, and even for storage structured data, but in small amounts (no more than one million records in the same table, in the 2010 version).
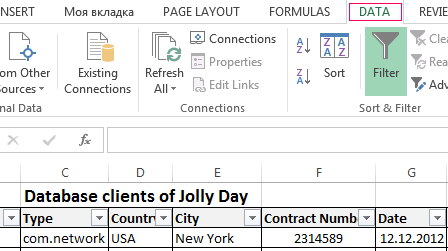
Database Structure — Excel table
Database — a data set distributed in rows and columns for easily searching, organizing and editing. How to make the database in Excel?
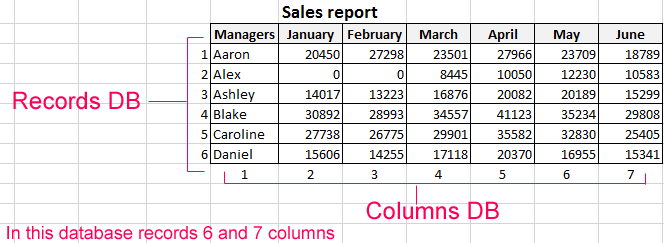
All information in the database is contained in the records and fields:
- Record is database (DB) line, which includes information about one object.
- Field is the column in the database that contains information of the same type about all objects.
- Records and database fields correspond to the rows and columns of a standard Microsoft Excel spreadsheet.
If you know how to do a simple table, then creating a database will not be difficult.
Creating DB in Excel: step by step instructions
Step by step to create a database in Excel. Our challenge is to form a client database. For several years, the company has several dozens of regular customers. It is necessary to monitor the contract term, the areas of cooperation and to know contacts, data communications, etc.
How to create a customer database in Excel:
- Enter the name of the database field (column headings).
- Enter data into the database. We are keeping order in the format of the cells. If it is a numerical format so it should be the same numerical format in the entire column. Data are entered in the same way as in a simple table. If the data in a certain cell is the sum on the values of other cells, then create formula.
- To use the database turn to tools «DATA».
- Assign the name of the database. Select the range of data — from the first to the last cell. Right mouse button — the name of the band. We give any name. Example — DB. Check that the range was correct.

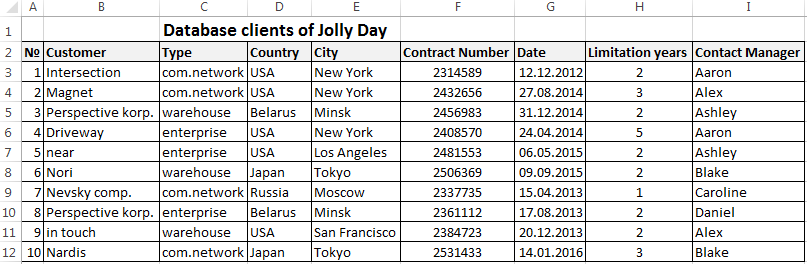
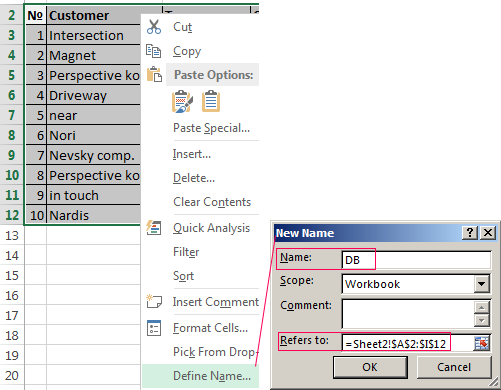
The main work of information entering into the DB is made. For easy using this information it is necessary to pick out the needful information, filter and sort the data.
How to maintain a database in Excel
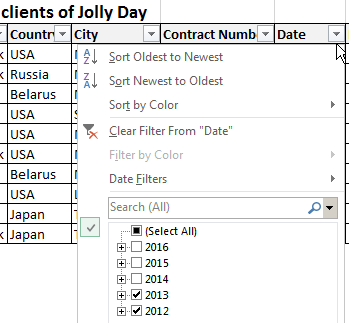
To simplify the search for data in the database, we’ll order them. Tool «Sort» is suitable for this purpose.
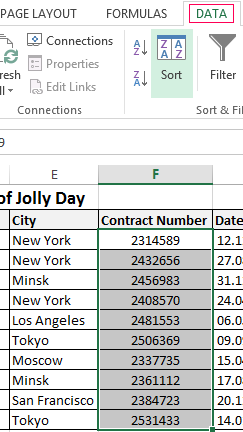
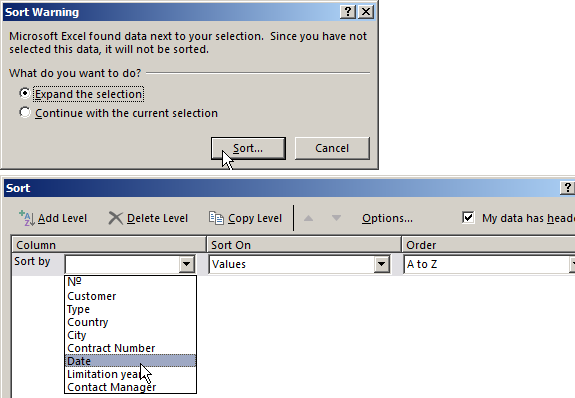
- Select the range you want to sort. For the purposes of our fictitious company the column «Date». Call the tool «Sort».
- Then system offers automatically expand the selected range. We agree. If we sort the data of only one column and the rest will leave in place so the information will be wrong. Then the menu will open parameters where we have to choose the options and sorting values.
The data distributed in the table by the term of the contract.
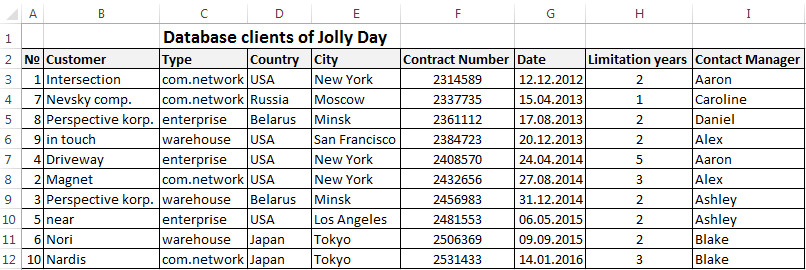
Now, the manager sees to whom it is time to renew the contract and with which companies we continue the partnership.
Database during the company’s activity is growing to epic proportions. Finding the right information is getting harder. To find specific text or numbers you can use:
By simultaneously pressing Ctrl + F or Shift + F5. «Find and Replace» search box appears.
Filtering the data
By filtering the data the program hides all the unnecessary information that user does not need. Data is in the table, but invisible. At any time, data can be recovered.
There are 2 filters which are often used In Excel:
- AutoFilter;
- filter on the selected range.
AutoFilter offers the user the option to choose from a pre-filtering list.
- On the «DATA» tab, click the button «Filter».
- Down arrows are appearing after clicking in the header of the table. They signal the inclusion of «AutoFilter».
- Click on the desired column direction to select a filter setting. In the drop-down list appears all the contents of the field. If you want to hide some elements reset the birds in front of them.
- Press «OK». In the example we hide clients who have concluded contracts in the past and the current year.
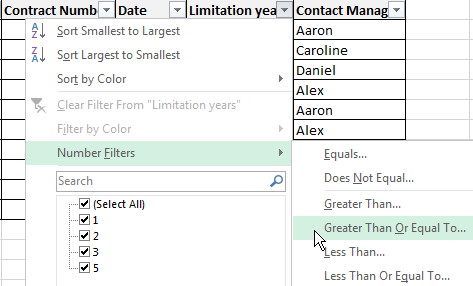
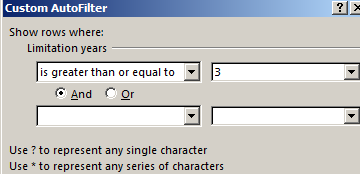
- To set a condition to filter the field type «Greater Than», «Less Than», «Equals», etc. values, select the command «Number Filters» in the filter list.
- If we want to see clients in a customer table whom we signed a contract for 3 years or more, enter the appropriate values in the AutoFilter menu.

Done!

Let’s experiment with the values filtered by the selected cells. For example, we need to leave the table only with those companies that operate in Belarus.
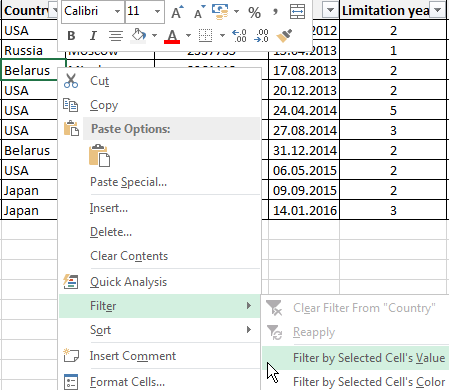
- Select the data with information which should remain prominent in the database. In our case, we find the column country — «РБ «. We click on the cell with right-click.
- Perform a sequence command: «Filter»–«Filter by Selected Cell’s Value». Done.

Sum can be found using different parameters if the database contains financial information:
- the sum of (summarize data);
- count (count the number of cells with numerical data);
- average (arithmetic mean count);
- maximum and minimum values in the selected range;
- product (the result of multiplying the data);
- standard deviation and variance of the sample.
Using the financial information in the database:
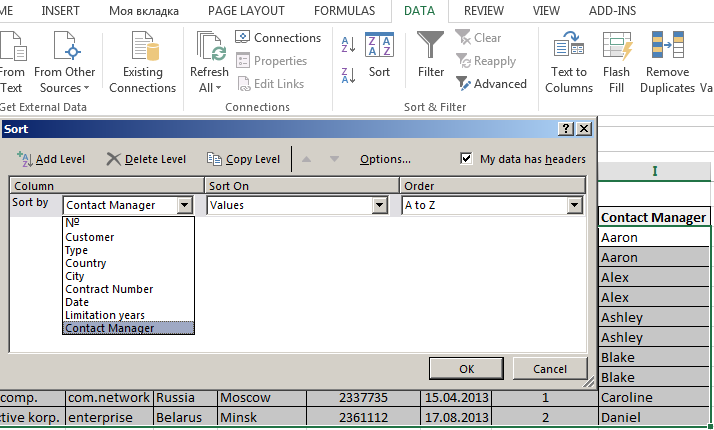
- Then the menu will open parameters where we have to choose the options and sorting values «Contact Manager».
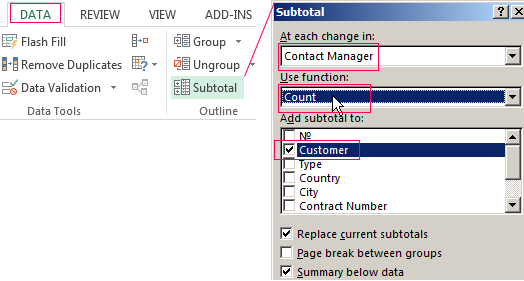
- Select the database range. Go to the tab «DATA» — «Subtotal».
- Select the calculation settings In the dialog box.
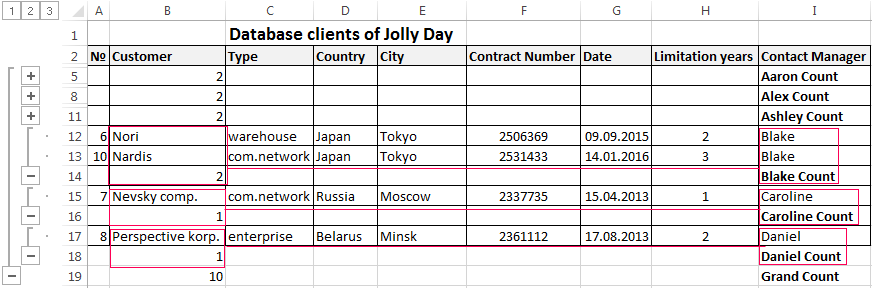
Tools on the «DATA» tab allows to segment the DB. Sort information in terms with relevance to company goals. Isolation of purchasers of goods groups help to promote the marketing of the product.
Prepared sample templates for conducting client base segment:
- Template for manager which allows monitors the result of outgoing calls to customers download.
- The simplest template. Customer in Excel free template database download.
- Example database from this article download example.
Templates can be adjusted for your needs: reduce, expand, and edit.