
Watch the Video on Using Data Entry Forms in Excel
Below is a detailed written tutorial about Excel Data Entry form in case you prefer reading over watching a video.
Excel has many useful features when it comes to data entry.
And one such feature is the Data Entry Form.
In this tutorial, I will show you what are data entry forms and how to create and use them in Excel.
Why Do You Need to Know About Data Entry Forms?
Maybe you don’t!
But if data entry is a part of your daily work, I recommend you check out this feature and see how it can help you save time (and make you more efficient).
There are two common issues that I have faced (and seen people face) when it comes to data entry in Excel:
- It’s time-consuming. You need to enter the data in one cell, then go to the next cell and enter the data for it. Sometimes, you need to scroll up and see which column it is and what data needs to be entered. Or scroll to the right and then come back to the beginning in case there are many columns.
- It’s error-prone. If you have a huge data set which needs 40 entries, there is a possibility you may end up entering something that was not intended for that cell.
A data entry form can help by making the process faster and less error-prone.
Before I show you how to create a data entry form in Excel, let me quickly show you what it does.
Below is a data set that is typically maintained by the hiring team in an organization.
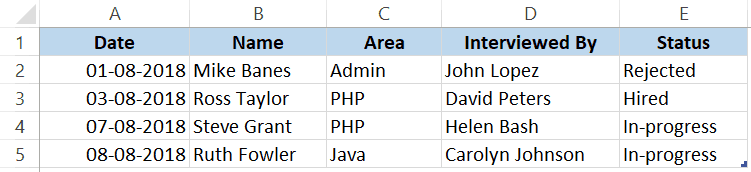
Every time a user has to add a new record, he/she will have to select the cell in the next empty row and then go cell by cell to make the entry for each column.
While this is a perfectly fine way of doing it, a more efficient way would be to use a Data Entry Form in Excel.
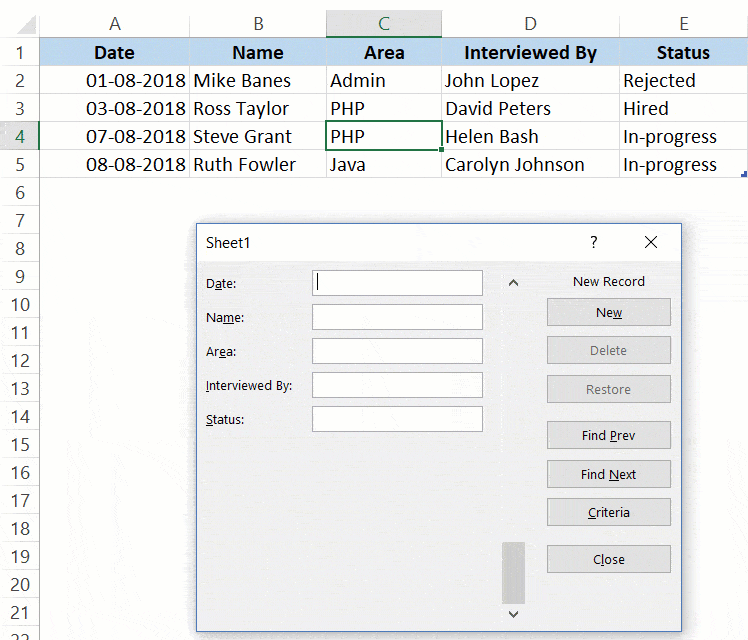
Below is a data entry form that you can use to make entries to this data set.
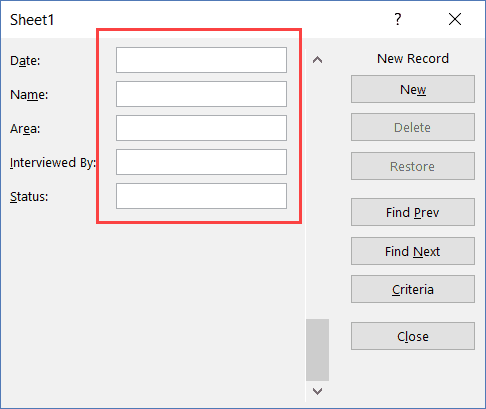
The highlighted fields are where you would enter the data. Once done, hit the Enter key to make the data a part of the table and move on to the next entry.
Below is a demo of how it works:
As you can see, this is easier than regular data entry as it has everything in a single dialog box.
Data Entry Form in Excel
Using a data entry form in Excel needs a little pre-work.
You would notice that there is no option to use a data entry form in Excel (not in any tab in the ribbon).
To use it, you will have to first add it to the Quick Access Toolbar (or the ribbon).
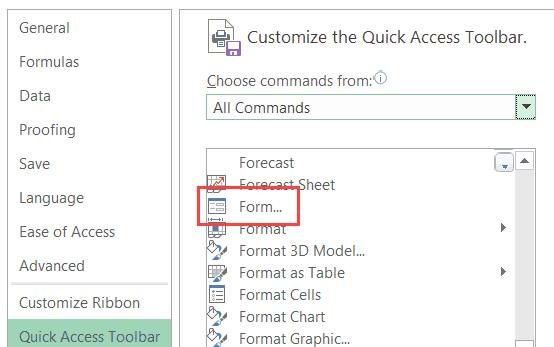
Adding Data Entry Form Option To Quick Access Toolbar
Below are the steps to add the data entry form option to the Quick Access Toolbar:
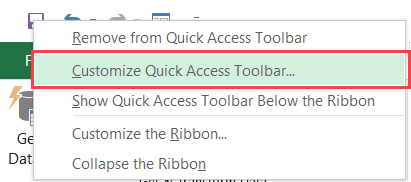
- Right-click on any of the existing icons in the Quick Access Toolbar.
- Click on ‘Customize Quick Access Toolbar’.

- In the ‘Excel Options’ dialog box that opens, select the ‘All Commands’ option from the drop-down.

- Scroll down the list of commands and select ‘Form’.

- Click on the ‘Add’ button.

- Click OK.


The above steps would add the Form icon to the Quick Access Toolbar (as shown below).
![]()
Once you have it in QAT, you can click any cell in your dataset (in which you want to make the entry) and click on the Form icon.
Note: For Data Entry Form to work, your data should be in an Excel Table. If it isn’t already, you’ll have to convert it into an Excel Table (keyboard shortcut – Control + T).
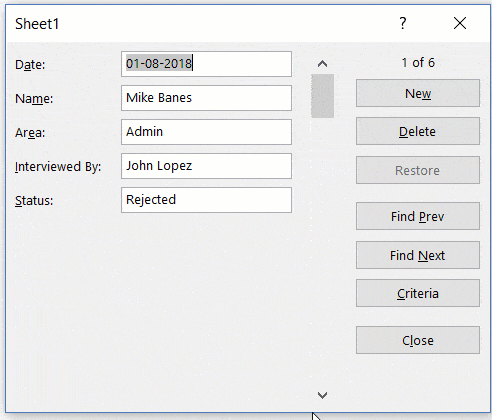
Parts of the Data Entry Form
A Data Entry Form in Excel has many different buttons (as you can see below).
Here is a brief description of what each button is about:
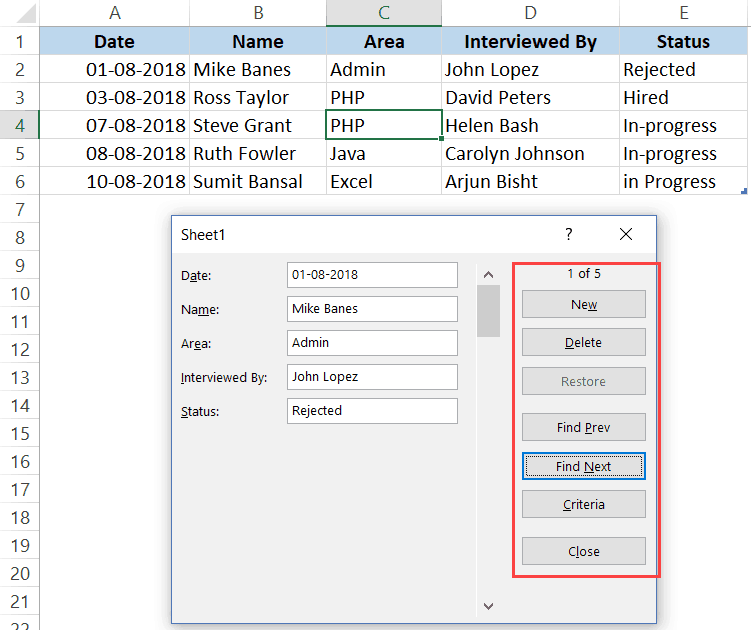
- New: This will clear any existing data in the form and allows you to create a new record.
- Delete: This will allow you to delete an existing record. For example, if I hit the Delete key in the above example, it will delete the record for Mike Banes.
- Restore: If you’re editing an existing entry, you can restore the previous data in the form (if you haven’t clicked New or hit Enter).
- Find Prev: This will find the previous entry.
- Find Next: This will find the next entry.
- Criteria: This allows you to find specific records. For example, if I am looking for all the records, where the candidate was Hired, I need to click the Criteria button, enter ‘Hired’ in the Status field and then use the find buttons. Example of this is covered later in this tutorial.
- Close: This will close the form.
- Scroll Bar: You can use the scroll bar to go through the records.
Now let’s go through all the things you can do with a Data Entry form in Excel.
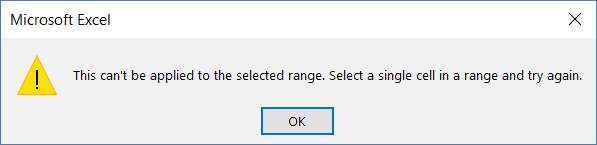
Note that you need to convert your data into an Excel Table and select any cell in the table to be able to open the Data Entry form dialog box.
If you haven’t selected a cell in the Excel Table, it will show a prompt as shown below:
Creating a New Entry
Below are the steps to create a new entry using the Data Entry Form in Excel:
- Select any cell in the Excel Table.
- Click on the Form icon in the Quick Access Toolbar.

- Enter the data in the form fields.
- Hit the Enter key (or click the New button) to enter the record in the table and get a blank form for next record.
Navigating Through Existing Records
One of the benefits of using Data Entry Form is that you can easily navigate and edit the records without ever leaving the dialog box.
This can be especially useful if you have a dataset with many columns. This can save you a lot of scrolling and the process of going back and forth.
Below are the steps to navigate and edit the records using a data entry form:
- Select any cell in the Excel Table.
- Click on the Form icon in the Quick Access Toolbar.
- To go to the next entry, click on the ‘Find Next’ button and to go to the previous entry, click the ‘Find Prev’ button.

- To edit an entry, simply make the change and hit enter. In case you want to revert to the original entry (if you haven’t hit the enter key), click the ‘Restore’ button.
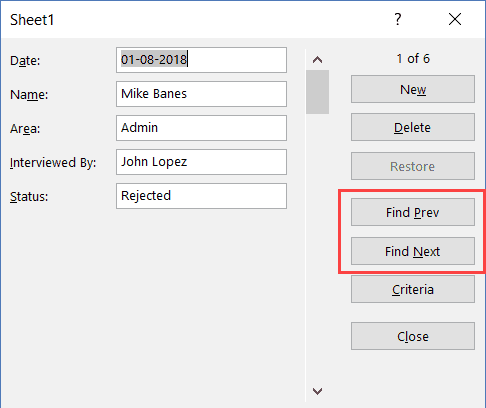
You can also use the scroll bar to navigate through entries one-by-one.
The above snapshot shows basic navigation where you are going through all the records one after the other.
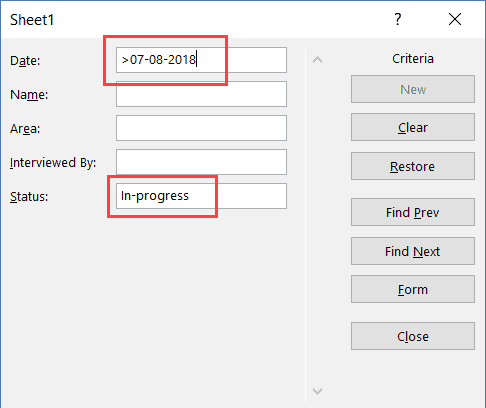
But you can also quickly navigate through all the records based on criteria.
For example, if you want to go through all the entries where the status is ‘In-progress’, you can do that using the below steps:
Criteria is a very useful feature when you have a huge dataset, and you want to quickly go through those records that meet a given set of criteria.
Note that you can use multiple criteria fields to navigate through the data.
For example, if you want to go through all the ‘In-progress’ records after 07-08-2018, you can use ‘>07-08-2018’ in the criteria for ‘Date’ field and ‘In-progress’ as the value in the status field. Now when you navigate using Find Prev/Find Next buttons, it will only show records after 07-08-2018 where the status is In-progress.
You can also use wildcard characters in criteria.
For example, if you have been inconsistent in entering the data and have used variations of a word (such as In progress, in-progress, in progress, and inprogress), then you need to use wildcard characters to get these records.
Below are the steps to do this:
- Select any cell in the Excel table.
- Click on the Form icon in the Quick Access Toolbar.
- Click the Criteria button.
- In the Status field, enter *progress
- Use the Find Prev/Find Next buttons to navigate through the entries where the status is In-Progress.

This works as an asterisk (*) is a wildcard character that can represent any number of characters in Excel. So if the status contains the ‘progress’, it will be picked up by Find Prev/Find Next buttons no matter what is before it).
Deleting a Record
You can delete records from the Data Entry form itself.
This can be useful when you want to find a specific type of records and delete these.
Below are the steps to delete a record using Data Entry Form:
- Select any cell in the Excel table.
- Click on the Form icon in the Quick Access Toolbar.
- Navigate to the record you want to delete
- Click the Delete button.

While you may feel that this all looks like a lot of work just to enter and navigate through records, it saves a lot of time if you’re working with lots of data and have to do data entry quite often.
Restricting Data Entry Based on Rules
You can use data validation in cells to make sure the data entered conforms to a few rules.
For example, if you want to make sure that the date column only accepts a date during data entry, you can create a data validation rule to only allow dates.
If a user enters a data that is not a date, it will not be allowed and the user will be shown an error.
Here is how to create these rules when doing data entry:
- Select the cells (or even the entire column) where you want to create a data validation rule. In this example, I have selected column A.
- Click the Data tab.

- Click the Data Validation option.

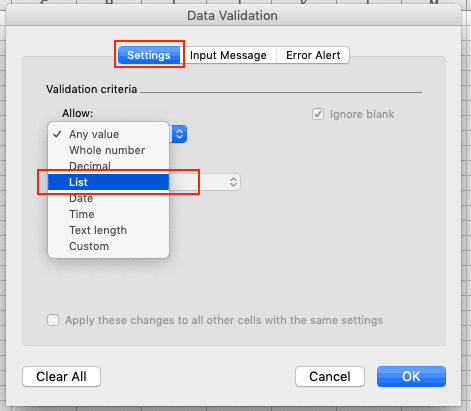
- In the ‘Data Validation’ dialog box, within the ‘Settings’ tab, select ‘Date’ from the ‘Allow’ drop down.

- Specify the start and the end date. Entries within this date range would be valid and rest all would be denied.
- Click OK.


Now, if you use the data entry form to enter data in the Date column, and if it isn’t a date, then it will not be allowed.
You will see a message as shown below:
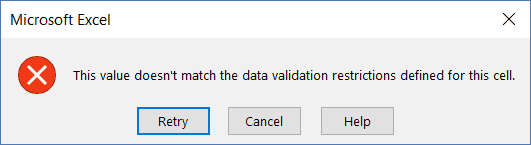
Similarly, you can use data validation with data entry forms to make sure users don’t end up entering the wrong data. Some examples where you can use this is numbers, text length, dates, etc.
Here are a few important things to know about Excel Data Entry Form:
- You can use wildcard characters while navigating through the records (through criteria option).
- You need to have an Excel table to be able to use the Data Entry Form. Also, you need to have a cell selected in it to use the form. There is one exception to this though. If you have a named range with the name ‘Database’, then the Excel Form will also refer to this named range, even if you have an Excel table.
- The field width in the Data Entry form is dependent on the column width of the data. If your column width is too narrow, the same would be reflected in the form.
- You can also insert bullet points in the data entry form. To do this, use the keyboard shortcut ALT + 7 or ALT + 9 from your numeric keypad. Here is a video about bullet points.
You May Also Like the Following Excel Tutorials:
- 100+ Excel Interview Questions.
- Drop Down Lists in Excel.
- Find and Remove Duplicates in Excel.
- Excel Text to Columns.

Data Entry Forms is an extremely useful feature if inputting data is part of your daily work.
It can help you avoid the mistakes and make the data entry process faster. It also helps you focus on one record at a time!
It is a convenient and faster way to input records in Excel by displaying one row of information at a time without having to move from one column to another.
In this tutorial, we will show you How to Create Form in Excel for Data Entry.
Whenever I wanted to enter data in Excel, it would take me a very long time to input these records one by one, but I discovered a handy trick that can turn my Excel Table into a handy Excel Data Entry Form!

Say goodbye to inputting entering data into this Table row by row by row by row….
Below, we will cover the Top 11 Excel Data Entry Form Tips and Tricks that will be beneficial for you:
- #1 – Create Form in Excel
- #2 – Add to Quick Access Toolbar (QAT)
- #3 – Access the Form anytime
- #4 – Browse through Records
- #5 – Edit Existing Record
- #6 – Search Criteria
- #7 – Restore a Record
- #8 – Data Validation in Forms
- #9 – Delete a Record
- #10 – Close the Form
- #11 – Keyboard Shortcuts for Data Entry Forms
Make sure to download the Excel Workbook below and follow along:
DOWNLOAD EXCEL WORKBOOK
Want to know how to use the Data Entry Form?
*** Watch our video and step by step guide below with free downloadable Excel workbook to practice ***
Watch it on YouTube and give it a thumbs-up!
Watch it on YouTube and give it a thumbs-up!
Watch it on YouTube and give it a thumbs-up!
1. Create Form in Excel
I will show you how easy it is to Create Form in Excel for Data Entry with the following quick video below (scroll further down to see the step by step instructions after you watch this awesome video).
*** Watch our video below on How to Create Form in Excel in 5 minutes!***

DOWNLOAD OUR
FREE EXCEL GUIDES
In this tutorial, you have learned how to create form in Excel with minutes without using VBA!!
Follow the steps below:
STEP 1: Convert your Column names into a Table, go to Insert> Table
Make sure My table has headers is also checked.

STEP 2:Let us add the Form Creation functionality to understand how to make a fillable form in Excel.
Go to File > Options


STEP 3:Go to Customize Ribbon.
Select Commands Not in the Ribbon and Form. This is the functionality we need.
Click New Tab.

STEP 4:Under the New Tab, select New Group, and click Add.
This will add Forms to a New Tab in our Ribbon.

Notice that there is also a Rename button, you can use it to rename the New Tab and New Group into something more descriptive, like Form:

STEP 5:Select your Table, and on your new Form tab, select Form.

STEP 6: A new Form dialogue box will pop up!
Input your data into each section.
Click New to save it. Repeat this process for all the records you want to add.
Press Close to get out of this screen and see the data in your Excel Table.

You can now use this new form to continually input data into your Excel Table!

2. Add to Quick Access Toolbar (QAT)
Now that you have learned how to create form in Excel, lets put them on your QAT for easy access.
To add to the quick access toolbar, follow the steps below:
STEP 1: Click on the small arrow right next to QAT.

STEP 2: Click on More Commands from the dropdown list.

STEP 3: In the Excel Options dialog box, select All Commands from Choose commands from list.

STEP 4: Select Form from the list and then click on Add>>.

STEP 5: Form is now available in the Customize Quick Access Toolbar. Click OK.

Data Entry Form is now part of your Quick Access Toolbar.

3. Access the Form anytime
To access the Excel Data Entry Form, click on any cell in the table and click on the Form icon in Quick Access Toolbar.

If you try to access the form when you haven’t selected a cell within the data table, you will receive an error message like the one shown below:

4. Browse through Records
To navigate through the existing records, simply use the Find Previous and Find Next buttons available on the Data Entry Form.

You can also use the scroll bar to go through the records one after the other.

This will save time when you have a data with multiple columns and records.
5. Edit Existing Record
Use the Find Previous and Find Next buttons to search for the record to want to edit.
Once you find the desired record, simply make the necessary edit and hit Enter in Excel.

The data table will be updated with the changes made.

6. Search Criteria
Using Wildcards
If you wish to search all entries containing the word “east” in the Region Column, you can do that by using the wildcard asterisk (*).
STEP 1: In the Data Entry Form, click on the Criteria button

STEP 2: In the Region field, type *east (to search all-region containing the word east)

STEP 3: Click Find Next to find the entries containing the word east.

Excel Data Entry Form will find the three entries for you in this scenario!


Using greater or less than sign
If you want to search for persons having a salary greater than or equal to $75,000, you can do so by following the steps below:
STEP 1: In the Data Entry Form, click on the Criteria button
STEP 2: In the Salary field, type >=75000.

STEP 3: Click Find Next to find all entries with a salary greater than or equal to $75,000.


7. Restore a Record
Suppose you have accidentally deleted the first name of a record.

And you don’t remember what was written in that field! Don’t panic.
You can use the Restore button in the Excel Data Entry Form and retrieve the data lost accidentally.

The data will reappear in the respective field.

One thing you need to keep in mind is that the Restore button is only useful if you haven’t hit Enter.
The moment you press the Enter button, the Restore button will become inactive and you won’t be able to revert back to the original data.
8. Data Validation in Forms
Even though you cannot directly add any data validation to the form. Any restriction created on the data table will still be in effect in the Forms.
Let’s see how!
Say, you add a list rule to the Region Column using Data Validation.
STEP 1: Select the Region Column.

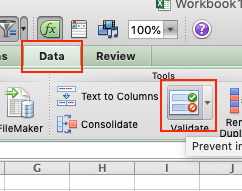
STEP 2: Go to Data Tab > Data Tools (Group) > Data Validation.

STEP 3: In the Data Validation dialog box, click on the Allow dropdown and select List.

STEP 4: In the Source field, type Northeast, Northwest, Southeast, Southwest, and click OK.

Data Validation has now been inserted in the Region Column where you are only allowed to enter values present in the list (Northeast, Northwest, Southeast, Southwest).
STEP 5: Click on the Forms icon in QAT.

STEP 6: Change the Region for Record 1 from Northeast to East and Click OK.

Once you click OK, you will see an error message as below:

9. Delete a Record

STEP 1: Use the Scroll Bar to navigate to find the entry you want to delete.
STEP 2: Simply, click on the Delete button.

STEP 3: A confirmation message will appear on your screen, Click OK.

The desired entry will be removed from the data table.

10. Close the Form
To close the dialog box for Data Forms, simply click on the Close button (X) on the top-right corner of the bix.

11. Keyboards Shortcuts for Data Entry Forms
You can use the following keyboard shortcuts to work faster when using Data Entry Forms:
- Press Tab to go to the next field in the Excel Forms.
- Press Enter to go to the next record in the Excel Forms.
- Hit the Esc button on your keyboard to close the Excel Form.
This completes our tutorial on the Top 11 things you should know if Data Entry is what you do in Excel. It will not only make the process faster but also a lot more easier and fun!
Few things to keep in mind when using the Excel Data Entry Form are:
- You can add a maximum of 32 fields per record.
- You cannot print a data form record.
- Before you hit Enter, you can restore any changes made to the data.
So, give it a try! I am sure you are gonna love it!!
You can know more about How to Create Form in Excel by going through this tutorial by Microsoft.

Data Entry Application is one of the highest utilized application in any of the organization. Data Entry Software allows you to enter the details with the form and transfer input data from User Form to Database.
You can go for several paid Data Entry Application but the real pain is Trust, Data Privacy and Info-Sec approval. Most of the time, we can’t download and install the commercial Data Entry Application in our organization. Considering all the issue, cost and data privacy, it’s always a good decision to design your own Multi-User Data Entry form in Microsoft Excel and MS Access. In this tool, you don’t seek any approval from IT or invest extra budget on application.
If you are comfortable with VBA and MS Access then it will be easy for you. But what if you are familiar with Visual Basic For Application and MS Access. In this case, it will be very difficult for you to design the application even though VBA is very simple language.
In this tutorial, we will learn How to Create a Data Entry Application in Excel and MS Access? You just need to be familiar with the Excel sheet and you can follow the steps to create fully dynamic data entry form in Excel and Access.
In this application, we will be using MS Excel as front end of this application and MS Access as Database. With the help of both application, we will design application for shareable environment where multiple users can use the Data Entry Form to transfer the data simultaneously. So without further delay, let’s begin!
First of all, you need to create a Folder where you can save Excel and MS Access file. Let’s create a folder named ‘Data Entry Application’
Now, open the MS Access application and create a Blank Database. In MS Access window, create a table named ‘tblEmployee’ and open the table in Design Mode.
Create the required Fields Name with required Data Type. Please see the below image.
Now Save the Table and go to File and Save the Database. To save the Database, please select ‘Access 2002 -2003 Database (*.mdb) and then Click on Save As. Please see the below image.
Given the database name as ‘Database’ and click on Save. Make sure you selected the same folder which we created for Data Entry Application.
Now, close the current open database and go to File then click on Open. Browse the database file which we created for application and then click on drop-down available beside the Open button and then select ‘Open Exclusive’. Please see the below snapshot.
This will open the ‘Database.mdb’ in Exclusive mode so that we can apply the protection on Database file. It will secure our database and users will not be able to open it and make any changes if they will not enter the correct password.
Now, go to File menu and select the Info. Under Info, click on the third option e.i. Set Database Password. Please see the below image.
Now, enter the Password ‘thedatalabs’ in both the Password and Verify text boxes and then click on Okay.
Close the database from the Exclusive mode and open it in normal mode (while opening just click on Open. Don’t select any other option from drop-down available beside the Open button). When you will open the database, it will ask Password. Please enter ‘thedatalabs’ as password to open the database.
Here, we have done with Database designing. Let’s move ahead and create Data Entry form in Excel.
Open MS Excel Application and create a New Workbook. Save the file with the name ‘Data Entry Application in Excel and MS Access’ and select the File Type ‘xlsm’. Macro enabled file is required to retain all the codes which we will write for this Data Entry Form.
Change the Sheet1 name to Home, remove the gridlines, and create labels and rounded rectangle for Launch button. Please see the below pic.
Let’s move to Visual Basic For Application (VBA) window to design the Form and write the required VBA codes.
To open the VBA window, go to Developer Tab in Excel and then click on Visual Basic under Code group. Alternatively, you can also use Shortcut key ALT + F11 to open the VBA window.
In VB window, let’s insert a UserForm. To insert the form, go to Insert menu and click on UserForm.
Let’s set the properties of Form.
Name: frmDataEntry; Caption: Data Entry Application;Height: 428.25; Width: 420
Let’s add other controls and set the properties of each and every controls. Follow the same format which is used in below image.
Set the properties for input controls. Name would be txtEmpID, txtName, txtDOB, imgCalendar, optFemale, optMale, cmbQualification, txtMobile, txtEmail, txtAddrss, cmdSubmit, cmdReset
Caption for optFemale would be Female, optMale would be Male, cmdSubmit would be Submit and cmdReset would be Reset.
Set the tab order for all input controls.
Let’s import the Custom Calendar from the Support File. Please see the below image.
Let’s add coding on Double click on txtDOB and imgCalendar. Make sure you have locked the txtDOB so that user will not be able to enter data directly.
Double click on txtDOB and add the below code on double click events.
Private Sub txtDOB_DblClick(ByVal Cancel As MSForms.ReturnBoolean)

Application.ScreenUpdating = False

Dim sDate As String

On Error Resume Next

sDate = MyCalendar.DatePicker(Me.txtDOB)

Me.txtDOB.Value = Format(sDate, "dd-mmm-yyyy")

On Error GoTo 0

Application.ScreenUpdating = True
End Sub
Now, double click on imgCalendar and add the below code on click events.
Private Sub imgCalendar_Click()

Application.ScreenUpdating = False

Dim sDate As String

On Error Resume Next

sDate = MyCalendar.DatePicker(Me.txtDOB)

Me.txtDOB.Value = Format(sDate, "dd-mmm-yyyy")

On Error GoTo 0

Application.ScreenUpdating = True
End Sub
Let’s insert a module in our project. To insert a module go to Insert menu and click on Module. Rename the Module1 to mdDataEntry.
Now double click on mdDataEntry to view the code window.
Add the below code in mdDataEntry to Reset and Initialize the form.
Sub Reset_Form()

With frmDataEntry

    .txtEmpID.Text = ""
    .txtEmpID.BackColor = vbWhite

    .txtName.Text = ""
    .txtName.BackColor = vbWhite

    .txtDOB.Text = ""
    .txtDOB.BackColor = vbWhite

    .optFemale.Value = False
    .optMale.Value = False

    .txtMobile.Value = ""
    .txtMobile.BackColor = vbWhite

    .txtEmail.Value = ""
    .txtEmail.BackColor = vbWhite

    .txtAddress.Value = ""
    .txtAddress.BackColor = vbWhite

    .cmbQualification.Clear
    .cmbQualification.BackColor = vbWhite

    .cmbQualification.AddItem "10+2"
    .cmbQualification.AddItem "Bachelor Degree"
    .cmbQualification.AddItem "Master Degree"
    .cmbQualification.AddItem "PHD"

    .cmbQualification.Value = ""

End With

End Sub
Add the below function in mdlDataEntry to validate the Email Id entered by User.
Function ValidEmail(email As String) As Boolean
Dim oRegEx As Object
 Set oRegEx = CreateObject("VBScript.RegExp")
 With oRegEx
    .Pattern = "^[w-.]{1,}@([da-zA-Z-]{1,}.){1,}[da-zA-Z-]{2,3}$"
    ValidEmail = .Test(email)
 End With
 Set oRegEx = Nothing
End Function
Let’s add one more function to validate all the entries made by user in Data Entry Form. You just need to copy the below code and paste it below the email validation function.
Function ValidEntry() As Boolean

ValidEntry = True

With frmDataEntry

    'Default Color

    .txtEmpID.BackColor = vbWhite
    .txtName.BackColor = vbWhite
    .txtDOB.BackColor = vbWhite
    .txtMobile.BackColor = vbWhite
    .txtEmail.BackColor = vbWhite
    .txtAddress.BackColor = vbWhite
    .cmbQualification.BackColor = vbWhite

    'Validating Name

    If Trim(.txtEmpID.Value) = "" Then
        MsgBox "Employee ID is blank. Please enter a valid ID.", vbOKOnly + vbInformation, "Emp ID"
        .txtEmpID.BackColor = vbRed
        ValidEntry = False
        Exit Function
    End If


    'Validating Name

    If Trim(.txtName.Value) = "" Then
        MsgBox "Employee Name is blank. Please enter a valid name.", vbOKOnly + vbInformation, "Employee Name"
        .txtName.BackColor = vbRed
        ValidEntry = False
        Exit Function
    End If

    'Validating DOB

    If Trim(.txtDOB.Value) = "" Then
        MsgBox "DOB is blank. Please enter DOB.", vbOKOnly + vbInformation, "Invalid Entry"
        .txtDOB.BackColor = vbRed
        ValidEntry = False
        Exit Function
    End If


    'Validating DOB

    If .optFemale.Value = False And .optMale.Value = False Then
        MsgBox "Please select gender.", vbOKOnly + vbInformation, "Invalid Entry"
        ValidEntry = False
        Exit Function
    End If

    'Validating Qualification

    If Trim(.cmbQualification.Value) = "" Then
        MsgBox "Please select the Qualification from drop-down.", vbOKOnly + vbInformation, "Invalid Entry"
        .cmbQualification.BackColor = vbRed
        ValidEntry = False
        Exit Function
    End If

    'Validating Mobile Number

    If Trim(.txtMobile.Value) = "" Or Len(.txtMobile.Value) < 10 Or Not IsNumeric(.txtMobile.Value) Then
        MsgBox "Please enter a valid mobile number.", vbOKOnly + vbInformation, "Invalid Entry"
        .txtMobile.BackColor = vbRed
        ValidEntry = False
        Exit Function
    End If

    'Validating Email

    If ValidEmail(Trim(.txtEmail.Value)) = False Then
        MsgBox "Please enter a valid email address.", vbOKOnly + vbInformation, "Invalid Entry"
        .txtEmail.BackColor = vbRed
        ValidEntry = False
        Exit Function
    End If

    'Validating Address

    If Trim(.txtAddress.Value) = "" Then
        MsgBox "Address is blank. Please enter a valid address.", vbOKOnly + vbInformation, "Invalid Entry"
        .txtAddress.BackColor = vbRed
        ValidEntry = False
        Exit Function
    End If


End With

End Function
Let’s add sub procedure to transfer the data from User Form to Database. Before writing the code, we need to add the reference of ADO library in our project. To do that, just go to Tool menu and select the References… In references window, please select ‘Microsoft ActiveX Data Objects 6.1 Library’ and then click on Okay. Please see the below snapshot.
Now, we have added the reference for ADO. Let’s start coding for Submitting Data. You just need to copy the below code and paste it below the ValidEntry Function. Here, we have utilized dynamic connection string to connect the database. You can check the support folders and use the fixed path link to replace the dynamic code. The same has been explained in our YouTube tutorial. Support file link has been provided at the bottom of this post.
Sub Submit_Data()

Application.EnableCancelKey = xlDisabled
Application.DisplayAlerts = False
Application.ScreenUpdating = False

On Error GoTo ErrorHandler
Dim nConnection As New ADODB.Connection
Dim nRecordset As New ADODB.Recordset

Dim sqlQuery As String

#If Win64 Then
    nConnection.Open "Provider=Microsoft.ACE.OLEDB.12.0;Data Source=" & ThisWorkbook.Path & "Database.mdb" & ";Jet OLEDB:Database Password=thedatalabs"
#Else
    nConnection.Open "Provider=Microsoft.Jet.OLEDB.4.0;Data Source=" & ThisWorkbook.Path & "Database.mdb" & ";Jet OLEDB:Database Password=thedatalabs"
#End If

sqlQuery = "Select * from tblEmployee"

nRecordset.Open Source:=sqlQuery, ActiveConnection:=nConnection, CursorType:=adOpenKeyset, LockType:=adLockOptimistic

With nRecordset

    .AddNew ' If new records

    .Fields("Employee ID").Value = frmDataEntry.txtEmpID.Value   'Employee ID
    .Fields("Employee Name").Value = frmDataEntry.txtName.Value   'Employee Name
    .Fields("DOB").Value = frmDataEntry.txtDOB  'DOB
    .Fields("Gender").Value = IIf(frmDataEntry.optFemale.Value = True, "Female", "Male") 'Gender
    .Fields("Qualification").Value = frmDataEntry.cmbQualification.Value   'Qualification
    .Fields("Mobile Number").Value = frmDataEntry.txtMobile.Value   'Mobile Number
    .Fields("Email ID").Value = frmDataEntry.txtEmail.Value   'Email
    .Fields("Address").Value = frmDataEntry.txtAddress.Value   'Address

    .Fields("SUBMITTED BY").Value = Environ("username")
    .Fields("SUBMITTED ON").Value = [Now()]

   .Update

   .Close

End With

nConnection.Close

'Reset the form

Call Reset_Form

Application.DisplayAlerts = True
Application.ScreenUpdating = True

MsgBox "Data submitted successfully!"

Exit Sub
ErrorHandler:
MsgBox Err.Description & " " & Err.Number, vbOKOnly + vbCritical, "Database Error"
Application.DisplayAlerts = True
Application.ScreenUpdating = True
nConnection.Close

End Sub
Add the below code at the bottom of Submit_Data procedure to launch the form. We will utilize this sub procedure to assign it on ‘Launch Form’ button available on Home sheet.
Sub Show_Form()
  frmDataEntry.Show
End Sub
Let’s move to frmDataEntry and add the required code in Form Intilization, Click events of Submit and Reset.
Double click on Form and add the below sub procedure on initialize event.
Private Sub UserForm_Initialize()
Call Reset_Form
End Sub
Code for Click event on Submit Button
Private Sub cmdSubmit_Click()
Dim i As VbMsgBoxResult

i = MsgBox("Do you want to submit the data?", vbYesNo + vbQuestion, "Submit Data")

If i = vbNo Then Exit Sub

If ValidEntry Then

    Call Submit_Data

End If
End Sub
Code for click event on Reset button
Private Sub cmdReset_Click()
Dim i As VbMsgBoxResult

i = MsgBox("Do you want to reset the form?", vbYesNo + vbQuestion, "Reset")

If i = vbNo Then Exit Sub

Call Reset_Form
End Sub
Now coding for this project is done. Let’s move to Excel window and assign the macro on ‘Launch Form’ button available on Home sheet. Right Click on ‘Launch Form’ button and select Assign Macro and then choose the macro named ‘Show_Form’ from the available options.
All done. Let’s launch the form with the help of ‘Launch Form’ button available on Home sheet.
Please watch our step by step tutorial for this form on YouTube.
Please click on below button to download the Excel, Database and other support files.
Using Excel to store data records is an oft-used — if sometimes frustrating — alternative to setting up a database. However, the data entry form in Excel is a pivotal tool. This article provides all the steps necessary to get started with the Excel data entry form. If you’re looking for something easier, download the free Excel template to get started immediately.
Download a Free Excel Data Entry Form Template
Download Excel Data Entry Form Template
Use this free template to create a customized data entry form that allows you to apply multiple restrictions to a field (such as numeric and five digits long for a ZIP code field), make a field mandatory, or make it unique from all other records (for example, for an order number). Enter the number of fields needed for each record, select a title and options for each field in the record, and then move to the second sheet to start entering data.
What Are Excel Forms?
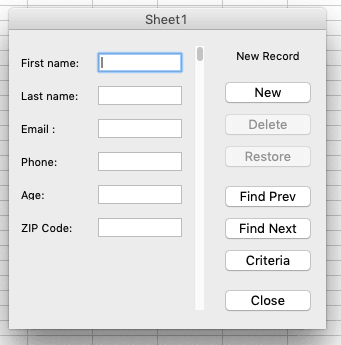
Excel offers the ability to make data entry easier by using a form, which is a dialog box with the fields for one record. The form allows data entry, a search function for existing entries, and the ability to edit or delete the data.
The example below has two fields per record. The form allows up to 32 fields per record.
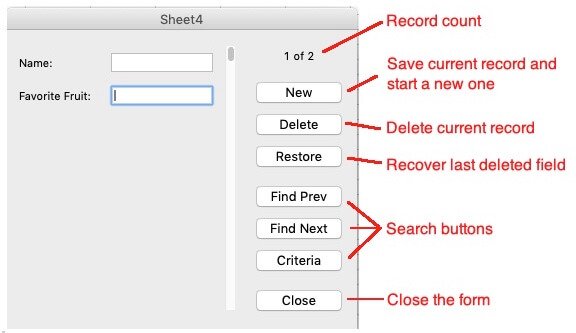
In addition to the navigation buttons, you can use the following keyboard commands to navigate through the form:
- Tab: Move to the next field.
- Shift+Tab: Move to the previous field.
- Enter: Save the record and start a new one.
Benefits of Using an Excel Data Entry Form
In addition to being able to enter data quickly and accurately, the form allows users to see more content without scrolling because the data appears in a vertical format (rather than horizontal). The form can also include data validation, including a dropdown list of pre-selected items in a column or ensuring that an entry meets certain criteria (such as a date or character length).
How Do I Create a Data Entry Form in Excel?
In general, the steps are to select an area in the sheet, insert a table, add titles at the top of the columns, and then find the form option in the data menu. To create a form, see the steps below for your version of Excel.
How Do I Create a Data Entry Form in Excel 2016?
These instructions also apply to Excel 365, and to Excel 2019 for PC. These steps were created with a different version of Excel so the interface will look different, but the steps are the same.
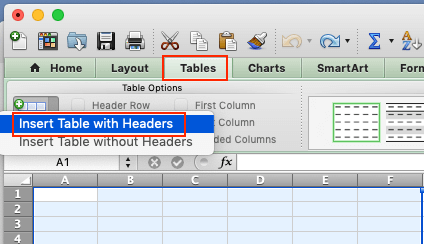
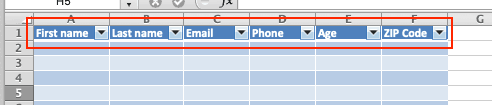
- On the chosen sheet, highlight the number of columns needed.

- Open the Tables tab, click New, click Insert Table with Headers.

- Change the default column headers, and adjust the width of columns if necessary.

- Open the Data menu and click Form…

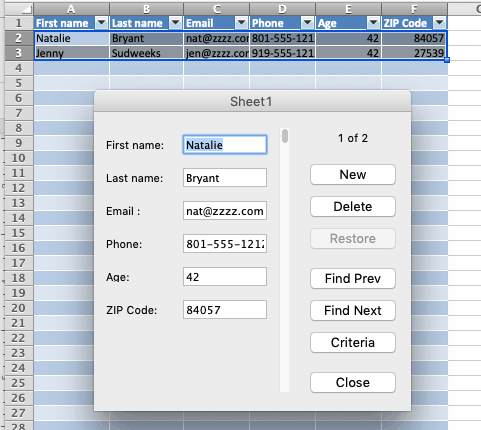
- The form will appear. The number of columns in the table will match the number of fields on the form. The column titles in the table will be the field titles on the form. You are now ready to enter data records into the form.

Inserting a Record
Type data into the first field, tab to the next field, and repeat until all fields are completed. Press Enter on your keyboard to save the data and move to the next record.
Finding a Record
Once you have entered data, you may want to find a record. To do so, click Criteria, enter the search term into the appropriate field (e.g. “Chicago” into a city field). Click Find Next. The first matching record will appear in the form (the records displayed in the sheet won’t be filtered). Click Find Next to scroll through the remaining records, or click Find Previous to scroll upward. You can use wildcard characters such as “*” and “?” when searching the records.
Editing a Record
Once the desired record is displayed in the form, select the field you want to change and edit the text. Hit Enter on your keyboard to save changes.
Deleting a Record
Once the desired record is displayed in the form, click Delete, then click OK.
How Do I Create a Data Entry Form in Excel 2013?
The steps for adding, finding, editing, and deleting a record are the same as for Excel 2016, so follow the steps above. The appearance may be slightly different. In general, the steps are to select an area in the sheet, insert a table, add titles at the top of the columns, and then find the form option in the data menu.
How Do I Create a Data Entry Form in Excel 2010?
In general, the steps are to select an area in the sheet, insert a table, add titles at the top of the columns, and then find the form option in the data menu. You can follow the steps for adding, finding, editing, and deleting a record in Excel 2016 above. Note that the interface may be slightly different.
How Do I Create a Data Entry Form in Excel 2007?
Select an area in the sheet, insert a table, add titles at the top of the columns, and then find the form option in the data menu. Follow the steps above for Excel 2016 to add, find, edit, or delete. The interface may be slightly different.
How Do I Create a Data Entry Form with a Single Click?
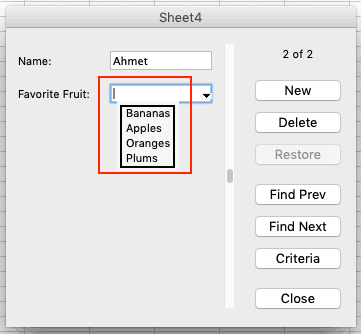
Adding a Drop-Down List to an Excel Data Entry Form
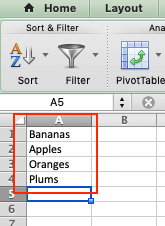
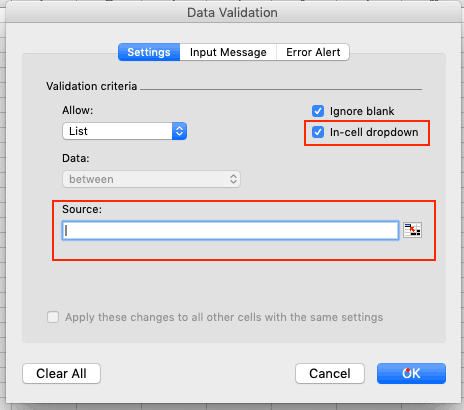
A drop-down menu presents a predefined list of options in a data entry form field. This is useful when you need to enter a set list of employees, products, part numbers, etc. into a field.
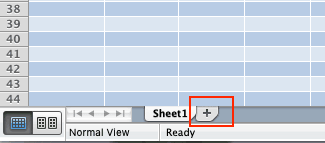
- Add a new sheet to the workbook (you can also use a blank sheet) by clicking the plus sign on the tabs at the bottom of the window.

While not required, it makes sense to change the name of the sheet to something like “data.” Double-click the new sheet’s title tab and type the new name.
- Enter the list of options into a column in the new sheet. If more than one field in the form needs a dropdown list, repeat the process in another column. If you have more than one field with a dropdown list, the data column for each list can be on the same sheet or on different sheets, depending on your preference.

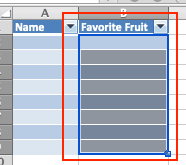
- Return to the worksheet with the table and select the column that will have the dropdown list.

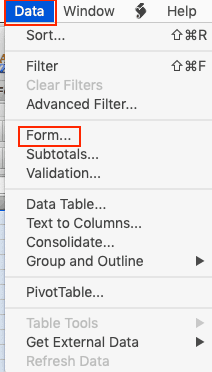
- On the ribbon, click Data, click Validate, click arrow next to the Allow field and click List.


Ensure the In-cell dropdown option is checked and put the cursor in the Source field.

- Click on the tab for the sheet with the list (in our example, the Data sheet), highlight the list of items (the sheet and cell reference will be added to the source field), and click OK.

- Show the data entry form based on the steps above. The field connected to that column will only allow entries from the list on the other sheet.


Note: In some older versions of Excel, the dropdown will not appear in the form, but the field will still be restricted to the list in on the data sheet.
Other Types of Cell Validation
In addition to a restricted list, the form fields can have other restrictions. Select the column and click Data on the ribbon, click Validate, click the Allow field, and then choose one of the options below:
- Make a Column a Date or Time: Select Date or Time. If needed, enter start and end values to constrain the starting and ending date or times.
- Make a Column Numeric: Select Whole number or Decimal. If needed, enter start and/or ending values to constrain the range.
- Restrict the Length: Select Text length. If needed, enter start and end values to constrain the range.
How Do I Create a Submit Button in Excel?
A submit button is a user-created control button that runs a macro when clicked. The macro can be any valid macro, such as sorting data, removing blank rows, or saving a sheet as a PDF.
There are two ways to create a button. One uses ActiveX, the other uses Visual Basic (VBA), so they are beyond the scope of this article. If you have experience with ActiveX or Visual Basic, Microsoft’s support site offers instructions.
How Do I Insert a UserForm in Excel?
A UserForm is an Excel tool that is similar to a data entry form. However, it is more flexible because it allows the use of checkboxes, radio buttons, multiple selections, and scrolling lists to enter data in addition to text boxes. Creating Userforms requires knowledge of Visual Basic. If you have experience with Visual Basic, a tutorial for creating UserForms can be found here or here.
How Do I Create a Data Entry Form with VBA?
A data entry form can be created with VBA in the same way as a UserForm in Excel.
Streamline Data Collection with Smartsheet Forms
Empower your people to go above and beyond with a flexible platform designed to match the needs of your team — and adapt as those needs change.
The Smartsheet platform makes it easy to plan, capture, manage, and report on work from anywhere, helping your team be more effective and get more done. Report on key metrics and get real-time visibility into work as it happens with roll-up reports, dashboards, and automated workflows built to keep your team connected and informed.
When teams have clarity into the work getting done, there’s no telling how much more they can accomplish in the same amount of time. Try Smartsheet for free, today.
Home / Advanced Excel / How to Create a Data Entry Form in Excel
The data entry form is one of the best ways to enter data into a table. But, creating a form to enter data it not a cup of cake.
Yes, that’s right.
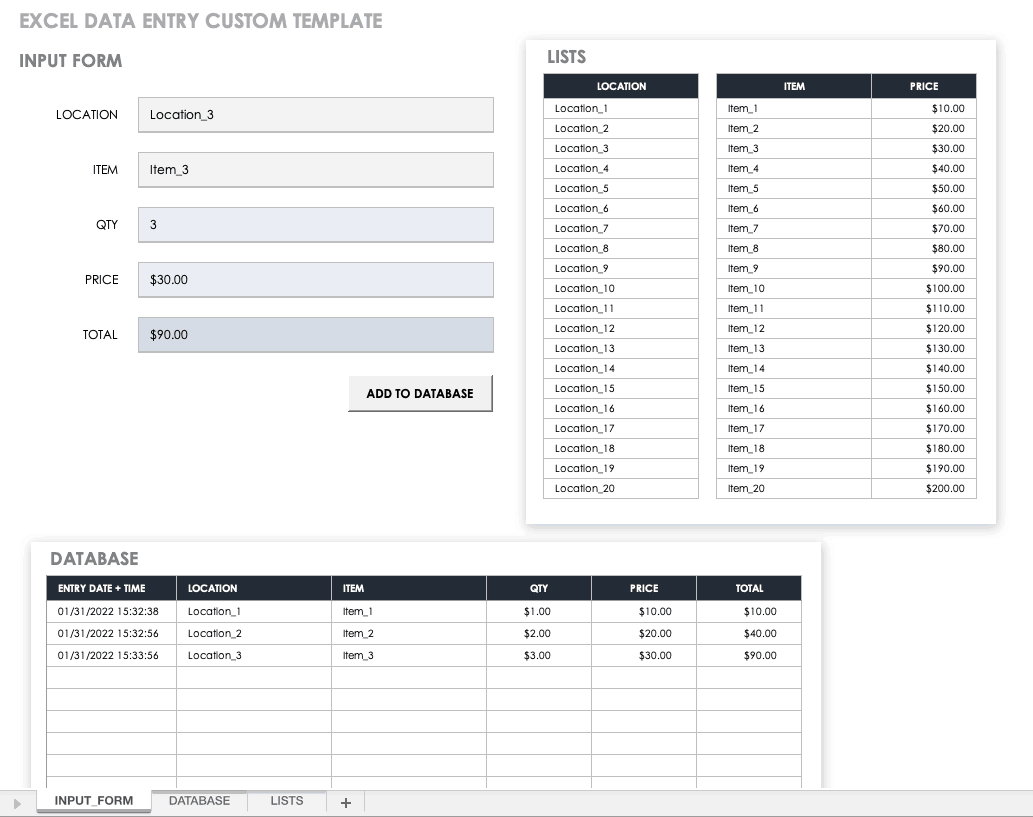
While struggling with this problem, I have found that you can create a form in Excel for data entry just with a single click. The best part about this form is it’s pre-designed and flexible. Just look at the below example.

Here’s the idea: To create this entry form, the only thing you need to do is to activate it.
In a short while, you will discover that how helpful this tool is. But, this is hard to believe that there is no listing of this data entry form in the ribbon. So, you have to make it appear before we use it. And before you activate this form, you need a table to enter data or at least headers of the data.

To activate it, click any of the cells in the table or just select one of the heading cells and use one of the below two methods.
- Use the keyboard shortcut key: Alt ⇢ D ⇢ O ⇢ O.
- Add an icon to the quick access toolbar.
- File ➜ Options ➜ Quick Access Toolbar.
- Choose Command From ➜ Commands Not In Ribbon ➜ From ➜ Add ➜ Click OK.

After using one of the above options, it will create a data entry form for you just like below.

And if you notice, all the headings of your data table are automatically captured in the form.
1. Create New Entry
To create a new data entry fill all the input boxes with data and click on the “New” button. Now if you look at the below example you’ll find that there is no input bar for the amount column.
We have a formula in the amount column to multiply the quantity by the price. That means this form is quite smart to discover the columns where there is no need to input data.
2. Navigate Entries
To navigate all the entries which you have entered in your data, you can use the scroll bar or you can use the “Find Prev” & “Find Next” buttons.
3. Edit Entries
To edit an entry you have to first navigate to that entry by the using method mentioned above. Once you navigate, you can make the changes in any of the input boxes and after that, just press enter key.
While editing your entry (before pressing enter or clicking the close button), if you want to restore your entry you can do it with the restore button. It will restore the previous data in all the input boxes.
4. Delete Entries
To delete an entry you have to navigate to that entry and click on the delete button. A pop window will appear for the confirmation of the deletion and it will instantly delete that entry from your data table.
5. Find a Specific Entry
If you are working on large data, you can use the “Criteria” button to find a specific entry.
For example, if you want to find entries below the table that match some specific criteria, just click on the Criteria button, enter the criteria in the input box, and press Enter. You will get the data entries matching your criteria. You can also use your criteria in more than one input box.
Important Points about this Data Entry Form
Well, there are some important points that you should know to play well with this form.
- The maximum number of input boxes you can use in the data entry form is 32.
- The width of the input box is purely connected with the related column in the worksheet. If your worksheet columns are not sufficiently wide to show values, the same width will reflect in your data form also.
- On the other hand, if only one of the columns is over in width, the same width will reflect for all input boxes in data form.
- If you have a range with the name “Database” then there is no need to select any cell from the table. It will always insert data into that table.
- While using criteria to pull some specific data, you can use Excel Wildcard Characters in this form.
- While creating data entries if you try to overwrite data in the cell, it will give you an alert message “Cannot extend list or database”.
.