
Excel for Microsoft 365 Excel 2021 Excel 2019 Excel 2016 Excel 2013 Excel 2010 Excel 2007 More…Less
You can use Excel to create and edit connections to external data sources that are stored in a workbook or in a connection file. You can easily manage these connections, including creating, editing, and deleting them using the current Queries & Connections pane or the Workbook Connections dialog box (available in previous versions).
Data in an Excel workbook can come from two different locations. The data may be stored directly in the workbook, or it may be stored in an external data source, such as a text file, a database, or an Online Analytical Processing (OLAP) cube. The external data source is connected to the workbook through a data connection, which is a set of information that describes how to locate, log in, query, and access the external data source.
When you are connected to an external data source, you can also perform a refresh operation to retrieve the updated data. Each time that you refresh data, you see the most recent version of the data, including any changes that were made to the data since it was last refreshed.
Connection information can either be stored in the workbook or in a connection file, such as an Office Data Connection (ODC) file (.odc) or a Universal Data Connection (UDC) file (.udcx). Connection files are particularly useful for sharing connections on a consistent basis and for facilitating data source administration.
If you use a connection file to connect to a data source, Excel copies the connection information from the connection file into the Excel workbook. When you make changes by using the Connection Properties dialog box, you are editing the data connection information that is stored in the current Excel workbook, and not the original data connection file that may have been used to create the connection, indicated by the file name that is displayed in the Connection File property. Once you edit the connection information (with the exception of the Connection Name and Connection Description properties), the link to the connection file is removed and the Connection File property is cleared.
By using the Connection Properties dialog box or the Data Connection Wizard, you can use Excel to create an Office Data Connection (ODC) file (.odc). For more information, see Connection properties and Share data with ODC.
-
Do one of the following:
-
Create a new connection to the data source. For more information, see Move data from Excel to Access, Import or export text files, or Connect to SQL Server Analysis Services Database (Import).
-
Use an existing connection. For more information, see Connect to (Import) external data.
-
-
Save the connection information to a connection file by clicking Export Connection File on the Definition tab of the Connection Properties dialog box to display the File Save dialog box, and then save the current connection information to an ODC file.
Note The Queries & Connections pane is available in Microsoft Office 365 for Excel and Excel stand-alone version 2019 or later. It replaced the Workbook Connections dialog box which is available in Excel stand-alone versions 2010, 2013, and 2016.
The Queries & Connections pane (Select Data > Queries & Connections) In one location, you can get to all the information and commands you need to work with your external data. This pane has two tabs:
-
Queries Displays all the queries in the workbook. Right click a query to see available commands. For more information, see Manage queries.
-
Connections
Displays all the connections in the workbook. Right click a connection to see available commands. For more information, see Connection properties.
Note The Workbook Connections dialog box is available in Excel stand-alone versions 2010, 2013, and 2016, but was replaced in Microsoft Office 365 for Excel and Excel stand-alone version 2019 with the Queries & Connections pane.
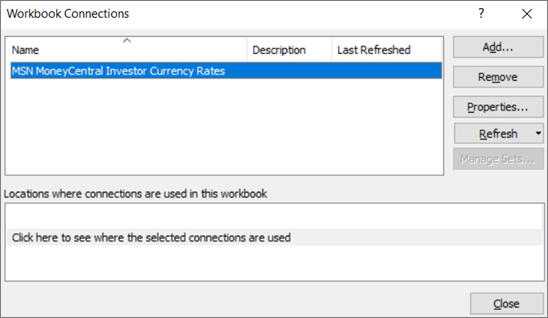
The Workbook Connections dialog box (Select Data > Connections) helps you manage one or more connections to external data sources in your workbook.
You can use this dialog box to do the following:
-
Create, edit, refresh, and delete connections that are in use in the workbook.
-
Verify where external data is coming from, because, for example, the connection was defined by another user.
-
Show where each connection is used in the current workbook.
-
Diagnose an error message about connections to external data.
-
Redirect a connection to a different server or data source, or replace the connection file for an existing connection.
-
Display the Existing Connections dialog box to create new connections. For more information, see Connect to (Import) external data.
-
Display the Connection Properties dialog box to modify data connection properties, edit queries, and change parameters. For more information, see Connection properties.
-
Make it easy to create and share connection files with users.
To manage the connections in the current workbook, do one or more of the following:
Identify a connection
In the top portion of the dialog box, all connections in the workbook are displayed automatically with the following information:
|
Column |
Comment |
|---|---|
|
Name |
The name of the connection, defined in the Connection Properties dialog box. |
|
Description |
An optional description of the connection, defined in the Connection Properties dialog box. |
|
Last refreshed |
The date and time that the connection was last successfully refreshed. If blank, then the connection has never been refreshed. |
Add a connection
-
Click Add to display the Existing Connections dialog box. For more information, see Connect to (Import) external data.
Display connection information
-
Select a connection, and then click Properties to display the Connection Properties dialog box. For more information, see Connection properties.
Refresh the external data
-
Click the arrow next to Refresh, and then do one of the following:
-
To refresh specific connections, select one or more connections, and then click Refresh.
-
To refresh all connections in the workbook, clear all connections, and then click Refresh All.
-
To get status information about a refresh operation, select one or more connections, and then click Refresh Status.
-
To stop the current refresh operation, click Cancel Refresh.
-
For more information, see Refresh an external data connection in Excel.
Remove one or more connections
-
Select one or more connections to be removed from the workbook, and then click Remove.
Notes:
-
This button is disabled when the workbook is protected or an object, such as a PivotTable report, that uses the connection is protected.
-
Removing a connection only removes the connection and does not remove any object or data from the workbook.
-
Important: Removing a connection breaks the connection to the data source and may cause unintended consequences, such as different formula results and possible problems with other Excel features.
Display the locations of one or more connections in the workbook
-
Select one or more connections, and then under Locations where connections are used in this workbook, click the link Click here to see where the selected connections are used.
The following information is displayed.
|
Column |
Comment |
|---|---|
|
Sheet |
The worksheet where the connection is used. |
|
Name |
The Excel query name. |
|
Location |
The reference to a cell, range, or object. |
|
Value |
The value of a cell, or blank for a range of cells. |
|
Formula |
The formula of a cell, or for a range of cells. |
Selecting another connection at the top of the dialog box clears the display of the current information.
See Also
Power Query for Excel Help
Need more help?
Want more options?
Explore subscription benefits, browse training courses, learn how to secure your device, and more.
Communities help you ask and answer questions, give feedback, and hear from experts with rich knowledge.
You all must have heard of Excel Workbook Connections but do know how to manage workbook connection in Excel? Well if you are not having any idea of enabling data connection in Excel workbook.
In that case our, this Excel workbook connections tutorial will help in grabbing every pinch of information reading this. So, that any Excel user can easily perform and manage external data connections in Excel.
What Is Data Connection In Excel?

Data of any Excel workbook can only be bring from different locations. Firstly, either the data is directly stored in your Excel workbook. Or secondly it may be saved in the external data source, like a database, an OLAP (Online Analytical Processing cube) or text file.
Using the data connection in Excel, external data sources are well connected with Excel workbook. Basically this data connection in Excel contains set of information about how to log in, query, locate, and perfectly access the external data source.
After connecting your excel workbook with external data source. One can easily use the refresh option to extract the updated data from their workbook. Using this way, user can get the most updated version of their data including the changes made in the data since it was last refreshed.
Well the Connection information can be stored in a connection file or in the workbook like Universal Data Connection (UDC) file (.udcx) or Office Data Connection (ODC) file (.odc)
These connection files are very useful to share connections on regular basis also to facilitate data source administration.
If you are using the connection file for connecting with the data source. Then in that case Excel will copies down the connection details from the connection file into your Excel workbook.
Different Ways To Perform Excel Workbook Connections
In this Excel workbook connections tutorial we will learn 3 different ways to use Data Connection In Excel 2010/2013/2016/2019:
- Workbook Connections dialog box
- Creating an Office Data Connection (ODC) file (.odc)
- Refresh external data connection
Method 1: Excel Workbook Connections Using Workbook Connections Dialog Box
![]()
Excel Workbook Connections dialog box option helps in easy managing of single or multiple connections with the external data sources of your workbook. Apart from this the Workbook Connections dialog box is helpful to perform the following tasks:
- It helps to edit, refresh, create and delete connections which are used in Excel workbook.
- Show the location of each connection that is already been used in the current Excel workbook.
- Easy diagnosis of error message regarding external data connections.
- With this option, user can either redirect connection to different data or to the different server. Or alternatively user can easily replace the connection file with the existing connection.
- It becomes too easy to make & share connection files.
Steps To Manage Excel Workbook Connection Using Workbook Connections Dialog Box
Here is how to manage connections in your current using Excel workbook i.e by using Workbook Connections dialog box:
Identify a connection
In the top portion of the dialog box, all connections in the workbook are displayed automatically with the following information:
| Column | Comment |
| Name | connection name is, defined within Connection Properties dialog box. |
| Description | A short description about connection, is mentioned in Connection Properties dialog box. |
| Last refreshed | when was the connection was last refreshed such as it’s date and time appears in this section. If it is blank, then it means that the connection has not refreshed yet. |
Add a connection
- Tap to the Add option to get the dialog box of Existing Connections.
Display Connection Information
- For this you need to choose a connection from the opened Existing Connections dialog box.
- Now hit the Properties option and this will open the dialog box of Connection Properties.
Refresh The External Data.
- Hit the arrow option present next to the Refresh option. After then perform anyone of the following:
- If you want to refresh any specific connections only, then make selections of those connections. After then tap to the Refresh option.
- For refreshing all connections of your workbook, just clear off all the connections. After that tap to the Refresh All option.
- If you want to get the status information about refresh operation then choose the connections about which you want to extract information. After then hit on the Refresh Status option.
- For stopping down the current running refresh operation just tap to the Cancel Refresh option.
Remove One Or More Connections
- Choose the connections which you wants to remove from your Excel workbook. After then tap to the Remove option.
Notes:
- Well this option appears disabled to you if your workbook is protected one or if it is an object, like PivotTable report, which uses the protected connection.
- Removing connection will only deletes off the connection. It will not remove any data or any object from your Excel workbook.
Important: By removing connection you are actually breaking the connection with the data source which may leads to cause unintentional consequences, Like different formula results or you may face difficulty in accessing Excel features.
Method 2: Excel Workbook Connections Using Refresh External Data Connection Option

User can connect their Excel workbook with an external data source, like to another Excel workbook, SQL Server database or an OLAP cube.
Well this connection information gets displayed on your workbook as PivotTable report, PivotChart, table.
For keeping the data of your Excel workbook updated you can make use of “Refresh” option to link the data with its source.
So whenever you will refresh your connection, you will only get the most current updated data.
Step To Use Refresh External Data Connection Option
For connections just tap to any cell of your Excel table which uses the connection. After then perform any of the following operation:
- Automatically refresh data when excel workbook is opened
- Automatically refresh data at regular interval
Step To Automatically Refresh Data When Excel Workbook Is Opened
- Tap to the cell present within the external data range.
- Now on the Data tab, go to the Queries & Connections Hit the arrow key present within the Refresh All option, and from this tap to the Connection Properties.

- From the opened dialog box of Connection Properties dialog tap to the Usage tab, within Refresh control. After then choose the check box “Refresh data when opening the file”.
- In order to save your workbook with the complete query definition excluding external data. You need to choose the check box “Remove data from the external data range before saving the workbook”.
Step To Automatically refresh data at regular interval:
- Tap to the cell present within the external data range.
- Now on the Data tab, go to the Queries & Connections Hit the arrow key present within the Refresh All option, and from this tap to the Connection Properties.
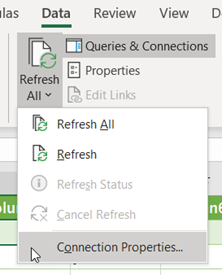
- In the opened Connection Properties dialog box. Hit Usage tab option.
- Choose the check box Refresh every. After then set the minute interval that will automatically refresh your data after certain period of time.
Method 3: Excel Workbook Connections By Creating An Office Data Connection (ODC) File

By making use of the Data Connection Wizard or Connection Properties dialog box one can easily use their Excel worksheet to create an Office Data Connection (ODC) file (.odc).
- You can perform any of the following task:
- Make new connection with data source. To catch more information, have a look at following topics :
- Connect to SQL Server Analysis Services Database (Import)
- Import or export text files
- Move data from Excel to Access
- Make new connection with data source. To catch more information, have a look at following topics :
- Or you can just make use of the existing connection. For more information, see Connect to (Import) external data.
- After then save the connection detail into the connection file. For this, just make a tap to the Export Connection File option present on the Definition tab of Connection Properties dialog box. This will open the File Save dialog box, so save your current connection information into the ODC file.
Wrap Up:
Hopefully, all the above mentioned fixes to setup Excel Workbook Connections will help you in easy using of data connection in your respective Excel 2010/2013/2016/2019 application. Apart from this if you you have any other query to ask then, ask it in our comment section.


Priyanka is an entrepreneur & content marketing expert. She writes tech blogs and has expertise in MS Office, Excel, and other tech subjects. Her distinctive art of presenting tech information in the easy-to-understand language is very impressive. When not writing, she loves unplanned travels.
Содержание
- Connect Your Data Sources and Automate Updates with Excel Data Connection
- Creating a data connection
- Refreshing and managing data connections
- Connect to (Import) external data
- Find out which data sources are used in a workbook data model
- Need more help?
- Work with external data in Excel Services (SharePoint Server)
- In this article
- What is external data?
- Data sources that are supported in Excel Services
- Excel Web App and Excel Services
- Determining whether Excel Services or Excel Web App is used to render a workbook
- External data sources that are supported in Excel Services and Excel Web App
Connect Your Data Sources and Automate Updates with Excel Data Connection
by Adam | Sep 5, 2018 | Blog

Although Excel does a great job at saving data in a nice table structure, some projects require data to be stored or exported elsewhere. Text files, other excel files, databases, or even web pages can be used as a means to consume or store data. If you need to periodically update your data, moving or copying to an Excel spreadsheet can be time consuming and prone to errors. Data connection features of Excel can help establish permanent links with other data sources and automate this process.
Excel can pull data from an external data source into your spreadsheet with the help of data connection features. Excel can connect external data sources when you provide certain information about the external data and allows you to refresh them manually, automatically in specified intervals, or in a more customized fashion using VBA. In this article, we’re going to be using an equipment rental data and connect it with data from a Microsoft Access database. You can download the workbook and the Access file below.
Data connection features can be found under the DATA tab and consists of two categories:
- Get External Data
- Connections

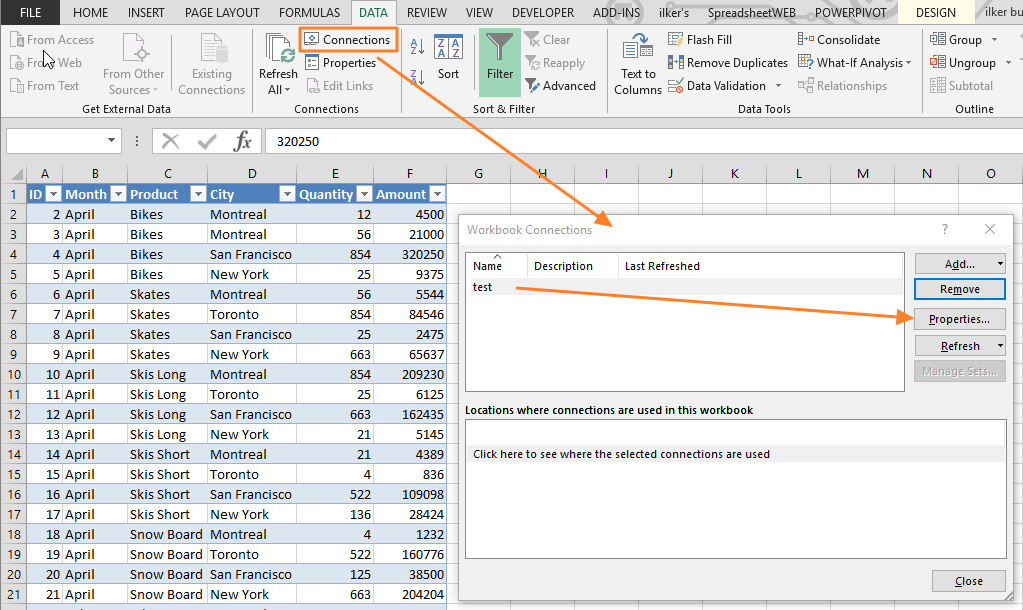
Features under the Get External Data section help create a connection with sources like other workbooks, databases, text files, or websites. Connections section contains features for managing existing connections. To begin creating a new link, click Connections. You will be taken to the Workbook Connections window.

When you connect an external data in Excel, data will be first saved in the workbook. This data can then be exported in other formats, such as Office Data Connection (ODC) (.odc), or a Universal Data Connection (UDC) file (.udcx), to save or share the information.
Creating a data connection
Follow the steps below to connect an external data source to your workbook.
- Begin by going to the Data tab and selecting the connection type that corresponds to your data source. In this example, we are using a Microsoft Access database. Please note that the exact steps will be different if you choose another data type. For example, while you need to select a file for an Access or a text file, you will need to enter the server address for a SQL database. Click the From Access icon to connect to an Access file.

- Select your file and click Open.
- Select Table window will appear. Select the table you’d like to use and click OK to continue.
- In the Import Data window, you can choose how and where to display your data, and you can access advanced settings by pressing the Properties You don’t have to this now as you can open the Properties window at any time after creating connection.


In our example, we choose the Table option. Here is brief summary of all options.
- Table: Data is displayed in a tabular form
- PivotTable Report: You can use the columns to create a PivotTable
- PivotChart: You can use the columns to create a PivotChart
- Only Create Connection: Data will not be displayed, but the connection can be used by other features or VBA, and can be exported.
- Add this data to Data Model: Data is added to the Power Pivot Data Model. This option is independent from the display option above. However, it is advisable to use it with Only Create Connection option, because you can manage your data better in the Data Model.
You can choose to pull certain columns, instead of the entire table, if necessary. Try the PivotTable and Only Create Connection options to create connections without displaying the data in your spreadsheet.
Refreshing and managing data connections
There are several ways to refresh existing connections. The first method is by using the icons under both DATA and TABLE TOOLS — DESIGN tabs in the ribbon. These icons can be used to refresh data connection manually.
Both options essentially do the same thing. However, the default actions are different for the Refresh buttons in the DATA and TABLE TOOLS – DESIGN tabs. While Refresh All action is the default action in DATA tab. Refresh action is the default in the TABLE TOOLS – DESIGN tab. The Refresh button only refreshes the active table’s connection.

Power Pivot and Power Query windows also contain refresh buttons.

To automate this process, you can set a time interval to refresh data connections. To set a refresh interval, and manage the connections (including advanced Properties), use the Connections button to open the Workbook Connections window. You can add new connections, or refresh existing ones in this menu. Select the existing connection and click the Properties button to open Connection Properties window.
Enable the Refresh every option and modify the number that represents minutes. When you click OK, your data connection will be updated in selected intervals.
An alternative way to automatically refresh data is using VBA. This allows combining data connection features with your own custom code. Below is sample codes that can refresh data connections.
Источник
Connect to (Import) external data
The main benefit of connecting to external data is that you can periodically analyze this data in Microsoft Office Excel without repeatedly copying the data, which is an operation that can be time-consuming and error-prone. After connecting to external data, you can also automatically refresh (or update) your Excel workbooks from the original data source whenever the data source is updated with new information.
Important: Connections to external data may be disabled on your computer. To connect to data when you open a workbook, you must enable data connections by using the Trust Center bar. For more information, see Add, remove, or view a trusted publisher, Trusted documents, and View my options and settings in the Microsoft Office Trust Center.
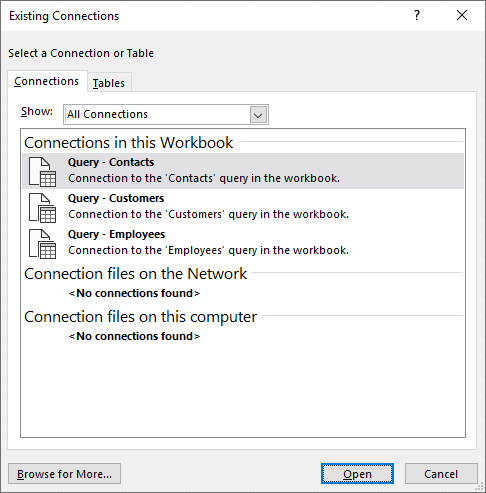
To open the Existing Connections dialog box, select Data > Existing Connections. You can display all the connections available to you and Excel tables in your workbook. You can open a connection or table from the list and then use the Import Data dialog box to decide how you want to import the data.
Note: You can also open the Existing Connections dialog box from the Change PivotTable Data Source dialog box. For more information about changing the data source for a PivotTable, see Change the source data for a PivotTable.
In the Show drop-down list, do one of the following:
All To display all connections, click All Connections. This is selected by default.
Workbook To display only the recently used list of connections, click Connections in this Workbook.
This list is created from connections that you have already defined, that you have created by using the Select Data Source dialog box of the Data Connection Wizard, or that you have previously selected as a connection from this dialog box.
Computer To display only the connections that are available on your computer, select Connection files on this computer.
This list is created from the My Data Sources folder that is usually stored in the My Documents folder on your computer.
Network To display only the connections that are available from a connection file that is accessible from the network, select Connection files on the Network. This list is created from an Excel Data Connection Library (DCL) on a Microsoft SharePoint Services site. A DCL is a document library in a SharePoint Services site that contains a collection of Office Data Connection (ODC) files (.odc). Typically, a DCL is set up by a site administrator, who can also configure the SharePoint site to display ODC files from this DCL in the External Connections dialog box. For more information, see SharePoint Services Central Administration Help.
Select the connection that you want, and then select Open. The Import Data dialog box appears.
Decide how you want to import the data, and then select OK. For more information about using this dialog box, select the question mark (?).
Tip: If you do not see the connection that you want, you can create a connection. Click Browse for More, and then in the Select Data Source dialog box, click New Source to start the Data Connection Wizard so that you can select the data source that you want to connect to.
Note: If you choose a connection from the Connection files on the network or Connection files on this computer categories, the connection file is copied into the workbook as a new workbook connection, and is then used as the new connection information.
In the Show drop-down list, do one of the following:
All To display all connections, click Workbook Tables. This is selected by default.
Connections To display tables defined only by a connection select Connections Tables.
This list is created from connections that you have already defined, that you have created by using the Select Data Source dialog box of the Data Connection Wizard, or that you have previously selected as a connection from this dialog box.
Workbook To display a table in the workbook select Workbook Tables.
Select the connection that you want, and then select Open. The Import Data dialog box appears.
Decide how you want to import the data, and then select OK. For more information about using this dialog box, select the question mark (?).
Источник
Find out which data sources are used in a workbook data model
If you’re working with data that’s been added to an Excel data model, then sometimes, you may lose track of which tables and data sources were added to the data model.
Note: Make sure you have enabled the Power Pivot add-in. For more information, see Start the Power Pivot add-in for Excel.
Here are a few easy steps you can follow to determine exactly what data exists in the model:
In Excel, click Power Pivot > Manage to open the Power Pivot window.
View the tabs in the Power Pivot window.
Each tab contains a table in your model. Columns in each table appear as fields in a PivotTable Field List. Any column that is grayed-out has been hidden from client applications.
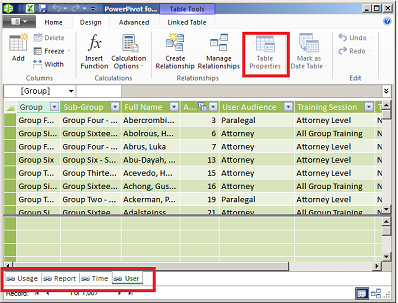
To view the origin of the table, click Table Properties.
If Table Properties is grayed out and the tab contains a link icon indicating a linked table, the data originates from a sheet in the workbook rather than an external data source.
For all other types of data, the Edit Table Properties dialog shows the connection name and query used to retrieve the data. Make a note of the connection name, and then use Connection Manager in Excel to determine the network resource and database used in the connection:
In Excel, click Data > Connections.
Select the connection used to populate the table in your model.
Click Properties > Definition to view the connection string.
Note: Data models were introduced in Excel 2013. You use them to create PivotTables, PivotCharts, and Power View reports that visualize data from multiple tables. Learn more about data models in Create a Data Model in Excel.
Need more help?
You can always ask an expert in the Excel Tech Community or get support in the Answers community.
Источник
Work with external data in Excel Services (SharePoint Server)
Note: This article assumes that you are using the version of Excel that comes with Office Professional Plus. Excel Starter and the version of Excel that comes with the Home and Student editions of Office do not support external data connectivity as described in this article.
The information in this article applies to Excel Services in SharePoint Server 2013 (on premises) only. For information about Microsoft 365 (in the cloud), see Use external data in workbooks in SharePoint Online.
You can work with a wide variety of data sources in Excel, including native data and external data. Some, but not all, of the external data sources that you can use in Excel are supported in Excel Services. Read this article to get an overview of what’s supported in Excel Services when you publish a workbook to a SharePoint library.
In this article
What is external data?
External data is data that is stored someplace else, such as on a server. You can import or display external data in a workbook by using one or more external data connections. Examples of external data sources can include SQL Server tables, SQL Server Analysis Services cubes, Microsoft Azure Marketplace data, and so on. External data connections that are used in a workbook make it possible to send queries and receive data from the databases that are specified in the connections. This enables you to refresh the data to view the most current information in a workbook.
As an alternative to working with external data, you can use native data in Excel. Native data is stored directly in the workbook, and does not require an external data connection to be retained, even if an external connection was used to import data into a workbook. To update native data, you can manually type updates or reimport data into Excel.
Data sources that are supported in Excel Services
Some, but not all, of the data sources that you can use in Excel are supported in Excel Services in SharePoint Server 2013. When a data source is supported in Excel Services, it means that you and other users are able to refresh the data that is displayed in a workbook. Excel Services in SharePoint Server 2013 supports the following kinds of data sources:
SQL Server tables
SQL Server Analysis Services cubes
OLE DB or ODBC data sources
Data models, such as those that are created in Excel
Excel Web App and Excel Services
If your organization is using Office Web Apps alongside SharePoint Server 2013, then either Excel Services (part of SharePoint Server 2013) or Excel Web App (part of Office Web Apps Server) is used to render workbooks in a browser window. This is a decision that SharePoint administrators make, and it can affect which data sources are supported when you are using a workbook in a browser window. For more information, see Comparing Excel Online, Excel Services, and Excel Web App.
Determining whether Excel Services or Excel Web App is used to render a workbook
You might be wondering how to tell if you are using Excel Services or Excel Web App when you view a workbook in a browser window. One way to do this is to examine the website address (URL) for the workbook.
Look for xlviewer in the URL.
If the URL resembles http://[servername]_layouts/15/xlviewer.aspx?id=/Documents/. , then Excel Services is used to render the workbook.
Look for WopiFrame in the URL.
If the URL resembles http://[servername]/_layouts/15/WopiFrame2.aspx?sourcedoc=/Documents/. , then Excel Web App is used to render the workbook.
You can also contact your SharePoint administrator for help with information about how your environment is configured.
External data sources that are supported in Excel Services and Excel Web App
The following table summarizes the kinds of data connections that you can use in Excel and which data connections are supported in Excel Services and in Excel Web App.
Excel Data Source
Supported in Excel Services (SharePoint Server)?
Supported in Excel Web App (Office Web Apps Server)?
SQL Server tables
Yes, if the environment includes SharePoint Server 2013 and it is configured to use Secure Store Service or an unattended service account. Contact a SharePoint administrator for more information.
SQL Server Analysis Services cubes
Yes, if the environment includes SharePoint Server 2013 and it is configured to use Secure Store Service or an unattended service account. Contact a SharePoint administrator for more information.
OLE DB or ODBC data sources
Yes, if each connection’s string contains a user name and password. Contact a SharePoint administrator for more information.
Yes, if each connection’s string contains a user name and password. Contact a SharePoint administrator for more information.
Data model that was created by using Excel
Yes, if Excel Services is configured to support data models. Contact a SharePoint administrator for more information.
Источник
How to use external data connections in Excel? Today’s tutorial is all about data import (SQL, CSV, and XML) and the managing of data sources. Stay with us!
It is not surprising that we rarely store databases and a large amount of raw data in Excel worksheets. The main reason for this is that Excel was not made for this.
Use external data connections to build a dashboard, and you have to work with a considerable amount of data. We think that the subject is so important. So, we provide a whole separate article about it.
The most common External Data Connections
The most important data sources are:
- SQL database
- CSV file
- XML
How can we import data using various external data connections into Excel?
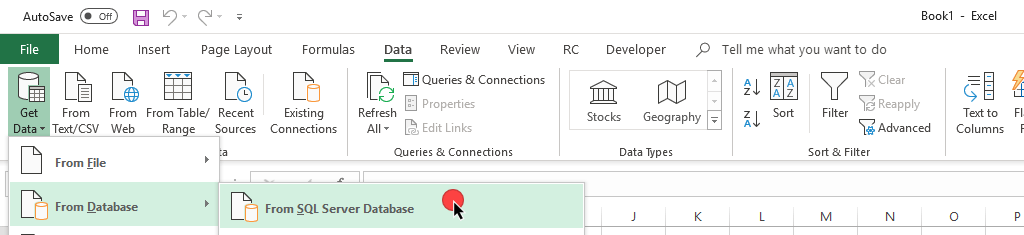
The starting point is always the same. First, go to the Data tab on the ribbon. Then, choose ‘Get data’ or ‘From Text/CSV.’ Then, of course, we can import data with the help of a web query also.

Connect to External Data Sources
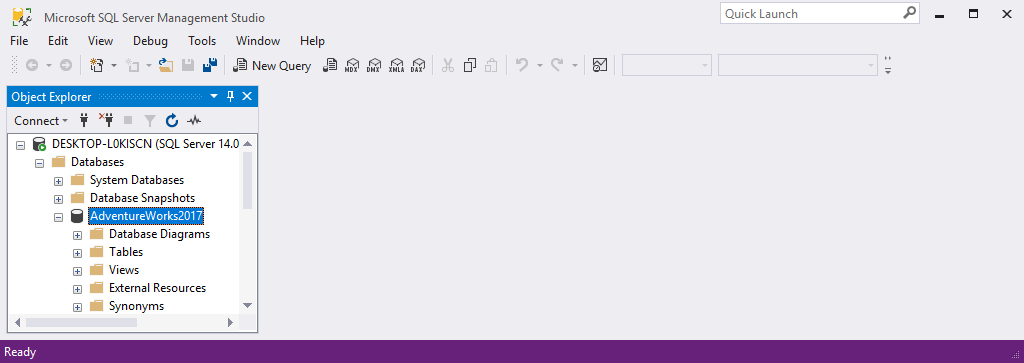
We’ll use the ‘AdventureWorks’ SQL Server database. It’s well known and used by many. SQL Server Management studio will help us import the given database from a backup.
First, start Excel.
Choose the Get Data > From database > From SQL Server Database menu.
In the next window, we have to give the name of the SQL Server.
The name of the Server is a mandatory field. The name of the database is optional.
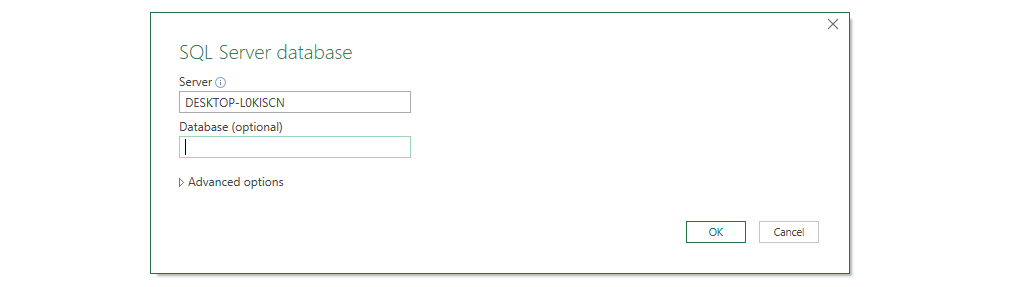
The Navigator will appear by clicking on the OK button, and we can find multiple things here. In our example, we’ll use the AdventureWorks database table.
We want to direct your attention to the ‘Select multiple items’ checkbox. If we do not check it, we can only import one table.
And what happens if we check it? Then we were able to import the highlighted table AND all the relevant connected tables also!

Now we’d like to import the ‘Person.Address’ table.
It can be seen in the figure below. If we need the connected tables also, we have to check the ‘Select related tables’ button, located at the bottom of the window.
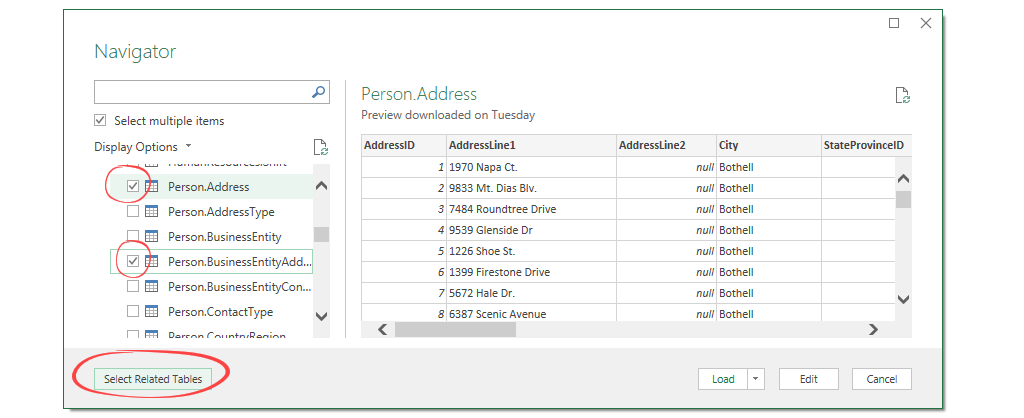
We have highlighted the data.
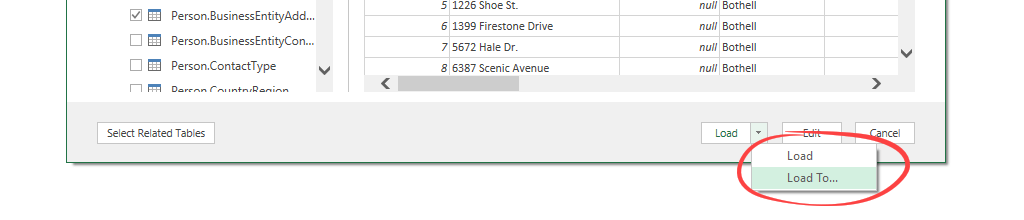
Now we’ll import with the help of the external data source. Then, finally, we’ll transfer the data into Excel by clicking on the Load button.
If we pay more attention to the button, we can see a drop-down list.
Let’s try out how the ‘Load to’ option work!
Take a closer look at the Import Data window!
We can see we have more options for data import. This chapter will show you how to create a data structure.
The Import Data Window: Select views

We can choose a view and layout for our project using the import data window.
- Table: we can display data in tabular form
- Pivot Table Report: we don’t have to specifically explain the advantages of Pivot tables. Choose this if you’d like to group the data in a short time. If you’d like to apply the drill-down method, this is the best choice!
- Pivot Chart: using the columns of the Pivot table, we can make a chart
- Only create a connection: if we don’t need the data right away, then we only create the connection between the SQL database and the Excel worksheet.
- Add this data to Data Model: in this case, the highlighted data will upload into the Power Pivot Data Model.
Explanation of the Get and Transform function: If you use this function in Excel, you create a query in your workbook. This query enables you to manage data using various external data sources. For example, suppose you want to refresh your data and keep your dashboard always-on use, the built-in Data Model in Excel. Of course, the most effective is to use the tabular format. So let’s choose this option!
How to manage and refresh External Data Connections?
We are already done with an important step.
Now we have our data in Excel. What happens when data changes in the source database? How can we keep data up to date? We’ll find the answer in this chapter.
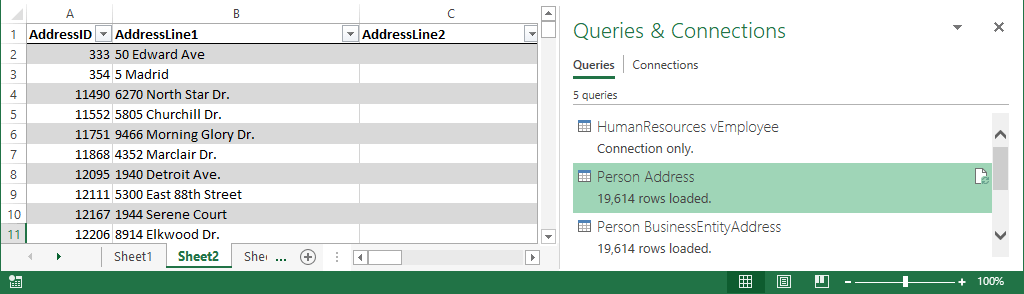
Check the ‘Queries and Connections’ window! It’s located on the right-hand side.
You can see the imported records and all related records of the Person.Address table. Every single database table is on a separate Worksheet.
Refreshing Data Connections manually
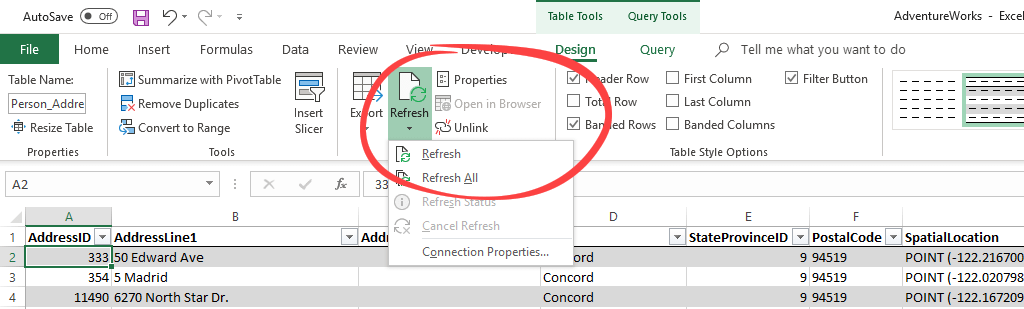
Usually, we use two methods to refresh existing data connections. First, we can find this menu on the ribbon in the Table Tools tab. Then, click on Refresh / Refresh all icons to refresh the data connections manually.
It is important to note a big difference between the two. We use Refresh when we only want to refresh the data of the given Worksheet. For example, a specific database table. When we use the Refresh all button, every table structure and all the Worksheets are being refreshed.
Using auto-refresh control to Scheduled Data Import
We also have the option to automate this process.
How to schedule refreshing? Set a 10-minute interval and forget about the manual work.
Click on the ‘Existing connections’ icon on the Data tab.
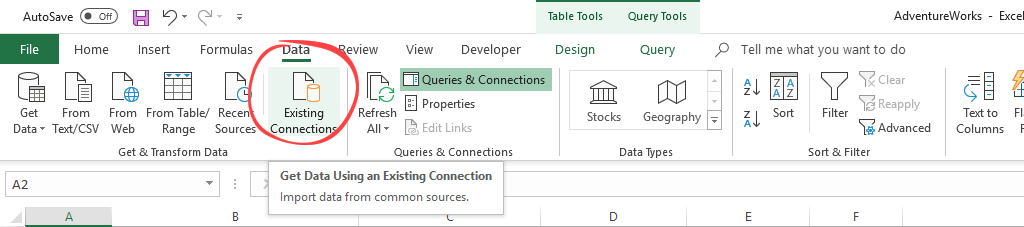
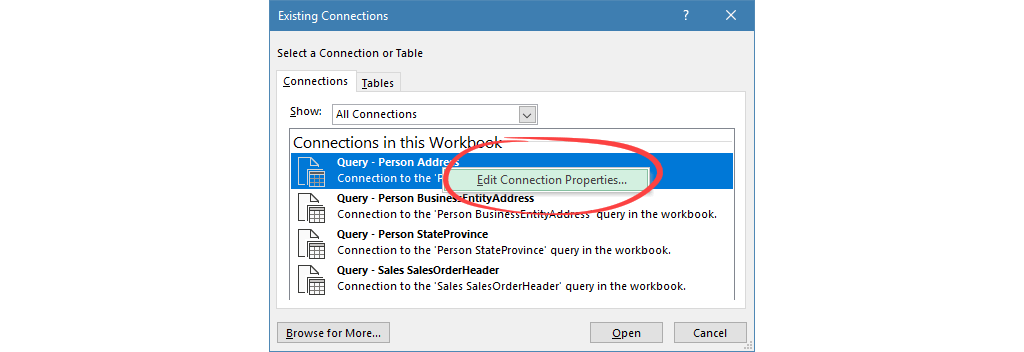
We’ll see the following window appear. We see the relevant connections of the workbook in one list.
After a right-click, you can choose the ‘Edit Connection Properties’ button.
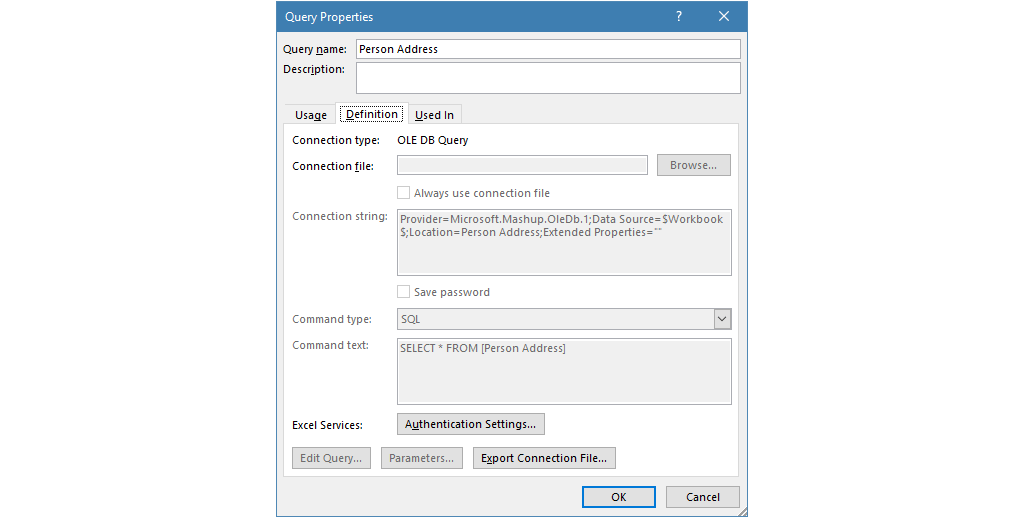
The Query Properties Window
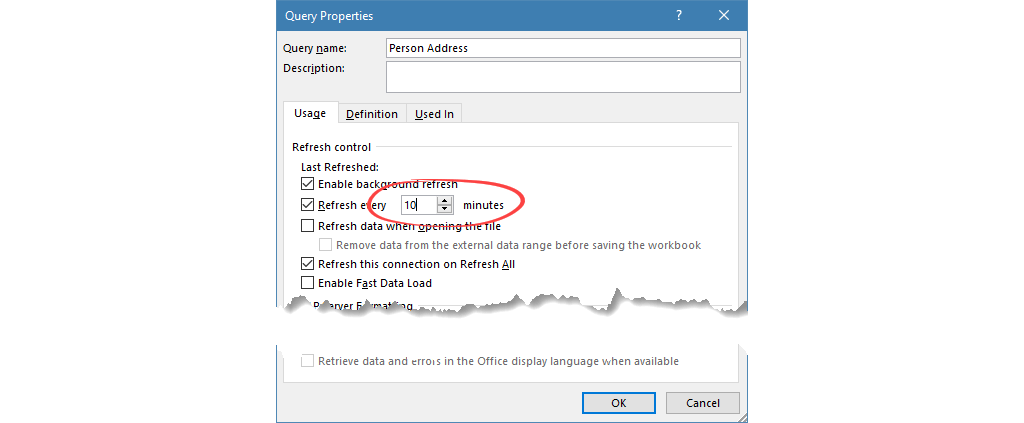
You can find all the adjustments on the ‘Usage’ tab. First, let us set the parameters of the query! Here are the details below:
The Refresh Control section informs us of the actual setups.
- Enable Background refresh: This is a query running in the background. We’ll be informed about the status of the process. Check the marked section on the picture. The extraction is in progress.

- Refresh every x minutes: We can set the intervals of the import. Our data set will be updated using external data sources.
- Refresh Data when opening file: This setting is automatically refreshing the data connection the moment Excel Workbook is opened. Usually, we shouldn’t use this option. If a large query starts up, it can even freeze up Excel. We’re better off if we refresh data after we’ve opened the workbook.
- Refresh This Connection on Refresh All: We already talked about this, but it is very important to let’s see it again! If we allow this option, all imported tables will refresh. (If not, then only the data on the active Worksheet will refresh.)
We can find more information about the data connection on the Definition tab. Add a specific name for the query. In the description field, we can give notes also.
Now let us see further options:
- Connection Type: The type of the connection, in our case, is OLE DB Query.
- Connection file: We can save the connection file to any place we want to. Also, we can browse an already created connection file.
- Connection String: It describes how and what we’ll import using external data sources.
- Command type: In our example, this is SQL.
- Command text: If you want, you can write your own SQL query. In this case, we import all records from the Person.Address table.
Importing CSV files to Excel – External Data Connection Example
In this chapter, we’ll import a CSV file containing sales records into Excel. This will be a lot easier than the SQL data import.
Choose the ‘From text / CSV’ option from the ‘Get and Transform Data’ option on the Data tab.

Locate the file and click import.
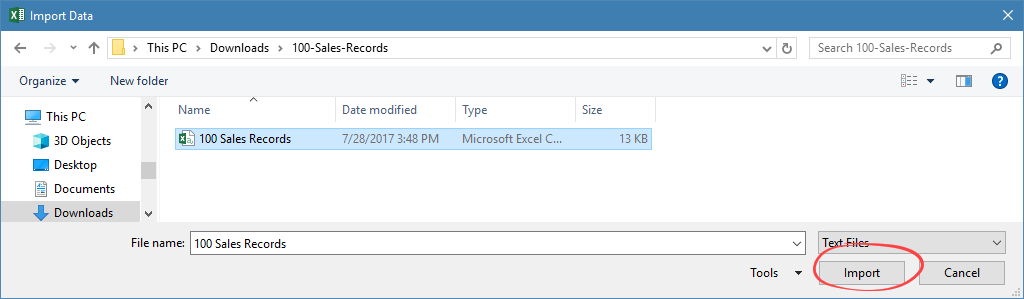
Before the data import, a preview window will appear. You can set the code page in the ‘File Origin’ section.
In the ‘Delimiter’ menu, you can give the character that will separate the columns of the imported table. The default ‘comma’ setting is the right one for us.
There’s the usual ‘Load / Load To’ button on the bottom right-hand corner. We have talked about this before. The Tabular format is perfect for us now.
Click on the Load button.
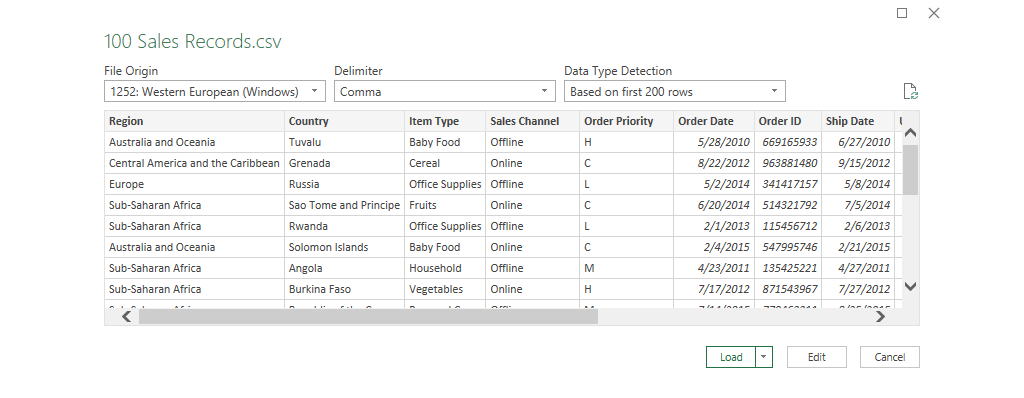
The file containing 100 sales records is in Excel in a matter of moments using external data sources!

Import Data from Website into Excel using XML files
We have two choices to import from XML to Excel. We either use a specific URL address or browse the file itself.
Using Web query
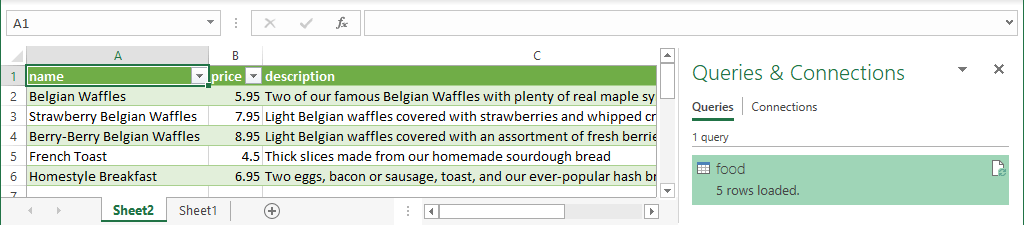
In this example, we’ll import a short restaurant menu into Excel using a web query.

Type the URL and click OK.

On the left-hand side of the Navigator Window, highlight the table we would like to import. After the highlight on the right-hand side, we’ll see a preview.
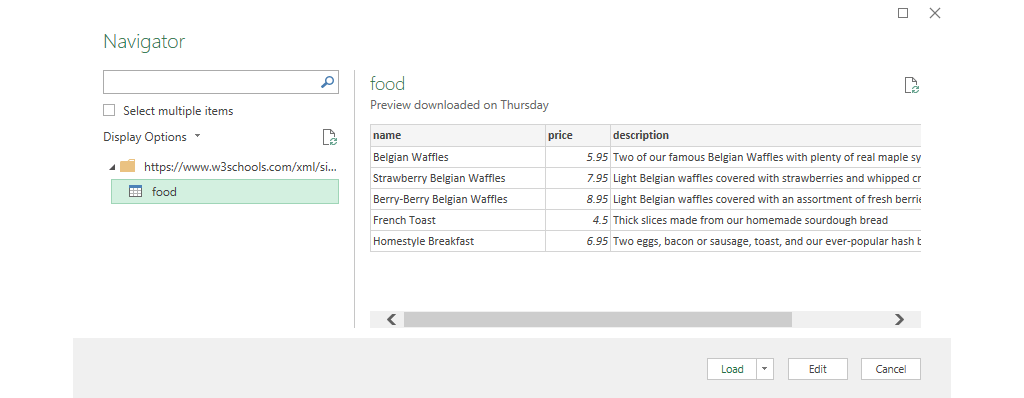
Click on the Load button.
With the help of the external data source, the table’s data will be on the given Worksheet.
Import a local XML file
On the Data Tab, choose Get Data > From file > From XML menu.

Click on the Import button and open the XML file.
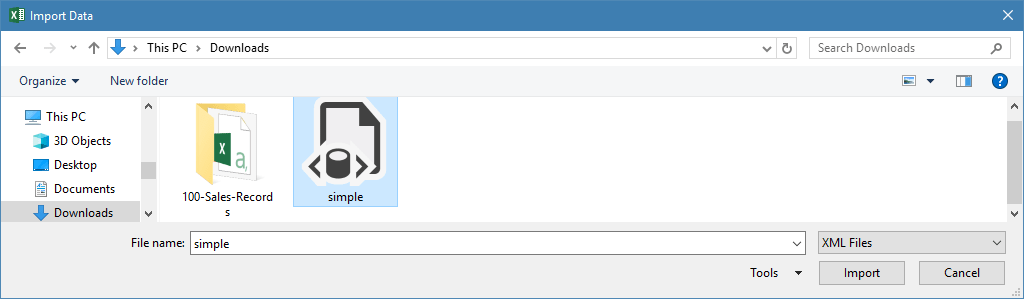
From here on, the steps are entirely the same as described in the web query tutorial.
Conclusion
In today’s article, we endeavored to show you the most critical external data sources. We can choose multiple formats for the data needed to be imported. Last but not least, we talked about the management of data connections. Excel is excellently capable of making charts, reports, and various data visualizations. We should leave the managing of large data to external data sources.
Download the examples!
Although Excel does a great job at saving data in a nice table structure, some projects require data to be stored or exported elsewhere. Text files, other excel files, databases, or even web pages can be used as a means to consume or store data. If you need to periodically update your data, moving or copying to an Excel spreadsheet can be time consuming and prone to errors. Data connection features of Excel can help establish permanent links with other data sources and automate this process.
Excel can pull data from an external data source into your spreadsheet with the help of data connection features. Excel can connect external data sources when you provide certain information about the external data and allows you to refresh them manually, automatically in specified intervals, or in a more customized fashion using VBA. In this article, we’re going to be using an equipment rental data and connect it with data from a Microsoft Access database. You can download the workbook and the Access file below.
Data connection features can be found under the DATA tab and consists of two categories:
- Get External Data
- Connections
Features under the Get External Data section help create a connection with sources like other workbooks, databases, text files, or websites. Connections section contains features for managing existing connections. To begin creating a new link, click Connections. You will be taken to the Workbook Connections window.
When you connect an external data in Excel, data will be first saved in the workbook. This data can then be exported in other formats, such as Office Data Connection (ODC) (.odc), or a Universal Data Connection (UDC) file (.udcx), to save or share the information.
Creating a data connection
Follow the steps below to connect an external data source to your workbook.
- Begin by going to the Data tab and selecting the connection type that corresponds to your data source. In this example, we are using a Microsoft Access database. Please note that the exact steps will be different if you choose another data type. For example, while you need to select a file for an Access or a text file, you will need to enter the server address for a SQL database. Click the From Access icon to connect to an Access file.

- Select your file and click Open.

- Select Table window will appear. Select the table you’d like to use and click OK to continue.

- In the Import Data window, you can choose how and where to display your data, and you can access advanced settings by pressing the Properties You don’t have to this now as you can open the Properties window at any time after creating connection.

In our example, we choose the Table option. Here is brief summary of all options.
- Table: Data is displayed in a tabular form
- PivotTable Report: You can use the columns to create a PivotTable
- PivotChart: You can use the columns to create a PivotChart
- Only Create Connection: Data will not be displayed, but the connection can be used by other features or VBA, and can be exported.
- Add this data to Data Model: Data is added to the Power Pivot Data Model. This option is independent from the display option above. However, it is advisable to use it with Only Create Connection option, because you can manage your data better in the Data Model.
You can choose to pull certain columns, instead of the entire table, if necessary. Try the PivotTable and Only Create Connection options to create connections without displaying the data in your spreadsheet.
Refreshing and managing data connections
There are several ways to refresh existing connections. The first method is by using the icons under both DATA and TABLE TOOLS — DESIGN tabs in the ribbon. These icons can be used to refresh data connection manually.
Both options essentially do the same thing. However, the default actions are different for the Refresh buttons in the DATA and TABLE TOOLS – DESIGN tabs. While Refresh All action is the default action in DATA tab. Refresh action is the default in the TABLE TOOLS – DESIGN tab. The Refresh button only refreshes the active table’s connection.
Power Pivot and Power Query windows also contain refresh buttons.
To automate this process, you can set a time interval to refresh data connections. To set a refresh interval, and manage the connections (including advanced Properties), use the Connections button to open the Workbook Connections window. You can add new connections, or refresh existing ones in this menu. Select the existing connection and click the Properties button to open Connection Properties window.
Enable the Refresh every option and modify the number that represents minutes. When you click OK, your data connection will be updated in selected intervals.
An alternative way to automatically refresh data is using VBA. This allows combining data connection features with your own custom code. Below is sample codes that can refresh data connections.
    ActiveWorkbook.Connections("test").Refresh 'Refresh only the connection named "test"

    ActiveWorkbook.RefreshAll 'Refresh all connections