
Text boxes in an MS Word document are a very useful feature. Text within a box acts as a highlight for the reader. Here, we will show you how to:
- Add a Text Box
- Remove a Text Box
- Customize a Text Box Border
- Change Border Color
- Create Dashed Border
- Change Border Thickness
Let us begin.
Step #1: Open the Word document.
Open the Word document where you want to add the text box.
Step #2: Add the Text Box
Position the cursor where you want the text box to appear.
In the top menu bar, click on the Insert tab to change the ribbon.

In the section Text, click on the Text Box icon to open a dialog box for Built-In text boxes.

Click on the text box you find suitable. We select the Simple Text Box.

Word adds the text box in the document.

Remove a Text Box
Step #1: Open the Word document.
Open the Word document that has at least one text box.
Step #2: Remove the text box
Click on the text box boundary to select it.

Press the Delete button on your keyboard.
Word will delete the text box from your document.
Customize a Text Box Border
Step #1: Open the Word document.
Open the Word document that has at least one text box.
Step #2: Customize the text box border
Click on the text box boundary to select it.

Right-click on the text box boundary to open a menu.
Click on Format AutoShape/Picture.

This opens a dialog box for Format Text Box.
Click on the Colors and Lines tab.

Change Border Color
Under Line, click on the down arrow on the right-hand side of Color:.

This opens a dialog box for Theme Colors and Standard Colors.
Click on the color of your choice.

The chosen color will appear against the Color: tab under Line.

Note: At this point, you can click on OK at the bottom of the dialog box to exit. Word will change the color of the box to your chosen color. Else, move to the next step to make more changes.
Create Dashed Border
In the Format Text Box dialog box, under Line, click on the down arrow on the right side of Dashed:.

This opens a choice for different dashed lines.
Select the most suitable dashed line.

The chosen dashed line will appear against the Dashed: tab under Line.

Note: At this point, you can click on OK at the bottom of the dialog box to exit. Word will make the changes to the text box as per your choices above. Else, move to the next step to make more changes.
Change Border Thickness
In the Format Text Box dialog box, under Line, click on the down arrow on the right side of Style:.

This opens a choice for lines of a different style.
Each line style has its weight in points on its left.
Select the line most suitable to you.

The chosen line style will appear against the Style: tab.
The weight of the chosen line style will appear against the Weight: tab under Style:.

The choice of line styles offers only a few discrete weights.
To change the line weight, select the number next to Weight:.
Change the number as you like.

Click on OK at the bottom of the Format Text Box dialog box to exit.
Word will make the changes to the text box according to all your choices.

Conclusion
Follow our step-by-step instructions to add or delete text boxes in your Word document. Beautify your text boxes with our instructions. We have shown you how to change the border color, style of the border line, and the thickness of the border.
Excel for Microsoft 365 Word for Microsoft 365 Outlook for Microsoft 365 PowerPoint for Microsoft 365 Project Online Desktop Client Excel 2021 Word 2021 Outlook 2021 PowerPoint 2021 Project Professional 2021 Project Standard 2021 Excel 2021 for Mac Word 2021 for Mac PowerPoint 2021 for Mac Excel 2019 Word 2019 Outlook 2019 PowerPoint 2019 Project Professional 2019 Project Standard 2019 Excel 2016 Word 2016 Outlook 2016 PowerPoint 2016 Project Professional 2016 Project Standard 2016 Excel 2013 Word 2013 Outlook 2013 PowerPoint 2013 Project Professional 2013 Project Standard 2013 Excel 2010 Word 2010 Outlook 2010 PowerPoint 2010 More…Less
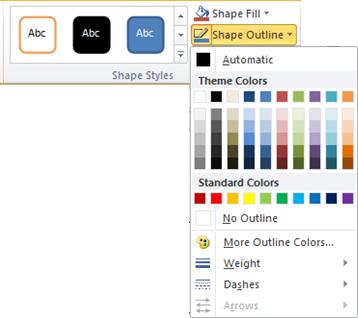
Shape Outline lets you choose the color, thickness, or style of the outside border of a text box, shape, or SmartArt graphic. By setting the border to No Outline, you remove the border altogether.
Important: In Word and Outlook, you must first anchor multiple objects before selecting them. Select one object. Next, press and hold Ctrl while you select more objects
Note: If you’re changing the border of a SmartArt graphic, select the graphic, and find Shape Outline on the Format tab.
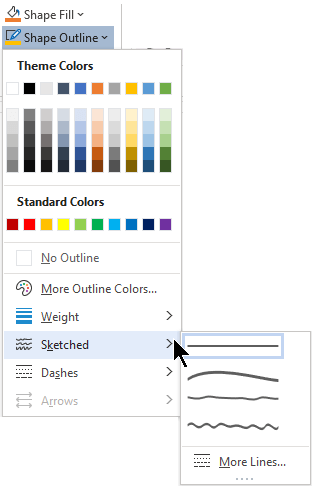
Try the «sketched» outline
If you’re using Microsoft 365, you can give a casual, hand-drawn look to shapes with the Sketched outline.
-
Select an existing shape in your document, or draw a new one.
-
With the shape selected, on the Shape Format tab, select Shape Outline > Sketched, and then select a line width.
(The smaller the point size («pt»), the thinner the line is.)

Set the line thickness
-
Select the text box or shape border.
If you want to change multiple text boxes or shapes, click the first text box or shape, and then press and hold Ctrl while you click the other text boxes or shapes.
-
Go to Format > Shape Outline, point to Weight, and then choose a thickness.
If you don’t see the Format tab, make sure you’ve selected the text box or shape.
Note: If you don’t see the thickness you want, select More Lines, and set the thickness you want in the Width box.
-
Select the text box or shape.
If you want to change multiple text boxes or shapes, click the first text box or shape, and then press and hold Ctrl while you click the other text boxes or shapes.
-
Click the Format tab, click Shape Outline, point to Dashes, and then click the style you want.
If you don’t see Format tab, make sure you’ve selected the text box or shape.
-
Select the text box or shape.
-
On the Format tab, click Shape Outline, point to Dashes, and then select More Lines.
-
In the Format Shape pane, under Line, select the line style options that you want.
-
Select the text box or shape.
If you want to change multiple text boxes or shapes, click the first text box or shape, and then press and hold Ctrl while you click the other text boxes or shapes.
-
On the Format tab, click Shape Outline, and then click No Outline.
See also
Add, change, or delete borders from documents or pictures
Add a fill or effect to a shape or text box
Apply or remove cell borders on a worksheet
-
Select the text box or shape.
If you want to change multiple text boxes or shapes, click the first text box or shape, and then press and hold Ctrl while you click the other text boxes or shapes.
-
Under Drawing Tools, on the Format tab, in the Shape Styles group, click Shape Outline, point to Weight, and then click the line weight that you want.
If you don’t see the Drawing Tools or Format tabs, make sure that you have selected the text box or shape. You might have to double-click the text box or shape to open the Format tab.
Note: If you don’t see the thickness you want, select More Lines, and set the thickness you want in the Width box.
-
Select the text box or shape.
If you want to change multiple text boxes or shapes, click the first text box or shape, and then press and hold Ctrl while you click the other text boxes or shapes.
-
Under Drawing Tools, on the Format tab, in the Shape Styles group, click Shape Outline, point to Dashes, and then click the border style that you want.
If you don’t see the Drawing Tools or Format tabs, make sure that you have selected the text box or shape. You might have to double-click the text box or shape to open the Format tab.
-
Select the text box or shape.
-
Under Drawing Tools, on the Format tab, click Shape Outline, point to Dashes, and then select More Lines.
-
In the Format Shape dialog box, under Line Style, select the line style options that you want.
-
Select the text box or shape border that you want to remove.
If you want to change multiple text boxes or shapes, click the first text box or shape, and then press and hold Ctrl while you click the other text boxes or shapes.
-
Under Drawing Tools, on the Format tab, in the Shape Styles group, click Shape Outline, and then click No Outline.
If you don’t see the Drawing Tools or Format tabs, make sure that you have selected the text box or shape. You might have to double-click the text box or shape to open the Format tab.

See also
Add a fill or effect to a shape or text box
Add, change, or delete borders from documents or pictures
Add, copy, or delete a text box
Apply or remove cell borders on a worksheet
Need more help?
There are two types of dashes in Word documents: the en dash (–) and the em dash
(—). The em dash (—) is typically about as wide as a capital M. The
en dash (–) is about as wide as a capital N. There are different rules and
standards for how and when dashes may or may not have spaces around them.
En and em dashes are often mistakenly entered with two or three hyphens in a row (— or
—). We strongly recommend avoiding using hyphens in Word; see below how to insert them
to create your perfect document.
Using an em dash
The em dash marks a break between parts of a sentence. Usually, it is used when a comma is too
weak, but a colon, semicolon, or parentheses pair is too strong. The em dash puts a nice pause in the
text—and it is underused in professional writing.
For example: In North American usage—and also in old British usage—an em dash is never
surrounded by spaces.
To insert the em dash into a document Word, use one of the following ways:
- On the Insert tab, in the Symbols group, select the Symbol button, and then click More Symbols…:

In the Symbol dialog box, on the Special Characters tab, choose the Em Dash:

After choosing the symbol, press the Insert button and close the Symbol dialog box.
- Press Alt+Ctrl+Num-
- Type 2014 and press Alt+X: —

Using an en dash
The en dash has two uses:
- It indicates a range of values. For example, 2015–2020, pp. 33–37, Rooms A–C.
- It denotes a connection or contrast between pairs of words — for example, New York–London flight, high–priority, Dragon Age: Origins – Awakening.
To insert the en dash into a document Word, do one of the following:
- On the Insert tab, in the Symbols group, select the Symbol button, and then click More Symbols…:

In the Symbol dialog box, on the Special Characters tab, choose the En Dash:
After choosing the symbol, press the Insert button and close the Symbol dialog box.
- Press Ctrl+Num-
- Type 2013 and press Alt+X: –

Note: Word has one option, using which two hyphens — can be changed automatically to an en dash. You can turn it in or off:
1. On the File tab, click the Options button:

2. In the Word Options dialog box, on the
Proofing tab, click the AutoCorrect Options… button:

3. In the AutoCorrect dialog box, on the AutoFormat As You Type tab, in the Replace as you type group, check or uncheck Hyphens (—) with dash (—) to turn on or off this option:

![]()
Download Article
A user-friendly guide to typing a dotted line in Microsoft Word on your computer or mobile device
![]()
Download Article
- Using Keyboard Shortcuts
- Using the Insert Tool on Desktop
- Using the Insert Tool on Mobile
|
|
Do you want to add a dotted or dashed line to your Microsoft Word document? You can use an easy keyboard shortcut to add a dotted line across the page, or you can use Word’s «Insert» function to manually draw a line. After inserting the line, you’ll be able to change its size, thickness, color, and more. This wikiHow will show you how to insert a dotted line into your Microsoft Word document using your computer, iPhone, or Android device.
Things You Should Know
- Type three asterisks (*) where you want your dotted line, then press «Enter».
- Click «Insert» → «Shapes» → select a line. Click «Shape Outline» → «Dashes».
- On mobile, click «Home» → «Insert» → «Shape» → select a line. Tap «Shape Style» and select dotted.
-
1
-
2
Place your cursor where you want your line to appear. You’ll need to be on a blank line, as this won’t work if there is text before or after your cursor on the same line.
- You’ll be creating a horizontal line that spans from one edge of your page to the other. The line will stop at your set margins.
- If you want to make the line span the whole page, you’ll need to change your document margins.
Advertisement
-
3
Type three asterisks (*) in a row. Hold down Shift and press 8 on the number row at the top of your keyboard to create an asterisk.
-
4
Press ↵ Enter to convert the dashes into a line. AutoCorrect will automatically create a dotted line.
- If you don’t have AutoCorrect enabled, do so by clicking File → Options → Proofing → AutoCorrect Options…. This will open a new window.
- Make sure the Border Lines box is checked. This can be found underneath Apply as you type.
- If you want to turn off AutoCorrect, uncheck the boxes.
- If you don’t have AutoCorrect enabled, do so by clicking File → Options → Proofing → AutoCorrect Options…. This will open a new window.
-
5
Use different characters for different line styles (optional). You can create different lines by using characters other than the dash.
- Thin line: Three hyphens (-).
- Thick line: Three underscores (_).
- Double line: Three equal signs (=).
- Triple line: Three pound signs (#).
- Squiggly line: Three tildes (~).


Advertisement
-
1
Open a project in Microsoft Word. This looks like a W on top of a blue square. Microsoft Word is available to install for Windows and Mac.[1]
- You must have a subscription to use Office 365.
-
2
Click the Insert tab. This tab is in the blue ribbon at the top of the Word window, between Home and Draw.
-
3
Click Shapes. It’s in the Insert toolbar, next to the icon of an overlapping circle and square.
- A drop-down menu will appear.
-
4
Select a line shape. In the «Lines» heading, click one of the line templates. You can choose a line, line arrow, double line arrow, and more. These lines can be adjusted to be dotted later.
-
5
Draw your line. Click and drag across the document to create your line.
- If you need to adjust the line’s length and orientation, click the left or right circle. Drag it left or right to adjust the length, or drag it up and down to adjust the orientation.
- To move the line, double-click and drag it to the desired position.
-
6
Double-click the line. You’ll be taken to the Shape Format tab.
-
7
Click Shape Outline. This will be in the Shape Styles section.
- A drop-down menu will open.
-
8
Click Dashes. The menu will expand.
-
9
Select a dash style. You can choose from the available presets or click More Lines to customize your own in the Format Shape panel.
- In the Format Shape panel, you can adjust the color, transparency, width, and more.


Advertisement
-
1
Open a document in the Microsoft Word app. This looks like a blue notebook next to a W.
- Microsoft Word is available for iOS in the App Store and for Android in the Google Play Store.
- Tap Blank document to open a new document or tap a file to open an existing document.
-
2
Tap the «Edit» icon at the top. It’s on the blue toolbar at the top. This will open the editing menu in the bottom half of your screen.
- On iPhone/iPad, this button looks like a white «A» and a pencil icon on the blue toolbar.
- On Android, you may find the same icon or just a white pencil.
-
3
Tap the Home button. It’s in the upper-left corner of the toolbar menu at the bottom. This will open your toolbar tabs.
-
4
Select Insert on the toolbar menu. This will open the available options.
-
5
Select Shape. This will open a menu with all the available shapes you can add.
-
6
Select the type of line you want to add. This will add the selected line to your document.
- You can add dots to your line later.
-
7
Drag the blue end-points of the line to adjust the line (optional). Adjust the size and position of your line from the blue dots on both ends of the shape.
- You can also do this after adding dots to your line.
-
8
Tap Shape Style on the Shape menu. This will open all the available styles for your line.
-
9
Select a dotted style. This will turn the selected line into a dotted line. You can size and position it however you want.


Advertisement
Ask a Question
200 characters left
Include your email address to get a message when this question is answered.
Submit
Advertisement
Thanks for submitting a tip for review!
About This Article
Article SummaryX
1. Open a document.
2. Type «***» where you want the line.
3. Press Enter or Return on your keyboard.
Did this summary help you?
Thanks to all authors for creating a page that has been read 179,002 times.
Is this article up to date?
Last Update: Jan 03, 2023
This is a question our experts keep getting from time to time. Now, we have got the complete detailed explanation and answer for everyone, who is interested!
Asked by: Dr. Casper Barton Sr.
Score: 4.4/5
(15 votes)
Right-click the line, then click «Format Shape,» or as an alternative, with the line selected, click the «Drawing Tools Format» tab on the Ribbon. To change the line to dashed or dotted line in Word, click the «Shape Outline» command in the Shape Styles group, then click «Dashes.» Select the desired line dash type.
How do I get dotted lines in Word?
To use a line shortcut, first, open your document with Microsoft Word. Next, place your cursor where you want to add a dotted line in your document. Type the asterisk sign (“*”) three times in your document. Now, press Enter, and Word will convert your asterisks into a dotted line automatically.
How can I draw a line in Word?
On the Insert tab, in the Illustrations group, click Shapes. Under Lines, right-click the line or connector that you want to add, and then click Lock Drawing Mode. Click where you want to start the line or connector, and then drag the cursor to where you want the line or connector to end.
How do I draw a dotted line in Windows 10?
Shapes can be drawn with dotted/dashed borders.
- Activate the Shapes tool.
- Select the Shape from the drop down list.
- Select the Outline option (no fill).
- Choose your Brush Width.
- Set the Style to Dotted!
- Drag out the Shape — it comes with a dotted border.
Which feature starts a new line whenever a word or sentence reached a border?
Text Wrapping is the feature starts a new line whenever a word or sentence reaches a border in Ms-word. The border can be of any image or the text editor , By default the text will automatically steer around the blank spaces. It is basically used to surround any image or diagram or graph with text.
20 related questions found
How do I group different shapes in Word?
Group shapes, pictures, or objects
- Press and hold CTRL while you select the shapes, pictures, or objects that you want to group. The Wrap Text option for each object must be other than In line with Text. …
- Go to Drawing Tools or Picture Tools, on the Format tab, in the Arrange group, select Group. , and then select Group.
Why can’t I Group A picture and a shape in Word?
Press and hold CTRL while you click the shapes, pictures, or other objects to group. You will need to select more than one shape, picture or object in order to enable the Group button. Tip: For help selecting a shape or picture, see Select a shape or other object.
How do I align a list of figures in Word?
Click anywhere inside the list. From the Numbering dropdown (in the Paragraph group), choose Define New Number Format (at the bottom). In the resulting dialog, change the Alignment setting from Left to Right, as shown in Figure G. Click OK to see the newly aligned list shown in Figure H.
Why is grouping not working in Word?
The Group button is unavailable
Only one shape or picture is selected. Make sure you have multiple shapes or pictures selected. If your selection includes a table, worksheet, or GIF image, the Group button will not be available.
What is the blank space outside the printing area on a page?
In the Inside and Outside boxes, type or select the amount of space you want for the inside and outside margins (margin: The blank space outside the printing area on a page.).
How do you increase line size in Word?
Change the weight of a line
- Select the line that you want to change. If you want to change multiple lines, select the first line, and then press and hold Ctrl while you select the other lines.
- On the Format tab, click the arrow next to Shape Outline. …
- Point to Weight, and then click the line weight that you want.
Which option would you choose to create a table in Word?
For a basic table, click Insert > Table and move the cursor over the grid until you highlight the number of columns and rows you want. For a larger table, or to customize a table, select Insert > Table > Insert Table. Tips: If you already have text separated by tabs, you can quickly convert it to a table.
How do I type below a table in Word?
If you can’t see any odd formatting using non-printing characters, then click on the table and use Table Tools>Layout>Properties and look at the Table tab of that dialog. If Text Wrapping is set to Around, then change it to None and see if that makes text appear below the table.
How do you customize a table in Word?
Click anywhere on the table, then click the Design tab on the right side of the Ribbon. Locate the Table Styles group, then click the More drop-down arrow to see all available table styles. Select the desired style. The selected table style will appear.
How do I format a table in Word?
Use Table Styles to format an entire table
- Click in the table that you want to format.
- Under Table Tools, click the Design tab.
- In the Table Styles group, rest the pointer over each table style until you find a style that you want to use. …
- Click the style to apply it to the table.
What is a line spacing in Word?
Line spacing is the space between each line in a paragraph. Word allows you to customize the line spacing to be single spaced (one line high), double spaced (two lines high), or any other amount you want.
How do I fix weird spacing between words in Word?
Change the spacing between characters
- Select the text that you want to change.
- On the Home tab, click the Font Dialog Box Launcher, and then click the Advanced tab. …
- In the Spacing box, click Expanded or Condensed, and then specify how much space you want in the By box.
How do I change the spacing between lines in Word 2010?
Click the Line and Paragraph Spacing command in the Paragraph group on the Home tab. Select the desired spacing option from the drop-down menu. From the drop-down menu, you can also select Line Spacing Options to open the Paragraph dialog box. From here, you can adjust the line spacing with even more precision.
Where Footnotes appear in a document?
Footnotes appear at the bottom of the page and endnotes come at the end of the document. A number or symbol on the footnote or endnote matches up with a reference mark in the document.
What is a typed or printed page with blank spaces for information?
Answer: typewriter… pls mark me as the brainliest. diavinad8 and 2 more users found this answer helpful. Thanks 1.
What is gutter margin?
A gutter margin adds extra space to the side margin, top margin, or inside margins of a document that you plan to bind. A gutter margin helps ensure that text isn’t obscured by the binding. … In the Gutter box, enter a width for the gutter margin. In the Gutter position box, click Left or Top.
What is the shortcut for grouping in Word?
Hold the Shift (or Ctrl) key and click the objects you want to group. Click the Group command on the Format tab, then select Group. The selected objects will now be grouped.
What is Word compatibility mode?
Compatibility Mode temporarily disables new or enhanced Word features so that the document can still be edited by people using the earlier version of Word. Compatibility Mode also preserves the layout of the document.
How do you rotate 45 degrees in Word?
Rotate to an exact angle by degrees
- Select the object to rotate.
- Go to Shape Format or Picture Format >Rotate.
- Select More Rotation Options.
- In the pane or dialog box that opens, enter the amount to rotate the object in the Rotation box. You can also use the arrows to rotate the object exactly where you want.
 This tutorial shows you how to create a nonbreaking dash in Microsoft Word. A nonbreaking dash will stop words or numbers connected by an en dash or em dash from separating at the end of a line.
These steps can also be used for hyphens. However, Word provides a built-in nonbreaking hyphen that is simpler to use than the process for dashes. See the bonus section at the end of this tutorial for the steps to insert a nonbreaking hyphen.
This tutorial is also available as a YouTube video showing all the steps in real time.
Watch more than 100 other writing-related software tutorials on my YouTube channel.
The images below are from Word for Microsoft 365. These steps also apply to Word 2021, Word 2019, Word 2016, Word 2013, and Word 2010.
1. Place your cursor where you want the dash to appear.

2. Select the Insert tab in the ribbon.

3. Select Symbol in the Symbols group.

4. Select More Symbols from the drop-down menu.

5. Select the Special Characters tab in the Symbol dialog box.

6. Select Em Dash (longer dash) or En Dash (shorter dash) from the Character menu.

7. Select the Insert button.

8. Select No-Width Non Break from the Character menu.
The no-width non break is a special character that can create an unbreakable connection between characters without creating a space between them.

9. Select the Insert button (see figure 7).
10. Select the Close button to close the Symbol dialog box.

Your new nonbreaking dash should now appear in your text.

Pro Tip: The no-width non break is invisible when your document’s formatting is hidden (which is the default setting). To view formatting, select the Show/Hide button in the Home tab. The no-width non break symbol looks like an open rectangle with a smaller, gray rectangle in the center.

Insert a Nonbreaking Hyphen in Microsoft Word
1. Place your cursor where you want to insert the nonbreaking hyphen.

2. Select the Insert tab in the ribbon (see figure 2)
3. Select Symbol in the Symbols group (see figure 3).
4. Select More Symbols from the drop-down menu (see figure 4).
5. Select the Special Characters tab in the Symbol dialog box (see figure 5).
6. Select Nonbreaking Hyphen from the Character menu.

7. Select the Insert button (see figure 7).
8. Select the Close button (see figure 9).
9. Type the word or number that you want to attach to the other side of the hyphen.
The nonbreaking hyphen will look like a normal hyphen. However, if you turn on Show/Hide, as described in the Pro Tip above, the nonbreaking hyphen will look slightly longer and thinner than a normal hyphen.

Pro Tip: You can also insert a nonbreaking hyphen by using the keyboard shortcut Ctrl + Shift + – (Control plus Shift plus hyphen).
Further Reading:
Three Ways to Insert Special Characters in Microsoft Word
How to Find and Replace Special Characters in Microsoft Word
How to Insert Nonbreaking Spaces in Microsoft Word
Updated October 05, 2021
Asked by: Dr. Casper Barton Sr.
Score: 4.4/5
(15 votes)
Right-click the line, then click «Format Shape,» or as an alternative, with the line selected, click the «Drawing Tools Format» tab on the Ribbon. To change the line to dashed or dotted line in Word, click the «Shape Outline» command in the Shape Styles group, then click «Dashes.» Select the desired line dash type.
How do I get dotted lines in Word?
To use a line shortcut, first, open your document with Microsoft Word. Next, place your cursor where you want to add a dotted line in your document. Type the asterisk sign (“*”) three times in your document. Now, press Enter, and Word will convert your asterisks into a dotted line automatically.
How can I draw a line in Word?
On the Insert tab, in the Illustrations group, click Shapes. Under Lines, right-click the line or connector that you want to add, and then click Lock Drawing Mode. Click where you want to start the line or connector, and then drag the cursor to where you want the line or connector to end.
How do I draw a dotted line in Windows 10?
Shapes can be drawn with dotted/dashed borders.
- Activate the Shapes tool.
- Select the Shape from the drop down list.
- Select the Outline option (no fill).
- Choose your Brush Width.
- Set the Style to Dotted!
- Drag out the Shape — it comes with a dotted border.
Which feature starts a new line whenever a word or sentence reached a border?
Text Wrapping is the feature starts a new line whenever a word or sentence reaches a border in Ms-word. The border can be of any image or the text editor , By default the text will automatically steer around the blank spaces. It is basically used to surround any image or diagram or graph with text.
20 related questions found
How do I group different shapes in Word?
Group shapes, pictures, or objects
- Press and hold CTRL while you select the shapes, pictures, or objects that you want to group. The Wrap Text option for each object must be other than In line with Text. …
- Go to Drawing Tools or Picture Tools, on the Format tab, in the Arrange group, select Group. , and then select Group.
Why can’t I Group A picture and a shape in Word?
Press and hold CTRL while you click the shapes, pictures, or other objects to group. You will need to select more than one shape, picture or object in order to enable the Group button. Tip: For help selecting a shape or picture, see Select a shape or other object.
How do I align a list of figures in Word?
Click anywhere inside the list. From the Numbering dropdown (in the Paragraph group), choose Define New Number Format (at the bottom). In the resulting dialog, change the Alignment setting from Left to Right, as shown in Figure G. Click OK to see the newly aligned list shown in Figure H.
Why is grouping not working in Word?
The Group button is unavailable
Only one shape or picture is selected. Make sure you have multiple shapes or pictures selected. If your selection includes a table, worksheet, or GIF image, the Group button will not be available.
What is the blank space outside the printing area on a page?
In the Inside and Outside boxes, type or select the amount of space you want for the inside and outside margins (margin: The blank space outside the printing area on a page.).
How do you increase line size in Word?
Change the weight of a line
- Select the line that you want to change. If you want to change multiple lines, select the first line, and then press and hold Ctrl while you select the other lines.
- On the Format tab, click the arrow next to Shape Outline. …
- Point to Weight, and then click the line weight that you want.
Which option would you choose to create a table in Word?
For a basic table, click Insert > Table and move the cursor over the grid until you highlight the number of columns and rows you want. For a larger table, or to customize a table, select Insert > Table > Insert Table. Tips: If you already have text separated by tabs, you can quickly convert it to a table.
How do I type below a table in Word?
If you can’t see any odd formatting using non-printing characters, then click on the table and use Table Tools>Layout>Properties and look at the Table tab of that dialog. If Text Wrapping is set to Around, then change it to None and see if that makes text appear below the table.
How do you customize a table in Word?
Click anywhere on the table, then click the Design tab on the right side of the Ribbon. Locate the Table Styles group, then click the More drop-down arrow to see all available table styles. Select the desired style. The selected table style will appear.
How do I format a table in Word?
Use Table Styles to format an entire table
- Click in the table that you want to format.
- Under Table Tools, click the Design tab.
- In the Table Styles group, rest the pointer over each table style until you find a style that you want to use. …
- Click the style to apply it to the table.
What is a line spacing in Word?
Line spacing is the space between each line in a paragraph. Word allows you to customize the line spacing to be single spaced (one line high), double spaced (two lines high), or any other amount you want.
How do I fix weird spacing between words in Word?
Change the spacing between characters
- Select the text that you want to change.
- On the Home tab, click the Font Dialog Box Launcher, and then click the Advanced tab. …
- In the Spacing box, click Expanded or Condensed, and then specify how much space you want in the By box.
How do I change the spacing between lines in Word 2010?
Click the Line and Paragraph Spacing command in the Paragraph group on the Home tab. Select the desired spacing option from the drop-down menu. From the drop-down menu, you can also select Line Spacing Options to open the Paragraph dialog box. From here, you can adjust the line spacing with even more precision.
Where Footnotes appear in a document?
Footnotes appear at the bottom of the page and endnotes come at the end of the document. A number or symbol on the footnote or endnote matches up with a reference mark in the document.
What is a typed or printed page with blank spaces for information?
Answer: typewriter… pls mark me as the brainliest. diavinad8 and 2 more users found this answer helpful. Thanks 1.
What is gutter margin?
A gutter margin adds extra space to the side margin, top margin, or inside margins of a document that you plan to bind. A gutter margin helps ensure that text isn’t obscured by the binding. … In the Gutter box, enter a width for the gutter margin. In the Gutter position box, click Left or Top.
What is the shortcut for grouping in Word?
Hold the Shift (or Ctrl) key and click the objects you want to group. Click the Group command on the Format tab, then select Group. The selected objects will now be grouped.
What is Word compatibility mode?
Compatibility Mode temporarily disables new or enhanced Word features so that the document can still be edited by people using the earlier version of Word. Compatibility Mode also preserves the layout of the document.
How do you rotate 45 degrees in Word?
Rotate to an exact angle by degrees
- Select the object to rotate.
- Go to Shape Format or Picture Format >Rotate.
- Select More Rotation Options.
- In the pane or dialog box that opens, enter the amount to rotate the object in the Rotation box. You can also use the arrows to rotate the object exactly where you want.
Updated: 05/16/2020 by
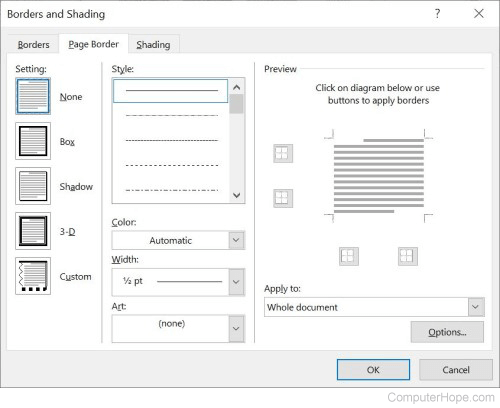
Microsoft Word gives you hundreds of page border options, allowing you to surround a page with a clean or fancy border, like a frame for a picture. You can also set a border to provide a shadow or 3D effect.
Add a border
- Open Microsoft Word.
- Click the Page Layout tab. In Word 2013 and 2016, click the Design tab instead.
- In the Page Background group, click the Page Borders option.
- In the Borders and Shading window (shown below), if not already selected, click the Page Border tab.
- Select Box if you want a square border around your page.
- Select the Style of border you want on the page, which can be solid, dotted, or dashed. Select the Color and Width of the border. If you want to select artwork to use as the border, click the down arrow for the Art drop-down menu. In the example below, we’re using the hearts art as a border.

Tip
By default, the borders are applied to the whole document, which means every page has the same border. Clicking the down arrow on Apply to gives you the option to select the first page only, selected page, all pages but the first page, and other options.
- Once you’ve selected all the border options you want to use in your document, click the OK button to apply the border.
Modify a border
- Open Microsoft Word.
- Click the Page Layout tab. In Word 2013 and 2016, click the Design tab instead.
- In the Page Background group, click the Page Borders option.
- In the Borders and Shading window (shown below), if not already selected, click the Page Border tab.
- Make the desired changes to the border that is currently set for the document or page. You can change the type of border in the Settings section, choosing from Box, Shadow, 3-D, or Custom. You can also change the style, color, and width of the order, and add or change art used in the border.
- When you have finished making the desired changes to the border, click the OK button to apply the changes.
Remove a border
- Open Microsoft Word.
- Click the Page Layout tab. In Word 2013 and 2016, click the Design tab instead.
- In the Page Background group, click the Page Borders option.
- In the Borders and Shading window (shown below), if not already selected, click the Page Border tab.
- Select None to remove any border on the page.
- Click the OK button to remove the border.
Lesson 15: Text Boxes and WordArt
/en/word2010/working-with-shapes/content/
Introduction
You may want to insert a text box into your document to draw attention to specific text or have the ability to easily move text within a document. Text boxes are basically treated the same as shapes, so you can add the same types of effects to them and can even change their shape.
In this lesson, you will learn how to insert a text box and format it in various ways, including resizing and moving it, as well as changing the text box shape, color, and outline. You will also learn how to create and format WordArt.
Text boxes
Text boxes are useful for helping to organize your document. They are basically treated the same as shapes, so when you insert a text box you can format it by changing its fill color, outline color, and shape style, as well as create WordArt and add 3D effects.
To insert a text box:
- Select the Insert tab on the Ribbon.
- Click the Text Box command in the Text group. A drop-down menu will appear.
- Select Draw Text Box.
Creating a blank text box
- Click and drag on the document to create the text box.
Drawing the text box
- You can now start typing to create text inside the text box.
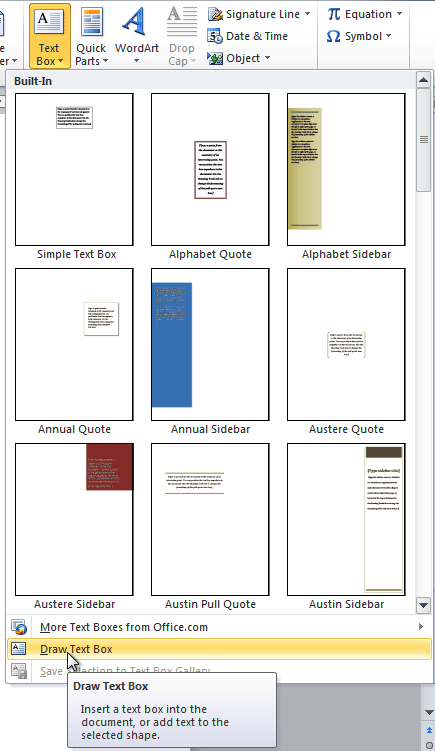
From the drop-down menu, you can also select one of the built-in text boxes that have predefined colors, fonts, positions, and sizes. If you choose this option, the text box will appear automatically so you will not need to click and drag to draw it.
 A built-in text box
To move a text box:
- Click the text box.
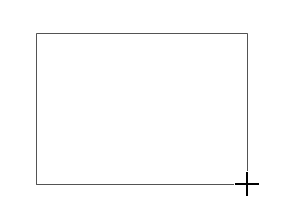
- Hover the mouse over one of the edges of the text box. The mouse pointer becomes a cross with arrows on each end .
- Click and drag the text box to the desired location on the page.
Moving a text box
 .
.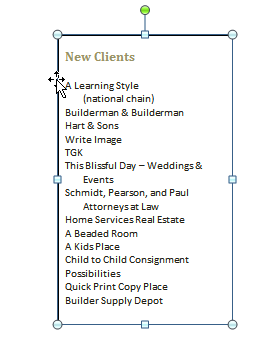
To resize a text box:
- Click the text box.
- Click and drag one of the sizing handles on the corners or sides of the text box until it is the desired size.
Resizing a text box
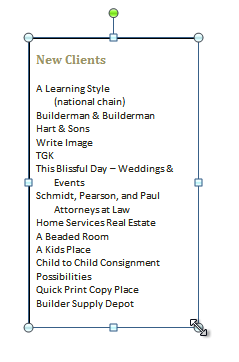
If you drag the sizing handles on any of the four corners, you will be able to change the height and width at the same time. The sizing handles on the top or bottom of the text box will only allow you to resize vertically, while the handles on the left and right sides will resize the text box horizontally.
Changing a text box’s appearance
To change the text box shape:
- Select the text box. A new Format tab appears with Drawing Tools.
- Go to the Format tab.
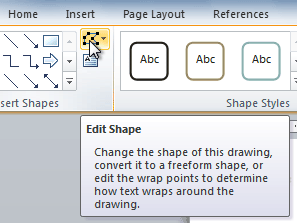
- Click the Edit Shape command.
The Edit Shape command
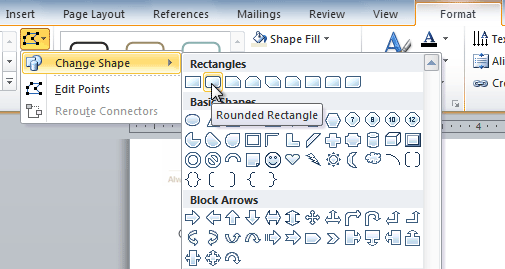
- Click Change Shape to display a drop-down list.
Choosing a different shape for the text box
- Select the desired shape from the list.
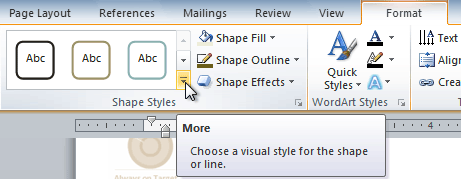
To choose a shape style:
Choosing a shape style allows you to apply a preset fill and outline color, and in some cases other effects such as beveling and shadow. You don’t have to pick a style for your text box, but it can help you save time or experiment with different appearances.
- Select the text box. The Format tab appears.
- Select the Format tab.
- Click the More drop-down arrow in the Shape Styles group to display more style options.
Viewing the Shape Styles
- Hover your mouse over the styles to see a live preview.
- Select the desired style.
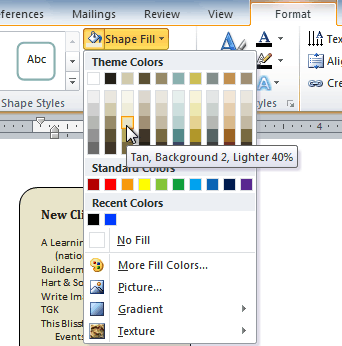
To change shape fill:
- Select the text box. The Format tab appears.
- Click the Format tab.
Changing the fill color
- Click the Shape Fill command to display a drop-down menu.
- From the drop-down menu, you can select a color from the list, choose No Fill, or select More Fill Colors to use a color that’s not on the list.
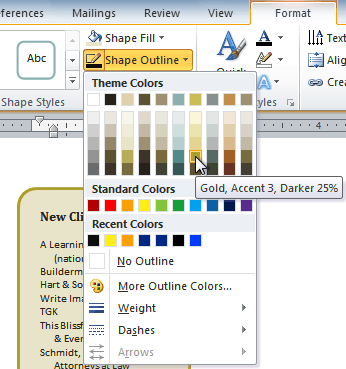
To change the shape outline:
- Select the text box. The Format tab appears.
- Click the Shape Outline command to display a drop-down list.
Changing the outline color
- Select a color from the list, choose No Outline, or select More Outline Colors to use a color that’s not on the list.
- From the drop-down menu, you can change the outline color, weight (thickness), and whether it is a dashed line.
To change shadow effects:
- Select the text box. The Format tab appears.
- Select the Format tab.
- Click the Shape Effects command.
- Click Shadow.
- Move your mouse over the menu options to see a live preview in your document.
Adding a shadow
- Click the desired option to select the shadow effect.
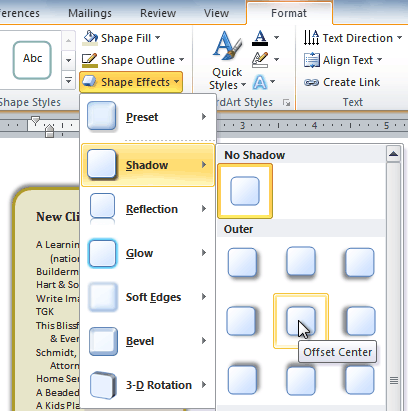
To choose a different shadow color for your shape, select Shadow Options from the drop-down menu, then click the Color button.
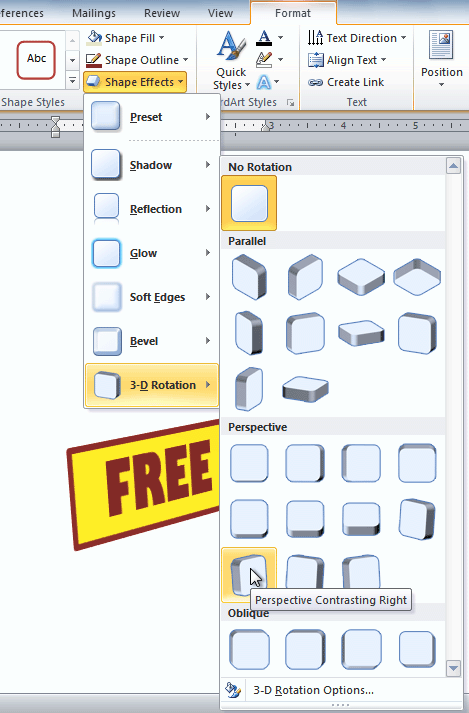
3D effects
Just like other types of shapes, text boxes can have 3D effects. There are two types of effects you can apply to your shapes to give them a 3D appearance: 3-D Rotation and Bevel. 3-D Rotation gives the appearance that you are viewing an object from a different angle, and it can be applied to any shape. Bevel adds thickness and a rounded edge to shapes; however, it doesn’t work with every type of shape.
To use 3-D Rotation:
- Select the text box.
- Select the Format tab.
- Click Shape Effects from the Shape Styles group.
- Hover your mouse over 3-D Rotation. A drop-down menu will appear.
Applying 3-D Rotation to a text box
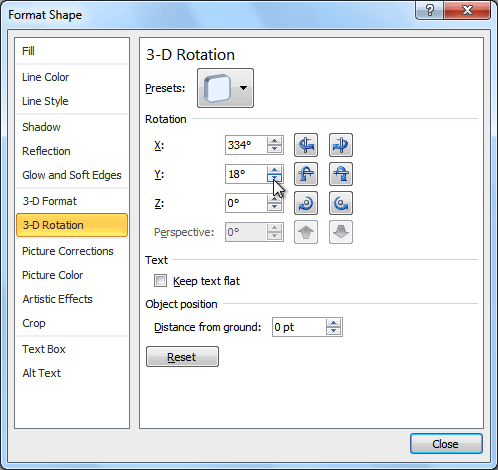
- Select the desired rotation preset from the drop-down menu. You can also click 3-D Rotation Options if you would prefer to type custom values.
3-D Rotation Options
To use bevel:
- Select the text box.
- Select the Format tab.
- Click Shape Effects from the Shape Styles group.
- Hover your mouse over Bevel. A drop-down menu will appear.
Adding bevel to a text box
- Select the desired bevel preset from the drop-down menu. You can also click 3-D Options if you would prefer to type custom values.
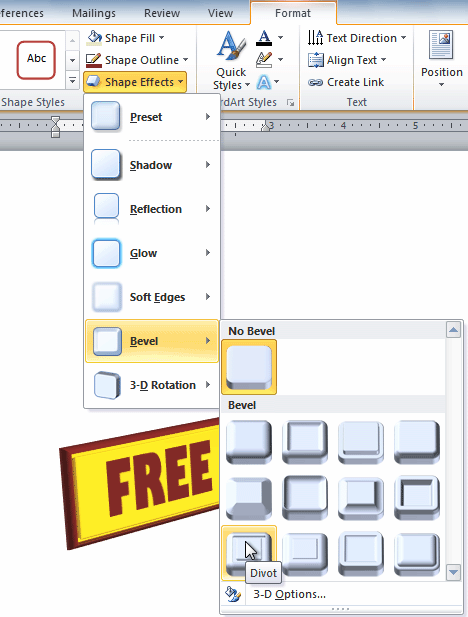
If you click 3-D Options, you’ll also be able to change the shape’s Material to give it a metal, plastic, or translucent appearance, and you can choose the Lighting type to change how the shape is illuminated.
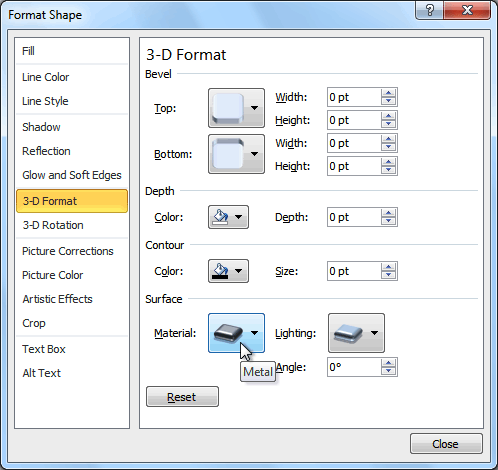 3-D Format Options
Creating WordArt
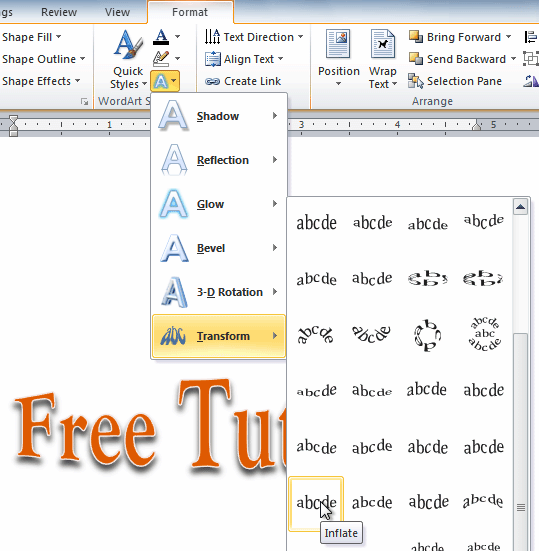
In addition to adding effects to a text box, you can add effects to the text inside the text box, which is known as WordArt. For the most part, the types of effects you can add are the same as the ones you can add to shapes or text boxes (shadow, bevel, etc.). However, you can also Transform the text to give it a wavy, slanted, or inflated look.
To apply a quick style to text:
A quick style will automatically apply several effects to your text at once. You can then refine the look of your text by adding or modifying text effects.
- Select the text box, or select some text inside of the text box. The Format tab will appear.
- Click the Format tab.
- Click the Quick Styles command in the WordArt Styles group. A drop-down menu will appear.
Selecting a Quick Style
- Select the desired style preset to apply the style to your text.

After you have applied a quick style, you can still modify the font or font color from the Home tab if you want.
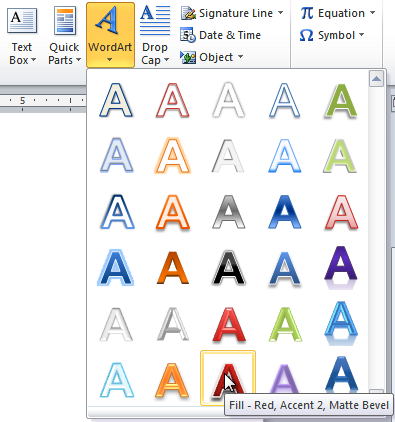
To convert regular text into WordArt:
For text to be formatted as WordArt, it needs to be inside of a text box. However, there’s a shortcut that allows you to convert text into WordArt even if it’s not in a text box.
- Select the text you want to convert.
- Click the Insert tab.
- Click the WordArt command. The Quick Styles drop-down menu will appear.
Converting text to WordArt
- Select the desired quick style.
- Word will automatically create a text box for your text and apply the style to the text.
After converting to WordArt

Some effects, such as shadows, can be added from the Text Effects menu in the Home tab. When you add effects in this way, it will not place the text in a text box.
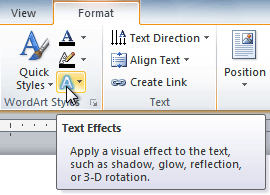
To add or modify text effects:
- Select the text box, or select some text inside of the text box. The Format tab will appear.
- Click the Format tab.
- Click the Text Effects command in the WordArt Styles group. A drop-down menu will appear, showing the different effect categories.
The Text Effects command
- Hover over an effect category. A drop-down menu will appear. You can hover the mouse over the different presets to see a live preview.
Adding an effect
- Select the desired effect preset. The effect will be applied to your text. If you want, you can combine several effects.
The finished WordArt

Challenge!
- Create a new document.
- Insert a text box.
- Enter some text into the text box.
- Move the text box to the desired location.
- Change the outline of the text box to a different color.
- Change the fill color of the text box.
- Add some WordArt effects to the text.
/en/word2010/inserting-clip-art-and-pictures/content/