
| title | keywords | f1_keywords | ms.prod | api_name | ms.assetid | ms.date | ms.localizationpriority |
|---|---|---|---|---|---|---|---|
|
Application.CutCopyMode property (Excel) |
vbaxl10.chm133101 |
vbaxl10.chm133101 |
excel |
Excel.Application.CutCopyMode |
d45d3352-2a33-99ae-22f2-0b1c11466209 |
04/04/2019 |
medium |
Application.CutCopyMode property (Excel)
Returns or sets the status of Cut or Copy mode. Can be True, False, or an XLCutCopyMode constant, as shown in the following tables. Read/write Long.
Syntax
expression.CutCopyMode
expression A variable that represents an Application object.
Remarks
| Return value | Description |
|---|---|
| False | Not in Cut or Copy mode. |
| xlCopy | In Copy mode. |
| xlCut | In Cut mode. |
| Set value | Description |
|---|---|
| False | Cancels Cut or Copy mode and removes the moving border. |
| True | Starts Cut or Copy mode and shows the moving border. |
Example
This example uses a message box to display the status of Cut or Copy mode.
Select Case Application.CutCopyMode
 Case Is = False
 MsgBox "Not in Cut or Copy mode"
 Case Is = xlCopy
 MsgBox "In Copy mode"
 Case Is = xlCut
 MsgBox "In Cut mode"
End Select
[!includeSupport and feedback]
Well first of all I found couple of answers while googling but most of the forums are blocked in my Office Network hence asking this question here! One more intention is to get an answer in plain English 
I understand if we set Application.CutCopyMode = False then the Copied/Cut results will be vanished (i.e. memory will be cleared) but when should we use this and when not to use this? Can anyone please help?
![]()
pnuts
58k11 gold badges85 silver badges137 bronze badges
asked Jul 12, 2013 at 4:24
![]()
1
By referring this(http://www.excelforum.com/excel-programming-vba-macros/867665-application-cutcopymode-false.html) link the answer is as below:
Application.CutCopyMode=False is seen in macro recorder-generated code when you do a copy/cut cells and paste . The macro recorder does the copy/cut and paste in separate statements and uses the clipboard as an intermediate buffer. I think Application.CutCopyMode = False clears the clipboard. Without that line you will get the warning ‘There is a large amount of information on the Clipboard....' when you close the workbook with a large amount of data on the clipboard.
With optimised VBA code you can usually do the copy/cut and paste operations in one statement, so the clipboard isn’t used and Application.CutCopyMode = False isn’t needed and you won’t get the warning.
answered Jul 12, 2013 at 5:53
4
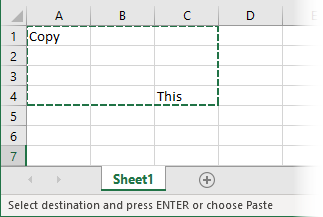
Normally, When you copy a cell you will find the below statement written down in the status bar (in the bottom of your sheet)
«Select destination and Press Enter or Choose Paste»
Then you press whether Enter or choose paste to paste the value of the cell.
If you didn’t press Esc afterwards you will be able to paste the value of the cell several times
Application.CutCopyMode = False does the same like the Esc button, if you removed it from your code you will find that you are able to paste the cell value several times again.
And if you closed the Excel without pressing Esc
you will get the warning ‘There is a large amount of information on the Clipboard….’
answered Feb 4, 2016 at 12:06
![]()
OsamaOsama
1611 silver badge3 bronze badges
Return to VBA Code Examples
VBA Application.CutCopyMode = False
If you’ve recorded macros while copying and pasting, you’ve probably seen the following line of code:
Application.CutCopyMode = FalseThis line of code “clears” the clipboard*. If you’ve copied an Excel cell, running this line of code will remove the animation around the copied cell:

CutCopyMode is an application-level property that indicates whether a Microsoft Office program (ex. Excel) is in Cut or Copy Mode. While in copy (or cut) mode, Excel has something stored in it’s clipboard which can be pasted.
I’m not aware of a time when you would ever need to set Application.CutCopyMode to True.
Avoiding CutCopyMode = False
You can usually avoid needing to set Application CutCopyMode = False by using VBA Copy+Paste best practices. As an example, the following line of code copies and pastes a cell in a single line, removing the need to set CutCopyMode to False:
Sub CopyPaste_OneLine()
    Range("a1").Copy Range("b1")
End Sub
Get Application.CutCopyMode Status
Occasionally, you might want to get the status of Application.CutCopyMode. Potentially to prevent errors while trying to Paste when nothing is in the clipboard. To get the status use the following code:
Sub Get_Application_CutCopyMode_Status()

    Select Case Application.CutCopyMode
        Case Is = xlCopy
            MsgBox "Copy Mode"
        Case Is = xlCut
            MsgBox "Cut Mode"
        Case Is = False
            MsgBox "Not in Cut or Copy mode"
    End Select

End Sub
*Application.CutCopyMode will only clear the Microsoft Office app (ex. Excel) clipboard. It will not clear Window’s clipboard. Click the link to learn more about how to clear Window’s clipboard using VBA.
VBA Coding Made Easy
Stop searching for VBA code online. Learn more about AutoMacro — A VBA Code Builder that allows beginners to code procedures from scratch with minimal coding knowledge and with many time-saving features for all users!

Learn More!
If you use copy and paste while recording a Macro, we will see the code which refers to Application.CutCopyMode = False. You may wonder why it’s there? What does it do?
In this post, we answer all your question about Application.CutCopyMode.
Application.CutCopyMode = False in recorded macros
If we record a VBA Macro where we copy and paste the recorded code might look similar to the following:
Range("A1:A10").Select
Selection.Copy
Range("D1").Select
ActiveSheet.Paste
Application.CutCopyMode = False
If we run the VBA code to copy and paste without that line of code, it still works fine. So, does it serve any purpose?
What is Application.CutCopyMode = False for?
In Excel, when we copy or cut a range of cells, the content is temporarily stored in Excel’s clipboard. This is when the animated dotted line appears and moves around the outside of the range; commonly referred to as the marching ants.
Look at the screenshot below; the marching ants show that we are in cut or copy mode, with cells A1 to C4 stored in the clipboard. The message in the status bar also changes to indicate which mode we are in.
Having copied a cell range, we can now:
- Paste the copied content from the clipboard, or
- Perform any other action to leave the cut/copy mode.
- Press Esc key to leave CutCopyMode without needing to perform an action on the worksheet.
Application.CutCopyMode = False is the VBA action of leaving cut/copy mode.
- The marching ants removed
- Status bar returns to its default status
- Memory used for the copied content in the clipboard is cleared
After using Application.CutCopyMode = False, it is no longer possible to paste from the clipboard using VBA. Trying to do so results in an error.
Run-time error’1004′: Paste method of Worksheet class failed

If we are in cut/copy mode and more than 101 cells have been selected, closing the workbook results in the following warning message.
There is a large amount of information on the Clipboard. Do you want to be able to paste this information into another program later?

Therefore, resetting the CutCopyMode before closing a workbook prevents this warning message from appearing.
Will Application.CutCopyMode clear the clipboard?
In the previous section, it was noted that Application.CutCopyMode = False clears the clipboard. However, this relates to Excel’s clipboard and not the Windows clipboard.
The Windows clipboard still retains the items it had previously and is unaffected by this setting.
What about CutCopyMode = True?
Logically, we would think Application.CutCopyMode = True would turn on the marching ants, but it doesn’t. Microsoft’s own documentation indicates it should, but I’ve never made this work, or seen others use it.
The opposite of Application.CutCopyMode = False is not Application.CutCopyMode = True. When we cut or copy cells, the status of CutCopyMode is either xlCopy or xlCut. Each status also has a numerical value:
- False = 0
- xlCopy = 1
- xlCut = 2
When pasting cells, Excel reads the CutCopyMode status to know whether it should cut or copy.
The following VBA will determine which mode Excel is in:
Select Case Application.CutCopyMode

    Case False
        MsgBox "CutCopyMode = False"

    Case xlCopy
        MsgBox "CutCopyMode = xlCopy"

    Case xlCut
        MsgBox "CutCopyMode = xlcut"

End Select
Should you use CutCopyMode = False?
If we are writing VBA code from scratch, it is rarely necessary to use CutCopyMode at all. Not because it is bad code, but because there are better ways to copy and paste which don’t use Excel’s clipboard, making it faster to execute.
Setting Values
We can paste values using the Value property of the range object. The following code places the values from cells B1 to B20 into cells A1 to A20 without using Excel’s clipboard.
Sub CopyAndPasteValuesOnly()

ActiveSheet.Range("A1:A20").Value = ActiveSheet.Range("B1:B20").Value

End Sub
Copy with Destination
If we wish to copy and paste more than just values, we can use the destination argument of the copy method. This also avoids the need to copy and paste.
Sub CopyAndPasteValuesOnly()

ActiveSheet.Range("A1:A20").Copy Destination:=ActiveSheet.Range("B1:B20")

End Sub
It is not necessary to define the full range of the destination; we can just reference the first cell. Excel knows how many cells we have copied and will adjust the paste range accordingly.
ActiveSheet.Range("A1:A20").Copy ActiveSheet.Range("B1")Conclusion
Ultimately, the decision of whether to use Application.CutCopyMode = False in our VBA code comes down to this: if at the end of executing the macro, the marching ants are visible, and you don’t want them to be, then use it, otherwise don’t worry about it.
Related posts:
- Cell and Range VBA properties and methods
- Useful VBA codes for Excel (30 example macros + Free ebook)
- VBA Code Library

About the author
Hey, I’m Mark, and I run Excel Off The Grid.
My parents tell me that at the age of 7 I declared I was going to become a qualified accountant. I was either psychic or had no imagination, as that is exactly what happened. However, it wasn’t until I was 35 that my journey really began.
In 2015, I started a new job, for which I was regularly working after 10pm. As a result, I rarely saw my children during the week. So, I started searching for the secrets to automating Excel. I discovered that by building a small number of simple tools, I could combine them together in different ways to automate nearly all my regular tasks. This meant I could work less hours (and I got pay raises!). Today, I teach these techniques to other professionals in our training program so they too can spend less time at work (and more time with their children and doing the things they love).
Do you need help adapting this post to your needs?
I’m guessing the examples in this post don’t exactly match your situation. We all use Excel differently, so it’s impossible to write a post that will meet everybody’s needs. By taking the time to understand the techniques and principles in this post (and elsewhere on this site), you should be able to adapt it to your needs.
But, if you’re still struggling you should:
- Read other blogs, or watch YouTube videos on the same topic. You will benefit much more by discovering your own solutions.
- Ask the ‘Excel Ninja’ in your office. It’s amazing what things other people know.
- Ask a question in a forum like Mr Excel, or the Microsoft Answers Community. Remember, the people on these forums are generally giving their time for free. So take care to craft your question, make sure it’s clear and concise. List all the things you’ve tried, and provide screenshots, code segments and example workbooks.
- Use Excel Rescue, who are my consultancy partner. They help by providing solutions to smaller Excel problems.
What next?
Don’t go yet, there is plenty more to learn on Excel Off The Grid. Check out the latest posts:
Содержание
- Свойство Application.CutCopyMode (Excel)
- Синтаксис
- Примечания
- Пример
- Поддержка и обратная связь
- VBA Application.CutCopyMode = False – What is it?
- VBA Application.CutCopyMode = False
- Avoiding CutCopyMode = False
- Get Application.CutCopyMode Status
- VBA Coding Made Easy
- VBA Code Examples Add-in
- Application cutcopymode vba excel описание
- Исследование кода VBA при записи макроса ВставкаСтроки
- VBA – Cut, Copy, Paste from a Macro
- Copy (Cut) and Paste a Single Cell
- VBA Coding Made Easy
- Copy Selection
- Copy (Cut) and Paste a Range of Cells
- Copy (Cut) and Paste an Entire Column
- Copy (Cut) and Paste an Entire Row
- Copy (Cut) and Paste to Another Worksheet or Workbook
- Value Paste
- Paste Special
- Clear Clipboard
- VBA Code Examples Add-in
- Application cutcopymode vba excel описание
Свойство Application.CutCopyMode (Excel)
Возвращает или задает состояние режима вырезания или копирования. Может иметь значение True, False или константа XLCutCopyMode , как показано в следующих таблицах. Для чтения и записи, Long.
Синтаксис
expression. CutCopyMode
выражение: переменная, представляющая объект Application.
Примечания
| Возвращаемое значение | Описание |
|---|---|
| False | Не в режиме выреза или копирования. |
| xlCopy | В режиме копирования. |
| xlCut | В режиме выреза. |
| Задать значение | Описание |
|---|---|
| False | Отменяет режим выреза или копирования и удаляет перемещаемую границу. |
| True | Запускает режим выреза или копирования и отображает движущуюся границу. |
Пример
В этом примере окно сообщения используется для отображения состояния режима вырезания или копирования.
Поддержка и обратная связь
Есть вопросы или отзывы, касающиеся Office VBA или этой статьи? Руководство по другим способам получения поддержки и отправки отзывов см. в статье Поддержка Office VBA и обратная связь.
Источник
VBA Application.CutCopyMode = False – What is it?
In this Article
VBA Application.CutCopyMode = False
If you’ve recorded macros while copying and pasting, you’ve probably seen the following line of code:
This line of code “clears” the clipboard*. If you’ve copied an Excel cell, running this line of code will remove the animation around the copied cell:
![]()
CutCopyMode is an application-level property that indicates whether a Microsoft Office program (ex. Excel) is in Cut or Copy Mode. While in copy (or cut) mode, Excel has something stored in it’s clipboard which can be pasted.
I’m not aware of a time when you would ever need to set Application.CutCopyMode to True.
Avoiding CutCopyMode = False
You can usually avoid needing to set Application CutCopyMode = False by using VBA Copy+Paste best practices. As an example, the following line of code copies and pastes a cell in a single line, removing the need to set CutCopyMode to False:
Get Application.CutCopyMode Status
Occasionally, you might want to get the status of Application.CutCopyMode. Potentially to prevent errors while trying to Paste when nothing is in the clipboard. To get the status use the following code:
*Application.CutCopyMode will only clear the Microsoft Office app (ex. Excel) clipboard. It will not clear Window’s clipboard. Click the link to learn more about how to clear Window’s clipboard using VBA.
VBA Coding Made Easy
Stop searching for VBA code online. Learn more about AutoMacro — A VBA Code Builder that allows beginners to code procedures from scratch with minimal coding knowledge and with many time-saving features for all users!

VBA Code Examples Add-in
Easily access all of the code examples found on our site.
Simply navigate to the menu, click, and the code will be inserted directly into your module. .xlam add-in.
Источник
Application cutcopymode vba excel описание
На этом шаге мы рассмотрим перечень окончательных действий по созданию указанного приложения .
Вернемся на рабочий лист ЖурналРегистрацииКУ .
При разработке приложения считалось, что основной метод формирования новой строки с данными в журнале регистрации — копирование строки с имеющейся записью, последующий переход в конец списка, выделение первой пустой строки и вставка скопированного содержимого. Задумайтесь, сколько однотипных действий должен совершить пользователь для выполнения этой, казалось бы очень простой, операции.
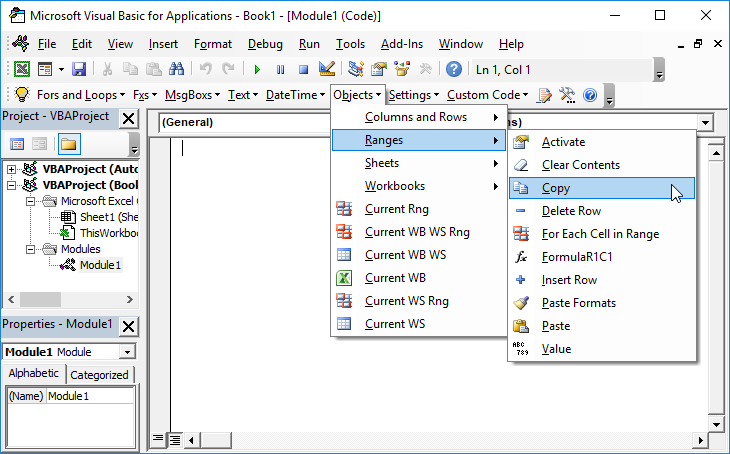
Оставим за пользователем только выбор копируемой строки, а все остальное поручите выполнять Excel в автоматическом режиме при нажатии на созданную кнопку Копирование и вставка выделенной строки (рисунок 1), которой назначьте следующий записываемый макрос с именем ВставкаСтроки .
Рис.1. Левая область журнала регистрации командировочных удостоверений на рабочем листе ЖурналРегистрацииКУ
Для записи макроса выполните следующую последовательность действий:
- перед записью макроса выделите выбранную строку, например, строку 9;
- выполните процедуру начала записи макроса, после чего задайте команду копирования, например, нажатием на кнопку Копирование на стандартной панели инструментов. Содержимое строки 9 будет помещено в буфер обмена;
- в связи с тем, что процедура автоматического определения и выделения первой пустой строки списка еще не изучена, выделите самую последнюю строку списка. Согласно ранее определенным договоренностям — это строка 200. Но чтобы добраться до нее, нужно выполнить ряд действий, например, перемещений на несколько экранов монитора вниз. Не затрудняйте себя, а выделите, например, строку 14 и произведите вставку из буфера обмена, например, нажатием на кнопку Вставка на стандартной панели инструментов;
- выделите строки от строки вставки (14) до первой строки после заголовка списка (4) и нажмите на кнопку Сортировка по возрастанию на стандартной панели управления. По умолчанию Excel произведет сортировку по данным столбца А . Список расположится в порядке возрастания порядковых номеров и содержимое скопированной строки 9 будет находиться в конце списка;
- остановите запись макроса.
Назначьте макрос кнопке и выделив одну из заполненных строк списка журнала регистрации, нажатием на созданную кнопку, проверьте правильность выполнения заданной последовательности ваших действий.
Исследование кода VBA при записи макроса ВставкаСтроки
После записи макроса не откладывайте на потом исследование записанного кода VBA , а открыв Редактор Visual Basic просмотрите записанные действия и при необходимости отредактируйте код VBA . Механически сгенерированный код показан на рисунке 2.
Рис.2. Механически сгенерированный код VBA
Между ключевыми словами начала и окончания выполнения подпрограммы находится восемь строк кода. По очереди рассмотрим каждую строку. Первая строка:
Обратите на точку, находящемуся между текстом кода. Она называется операция точка , и предназначена для разделения названия свойства и названия метода в этой строке.
Обратите внимание на три рассмотренные строки в совокупности. Они предназначены для выполнения одной операции — копирования выделенной строки с целью вставки ее содержимого в другую строку. Но ту же операцию может выполнить всего одна строка, в которой в качестве аргумента метода Copy указано место вставки содержимого скопированного диапазона:
При подобном редактировании кода макроса нет необходимости даже соблюдать интервал (пробелы) между операторами Copy и Rows . После окончания редактирования, установка интервалов между операторами при отсутствии ошибок выполняется Редактором Microsoft Visual Basic автоматически.
Следующую строку Excel генерирует также самостоятельно:
Следующая выполняемая операция (сортировка) состоит из двух строк:
В одной строке Редактора может находиться до 1024 символов. Но если все 1024 символа разместить в одной строке, то это затруднит ее чтение. Для переноса кода строки в следующую, используется символ подчеркивания (_), перед которым обязательно должен находиться пробел.
Excel позволяет выполнять операцию сортировки с использованием от одного до трех ключей и для сортировки диапазона с помощью VBA используется метод Sort . В этой команде, выполняющей операцию сортировки, находятся следующие операторы:
- Selection — выделенная область рабочего листа, значения которой будут сортироваться;
- Sort — имя метода (сортировка);
- Key1:=Range(«A14») — произвести сортировку выделенного диапазона по столбцу А , где аргумент Key1 указывает, что это первый ключ сортировки. Как вы знаете, Excel позволяет производить последнюю сортировку выделенного диапазона по трем полям с помощью диалогового окна Сортировка диапазона , которое вызывается с помощью команды Данные | Сортировка ;
- Order1 — указывает на порядок сортировки диапазона по первому ключу. Аргумент xlAscending — произвести сортировку по возрастанию. При сортировке по убыванию присваивается значение xlDescending ;
- Header — аргумент, с помощью которого определяется: сортировать ли первую строку выделенного диапазона. При механической записи макроса этому аргументу присвоено значение xlGuess . В этом случае Excel самостоятельно определяет, является ли первая строка строкой заголовка и нужно ли ее сортировать. Для того чтобы указать, что первая строка является строкой заголовка, и ее сортировать не требуется, присвойте этому аргументу значение xlYes . Если присвоить значение xlNo , то в этом случае первая строка сортируется;
- OrderCustom — целое число, которое указывает порядок сортировки, указанный пользователем на вкладке Списки диалогового окна Параметры , выводимое командой Сервис| Параметры . По умолчанию присваивается значение 1;
- MatchCase — указывает различать (True) или нет (False) при сортировке заглавные и строчные буквы;
- Orientation — указывает как проводить сортировку: по строкам (xlTopToBottom) или столбцам (xlLeftToRight) .
Как видно из записанного кода для присвоения методам значений применяются знаки := (двоеточие и равно).
Полученный в результате редактирования код макроса показан на рисунке 3, а остальной текст кода можно удалить.
Рис.3. Отредактированный код VBA подпрограммы вставки в конец списка содержимого выделенной строки
За счет минимизации текста подпрограммы было увеличено его быстродействие. Ведь для Excel нужно было прочитать ранее 8 строк, по каждой из которых он должен был предпринять какие-то действия, что значительно дольше, чем 3.
Полный текст этого приложения можно взять здесь.
Со следующего шага мы начнем рассматривать автоматизацию рабочего процесса по формированию и учету кассовых документов .
Источник
VBA – Cut, Copy, Paste from a Macro
In this Article
In this tutorial, you will learn several different methods to Copy & Paste and Cut & Paste using a VBA macro. Read the companion tutorial on Value Pasting and PasteSpecial for more advanced copying and pasting options.
To use this code: Open the Visual Basic Editor (Alt + F11), Insert a new module (Insert > Module) and copy & paste the desired code into the module.
Copy (Cut) and Paste a Single Cell
This example copies or cuts and pastes a single cell, A1 over to B1:
VBA Coding Made Easy
Stop searching for VBA code online. Learn more about AutoMacro – A VBA Code Builder that allows beginners to code procedures from scratch with minimal coding knowledge and with many time-saving features for all users!
Copy Selection
If you want to copy the active selection use this:
Copy (Cut) and Paste a Range of Cells
This example copies or cuts and pastes a range of cells, A1:A3 over to B1:B3 :
Copy (Cut) and Paste an Entire Column
Below we will demonstrate a couple of quick examples. Read our article on Copying and Pasting Rows and Columns for detailed examples, explanations, and variations.
This example copies or cuts and pastes an entire column, A over to B:
Copy (Cut) and Paste an Entire Row
This example copies or cuts and pastes an entire row, 1 over to 2:
Copy (Cut) and Paste to Another Worksheet or Workbook
Value Paste
Normally, when you Copy and Paste you Paste all the properties of a cell: formatting, formulas, etc.. Value Pasting allows you to Copy and Paste cells’ values and nothing else. The easiest way to Value Paste in VBA is to define the cell’s value directly:
Paste Special
Paste Special allows you to Copy and Paste specific properties of cells (examples: formats, values, column widths, etc.). It also allows you to perform special paste operations (examples: skip blanks, transpose). We will look at several examples below, but for an in-depth read our tutorial on Value Pasting and Paste Special.
Clear Clipboard
After Copying & Pasting you might want to clear the clipboard (we do in some of the code examples above). To clear the Excel clipboard, we set Application.CutCopyMode to False:
![]()
This will clear Excel’s clipboard. However, it will not clear the Windows Clipboard. To clear the Window’s clipboard follow the instructions here.
VBA Code Examples Add-in
Easily access all of the code examples found on our site.
Simply navigate to the menu, click, and the code will be inserted directly into your module. .xlam add-in.
Источник
Application cutcopymode vba excel описание
Put someting in cell A1 and try this:
Sub Test()
Range(«A1»).Copy
Range(«B1»).Pastespecial Paste:=xlvalues
End Sub
Notice how the border around cell A1 is still flashing? Go to any other cell on the worksheet and hit Ctrl + V (or however you like to paste)
Now try this
Sub Test2()
Range(«A1»).Copy
Range(«B1»).Pastespecial Paste:=xlvalues
Application.Cutcopymode = False
End Sub
No flashing. no pasting.
Basically CutCopyMode is the setting that tells you if there is something ready to paste. You’d normally turn it off from the main Excel interface by hitting escape to get rid of the flashing around the selection.
Hope this helps,
Another reason to put Application.Cutcopymode = False is to clear the clipboard.
If you (say) have a loop where you have to copy a number of things, put Application.Cutcopymode = False after each paste or you will soon be getting messages about being unable to comply because the clipboard is full.
Hey, John, another interesting reply. Regarding the clipboard-clearing benefit, if I am doing a copy/paste in a loop, is there any difference between setting CutCopyMode to FALSE after EACH paste execution or setting it FALSE after the loop finishes? I guess I still don’t quite understand it. If I have a loop that sets CutCopyMode to FALSE in each iteration, what turns it back on? Does the execution of a COPY set CutCopyMode to TRUE? Now that I think about it, of course that’s what happens. So whether you set it to FALSE internal to the loop would pretty much depend on how much is being copied per iteration. I would guess that turning it off at the end of the procedure would be adequate for most applications.
:rotlaugh: Nice work, Sid! :thumb
. I would guess that turning it off at the end of the procedure would be adequate for most applications.On the contrary, that would be adequate for a few applications and there is generally no way of knowing in advance whether the current use is one of them.
In fact, to be more correct, as you don’t know whether there is anything on the clipboard prior to running your macro, it’s probably best to also set it to False before entering the loop as well i.e.
Application.CutCopyMode = False
For PasteIt= 1 to 100
Application.CutCopyMode = False
Next PasteIt
Sid, you should just be able to set it to False when you are done with your procedure. Adding to the clipboard will just tack it on, just as you would extend a list. What you come up against is the resources you have to allocate for the clipboard.
If you are copying huge amounts of data, it may be worthwhile — performance-wise — for you to set the CutCopyMode to False after every iteration. Otherwise, it’s pretty much a waste of space. I guess the question comes down to, «How much of a clean freak are you?» (Not to imply that it’s bad, but can be over-done.)
And btw, you don’t set CutCopyMode to True, you set it to xlCopy or xlCut. Paste is used by another method altogether. There is a better [explaining] diagram in the Object Browser (Alt + F11 | F2).
. If you are copying huge amounts of data, it may be worthwhile — performance-wise — for you to set the CutCopyMode to False after every iteration. Otherwise, it’s pretty much a waste of space. I guess the question comes down to, «How much of a clean freak are you?» (Not to imply that it’s bad, but can be over-done.). Hi Zack,
According to my Help files (2000) I can only fit 12 separate items on the clipboard before getting an error message, so it’s not just about the amount of data, it’s also about the number of iterations/items.
There is some confusion here 🙂
Setting CutCopyMode = False clears the marching ants and the Windows Clipboard of whatever the ants were marching round. It does not clear anything else from the Windows clipboard and it does not clear the Office Clipboard.
The Windows Clipboard contains, at most, one item, the last thing copied regardless of the app. Copying something else overwrites it.
The Office Clipboard contains up to 24 (in 2003) different copied items with the oldest item being discarded to add a new item when it is full. It can be manipulated through the Excel GUI (and partially in code, though not in any obvious manner).
My understanding, which could well be wrong , is .
If there is a region surrounded by marching ants then that region has been copied to, and is currently on the Windows Clipboard and has been copied to, and is currently number one on the Office Clipboard.
If and only if there is a region surrounded by marching ants will setting CutCopyMode = False have any effect at all. That effect will be to clear the marching ants and to clear the Windows clipboard.
The API method (presumably as per the KB you reference) will clear the Windows Clipboard of whatever is on it, whatever its source.
The Office Clipboard is a whole different beast — and I lied a little when I said you could get at it in code. I just had a little play, and you can work with the Clipboard CommandBar in 2000, but since it moved to the Task Pane, I don’t know how to do it — I’m still looking, I don’t know if it’s possible or not.
There is some confusion here 🙂
Setting CutCopyMode = False clears the marching ants and the Windows Clipboard of whatever the ants were marching round. It does not clear anything else from the Windows clipboard and it does not clear the Office Clipboard.
The Windows Clipboard contains, at most, one item, the last thing copied regardless of the app. Copying something else overwrites it.
The Office Clipboard contains up to 24 (in 2003) different copied items with the oldest item being discarded to add a new item when it is full. It can be manipulated through the Excel GUI (and partially in code, though not in any obvious manner).Hi Tony,
I haven’t tested this extensively, I’m only going on what I’ve read in the help files and elsewhere on the web.
If you read your Help files re the clipboard you’ll see that you have a certain number of copies that can be made (varies from version to version of course) and you will also find instructions in the Help file for clearing the Office clipboard, now, record that action.
i.e. specifically, Open excel, copy something (anything) on the s/s, now.
Go to View > Toolbars > Clipboard (note that this is the Office clipboard)
Go to Tools > Macro > Record New Macro. > OK
Click ‘Clear Clipboard’ on the clipboard toolbar
Now end your macro recording and open the VBE window to find the macro you’ve just recorded and note the single line of code in it which resulted from clicking ‘Clear Clipboard’ is. Application.CutCopyMode = False
If there are marching ants then pressing «Clear Clipboard» will, as well as clearing the office clipboard, also clear the marching ants and the windows clipboard. If there are no marching ants and you press «Clear Clipboard», then nothing will be recorded. This is because «CutCopyMode = False» is an extra action performed by «Clear Clipboard» under certain circumstances, and it is recorded when it is triggered.
Running «CutCopyMode = False» will not clear the Office Clipboard, nor will it even clear the Windows Clipboard unless there are marching ants.
I know I get no error messages when I insert Application.CutCopyMode = False in a loop in some procedures that bomb out when it’s not inserted. You’re forcing me to experiment a bit more now :rofl: . This is strange
If you copy something and then run «Application.CutCopyMode = False» the clipboard is certainly shown as still having something on it. However when you try to paste, nothing is pasted, then, when you close and re-open the workbook you will then find the clipboard is now shown as being empty.
Here’s another experiment, select and copy the sheet and then exit the workbook. You should see a message similar to the one shown below.
Now repeat the above but run «Application.CutCopyMode = False» before exiting the workbook. There is now no message shown, this would also seem to indicate that the clipboard is indeed empty.
You are, I think, confusing the Windows and Office Clipboards. You only get indication in Excel of what is on the Windows clipboard in a limited set of circumstances (when a range is dotted, or maybe when you quit as you show). You get indication of what is on the Office clipboard via the Clipboard toolbar — what is on the Windows clipboard may be (but also may not be) one of the items on the Office clipboard.
Rather than post a full explanation here, I’ve started writing this up as an article which I should submit later today.
I look forward to seeing your article (if it ever gets approved). http://vbaexpress.com/forum/images/smilies/039.gif
It will, Sid. No worries there, it just takes time. :yes
Источник