
 This tutorial shows three ways to cut, copy, and paste in Microsoft Word. First, we’ll use keyboard shortcuts. Then, we’ll use the tools in the ribbon. Lastly, we’ll use the shortcut menu. Plus, the bonus tip at the end shows how to choose a pasting option after pasting your text.
Table of Contents
- How to Use Keyboard Shortcuts to Cut, Copy, and Paste
- How to Use the Ribbon to Cut, Copy, and Paste
- How to Use the Shortcut Menu to Cut, Copy, and Paste
- Bonus Tip: How to Choose a Pasting Option after Pasting Text
But first…
What Does It Mean to Cut, Copy, and Paste?
Cutting: When you cut text or an image, you are removing it from its original location, which can be your current Word document or another editable location, such as Microsoft Excel or Google Docs. Once cut, it will be placed in the Clipboard, which is a temporary storage area on your computer.
Copying: When you copy text or an image, you are placing a duplicate in the Clipboard, but you are not removing it from its original location.
Pasting: After cutting or copying, you can then use the paste function to move the text or image from the Clipboard to a new location in your document.
For an advanced look at the Clipboard, please see “How to Use the Clipboard in Microsoft Word.”
Do you want to copy and paste formatting instead of text? Check out “How to Use the Format Painter in Microsoft Word.”
This tutorial is available as a YouTube video showing all the steps in real time.
Watch more than 150 other writing-related software tutorials on my YouTube channel.
The images below are from Word for Microsoft 365. These steps also apply to Word 2021, Word 2019, Word 2016, and Word 2013.
How to Use Keyboard Shortcuts to Cut, Copy, and Paste
The following keyboard shortcuts work in Windows across all Microsoft Office apps, Adobe Acrobat, Google Docs, and many other locations such as email platforms, social media comment boxes, and website text boxes.
To Cut or Copy
- Select the text or image you want to cut or copy.
- Press the keyboard shortcut:
Cut: Ctrl + X
Copy: Ctrl + C
Your text or image should now be cut or copied.
To Paste
- Place your cursor where you want to insert the text or image.
- Press the keyboard shortcut:
Paste: Ctrl + V
Your text or image should now be pasted into the new location in your document.
How to Use the Ribbon to Cut, Copy, and Paste
The ribbon method requires more steps than the keyboard shortcuts; however, it offers more customization options for pasting.
To Cut or Copy
- Select the text or image you want to cut or copy.
- Select the Home tab in the ribbon.

- Select Cut or Copy from the Clipboard group.

Your text or image should now be cut or copied.
To Paste
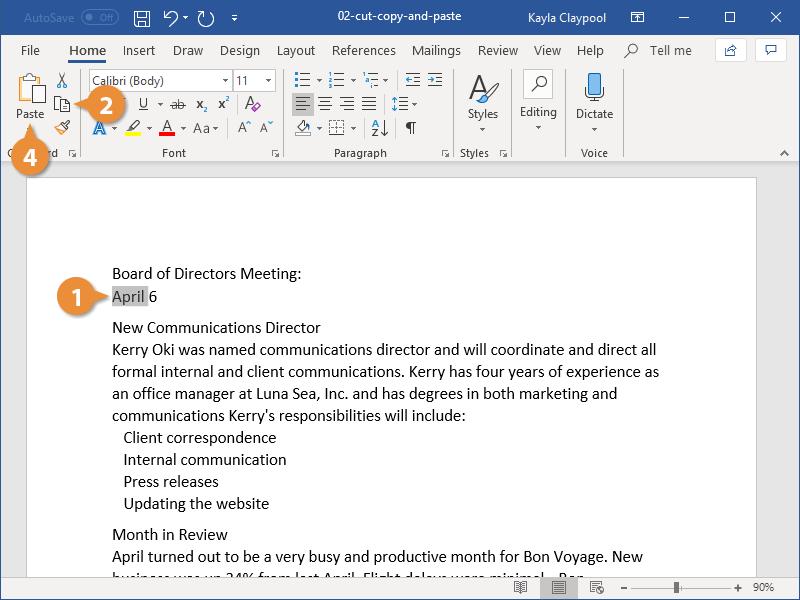
- Place your cursor where you want to insert the text or image.
- Select the Home tab in the ribbon (see figure 1).
- Select the Paste button to paste the text or image without additional options.

- Select the Paste Options menu arrow for additional options.
![]()
- Choose an option from the drop-down menu:
A. Keep Source Formatting maintains the formatting (e.g., font, size, color, etc.) of the pasted text.
B. Merge Formatting changes the formatting of the pasted text to match the formatting of the new location.
C. Picture pastes the text or other content as an image (only available in Word for Microsoft 365).
D. Keep Text Only removes the formatting of the pasted text and adds the formatting of the new location.

What Is the Difference between Merge Formatting and Keep Text Only?
The difference between Merge Formatting and Keep Text Only is a bit confusing, so let’s dig into them a little deeper.
Merge Formatting matches the formatting of the pasted text to the formatting of the new location. However, it doesn’t remove existing emphasis formatting (boldness, italics, or underlining) from the pasted text.
For example, if you use Merge Formatting to paste a twenty-word paragraph with black font and five bold words into a location with red font, all twenty words will turn red. But, the five bold words will maintain the bold format.
Keep Text Only removes all formatting from the pasted text, including emphasis formatting, and then adds the formatting of the new location to the pasted text.
So, if you use Keep Text Only to paste that same twenty-word paragraph with black font and five bold words into a location with red font, all twenty words will turn red and the five bold words will lose the bold format.
- (Optional) For further customization, choose an advanced option from the drop-down menu:
-
- Paste Special opens the Paste Special dialog box with additional options including pasting as HTML format and unformatted Unicode text.
- Set Default Paste opens the Word Options dialog box where you can choose default options for pasting within the same document, pasting between documents, and pasting from other programs.

Your text or image should now be pasted into the new location in your document.
How to Use the Shortcut Menu to Cut, Copy, and Paste
The shortcut menu attached to the Mini toolbar lets you cut, copy, and paste from inside the document.
To Cut or Copy
- Select the text or image you want to cut or copy.
- Right-click the selected text or image, and then select Cut or Copy from the shortcut menu.

Your text or image should be cut or copied.
To Paste
- Right-click where you want to insert the text or image, and then select an option from the shortcut menu:
A. Keep Source Formatting
B. Merge Formatting
C. Picture (only available in Word for Microsoft 365)
D. Keep Text Only
See the definition for each option in step 5 of the section above.

Your text or image should now be pasted into the new location in your document.
Bonus Tip: Choose a Pasting Option after Pasting Text
Word provides a convenient way to choose a pasting option after you have pasted text into its new location.
- Select the Paste Options button that appears after you paste your text into its new location.

- Select an option from the shortcut menu:
A. Keep Source Formatting
B. Merge Formatting
C. Picture (Word for Microsoft 365 only)
D. Keep Text Only

Your pasted text should change formatting according to your selection.
Important Note: The Paste Options button will disappear once you perform another function such as typing or pressing the Enter key, so if you want to use this button, you must do so immediately after pasting your text.
Related Resources
How to Insert Files into Existing Files in Microsoft Word (PC & Mac)
How to Change the Font, Font Size, and Font Color in Microsoft Word
How to Insert and Modify Images in Microsoft Word
How to Add Page Numbers in Microsoft Word
Updated June 18, 2022
Apply or remove double-line strikethrough formatting
- Select the text that you want to format.
- Go to Home and select the Font Dialog Box Launcher. , and then select the Font tab.
- Select Double strikethrough.
How do you make slashed text?
Follow these simple steps to cross out text on any webpage or social networking sites like Facebook, Twitter, Instagram.
- Enter your text.
- Click on StrikeEm button.
- Click the s̶t̶r̶i̶k̶e̶t̶h̶r̶o̶u̶g̶h̶ ̶t̶e̶x̶t̶ generated.
- Copy the s̶t̶r̶i̶k̶e̶t̶h̶r̶o̶u̶g̶h̶ ̶t̶e̶x̶t̶ .
- Paste it where you want.
What is the keyboard shortcut for strikethrough text?
For a quick single strikethrough effect, you can use a keyboard combination to quickly reach the outcome. On a PC: the shortcut is Alt + H + 4. So, you select a piece of text or an entire paragraph and hit these keys on your keyboard. On a Mac: The keyboard shortcut is Cmd+Shift+X.
What is strikethrough in Word?
Strikethrough is a typographical presentation of words with a horizontal line through their center, resulting in text like this. Contrary to censored or sanitized (redacted) texts, the words remain readable.
What is the command for strikethrough Google Docs?
Keyboard shortcuts for Google Docs
| Common actions | |
|---|---|
| Strikethrough | Alt + Shift + 5 |
| Superscript | Ctrl + . |
| Subscript | Ctrl + , |
| Copy text formatting | Ctrl + Alt + c |
How do you strikethrough in notes?
to apply the strikethrough style, or use the CTRL+SHIFT+9 keyboard shortcut on PCs or the CMD+SHIFT+9 keyboard shortcut on Macs.
How do you write subscript?
Alternatively, you can find other keyboard apps on the Play Store that allows typing subscript.
- Open the text where you want to type subscript.
- Switch your keyboard to the Engineering Keyboard.
- Tap the nnn super/subscript icon on the bottom-left.
- Tap the subscript character you want to type.
What is subscript example?
Subscript is the text which a small letter/number is written after a particular letter/number. It is used when writing chemical compounds. An example of subscript is N2. Superscript is the small letter / number above a particular letter / number.
How do you write H2O?
The chemical symbol for water is H2O. The chemical symbol for water, H2O, stands for dihydrogen monoxide. This shorthand indicates that two hydrogen atoms, represented by H2, bonded to one oxygen atom, represented by O, forms one molecule of water.
What is H2O full name?
H2O is the molecular formula of water, also called Dihydrogen monoxide. H2O symbolises two hydrogen atoms and one oxygen atom.
Why is it called H2O?
The scientific name for water is H2O. It is called H2O because it has two atoms of hydrogen (H) and one atom of oxygen (O). When water boils, water molecules move very fast. Water molecules move so fast that they actually break apart from each other and escape into the air as water vapor or steam.
What is H2O full form?
H. 2. O is the chemical formula for water, meaning that each of its molecules contains one oxygen and two hydrogen atoms.
What is full form Google?
GOOGLE: Global Organization of Oriented Group Language of Earth. Officially Google has not a full form. It is generated from a word “googol” which means a huge number. The word “googol” represents a number that is 1 followed by 100 zeros.
What is the chemical name for water?
Oxidane
What is the full chemical name for water?
H2O
What is the chemical name for CO2?
Carbon dioxide
What is deoxygenated water?
Deaerated Water. Naturally occurring water contains a high concentration of oxygen (up to 10–12 ppm dissolved oxygen), and as oxygen is detrimental to the flavor stability of beer, any water that comes into contact with fermented beer should be “deaerated,” or more precisely, deoxygenated.
What happens when water is deoxygenated?
Ocean deoxygenation may also influence the movement of gases between the ocean and the atmosphere. Deoxygenated deeper ocean waters produce greenhouse gases such as nitrous oxide, carbon dioxide and methane that may reach the ocean surface and be released into the atmosphere, contributing to further warming.
What is it called when water loses oxygen?
Aquatic hypoxia. Oxygen depletion is a phenomenon that occurs in aquatic environments as dissolved oxygen (DO; molecular oxygen dissolved in the water) becomes reduced in concentration to a point where it becomes detrimental to aquatic organisms living in the system.
Can the ocean run out of oxygen?
If countries continue with a business-as-usual approach to emissions, the world’s oceans are expected to lose 3-4% of their oxygen by the year 2100. This is likely to be worse in the tropical regions of the world. Much of the loss is expected in the top 1,000m of the water column, which is richest in biodiversity.
Can earth run out water?
Water, as a vapor in our atmosphere, could potentially escape into space from Earth. While our planet as a whole may never run out of water, it’s important to remember that clean freshwater is not always available where and when humans need it. In fact, half of the world’s freshwater can be found in only six countries.

Cutting, copying, and pasting are three of the most basic features available to a computer user, but as you might expect Microsoft Word gives you more options than just those. There’s a built-in Office clipboard that’s pretty powerful, the ability to choose the format of content you paste, and more. Here’s how it all works.
Paste Text the Way You Want
When you paste text using Ctrl+V, Word defaults to pasting both the text and any formatting applied to that text. This means that the text will look like it did in the original location. Technically, Word copies the formatting marks in the text, which can be interpreted in different ways. This is why you might find that text copied from a website can appear much larger in Word; the formatting marks are interpreted differently by Word than they are by your web browser.
Instead of hitting Ctrl+V, you can click Home > Paste to see some different options.

The “Paste” drop-down menu shows a few options as icons across the top. From left to right these are:
- Keep Source Formatting: This is the default option you get when pressing Ctrl+V, as described above.
- Merge Formatting: This command pastes just the text you’ve copied but changes the formatting to match the surrounding text into which you’re pasting.
- Picture: This command inserts the text as a picture.
- Keep Text Only: This command removes all formatting from the original text. The text will take on the default formatting of the paragraph into which you insert the text.
There are also a couple of other options on the “Paste” drop-down menu. The “Paste Special” command lets you paste whatever you’ve copied as a special document type. For example, you could paste as a Word document, picture, or even HTML. The options available in the Paste Special window change depending on what you’ve copied. If you copied text, for example, you could insert it as a separate Word document. If you copied an image, you can change the format of the image when you paste (which we’ll talk more about in the next section).
The “Set Default Paste” option lets you change the default paste action (when you press Ctrl+V) if you don’t want “Keep Source Formatting” to be the default.
RELATED: How to Change the Default Paste Setting in Microsoft Word
Paste Images the Way You Want
When you paste an image into Word, it gives you some flexibility on the format. Click Home > Paste > Paste Special (after copying an image) to see the options.
In this case, we’re pasting from the clipboard, so we can choose if we want the pasted image to be in PNG or BitMap format. If we were pasting an image file, we’d get the choice to embed it as a file or link to it instead (which lowers the size of the document).
You can also choose whether your pasted images default to “in line with text” or a different text wrapping by going to File > Options > Advanced > Insert/Paste Pictures As.
If you’re not sure what text wrapping is, or why you might change it, we’ve got you covered.
RELATED: How to Wrap Text Around Pictures and Other Illustrations in Microsoft Word
Copy Formatting and Apply it to Other Text
You’ve got your formatting set just so, and now you want various other parts of your document to look the same. It would be a pain to have to change each block of text to match manually, so Word provides the Format Painter tool to help. Format Painter copies the formatting from selected text and then pastes it into other text. If you select an entire paragraph, it copies the paragraph formatting. If you select just a few words of text, it copies any character formatting applied to that text.
Select the text with the formatting you want to copy, hit Home > Format Painter and then select the text to which you want to paste the formatting. If you want to paste formatting to multiple locations, select the text and then double-click the “Format Painter” button. Anything you click or select after that gets pasted with the original formatting, and you can click the “Format Painter” button again to turn it off.
For more tips on using Format Painter, check out our full guide to copying formatting in Word.
RELATED: How to Quickly and Easily Copy Formatting in Word
Copying Tracked Changes From One Document to Another
If you’re using Tracked Changes and you want to move part of a document to a new document, you might not want to lose those tracked changes. Thankfully you don’t have to, but it’s not always obvious how to do it. This is primarily because you have to turn the Track Changes feature off before you copy the text.
This initially seems counter-intuitive, but there is some logic behind it. If you copy text with tracked changes and don’t turn the feature off first, Word assumes that you want to copy that text as if all the changes had been accepted. Want to know more? Check out our guide to copying, and pasting text with tracked changes.
RELATED: How to Copy and Paste Text With Tracked Changes in Word 2013
Using the Spike to Cut or Copy Lots of Things and Then Paste Them All at Once
You’ve written a great document and all is well, except that you now want to move various bits of it around to create a new paragraph. Or maybe you want to go through your document and copy all the names of people into a list in another document. Either way, this means you’ll have to cut individual bits of text from the document, go to the site of your new paragraph, paste the text in, then rinse and repeat until you’re done—right? Wrong.
The spike is one of Word’s best-kept secrets. It’s named after those literal spikes you used to see get in paper-based offices and sometimes still see in restaurants—you know, the sharp metal thing they stab receipts onto?
In Word, you can select some text and then hit Ctrl+F3 to cut that text and place it in your spike. Want to copy instead of cut? Just hit undo after hitting Ctrl+F3—that undoes the cutting of the text but not the placing of that text onto the spike. You can keep doing this to keep adding more text to the spike.
When you’re ready to paste everything, place your insertion point where you want to paste the text you’ve collected and then hit Shift+Ctrl+F3. This pastes everything in the spike at that location and also clears everything from the spike. Each item you had in the spike is pasted as its own paragraph, making it a great way to create a list.
Want to know more? Check out our complete guide to using the spike in Word.
RELATED: How to Use the Spike to Copy and Paste Text in Microsoft Word
Use Office’s Much Better Clipboard
The Windows Clipboard has always been fairly limited (although it is getting some upgrades soon). You copy something to the clipboard and then paste it somewhere else. The biggest limitation to the Windows Clipboard is that it only holds one thing at a time. Copy something new and whatever was there is now gone.
Enter the Office Clipboard, which can store up to 24 different items. You don’t even have to copy things in a different way. Just keep copying things by selecting them and hitting Ctrl+C and the Office Clipboard stores them for you.
When it’s time to paste content, you can open the Office Clipboard by clicking on the small arrow in the bottom right of the Home > Clipboard group.
You see a nice list of the last 24 things you’ve copied—text, images, whatever. You can then paste or delete individual items on the list.
It’s a great tool (and one we’ve highlighted previously, so give it a go! You’ll wonder how you managed without it.
RELATED: How to Use Microsoft Office’s Built-In Clipboard
Don’t Use the Clipboard At All
Clipboards are all well and good, but the cool kids can copy and paste without using them at all.
We’ve covered this before of course, but a reminder never hurts. If you’ve got something stored on the clipboard and you don’t want to lose it, you can select text in your Word document and then Ctrl+right-click somewhere else in the document to cut the text from the original location and move it there. You can also use Ctrl+Shift+right-click to copy the selected text instead of cutting it.
RELATED: How to Move or Copy Text in Microsoft Word Without Affecting the Clipboard
Change “Insert” to be a “Paste Key”
By default, the Insert key on your keyboard toggles between Overtype and Insert modes, but you can change it to be a Paste key if you don’t use those other functions. Using the Insert key for pasting used to be a common function years ago, but Ctrl+V has become the default in the Windows world.
If you have happy memories of using Insert to paste text in ye olden days, or you’ve got mobility issues that make it easier to use a single key, we’ve provided instructions on how to change Insert into a Paste key.
RELATED: How to Use the Insert Key to Insert Copied Content in Word
As usual, Word has a lot more going on with even a simple thing like cut, copy and paste. Have we missed a good trick? Let us know in the comments!
READ NEXT
- › How to Convert a Table to an Image in Microsoft Word
- › What Your Function Keys Do in Microsoft Word
- › How to Rearrange Pages in Microsoft Word
- › How to Copy and Paste Only Visible Cells in Microsoft Excel
- › How to Make a Chart in Microsoft Word
- › How to Duplicate Slides in Microsoft PowerPoint
- › How to Remove Hyperlinks From Microsoft Word Documents
- › The New NVIDIA GeForce RTX 4070 Is Like an RTX 3080 for $599
Move text and images in a document easily
What to Know
- Highlight the text and press Ctrl+X to cut or Ctrl+C to copy (Command on a Mac). Alternatively, right-click the text and select Cut or Copy.
- To paste, move the cursor to desired location and press Ctrl+V (Command on a Mac). Alternatively, right-click and select Paste.
- You can’t use Paste if you want to paste something other than the last item copied. To access older items, access the Clipboard.
Cut, Copy, and Paste might be the three most used commands in Microsoft Word—and for good reason. Here are the differences between Copy, Cut, and Paste, and how to use them in Word for Microsoft 365, Word 2019, Word 2016, and Word 2013.
How to Cut and Copy in Word
There are several ways to use the Cut and Copy commands and these are universal to all versions of Microsoft Word. First, use the mouse to highlight the text, image, table, or another item you want to cut or copy. Then, use one of the following commands:
- Go to the Ribbon, select the Home tab, then select Cut or Copy.
- Right-click the selected text and choose Cut or Copy.
- Use the key shortcut Ctrl + X to cut or use Ctrl + C to copy. On Mac, use Command + X or Command + C.
How to Paste the Last Item Cut or Copied in Word
There are several ways to use the Paste command that are universal to all versions of Microsoft Word. First, either use the Cut or Copy command to save an item to the Clipboard. Then, to paste it, do one of the following:
- Go to the Home tab, then select Paste.
- Place the cursor where you want the text or image to go in the document, then right-click and choose Paste.
- Use the key combination Ctrl + V to paste. On Mac use Command + V. This is the keyboard shortcut for Paste and is universal to most Microsoft Office and 365 applications.
How to Use the Clipboard to Paste Previously Cut or Copied Items
You can’t use the Paste command as outlined in the previous section if you want to paste something other than the last item copied. To access items older than that, access the Clipboard.
If you’re collaborating with others to create a document, use Track Changes so your collaborators can quickly see the changes you’ve made.
Here’s how to use the Clipboard:
-
Go to the Home tab.
-
In the Clipboard group, select the dialog launcher to open the Clipboard pane.
-
Select the text or image you want to copy and press Ctrl+C.
-
Repeat until you’ve copied all the items you want to use. The items appear in the Clipboard, with the latest at the top.
-
Place the cursor in the document where you want to paste the items, then go to the Clipboard pane, select the drop-down arrow next to the item you want to paste, then choose Paste.
Alternatively, if you want to paste all of the items in your Clipboard, select Paste All.
What Are the Differences Between Copy, Cut, and Paste?
Cut and Copy are comparable commands. When you cut something, such as text or a picture, it’s saved to the Clipboard and removed from the document. When you copy something it’s also saved to the Clipboard, but it remains in the document.
If you want to paste the last item you cut or copied, use the Paste command, available in various areas of Microsoft Word. If you want to paste an item other than the last one you cut or copied, use the Clipboard history.
When you paste something you cut, it’s moved to the new location. If you paste something you copied, it’s duplicated at the new location.
Thanks for letting us know!
Get the Latest Tech News Delivered Every Day
Subscribe
You can move or copy text in a Word document by cutting or copying a selection and then pasting the text in a new location.
You can cut, copy, and paste any item—like pictures, shapes, or tables—not just text.
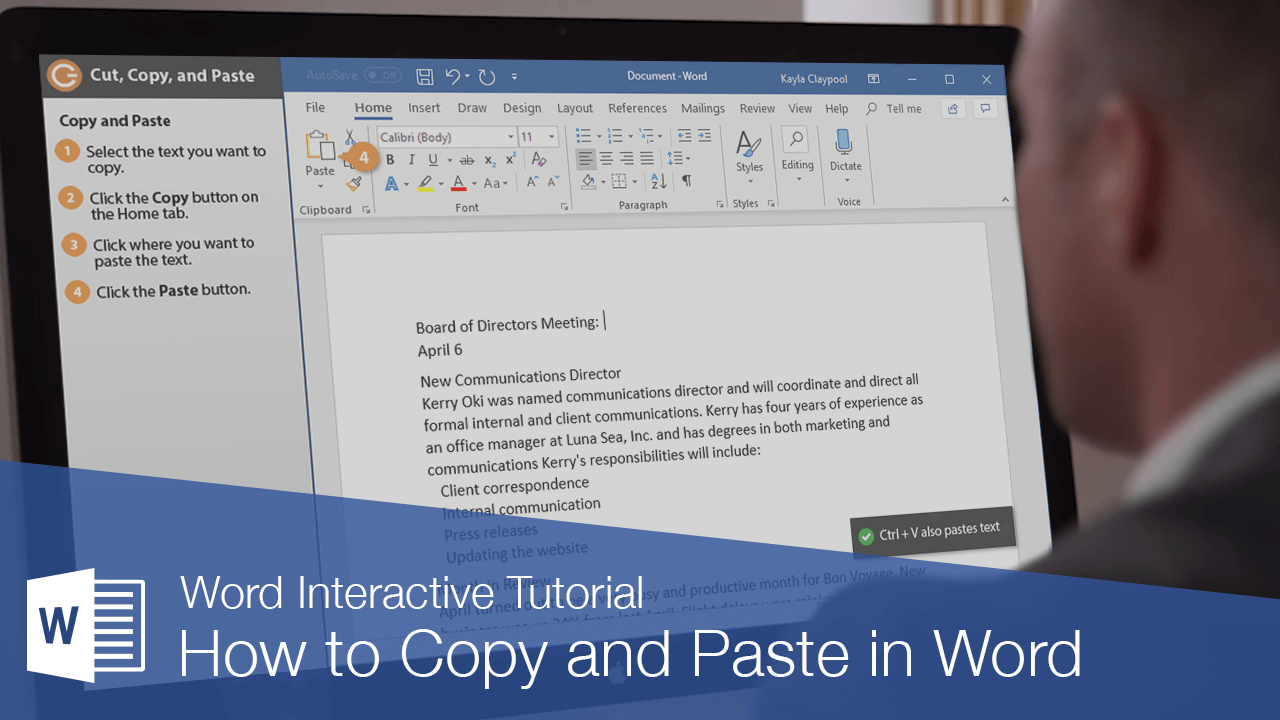
Copy and Paste
Copying text lets you duplicate the selected text so it can be used somewhere else.
- Select the text you want to copy.
- Click the Copy button on the Home tab.
A copy of the selected text is placed in the Clipboard.
Press Ctrl + C to copy.
- Click where you want to paste the text.
You can copy, cut, and paste text or other items within a document, between documents, or between programs.
- Click the Paste button.
Press Ctrl + V to paste.

The text you copied is duplicated in the new location.
Cut and Paste
When you cut text, it is removed from its original location and placed in the Clipboard.
- Select the text you want to cut.
- Click the Cut button on the Home tab.
Press Ctrl + X to cut.
- Click where you want to paste the text.
- Click the Paste button.
Select the text you want to move, then click and drag the selected text to where you want to place it. (Pressing Ctrl while moving will copy it.)

FREE Quick Reference
Click to Download
Free to distribute with our compliments; we hope you will consider our paid training.