
Word for Microsoft 365 Word 2021 Word 2019 Word 2016 Word 2013 Word 2010 Word 2007 More…Less
Delete lines or connectors
Click the line, connector, or shape that you want to delete, and then press Delete.
Tip:
If you want to delete multiple lines or connectors, select the first line, press and hold Ctrl while you select the other lines, and then press Delete.
If you can’t select a line to delete, it might actually be a horizontal line, which is a type of border.
Remove a horizontal line
-
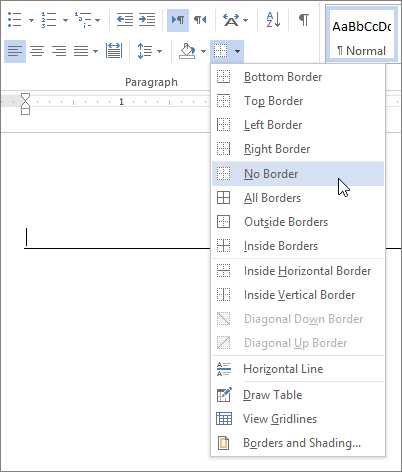
Place the cursor immediately above the horizontal line.
-
On the Home tab, click the arrow next to the Borders and Shading button, and click No Border.

For more on how lines work in borders, see Add, change, or delete borders from documents or pictures.
Need more help?
Want more options?
Explore subscription benefits, browse training courses, learn how to secure your device, and more.
Communities help you ask and answer questions, give feedback, and hear from experts with rich knowledge.
Making some special templates in Word requires you to insert a clipping line, telling others to cut paper along the dotted line with scissors. So, how can we make an iconic clipping line in Word?
Before taking action, you should know what a clipping line looks like. It’s usually composed of a dotted line and a scissors icon. So, you can insert a dotted line at first.
How to Insert a Dotted Line in Word
Method 1
1. Go to Insert tab, click Shapes and choose the straight line in the list.

2. Draw it at the place you want to insert a clipping line, then choose its color in Format
(Drawing Tools).
3. Click Shape Outline – Dashes to select a style. Then the line will be converted into a dotted line.

Method 2
Alternately, you can also press [Shift+6] to input multiple suspension points till it’s long enough.

Method 3
Press [-] key constantly to constitude a dotted line.

How to Insert an Icon of Scissors into Word
Method 1
1. Switch to Insert tab, click Icons in Illustrations section.

2. Input “scissors” in the search box and press [Enter] to find proper icons.

3. Select the icon you want, hit Insert to add it.
Method 2:
1. Switch to Insert tab, click Symbol – More Symbol…

2. Change the Font to Wingdings, and you can find the scissors icon very easily.
3. Choose the one you want, click Insert to add it to your document.

4. After that, adjusting the location and size of the icon to fit in the dotted line.
With these methods above, you can create different styles of clipping line in Word according to your preference.


Copyright Statement: Regarding all of the posts by this website, any copy or use shall get the written permission or authorization from Myofficetricks.
Horizontal lines in Microsoft Word don’t count as characters, so getting rid of them can be challenging—unless you use this tip!

If you want to split up a Microsoft Word document with simple dividers for readability, all you have to do is type three hyphens and press Enter for a long horizontal line to appear.
However, once it’s there, getting rid of it can prove challenging. You’d think using the Delete or Backspace keys would work, but they don’t—you seem to be stuck with that line. Don’t worry, though. Here’s how to remove a line in Microsoft Word.
How to Delete a Horizontal Line in Microsoft Word
While you can’t use the Backspace or Delete keys to get rid of it, you can still delete that line:
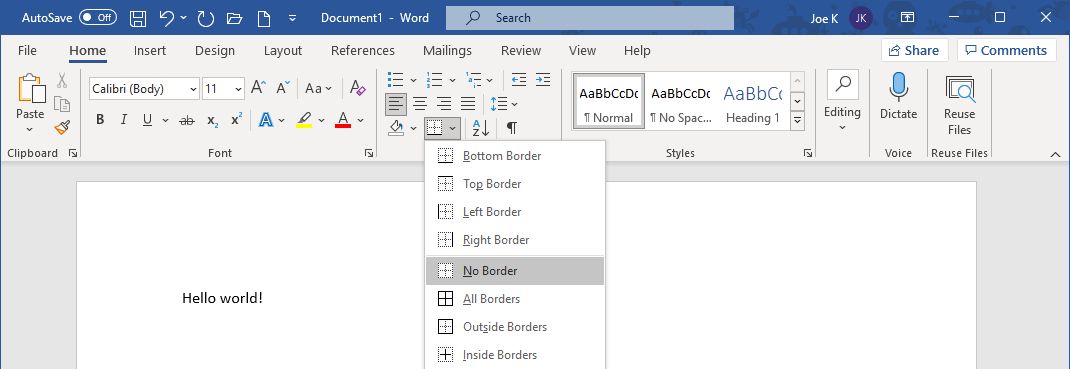
- Click directly above the line.
- Go to the Home tab in the Ribbon.
- Within the Paragraph section, click the dropdown arrow next to the Borders icon and select No Border.
How to Stop Word Automatically Creating a Horizontal Line
You might not want Word to automatically create a horizontal line when you type three dashes. If that’s the case, here’s how to disable that feature:
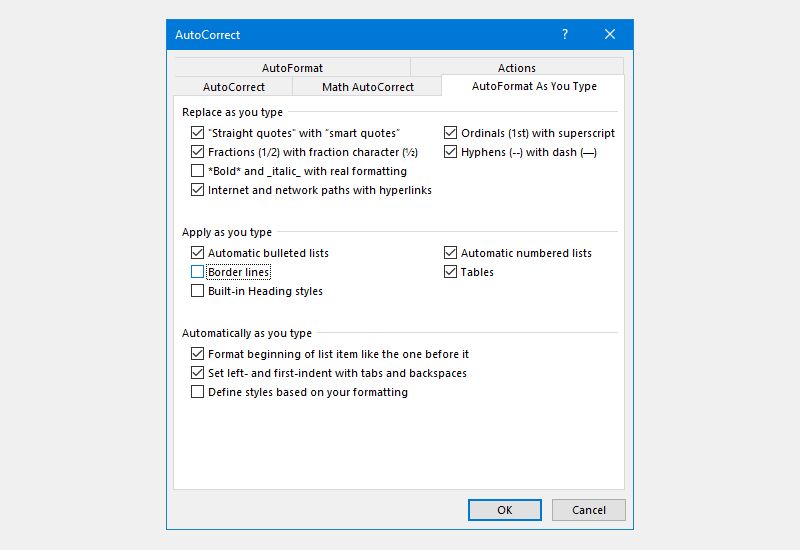
- Go to File > Options > Proofing > AutoCorrect Options > AutoFormat As You Type.
- Beneath Apply as you type, remove the tick from Border lines.
- Click OK.
How to Insert a Horizontal Line in Microsoft Word
If you want an alternative method to insert a horizontal line in Word, and one that is more obvious to delete, here’s how:
- Click where you want to place the line.
- Go to the Home tab in the Ribbon.
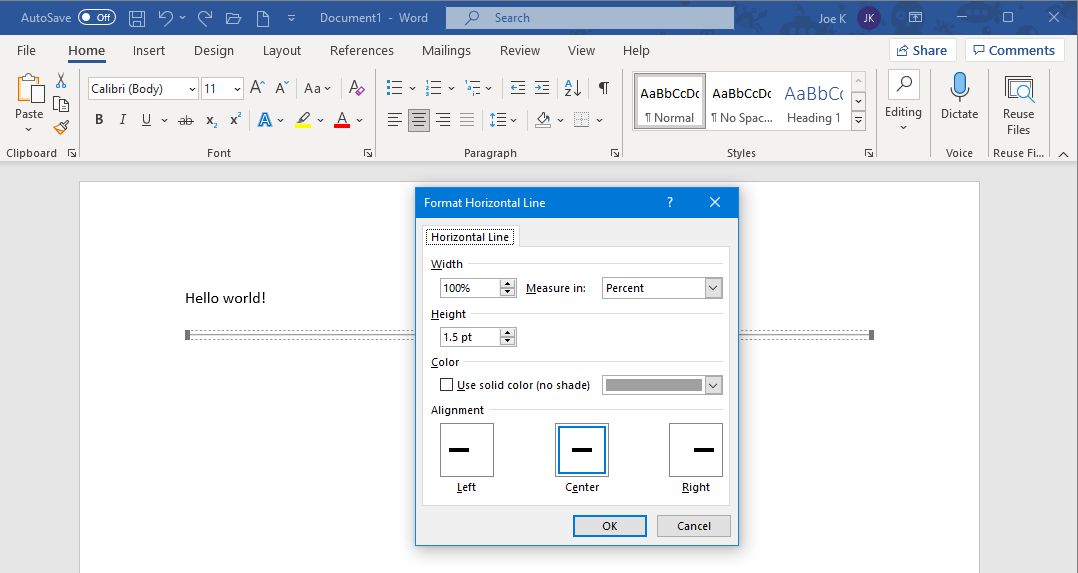
- Within the Paragraph section, click the dropdown arrow next to the Borders icon and select Horizontal Line.
- Double click the newly inserted line to format it, like adjusting width, height, and color.
If you ever need to remove the line, all you need to do is click on it and press the Delete or Backspace key.
There are numerous ways to insert lines into Microsoft Word, so be sure to check them all out.
Now you know how easy it is to remove a horizontal line in Word. This is just the tip of the iceberg when it comes to the great hidden features of Microsoft Word; it has plenty of advanced tools just waiting to be discovered, so don’t be afraid to experiment.
-
Главная
-
TecAngel
-
How to make Dotted and dashed cut lines with scissors in Microsoft Word?
Просмотров: 297

TecAngel
19 марта 2021
Если вам понравилось бесплатно смотреть видео how to make dotted and dashed cut lines with scissors in microsoft word? онлайн которое загрузил TecAngel 19 марта 2021 длительностью 00 ч 03 мин 39 сек в хорошем качестве, то расскажите об этом видео своим друзьям, ведь его посмотрели 297 раз.

Sleepy ash
1 год назад
thankkkss helped me alot :3
Сейчас смотрят

00:03:39
TecAngel
СМОТРЕТЬ
2 года назад
297 просмотров
How to make Dotted and dashed cut lines with scissors in Microsoft Word?
")
00:18:46
Виктор Гордич
СМОТРЕТЬ
3 года назад
2 154 просмотров
ТК Пинск. Выпуск новостей и погода на канале «Мир» (28.03.2020 15:58)

00:15:54
Тепловода-оз
СМОТРЕТЬ
2 года назад
2 194 просмотров
Монтаж печи-камина в каркасном доме с дымоходом через стену

00:01:14
РАЗБОРКА ГРУЗОВИКОВ МАШИНОКОМПЛЕКТЫ
СМОТРЕТЬ
3 года назад
4 377 просмотров
Серия №3 заменил рестайлинговую приборную панели и мультируль на MAN TGA Разборка Грузовиков Тягачей
Смотрите далее

How to Create Dotted or Dashed Cut Lines with Scissors in Word
HOWZA: Office Software
2 года назад

How to Create a Booklet in Microsoft Word
Computergaga
6 лет назад

Creating a Table of Contents in Microsoft Word
Technology for Teachers and Students
3 года назад

Word 2016 — Page Break — How to Insert Do Use Add Put and Make Breaks in Pages — Inserting in MS 365
Professor Adam Morgan
3 года назад

Word Dotted and dashed cut lines with scissors
Vishap TVplus
3 года назад

How to Create a Long Line in Microsoft Word : Tech Vice
eHowTech
9 лет назад

Excel: Convert number to percentage without multiplying by 100
TecAngel
2 года назад

How to resize multiple images at once in Microsoft Word?
TecAngel
2 года назад

How can I make an image fill a whole page on Microsoft Word?
TecAngel
2 года назад

Historical timeline template — Google docs -How to?
TecAngel
3 года назад

How to double space in google docs on a Chromebook?
TecAngel
2 года назад
.")
Drag and drop a picture into Word Document (Easily — WITHOUT picture distortion).
Lisa Doe
8 лет назад

Creating a Simple Flowchart in Microsoft Word.
Floyd Jay Winters
1 десятилетие назад
Популярные видео
")
BMW сломалась. Спасаем Славин кошелек

9 часов назад

Как Ходили родители в ШКОЛУ!
14 часов назад

Женский Форум #28 | Дима Позов
13 часов назад

Устроился на работу в БАНЮ, а тут призраки какие-то..
1 день назад

Who is More Stupid? #tiktok #sigmagirl #funny
11 часов назад
")
Подземелья Чикен Карри #17 Демонизация (Мягкова, Смирнов, Кукушкин, Гудков, BRB)
12 часов назад

Шоу Иды Галич ЕСТЬ ВОПРОСИКИ — Карина Кросс. Про Тимати, развод и новые отношения.
11 часов назад

머리 자른다
13 часов назад

Женя Лизогуб и Милана Некрасова СМОТРЯТ ЛАЙК. ЗАСМЕЯЛСЯ- ПЕРЕВЕЛ ДЕНЬГИ ПОДПИСЧИКУ
12 часов назад

Гордей и Жекич — СКОЛЬКО ПОТЕРЯЛИ ДЕНЕГ.
1 день назад
![Lp. Голос Времени #54 МАЛЕНЬКАЯ ДЕВОЧКА [Страх] • Майнкрафт](https://pic.epicube.su/XGDope55E7Y/lp-golos-vremeni-54-malenykaya-devochka-strah-maynkraft.webp "Lp. Голос Времени #54 МАЛЕНЬКАЯ ДЕВОЧКА [Страх] • Майнкрафт")
Lp. Голос Времени #54 МАЛЕНЬКАЯ ДЕВОЧКА [Страх] • Майнкрафт
10 часов назад

Handalak — Munisa Rizayevani yertib qo’yibdi
12 часов назад

САМЫЙ ВЫСОКИЙ И ОПАСНЫЙ ВУЛКАН АФРИКИ КИЛИМАНДЖАРО feat Дима Масленников
10 часов назад

ДОМ в КАМНЕ. Я ПОСТРОИЛ МВК БУНКЕР ОБМАНКУ в РАСТ / RUST
10 часов назад
")
SHAMAN — МЫ (музыка и слова: SHAMAN)
1 день назад

Manually removing extra blank lines from a Microsoft Word document is tedious. Luckily, a feature built into Word can remove all empty lines at once. Here’s how to do it.
How Blank Lines Work in Microsoft Word
Microsoft Word adds a hidden tag (called a “paragraph tag”) to the end of each line whenever you hit Enter. You can see these tags in your document by clicking the paragraph icon (which looks like a backward “P” with two lines) in the “Home” tab of Word.

Using “Find and Replace” in Word, you can replace those double paragraph tags with a single tag. That removes the extra empty lines from your document.
How to Delete Extra Blank Lines in a Word Document
To start removing empty lines, open your document with Microsoft Word. Click “Home” in the menu and then select “Replace” on the right of the screen.
The “Find and Replace” window will open. Click the “Find What” box and type this:
^p^p
Each “^p” is a special code that stands for the paragraph tag. We’re going to replace instances of two-paragraph tags in a row with a single paragraph tag. In the “Replace With” box, type this:
^p
Then click “Replace All” at the bottom of the window.
After you click, all the blank lines will be removed from your document. When you see the confirmation pop-up, click “OK.”
If you still see any blank lines, that’s because there were more than two consecutive blank lines in place. In this case, click “Replace All” in the “Find and Replace” window again until all the extra lines are removed (or you can experiment with the number of “^p” codes that you find and replace until your needs are met).
When you’re all done, close the “Find and Replace” window. If you ever get annoyed with horizontal lines automatically appearing in Word when you type certain characters, you can replace those, too.
RELATED: How to Remove Automatic Horizontal Lines in Word
READ NEXT
- › How to Adjust and Change Discord Fonts
- › HoloLens Now Has Windows 11 and Incredible 3D Ink Features
- › The New NVIDIA GeForce RTX 4070 Is Like an RTX 3080 for $599
- › BLUETTI Slashed Hundreds off Its Best Power Stations for Easter Sale
- › Google Chrome Is Getting Faster
- › This New Google TV Streaming Device Costs Just $20
How-To Geek is where you turn when you want experts to explain technology. Since we launched in 2006, our articles have been read billions of times. Want to know more?