
In Word for Mac, you can choose a predefined paper size from a list and change the paper size for all pages in your document, for a specific page, or for a specific section. You can also change the default paper size used for new documents.
When you create a new document, Word applies the default paper size and margins that are stored in a template (normal.dotm). If you frequently use a paper size that differs from the default size (for example, US Legal), you can set new defaults that Word uses when you create a new document. If your current document is set up with the margins that you want, you can use this document to set your new default margins.
In Word 2016 for Mac, you can also create a custom paper size and you can choose different paper sources for pages in your document. Choosing different paper trays allows you to use different paper for your first page, which could be a different color or heavier weight than the other pages.
-
On the File menu, click Page Setup.
-
In Page Setup, select a size from the Paper Size list.

If you select Manage Custom Sizes from the list, you can define a custom paper size; click the plus sign to create a new paper definition, and then enter sizes for width, height, and non-printable area.
-
When you have finished selecting your paper size, click OK.
-
Select the text on the pages that you want to change.
-
On the Format menu, click Document > Page Setup.
-
Select a paper size from the Paper Size list, and then click OK.
-
On the Document page, on the Apply to list, click Selected text, and then click OK.
Word inserts section breaks as needed before and after the text that you selected and changes the paper size for that section.
-
On the View menu, click Print Layout.
-
To display nonprinting characters, such as paragraph markers (¶), click Show all nonprinting characters
on the Home tab. -
Select the section break for the section that you want to change.
-
On the Format menu, point to Document, and then click Page Setup.
-
On the Paper Size list, select a paper size and then click OK.
-
On the Apply to list, click Selected sections.
 on the Home tab.
-
On the Format menu, click Document.
-
Click Default, and then click Yes.
Note: If you change the preferred paper size or margins for the template that Word bases new documents on (normal.dotm), all future documents that use the normal.dotm template use the new settings. If you change the preferred paper size or margins for a document that is based on another template, only new documents that are based on that template use the new settings.
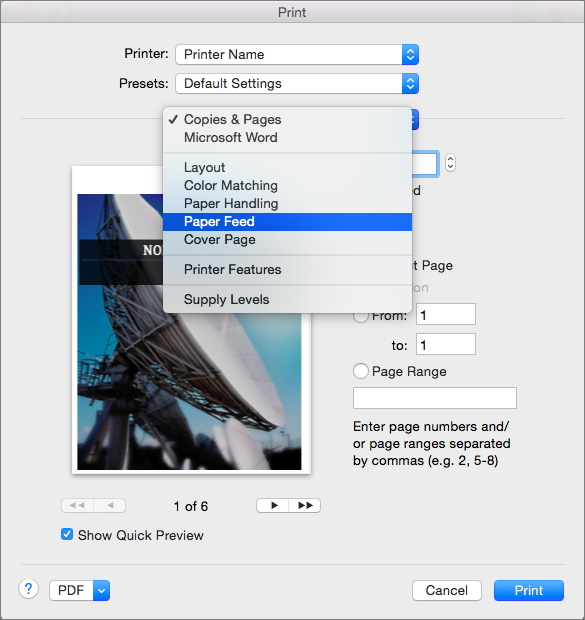
Choose a paper source for your document’s first page, and then for all subsequent pages. The list of available sources is provided by the printer driver on your computer and may be different from those shown here.
If a page source is set to Auto Select, Word will automatically choose a paper source based on the size of the page and the information about paper sizes provided by your printer driver.
-
On the File menu, click Print.
-
In Print, select Paper Feed.
Word displays Paper Feed settings.
-
To specify a paper source for the first page in your document, select First Page From, and then select a source from the First Page From list.
-
To change the paper source for all pages in your document after the first page, select a source in the Remaining From list.
-
If you are ready to print, click Print.
Otherwise, change Paper Feed to another category of settings to make additional changes.

-
On the Format menu, click Document.
-
Click Page Setup.
-
On the Paper Size pop-up menu, select a paper size.
-
Click OK.
-
On the Apply to pop-up menu, click Whole document, and then click OK.
-
Select the text on the pages that you want to change.
-
On the Format menu, click Document.
-
Click Page Setup.
-
On the Paper Size pop-up menu, select a paper size.
-
Click OK.
-
On the Apply to pop-up menu, click Selected text, and then click OK.
Word inserts section break as needed before and after the text that you selected and changes the paper size for that section.
-
On the View menu, click Print Layout.
-
To display nonprinting characters, such as paragraph markers (¶), click Show all nonprinting characters
on the Standard toolbar. -
Select the section break for the sections that you want to change.
-
On the Format menu, point to Document, and then click Page Setup.
-
On the Paper Size pop-up menu, select a paper size.
-
Click OK.
-
On the Apply to pop-up menu, click Selected sections.
-
On the Format menu, click Document.
-
Click Default, and then click Yes.
Note: If you change the preferred paper size or margins for the template that Word bases new documents on (normal.dotm), all future documents that use the normal.dotm template use the new settings. If you change the preferred paper size or margins for a document that is based on another template, only new documents that are based on that template use the new settings.
See also
Print a document
Insert, delete, or change a section break
Use headers and footers
Need more help?
Want more options?
Explore subscription benefits, browse training courses, learn how to secure your device, and more.
Communities help you ask and answer questions, give feedback, and hear from experts with rich knowledge.
You can use Microsoft Word to create documents in different formats and sizes. You can choose from the standard sizes built into Word. The other possibility is to customize the dimensions according to your requirements.
By default, a new Word document uses an A4 size sheet, measuring 8.27 inches by 11.69 inches. Schools and offices use the A4 size most for printing presentations. But documents can be larger or smaller in comparison to A4. Also, the user might want to change the page size of the document for printing.
It is always possible to print on a larger paper using a special printer setting. But if your printer does not allow that, the only option is to change the size of the document in Word.
The process is very simple and you only have to follow the steps in our instructions. You can change the size of all the pages while working on a Microsoft Word document. Sometimes, you may want to change the size of a specific page inside a document.
Thus, you may set up a custom page size for:
- All pages in a document
- Specific pages in a document
We will show you both the methods.
Let us begin.
Method #1: Custom page size for all pages in a document.
Step #1: Open the document
Open the Word document for which you want to change the page size. The document could be new or an existing one. The process is the same for both.
Click on the Layout tab on the top menu bar to change the ribbon.

Step #2: Select a standard page size
In the Page Setup section, click on the Size icon. This will open various selections for page size.

You can select from standard sizes like:
- Letter (8.5” x 11”)
- Tabloid (11” x 17”)
- Legal (8.5” x 14”)
- Statement (5.5” x 8.5”)
- Executive (7.25” x 10.5”)
- A3 (11.69” x 16.54”)
- A4 (8.27” x 11.69”)
- A5 (5.83” x 8.27”)
- B4(JIS) (10.12” x 14.33”)
- B5(JIS) (7.17” x 10.12”)
Step #3: Select a non-standard page
Click on More Paper Sizes. This will open the Page Setup dialog.

Click on the Paper tab.
Under Paper size, click on the downward arrow. Scroll down and click on Custom Size.
Enter your desired Width and Height of the page in inches.
Click on the downward arrow next to Apply to:. Word offers two options:
- Whole document—The page size applies to all the pages in the document.
- This point forward—The page size applies to all pages following the cursor.
Click on Whole document.
Click on Ok to exit the dialog.
Word changes all the pages in your document to your custom size.

Method #2: Custom page size for specific pages in a document
Step #1: Open the document
Click on the View tab on the top menu bar to change the ribbon.
Step #2: Increase the number of pages on display
In the Zoom section, click on Multiple Pages.

Drag the Zoom slider in the bottom right-hand corner of your screen to the left side.

This will increase the number of pages Word is displaying on the screen.

Place the cursor at the beginning of the page you want to change.
Step #3: Change the page size
Click on the Layout tab in the top menu bar to change the ribbon.
In the Page Setup section, click on Size.

This will open various selections for page size.

Click on More Paper Sizes. This will open the Page Setup dialog.

Click on the Paper tab.
Under Paper size, click on the downward arrow. Scroll down and click on Custom Size.
Enter your desired Width and Height of the page in inches.
Click on the downward arrow next to Apply to:. Word offers two options:
- Whole document—The page size applies to all the pages in the document.
- This point forward—The page size applies to all pages following the cursor.
Click on This point forward.
Click on Ok to exit the dialog.
Word changes the size according to your choice for all pages following the cursor.

Step #4: Revert to original page size for the rest of the document
Place the cursor at the beginning of the page from where you want to revert to the original size.
Repeat Step #3, only this time enter the original Width and Height of the pages.
Word changes the rest of the pages in the document to their original size.

Conclusion
We have shown you how to change to a custom page size for all pages or for a few pages of your document. Follow our instructions step by step for easily implementing the change in page size.
If you want to learn how to setup custom page size in Google Doc, check out this tutorial.
Changing the Paper Size in Word
You aren’t tied to letter-size paper and documents in Word
Updated on January 4, 2021
What to Know
- Mac: Go to File > Page Setup, choose Page Attributes from the drop-down menu, then set the Paper Size.
- Word 365: Go to File > Print > Page Setup, select the Paper tab, then set the Paper Size.
- If you don’t see the size you want, select Custom or Manage Custom Sizes to set your own margins and define a nonprintable area.
This article explains how to change paper size in Word. Instructions apply to Word for Mac and Microsoft 365.
How to Change a Document Paper Size for Printing
You can change a document paper size for a new file or for an existing one.
-
Open a new or existing file in Microsoft Word.
-
On a Mac, choose the File menu and select Page Setup.
-
In Word 365, choose File.
-
Select Print in the left pane, then click the Page Setup link at the bottom of Settings.
-
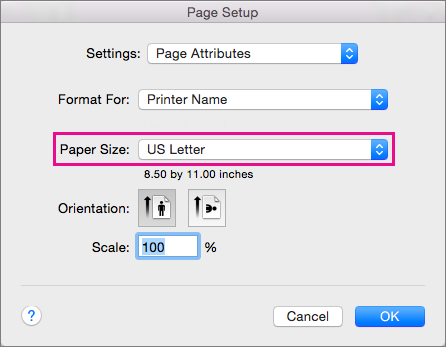
On a Mac, when the Page Setup dialog box appears, it should be set on Page Attributes. If not, click the drop-down selector at the top of the box and select Page Attributes.
-
For Word 365, you may need to click the Paper tab at the top of the dialog.
-
Using the drop-down menu next to (or under) Paper Size, select the size paper you want from the available options. When you make a selection, the Word document on-screen changes to that size. For example, if you pick US Legal on the menu, the document size changes to 8.5 by 14.
Paper Size Limitations in Word
For U.S. versions of Microsoft Word, the default paper size is 8.5 inches by 11 inches. While you probably print most of your letters, reports, and other documents on this size paper, changing the page size in Word to use a different-size paper is a straighforward task.
Word does not place many limitations on page size or orientation. There is a good chance that your printer sets greater limitations on the paper you use than Word does, so before you make any changes to the page size, you should consult your printer documentation. It may save you a lot of frustration in the long run.
How to Set Up a Customized Paper Size
If you don’t see the size you want in the drop-down menu, set up any specific size you want.
-
On Mac and non-Microsoft 365 versions of Word, click Manage Custom Sizes at the bottom of the list of paper size options.
-
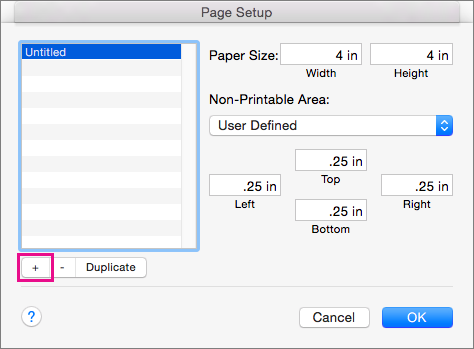
Click the plus sign to add a new customized size. The fields populate with the default measurements, which you will change.
-
Highlight untitled in the customized size list and change the name to something you’ll remember or recognize by typing over it.
-
Click in the field next to Width and enter a new width. Do the same in the field next to Height.
-
Set a Non-Printable Area by choosing User Defined and filling in the margin amounts in the Top, Bottom, Left, and Right fields. You can also select your printer to use its default non-printing areas.
-
Click OK to return to the Page Setup screen.
-
Select Other or the name you gave the customized size in the drop-down paper size menu. Your document changes to that size on the screen.
Word 365 is a bit different. Set the Paper size to custom, and then set the various parameters in the Paper, Margins, and Layout tabs. Then Click OK.
If you enter a paper size that the chosen printer cannot run, the name of the customized paper size is grayed out in the paper size drop-down menu.
Thanks for letting us know!
Get the Latest Tech News Delivered Every Day
Subscribe
In Microsoft Word, there are four main snap-in regions: Styles, Tables, Headings and Pop-ups. These areas could be personalized with text, picture or custom paper. By clicking the right Paper Size button, you may open the Styles dialog box. Pick the desired style from the Available Styles dialog box. You can even modify the fashions of the present document by choosing New Style from the Available Styles dialogue box.
Then, click the Customize button to input custom paper to the specified regions of the webpage. When finished, click on the Save button to store your changes. To preview your habit and pressed on the ideal arrow button, you will see the changes happening in real time. You could even use the arrows to move your cursor around the page and set the width and height as required.
There are four main categories of custom document for Microsoft Word which you can personalize and set as your default or custom document types. These include Bold, rial, Helvetica and Times New Roman. You can also alter your fonts and colours at the identical time, if you like.
If you’re using computers using Microsoft Word for years and your printer doesn’t support all the available custom paper sizes, you may have to improve your printer drivers. Upgrading the printer driver automatically upgrades your custom paper sizes. There is a website that provides free printer driver updates together with brand new printer cartridges. Or, you can contact the manufacturer of your printer to purchase the printer driver software which will make it feasible to upgrade your printer. Some older printers ask you to reinstall and uninstall the printer driver before you can use all of the available custom paper sizes. Some of these older printers support custom paper sizes through USB or parallel port devices.
To change the custom paper size in Microsoft Word, choose»View» in the primary menu, and then click»Tools». In the»ayers» section, click on»Style», and then click»Desk». Change the size as desired. To alter the shape, click» Sketch» on the left-hand , and then click»abanner» on the right hand side. A small arrow appears on the toolbar of this sketch instrument, and you can click on it to start a silhouette dialog box.
Among the most recent technologies provided by Microsoft Office is known as Officeomi. With this technology, a ribbon is provided on the display for controlling the printing, trimming and binding of documents. If affordable papers your printer doesn’t have this feature yet, you will be able to see a mock up of the custom paper sizes which you want to utilize. Microsoft Office also provides third party software packages which allow third-party custom program integration using Word.
When you’re ready to change the paper size of a Word file, open the document and navigate to the “Page Setup” group in the “Layout” tab. Here, click “Size.” A drop-down menu appears in which you see a generous list of paper sizes. Just select an option from this list to change the paper size of the entire document.
Contents
- 1 How do you resize a Word document?
- 2 Why can’t I change paper size in Word?
- 3 How do I resize a document?
- 4 How do I make my Word document smaller in size?
- 5 How do I change 11×17 to 8.5 x11 in Word?
- 6 How do I make a Word document 8.5 x11?
- 7 How do I shrink 11×17 to 8.5 x11 PDF?
- 8 Is 8.5 x11 the same as 11×17?
- 9 Is A4 the same as 8.5 x11?
- 10 Is 8.5 x11 long or short?
- 11 Is 8.5 x11 a standard paper?
- 12 How do you change paper size to 11×17 in Word?
- 13 How do I make a PDF 8.5 x11?
- 14 Is letter the same as 8.5 x11?
- 15 Is A5 the same as 8.5 x11?
- 16 Is 8.5 x11 long bond paper?
- 17 What is 8.5 by 11 paper called?
- 18 What is half of 8.5 x11 paper?
- 19 How do I change my default paper size to A4?
- 20 Do they make 8.5 x11 frames?
How do you resize a Word document?
Word also allows you to customize the page size in the Page Setup dialog box.
- From the Page Layout tab, click Size. Select More Paper Sizes… from the drop-down menu.
- The Page Setup dialog box will appear.
- Adjust the values for Width and Height, then click OK.
- The page size of the document will be changed.
Why can’t I change paper size in Word?
Go to the “Page Layout” tab and check the “Size” button. Your selected size should now be applied to the document. Just for clarity, opening existing documents will not update their page size to the newly selected page size.
How do I resize a document?
How to resize a PDF online:
- To start, drop your PDF file or upload it from your device or your cloud storage service.
- Select the size of your document in the drop-down menu.
- If you choose custom size, you need to enter the dimensions for height and width, in inches or millimeters.
- Click on the Resize button.
How do I make my Word document smaller in size?
Scaling Your Output
- Load the document you want to print.
- Press Ctrl+P. Word displays the Print dialog box.
- Use the Scale to Paper Size drop-down list (lower-right corner) to specify the paper on which your document will be printed.
- Specify any other printing options, as desired.
- Click on OK to print your document.
How do I change 11×17 to 8.5 x11 in Word?
At File | Print (Ctrl+P), click the arrow beside 1 Page Per Sheet and then Scale to Paper Size. The menu that opens will depend on the selected printer but should include Letter. Choose that.
How do I make a Word document 8.5 x11?
Word’s default paper size is “Letter,” which is 8.5 x 11 inches. If you use a different size more frequently than the default, you can change the default size of all new documents. This way, you won’t have to change the paper size of each new document you create. To do this, go to Layout > Size > More Paper Sizes.
How do I shrink 11×17 to 8.5 x11 PDF?
Here is my klugey solution:
- Print the file to the Adobe PDF maker.
- For “Page Sizing & Handling”, select “Poster”. I set the Overlap to 0 in, and reduced the scale until each 11×17 page fit onto two 8.5×11 pages.
- Click “Print” and save to a new file.
Is 8.5 x11 the same as 11×17?
8.5×11 (letter size) 8.5×14 (legal size) 11×17 (tabloid size)
Is A4 the same as 8.5 x11?
A4 Paper is a standardized copy paper size established by the International Standards Organization. The paper dimensions are 210 x 297 mm. Throughout Europe and the world A4 is the close equivalent to U.S. letter size (8.5″ x 11″), but measuring 8.27 x 11.69 inches.These sizes are standard worldwide.
Is 8.5 x11 long or short?
The short bond paper size in inches is 8.5″ x 11″. The short bond paper size in centimeters is 21.59 cm x 27.94 cm.
Is 8.5 x11 a standard paper?
As offices became increasingly mechanized with the introduction of the typewriter, photocopier and printer, the need for paper at a fixed size grew, and 8.5 x 11 inches became standard “letter” paper.
How do you change paper size to 11×17 in Word?
How to Set Up an 11X17 Document in Word
- Open Microsoft Word.
- Click the “Page Layout” tab.
- Click “Size” in the “Page Setup” group, and select “Ledger 11″ x 17.” The Word document automatically changes to reflect the new size.
How do I make a PDF 8.5 x11?
Open up the Crop tool (Tools>Pages>Crop) and first select to “Change Page Size” to a custom size of 8.5″x11. 7″ – this will create a page that is as wide as a letter sized page, and as tall as an A4 sized page. Select to “Center” the page content. Apply this to all pages.
Is letter the same as 8.5 x11?
In 1995, the American National Standards Institute adopted the ANSI/ASME Y14. 1 standard. The different formats of this system are denoted by ANSI followed by a letter.
North American Sizes.
| Format | Size in Inches | Size in Millimeters |
|---|---|---|
| Letter | 8.5 × 11 | 216 × 279 |
| Legal | 8.5 × 14 | 216 × 356 |
| Tabloid (Ledger) | 11 × 17 | 279 × 432 |
Is A5 the same as 8.5 x11?
A5 Size. Letter size paper is 8.5 x 11 inches (215.9 x 279.4 mm), whereas A5 size paper is 5.8 x 8.3 inches (138 x 210 mm).
Is 8.5 x11 long bond paper?
The long bond paper size in inches is 8.5″ x 13″.The long bond paper size in millimeters (mm) is 215.9 mm x 330.2 mm.
What is 8.5 by 11 paper called?
Letter
Office paper sizes as Letter, Legal, Tabloid and more.
Instead paper formats like “Letter” (8.5 x 11 inches), “Legal” (8.5 x 14 inches), “Executive” (7 x 10 inches), and “Ledger/Tabloid” (11 x 17 inches) are widely used.
What is half of 8.5 x11 paper?
Half Fold/Bi-fold –
Final folded size (8.5×11 sheet) is 5.5×11.
How do I change my default paper size to A4?
- control panel.
- Device and Printers.
- right click on your printer.
- Printer properties.
- Device settings.
- change tray 1 to A4 and change manuale feed to A4 insted of Letter.
Do they make 8.5 x11 frames?
Americanflat 8.5×11 Diploma Frame in Black with Shatter Resistant Glass – Horizontal and Vertical Formats for Wall and Tabletop.