You can use WordArt with a Transform text effect to curve or bend text around a shape. If you want the text to circle the shape, you can also do this, but it’s a little bit more work. You can also insert WordArt multiple times to wrap text around shapes with straight edges.
-
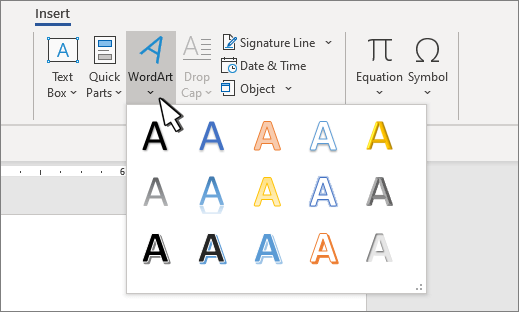
Go to Insert > WordArt, and pick the WordArt style you want.
Note: The WordArt icon is located in the Text group, and it may appear different depending on the version you’re using and the size of your screen. The icon may also look like this
or
.
-
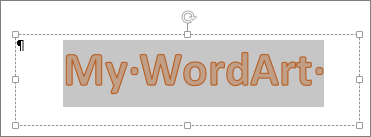
Replace the WordArt placeholder text with your own text.
-
Select your WordArt text.
-
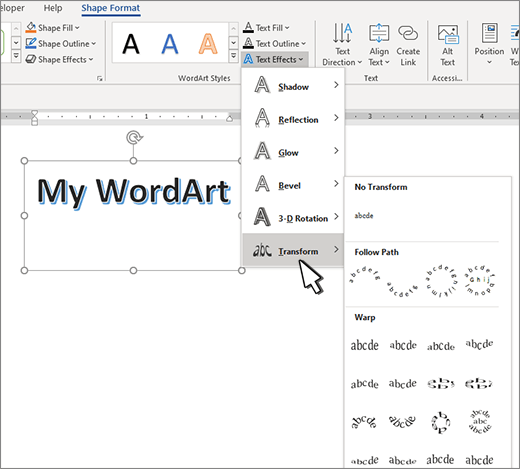
Go to Shape Format or Drawing Tools Format, select Text Effects >Transform and pick the look you want.
Note: Depending on your screen size, you might only see the icons for WordArt Styles.
Advanced techniques
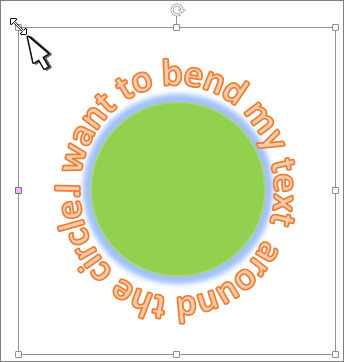
Wrap around a circle To create text that completely circles your shape, choose Circle under Follow Path, and then drag any of the sizing handles until your WordArt is the size and shape you want.
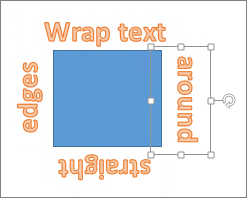
Wrap around straight edges To wrap text around a shape that has straight edges, such as a rectangle, insert WordArt objects for each edge. In this example, WordArt is inserted four times, one for each side of the shape.
Group moves and copy To move or copy multiple WordArt objects as a single shape, see Group or ungroup shapes, pictures, or other objects .
Precise angle control You can control the angle of your WordArt text in relation to your shape with precision by using the Rotate tool.
If you need very precise control or are creating a complex combination of shapes and text, you’ll want to use a third-party drawing or graphics program to create the text around your shape and then copy and paste it into your Office document.
See Also
Add shapes
Insert WordArt
Create curved or circular WordArt
-
Go to Insert > WordArt.
-
Pick the WordArt style you want.
-
Type your text.
-
Select the WordArt.
-
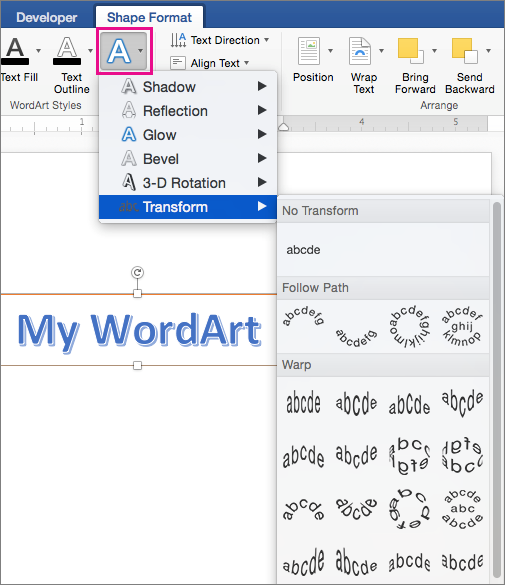
Go to Shape Format > Text Effects > Transform and pick the effect you want.
Advanced techniques
Wrap around a circle To create text that completely circles your shape, choose Circle under Follow Path, and then drag any of the sizing handles until your WordArt is the size and shape you want.

Wrap around straight edges To wrap text around a shape that has straight edges, such as a rectangle, insert WordArt objects for each edge. In this example, WordArt is inserted four times, one for each side of the shape.

Group moves and copy To move or copy multiple WordArt objects as a single shape, see Group or ungroup shapes, pictures, or other objects .
Precise angle control You can control the angle of your WordArt text in relation to your shape with precision by using the Rotate tool.
If you need very precise control or are creating a complex combination of shapes and text, you’ll want to use a third-party drawing or graphics program to create the text around your shape and then copy and paste it into your Office document.
In Word for the web you can see WordArt that’s already in your document, but to add more WordArt you need to open or edit the doc in the desktop version of Word.
You can use the Font features on the Home tab to change the font color and size, and apply bolding, italics, or underlines to your text.
Use the WordArt feature to bend and shape words
Updated on February 6, 2021
What to Know
- Use Transform in Text Effects to curve text as you wish.
- Text Effects is part of Microsoft Word’s Word Art Feature.
This article demonstrates how to bend words into an arch or around a shape or image in Word for Microsoft 365, Word 2019, Word 2016, Word 2013, and Word for Mac 2016 and 2011.
How to Curve Text With WordArt
Microsoft Word uses the WordArt feature to curve text:
-
Open a Word document and select Insert > WordArt.
You can also select the WordArt icon from the toolbar. It looks like a capital letter A. However, the icon’s appearance and location vary depending on the version and platform.
-
In the WordArt menu, choose the WordArt style you want. Placeholder text appears in the document. Type your text over the placeholder text.
-
Select the text to display the Drawing Tools tab.
-
Go to either the WordArt Styles or Text Styles group, then select Text Effects, which is represented by a blue and white letter A.
In Word 2016, Text Effects displays when you hover the mouse cursor over it. In earlier versions, it’s clearly labeled.
-
Select Transform.
-
From the submenu, choose from a variety of effects, including curved and bent text. Select an option to apply it to the text.
How to Undo Curved Text
To remove a curved or bent text effect without deleting your text:
-
Select the curved or bent text you want to modify.
-
Select Text Effects.
-
Select Transform > No Transform. The curved or bent text transformation effect is removed.
Thanks for letting us know!
Get the Latest Tech News Delivered Every Day
Subscribe
На чтение 5 мин Просмотров 5.3к.
Большинство пользователей владеют базовыми функциями текстового редактора Microsoft Word. Однако мало кто знает о полном наборе функций и возможностей. В программе можно редактировать тексты, не только по содержанию, но и по внешнему стилю: расположить его по кругу, вертикально или изогнуть, наложить на изображение и многое другое.
В этой пошаговой инструкции вы узнаете, как сделать текст полукругом.
Делаем текст полукругом через фигуры
Если вам нужно сделать для логотипа, листовки, объявления или какого-то шаблона заготовку с полукруглым текстом, то для этого необязательно для этого устанавливать тяжеловесные программы для дизайнеров.
Для того, чтобы сделать полукруглый текст в ворде, вам нужно:
- Запустить программу и создать документ.
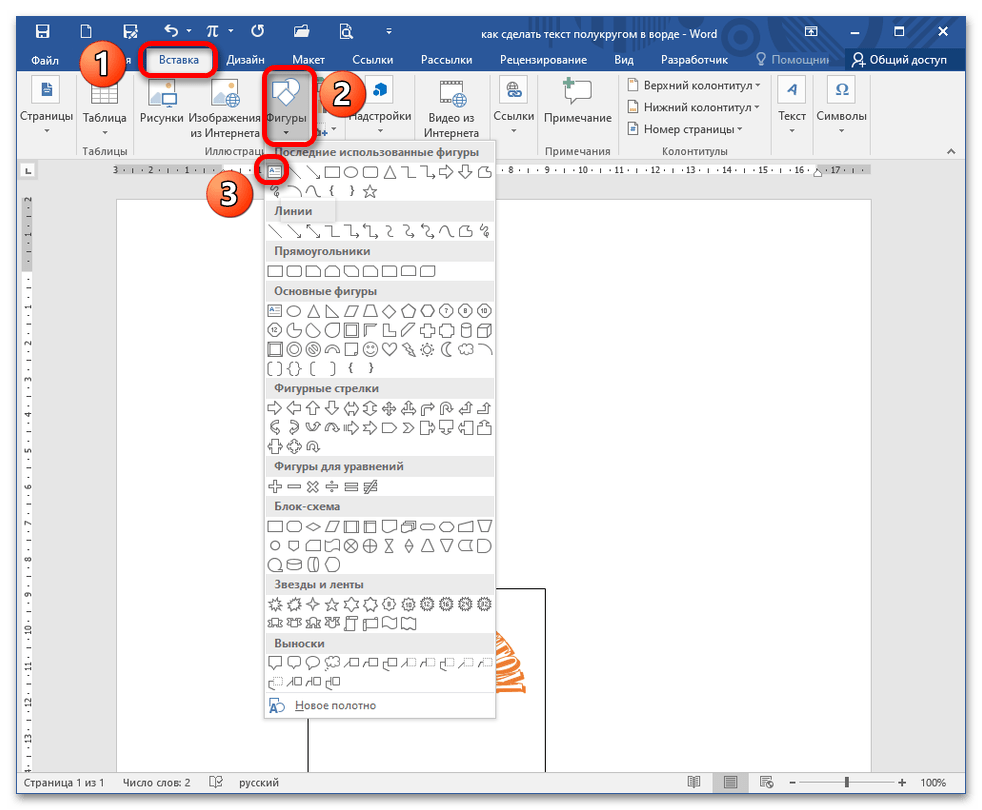
- Перейти в верхнюю панели на раздел «Вставка» и найти строку «Фигуры».
- В открывшейся вкладке нажимаете на значок «Надпись» – расположен в начале списка.
- На рабочем поле вы увидите вместо курсора – крестовину. С помощью нее создаете рабочую область в виде прямоугольника или квадрата нужного размера.
- Вписываете в него текст.
- Жмете на рамку и используете параметр «Контур фигуры» (находится в разделе «Формат»).
- Устанавливаете строку «Нет контура».
- Теперь работаете со стилем текста. Выделяете его мышкой, заходите в раздел «Формат», затем в «Текстовые эффекты».
- В окне ищем строку «Преобразовать», затем жмем на «Траектория движения».
- Выбираете нужный параметр (один из видов дуги).
- Изменяя размеры текста, вы меняете уровень «крутизны» полукруга.
- Нажав мышкой на круг со стрелкой над надписью, вы меняете наклон изображения.
https://www.youtube.com/watch?v=IlY4lJNP3Gs
https://programmainfo.ru/test/volga-ili-pobeda-a-ty-znakom-s-sovetskim-avtopromom-prover-sebya-v-uvlekatelnom-teste
Как в Ворде сделать текст полукругом
Если вы делаете не просто текст полукругом, а хотите поместить надпись внутри объекта по кругу, модель действий будет немного другая.
Прежде всего нужно создать фигуру, на которую будете наносить текст. Для этого:
- Открываете Ворд и создаете документ.
- В верхней панели инструментов переходите по разделам: «Вставка»-«Фигуры».
- Жмете на овал и нажав левой кнопкой мыши на экран рисуете его нужного размера. Чтобы получился круг в момент изменения размера овала, нажимаете «Shift». Можете менять стиль фигуры, цвет, прозрачность и контур.
- Два раза жмете на объект и идете в раздел «Формат».
- Ищите строку «Вставка фигур»-«Надпись» и нажимаете на круг или овал.
- Вставляете нужный текст.
- С помощью настроек стиля можно изменить вид текста.
- Убираем поле вокруг текста. Жмете на него и ищите пункт «Заливка» выбираете параметр «Нет заливки», аналогично убираем контур.
- Переходите в раздел «Стили WordArt» и жмете на строку «Текстовые эффекты».
- Выбираете графу «Преобразовать»
Обращаем ваше внимание, что иногда текста может не хватить на всю фигуру. Тогда его нужно либо дополнить, либо уменьшить сам круг или увеличить шрифт/размер пробелов. Тогда полукруглый текст станет красиво выглядеть
- После наведя курсор мышки на зеленый круг над фигурой, вы можете увеличить изогнутый текст до нужных размеров.
https://programmainfo.ru/test/otlichish-krinzh-ot-krasha
Сделать полукруглый текс функцией “WordArt”
Решая вопрос, как сделать текст полукругом, вам может не хватить описанных выше стандартных эффектов и параметров настройки. Для этого в Word есть специальные инструменты. Один из них работа с объектом WordArt.
С помощью этого инструмента и параметра «Преобразовать текст» вы сможете выполнить полукруглый текст или повернуть его вокруг фигуры.
Еще один секрет в работе с этим объектом – при многократном добавлении – вы сможете добиться обтекания надписи вокруг фигур.
- Открываете Word, создаете документ и переходите в раздел «Вставка».
- Кликаете по строке «WordArt».
- Нажимаете на один из стилей.
- Вводите свою надпись и выделяете ее.
- Ищите вкладку «Формат»-«Текстовые эффекты»-«Преобразовать». В выпавшем окне кликаете по тому виду, который вам нужно создать.
https://programmainfo.ru/test/kakoy-ty-instrument
В материале мы рассказали о разных путях создания текста по кругу или полукругу в обычном текстовом редакторе Word. Потратив на это не более десяти минут, вы сможете изогнуть текст в ворде или полностью сделать надпись или логотип полукруглым. Вам не понадобятся дополнительные программы и специальные знания в области дизайна.
Скворцов Михаил
Специалист программирования компьютерных систем и устройств на базе ОС «Android»
Задать вопрос эксперту
( 1 оценка, среднее 5 из 5 )
В MS Word доступен единственный способ написания текста по кругу, полукругу или заданной траектории.
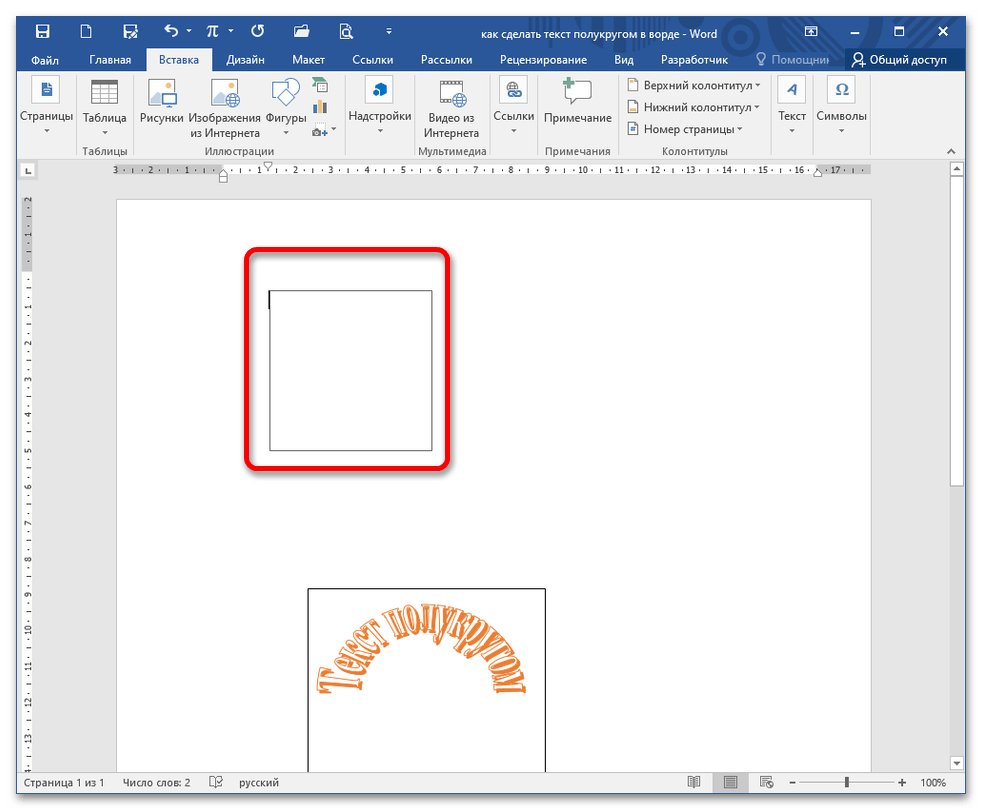
- Откройте документ, определите местоположение фигуры и установите курсор. Перейдите на вкладку «Вставка», раскройте блок «Фигуры» и выберите инструмент «Надпись».
Подробнее: Создание надписей в Microsoft Word
- Задайте размер фигуры, желательно выполнить в виде квадрата (в таком случае запись действительно расположится полукругом, а не полуовалом, как в случае с прямоугольником). Впишите необходимый текст и выделите квадрат кликом (курсор приобретает вид снежинки).
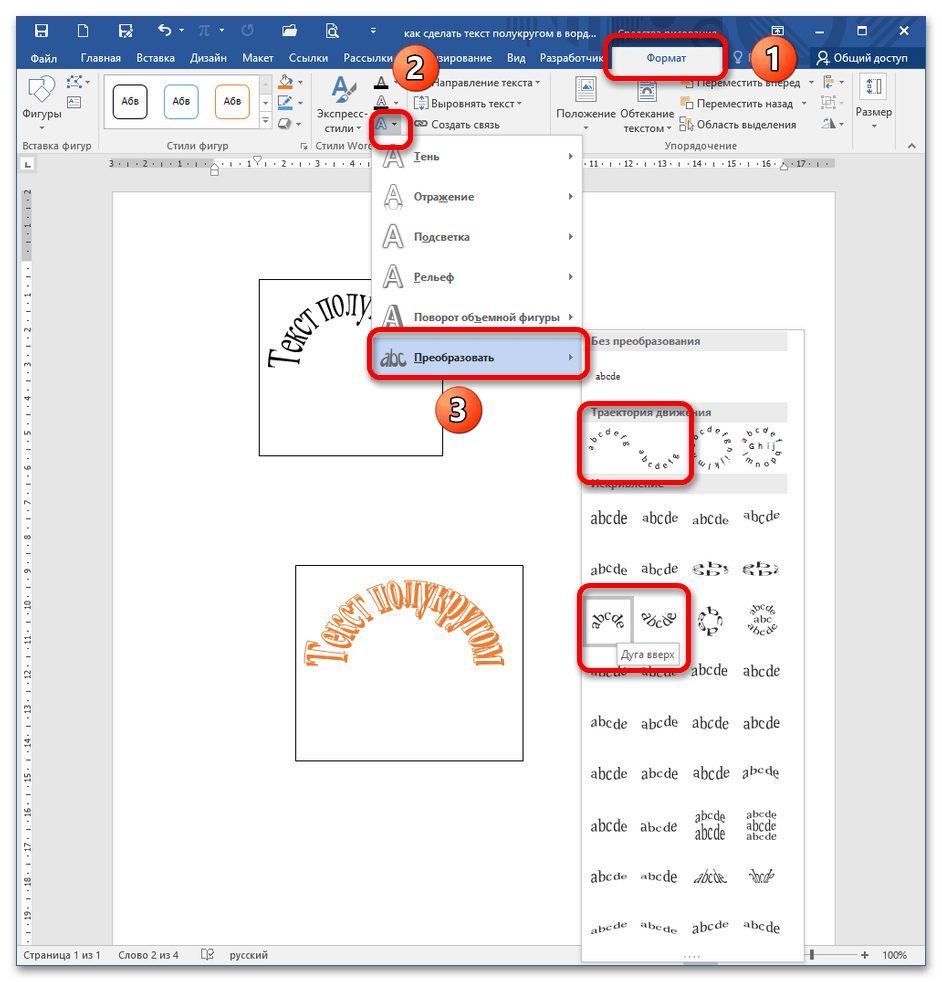
- Во время выделения на Ленте открывается дополнительная вкладка «Формат», перейдите на нее. Найдите блок «Стили WordArt» – «Текстовые эффекты», нажмите на стрелку и раскройте пункт «Преобразовать».
Здесь вы можете увидеть различные стили расположения текста. Для конкретной задачи (текст полукругом) подойдут 4 функции: в «Траектории движения» – «Дуга вверх» и «Дуга вниз»; в «Искривлении» – инструменты с такими же названиями. Они отличаются размером и положением текста.
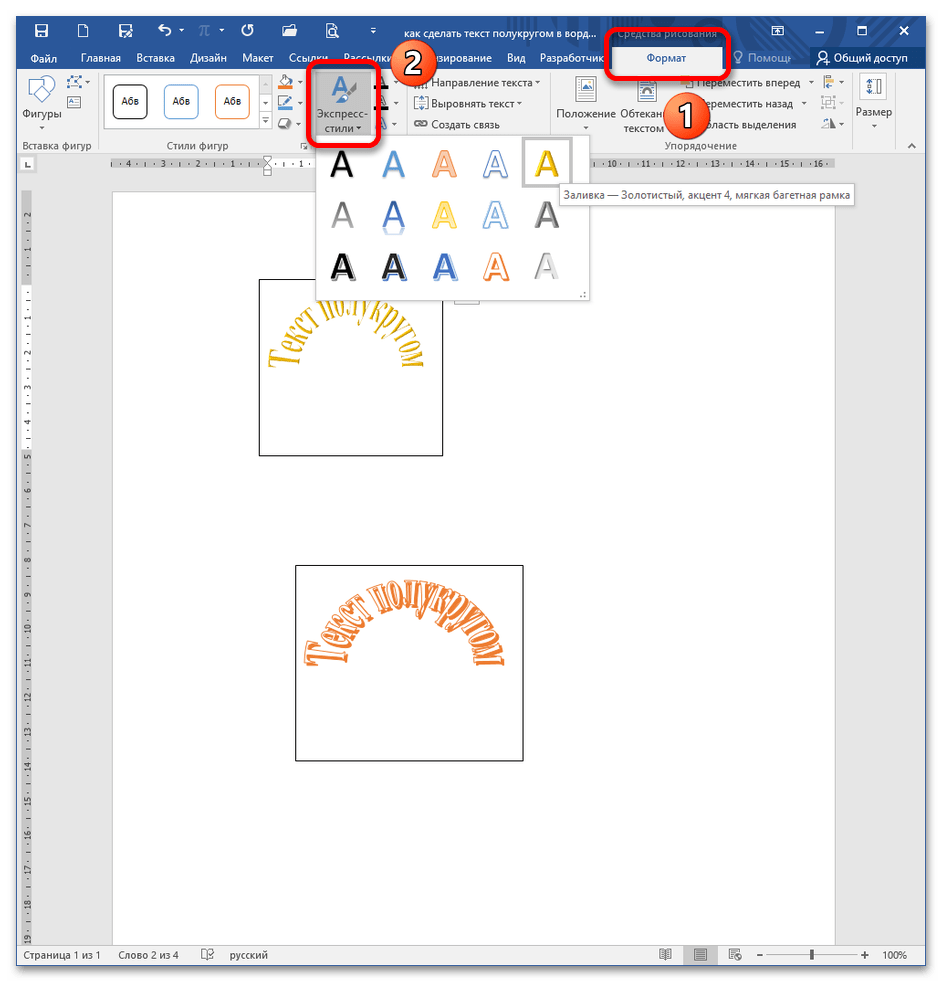
- Чтобы придать тексту привлекательный вид, воспользуйтесь начертаниями WordArt. Нажмите «Экспресс-стили» и выберите понравившийся.
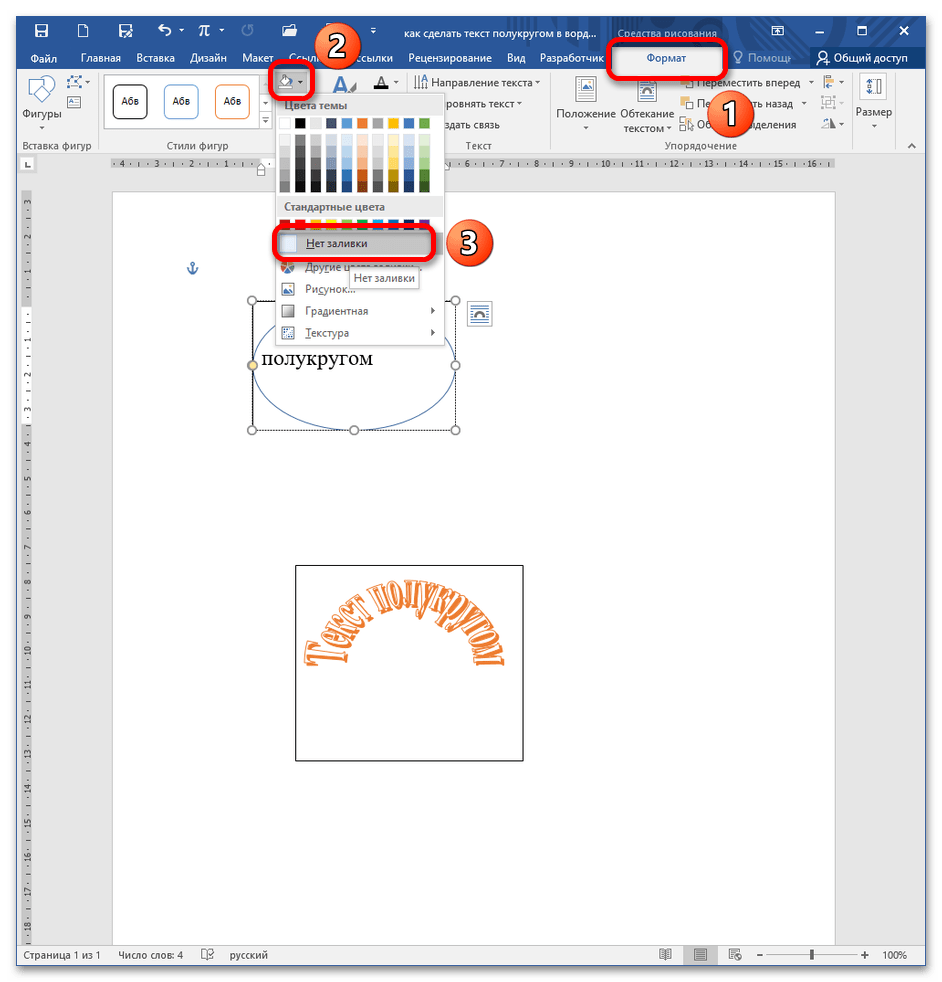
- Если необходимо выполнить надпись на фигуре, тогда нарисуйте, например, овал и поверх него расположите «Надпись».
Подробнее: Добавление текста в фигуру в программе Microsoft Word
Важно! Примените функцию «Нет заливки» к последней фигуре, поскольку она перекрывает фон овала.
Затем повторите действия 3-4 для придания тексту формы.
Читайте также: Написание текста по кругу в Microsoft Word
Еще статьи по данной теме:
Помогла ли Вам статья?
Whether you want to add a little flair, or you want some text to flow along with the curve of another element (like clip art or a logo), making your letters curve along a path in Word is pretty easy.
First, click “Insert” on the main Word ribbon.
Click “WordArt” from the text options.
Select the style you want your WordArt to be. You can go for anything from plain-looking text to something super-fancy.
Type your text in your newly selected WordArt box.
With your new WordArt still selected, click “Format” on the main Word ribbon.
Click the “Text Effects” button.
Click “Transform” on the drop-down menu.
To get your text to follow a curved path, you’ll want to select one of the options from the “Follow path” section of the menu. You can choose whether you want your text to curve up, down, or all around.
Click to make your selection, and you’ll see your text automatically warped in the direction of your choosing.
If you want to play with the degree of your curve, drag the orange dot.
By moving the orientation of the orange dot, you’ll adjust the curve of your text. You can even use it to turn your text upside down. You’ll have to play with the format and adjustments a bit to get your text to curve just the way you want, especially if you’re trying to match it up with another object.
If you want your text to go back to normal with no curves, head back over to the Text Effects menu and hit “No transform.”
Just like that, your text is back to normal.
READ NEXT
- › How to Curve Text in PowerPoint
- › How to Curve Text in Adobe Photoshop
- › This New Google TV Streaming Device Costs Just $20
- › How to Adjust and Change Discord Fonts
- › The New NVIDIA GeForce RTX 4070 Is Like an RTX 3080 for $599
- › BLUETTI Slashed Hundreds off Its Best Power Stations for Easter Sale
- › HoloLens Now Has Windows 11 and Incredible 3D Ink Features
- › Google Chrome Is Getting Faster
How-To Geek is where you turn when you want experts to explain technology. Since we launched in 2006, our articles have been read billions of times. Want to know more?


 or
or  .
.