
Pipe To Excel
pipe2excel sends the contents of STDIN
or files of arguments to Excel as CSV to Microsoft Excel.
- The each value of the csv is inserted as a string.
- Only matching
/^-?[1-9]d*(.d*[1-9])?$/, as a number
- Only matching
- The encoding of the CSV is detected automatically whether it is written in UTF8 or the encoding of the current codepage.
How to use
OLE-MODE (Supported only Windows)
C:> pipe2excel foo.csv bar.csv
C:> type foo.csv | pipe2excel
It starts Microsoft Excel.
Non-OLE (Both Windows and Linux Ok)
C:> pipe2excel -o foo.xlsx foo.csv
It does not start Microsoft Excel. It creates foo.xlsx statically.
Options
-f stringField Sperator (default «,»)-o stringSave to file and quit immediately without EXCEL.EXE-vShow version
Source CSV data (sample)

Destinate Excel data (sample)

history
- v0.5.2 (Feb 19,2022)
- Fix package dependency problems
- Move or copy some packages into internal directory
- Change package owner to hymkor
- v0.5.1 (May 28,2021)
- Support Linux as platform (but required -o option always)
- (#1) Fix the panic on reading CSV from STDIN and using -o
- v0.5.0 (Aug 08,2018)
- When
-o FILENAMEis given, use «tealeg/xlsx» instead of «go-ole/go-ole» - Remove options -s and -q. Their features are enabled with -o.
- When
- v0.4.0 (Aug 05,2018)
- Add -f option to set field seperator
- Do not treat as string when the value is a negative integer.
- v0.3.0 (Jul 11,2018)
- Fix leak release COM
- Print help if no arguments and stdin is not redirected
- v0.2.0 (Jul 1,2018)
- Only matching
/^[1-9]d*(.d*[1-9])?$/, as a number
- Only matching
- v0.1.0 (Jul 1,2018)
- Set cell as a string
- Detect encoding utf8 or codepage automatically and remove -u option
- Add -v option to show version
- v0.0.1 (Jul 1,2018)
- prototype
Содержание
- tealeg/csv2xlsx
- Sign In Required
- Launching GitHub Desktop
- Launching GitHub Desktop
- Launching Xcode
- Launching Visual Studio Code
- Latest commit
- Git stats
- Files
- README.org
- About
- Applied Go
- evangwt/go-csv
- Sign In Required
- Launching GitHub Desktop
- Launching GitHub Desktop
- Launching Xcode
- Launching Visual Studio Code
- Latest commit
- Git stats
- Files
- README.md
- About
- Go CSV — read & write CSV
- Advertisements CSV
- Go CSV Read
- Advertisements Go CSV ReadAll
- Go CSV different delimiter
- Advertisements Go CSV Write
- Go CSV WriteAll
- csv-parser
- Here are 37 public repositories matching this topic.
- jszwec / csvutil
- plagioriginal / csvparser
- rubenwap / csvtogs
- trimmer-io / go-csv
- stefantds / csvdecoder
- NeaGogu / Kaspersky-to-csv
- willwangcn / fastcsv
- jamesneve / sunfish
- SharkFourSix / gompare
- guimsmendes / employee-csv-parser
- FourLineCode / minicel
- MarwanGalal746 / Ecommerce-Product-Manager
- ike-cunha / csv_parser_insert
- Bhinneka / ngos
- klenovda / fileToMongo
- Rakanixu / elastic-analytics
- c-seeger / csv2json
- Walah / Go-CSV-Parser
- gilcrest / csv-example
- AidanJHMurphy / go-csv
- Improve this page
- Add this topic to your repo
tealeg/csv2xlsx
Use Git or checkout with SVN using the web URL.
Work fast with our official CLI. Learn more.
Sign In Required
Please sign in to use Codespaces.
Launching GitHub Desktop
If nothing happens, download GitHub Desktop and try again.
Launching GitHub Desktop
If nothing happens, download GitHub Desktop and try again.
Launching Xcode
If nothing happens, download Xcode and try again.
Launching Visual Studio Code
Your codespace will open once ready.
There was a problem preparing your codespace, please try again.
Latest commit
Git stats
Files
Failed to load latest commit information.
README.org
Because the XLSX2CSV program exists, it seemed that it was natural to create a csv2xlsx corollary when the underlying xlsx library grew the ability to write XLSX files.
Warning, this is old and largely unmaintained.
In order to build and install this program you’ll need the go toolchain. You can find this in the package management system of pretty much every Linux distro and in Homebrew for Mac. Failing that you can download and install it manually from here: https://go.dev/dl/
Once you have Go installed, you’ll need to either clone this repository:
… or download and extract a Zipped snapshot from the green “Code” button above.
From within the resulting `csv2xlsx` directory issue the following command to build the project:
If all goes well you shuould find the compiled binary csv2xlsx has been created.
To run csv2xlsx you must provide it with at least two parameters: an input file and an output file . For example:
If your input file uses a delimiter other than a comma then you must provide that as a third paramater, thus:
If you’re looking for a more useful csv2xlsx convertor checkout out.. :
About
A simple program to convert CSV files into XLSX files.
Источник
Applied Go
Your managers, all through the hierarchy, love circulating spreadsheets via email. (They simply don’t know better.) How to extract and analyze the relevant data from the daily mess? Go can help.
This article is also available as a video on the Applied Go YouTube channel:
It is the shortened version of a lecture in my upcoming minicourse “Workplace Automation With Go”.
Spreadsheet data is everywhere. You can find it in Excel sheets as well as when downloading business data from a website.
Package encoding/csv from the Go standard library can help you processing that data and produce statistics, reports or other kinds of output from it. Here is how.
Let’s assume we work at a stationery distributor. Every evening, we receive a spreadsheet containing the orders of the day for review. The data looks like this:
| Date | Order ID | Order Item | Unit Price | Quantity |
|---|---|---|---|---|
| 2017-11-17 | 1 | Ball Pen | 1.99 | 50 |
| 2017-11-17 | 2 | Notebook | 12.99 | 10 |
| 2017-11-17 | 3 | Binder | 4.99 | 25 |
| 2017-11-20 | 4 | Pencil | 0.99 | 100 |
| 2017-11-20 | 5 | Sketch Block | 2.99 | 40 |
| 2017-11-22 | 6 | Ball Pen | 1.99 | 30 |
| 2017-11-23 | 7 | Sketch Block | 2.99 | 20 |
| 2017-11-24 | 8 | Ball Pen | 1.99 | 60 |
We’re interested in some information that is not directly contained in the data; especially, we want to know
- the total price for each order,
- the total sales volume,
- and the number of ball pens sold.
As we get a new copy every day, creating formulas within the spreadsheet is not an option. Instead, we decide to write a small tool to do the calculations for us. Also, the tool shall add the result to the table and write a new spreadsheet file.
But before starting to code, our first step is to export the spreadsheet data to CSV. To make things a bit more complicated, we export the data with a semicolon as the column separator.
(The exact steps vary, depending on the spreadsheet software used.)
The raw CSV data looks like this:
We can see a header row and data rows, with data separated by semicolons.
Now let’s dive into the Go code to process the data from this spreadsheet and from all spreadsheets that are still to come.
Источник
evangwt/go-csv
Use Git or checkout with SVN using the web URL.
Work fast with our official CLI. Learn more.
Sign In Required
Please sign in to use Codespaces.
Launching GitHub Desktop
If nothing happens, download GitHub Desktop and try again.
Launching GitHub Desktop
If nothing happens, download GitHub Desktop and try again.
Launching Xcode
If nothing happens, download Xcode and try again.
Launching Visual Studio Code
Your codespace will open once ready.
There was a problem preparing your codespace, please try again.
Latest commit
Git stats
Files
Failed to load latest commit information.
README.md
Simple CSV lib writen by golang solves the encoding nightmare while exporting records. Both on Windows and MacOS with Microsoft Excel, Apple Numbers.
The encoding of CSV files is a nightmare. Some old versions of Microsoft Excel drop the Unicode BOM, althrogh you try to add ‘0xEF, 0xBB, 0xBF’ with UTF-8 encoding. For Example, Excel 2003, Excel 2007. However the newer versions have no problems. Maybe you will use «encoding/csv» lib, but it does not solve the encoding problem.
| Bytes | Encoding Form |
|---|---|
| 00 00 FE FF | UTF-32, big-endian |
| FF FE 00 00 | UTF-32, little-endian |
| FE FF | UTF-16, big-endian |
| FF FE | UTF-16, little-endian |
| EF BB BF | UTF-8 |
UTF-16 is the key point. But the comma delimiter does not work. We should replace «,» with «t». So this is not a standard CSV format as «Comma Seperated Values». And this is why when you use standard lib «encoding/csv» and encode your records with UTF-16 and the result is still not what you want. Here I choose UTF-16 little-endian.
Copyright (c) 2018
Permission is hereby granted, free of charge, to any person obtaining a copy of this software and associated documentation files (the «Software»), to deal in the Software without restriction, including without limitation the rights to use, copy, modify, merge, publish, distribute, sublicense, and/or sell copies of the Software, and to permit persons to whom the Software is furnished to do so, subject to the following conditions:
The above copyright notice and this permission notice shall be included in all copies or substantial portions of the Software.
THE SOFTWARE IS PROVIDED «AS IS», WITHOUT WARRANTY OF ANY KIND, EXPRESS OR IMPLIED, INCLUDING BUT NOT LIMITED TO THE WARRANTIES OF MERCHANTABILITY, FITNESS FOR A PARTICULAR PURPOSE AND NONINFRINGEMENT. IN NO EVENT SHALL THE AUTHORS OR COPYRIGHT HOLDERS BE LIABLE FOR ANY CLAIM, DAMAGES OR OTHER LIABILITY, WHETHER IN AN ACTION OF CONTRACT, TORT OR OTHERWISE, ARISING FROM, OUT OF OR IN CONNECTION WITH THE SOFTWARE OR THE USE OR OTHER DEALINGS IN THE SOFTWARE.
About
Simple CSV lib writen by golang solves the encoding nightmare. Both on Windows and MacOS with Microsoft Excel, Apple Numbers.
Источник
Go CSV — read & write CSV
last modified January 9, 2023
Go CSV tutorial shows how to read and write CSV data in Golang.
Advertisements CSV
is a very popular import and export data format used in spreadsheets and databases. Each line in a CSV file is a data record. Each record consists of one or more fields, separated by commas. While CSV is a very simple data format, there can be many differences, such as different delimiters, new lines, or quoting characters.
Golang has the encoding/csv package to deal with CSV. It provides functions to read and write comma-separated values (CSV) files. A CSV file contains zero or more records of one or more fields per record. Each record is separated by the newline character. The final record may optionally be followed by a newline character. White space is considered part of a field. Blank lines are ignored.
We use Go version 1.18.
Go CSV Read
The Read function reads one record (a slice of fields) from the reader.
This is the numbers.csv file.
In the code example, we read values from the numbers.csv file.
The values are read in a for loop line by line using the Read function.
Advertisements Go CSV ReadAll
The ReadAll function reads all the remaining records from the reader. Each record is a slice of fields.
This is the users.csv file. The first line are the column names.
The example reads the users.csv file. Each line is turned into a User type.
Here we skip the first line, which contains the column names.
We get all the records in one shot with ReadAll .
Go CSV different delimiter
Despite its name, CSV may contain other seperators than a comma. This is due to the lack of the standardization of the CSV format.
In the users.csv file, the fields are separated with a semicolon. The file also contains a comment.
The example reads all data from this file.
Here we set the separator and the comment character so that the package knows how to parse the file.
Advertisements Go CSV Write
The Write function writes a single CSV record to writer. A record is a slice of strings with each string being one field. Writes are buffered, so Flush must be called to ensure that the record is written to the underlying writer.
In the code example, we write a couple of records into the users.csv file with the Write function.
Go CSV WriteAll
The WriteAll function writes multiple CSV records to the writer using Write and then calls Flush .
We write a couple of records in one shot with WriteAll .
In this article, we have showed how to read and write CSV data in Golang.
Источник
csv-parser
Here are 37 public repositories matching this topic.
jszwec / csvutil
csvutil provides fast and idiomatic mapping between CSV and Go (golang) values.
plagioriginal / csvparser
A fast, easy-of-use and dependency free custom mapping from .csv data into Golang structs
rubenwap / csvtogs
Take a CSV file and create a Google Spreadsheet with the contents
trimmer-io / go-csv
A pure Go CSV file transcoder
stefantds / csvdecoder
Go library for parsing and deserialising CSV files into Go objects
NeaGogu / Kaspersky-to-csv
CSV parser for the password file exported by Kaspersky Password Manager
willwangcn / fastcsv
fastcsv is a csv parser for golang. simple load csv file into plain struct.
jamesneve / sunfish
A CSV parser for Go
SharkFourSix / gompare
A simple utility for validating CSV columns
guimsmendes / employee-csv-parser
Project to implement a Csv-Parser for companies that receive different type of files with employees’s information.
FourLineCode / minicel
A simple excel engine without ui to parse .csv files.
MarwanGalal746 / Ecommerce-Product-Manager
One of the main challenges of building an ecommerce platform is to keep an accurate list of products and their stocks up to date. It’s a system that allows us to manage products for an hypothetical ecommerce platform.
ike-cunha / csv_parser_insert
Ferramenta para manipular e persistir dados de CSV em uma base de dados Postgres
Bhinneka / ngos
(Experimental Version) CLI tool for comparing two `CSV` files, and create the output of the difference
klenovda / fileToMongo
download csv-file and save in mongoDb
Rakanixu / elastic-analytics
Export CSV data to elasticsearch
c-seeger / csv2json
csv2json converter written in go
Walah / Go-CSV-Parser
It parses CSV file using the ‘multipart.NewWriter()’ & ‘csv.NewReader()’
gilcrest / csv-example
Example repo using gocarina for processing csv files
AidanJHMurphy / go-csv
Provides a struct decorator tag and wraper for the base csv package
Improve this page
Add a description, image, and links to the csv-parser topic page so that developers can more easily learn about it.
Add this topic to your repo
To associate your repository with the csv-parser topic, visit your repo’s landing page and select «manage topics.»
Источник
The importance of analyzing data at any scale cannot be overemphasized. Nearly every part of our day-to-day lives is data driven, and as developers, one of the first considerations when building any reasonably sized application is what database to use and how to structure your data.
But, it doesn’t stop at just storing data, you’ll also need to make sense of this data by extracting and presenting it in a format that any non-technical person can understand. For example, an ecommerce business generates large amounts of data every day, meaning we’d need to keep track of things like product inventory, monthly revenue, financial statements, and more. Currently, there are many services that provide these types of solutions, but one of the easiest ways to quickly extract and present data is to generate a spreadsheet or a CSV file.
In this article, we’ll explore how to create spreadsheets in Go by building a simple expense report and exporting it in CSV format using the Excelize library. You can find the complete code for this tutorial at the GitHub repo. Let’s get started!
- Generating an expense report
- Creating a worksheet
- Adding data and creating styles
- Saving the worksheet
- Exporting to CSV
Generating an expense report
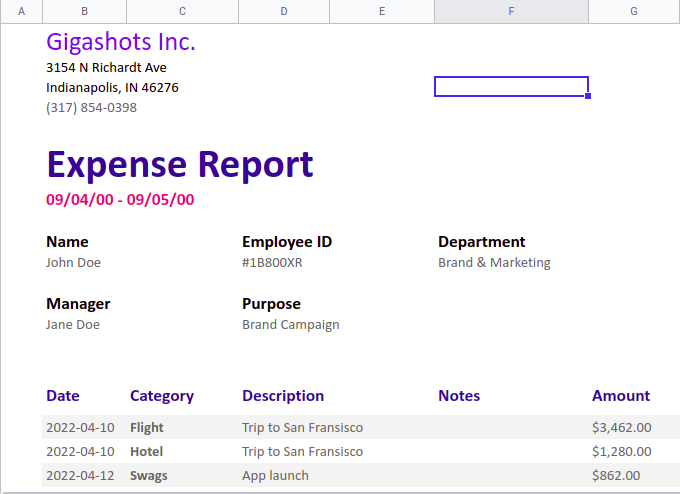
An expense report is an itemized list showing a company’s expenditure over a period of time in as much detail as possible. We’ll build a report that’s similar to what we have in the image below:
Creating a worksheet
To get started, make sure you have Go ≥v1.15 installed and create a new project folder. In the project directory, create a main.go file and initialize Go modules with the following code:
$ mkdir <project-name>
$ cd <project-name>
$ touch main.go
$ go mod init github.com/<your-username>/<project-name>
The main.go file is the entry point of our Go application, and we use the generated go.mod file for dependency management. Next, install the Excelize library by running the command below:
$ go get github.com/xuri/excelize/v2
Excelize is a Go library with no dependencies that provides primitives for reading and writing to XLSX files and other supported spreadsheet file formats. In your main.go file, import Excelize, create a new file, create a new worksheet, and set the active sheet to the worksheet you just created:
package main
import "github.com/xuri/excelize/v2"
const (
   SheetName = "Expense Report"
)
func main() {
   var err error
   f := excelize.NewFile()
   index := f.NewSheet("Sheet1")
   f.SetActiveSheet(index)
   f.SetSheetName("Sheet1", SheetName)
}
Adding data and creating styles
With our worksheet created, we can start building the report. First, we’ll set some dimensions to fit the structure we want, as shown in the image below. Add the following code block to your main function:
//main.go
//...
   err = f.SetColWidth(SheetName, "A", "A", 6)
   err = f.SetColWidth(SheetName, "H", "H", 6)
   err = f.SetColWidth(SheetName, "B", "B", 12)
   err = f.SetColWidth(SheetName, "C", "C", 16)
   err = f.SetColWidth(SheetName, "D", "D", 13)
   err = f.SetColWidth(SheetName, "E", "E", 15)
   err = f.SetColWidth(SheetName, "F", "F", 22)
   err = f.SetColWidth(SheetName, "G", "G", 13)
We just need columns A to G for the report, so we’re using the SetColWidth to adjust the width of the columns to fit our requirements. You’ll notice that we’ve defined an error variable to the top of the main function, and we’re simply assigning any error returned from these functions to it. Ideally, you should handle each error properly since it’s idiomatic in Go, but it’s fine to keep the code minimal.
The first section of the report contains static information, so we’ll have it hard-coded. Add the following code block to your main function:
//main.go
//...
   err = f.SetRowHeight(SheetName, 1, 12)
   err = f.MergeCell(SheetName, "A1", "H1")

   err = f.SetRowHeight(SheetName, 2, 25)
   err = f.MergeCell(SheetName, "B2", "D2")

   style, err := f.NewStyle(&excelize.Style{Font: &excelize.Font{Size: 20, Color: "6d64e8"}})
   err = f.SetCellStyle(SheetName, "B2", "D2", style)
   err = f.SetSheetRow(SheetName, "B2", &[]interface{}{"Gigashots Inc."})
   err = f.MergeCell(SheetName, "B3", "D3")
   err = f.SetSheetRow(SheetName, "B3", &[]interface{}{"3154 N Richardt Ave"})

   err = f.MergeCell(SheetName, "B4", "D4")
   err = f.SetSheetRow(SheetName, "B4", &[]interface{}{"Indianapolis, IN 46276"})

   style, err = f.NewStyle(&excelize.Style{Font: &excelize.Font{Color: "666666"}})
   err = f.MergeCell(SheetName, "B5", "D5")
   err = f.SetCellStyle(SheetName, "B5", "D5", style)
   err = f.SetSheetRow(SheetName, "B5", &[]interface{}{"(317) 854-0398"})

   style, err = f.NewStyle(&excelize.Style{Font: &excelize.Font{Size: 32, Color: "2B4492", Bold: true}})
   err = f.MergeCell(SheetName, "B7", "G7")
   err = f.SetCellStyle(SheetName, "B7", "G7", style)
   err = f.SetSheetRow(SheetName, "B7", &[]interface{}{"Expense Report"})

   style, err = f.NewStyle(&excelize.Style{Font: &excelize.Font{Size: 13, Color: "E25184", Bold: true}})
   err = f.MergeCell(SheetName, "B8", "C8")
   err = f.SetCellStyle(SheetName, "B8", "C8", style)
   err = f.SetSheetRow(SheetName, "B8", &[]interface{}{"09/04/00 - 09/05/00"})

   style, err = f.NewStyle(&excelize.Style{Font: &excelize.Font{Size: 13, Bold: true}})
   err = f.SetCellStyle(SheetName, "B10", "G10", style)
   err = f.SetSheetRow(SheetName, "B10", &[]interface{}{"Name", "", "Employee ID", "", "Department"})
   err = f.MergeCell(SheetName, "B10", "C10")
   err = f.MergeCell(SheetName, "D10", "E10")
   err = f.MergeCell(SheetName, "F10", "G10")

   style, err = f.NewStyle(&excelize.Style{Font: &excelize.Font{Color: "666666"}})
   err = f.SetCellStyle(SheetName, "B11", "G11", style)
   err = f.SetSheetRow(SheetName, "B11", &[]interface{}{"John Doe", "", "#1B800XR", "", "Brand & Marketing"})
   err = f.MergeCell(SheetName, "B11", "C11")
   err = f.MergeCell(SheetName, "D11", "E11")
   err = f.MergeCell(SheetName, "F11", "G11")

   style, err = f.NewStyle(&excelize.Style{Font: &excelize.Font{Size: 13, Bold: true}})
   err = f.SetCellStyle(SheetName, "B13", "G13", style)
   err = f.SetSheetRow(SheetName, "B13", &[]interface{}{"Manager", "", "Purpose"})
   err = f.MergeCell(SheetName, "B13", "C13")
   err = f.MergeCell(SheetName, "D13", "E13")

   style, err = f.NewStyle(&excelize.Style{Font: &excelize.Font{Color: "666666"}})
   err = f.SetCellStyle(SheetName, "B14", "G14", style)
   err = f.SetSheetRow(SheetName, "B14", &[]interface{}{"Jane Doe", "", "Brand Campaign"})
   err = f.MergeCell(SheetName, "B14", "C14")
   err = f.MergeCell(SheetName, "D14", "E14")
There’s a lot going on in this block of code, so let’s break it down.
As stated earlier, Excelize provides a set of primitive functions to manipulate the spreadsheet. Each functionality you need just requires calling a method on the file object, which accepts some parameters. In this case, we’re using five main methods:
SetRowHeightMergeCellNewStyleSetCellStyleSetSheetRow
SetRowHeight adjusts the height of a given row, and MergeCell combines multiple cells in a row into one single cell. To compose styles, we can use the excelize.Style struct, which provides the properties you need to define custom styles. The NewStyle method simply takes in the Style object and returns an index representing the style.
After defining your custom style, we can use SetCellStyle to apply the style to a single cell or a range of cells. We use SetSheetRow to add data to a cell or a range of cells in a single row. It accepts a slice of interface, which is a container for any primitive data type. The slice is positional, and each element will be placed in the corresponding cell starting from the axis provided. Therefore, we used an empty string in some cases where multiple cells were merged.
The second part of the report is a table containing dynamic data that can be of any length, meaning we can’t just define the content of each row like we did before. The data represented in the table follows a defined structure, so we can just loop through the incoming data and create each row dynamically.
Let’s define some arbitrary data that will represent a list of expenses. At the top of your main.go file, outside of the main function, add the following variable:
//main.go
//...
var (
   expenseData = [][]interface{}{
      {"2022-04-10", "Flight", "Trip to San Fransisco", "", "", "$3,462.00"},
      {"2022-04-10", "Hotel", "Trip to San Fransisco", "", "", "$1,280.00"},
      {"2022-04-12", "Swags", "App launch", "", "", "$862.00"},
      {"2022-03-15", "Marketing", "App launch", "", "", "$7,520.00"},
      {"2022-04-11", "Event hall", "App launch", "", "", "$2,080.00"},
   }
)
//...
Now, add the following block of code to your main function:
//main.go
//...
   style, err = f.NewStyle(&excelize.Style{
      Font:      &excelize.Font{Size: 13, Bold: true, Color: "2B4492"},
      Alignment: &excelize.Alignment{Vertical: "center"},
   })
   err = f.SetCellStyle(SheetName, "B17", "G17", style)
   err = f.SetSheetRow(SheetName, "B17", &[]interface{}{"Date", "Category", "Description", "", "Notes", "Amount"})
   err = f.MergeCell(SheetName, "D17", "E17")
   err = f.SetRowHeight(SheetName, 17, 32)

   startRow := 18
   for i := startRow; i < (len(expenseData) + startRow); i++ {
      var fill string
      if i%2 == 0 {
         fill = "F3F3F3"
      } else {
         fill = "FFFFFF"
      }

      style, err = f.NewStyle(&excelize.Style{
         Fill:      excelize.Fill{Type: "pattern", Pattern: 1, Color: []string{fill}},
         Font:      &excelize.Font{Color: "666666"},
         Alignment: &excelize.Alignment{Vertical: "center"},
      })
      err = f.SetCellStyle(SheetName, fmt.Sprintf("B%d", i), fmt.Sprintf("G%d", i), style)
      err = f.SetSheetRow(SheetName, fmt.Sprintf("B%d", i), &expenseData[i-18])
      err = f.SetCellRichText(SheetName, fmt.Sprintf("C%d", i), []excelize.RichTextRun{
         {Text: expenseData[i-18][1].(string), Font: &excelize.Font{Bold: true}},
      })

      err = f.MergeCell(SheetName, fmt.Sprintf("D%d", i), fmt.Sprintf("E%d", i))
      err = f.SetRowHeight(SheetName, i, 18)
   }
We’re still using the same methods to compose the styles and add data. However, we’re looping through the expenseData list and adding each item to the current row. We started the loop at 18, which is the current row in the spreadsheet. To make the rows of the table more distinct and readable, we add a subtle background color to every other row by checking if it’s even or odd using a modulo operation.
Saving the worksheet
In just a few lines of code, you’ve been able to create an expense report using simple Go functions. There are many ways that you can display the report, but in this article, you’ll save the file to your disk and upload it to Google sheets. Add the following code block at the end of the main function:
//main.go
//...
   err = f.SaveAs("expense-report.xlsx")
   if err != nil {
      log.Fatal(err)
   }
The code above will save the file in the current directory with an XLSX extension. Now, open up a new spreadsheet in Google Sheets and import the file. You should see the expense report just like in the sample image above.
Exporting to CSV
So far, we’ve explored working with XLSX files, however, there are other formats suitable for presenting this kind of data. A CSV file is a text file with rows of data delimited by commas that is mostly used for importing and exporting data.
Consider a case where we want to store the table in our expense report in some self-hosted database. We can extract this table in CSV format and import it in the database with just a few steps.
First, create a function outside of your main function called generateCSV and add the code block below:
//main.go
//...
type Axis struct {
   row int
   col string
}

func generateCSV(f *excelize.File, start, end Axis) error {
   var data [][]string

   for i := start.row; i <= end.row; i++ {
      row := []string{}
      for j := []rune(start.col)[0]; j <= []rune(end.col)[0]; j++ {
         value, err := f.GetCellValue(SheetName, fmt.Sprintf("%s%d", string(j), i), excelize.Options{})
         if err != nil {
            return err
         }
         row = append(row, value)
      }
      data = append(data, row)
   }

   file, err := os.Create("expenses.csv")
   if err != nil {
      return err
   }
   defer f.Close()

   writer := csv.NewWriter(file)
   return writer.WriteAll(data)
}
The generateCSV function accepts an excelize.File type, a start axis, and an end axis. The axis is just a combination of the row and column that makes a cell. We loop through each row, and for each row, we loop through each column within the bounds of the start and end axis.
We then use the f.GetCellValue to extract the current value of each cell. Because the columns are represented as alphabet strings, we convert them to runes to get the underlying unicode decimal. Finally, we save the extracted data to a .csv file using the CSV package from the standard library.
We can call this function after saving the worksheet and passing the file handle. In your main function, add the following code block:
//main.go
///...
   err = f.SaveAs("expense-report.xlsx")
   err = generateCSV(f, Axis{17, "B"}, Axis{22, "G"})

   if err != nil {
      log.Fatal(err)
   }
We provide the file we created earlier for the worksheet and the axis representing the range of the table. If you run the main.go file now, you should see an XLSX file and a CSV file generated:
$ go run main.go
Conclusion
There are many use cases for presenting data in a spreadsheet-compatible format, including analysis, transformation, and validation. In this article, we learned how to work with spreadsheets using Go and the Excelize package by generating an expense report.
When you consider the other features that Excelize offers out of the box, we’ve only scratched the surface. You can add images, create charts, sparklines, shapes, pivot tables, and more. I hope you learned something new, and leave a comment if you have any questions. Happy coding!
Cut through the noise of traditional error reporting with LogRocket

LogRocket is a digital experience analytics solution that shields you from the hundreds of false-positive errors alerts to just a few truly important items. LogRocket tells you the most impactful bugs and UX issues actually impacting users in your applications.
Then, use session replay with deep technical telemetry to see exactly what the user saw and what caused the problem, as if you were looking over their shoulder.
LogRocket automatically aggregates client side errors, JS exceptions, frontend performance metrics, and user interactions. Then LogRocket uses machine learning to tell you which problems are affecting the most users and provides the context you need to fix it.
Focus on the bugs that matter — try LogRocket today.
What is an idiomatic golang way to dump an array of strucs into an excel file?
an example of my struct:
type Item {
    Id                   string `json: "Id"`
    Name                 string `json: "Name"`
    Type                 string `json: "Type"`
}
asked Apr 5, 2021 at 23:02
![]()
1
The most «idiomatic» way I can think of in standard Go is using the encoding/csv package to create a CSV file. Excel can load CSVs.
The package documentation has examples. You’ll need to serialize each struct into a []string, and then encoding/csv takes it from there.
Alternatively if you want to use 3rd party packages, https://github.com/gocarina/gocsv takes structs and can write those to CSV directly.
answered Apr 6, 2021 at 0:08
![]()
Eli BenderskyEli Bendersky
260k88 gold badges348 silver badges412 bronze badges
This article is also available as a video on the
Applied Go YouTube channel:
It is the shortened version of a lecture in my upcoming minicourse
“Workplace Automation With Go”.
Spreadsheet data is everywhere. You can find it in Excel sheets as well as when downloading business data from a website.
Package
encoding/csv from the Go standard library can help you processing that data and produce statistics, reports or other kinds of output from it. Here is how.
Let’s assume we work at a stationery distributor. Every evening, we receive a spreadsheet containing the orders of the day for review. The data looks like this:
| Date | Order ID | Order Item | Unit Price | Quantity |
|---|---|---|---|---|
| 2017-11-17 | 1 | Ball Pen | 1.99 | 50 |
| 2017-11-17 | 2 | Notebook | 12.99 | 10 |
| 2017-11-17 | 3 | Binder | 4.99 | 25 |
| 2017-11-20 | 4 | Pencil | 0.99 | 100 |
| 2017-11-20 | 5 | Sketch Block | 2.99 | 40 |
| 2017-11-22 | 6 | Ball Pen | 1.99 | 30 |
| 2017-11-23 | 7 | Sketch Block | 2.99 | 20 |
| 2017-11-24 | 8 | Ball Pen | 1.99 | 60 |
We’re interested in some information that is not directly contained in the data; especially, we want to know
- the total price for each order,
- the total sales volume,
- and the number of ball pens sold.
As we get a new copy every day, creating formulas within the spreadsheet is not an option. Instead, we decide to write a small tool to do the calculations for us. Also, the tool shall add the result to the table and write a new spreadsheet file.
But before starting to code, our first step is to export the spreadsheet data to CSV. To make things a bit more complicated, we export the data with a semicolon as the column separator.
(The exact steps vary, depending on the spreadsheet software used.)
The raw CSV data looks like this:
Date;Order ID;Order Item;Unit Price;Quantity
2017-11-17;1;Ball Pen;1.99;50
2017-11-17;2;Notebook;12.99;10
2017-11-17;3;Binder;4.99;25
2017-11-18;4;Pencil;0.99;100
2017-11-18;5;Sketch Block;2.99;40
2017-11-19;6;Ball Pen;1.99;30
2017-11-19;7;Sketch Block;2.99;20
2017-11-19;8;Ball Pen;1.99;60
We can see a header row and data rows, with data separated by semicolons.
Now let’s dive into the Go code to process the data from this spreadsheet and from all spreadsheets that are still to come.
Reading and processing CSV data with Go
Reading CSV files
As the next step, we need to read in the header row, and then the data rows. The result shall be a two-dimensional slice of strings, or a slice of slices of strings.
Process the data
Now that the data is read in, we can loop over the rows, and read from or write to each row slice as needed.
This is where we can extract the desired information: The total price for each order, the total sales volume, and the number of ball pens sold.
Write the new CSV data
Finally, we write the result to a new file, using os.Create() and a CSV writer that knows how to turn the slice of slices of strings back into a proper CSV file.
Note that we do not set the separator to semicolon here, as we want to create a standard CSV format this time.
When running this code, the output file should look like this:
Date,Order ID,Order Item,Unit Price,Quantity,Total
2017-11-17,1,Ball Pen,1.99,50,99.50
2017-11-17,2,Notebook,12.99,10,129.90
2017-11-17,3,Binder,4.99,25,124.75
2017-11-18,4,Pencil,0.99,100,99.0
2017-11-18,5,Sketch Block,2.99,40,119.60
2017-11-19,6,Ball Pen,1.99,30,59.70
2017-11-19,7,Sketch Block,2.99,20,59.80
2017-11-19,8,Ball Pen,1.99,60,119.40
,,,Sum,,811.65
,,,Ball Pens,140,
And we can open it in our spreadsheet app, or in a CSV viewer, to get a nicely formatted table.
| Date | Order ID | Order Item | Unit Price | Quantity | Total |
|---|---|---|---|---|---|
| 2017-11-17 | 1 | Ball Pen | 1.99 | 50 | 99.50 |
| 2017-11-17 | 2 | Notebook | 12.99 | 10 | 129.90 |
| 2017-11-17 | 3 | Binder | 4.99 | 25 | 124.75 |
| 2017-11-18 | 4 | Pencil | 0.99 | 100 | 99.0 |
| 2017-11-18 | 5 | Sketch Block | 2.99 | 40 | 119.60 |
| 2017-11-19 | 6 | Ball Pen | 1.99 | 30 | 59.70 |
| 2017-11-19 | 7 | Sketch Block | 2.99 | 20 | 59.80 |
| 2017-11-19 | 8 | Ball Pen | 1.99 | 60 | 119.40 |
| Sum | 811.65 | ||||
| Ball Pens | 140 |
Here we can see our new Totals column, as well as the two new rows that show the overall sum and the number of ball pens ordered.
How to get and run the code
Step 1: go get the code. Note the -d flag that prevents auto-installing
the binary into $GOPATH/bin.
This time, also note the /... postfix that downloads all files, not only those imported by the main package.
go get -d github.com/appliedgo/spreadsheet/...
Step 2: cd to the source code directory.
cd $GOPATH/src/github.com/appliedgo/spreadsheet
Step 3. Run the binary.
go run spreadsheet.go
You should then find a file named ordersReport.csv in the current directory. Verify that it contains the expected result.
Q&A: Why CSV?
I use CSV here, rather than the file formats used by Excel or Open/Libre Office or Numbers, in order to stay as flexible and vendor-independent as possible. If you specifically want to work with Excel sheets, a
quick search on GitHub should return a couple of useful third-party libraries. I have not used any of them yet, so I can neither share any experience nor recommend a particular one.
Links
Wikipedia: Comma-separated values — Details about the CSV format.
Happy coding!