Import or export text (.txt or .csv) files
There are two ways to import data from a text file with Excel: you can open it in Excel, or you can import it as an external data range. To export data from Excel to a text file, use the Save As command and change the file type from the drop-down menu.
There are two commonly used text file formats:
-
Delimited text files (.txt), in which the TAB character (ASCII character code 009) typically separates each field of text.
-
Comma separated values text files (.csv), in which the comma character (,) typically separates each field of text.
You can change the separator character that is used in both delimited and .csv text files. This may be necessary to make sure that the import or export operation works the way that you want it to.
Note: You can import or export up to 1,048,576 rows and 16,384 columns.
Import a text file by opening it in Excel
You can open a text file that you created in another program as an Excel workbook by using the Open command. Opening a text file in Excel does not change the format of the file — you can see this in the Excel title bar, where the name of the file retains the text file name extension (for example, .txt or .csv).
-
Go to File > Open and browse to the location that contains the text file.
-
Select Text Files in the file type dropdown list in the Open dialog box.
-
Locate and double-click the text file that you want to open.
-
If the file is a text file (.txt), Excel starts the Import Text Wizard. When you are done with the steps, click Finish to complete the import operation. See Text Import Wizard for more information about delimiters and advanced options.
-
If the file is a .csv file, Excel automatically opens the text file and displays the data in a new workbook.
Note: When Excel opens a .csv file, it uses the current default data format settings to interpret how to import each column of data. If you want more flexibility in converting columns to different data formats, you can use the Import Text Wizard. For example, the format of a data column in the .csv file may be MDY, but Excel’s default data format is YMD, or you want to convert a column of numbers that contains leading zeros to text so you can preserve the leading zeros. To force Excel to run the Import Text Wizard, you can change the file name extension from .csv to .txt before you open it, or you can import a text file by connecting to it (for more information, see the following section).
-
Import a text file by connecting to it (Power Query)
You can import data from a text file into an existing worksheet.
-
On the Data tab, in the Get & Transform Data group, click From Text/CSV.
-
In the Import Data dialog box, locate and double-click the text file that you want to import, and click Import.
-
In the preview dialog box, you have several options:
-
Select Load if you want to load the data directly to a new worksheet.
-
Alternatively, select Load to if you want to load the data to a table, PivotTable/PivotChart, an existing/new Excel worksheet, or simply create a connection. You also have the choice of adding your data to the Data Model.
-
Select Transform Data if you want to load the data to Power Query, and edit it before bringing it to Excel.
-
If Excel doesn’t convert a particular column of data to the format that you want, then you can convert the data after you import it. For more information, see Convert numbers stored as text to numbers and Convert dates stored as text to dates.
Export data to a text file by saving it
You can convert an Excel worksheet to a text file by using the Save As command.
-
Go to File > Save As.
-
Click Browse.
-
In the Save As dialog box, under Save as type box, choose the text file format for the worksheet; for example, click Text (Tab delimited) or CSV (Comma delimited).
Note: The different formats support different feature sets. For more information about the feature sets that are supported by the different text file formats, see File formats that are supported in Excel.
-
Browse to the location where you want to save the new text file, and then click Save.
-
A dialog box appears, reminding you that only the current worksheet will be saved to the new file. If you are certain that the current worksheet is the one that you want to save as a text file, click OK. You can save other worksheets as separate text files by repeating this procedure for each worksheet.
You may also see an alert below the ribbon that some features might be lost if you save the workbook in a CSV format.
For more information about saving files in other formats, see Save a workbook in another file format.
Import a text file by connecting to it
You can import data from a text file into an existing worksheet.
-
Click the cell where you want to put the data from the text file.
-
On the Data tab, in the Get External Data group, click From Text.
-
In the Import Data dialog box, locate and double-click the text file that you want to import, and click Import.
Follow the instructions in the Text Import Wizard. Click Help
on any page of the Text Import Wizard for more information about using the wizard. When you are done with the steps in the wizard, click Finish to complete the import operation.
-
In the Import Data dialog box, do the following:
-
Under Where do you want to put the data?, do one of the following:
-
To return the data to the location that you selected, click Existing worksheet.
-
To return the data to the upper-left corner of a new worksheet, click New worksheet.
-
-
Optionally, click Properties to set refresh, formatting, and layout options for the imported data.
-
Click OK.
Excel puts the external data range in the location that you specify.
-
If Excel does not convert a column of data to the format that you want, you can convert the data after you import it. For more information, see Convert numbers stored as text to numbers and Convert dates stored as text to dates.
Export data to a text file by saving it
You can convert an Excel worksheet to a text file by using the Save As command.
-
Go to File > Save As.
-
The Save As dialog box appears.
-
In the Save as type box, choose the text file format for the worksheet.
-
For example, click Text (Tab delimited) or CSV (Comma delimited).
-
Note: The different formats support different feature sets. For more information about the feature sets that are supported by the different text file formats, see File formats that are supported in Excel.
-
-
Browse to the location where you want to save the new text file, and then click Save.
-
A dialog box appears, reminding you that only the current worksheet will be saved to the new file. If you are certain that the current worksheet is the one that you want to save as a text file, click OK. You can save other worksheets as separate text files by repeating this procedure for each worksheet.
-
A second dialog box appears, reminding you that your worksheet may contain features that are not supported by text file formats. If you are interested only in saving the worksheet data into the new text file, click Yes. If you are unsure and would like to know more about which Excel features are not supported by text file formats, click Help for more information.
For more information about saving files in other formats, see Save a workbook in another file format.
The way you change the delimiter when importing is different depending on how you import the text.
-
If you use Get & Transform Data > From Text/CSV, after you choose the text file and click Import, choose a character to use from the list under Delimiter. You can see the effect of your new choice immediately in the data preview, so you can be sure you make the choice you want before you proceed.
-
If you use the Text Import Wizard to import a text file, you can change the delimiter that is used for the import operation in Step 2 of the Text Import Wizard. In this step, you can also change the way that consecutive delimiters, such as consecutive quotation marks, are handled.
See Text Import Wizard for more information about delimiters and advanced options.
If you want to use a semi-colon as the default list separator when you Save As .csv, but need to limit the change to Excel, consider changing the default decimal separator to a comma — this forces Excel to use a semi-colon for the list separator. Obviously, this will also change the way decimal numbers are displayed, so also consider changing the Thousands separator to limit any confusion.
-
Clear Excel Options > Advanced > Editing options > Use system separators.
-
Set Decimal separator to , (a comma).
-
Set Thousands separator to . (a period).
When you save a workbook as a .csv file, the default list separator (delimiter) is a comma. You can change this to another separator character using Windows Region settings.
Caution: Changing the Windows setting will cause a global change on your computer, affecting all applications. To only change the delimiter for Excel, see Change the default list separator for saving files as text (.csv) in Excel.
-
In Microsoft Windows 10, right-click the Start button, and then click Settings.
-
Click Time & Language, and then click Region in the left panel.
-
In the main panel, under Regional settings, click Additional date, time, and regional settings.
-
Under Region, click Change date, time, or number formats.
-
In the Region dialog, on the Format tab, click Additional settings.
-
In the Customize Format dialog, on the Numbers tab, type a character to use as the new separator in the List separator box.
-
Click OK twice.
-
In Microsoft Windows, click the Start button, and then click Control Panel.
-
Under Clock, Language, and Region, click Change date, time, or number formats.
-
In the Region dialog, on the Format tab, click Additional settings.
-
In the Customize Format dialog, on the Numbers tab, type a character to use as the new separator in the List separator box.
-
Click OK twice.
Note: After you change the list separator character for your computer, all programs use the new character as a list separator. You can change the character back to the default character by following the same procedure.
Need more help?
You can always ask an expert in the Excel Tech Community or get support in the Answers community.
See Also
Import data from external data sources (Power Query)
Need more help?
Содержание
- Import or export text (.txt or .csv) files
- Import a text file by opening it in Excel
- Import a text file by connecting to it (Power Query)
- Export data to a text file by saving it
- Import a text file by connecting to it
- Export data to a text file by saving it
- Need more help?
- Редактируем CSV-файлы, чтобы не сломать данные
- Что такое CSV-файлы
- Как Excel портит данные: из классики
- Побеждаем порчу данных правильным импортом
- Альтернатива: Open Office Calc
- Бонус-трек: проблемы при сохранении из Calc в .xlsx
Import or export text (.txt or .csv) files
There are two ways to import data from a text file with Excel: you can open it in Excel, or you can import it as an external data range. To export data from Excel to a text file, use the Save As command and change the file type from the drop-down menu.
There are two commonly used text file formats:
Delimited text files (.txt), in which the TAB character (ASCII character code 009) typically separates each field of text.
Comma separated values text files (.csv), in which the comma character (,) typically separates each field of text.
You can change the separator character that is used in both delimited and .csv text files. This may be necessary to make sure that the import or export operation works the way that you want it to.
Note: You can import or export up to 1,048,576 rows and 16,384 columns.
Import a text file by opening it in Excel
You can open a text file that you created in another program as an Excel workbook by using the Open command. Opening a text file in Excel does not change the format of the file — you can see this in the Excel title bar, where the name of the file retains the text file name extension (for example, .txt or .csv).
Go to File > Open and browse to the location that contains the text file.
Select Text Files in the file type dropdown list in the Open dialog box.
Locate and double-click the text file that you want to open.
If the file is a text file (.txt), Excel starts the Import Text Wizard. When you are done with the steps, click Finish to complete the import operation. See Text Import Wizard for more information about delimiters and advanced options.
If the file is a .csv file, Excel automatically opens the text file and displays the data in a new workbook.
Note: When Excel opens a .csv file, it uses the current default data format settings to interpret how to import each column of data. If you want more flexibility in converting columns to different data formats, you can use the Import Text Wizard. For example, the format of a data column in the .csv file may be MDY, but Excel’s default data format is YMD, or you want to convert a column of numbers that contains leading zeros to text so you can preserve the leading zeros. To force Excel to run the Import Text Wizard, you can change the file name extension from .csv to .txt before you open it, or you can import a text file by connecting to it (for more information, see the following section).
Import a text file by connecting to it (Power Query)
You can import data from a text file into an existing worksheet.
On the Data tab, in the Get & Transform Data group, click From Text/CSV.
In the Import Data dialog box, locate and double-click the text file that you want to import, and click Import.
In the preview dialog box, you have several options:
Select Load if you want to load the data directly to a new worksheet.
Alternatively, select Load to if you want to load the data to a table, PivotTable/PivotChart, an existing/new Excel worksheet, or simply create a connection. You also have the choice of adding your data to the Data Model.
Select Transform Data if you want to load the data to Power Query, and edit it before bringing it to Excel.
If Excel doesn’t convert a particular column of data to the format that you want, then you can convert the data after you import it. For more information, see Convert numbers stored as text to numbers and Convert dates stored as text to dates.
Export data to a text file by saving it
You can convert an Excel worksheet to a text file by using the Save As command.
Go to File > Save As.
In the Save As dialog box, under Save as type box, choose the text file format for the worksheet; for example, click Text (Tab delimited) or CSV (Comma delimited).
Note: The different formats support different feature sets. For more information about the feature sets that are supported by the different text file formats, see File formats that are supported in Excel.
Browse to the location where you want to save the new text file, and then click Save.
A dialog box appears, reminding you that only the current worksheet will be saved to the new file. If you are certain that the current worksheet is the one that you want to save as a text file, click OK. You can save other worksheets as separate text files by repeating this procedure for each worksheet.
You may also see an alert below the ribbon that some features might be lost if you save the workbook in a CSV format.
For more information about saving files in other formats, see Save a workbook in another file format.
Import a text file by connecting to it
You can import data from a text file into an existing worksheet.
Click the cell where you want to put the data from the text file.
On the Data tab, in the Get External Data group, click From Text.
In the Import Data dialog box, locate and double-click the text file that you want to import, and click Import.
Follow the instructions in the Text Import Wizard. Click Help 
In the Import Data dialog box, do the following:
Under Where do you want to put the data?, do one of the following:
To return the data to the location that you selected, click Existing worksheet.
To return the data to the upper-left corner of a new worksheet, click New worksheet.
Optionally, click Properties to set refresh, formatting, and layout options for the imported data.
Excel puts the external data range in the location that you specify.
If Excel does not convert a column of data to the format that you want, you can convert the data after you import it. For more information, see Convert numbers stored as text to numbers and Convert dates stored as text to dates.
Export data to a text file by saving it
You can convert an Excel worksheet to a text file by using the Save As command.
Go to File > Save As.
The Save As dialog box appears.
In the Save as type box, choose the text file format for the worksheet.
For example, click Text (Tab delimited) or CSV (Comma delimited).
Note: The different formats support different feature sets. For more information about the feature sets that are supported by the different text file formats, see File formats that are supported in Excel.
Browse to the location where you want to save the new text file, and then click Save.
A dialog box appears, reminding you that only the current worksheet will be saved to the new file. If you are certain that the current worksheet is the one that you want to save as a text file, click OK. You can save other worksheets as separate text files by repeating this procedure for each worksheet.
A second dialog box appears, reminding you that your worksheet may contain features that are not supported by text file formats. If you are interested only in saving the worksheet data into the new text file, click Yes. If you are unsure and would like to know more about which Excel features are not supported by text file formats, click Help for more information.
For more information about saving files in other formats, see Save a workbook in another file format.
The way you change the delimiter when importing is different depending on how you import the text.
If you use Get & Transform Data > From Text/CSV, after you choose the text file and click Import, choose a character to use from the list under Delimiter. You can see the effect of your new choice immediately in the data preview, so you can be sure you make the choice you want before you proceed.
If you use the Text Import Wizard to import a text file, you can change the delimiter that is used for the import operation in Step 2 of the Text Import Wizard. In this step, you can also change the way that consecutive delimiters, such as consecutive quotation marks, are handled.
See Text Import Wizard for more information about delimiters and advanced options.
If you want to use a semi-colon as the default list separator when you Save As .csv, but need to limit the change to Excel, consider changing the default decimal separator to a comma — this forces Excel to use a semi-colon for the list separator. Obviously, this will also change the way decimal numbers are displayed, so also consider changing the Thousands separator to limit any confusion.
Clear Excel Options > Advanced > Editing options > Use system separators.
Set Decimal separator to , (a comma).
Set Thousands separator to . (a period).
When you save a workbook as a .csv file, the default list separator (delimiter) is a comma. You can change this to another separator character using Windows Region settings.
Caution: Changing the Windows setting will cause a global change on your computer, affecting all applications. To only change the delimiter for Excel, see Change the default list separator for saving files as text (.csv) in Excel.
In Microsoft Windows 10, right-click the Start button, and then click Settings.
Click Time & Language, and then click Region in the left panel.
In the main panel, under Regional settings, click Additional date, time, and regional settings.
Under Region, click Change date, time, or number formats.
In the Region dialog, on the Format tab, click Additional settings.
In the Customize Format dialog, on the Numbers tab, type a character to use as the new separator in the List separator box.
In Microsoft Windows, click the Start button, and then click Control Panel.
Under Clock, Language, and Region, click Change date, time, or number formats.
In the Region dialog, on the Format tab, click Additional settings.
In the Customize Format dialog, on the Numbers tab, type a character to use as the new separator in the List separator box.
Note: After you change the list separator character for your computer, all programs use the new character as a list separator. You can change the character back to the default character by following the same procedure.
Need more help?
You can always ask an expert in the Excel Tech Community or get support in the Answers community.
Источник
Редактируем CSV-файлы, чтобы не сломать данные
Продукты HFLabs в промышленных объемах обрабатывают данные: адреса, ФИО, реквизиты компаний и еще вагон всего. Естественно, тестировщики ежедневно с этими данными имеют дело: обновляют тест-кейсы, изучают результаты очистки. Часто заказчики дают «живую» базу, чтобы тестировщик настроил сервис под нее.
Первое, чему мы учим новых QA — сохранять данные в первозданном виде. Все по заветам: «Не навреди». В статье я расскажу, как аккуратно работать с CSV-файлами в Excel и Open Office. Советы помогут ничего не испортить, сохранить информацию после редактирования и в целом чувствовать себя увереннее.
Материал базовый, профессионалы совершенно точно заскучают.
Что такое CSV-файлы
Формат CSV используют, чтобы хранить таблицы в текстовых файлах. Данные очень часто упаковывают именно в таблицы, поэтому CSV-файлы очень популярны.
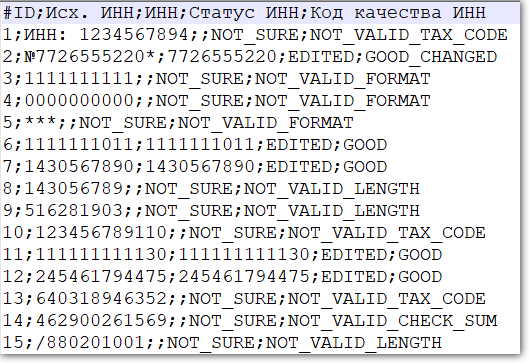
CSV-файл состоит из строк с данными и разделителей, которые обозначают границы столбцов
CSV расшифровывается как comma-separated values — «значения, разделенные запятыми». Но пусть название вас не обманет: разделителями столбцов в CSV-файле могут служить и точки с запятой, и знаки табуляции. Это все равно будет CSV-файл.
У CSV куча плюсов перед тем же форматом Excel: текстовые файлы просты как пуговица, открываются быстро, читаются на любом устройстве и в любой среде без дополнительных инструментов.
Из-за своих преимуществ CSV — сверхпопулярный формат обмена данными, хотя ему уже лет 40. CSV используют прикладные промышленные программы, в него выгружают данные из баз.
Одна беда — текстового редактора для работы с CSV мало. Еще ничего, если таблица простая: в первом поле ID одной длины, во втором дата одного формата, а в третьем какой-нибудь адрес. Но когда поля разной длины и их больше трех, начинаются мучения.

Следить за разделителями и столбцами — глаза сломаешь
Еще хуже с анализом данных — попробуй «Блокнотом» хотя бы сложить все числа в столбце. Я уж не говорю о красивых графиках.
Поэтому CSV-файлы анализируют и редактируют в Excel и аналогах: Open Office, LibreOffice и прочих.
Ветеранам, которые все же дочитали: ребята, мы знаем об анализе непосредственно в БД c помощью SQL, знаем о Tableau и Talend Open Studio. Это статья для начинающих, а на базовом уровне и небольшом объеме данных Excel с аналогами хватает.
Как Excel портит данные: из классики
Все бы ничего, но Excel, едва открыв CSV-файл, начинает свои лукавые выкрутасы. Он без спроса меняет данные так, что те приходят в негодность. Причем делает это совершенно незаметно. Из-за этого в свое время мы схватили ворох проблем.
Большинство казусов связано с тем, что программа без спроса преобразует строки с набором цифр в числа.
Округляет. Например, в исходной ячейке два телефона хранятся через запятую без пробелов: «5235834,5235835». Что сделает Excel? Лихо превратит номера́ в одно число и округлит до двух цифр после запятой: «5235834,52». Так мы потеряем второй телефон.
Приводит к экспоненциальной форме. Excel заботливо преобразует «123456789012345» в число «1,2E+15». Исходное значение потеряем напрочь.
Проблема актуальна для длинных, символов по пятнадцать, цифровых строк. Например, КЛАДР-кодов (это такой государственный идентификатор адресного объекта: го́рода, у́лицы, до́ма).
Удаляет лидирующие плюсы. Excel считает, что плюс в начале строки с цифрами — совершенно лишний символ. Мол, и так ясно, что число положительное, коль перед ним не стоит минус. Поэтому лидирующий плюс в номере «+74955235834» будет отброшен за ненадобностью — получится «74955235834». (В реальности номер пострадает еще сильнее, но для наглядности обойдусь плюсом).
Потеря плюса критична, например, если данные пойдут в стороннюю систему, а та при импорте жестко проверяет формат.
Разбивает по три цифры. Цифровую строку длиннее трех символов Excel, добрая душа, аккуратно разберет. Например, «8 495 5235834» превратит в «84 955 235 834».
Форматирование важно как минимум для телефонных номеров: пробелы отделяют коды страны и города от остального номера и друг от друга. Excel запросто нарушает правильное членение телефона.
Удаляет лидирующие нули. Строку «00523446» Excel превратит в «523446».
А в ИНН, например, первые две цифры — это код региона. Для Республики Алтай он начинается с нуля — «04». Без нуля смысл номера исказится, а проверку формата ИНН вообще не пройдет.
Меняет даты под локальные настройки. Excel с удовольствием исправит номер дома «1/2» на «01.фев». Потому что Windows подсказал, что в таком виде вам удобнее считывать даты.
Побеждаем порчу данных правильным импортом
Если серьезно, в бедах виноват не Excel целиком, а неочевидный способ импорта данных в программу.
По умолчанию Excel применяет к данным в загруженном CSV-файле тип «General» — общий. Из-за него программа распознает цифровые строки как числа. Такой порядок можно победить, используя встроенный инструмент импорта.
Запускаю встроенный в Excel механизм импорта. В меню это «Data → Get External Data → From Text».
Выбираю CSV-файл с данными, открывается диалог. В диалоге кликаю на тип файла Delimited (с разделителями). Кодировка — та, что в файле, обычно определяется автоматом. Если первая строка файла — шапка, отмечаю «My Data Has Headers».
Перехожу ко второму шагу диалога. Выбираю разделитель полей (обычно это точка с запятой — semicolon). Отключаю «Treat consecutive delimiters as one», а «Text qualifier» выставляю в «». (Text qualifier — это символ начала и конца текста. Если разделитель в CSV — запятая, то text qualifier нужен, чтобы отличать запятые внутри текста от запятых-разделителей.)
На третьем шаге выбираю формат полей, ради него все и затевалось. Для всех столбцов выставляю тип «Text». Кстати, если кликнуть на первую колонку, зажать шифт и кликнуть на последнюю, выделятся сразу все столбцы. Удобно.
Дальше Excel спросит, куда вставлять данные из CSV — можно просто нажать «OK», и данные появятся в открытом листе.
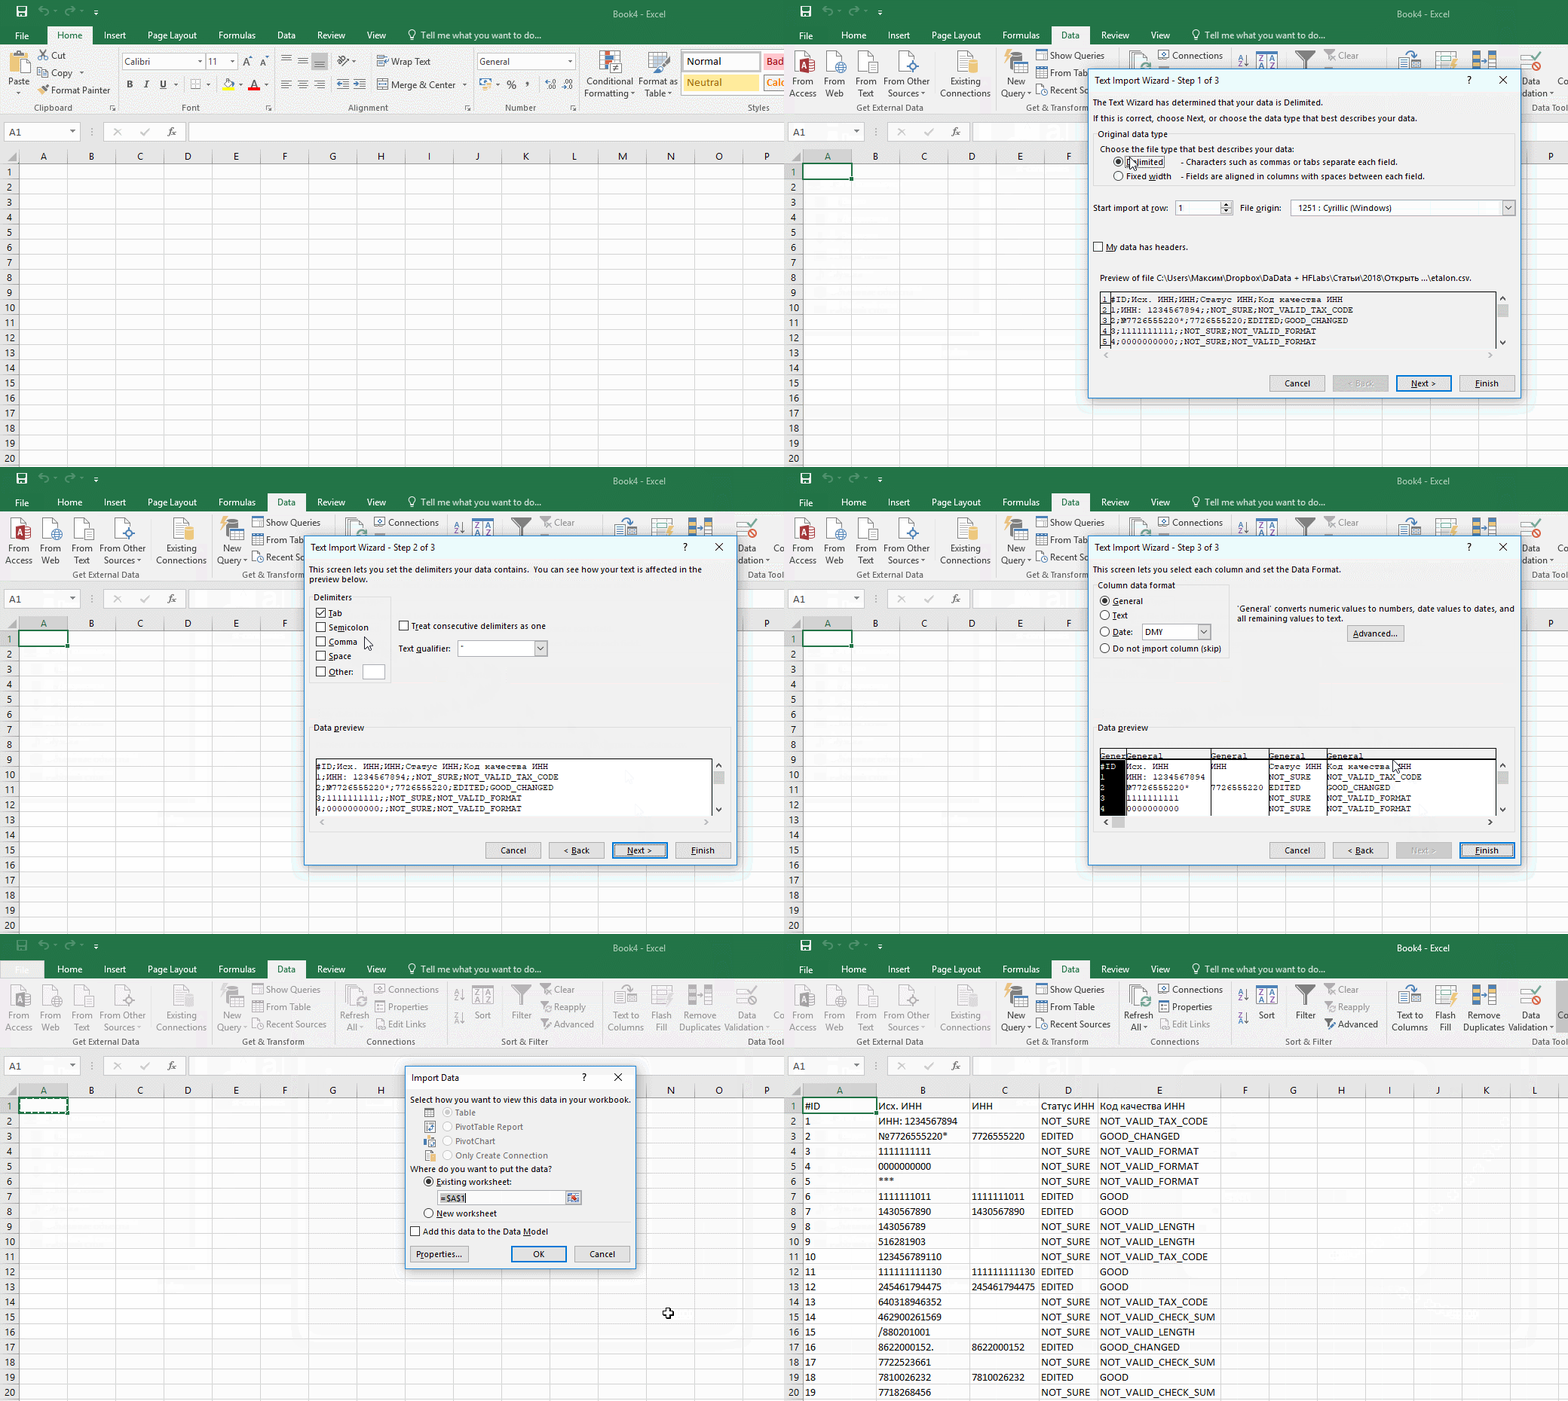
Перед импортом придется создать в Excel новый workbook
Но! Если я планирую добавлять данные в CSV через Excel, придется сделать еще кое-что.
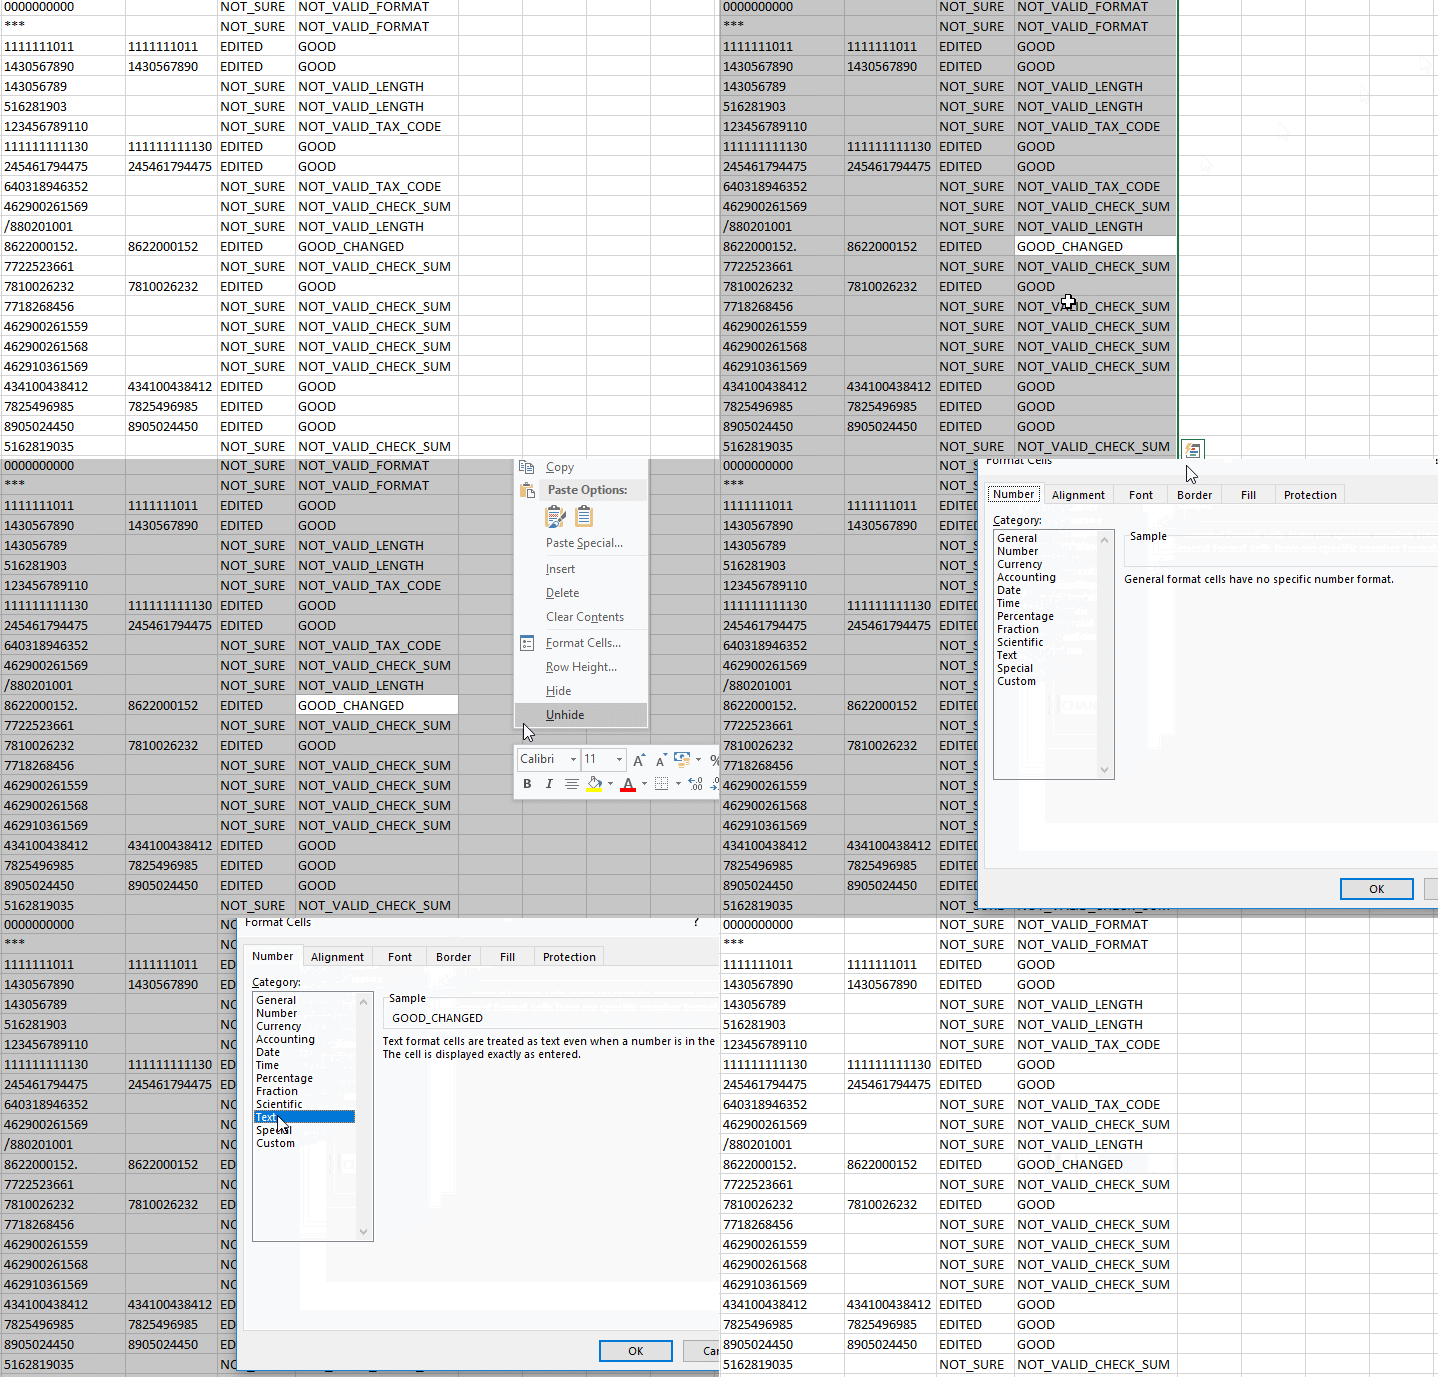
После импорта нужно принудительно привести все-все ячейки на листе к формату «Text». Иначе новые поля приобретут все тот же тип «General».
- Нажимаю два раза Ctrl+A, Excel выбирает все ячейки на листе;
- кликаю правой кнопкой мыши;
- выбираю в контекстном меню «Format Cells»;
- в открывшемся диалоге выбираю слева тип данных «Text».
Чтобы выделить все ячейки, нужно нажать Ctrl+A два раза. Именно два, это не шутка, попробуйте
После этого, если повезет, Excel оставит исходные данные в покое. Но это не самая твердая гарантия, поэтому мы после сохранения обязательно проверяем файл через текстовый просмотрщик.
Альтернатива: Open Office Calc
Для работы с CSV-файлами я использую именно Calc. Он не то чтобы совсем не считает цифровые данные строками, но хотя бы не применяет к ним переформатирование в соответствии с региональными настройками Windows. Да и импорт попроще.
Конечно, понадобится пакет Open Office (OO). При установке он предложит переназначить на себя файлы MS Office. Не рекомендую: хоть OO достаточно функционален, он не до конца понимает хитрое микрософтовское форматирование документов.
А вот назначить OO программой по умолчанию для CSV-файлов — вполне разумно. Сделать это можно после установки пакета.
Итак, запускаем импорт данных из CSV. После двойного клика на файле Open Office показывает диалог.
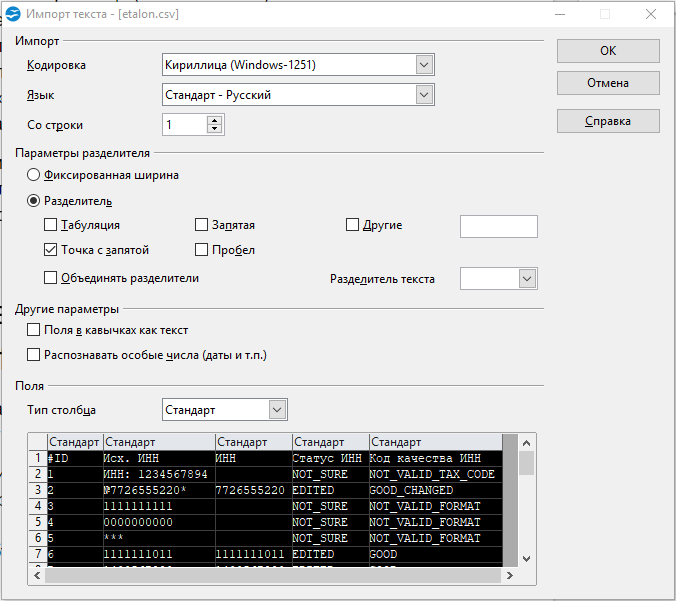
Заметьте, в OO не нужно создавать новый воркбук и принудительно запускать импорт, все само
- Кодировка — как в файле.
- «Разделитель» — точка с запятой. Естественно, если в файле разделителем выступает именно она.
- «Разделитель текста» — пустой (все то же, что в Excel).
- В разделе «Поля» кликаю в левый-верхний квадрат таблицы, подсвечиваются все колонки. Указываю тип «Текст».
Штука, которая испортила немало крови: если по ошибке выбрать несколько разделителей полей или не тот разделитесь текста, файл может правильно открыться, но неправильно сохраниться.
Помимо Calc у нас в HFLabs популярен libreOffice, особенно под «Линуксом». И то, и другое для CSV применяют активнее, чем Excel.
Бонус-трек: проблемы при сохранении из Calc в .xlsx
Если сохраняете данные из Calc в экселевский формат .xlsx, имейте в виду — OO порой необъяснимо и масштабно теряет данные.

Белая пустошь, раскинувшаяся посередине, в оригинальном CSV-файле богато заполнена данными
Поэтому после сохранения я еще раз открываю файл и убеждаюсь, что данные на месте.
Если что-то потерялись, лечение — пересохранить из CSV в .xlsx. Или, если установлен Windows, импортнуть из CSV в Excel и сохранить оттуда.
После пересохранения обязательно еще раз проверяю, что все данные на месте и нет лишних пустых строк.
Если интересно работать с данными, посмотрите на наши вакансии. HFLabs почти всегда нужны аналитики, тестировщики, инженеры по внедрению, разработчики. Данными обеспечим так, что мало не покажется 🙂
Источник
Время на прочтение
5 мин
Количество просмотров 197K
Продукты HFLabs в промышленных объемах обрабатывают данные: адреса, ФИО, реквизиты компаний и еще вагон всего. Естественно, тестировщики ежедневно с этими данными имеют дело: обновляют тест-кейсы, изучают результаты очистки. Часто заказчики дают «живую» базу, чтобы тестировщик настроил сервис под нее.
Первое, чему мы учим новых QA — сохранять данные в первозданном виде. Все по заветам: «Не навреди». В статье я расскажу, как аккуратно работать с CSV-файлами в Excel и Open Office. Советы помогут ничего не испортить, сохранить информацию после редактирования и в целом чувствовать себя увереннее.
Материал базовый, профессионалы совершенно точно заскучают.
Что такое CSV-файлы
Формат CSV используют, чтобы хранить таблицы в текстовых файлах. Данные очень часто упаковывают именно в таблицы, поэтому CSV-файлы очень популярны.
CSV-файл состоит из строк с данными и разделителей, которые обозначают границы столбцов
CSV расшифровывается как comma-separated values — «значения, разделенные запятыми». Но пусть название вас не обманет: разделителями столбцов в CSV-файле могут служить и точки с запятой, и знаки табуляции. Это все равно будет CSV-файл.
У CSV куча плюсов перед тем же форматом Excel: текстовые файлы просты как пуговица, открываются быстро, читаются на любом устройстве и в любой среде без дополнительных инструментов.
Из-за своих преимуществ CSV — сверхпопулярный формат обмена данными, хотя ему уже лет 40. CSV используют прикладные промышленные программы, в него выгружают данные из баз.
Одна беда — текстового редактора для работы с CSV мало. Еще ничего, если таблица простая: в первом поле ID одной длины, во втором дата одного формата, а в третьем какой-нибудь адрес. Но когда поля разной длины и их больше трех, начинаются мучения.
Следить за разделителями и столбцами — глаза сломаешь
Еще хуже с анализом данных — попробуй «Блокнотом» хотя бы сложить все числа в столбце. Я уж не говорю о красивых графиках.
Поэтому CSV-файлы анализируют и редактируют в Excel и аналогах: Open Office, LibreOffice и прочих.
Ветеранам, которые все же дочитали: ребята, мы знаем об анализе непосредственно в БД c помощью SQL, знаем о Tableau и Talend Open Studio. Это статья для начинающих, а на базовом уровне и небольшом объеме данных Excel с аналогами хватает.
Как Excel портит данные: из классики
Все бы ничего, но Excel, едва открыв CSV-файл, начинает свои лукавые выкрутасы. Он без спроса меняет данные так, что те приходят в негодность. Причем делает это совершенно незаметно. Из-за этого в свое время мы схватили ворох проблем.
Большинство казусов связано с тем, что программа без спроса преобразует строки с набором цифр в числа.
Округляет. Например, в исходной ячейке два телефона хранятся через запятую без пробелов: «5235834,5235835». Что сделает Excel? Лихо превратит номера́ в одно число и округлит до двух цифр после запятой: «5235834,52». Так мы потеряем второй телефон.
Приводит к экспоненциальной форме. Excel заботливо преобразует «123456789012345» в число «1,2E+15». Исходное значение потеряем напрочь.
Проблема актуальна для длинных, символов по пятнадцать, цифровых строк. Например, КЛАДР-кодов (это такой государственный идентификатор адресного объекта: го́рода, у́лицы, до́ма).
Удаляет лидирующие плюсы. Excel считает, что плюс в начале строки с цифрами — совершенно лишний символ. Мол, и так ясно, что число положительное, коль перед ним не стоит минус. Поэтому лидирующий плюс в номере «+74955235834» будет отброшен за ненадобностью — получится «74955235834». (В реальности номер пострадает еще сильнее, но для наглядности обойдусь плюсом).
Потеря плюса критична, например, если данные пойдут в стороннюю систему, а та при импорте жестко проверяет формат.
Разбивает по три цифры. Цифровую строку длиннее трех символов Excel, добрая душа, аккуратно разберет. Например, «8 495 5235834» превратит в «84 955 235 834».
Форматирование важно как минимум для телефонных номеров: пробелы отделяют коды страны и города от остального номера и друг от друга. Excel запросто нарушает правильное членение телефона.
Удаляет лидирующие нули. Строку «00523446» Excel превратит в «523446».
А в ИНН, например, первые две цифры — это код региона. Для Республики Алтай он начинается с нуля — «04». Без нуля смысл номера исказится, а проверку формата ИНН вообще не пройдет.
Меняет даты под локальные настройки. Excel с удовольствием исправит номер дома «1/2» на «01.фев». Потому что Windows подсказал, что в таком виде вам удобнее считывать даты.
Побеждаем порчу данных правильным импортом
Если серьезно, в бедах виноват не Excel целиком, а неочевидный способ импорта данных в программу.
По умолчанию Excel применяет к данным в загруженном CSV-файле тип «General» — общий. Из-за него программа распознает цифровые строки как числа. Такой порядок можно победить, используя встроенный инструмент импорта.
Запускаю встроенный в Excel механизм импорта. В меню это «Data → Get External Data → From Text».
Выбираю CSV-файл с данными, открывается диалог. В диалоге кликаю на тип файла Delimited (с разделителями). Кодировка — та, что в файле, обычно определяется автоматом. Если первая строка файла — шапка, отмечаю «My Data Has Headers».
Перехожу ко второму шагу диалога. Выбираю разделитель полей (обычно это точка с запятой — semicolon). Отключаю «Treat consecutive delimiters as one», а «Text qualifier» выставляю в «{none}». (Text qualifier — это символ начала и конца текста. Если разделитель в CSV — запятая, то text qualifier нужен, чтобы отличать запятые внутри текста от запятых-разделителей.)
На третьем шаге выбираю формат полей, ради него все и затевалось. Для всех столбцов выставляю тип «Text». Кстати, если кликнуть на первую колонку, зажать шифт и кликнуть на последнюю, выделятся сразу все столбцы. Удобно.
Дальше Excel спросит, куда вставлять данные из CSV — можно просто нажать «OK», и данные появятся в открытом листе.
Перед импортом придется создать в Excel новый workbook
Но! Если я планирую добавлять данные в CSV через Excel, придется сделать еще кое-что.
После импорта нужно принудительно привести все-все ячейки на листе к формату «Text». Иначе новые поля приобретут все тот же тип «General».
- Нажимаю два раза Ctrl+A, Excel выбирает все ячейки на листе;
- кликаю правой кнопкой мыши;
- выбираю в контекстном меню «Format Cells»;
- в открывшемся диалоге выбираю слева тип данных «Text».
Чтобы выделить все ячейки, нужно нажать Ctrl+A два раза. Именно два, это не шутка, попробуйте
После этого, если повезет, Excel оставит исходные данные в покое. Но это не самая твердая гарантия, поэтому мы после сохранения обязательно проверяем файл через текстовый просмотрщик.
Альтернатива: Open Office Calc
Для работы с CSV-файлами я использую именно Calc. Он не то чтобы совсем не считает цифровые данные строками, но хотя бы не применяет к ним переформатирование в соответствии с региональными настройками Windows. Да и импорт попроще.
Конечно, понадобится пакет Open Office (OO). При установке он предложит переназначить на себя файлы MS Office. Не рекомендую: хоть OO достаточно функционален, он не до конца понимает хитрое микрософтовское форматирование документов.
А вот назначить OO программой по умолчанию для CSV-файлов — вполне разумно. Сделать это можно после установки пакета.
Итак, запускаем импорт данных из CSV. После двойного клика на файле Open Office показывает диалог.
Заметьте, в OO не нужно создавать новый воркбук и принудительно запускать импорт, все само
- Кодировка — как в файле.
- «Разделитель» — точка с запятой. Естественно, если в файле разделителем выступает именно она.
- «Разделитель текста» — пустой (все то же, что в Excel).
- В разделе «Поля» кликаю в левый-верхний квадрат таблицы, подсвечиваются все колонки. Указываю тип «Текст».
Штука, которая испортила немало крови: если по ошибке выбрать несколько разделителей полей или не тот разделитесь текста, файл может правильно открыться, но неправильно сохраниться.
Помимо Calc у нас в HFLabs популярен libreOffice, особенно под «Линуксом». И то, и другое для CSV применяют активнее, чем Excel.
Бонус-трек: проблемы при сохранении из Calc в .xlsx
Если сохраняете данные из Calc в экселевский формат .xlsx, имейте в виду — OO порой необъяснимо и масштабно теряет данные.
Белая пустошь, раскинувшаяся посередине, в оригинальном CSV-файле богато заполнена данными
Поэтому после сохранения я еще раз открываю файл и убеждаюсь, что данные на месте.
Если что-то потерялись, лечение — пересохранить из CSV в .xlsx. Или, если установлен Windows, импортнуть из CSV в Excel и сохранить оттуда.
После пересохранения обязательно еще раз проверяю, что все данные на месте и нет лишних пустых строк.
Если интересно работать с данными, посмотрите на наши вакансии. HFLabs почти всегда нужны аналитики, тестировщики, инженеры по внедрению, разработчики. Данными обеспечим так, что мало не покажется 
It is easy to read the data presented in comma-separated values format by opening with Excel but scrambled data makes it hard to read. There are also a few problems associated, like unexpected data changes, by changing the format when the CSV file is opened directly. This article shows different ways to convert the CSV files into Excel by covering the following topics.
Excel has a handling feature for various data presented in different formats, including Comma Separated Values (CSV). In addition, it contains various useful functions that help import these files and easily convert them into Excel sheet tables. As a result, it is the most commonly used for transmitting and storing data related to contacts, statistical information, and calendar appointments.
This section facilitates examples of ways to convert the Comma Separated Values files into excel.
Table of contents
- What Is Converting CSV Files In Excel?
- Explanation
- How To Open, Import & Convert CSV File Into Excel?
- How to Use CSV Files in Excel?
- Important Things To Note
- Recommended Articles
- Converting CSV files in excel is an easy process. CSV stands for Comma separated Values. It indicates that the values will be separated by a comma.
- We can have CSV files in Excel in two different ways. One is by importing the file, and the other one is by opening the file.
- We should remember that the format of the CSV file inserted using the open method will be in .csv format and will not change into .xlsx or .xls formats.
- For CSV files, excel allows a maximum of 1,048,576 rows and 16,384 columns.
Explanation
We have been using the data available in CSV format for several years. It indicates that data is separated by a comma using the common fields. Different ways are available to convert the CSV files into Excel. Those include:
- Direct opening of CSV files with Excel.
- Double-clicking and opening the file through the windows explorer option.
- Importing CSV files into worksheets.
The main intention behind the conversion of CSV data into Excel is that supportability. Each comma-separated value is placed into each cell to separate easily with the conversion. The data presented in the CSV format limits the capabilities of a user in generating insights from the data in performing the data analysis.
How To Open, Import & Convert CSV File Into Excel?
Let us discuss some examples of the comma-separated values file in Excel to understand how to open, import and convert CSV files into Excel.
You can download this CSV Files into Excel Template here – CSV Files into Excel Template
Example #1 – Open CSV File In WorkSheet
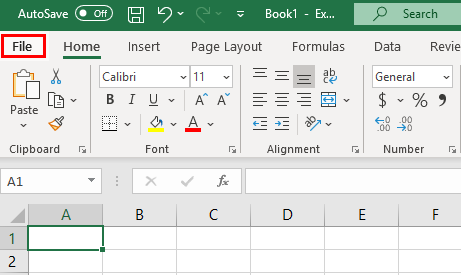
Step 1: We must open the Excel worksheet and go to the File menu.
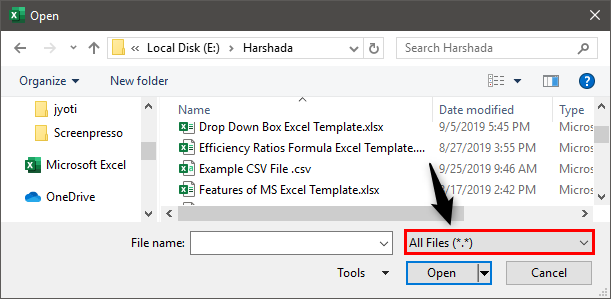
It shows the Open dialog box, as shown in the figure.
Step 2: Then, we need to go to the CSV file’s directory. Select All Files on the right of the File name field.
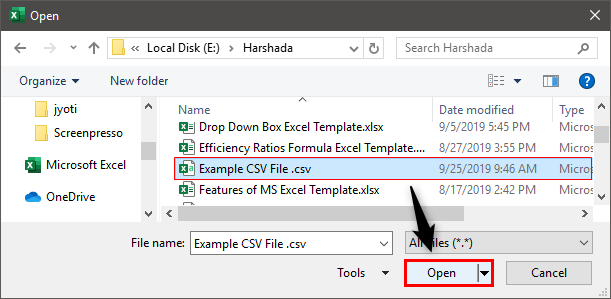
Select the name of the CSV file. Then, click on Open to open the file with Excel.
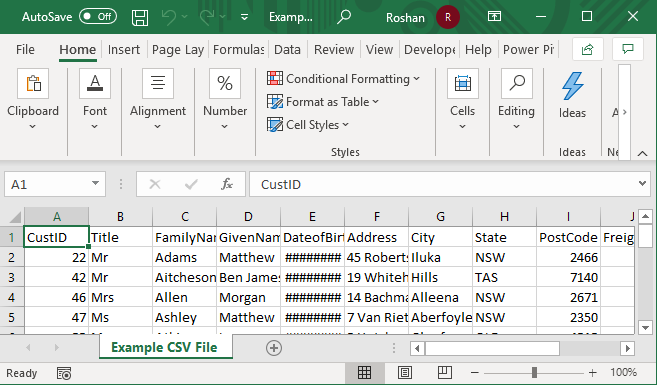
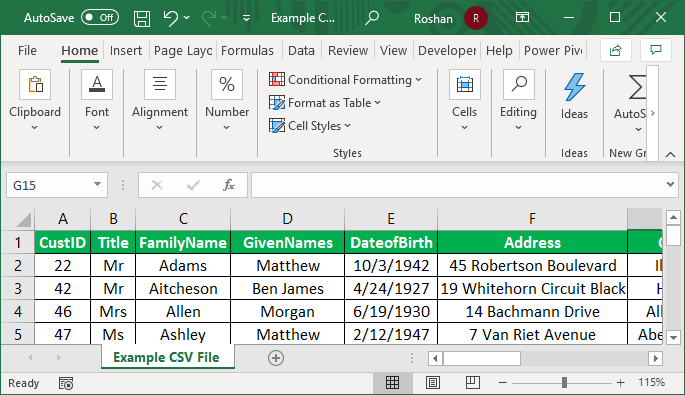
Step 3: It directly displays the data in the new workbook, as shown in the figure.
Data separated by a comma is placed into each cell in the Excel sheet.
Step 4: We need to apply the formatting to the title fields to differentiate the headers of columns.
Step 5: Use the data for required purposes by applying the excel functions and formula.
Note: In this Excel, if we open a .txt file instead of a .csv file, Import Text Wizard is used to import the data into Excel.
Example #2 – Using Windows Explorer
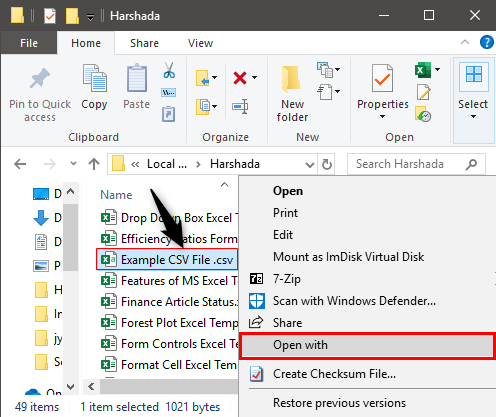
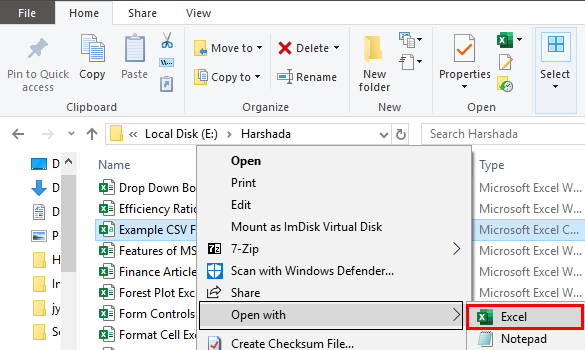
Step 1: We must go to the CSV file’s directory. Right-click on the file and choose Open with.
Step 2: Select the choose default program option on the right side of the Open with command, as shown in the figure. Then, choose Excel (desktop) among the recommended programs.
Step 3: As a result, now, the file is opened, and data is displayed, as shown in the figure.
Example #3 – Import CSV File Through External Data
This method requires a lot of steps to import data compared to the other two techniques. However, it helps in importing the data into the current worksheet.
The steps to import CSV files through external data are as follows:
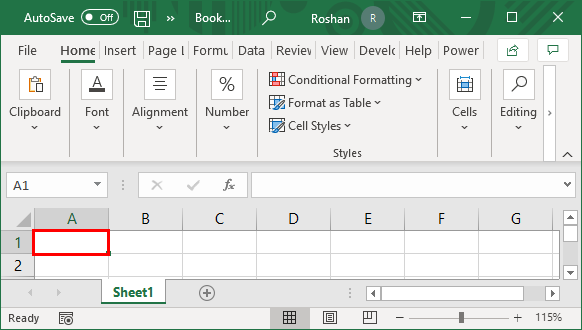
- First, we must open an Excel worksheet and place the cursor into a cell where we want to locate the data by importing from a .txt file or .csv file.
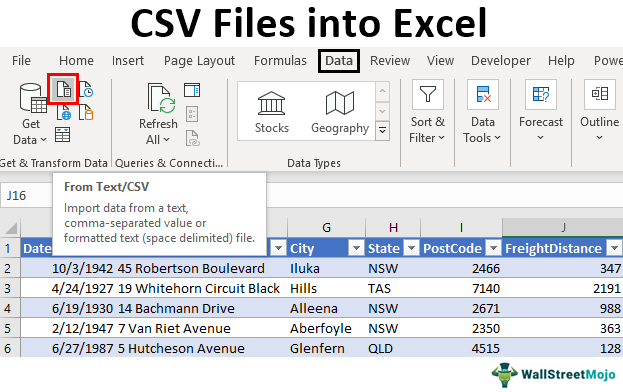
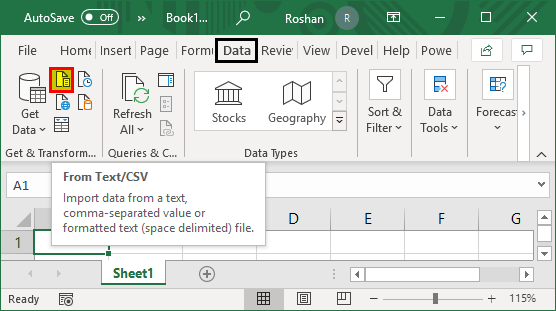
- Then, we need to go to the Data tab on the ribbon and click From Text/CSV under the Get External Data group, as shown in the screenshot.
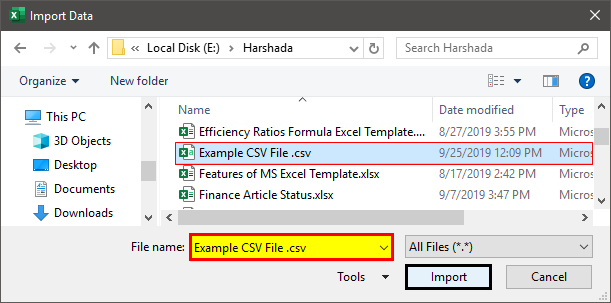
- Browse to the location of the CSV or txt file to import the data. Then, select the .csv file and click on the Import button.
- The Example CSV File wizard will open when clicking on Import.
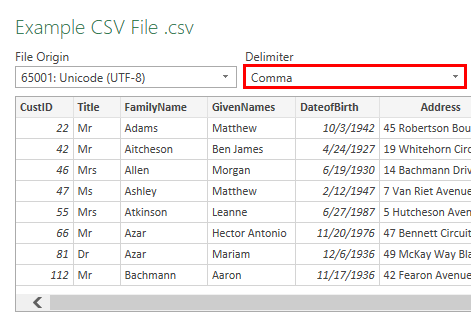
- Then we need to set the delimiter as Comma and click on ‘Load to’ to move to the next step.
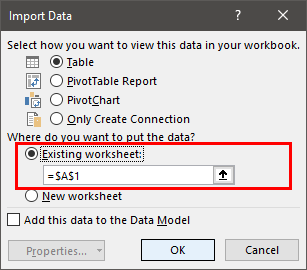
- It opens the ‘Import data’ dialog box. Here, we must choose the existing worksheet, place the cell address, and click OK.
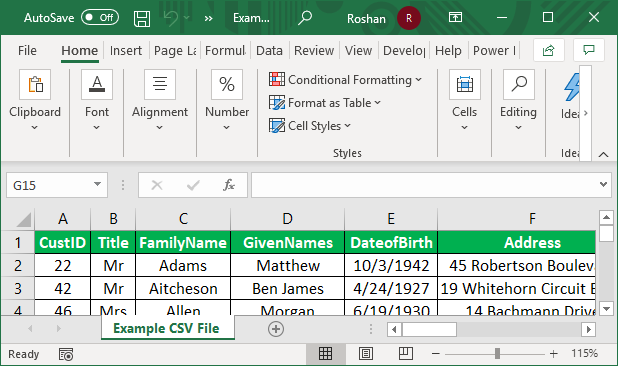
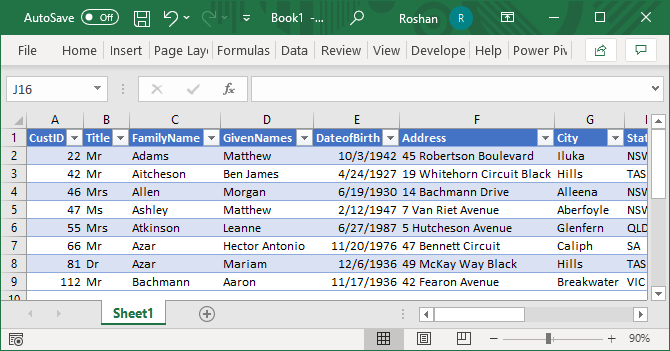
- Consequently, the data will be imported into the Excel sheet, as shown in the screenshot.
We can use the data for various purposes in Excel.
How to Use CSV Files in Excel?
- Storing data and performing the required calculations on the data.
- Improving the security of the files as Excel files are not opened by any other software.
- Possible to save the data in tabular format with the extension of .xls and .xlsx.
- Display of data in rows and columns to represent the fields.
- Using the required format for the data of different types.
- Development of graphs and charts on the numerical data if presented.
- Using the statistical analysis of the data.
- Using the programming and macros and developing the data in developer mode.
- Improving the flexibility in reading large data by using sorting and filtering.
Important Things To Note
- Opening the CSV files is an easy way to convert the CSV data into Excel, and it does not change the file format to .xls or .xlsx
- Default settings are provided for when the .csv file is opened with Excel.
Frequently Asked Questions
1. What is CSV file in excel?
CSV (Comma separated Values) are the values separated by commas in Excel. This feature is available in any version, from 365 to 2007 version.
2. What are the two ways to insert CSV files into Excel?
In Excel, we have 2 ways to insert CSV files. One is by importing and another, by opening. The shortcut to open a CSV file in Excel is Ctrl +O.
3. Which is better? Opening or importing a CSV file into Excel?
Though both methods are used commonly to insert CSV files into Excel, opening a file uses default data formatting settings. We cannot decide how to display the data.
If the data has other values (such as data formats), it is better to import the CSV file into Excel to control how to display the data.
Recommended Articles
This article is a guide to CSV files into Excel. Here, we discuss how to open, import, and convert CSV files into Excel, practical examples, and a downloadable Excel template. You may learn more about Excel from the following articles: –
- Excel CSV UTF8
- CSV vs. Excel
- What is OneDrive Excel?
- Power Query Excel
CSV – популярное расширение файлов, которые используются, в основном, для обмена данными между различными компьютерными программами. Чаще всего необходимости в открытии и редактировании таких документов нет. Однако в некоторых случаях перед пользователями может встать такая задача. Программа Excel позволяет это сделать, но в отличие от стандартных файлов в формате XLS и XLSX, простое открытие документа двойным щелчком мыши не всегда дает качественный результат, что может выражаться в некорректном отображении информации. Давайте посмотрим, каким образом можно открыть файлы с расширением CSV в Экселе.
-
Открываем CSV-файлы
- Метод 1: двойным щелчком или через контекстное меню
- Метод 2: применяем Мастер текстов
- Метод 3: через меню “Файл”
- Заключение
Для начала давайте разберемся, что из себя представляют документы в данном формате.
CSV – аббревиатура, которая расшифровывается как “Comma-Separated Values” (на русском языке означает “значения, разделенные запятыми”).
Как следует из названия, в таких документах используются разделители:
- запятая – в англоязычных версиях;
- точка с запятой – в русскоязычных версиях программы.
Во время открытия документа в Excel основная задача (проблема) заключается в выборе способа кодировки, примененного при сохранении файла. Если будет выбрана не та кодировка, скорее всего, пользователь увидит множество нечитаемых символов, и полезность информации будет сведена к минимуму. Помимо этого, ключевое значение имеет используемый разделитель. Например, если документ был сохранен в англоязычной версии, а затем его пытаются открыть в русскоязычной, скорее всего, качество отображаемой информации пострадает. Причина, как мы ранее отметили, заключается в том, что в разных версиях используются разные разделители. Давайте посмотрим, как избежать этих проблем и как правильно открывать файлы CSV.
Прежде, чем приступить к более сложным методам, давайте рассмотрим самый простой. Он применим только в тех случаях, когда файл был создан/сохранен и открывается в одной и той же версии программы, а значит, проблем с кодировкой и разделителями быть не должно. Здесь возможно два варианта, опишем их ниже.
Excel установлена как программа по умолчанию для открытия CSV-файлов
Если это так, открыть документ можно как и любой другой файл – достаточно просто дважды щелкнуть по нему.
Для открытия CSV-фалов назначена другая программа или не назначена вовсе
Алгоритм действия в таких ситуациях следующий (на примере Windows 10):
- Щелкаем правой кнопкой мыши по файлу и в открывшемся контекстном меню останавливаемся на команде “Открыть с помощью”.
- Во вспомогательном меню система может сразу предложить программу Excel. В этом случае кликаем по ней, в результате чего файл откроется (как и при двойном щелчке по нему). Если нужной нам программы нет в списке, кликаем по пункту “Выбрать другое приложение”.
- Появится окно, в котором мы можем выбрать программу (чтобы раскрыть весь список доступных вариантов, требуется нажать кнопку “Еще приложения”), с помощью которой требуется открыть документ. Ищем то, что нам нужно и жмем OK. Чтобы назначить Excel приложением по умолчанию для данного типа файлов, предварительно ставим соответствующую галочку.
- В некоторых случаях, когда и в этом окошке не удается найти Эксель, щелкаем по кнопке “Найти другое приложение на этом компьютере” в конце списка.
- На экране отобразится окно, в котором мы переходим к расположению программы на ПК, отмечаем исполняемый файл с расширением EXE и жмем кнопку “Открыть”.
Независимо от того, какой из описанных выше способов был выбран, результатом будет открытие CSV-файла. Как мы упомянули выше, корректно отображаться содержимое будет только при соответствии кодировки и разделителей.
В остальных случаях может показываться нечто подобное:
Поэтому описанный метод подходит не всегда, и мы переходим к следующим.
Метод 2: применяем Мастер текстов
Воспользуемся интегрированным в программу инструментом – Мастером текстов:
- Открыв программу и создав новый лист, чтобы получить доступ ко всем функциям и инструментам рабочей среды, переключаемся во вкладку “Данные”, где щелкаем по кнопке “Получение внешних данных”. Среди раскрывшихся вариантов выбираем “Из текста”.
- Откроется окно, в котором нам нужно перейти к расположению файла, который требуется импортировать. Отметив его жмем кнопку “Импорт”.
- Появится Мастер текстов. Проверяем, чтобы была выбрана опция “с разделителями” для параметра “Формат данных”. Выбор формата зависит от кодировки, которая была использована при его сохранении. Среди самых популярных форматов можно отметить “Кириллицу (DOS)” и “Юникод (UTF-8)”. Понять, что сделан правильный выбор можно, ориентируясь на предварительный просмотр содержимого в нижней части окна. В нашем случае подходит “Юникод (UTF-8)”. Остальные параметры чаще всего не требует настройки, поэтому жмем копку “Далее”.
- Следующим шагом определяемся с символом, который служит в качестве разделителя. Так как наш документ был создан/сохранен в русскоязычной версии программы, выбираем “точку с запятой”. Здесь у нас, как и в случае с выбором кодировки, есть возможность попробовать различные варианты, оценивая результат в области предпросмотра (можно, в том числе, указать свой собственный символ, выбрав опцию “другой”). Задав требуемые настройки снова нажимаем кнопку “Далее”.
- В последнем окне, чаще всего, вносить какие-либо изменения в стандартные настройки не нужно. Но если требуется изменить формат какого-то столбца, сначала кликаем по нему в нижней части окна (поле “Образец”), после чего выбираем подходящий вариант. По готовности жмем “Готово”.
- Появится окошко, в котором выбираем способ импорта данных (на имеющемся или на новом листе) и жмем OK.
- Все готово, нам удалось импортировать данные CSV-файла. В отличие от первого метода, мы можем заметить, что была соблюдена ширина столбцов с учетом содержимого ячеек.
И последний метод, которым можно воспользоваться заключается в следующем:
- Запустив программу выбираем пункт “Отрыть”.
Если программа уже ранее была открыта и ведется работа на определенном листе, переходим в меню “Файл”.
Щелкаем по команде “Открыть” в списк команд.
- Жмем кнопку “Обзор”, чтобы перейти к окну Проводника.
- Выбираем формат “Все файлы”, переходим к месту хранения нашего документа, отмечаем его и щелкаем кнопку “Открыть”.
- На экране появится уже знакомый нам Мастер импорта текстов. Далее руководствуемся шагами, описанными в Методе 2.
Заключение
Таким образом, несмотря на кажущуюся сложность, программа Эксель вполне позволяет открывать и работать с файлами в формате CSV. Главное – определиться с методом реализации. Если при обычном открытии документа (двойным щелчком мыши или через контекстное меню) его содержимое содержит непонятные символы, можно воспользоваться Мастером текста, который позволяет выбрать подходящую кодировку и знак разделителя, что напрямую влияет на корректность отображаемой информации.






 Если программа уже ранее была открыта и ведется работа на определенном листе, переходим в меню “Файл”.
 Щелкаем по команде “Открыть” в списк команд.


