
This post will cover several methods for obtaining the cross symbol in Microsoft Word, including using your keyboard.
However, before we begin, you may get this symbol by copying and pasting it from the button below.
Cross Symbol Alt Code Shortcut (Windows)
The Alt Code shortcut for the Cross Symbol is Alt + 0134. To type with this method, press and hold one of the Alt keys on your keyboard while using the numeric keypad to enter the Alt code, then release the Alt key.
This method requires that your keyboard have a separate numeric keypad with Num Lock enabled. It also works on Windows only.
On Windows, alt codes are used to type symbols or characters that are not available on the keyboard.
This method is extremely beneficial because it saves a significant amount of time when trying to type special characters.
The following are the detailed steps you can take to type the Cross symbol on Windows using the Alt Code keyboard shortcut:
- Open your document where the Cross symbol is to be typed.
- The cursor should be positioned in the desired location.
- Press and hold on one of your keyboard’s Alt Keys.
- As you hold down the Alt key, use the numeric keypad on the right to type the Cross Alt code (0134)
- Release the alt key after typing the code.
As soon as you let go of the Alt key, the Cross symbol will appear.
The following rules must be followed in order for the Cross Alt Code to work.
- Before typing the code, you must hold down the Alt key.
- To type the alt code, you must use the numeric keypad on the right side of the keyboard.
- The NumLock must be enabled because you are using the 10-key numeric keypad. When you turn off NumLock, the number keys become disabled, and you won’t be able to type any numbers.
- If you’re using a laptop that doesn’t have a numeric keypad, you’ll need to activate the hidden numeric keypad first. On most laptops, you can turn it on by pressing the Fn + NmLk keys at the same time. A hidden numeric keypad isn’t found on every laptop. If it doesn’t appear in yours, you won’t be able to type symbols using the alt code method unless you connect an external keyboard with a numeric keypad or use the on-screen keyboard. Yet still, you can use the other methods discussed in this guide.
- You should also be aware that, depending on the text editor you’re using, not all symbols can be typed with the alt code. Only Microsoft Word recognizes some of the alt codes.
Cross Symbol Shortcut (Mac)
The Cross Symbol shortcut for Mac is Option + T.
The Alt code method is only for Windows and can only be used on that platform.
However, this shortcut will work for you if you’re using a Mac PC.
Follow the directions below to use this Mac keyboard shortcut:
- Open the document where you want to type the symbol.
- Press and hold the Option key.
- As you hold on to this key, simply press once on the T key.
- Then release the Option key.
You can type the Cross sign anywhere with your Mac keyboard if you follow the above steps correctly.
Shortcut to type Cross Sign (MS Word)
MS Word shortcut to type the Cross symbol is 2020, Alt + X.
While the Alt code and Mac shortcut mentioned above can be used to type this symbol anywhere, including Microsoft Word, this shortcut can only be used in Word.
To use this shortcut, open your Microsoft Word document, position the insertion pointer where you want to type the Cross symbol, and then follow the simple instructions below:
- Simply type 2020.
- Then press Alt plus X simultaneously.
- If it doesn’t work, highlight the code before pressing the Alt and X keys simultaneously.
When you press Alt + X after typing the Unicode, the symbol appears in place of the Unicode.
Insert Cross Symbol from the Office Symbol Library
If using the keyboard isn’t your thing, there’s also a mouse-based method for getting the Cross symbol in Office apps like Microsoft Word, Excel, or PowerPoint.
To explain the steps, we’ll use screenshots from Microsoft Word. You can, however, use the same method in Excel and PowerPoint.
Without further ado, here are the steps to take:
- Launch MS Word or Excel or PowerPoint.
- Place your cursor at the desired place.
- Navigate to the Insert tab.

- Click the Symbols button in the Symbols group, then select More Symbols from the drop-down menu.

The Symbol window will appear. It contains a gazillion of symbols which include the Cross symbol.
- Find the Cross symbol in the symbol library.
To easily locate this symbol, use the Subset dropdown list to display specific types of symbols. You can find the Cross symbol in the General Punctuations group in the Subset list.
However, the fastest way to get this symbol is to type the Unicode 2020 in the Character code text box. Once you type the Unicode, the Cross symbol will be filtered out and selected.
- To insert it into your document, simply double-click on it. Alternatively, click the Insert button.
- Close the Dialog.
If you follow the above steps carefully, you can insert the Cross symbol in Word or any other symbol or character not available on the keyboard.
Copy and Paste Cross Symbol
This is by far the simplest way to obtain any symbol, including the Cross sign.
You simply need to copy the symbol somewhere, such as a web page, and then press Ctrl + V after switching to the document where you need it.
If you want to copy the symbol, you can do so below.
†
If you have a Windows PC, the steps below will show you how to copy this symbol from the Character Map.
- Search and Launch the Character Map app.
- Near the button, select the Advance View checkbox to expand more Character map options.

- In the Advanced view you will see a search box. Type Dagger in there and press Enter.
- The symbol will appear in the search results.
- Simply double click on it and hit on the Copy button after it is selected in the Characters to copy text box.
Conclusion
Obtaining symbols that do not have keys on the keyboard can be difficult.
However, with the assistance of the methods and instructions discussed here, it should no longer be a difficult task.
Thank you very much for taking the time to read this guide.
![]()
Download Article
![]()
Download Article
This wikiHow will teach you how to add a cross mark symbol or × in a Word document using the symbols menu in Windows and Mac or an alt code. If you have a 10-digit numerical keypad, you can use the ALT code, which is Alt + 0215.
Things You Should Know
- Open a word doc and go to Insert / Symbol.
- On a Windows computer, click More Symbols / Wingdings 2. Then, select the cross mark and click Insert.
- On a Mac computer, click Advanced Symbols. Select the cross mark from the pop up window and click Insert.
- You can also use the ALT code method to produce a small cross mark (×). Simply press «ALT + 0215».
-

1
Open your document in Word. You can either open Word, then go to File > Open to open your document, or you can right-click your document file and click Open with > Word.
- You can also create a new, blank document.
-
2
Click where you want to add the symbol. The cursor defaults to the last place it was when you last worked on the document or in the most upper left corner of a new document.
- You can use the ALT code Alt + 0215 instead of continuing through with the rest of this method, though that alt code will produce a small cross mark (×). If you want to read more about ALT codes, read How toType Symbols Using the ALT Key.
Advertisement
-
3
Click the Insert tab. You’ll see this along the top of your document space next to the Home tab.
- If you’re using a Mac, you’ll see this along the top of your screen, and it will produce a drop-down menu.
-
4
Click Symbol. You’ll see this in the far right of the menu in the Symbols grouping.
- If you’re using a Mac, you’ll find this in the middle of the drop-down menu.
-
5
Click More Symbols. You’ll see this at the bottom of the menu.
- If you’re using a Mac, the button is Advanced Symbol instead. A window will pop up and you can click to select the cross mark symbol and click Insert.
-
6
Click to select Wingdings 2 from the font drop-down menu. You’ll find this under the Symbols tab.
-
7
Click to select the cross mark symbol and click Insert. You’ll see the cross mark symbol appear in the document where your cursor is located.[1]


Advertisement
Ask a Question
200 characters left
Include your email address to get a message when this question is answered.
Submit
Advertisement
Thanks for submitting a tip for review!
References
About This Article
Article SummaryX
1. Open your document in Word.
2. Click where you want to add the symbol.
3. Click the Insert tab.
4. Click Symbol.
5. Click to select Wingdings 2 from the font drop-down menu.
6. Click to select the cross mark symbol and click Insert.
Did this summary help you?
Thanks to all authors for creating a page that has been read 35,479 times.
Is this article up to date?
HTTA is reader supported. When you buy through links on our site, we may earn an affiliate commission at no extra cost to you. Learn more.
In today’s article, you’ll learn how to use some keyboard shortcuts to type the Cross Symbol (text) anywhere like Word/Excel using Windows or Mac.
Just before we begin, I’ll like to tell you that you can also use the button below to copy and paste the Cross sign into your work for free.
However, if you just want to type this symbol on your keyboard, the actionable steps below will show you how.
Cross Symbol [†] Quick Guide
To type the Cross Symbol on Mac, press Option + t shortcut on your keyboard. For Windows users, simply press down the Alt key and type 0134 using the numeric keypad, then let go of the Alt key. These Cross sign shortcuts can work on any software including MS Word, Excel, and PowerPoint, on both Windows and Mac.
Below table contains all the information you need to type the Cross Symbol on keyboard on both Mac and Windows keyboard.
| Symbol Name | Cross Sign |
| Symbol | † |
| Alt Code | 0134 |
| Shortcut for Windows | Alt+0134 |
| Shortcut for Mac | Option + t |
| Shortcut for Word | 271D, Alt+X |

The quick guide above provides some useful shortcuts and alt codes on how to type the Cross symbol on both Windows and Mac.
You can also explore the table below for different variations of the Cross symbols with their respective Alt Codes that can be used to type them in Microsoft Word.
| Cross Symbol Name | Cross Symbol Text | Cross Symbol Alt Code |
| Cross | † | Alt + 0134 |
| Latin Roman Cross | ✝ | Alt + 10013 |
| Outlined Cross | ✟ | Alt + 10015 |
| Latin Cross 3D | ✞ | Alt + 10014 |
| Latin Cross outline | ✟ | Alt + 10013 |
| Greek Cross | ☩ | Alt + 9769 |
| Orthodox Cross | ☦ | Alt + 9766 |
| Dotted Cross | ⁜ | Alt + 8284 |
| Cross | ☨ | Alt + 9768 |
| Jerusalem Cross | ☩ | Alt + 9769 |
| West Syriac Cross | ♰ | Alt + 9840 |
| East Syriac Cross | ♱ | Alt + 9841 |
| Heavy Cross | ✚ | Alt + 10010 |
| Maltese Cross | ✠ | Alt + 10016 |
For more details, below are some other methods you can also use to insert these symbols into your work such as Word or Excel document.
Microsoft Office provides several methods for typing Cross Symbol or inserting symbols that do not have dedicated keys on the keyboard.
In this section, I will make available for you five different methods you can use to type or insert the Cross Sign on your PC, like in MS Office (ie. Word, Excel, or PowerPoint) for both Mac and Windows users.
Without any further ado, let’s get started.
Using the Cross Symbol Alt Code (Windows Only)
The Cross Symbol alt code is 0134.
Even though this Symbol have no dedicated key on the keyboard, you can still type it on the keyboard with the Alt code method. To do this, press and hold the Alt key whilst pressing the Cross Symbol Text Symbol Alt code (i.e. 0134) using the numeric keypad.

This method works on Windows only. And your keyboard must also have a numeric keypad.
Below is a break-down of the steps you can take to type the Cross Sign on your Windows PC:
- Place your insertion pointer where you need the Cross Symbol text.
- Press and hold one of the Alt keys on your keyboard.
- Whilst holding on to the Alt key, press the Cross symbol’s alt code (0134). You must use the numeric keypad to type the alt code. If you are using a laptop without the numeric keypad, this method may not work for you. On some laptops, there’s a hidden numeric keypad which you can enable by pressing Fn+NmLk on the keyboard.
- Release the Alt key after typing the Cross Sign Alt code to insert the Symbol into your document.
This is how you may type this symbol in Word using the Alt Code method.
Using the Cross Symbol Shortcut (Mac and Windows)
For Mac users, the keyboard shortcut for the Cross Symbol is Option + t. For Windows users, use the Alt Code method by pressing down the [Alt] key whilst typing the Cross Symbol Text alt code which is 0134. You must use the numeric keypad to type the alt code. Also, ensure that your Num Lock key is turned on.
Below is a breakdown of the Cross Symbol shortcut for Mac:
- First of all, place the insertion pointer where you need to type the Cross symbol (†).
- Now, press Option + t simultaneously on your keyboard to insert the symbol.
Below is a breakdown of the Cross Symbol shortcut for Windows:
- Place the insertion pointer at the desired location.
- Press and hold down the Alt key
- While pressing down the Alt key, type 0134 using the numeric keypad to insert the symbol.
These are the steps you may use to type Cross Symbol in Word or Excel.
Copy and Paste Cross Sign † (text)
Another easy way to get the Cross Symbol on any PC is to use my favorite method: copy and paste.
All you have to do is to copy the symbol from somewhere like a web page, or the character map for windows users, and head over to where you need the symbol (say in Word or Excel), then hit Ctrl+V to paste.
Below is the symbol for you to copy and paste into your Word document. Just select it and press Ctrl+C to copy, switch over to Microsoft Word, place your insertion pointer at the desired location, and press Ctrl+V to paste.
†
Alternatively, just use the copy button at the beginning of this post.
For windows users, obey the following instructions to copy and paste the Cross Symbol using the character map dialog box.
- Click on the Start button and search for Character Map. The Character Map app will appear in the search results, click to open.

- The Character Map dialog will appear. Click to check the Advanced view check-box to expand the dialog box for more advanced options.

- In the font list, select Segoe UI Symbol.
- On the advanced view, type Cross in the Search box.
- You should now see the Cross Symbol on the character map dialog. If you can’t see it, then you should look through the library of symbols to spot it. When found, double click it to select. Alternatively, click on the Select button.

- After you select the symbol by double-clicking it, it should appear in the Character to copy: field, then click on the Copy button to copy the symbol.
- Switch to your Microsoft Word or Excel document, place the insertion pointer at the desired location, and press Ctrl+V to paste.
This is how you may use the Character Map dialog to copy and paste any symbol on Windows PC.
Using insert Symbol dialog box (Word, Excel, PowerPoint)
The insert symbol dialog box is a library of symbols from where you can insert any symbol into your Word document with just a couple of mouse clicks.
Obey the following steps to insert the Cross Symbol in Word or Excel using the insert symbol dialog box.
- Open your Word document.
- Click to place the insertion pointer where you wish to insert the symbol.
- Go to the Insert tab.

- In the Symbols category, click on the Symbol drop-down and select the More Symbols button.

The Symbol dialog box will appear.
- In the Font list, select Segoe UI Symbol.
- In the Subset drop-down list, select Dingbats to display symbols in this category which includes the Cross Symbol.
- Select the symbol and click on the Insert button. Alternatively, double click on the symbol to insert it into your Word document.

- Close the dialog.
The symbol will then be inserted exactly where you placed the insertion pointer.
These are the steps you may use to insert the Cross Symbol in Word.
Conclusion
As you can see, there are several different methods you can use to type the Cross Sign in Microsoft Word.
Using the shortcuts for both Windows and Mac makes the fastest option for this task. Shortcuts are always fast.
Thank you very much for reading this blog.
If you have anything thing to say or questions to ask concerning the Cross Symbol text, please drop it in the comments.
Thank you
A tick or a cross symbol can help to clarify your point in Word document, but apparently there are no corresponding keys on the keyboard. So you must take some steps to insert them just like type other special symbols. Here I collected some effective methods, you can choose any one of them to insert a check mark (√) or error mark (×) in Word.
Insert Tick or Cross Symbols
1. Click Symbol in Insert tab, choose More Symbols… in the drop-down menu.

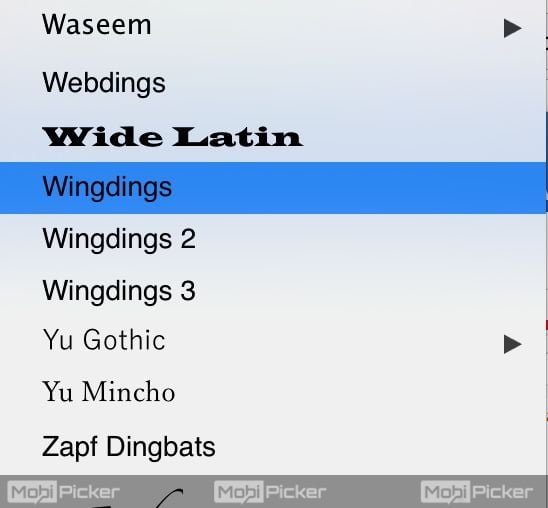
2. Choose the Font as Wingdings 2 under Symbols tab.
3. Then you can find tick and cross symbols very easily. Just select the one you want, and hit Insert button to add it to your document.

Change the Font to Wingdings 2
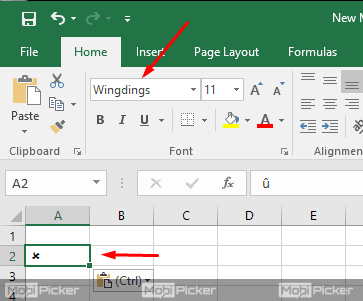
1. To simplify the process, you can directly change the font in Home tab to Wingdings 2 at first.

2. Then if you enter the capital letter “O”, it will be displayed as a cross symbol, and “P” will be displayed as a tick symbol.
3. Similarly, you can enter the capital letter at first, and then select it and change its font (either in Home tab or right-click menu) to Wingdings 2.
Change the Font to Wingdings
1. Alternately, you can change the font into Wingdings instead of Wingdings 2.
2. Press and hold the [Alt] key while enter the corresponding code on numeric pad. Then you can type the check mark or cross mark easily. The codes are as below:
√ – [Alt] + 0252
× – [Alt] + 0251

The method 1 and 2 can also be applied to Microsoft Excel. And if you want to insert a box with tick or cross, you can also check this post → How to Quick Insert a Box with Tick or Cross in Microsoft Word
As for other mathematical symbols, lick here → 5 Methods to Insert Mathematical Symbols in Word
Copyright Statement: Regarding all of the posts by this website, any copy or use shall get the written permission or authorization from Myofficetricks.
The check mark symbol ✓ (also known as a checkmark or tick mark) has different meanings in different cultures: as a sign of agreement, confirmation, to indicate the concepts «yes» or «correct»; and as a sign of refusal, reject, to represent the notions of «no» or «wrong».
The X mark symbol 🗴 (also known as a cross, cross-mark, x sign, ex symbol) is often used in documents as a sign of refusal, reject, to indicate the concept «no» or «wrong»; or as an indicator of a completed task, a finished step, etc.
Note: Be careful when using these symbols in your document! In some countries, the check ✓ or ✗ mark is commonly used to indicate something wrong, incorrect. Another symbol can be used instead of the checkmark, such as the O mark, the plus symbol +, the letter R, etc.
The check mark symbol can also be mistakenly used in place of the
square root symbol, or as a bullet for the
manually created bulleted list.
We strongly recommend avoiding misusing symbols; see the appropriate tips to make perfect documents.
A tick mark and X mark can be inserted in a document Word using several different ways:
The standard way: using the Symbol dialog box:
To open the Symbol dialog box, do the following:
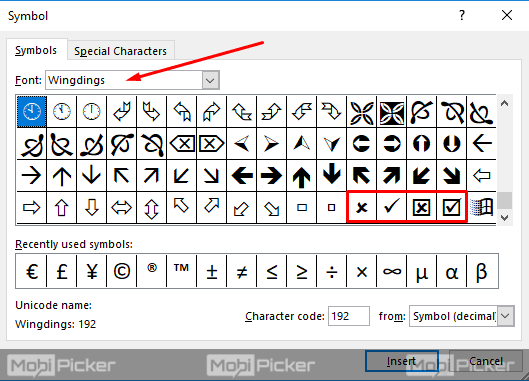
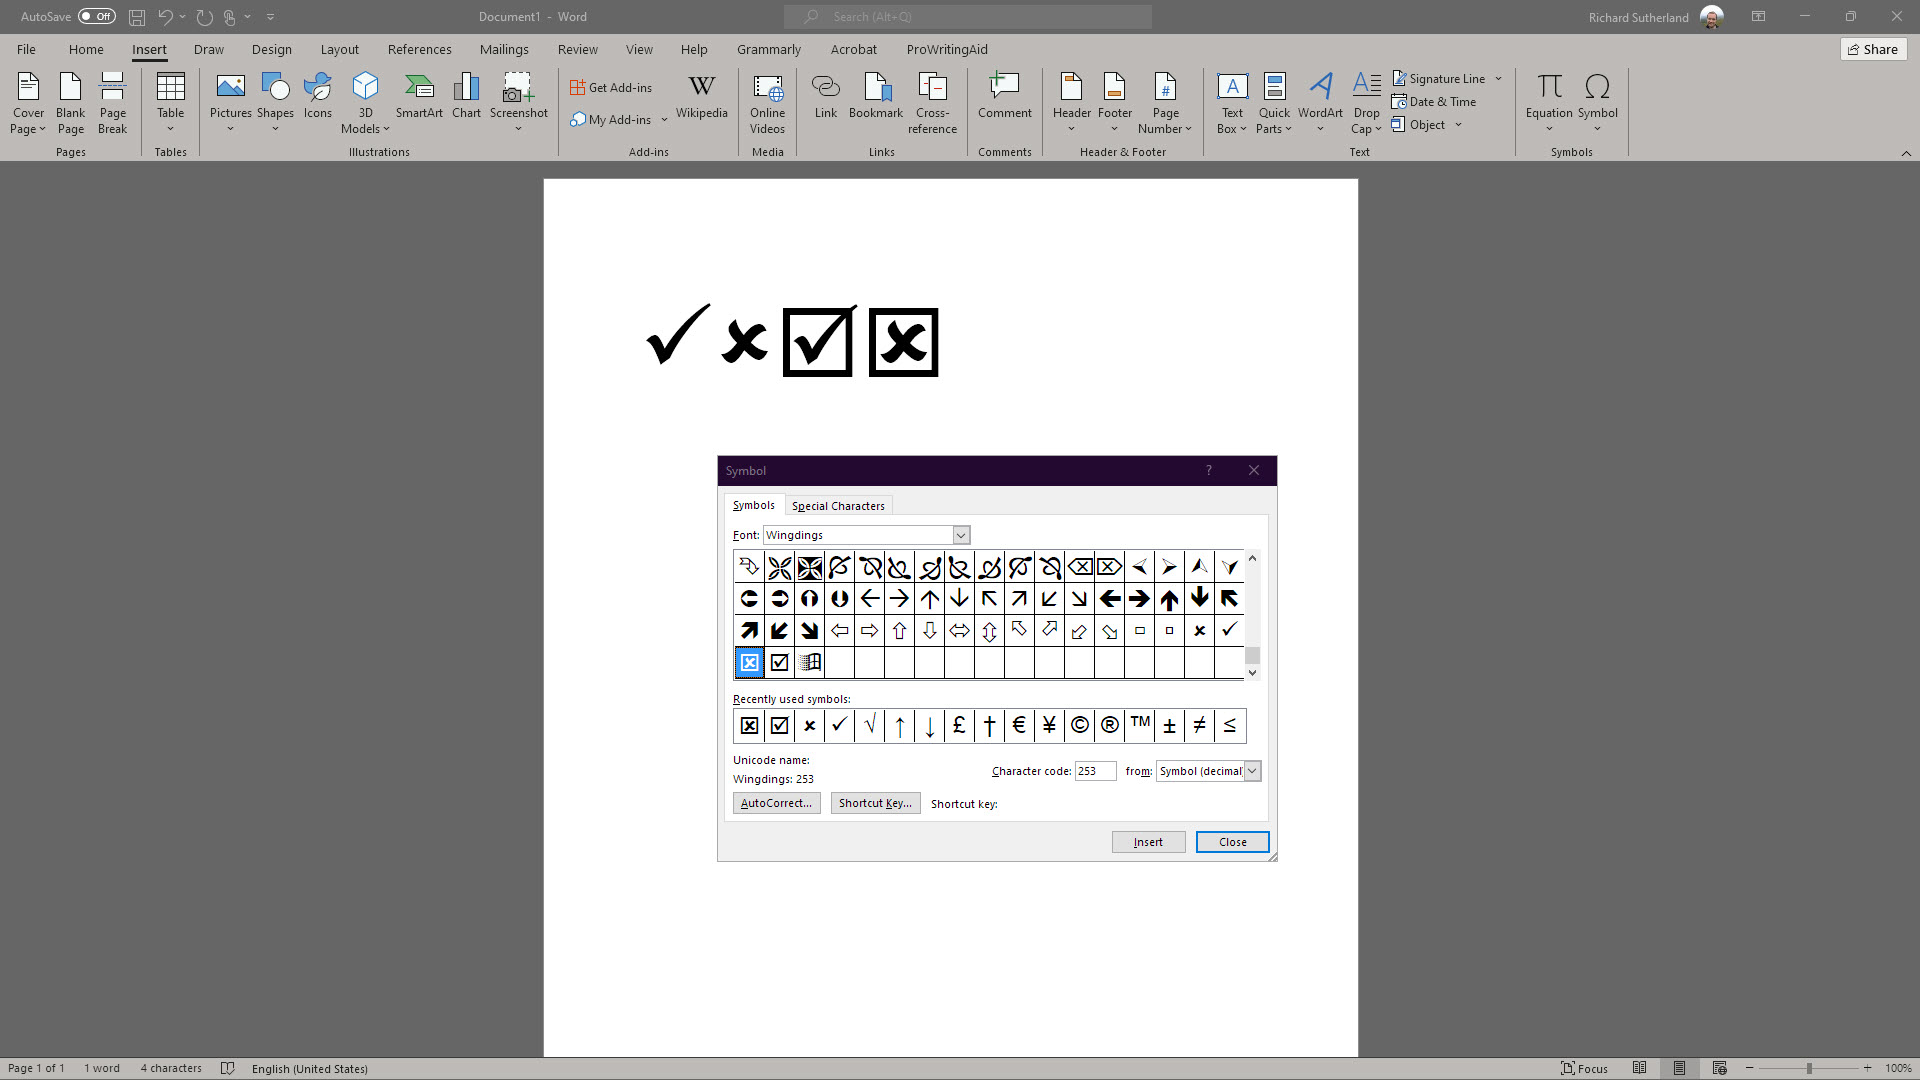
1. On the Insert tab, in the Symbols group, select the Symbol button, and then click More Symbols…:

2. On the Symbol dialog box:
- From the Font dropdown list, choose the Wingdings font,
- Choose a symbol you need:
- A check mark symbol (or a square with check mark symbol):

- An X mark symbol (or a square with a cross symbol):
- A check mark symbol (or a square with check mark symbol):
- Click the Insert button to insert the symbol to the current cursor position.
- Click the Cancel button to close the Symbol dialog box.


Note: You can also select the Segoe UI Symbol font to choose other types of a symbol, for example:
- A checkmark:
- An X mark:


II. Using a shortcut key:
In Microsoft Word, you can use Unicode to insert any of the used symbols:
| Unicode | Symbol | |
|---|---|---|
| The checkmark symbol | Type 2713 and immediately press Alt+X | ✓ |
| The Ballot box with check symbol | Type 2611 and immediately press Alt+X | ☑ |
| The X mark symbol | Type 274c or 274C (does not matter, uppercase or lowercase) and immediately press Alt+X | 🗴 |
| The Ballot box with X symbol | Type 274e or 274E (does not matter, uppercase or lowercase) and immediately press Alt+X | 🗵 |
The quicker way: creating a shortcut key:
Microsoft Word offers a pre-defined shortcut key for popular symbols such as checkmark, or X mark.
To open the Symbol dialog box, do the following:
1. On the Insert tab, in the Symbols group, select the Symbol button, and then click More Symbols….
2. On the Symbol dialog box:
- From the Font dropdown list, choose the font from which you want to insert a symbol (for this example, the Wingdings font),
- Choose the symbol (for example, the check mark symbol),
- Click the Shortcut Key… button:

3. On the Customize Keyboard dialog box, in the Press new shortcut key field, type the key combination you want to use for the symbol (e.g., for the checkmark sign ✓ the combination Alt+O,K), and click the Assign button:

Note: Be careful! You can reassign the assigned already shortcuts in Word. Be sure that after Current assign to: there are no active Word commands. In any case, you can reassign any existing function in Word to a different key.
If you are looking for the solution to insert cross / tick mark in Word/Excel, you are at the right place. There are several ways to insert cross/ tick symbol (checkmark) into the Microsoft Word or Excel. The methods we are going to discuss in this tutorial applies to Microsoft Word 2016, Word 2013, MS Word 2011, MS Word 2010, Word 2007, Word 2008, Word 2004 and Microsoft Office 365.
We have added five simple methods to insert tick mark (checkmark) or cross symbol in MS Word or MS Excel. Check them out below.
1. Copy and Paste Tick / Cross Symbol in Word / Excel
The first method to insert a tick in Word is quite simple. All you need to do is copy the symbol (tick or a cross) from here ✓ ✔ ☑ ✅ ✕ ✖ ✗ ✘ ☒ ☓ and paste it to the Microsoft Word document where you need the tick/cross symbol. To do the Copy operation, highlight the tick symbol above and press Ctrl + C. Now, to paste it, select where you want the symbol and press Ctrl + V.
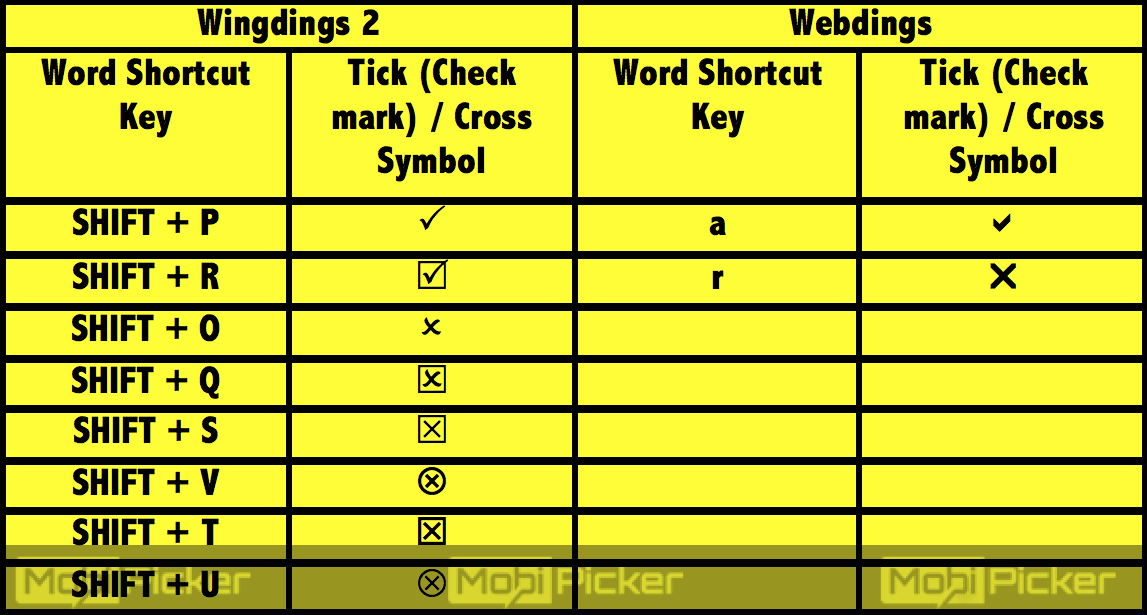
2. Insert Tick / Checkmark Symbol in Word/Excel Using Wingdings 2 /Webdings Fonts
If the copy paste method is not suitable, another easy method to insert tick (checkmark) or cross symbol in Word or Excel is to use either the “Wingdings 2” font or the “Webdings” font. You can easily select the font from the drop-down menu.
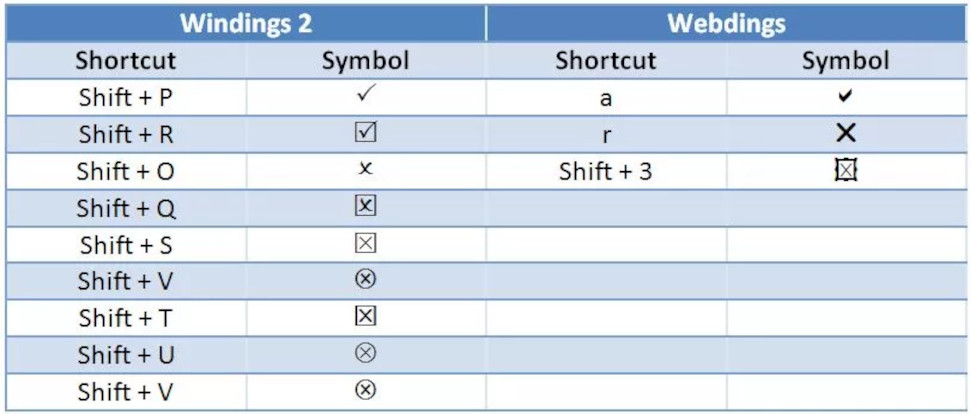
After selecting the Wingdings 2 or Webdings font, make use of the shortcut keys (Shift + P, R, O, Q, S, V, T, U, V) to insert the Tick symbol in Word. Refer below table for
3. Insert Tick / Check Mark / Cross with Symbol Command
One can also make use of symbol command for this purpose. To perform this method, it is necessary to install MS Excel on your computer. To start with, follow the following steps.
Step 1: Open Excel or Word.
Step 2: Click on “Insert” menu and then tap on “Symbols”
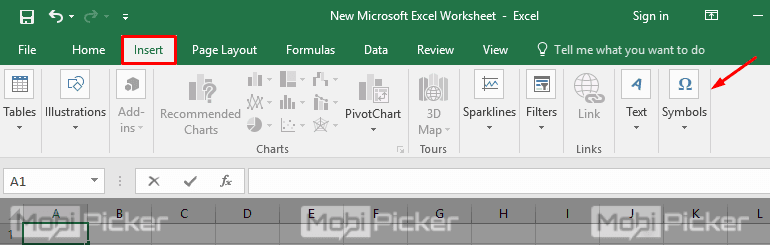
Step 3: Once Symbols box opens, change the font to “Wingdings” and then scroll down to bottom. Select the required tick mark or cross symbol and then click on “Insert.”
4. Insert Tick Symbol / Checkmark/ Cross Symbol using Character Map
To insert tick mark symbol in Excel / Word using Character Map, follow the steps below.
Step 1: Go to “Start” menu. Search “Character Map”
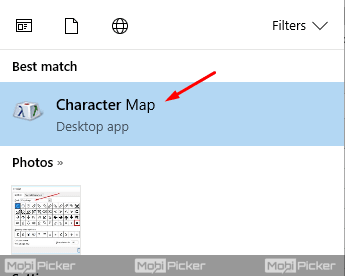 Step 2: Open “Character Map” and select the “Wingdings” font.
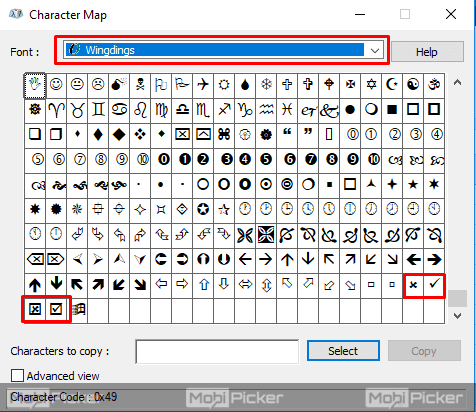
Step 3: Scroll to bottom and click on tick symbol or cross symbol and then click on “Copy”
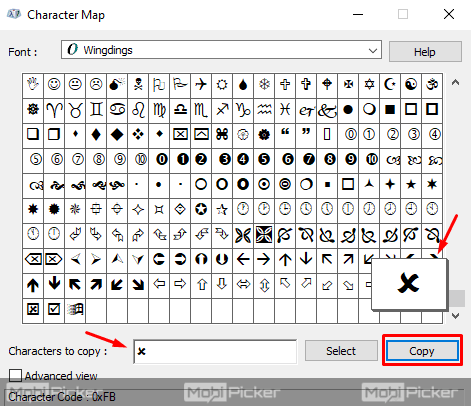
Step 4: Go to Excel or Word where you want to insert the tick mark / cross symbol.
Step 5: Click on the location where tick mark / cross required and then change the font to “Wingdings.” Now paste (Ctrl + V) the copied symbol.
5. Insert Tick Mark or Cross Symbol in Word / Excel Using Character Code
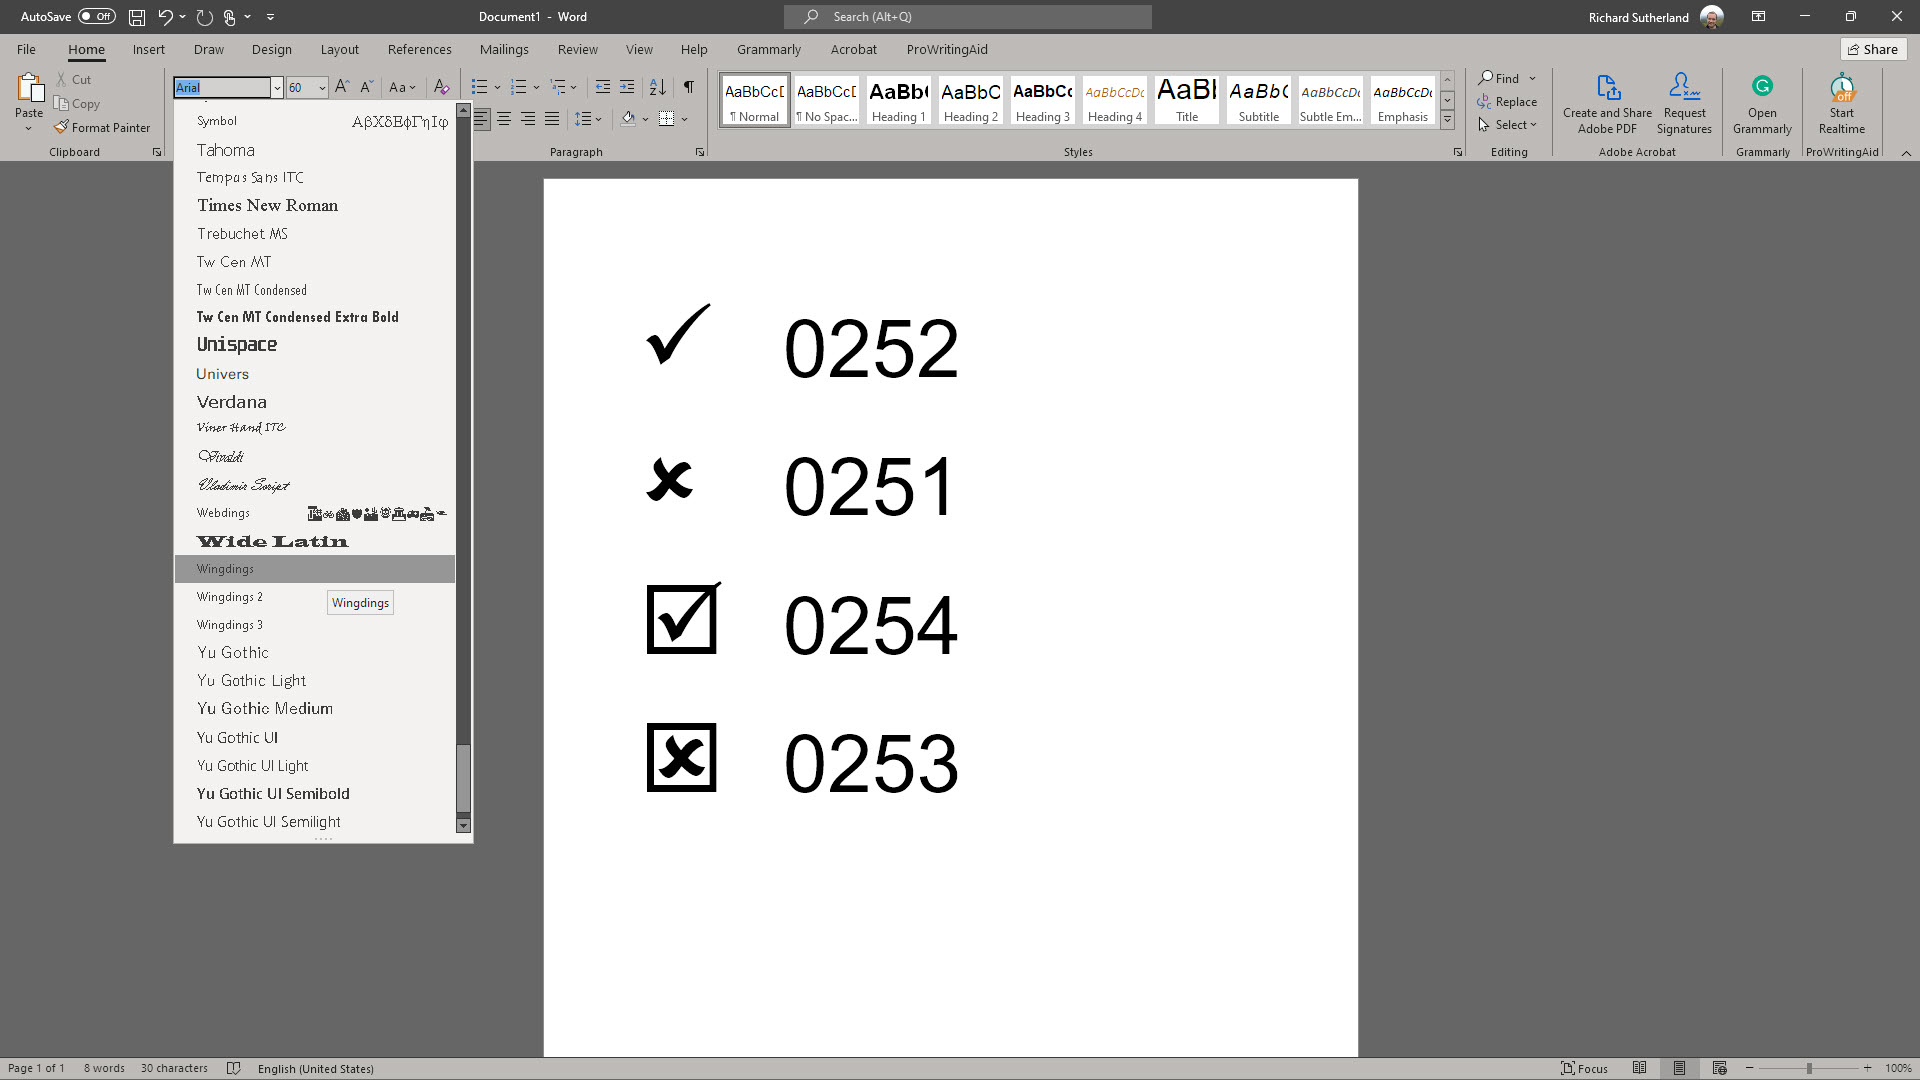
If you are good with numbers, this method is perfect to insert tick symbol or cross symbol in Word or Excel. In order to insert tick/cross symbol with this method, your keyboard must have numeric pad. With a series of code, you can insert four different tick marks. First, change your font to Wingdings. Now click on the location where you need tick mark or cross symbol in Word / Excel. Now press Alt key and type the combination of numbers as shown below.
For Tick Symbol
- ALT + 0252
- ALT + 0254
For Cross Symbol
- ALT + 0251
- ALT + 0253
Don’t forget to change the font to Wingdings to make it work. Once you are done with inserting tick / cross symbol in Word / Excel, you can change the font back to Ariel or whatever you desire.
NOTE: Methods might vary depending upon the version of Microsoft Word that you have installed.
Let us know if you find any difficulties to insert Cross / Tick symbol in Word or Excel.
Check Also: How to make a line graph in Excel

Microsoft Word and Excel are two important applications in the Microsoft Office (opens in new tab) suite. And with more online functionality than ever, the latest versions of the software are considered some of the best online collaboration tools a business can use today.
One issue that Microsoft Office users often run into is how to insert a tick or a cross into a Word or Excel document.
These symbols are nowhere to be found on a keyboard, so you need to discover another way to make them. Thankfully, it’s a simple process, and there are a few ways you can do this. We cover the five best ways to insert a tick or a cross into a Word or Excel document below.
How to insert a tick or a cross symbol in Microsoft Word and Excel: Preparation
Clearly you’ll need a copy of Microsoft Office to perform these tasks, and we recommend Microsoft 365 (opens in new tab) over all the other alternatives to Microsoft Office. Over the past few years, features like AutoSave, editing using a mobile device, and threaded commenting in Excel have made team collaboration easier in Microsoft’s office productivity software.
If you have a standalone version of Microsoft Office, the examples below will also work on Office 2004 and above. However, the arrangement of the interface menus differs significantly between versions.
Option 1: Copy and paste from the below symbols
To copy and paste a tick or cross, highlight one of the ticks or crosses below, then copy and paste it to your destination. Highlight (or double-click on) your preferred symbol below:
✓
✔
☑
✅
✕
✖
✗
✘
To Copy – once the symbol is highlighted press Ctrl + C (or right-click and select Copy from the menu)
Then place the cursor in the desired document (or select a cell)
To Paste – select where you want the symbol and press Ctrl + V (or right-click and select Paste from the menu)
Option 2: Insert a tick or a cross using the Symbol menu
The first way to add a tick or a cross to a Word or Excel document is through the Symbol menu. You’ll find it under the Insert menu, which is on the ribbon at the top of the screen.
Click on Symbol and choose More Symbols. Change the font to Wingdings in the Font select box. Scroll to the bottom, and you’ll find two different styles of ticks and crosses. Choose the symbol you prefer and click Insert.
Option 3: Insert a tick or a cross using the character code
As a slight shortcut, you can insert a tick or a cross by first changing the font to Wingdings, then entering the character codes directly. This only works if your computer’s keyboard has a separate numpad.
After setting the font to Wingdings, hold down the Alt button, type the relevant four-digit character code on the computer’s numpad, and then release the Alt button. The character will be inserted into your document.
The codes for a tick and a cross are 0252 and 0251, respectively. There are two alternatives, 0254 and 0253, respectively, that have boxes around them.
Option 4: Insert a tick or a cross with a built-in keyboard shortcut
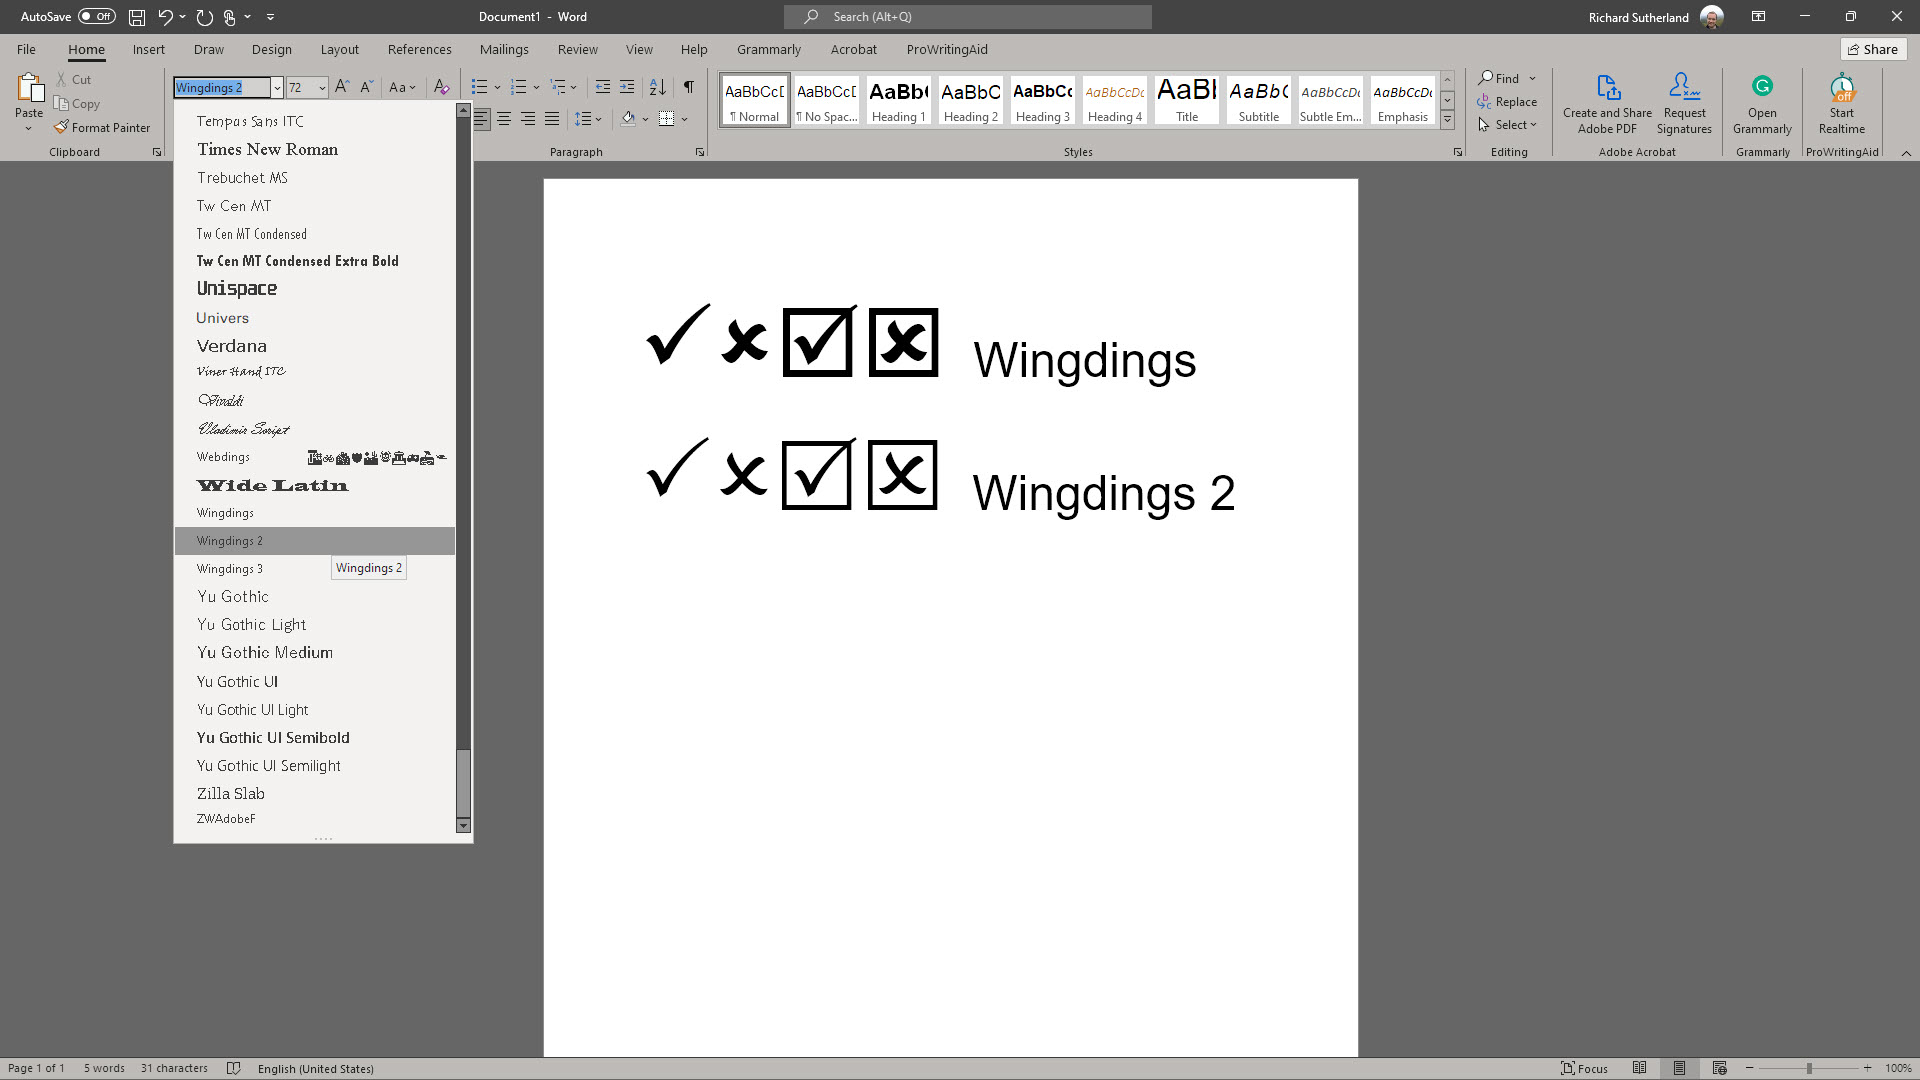
Another alternative is to use built-in keyboard shortcuts in conjunction with another font called Wingdings 2.
Set the font to Wingdings 2 in your document where you want the tick or cross to be added. Press Shift+P for a tick or Shift+O for a cross. If you prefer them to be in boxes, press Shift+R or Shift+Q.
Option 5: Set your own keyboard shortcuts for the tick or cross
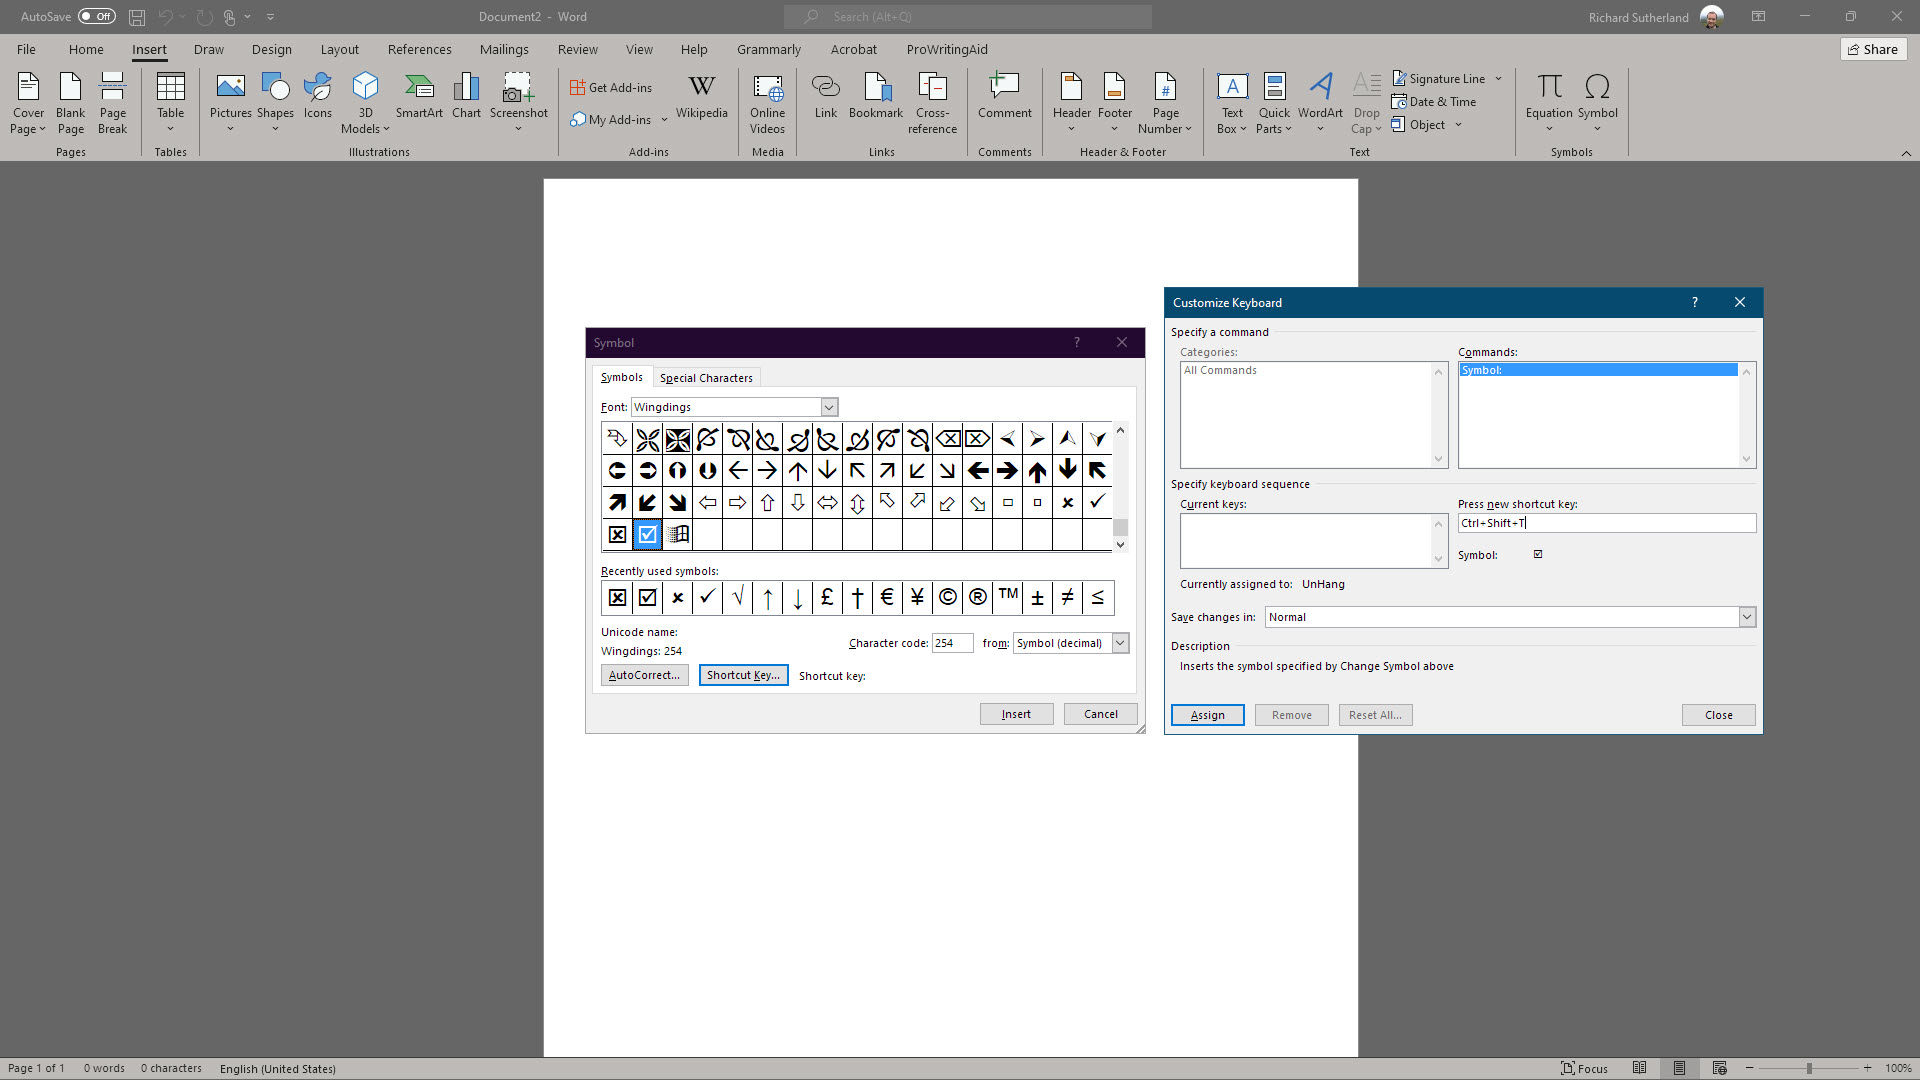
Finally, you can set up your own keyboard shortcut that will speed up the process of inserting ticks and crosses in the future. You can do this by finding the relevant symbol in the Symbol menu and choosing a shortcut key.
First, open the Insert menu, select the Symbol dropdown, and click on More Symbols. Switch the font to either Wingdings or Wingdings 2 and find the symbol you prefer.
Press Shortcut Key and enter your own combination of keys (e.g., Ctrl+Shift+T). Click Assign. Now, whenever you press that combination of keys, the symbol will be inserted into your document without you having to change the font, visit the Symbol menu, or enter a character code.
Summary
We’ve outlined five ways to insert ticks and crosses into your Microsoft Word and Excel documents. You can use the Symbol menu, enter the character code, or use a keyboard shortcut.
The Microsoft Office suite is in our list of the best tools and apps for remote workers, though we’ve found that many companies still aren’t making the most of Microsoft 365, because employees aren’t always aware of all the features that are available to them.
For more information on how to get the best out of Microsoft Word and Excel, we’ve put together a few guides. We discuss how to use the Microsoft Office Ribbon (opens in new tab) and how to start page numbering from a specific page in Microsoft Word (opens in new tab). You may also find it useful to learn how to insert and edit footnotes in Microsoft Word (opens in new tab).
A daily dose of IT news, reviews, features and insights, straight to your inbox!
Richard brings more than 20 years of computer science, full-stack development and business operations experience to IT Pro Portal. A graduate in Computer Science and former IT support manager at Samsung, Richard has taught courses in Java, PHP and Perl, and developed software for both private businesses and state organisations. A prolific author in B2B and B2C tech, Richard has written material for Samsung, TechRadar Pro, and now IT Pro Portal.
Most Popular
If you’re looking for how to insert a tick symbol (otherwise known as a check mark or checkmark) into Microsoft Word and Microsoft Excel, you’ve come to the right place.
The methods we outline below are relevant for Word Microsoft 365, Word for Microsoft 365 for Mac, Word 2021, Word 2021 for Mac, Word 2019, Word 2019 for Mac, Word 2016, Word 2016 for Mac, Word 2013, Word 2010, Microsoft Word 2007, Microsoft Word 2008 and Microsoft Word 2004, as well as relevant versions of Microsoft Excel.
The final method, using the Windows 10 emoji menu, can be used in any Windows 10 and Windows 11 app.
Method 1 – Copy and Paste — ✓ ✔ ☑ ✅ ✕ ✖ ✗ ✘
To copy and paste a tick or cross, highlight one of the ticks or crosses below, then copy and paste it to your destination
Highlight your preferred symbol below:
✓ ✔ ☑ ✅ ✕ ✖ ✗ ✘
To Copy – once the symbol is highlighted press Ctrl + C
then
To Paste – select where you want the symbol and press Ctrl + V
Method 2 – Font Shortcuts
The most common method is to use either the «Wingdings 2» font or the «Webdings» font. This can easily be found from the drop-down menu and you will be able to choose from a few different styles of tick marks. Alternatively, use the following shortcuts after having selected Wingdings 2 or Webdings as your font of choice:
Method 3 – Symbol command
You can also use the symbol command. Note that you will need to have Excel installed to do this.
After accessing the «Insert» menu, find the «Symbol» tab.
From this section, choose the «Font» option and select «Wingdings». The tick mark will be found at the bottom of the list.
This can also be accessed from the «Start» menu under the «Character Map» section (within System Tools). Choose the font option and once again, select Wingdings. When you hover the mouse over the correct symbol, it will appear larger and you will have the ability to select different versions of the check mark. Finally, copy and paste the icon to the relevant location within the text.
Method 4 – Tick symbol character code
Another quick way is to use the character code of the tick symbol. Remember that you will need the numerical keypad as rather than the keyboard. There are a series of codes that will enable you to insert four different tick marks.
1. Change font to «Wingdings»
2. Using the numerical keypad (not the horizontal line of numbers), hold down Alt and enter any one of the following combination of numbers:
Ticks
ALT + 0252
ALT + 0254
Crosses
ALT + 0251
ALT + 0253
Remember, you will have to change the font to Wingdings before the character code is entered. Thereafter, you can switch the font back to the desired appearance.
These are the most efficient ways to insert a tick mark into a standard Word document. Note that these methods will vary depending upon the version of Microsoft Word that you have installed.
This one’s for Windows 10 and Windows 11 users.
Place the cursor where you want to insert your symbol then hit the Windows key and . (period/full stop) to bring up the emoji/symbol menu. Now start typing «tick» or «check» (or «cross»), and you’ll see the available graphics in the menu. Click on the one you want to insert it into your document.
- Check out our guide to the best alternatives to Microsoft 365
Type one of the four diagonal cross Mark ✗, multiplication or ballot symbols into Microsoft Word, Excel, PowerPoint or Outlook. Both in Office for Windows and Office for Mac.
The X or Cross Mark ✗ symbol is used for bullet or check lists and other indicators. It’s the opposite of the tick or Checkmark.
There are four different X marks in Unicode with different names: ✕ Multiplication X – X Heavy Multiplication X – ✗ Cross Mark / Ballot X and ✘ Heavy Ballot X

In Unicode symbol naming the word ‘Cross’ means a Christian style or “Latin Cross” like this ✝ or many variations. Terms like Multiplication or Ballot are used for the diagonal cross as in “Tick or Cross”
How Cross Mark ✗ looks in normal, bold or italic
Here’s some examples of how the various Cross Mark ✗ looks in Segoe UI Symbol which is supplied with Office for Windows or Mac.
Multiplication X and Heavy Multiplication X
The two Multiplication X are upright and straight.
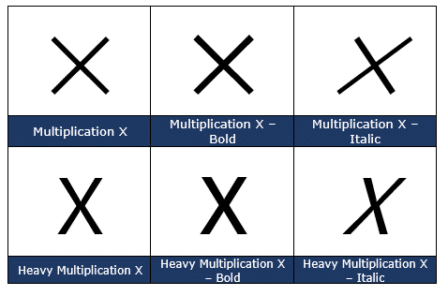
Ballot X and Heavy Ballot X
Ballot X and Heavy Ballot X are skewed for a slightly handwritten look with ‘brush strokes’ at the end.

Multipication X ✗ codes
These are the important code numbers or values you’ll need to enter the Multipication X or ✗
Decimal: 10005 Hex: 2715
Web: ✕ or ✕
(web codes aren’t used in Microsoft Office, we’ve included them for the sake of completeness.)
The Multipication X ✗ sign does NOT have an inbuilt shortcut in Word or Outlook. Use the standard Word Alt + X symbol shortcut 2715 then Alt + X . Once in a document you can copy it to AutoCorrect and make your own shortcut.
Heavy Multipication X X codes
These are the important code numbers or values you’ll need to enter the Heavy Multipication X or X
Decimal: 10006 Hex: 2716
Web: ✖ or ✖
(web codes aren’t used in Microsoft Office, we’ve included them for the sake of completeness.)
The Heavy Multipication X X sign does NOT have an inbuilt shortcut in Word or Outlook. Use the standard Word Alt + X symbol shortcut 2716 then Alt + X
Ballot X ✗ codes
These are the important code numbers or values you’ll need to enter the Ballot X or ✗
Decimal: 10007 Hex: 2717
The HTML entity ✗ means the Ballot X symbol.
Web: ✗ or ✗ or ✗
(web codes aren’t used in Microsoft Office, we’ve included them for the sake of completeness. )
The Ballot X ✗ sign does NOT have an inbuilt shortcut in Word or Outlook. Use the standard Word Alt + X symbol shortcut 2717 then Alt + X
Heavy Ballot X ✘ codes
These are the important code numbers or values you’ll need to enter the Heavy Ballot X or ✘
Decimal: 10008 Hex: 2718
Web: ✘ or ✘
(web codes aren’t used in Microsoft Office, we’ve included them for the sake of completeness.)
The Heavy Ballot X ✘ sign does NOT have an inbuilt shortcut in Word or Outlook.
Use the standard Word Alt + X symbol shortcut 2718 then Alt + X
Word, Excel, PowerPoint and Outlook
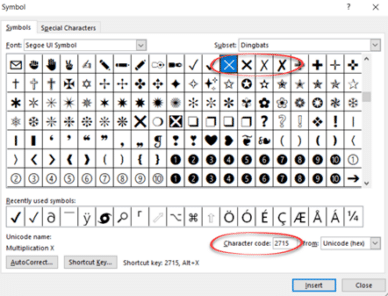
Insert | Symbols | Symbol and look for the four X marks starting at Character Code 2715.
Windows
In Windows there are several shortcuts to enter the Cross Mark ✗ character into any program, but they use a numeric keypad, not the number row above the letters. For example Alt + 10007
Windows Character Map
The Windows Character Map accessory in all Windows releases. Jump to Unicode 2715 then all four X symbol options appear in a row.

Character Map has a search feature, something missing from the Insert | Symbol in Office.
MacOS and Office for Mac inserting characters
On a Mac, to enter the Cross Mark ✗ symbol:
- Command + Control + Spacebar shortcut to open the Character Viewer.
- Search for “ Ballot “ or “Multi” and the Viewer should find the symbol you need.

Despite the name Character Viewer, the Apple system tool will also insert characters into any program, including Office for Mac.
Type a Checkmark or tick ✓ in Word, Excel, PowerPoint and Outlook
Tilde ~ symbol in Word, Excel, PowerPoint and Outlook
Type Infinity ∞ symbols in Word, Excel, PowerPoint and Outlook
Left Right arrow ↔ in Outlook, Excel, PowerPoint and Word
Right arrow → symbol in Word, Excel, PowerPoint and Outlook