Apply or Remove Strikethrough Using Shortcuts in Word
by Avantix Learning Team | Updated March 14, 2021
Applies to: Microsoft® Word® 2010, 2013, 2016, 2019 and 365 (Windows)
You can apply strikethrough to text in Word to cross out or create a line through text. This can be effective to show that something has been removed or deleted. Although you can use Strikethrough on the Home tab in the Ribbon or use the Font dialog box, you can also write your own Strikethrough keyboard shortcut in Microsoft Word.
Recommended article: How to Insert a Line in Word (3+ Ways)
Do you want to learn more about Microsoft Word? Check out our virtual classroom or live classroom Word courses >
What is strikethrough?
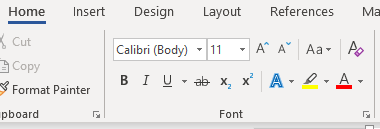
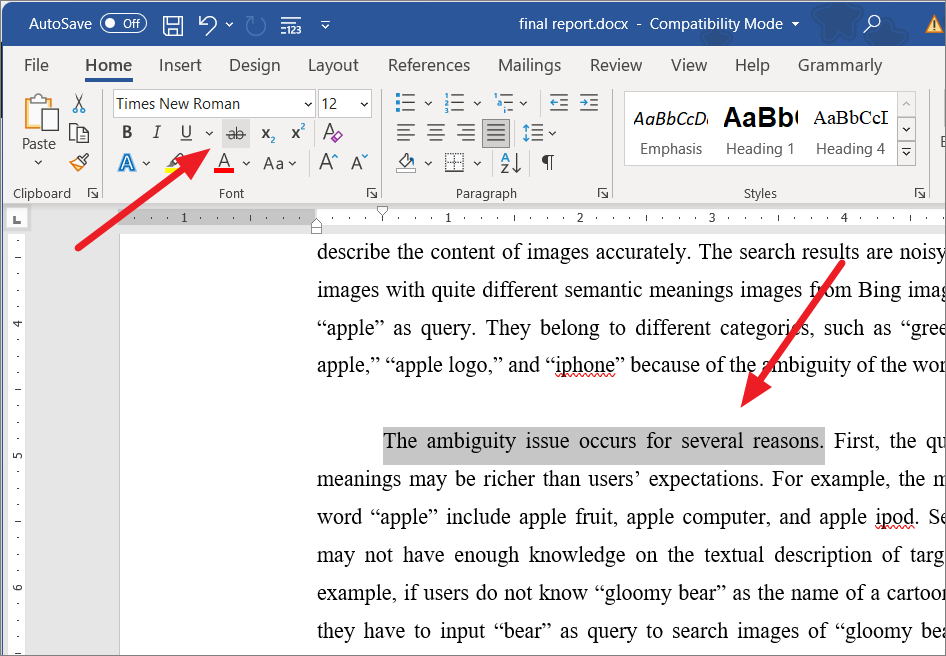
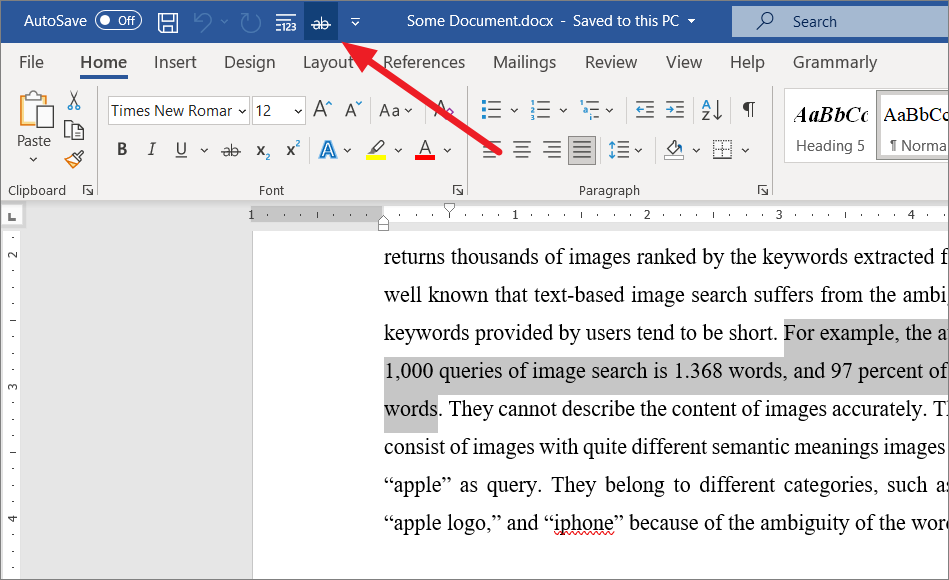
Strikethrough is a character format that can be applied to text where a line appears through the selected text. Because it’s a format, it can be removed easily. The most common way to apply strikethrough is to select the text and then click Strikethrough in the Font group on the Home tab in the Ribbon (as an ab with a line through it):
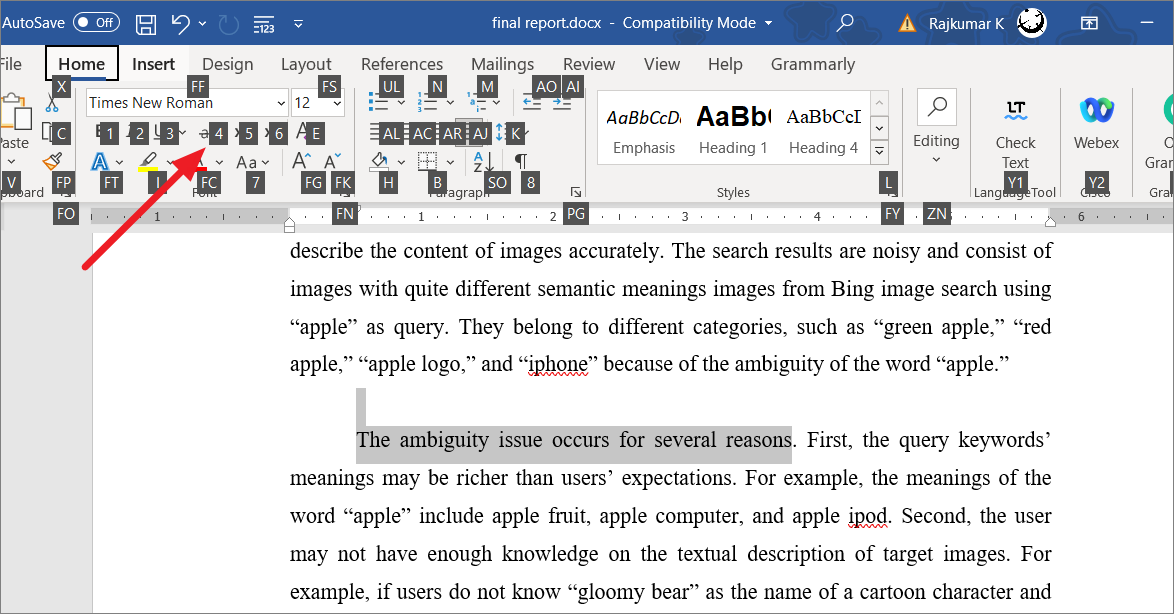
You can also press Alt > H > 4 (Alt, then H and then 4).
Using keyboard shortcuts to access the Font dialog box
To access the Font dialog box using a keyboard shortcut and then apply Strikethrough:
- Select the text you want to strikethrough.
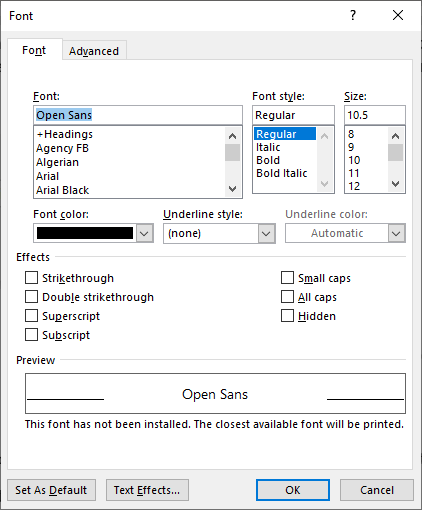
- Press Ctrl + D. The Font dialog box appears.
- Press Alt + K to select Strikethrough (note that k is the underlined letter).
- Press Enter.
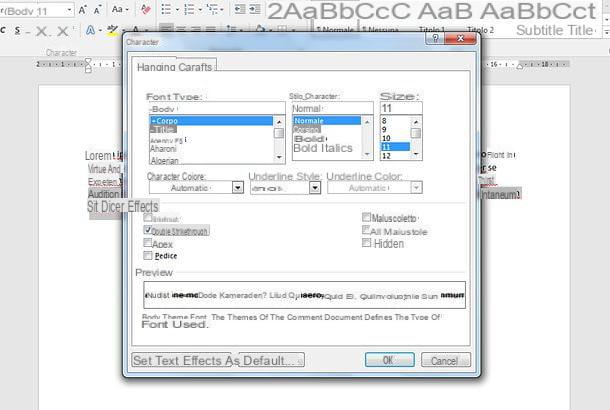
Below is the Font dialog box:
Adding Strikethrough to the Quick Access Toolbar
You can also add Strikethrough to the Quick Access Toolbar and then access it using Alt.
It’s usually easier to work with the Quick Access Toolbar if you display it below the Ribbon. If the Quick Access Toolbar is above the Ribbon, click the down arrow to the right of the Quick Access Toolbar and select Show Below the Ribbon from the drop-down menu.
To add Strikethrough to the Quick Access Toolbar:
- Right-click Strikethrough in the Font group on the Home tab in the Ribbon. A drop-down menu appears.
- Select Add to Quick Access Toolbar.
- Click the down arrow to the right of the Quick Access Toolbar and select More commands from the drop-down menu. The Options dialog box appears.
- In the list of commands on the right side of the dialog box, click Strikethrough.
- Click the up arrow that appears on the far right until the button appears at the top of the list (you can move it to the second position, third position, etc.).
- Click OK.
- Press Alt. Key tips appear on the Quick Access Toolbar. If you have moved Strikethrough to the first position, press 1 to apply it. If you have moved Strikethrough to the second position, press 2 to apply it and so on. These are sequential shortcuts, so press Alt and then the number.
Creating a custom keyboard shortcut
You can also create your own keyboard shortcuts in Microsoft Word by customizing the keyboard. This is a great way to create a strikethrough shortcut.
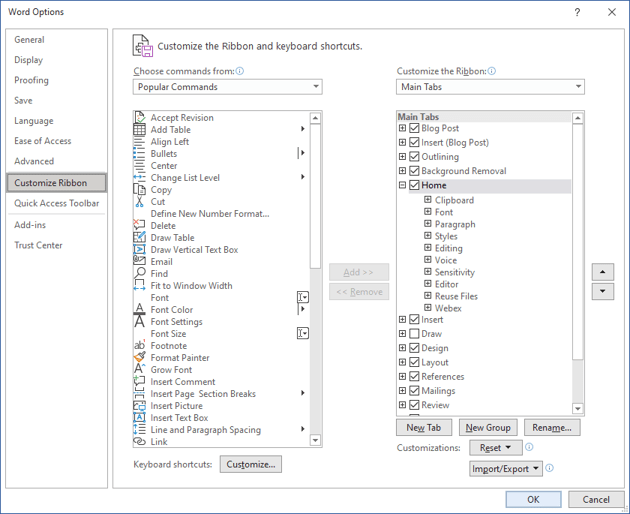
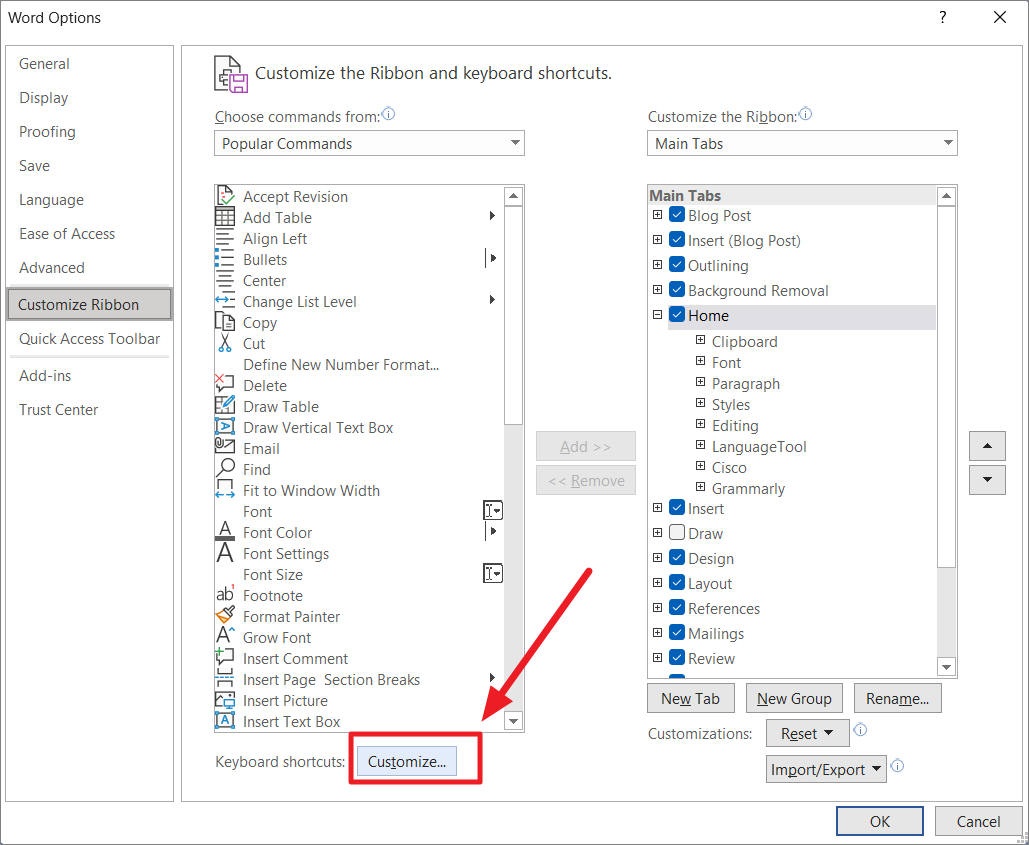
In Microsoft Word (unlike Excel and PowerPoint), you can use File Options to customize your keyboard (note the Customize command at the bottom of the Customize Ribbon category):
To create your own keyboard shortcut for Strikethrough using File Options:
- Click the File tab in the Ribbon.
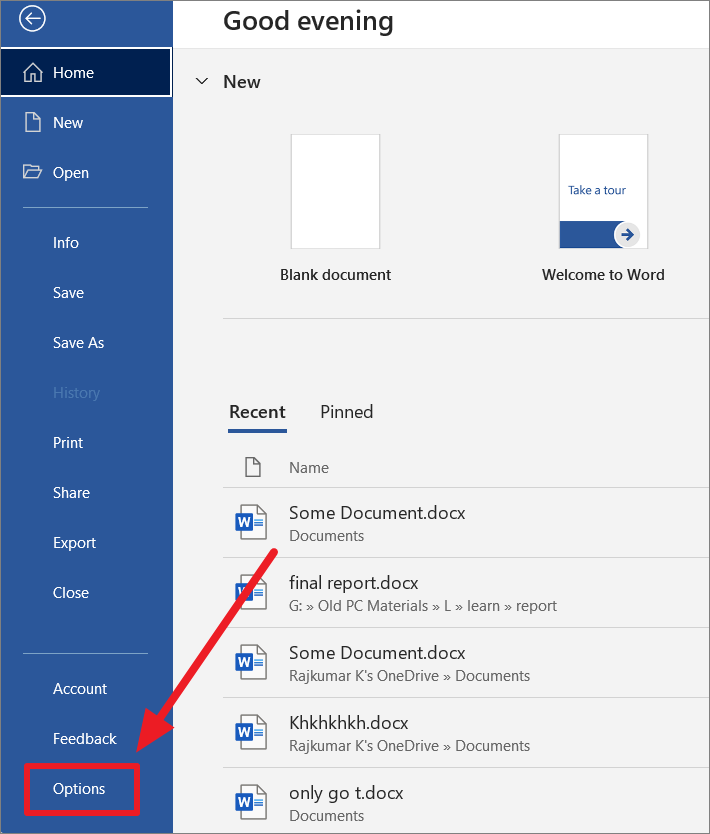
- Click Options. A dialog box appears.
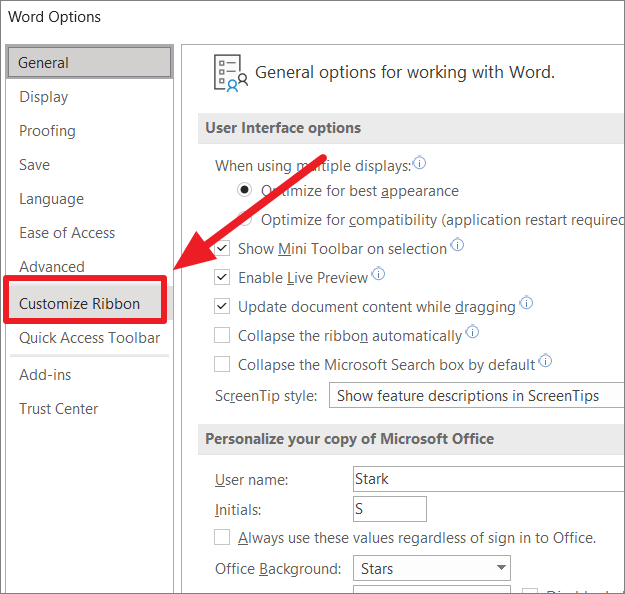
- In the left panel, click Customize Ribbon.
- In the panel on the right, beside Keyboard Shortcuts, click Customize. The Customize Keyboard dialog box appears.
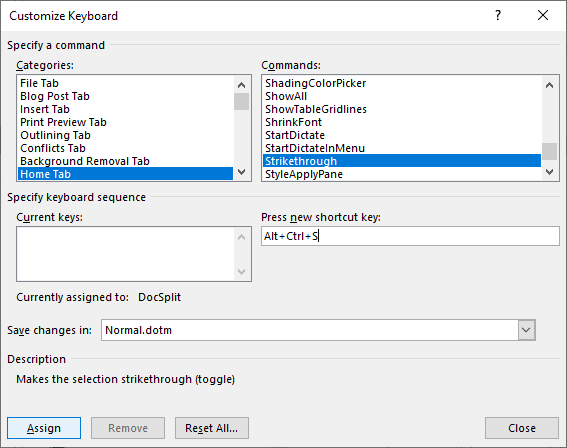
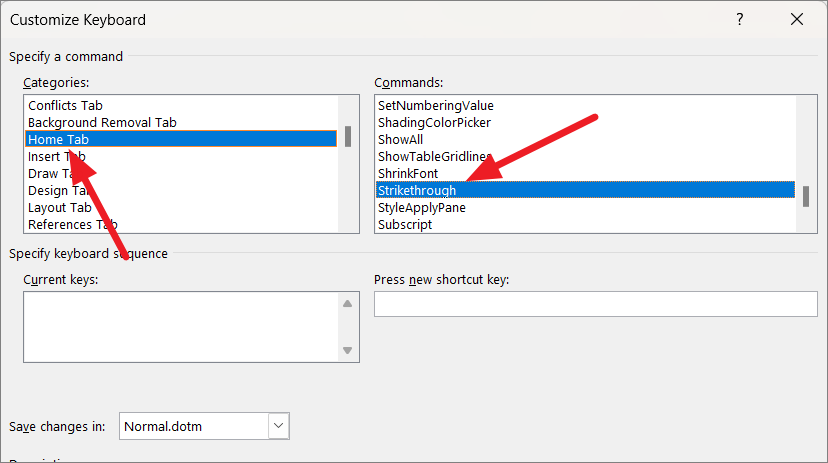
- Under Categories, click Home Tab.
- Under Commands, click Strikethrough.
- Click in the box below Press new shortcut key.
- Press the keys you want to assign (at the same time). You can press Ctrl + Alt + a letter so that it is less likely to have a conflict with a previously assigned shortcut. You don’t want to reassign common shortcuts such as Ctrl + P. In this case, you could press Ctrl + Alt + S.
- Click Assign.
- Beside Save changes in, select Normal (to save the changes globally). Normal is the default global template.
- Click Close.
- Click OK in the Options dialog box.
Now you can select text and use the keyboard shortcut you assigned (such as Ctrl + Alt + S) to apply strikethrough. Strikethrough is a toggle, so you can use the same shortcut to remove strikethrough.
Below is the Customize Keyboard dialog box:
You can assign keyboard shortcuts to many other commands using this strategy.
Because the keyboard assignments are typically saved in the Normal template, when you exit Word, be sure to save the Normal template when prompted.
Subscribe to get more articles like this one
Did you find this article helpful? If you would like to receive new articles, join our email list.
More resources
How to Generate Random Text in Word
How to Hide Comments in Word (or Display Them)
How to Insert Greek Letters or Symbols in Word (6 Ways)
How to Superscript or Subscript in Microsoft Word (with Shortcuts)
3 Strikethrough Shortcuts in Excel to Cross Out Text or Values in Cells
Related courses
Microsoft Word: Intermediate / Advanced
Microsoft Excel: Intermediate / Advanced
Microsoft PowerPoint: Intermediate / Advanced
Microsoft Word: Long Documents Master Class
Microsoft Word: Styles, Templates and Tables of Contents
Microsoft Word: Designing Dynamic Word Documents Using Fields
VIEW MORE COURSES >
Our instructor-led courses are delivered in virtual classroom format or at our downtown Toronto location at 18 King Street East, Suite 1400, Toronto, Ontario, Canada (some in-person classroom courses may also be delivered at an alternate downtown Toronto location). Contact us at info@avantixlearning.ca if you’d like to arrange custom instructor-led virtual classroom or onsite training on a date that’s convenient for you.
Copyright 2023 Avantix® Learning
Microsoft, the Microsoft logo, Microsoft Office and related Microsoft applications and logos are registered trademarks of Microsoft Corporation in Canada, US and other countries. All other trademarks are the property of the registered owners.
Avantix Learning |18 King Street East, Suite 1400, Toronto, Ontario, Canada M5C 1C4 | Contact us at info@avantixlearning.ca
A Strikethrough, also known as strikeout is a font effect where text is crossed out with a horizontal line (like this) to indicate that text is no longer required/valid or error in the text. It is often used to delete the text without actually removing it from the document. You can strikethrough a word, group of characters, sentences, lines, and paragraphs in MS Word.
Strikethrough can be useful when you are collaborating on a document with someone and you want to show that a particular section should be removed from the text or is not important. You will often see strikethrough to show price change on labels.
There are several ways to use strikethrough on Microsoft Word, including via Ribbon, Ribbon guide shortcuts, font window and shortcuts, Quick Access Toolbar shortcut, custom keyboard shortcut, and using shapes.
Strike Out Text Using Strikethrough Button from the Ribbon
The easiest method to strikethrough a text in Microsoft Word is using the dedicated Strikethrough button from the Ribbon. Here’s how you can do that:
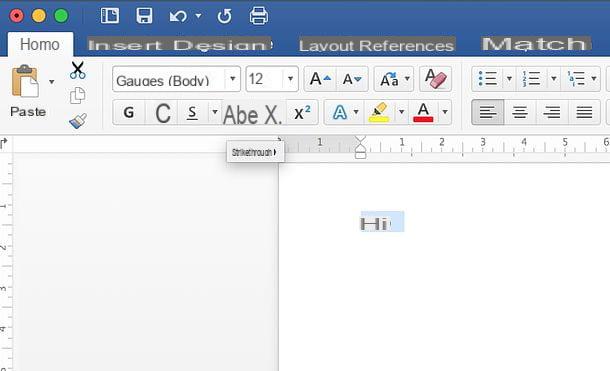
First, open the Word document and select the text you want to strikethrough. Then, under the Home tab, click the ab button with a line across (Strikethrough) like this: ab or abc from the Font section.
Use your Ribbon Guide shortcuts
You can also use Word’s Ribbon guide shortcuts to access the same strikethrough button from the Ribbon.
Select the text you want to strike out, then press these shortcut keys one after the other: Alt,H,4.
As soon as you type Alt, Word will enable guide shortcuts for ribbon. When you press H, it will switch to the Home tab, then click 4 to enable strikethrough.
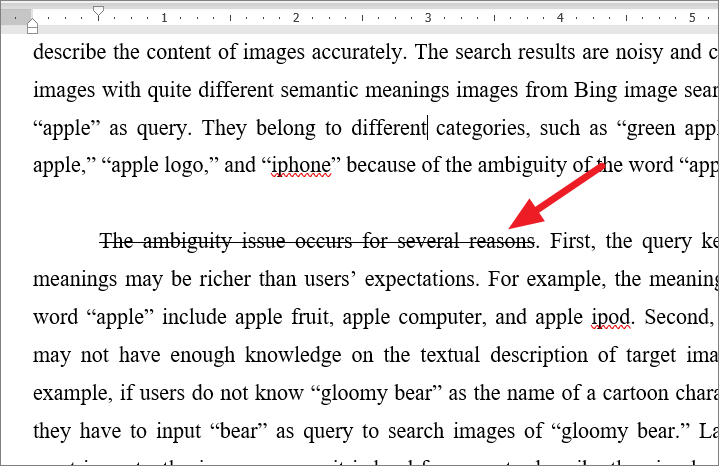
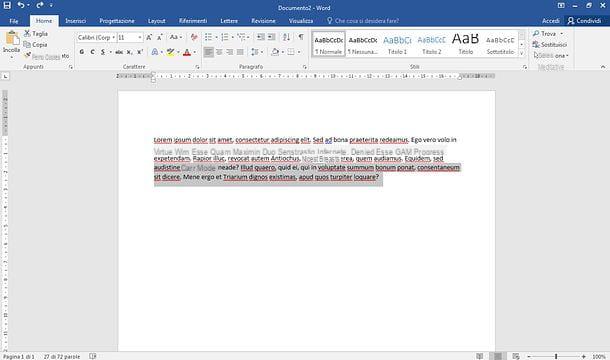
Either way, the selected text will be quickly crossed out as shown below.
To remove the strikethrough, simply select the struck-out text and click the ‘Strikethrough’
Use the Font Dialog box to Cross Out Text
The Font Dialog box is another way to add strikethrough to text in MS Word. In some cases the Strikethrough option is not available in the Ribbon, you can access it from the Font window.
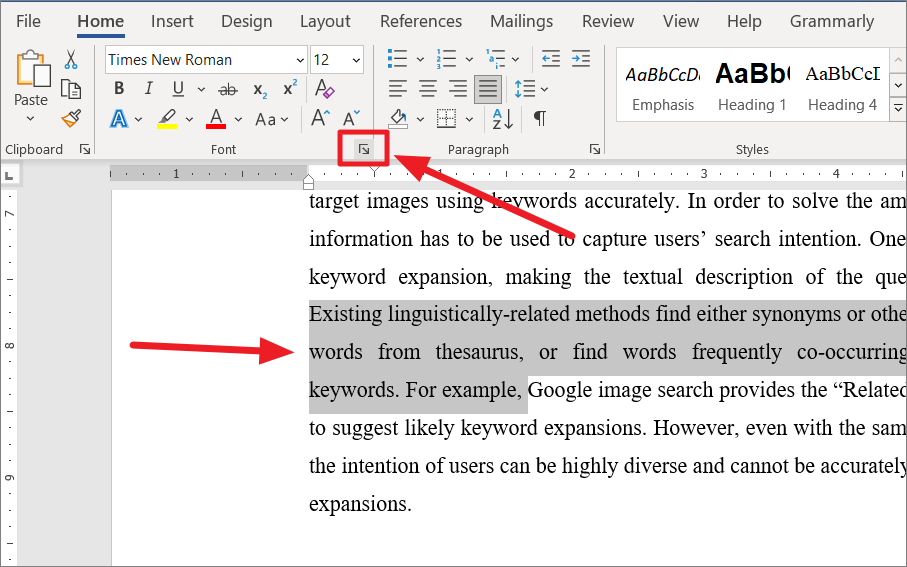
First, select the text you want to strikethrough, then click the small Diagonal Arrow in the bottom right corner of the Font group under ‘Home’ tab. Or press the Ctrl+D.
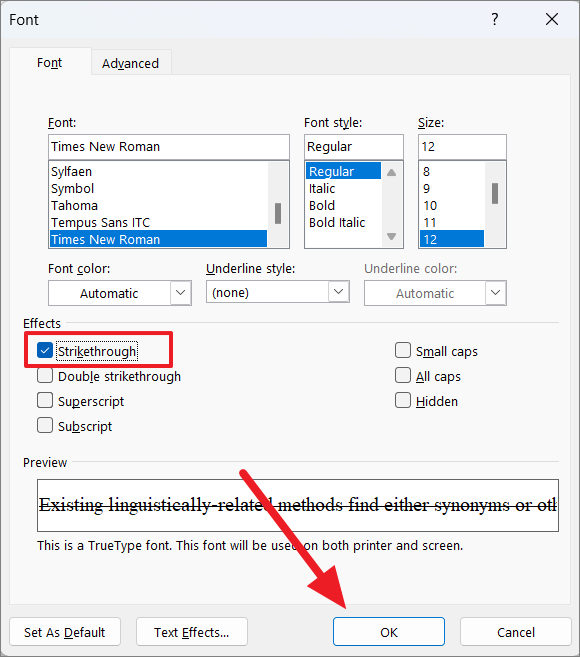
When the Font window opens, check the ‘Strikethrough’ option under the Effects section and click ‘OK’ or simply press Alt+K.
Add Double Strikethrough using Font dialog box
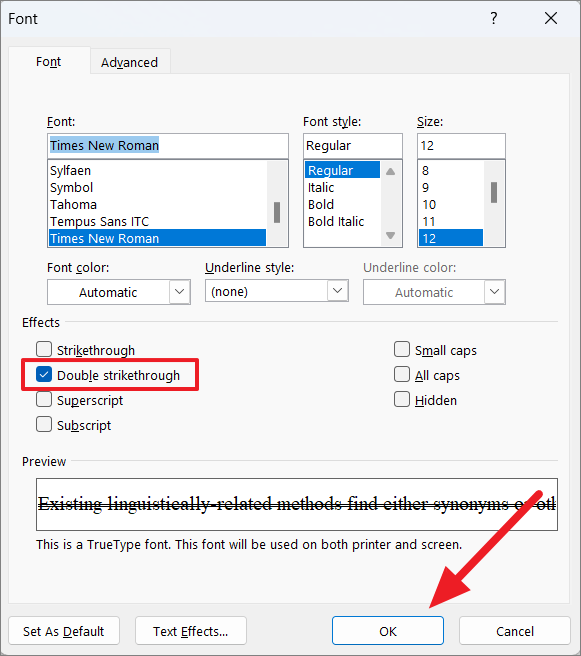
Select the text you want to double strike out, then open the Font dialog windows using the above steps (Ctrl+D). From the Font window, click the ‘Double strikethrough’ to check it, and click ‘OK’ to add double strikethrough.
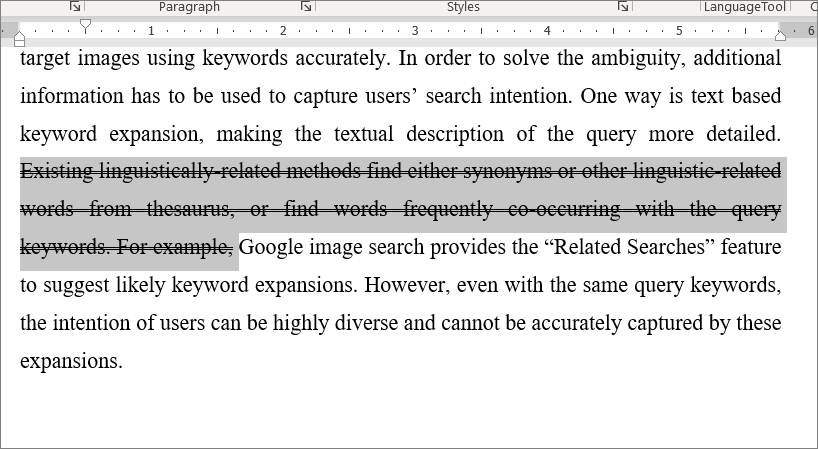
As shown below, the selected text will be double strikethrough.
Create a Custom Keyboard Shortcut to Strikethrough
The default Strikethrough shortcut key requires you to press Alt, then H, then 4 sequentially, which may be a bit difficult and needs more time to access the option. If you are not comfortable using the provided shortcuts for accessing strikethrough, you can create your own shortcut in Microsoft Word by customizing the keyboard. Follow these steps to create a custom keyboard shortcut for Strikethrough.
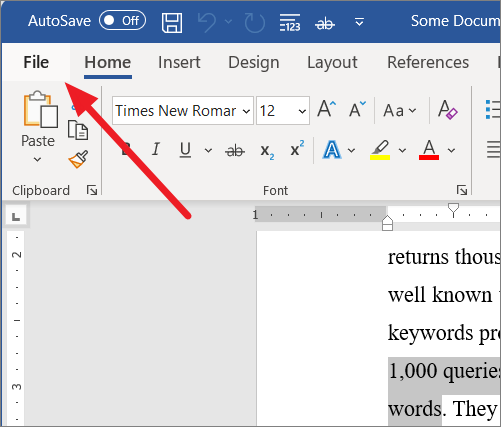
On the top left corner MS Word window, click on the ‘File’ tab.
Then, click on ‘Options’ in the bottom left corner of the backstage view.
In the Word Options window, click on ‘Customize Ribbon’ from the panel on the left.
Now, on the right, click the ‘Customize’ button next to Keyboard Shortcuts at the bottom window.
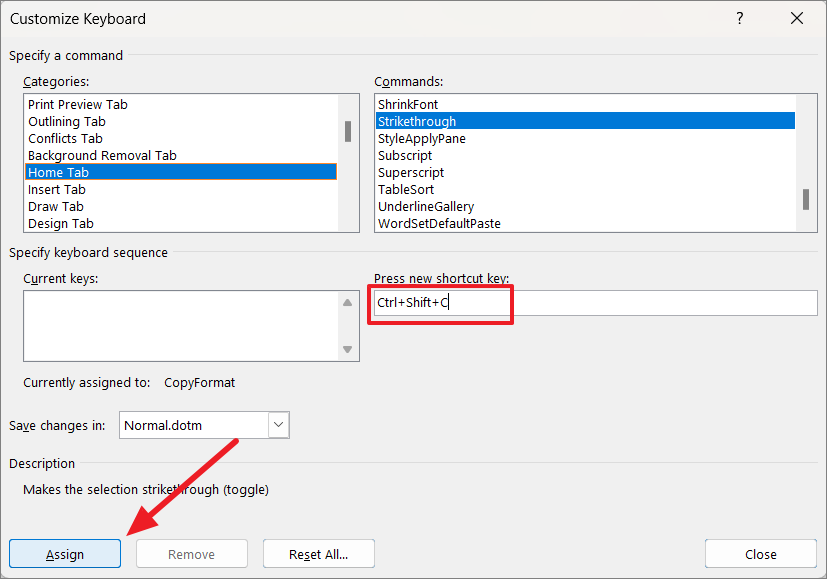
Another dialog window called Customize Keyboard will appear. Here, scroll down and select ‘Home tab’ under Categories and choose ‘Strikethrough’ under Commands.
Next, click in the box below ‘Press new shortcut key:’. And hit the keys (simultaneously) you want to assign as the shortcut. It is recommended to assign three key shortcuts to avoid conflict with other common shortcuts. Here, we have entered Ctrl+Shift+C, but you can enter any other shortcuts. After entering the shortcut keys, click the ‘Assign’ button at the bottom left corner to confirm it.
Then, click the ‘Close’ button to close the window.
Now, you can select the text and press your custom keyboard shortcut to quickly strikethrough the selected text.
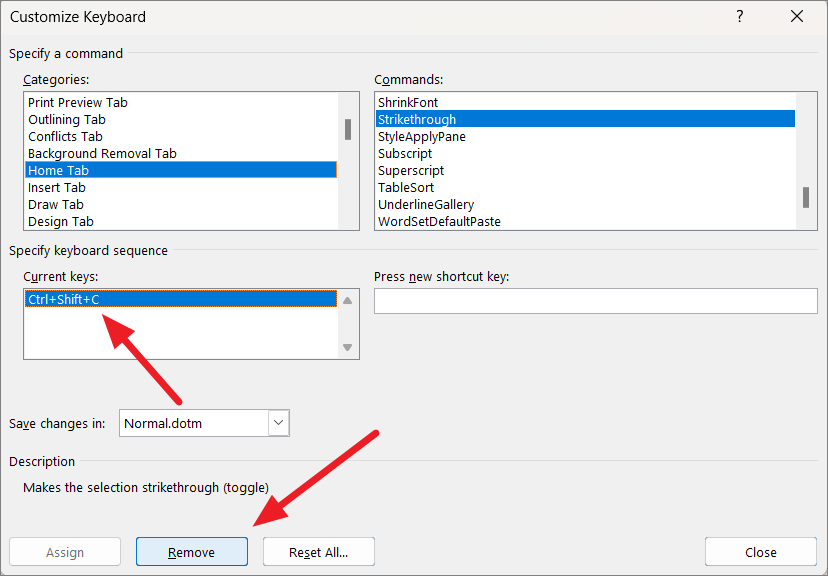
To remove the shortcut keys, go back to the Customize Keyboard window using the same above steps. Then, select ‘Home tab’ under Categories and choose ‘Strikethrough’ under Commands. After that, select the shortcut keys under ‘Current Keys:’ and click the ‘Remove’ button to delete the shortcut.
Add Strikethrough to the Quick Access Toolbar
If the Strikethrough button is unavailable in the Ribbon, you can add Strikethrough to the Quick Access Toolbar and then quickly access it.
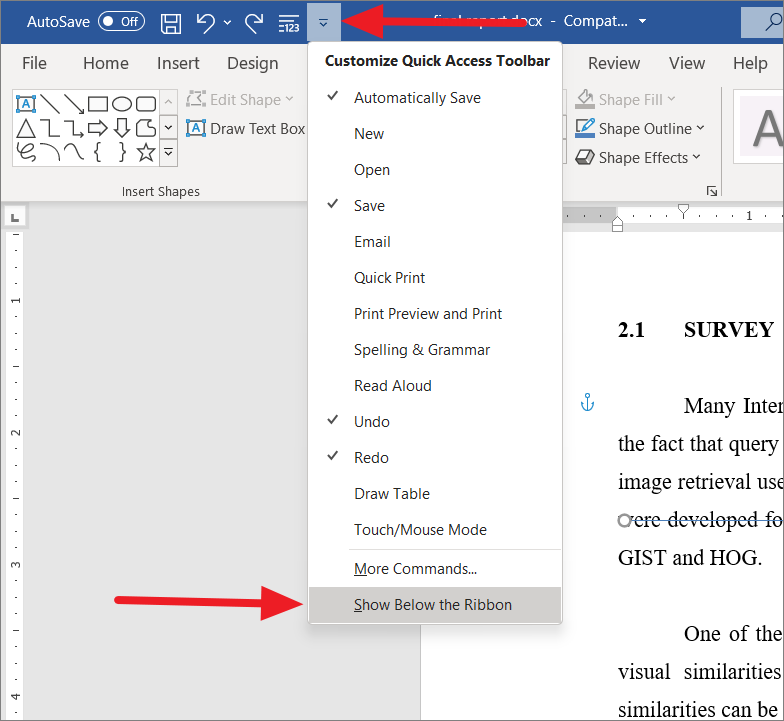
Quick Access Toolbar is the small tool above right above the ribbon. If you want to move the Quick Access Toolbar below the ribbon, click the small down arrow button to the right of the Quick Access Toolbar and select ‘Show Below the Ribbon’ from the drop-down.
To add Strikethrough to the Quick Access Toolbar, follow these instructions:
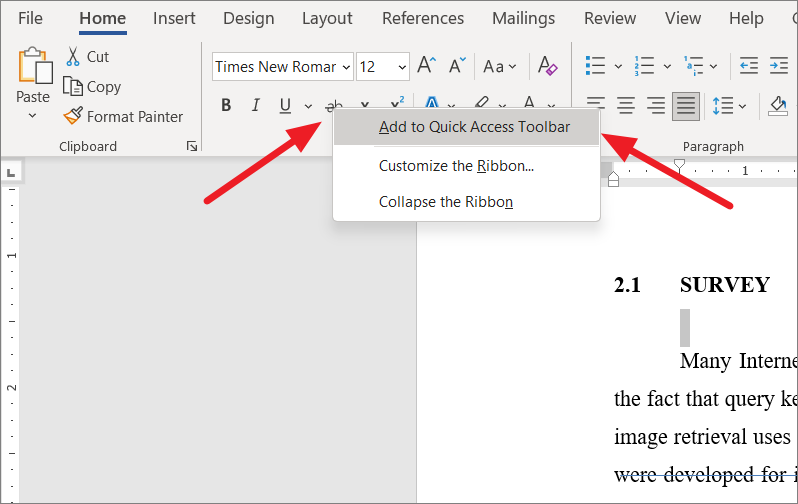
If the Strikethrough button is available in the Ribbon, right-click ‘Strikethrough’ in the Font group on the ‘Home’ tab in the Ribbon. From the drop-down, select ‘Add to Quick Access Toolbar’.
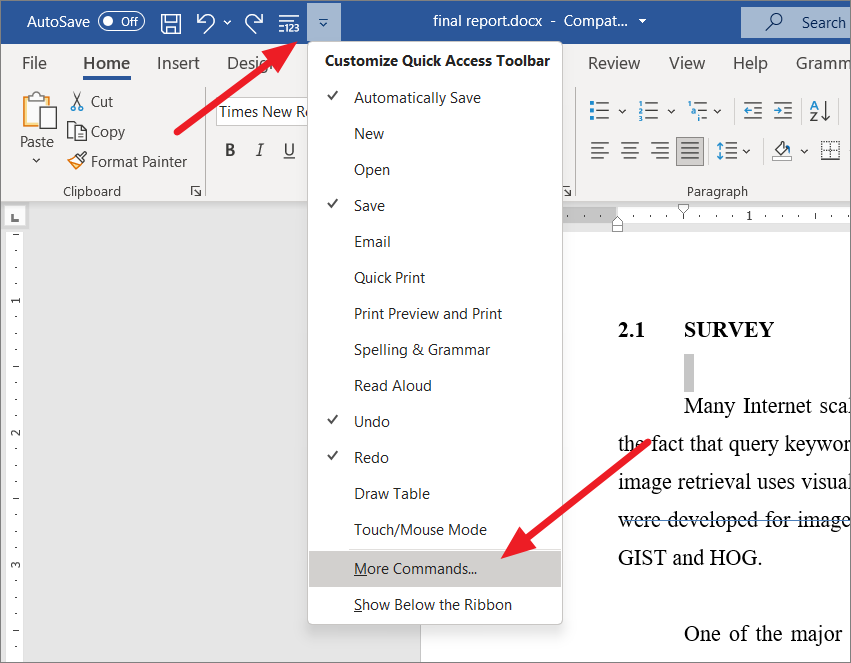
If the Strikethrough option is not available in the Ribbon, click the down arrow to the right of the Quick Access Toolbar and select ‘More Commands…’ from the drop-down menu. Or, go to the ‘File’ tab, select ‘Options’, and then click ‘Quick Access Toolbar’ in the Word Options window.
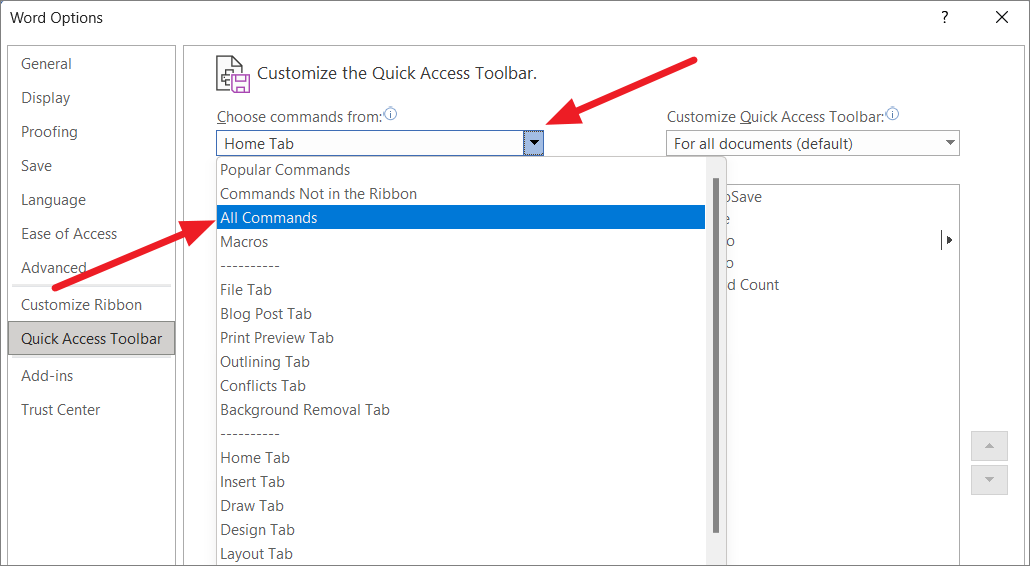
On the right side, choose ‘All Commands…’ from the ‘Choose commands from:’ drop-down.
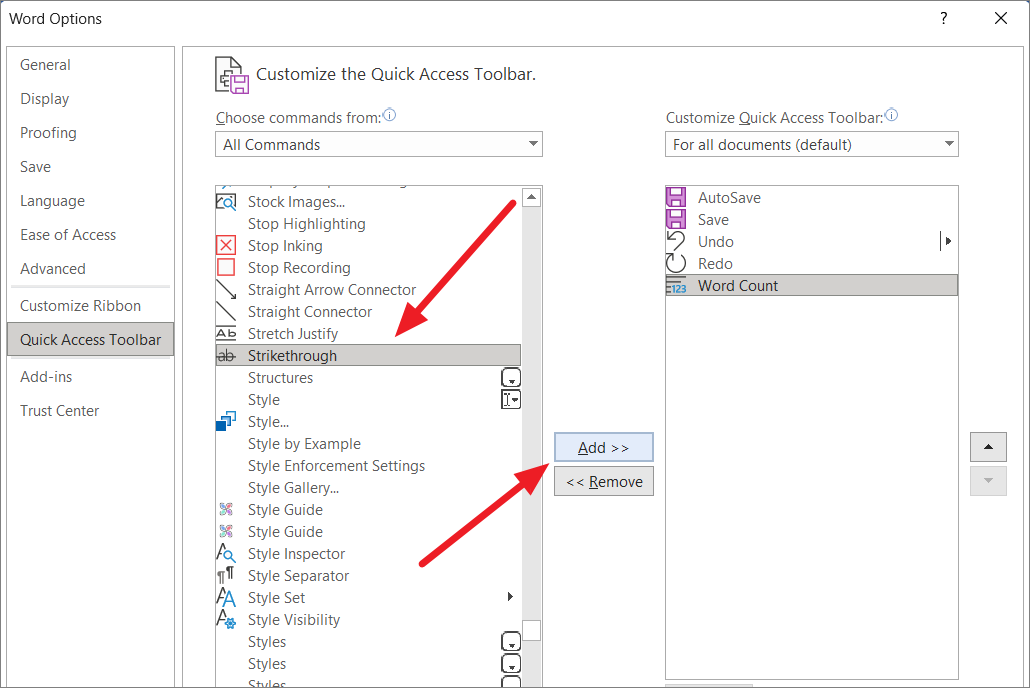
From the list of commands on the left side box, select the ‘Strikethrough’ command and click the ‘Add >>’ button in the middle to add it to the right-side box.
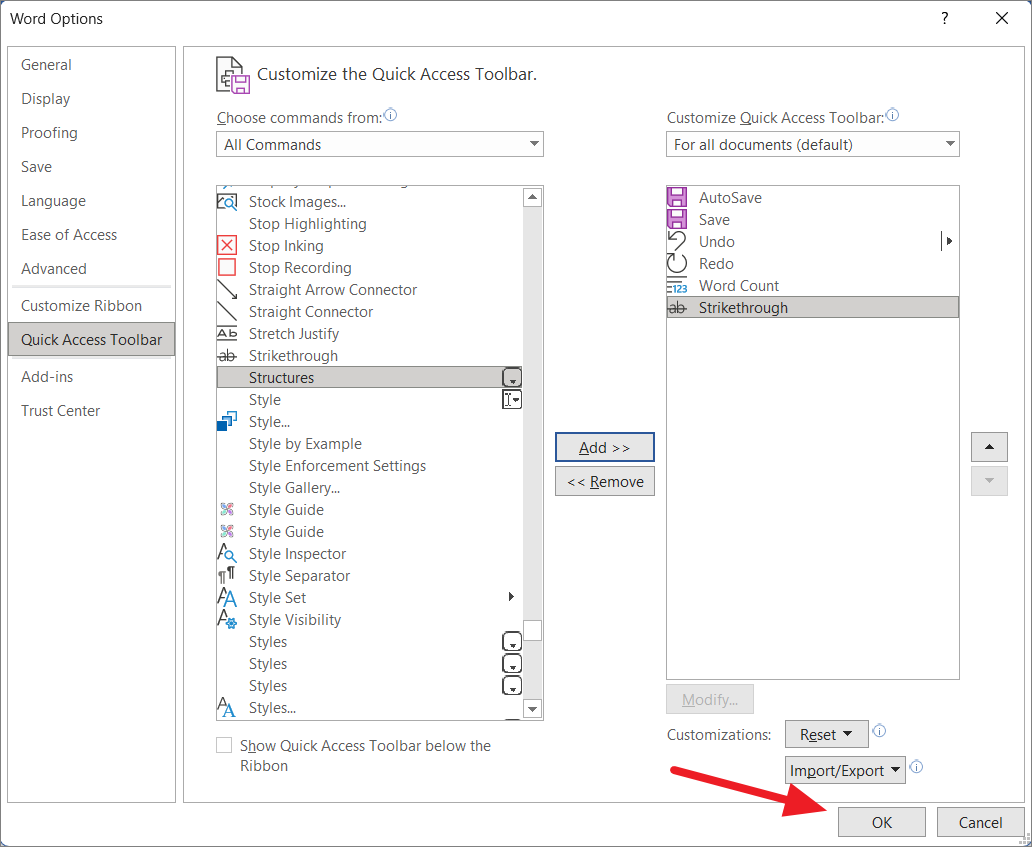
Then, click ‘OK’ to save the changes.
Now, you can quickly access the Strikethrough shortcut from the Quick Access Toolbar at the top.
Put a Line Through a Text Using Shapes
You can also put a line through text using created line shape. You can insert a line from the Shapes feature and use it to strikethrough any number of text. With the created line, you can even strike across an entire paragraph or page. Here’s how you can do that:
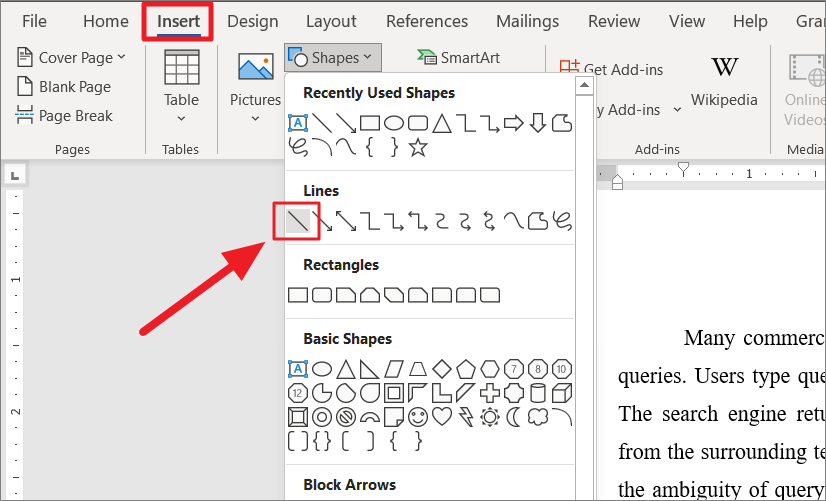
First, open the document where you want to strikethrough text. Go to the ‘Insert’ tab in the Ribbon. Then, click the ‘Shape’s drop-down button from the Illustrations group and select the ‘Line’ shape in the Line section.
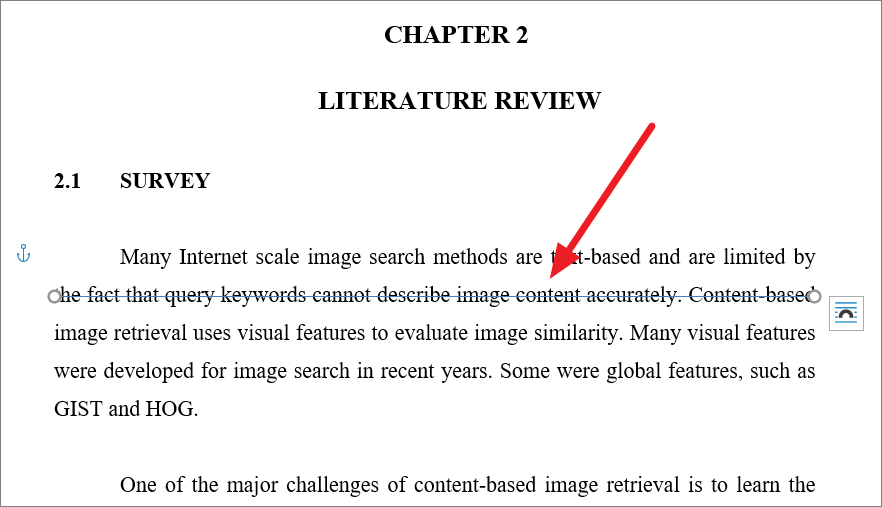
Then, draw a line over the text you want to strike out by holding and moving the across the text.
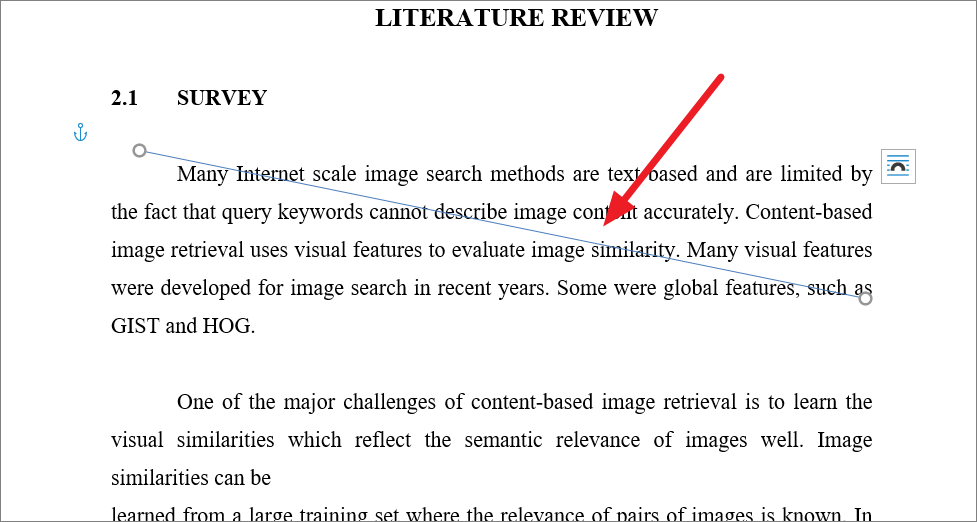
You can also create a diagonal cross-out line across a passage or an entire page using the same method.
This method creates a customizable strikethrough on text. After drawing a cross-out line across text, you change the color, width, and design of the line.
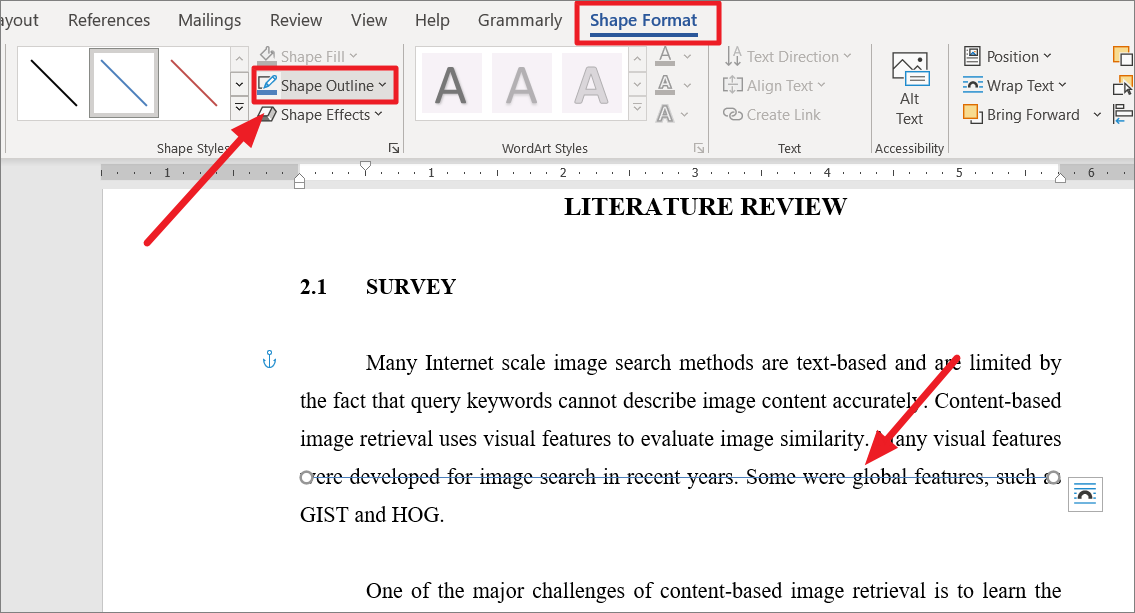
You can select the inserted line, and change the line color, outline, and effects from the Shape Styles group under the ‘Shape Format’ tab.
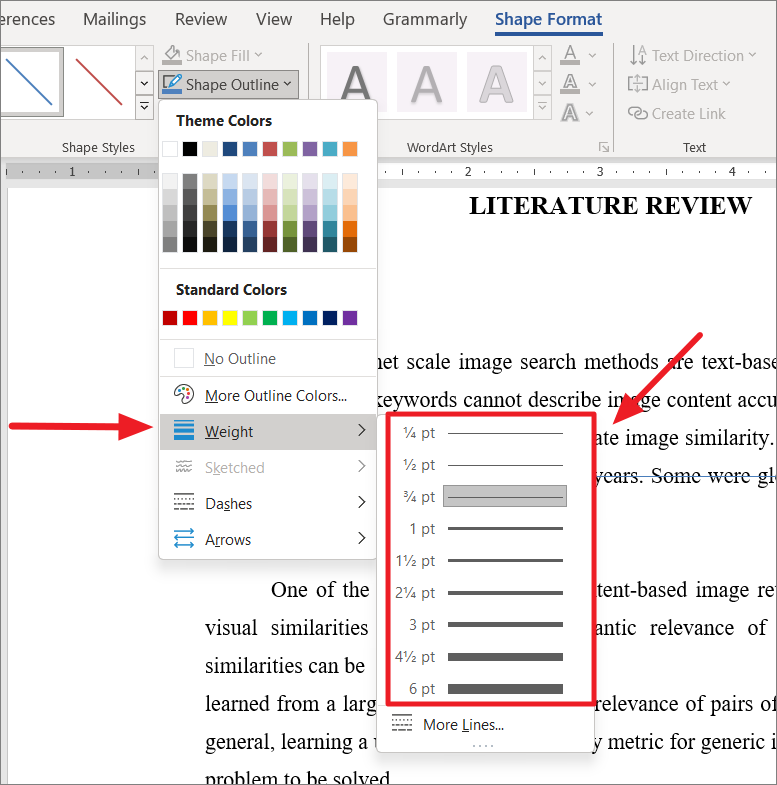
To change the width of the line, select the line, and click the ‘Shape Outline’ drop-down button from the Shape Format tab.
Then, select ‘Weight’ from the drop-down menu and choose a line width from the sub-menu.
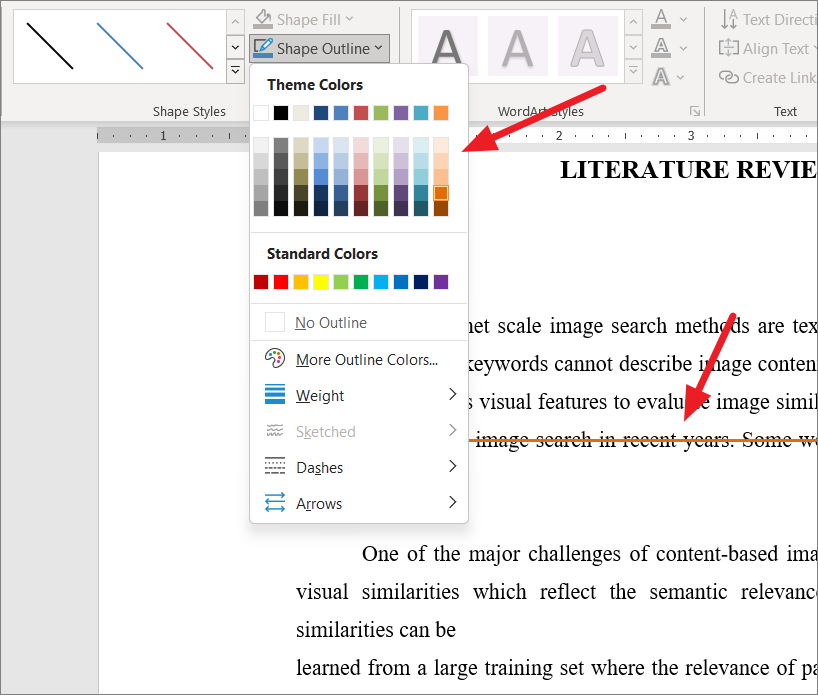
To change the color of the line, click the ‘Shape Outline’ menu and choose a color from the Theme Colors section.
You can change the line into dashes or arrows using the ‘Dashes’ and ‘Arrows’ options from the Shape Outline menu.
That’s it.
Cross out a word in Word on PC and Mac
Let’s start this guide on how to strike out a word in Word from the «classic» version of the software, the one that can be installed on Windows or macOS following a subscription to the service Microsoft 365 or buying the single version of Office (I told you about it in my tutorial on how to download Office, remember?). The program has the same interface on both operating systems, so the steps to be taken are the same in both Windows and Mac environments.
Therefore, open the document on which you intend to operate and select the word or phrase to be crossed out. To select text in Word you can use the mouse or the keyboard: using the mouse, you can do double click on a word to select it in its entirety; you can do triple click on a word to select the entire paragraph that contains it, while holding down the left click and by moving the cursor to the right or left you can select custom text portions.
To select text with the keyboardinstead, use the following combinations: Shift + Left Arrow o Shift + Right Arrow to gradually select the text that is to the left or right of the Word cursor; Shift + Ctrl + Right Arrow or Left Arrow (Or shift + options + right arrow or left arrow on Mac) to select the word to the left or right of the Word cursor; Shift + Down Arrow to select the entire line on which the Word cursor is positioned.
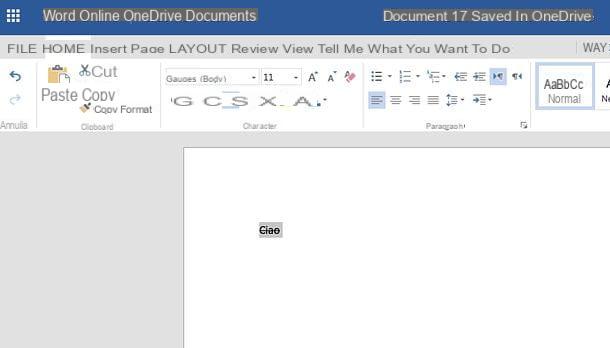
At this point, select the tab Home Word and click on the button a B C which is located at the top left (in the section Character). If, on the other hand, you want to apply the double strikethrough effect to the selected text, right-click on it and select the item Character give the menu that you come purpose.
In the window that opens, put the check mark next to the option Double strikethroughclick on your button OK to save the changes and that’s it.
In case of second thoughts, you can remove the strikethrough from a text simply by selecting it in Word and clicking on the button again a B C located at the top left (in the tab Home).
To remove the double strikethrough effect, instead, select the text of your interest in Word, right-click on it and choose the item Character from the menu that is proposed to you. In the window that opens, remove the check mark from the item Double strikethrough, pigia sul pulsating OK And that’s it.
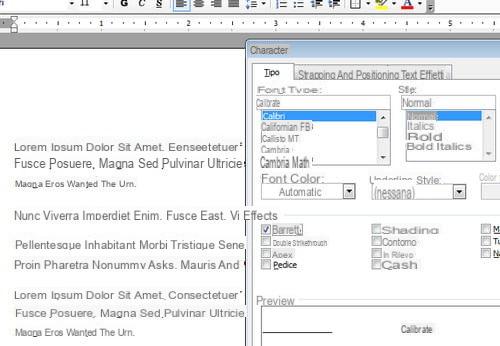
Utilizzi anchor Office 2003 or even an older version of the Microsoft suite (the ones with the classic interface, not the tabbed ones)? In this case, to cross out a word in Word you need to open the document to be corrected and select the word or phrase to cross out. Then right-click on the selected words and choose the item Character give the menu to compare.
In the window that opens, put the check mark next to the item Strikethrough and click on the button OK to complete the operation and cross out the selected text portion. If you want to cross out the wrong words / phrases with two lines instead of a single line, put the check mark next to the item Double strikethrough.
Once you have applied all the corrections to your document, regardless of the version of Word you are using, you can save the final result by clicking on the icon floppy disk located at the top left.
If, on the other hand, you want to save the document as a new file without overwriting the original one, proceed as follows: if you use Word 2007 or laterclick on your button Fillet located at the top left, select the item Save with name from the menu that opens and click on the button Shop by Department to choose the name and destination folder of the document to be saved. If, on the other hand, you still use Office 2003 or earlier, go to the menu Fillet (top left) and select the item Save with name from the latter. Easier than that ?!
Cross out a word in Word Online
As already mentioned at the opening of the post, an online version of Word is available that is completely free and can be used from all the most popular web browsers (eg. Chrome, Firefox o Safari) without installing additional software on your computer. As easily understood, it does not include all the advanced functions of Word for Windows or macOS, but for some activities, such as adding strikethrough text in documents, it is more than enough.
Word Online works through Microsoft account and relies on OneDrive, the cloud storage service of the Redmond giant (which I told you about in my dedicated guide). To use it, therefore, you must have a Microsoft account (if you don’t have one yet, fix it immediately by following the instructions you find in my tutorial on how to create a Microsoft account) and you must upload the documents to be edited on OneDrive.
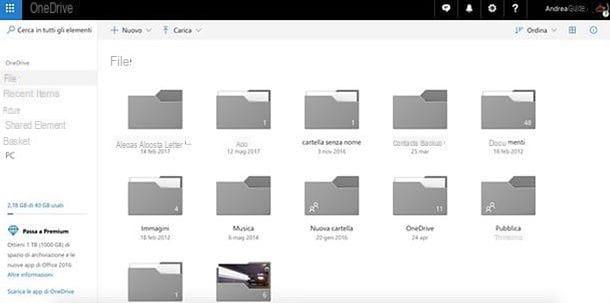
To upload a document to OneDrive, connected to the main page of the service using the link I have provided you just now, click on the button Go to my OneDrive (if required) and log in to yours Microsoft account. At this point, take the file to be edited in Word online and drag it into the browser window using the mouse. The upload progress will be shown to you via the icon arrow which will appear at the top right.
Once upload is complete, click on the icon of the document to be edited (always within OneDrive) and within a few seconds it will be opened in Word Online.
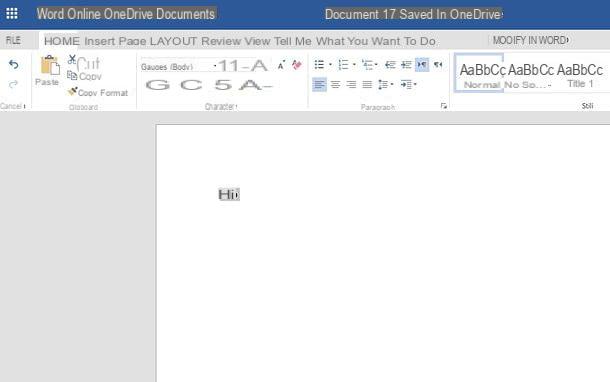
Now you simply have to follow the instructions I gave you earlier in the chapter dedicated to Word for Windows and macOS: select, therefore, the text to be crossed out, go to the tab Home Word Online and click the button a B C which is located at the top left. Unfortunately there is no option to apply the double strikethrough effect.
In case of second thoughts, you can retrace your steps and remove the crossed out effect from a word or phrase, simply by selecting the latter and clicking again on the button a B C located at the top left of the tab Home in Word Online.
Once you have applied all the corrections you need, you can download your document to your PC by clicking on the button Fillet located at the top left in Word Online, by selecting the item Save with name from the bar that appears laterally and pressing the button Download a copy.
Cross out a word in Word for smartphones and tablets
Are you often away from home and, consequently, would it be convenient for you to edit your documents even from smartphones and tablets? No problem: Word is also available as an application for Android (also on alternative stores) and iOS / iPadOS and can be used for free on all devices that have dimensions equal to or less than 10.1 ″ (for larger devices, however, a subscription is required of a subscription a Microsoft 365).
Once you have downloaded the Word app on your smartphone or tablet, launch it and log in to yours Microsoft account. Then decide whether to start creating a new document or to open an existing file by selecting the tab apri Word and drawing from one of the many sources available: the device memory, OneDrive, dropbox, Google Drive etc.
Once the document of your interest has been opened, select the text to be crossed out by making a prolonged tap on it and then using the indicators that appear on the screen, in order to select the exact word, phrase or paragraph on which to operate. After that, if you are using one smartphone, pigia sull’icona del triangle (Android) or dei three dots (iOS / iPadOS) located at the bottom right, select the tab Home from the drop-down menu displayed at the bottom left and tap the button a B C .
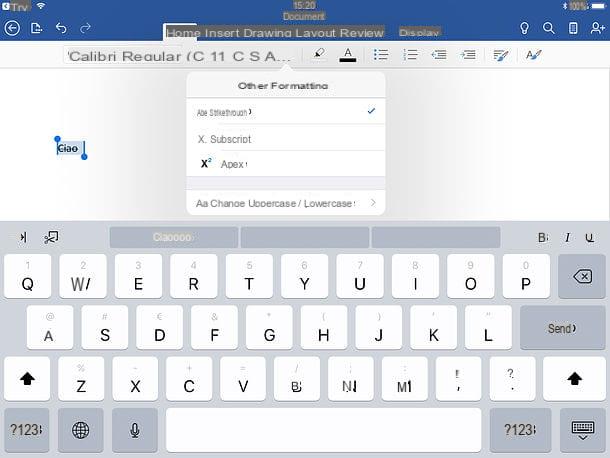
If you use a tabletinstead, to cross out the selected text in Word you have to select the tab Home located at the top, press the button The … present in it and choose the option Strikethrough give the menu to compare.
Cross out a word in Word by review
Su Word it is possible to show the words crossed out following a review. If you didn’t know, the revision is a way to make sure to apply corrections to a document without modifying it to make them first visible to other users, who may have to apply others. In this way, all the revisions will be collected in the document with the possibility of accepting or rejecting them.
When you delete one or more terms in review mode, they are crossed out. Only by activating a special display mode is it possible to see all corrections, including crossed out terms.
First, you need to know that Word review can be activated from the tab revision found in any version of this word processor, including its online counterpart and mobile app. To activate the mode and also see any terms that may be crossed out, follow these steps.
- Su Microsoft Word, press the button revisions to activate the mode. Then select the option from the drop-down menu next to it All comments.
- Su Word Online, press the button Detect changes and, in the menu that is shown to you, choose the item For everyone.
- On the app Word, tap on the item revisions and then make sure that the wording below is indicated All comments.
By following these steps, you will be able to see the corrections made by all users who have intervened on the document. Any deleted words will be marked with a strikethrough. To confirm or deny a correction, all you have to do is select it in the document and then press the keys respectively Accept o Reject located in the tab revision.
How to strike out a word in Word
Contents
- 1 How to Strikethrough in Word with Font Formatting
- 2 How to Put a Line Through Text in Word Using the Font Dialog Box
- 3 How to Add Strikethrough in Word to the Quick Access Toolbar
- 4 How to Create a Word Strikethrough Shortcut
- 5 How to Put a Line Through Any Text Using Unicode
- 6 How to Clear Formatting in Word or Turn Text Upside Down
Though it’s rare, there are times when we need to show that text should be removed from a document without actually removing it. The best way to do this is to learn how to strikethrough text in Word or your respective editing or social media application. Today we’re going walk you through just that, but first a word about what strikethrough is.
What is strikethrough?
Strikethrough text, also known as crossed-out text, lets you put a line through words. In Word, strikethrough takes the form of a character format, which allows you to easily add and remove it at will.
In other applications, you may have to use an online tool to generate your strikethrough text. Or, if the application supports markdown, you may also be able to use the double tilde symbol (~~) before and after your text to achieve the effect.
Today we’ll be showing you how to put a line through text in Word using several methods, but also share an online tool you can use for any application. Let’s start:
How to Strikethrough in Word with Font Formatting
The most user-friendly way to strikethrough text in Word is via the ever-familiar font formatting panel. Here’s how you access it:
- Select your text, open the Font dialog, and press the strikethrough symbol
You can find the font panel in the “Home” tab of your ribbon. It’s where you have bold, underline, and other formatting options. The button will look something like this:
ab. Click it and it will automatically put a line through your selected text.If you want to do this faster, you can also press Alt > H > 4 on your keyboard.
How to Put a Line Through Text in Word Using the Font Dialog Box
If you need an alternate method to above, you can strikethrough text in Word quite quickly by using the Font dialog box and some handy keyboard shortcuts. Here’s how:
- Select your text and press Ctrl + D
You should see the font dialog box pop up with all of its normal options.
- Press Alt + K, then Enter
Alt + K will tick the strikethrough box without you needing to take your fingers of the keyboard. The Enter key applies the changes.
- Check your crossed out text in Word
You should see that the text you selected has a line through it, just as intended. With a bit of practice, you should be able to complete this whole process in less than a second.
How to Add Strikethrough in Word to the Quick Access Toolbar
For faster access to strikethrough in Word, you can add it to your quick access toolbar, which will both make it more visible and easier to access via keyboard shortcut. Here’s how you can do so:
- Right-click the strikethrough button in the “Home” tab and select “Add to Quick Access Toolbar”
Depending on the size of your Word window, you may have to click the “Font” button to expand the font panel.
- Press the Quick Access dropdown arrow and press “More Commands…”
Depending on your Word settings, the quick settings dropdown will either be just above or just below your ribbon.
- Select Strikethrough from the right-hand list and change its position
You can press the up and down arrows on the right-hand side to move it to wherever make the most sense to you. Bear in mind that the position in the list will determine the number you have to press to apply it with a shortcut. If it was first in the list, for example, the button would be Alt + 1. Click “OK” to save the changes.
- Select your text and press the relevant keyboard shortcut
If your strikethrough is second in Quick Access list like ours, this will be Alt + 2. Otherwise, it could be Alt + 1, Alt + 3, Alt + 4, etc.
How to Create a Word Strikethrough Shortcut
The default Word Strikethrough shortcut is a bit of a pain, requiring you to press Alt, then H, then 4. We can change this by creating a custom strikethrough shortcut:
- Click “File”
- Select “More… > Options” from the sidebar
- Select “Customize Ribbon” and press “Customize” next to “Keyboard shortcuts:”
This button should be located underneath the left-hand list.
- Click “Home tab” in the left column and “Strikethrough” in the right
- Click in the “Press new shortcut key” box and press the shorcut you’d like on your keyboard.
In our case, we went for Alt + Ctrl + S. Note that you probably shouldn’t use just Ctrl + S as that’s reserved for saving your document. Once you’ve decided, press “Assign”.
- Select “Normal.dotm” in the “Save changes in:” dropdown
This will ensure the shortcut applies across all documents, rather than just the one you’re currently using. You can safely press “Close” when you’re done. Make sure you save the normal template when prompted when you exit Word.
- Press “OK” in the Word Options window
You can now test your Word strikethrough shortcut on some text if you’d like.
How to Put a Line Through Any Text Using Unicode
Outside of Word, you can easily put a line through text using online strikethrough text tools that convert text to unicode. You simply paste your text, press a button, and copy and paste it back into your document or message. This however only works with apps and forms that support such unicode strikethrough text characters.
We’ll be using SaijoGeorge in this tutorial, but you can use any of the many freely available online tools.
- Enter your text in the white textbox and press “StrikeEm”
- Click on the strikethrough text and press Ctrl +X to copy the text from the pop-up
- Example: Press Ctrl + V to paste the crossed-out text in your Word processor
- Example: Press Ctrl + V to paste the text into a chat message
How to Clear Formatting in Word or Turn Text Upside Down
Now that you know how to strikethrough in Word, you may be wondering whether you can remove the effect from a piece of text again. The answer is yes, and our tutorial on how to clear formatting in Word will tell you everything you need to know. If you’d rather play around with other text effects, however, you can read our how to turn text upside down tutorial.
Now we will tell you how to cross out the word inThe Vorda. After all, working in the specified text editor gives the user great opportunities. Thanks to the application, you can make various manipulations with the text. We will describe one of them now.
How to cross out the word in the Word: instruction
To start, we type in the Microsoft Word programnecessary to us text. It should be noted that for the crossed out text in the Word is a special designation. We have this function to use. If there is no «abc strikeout» button in the toolbar, place the cursor on the blank field of the toolbar. Click the right mouse button and in the resulting tool window select the «Settings …» section. Further, in order to understand how to cross out the word in a Word, we need to select the «Commands» section in the appeared settings window. Next, go to the left column of the «Categories» and find the «Format» item. Let’s pay attention to the right column of the «Team», because there appeared a list of opportunities corresponding to this category. Move the slider down and find the notation «abc Strikethrough». We put the cursor on the icon, click with the left mouse button, and then, while holding it, drag the symbol to the toolbar field. You can choose the right place for you.
How to use
Now you know how to cross out the word in the word,because the toolbar from now on fixed the designation of the command, which allows you to cross out the signs, words and letters. However, we will talk about some more points. So, in our printed text choose the word to be struck out. Select it. Click on the symbol «abc Strikethrough» in the toolbar. All the word that interests us is crossed out.
Type the text
Next, we’ll discuss how to write with a crossed out font. Based on specific goals in writing individual blocks of necessary text or an inscription, it is better to use different variants in font design. Thanks to this content will look expressive, and your reader will be much harder to make a mistake in understanding the semantic load of the inscription. One way to achieve a correct understanding of the written text can be called using a crossed out font. If you use the text editor «Word», it is enough to activate the function, which was discussed above, and go to the material set. If you are interested in a similar feature in the Photoshop graphics editor, click on the text layer selected for such processing, then expand the «Window» section in the program menu. You must select the «Symbol» line in order to open a special panel. In it, you can make changes to text parameters on the selected layer. The second bottom row on this panel has pictograms, each of which depicts the Latin letter «T» in various spellings. In this case, the crossed out letter in this list is in last place. Pressing the rightmost pictogram, you will get the desired result. Now you know how to cross out the word in the Word.
</ p>>

