
![]()
Download Article
![]()
Download Article
Want to cross out words, letters, or entire sentences in Microsoft Word? We’ll show you how to use strikethrough to cross out any text in your Microsoft Word document using a computer, Android, iPhone, iPad, or Windows tablet.
Things You Should Know
- The strikethrough option is located in the Home tab at the top of Word.
- You can apply a double-line strikethrough using the Font panel’s additional options.
- To remove a strikethrough, highlight the text and click the strikethrough icon. Alternatively, select ‘Clear Formatting’ to remove it.
-

1
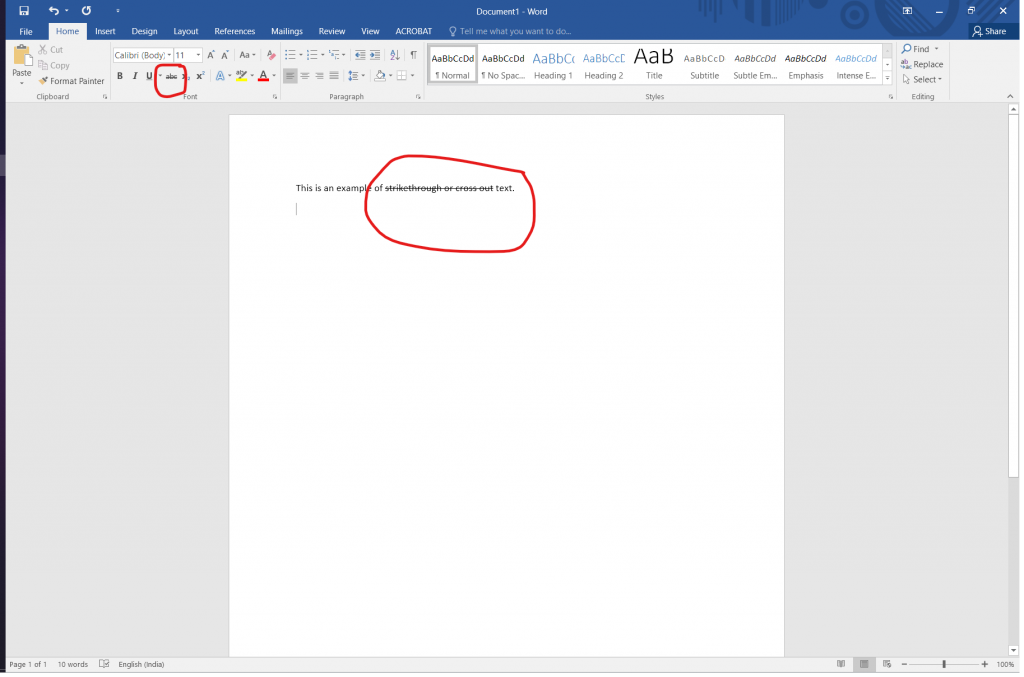
Highlight the text you want to strike out. You can do this by clicking and dragging the mouse cursor over the word or phrase.
- Although there is no keyboard shortcut for striking through text, it’ll only take a few seconds to apply the formatting.
-
2
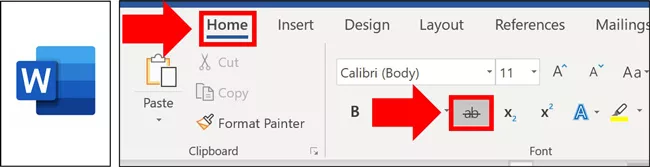
Click the Home tab. If you’re not already on the Home tab, you’ll need to click Home at the top of Word to go there now.
Advertisement
-
3
Click the strikethrough icon. This icon looks like «
ab
» (or «
abc
» in some versions) with a horizontal line through both letters. You’ll see it up near the rest of your font options, such as the options to make words bold and italic. Clicking this icon will cross out all selected text.
- To remove the strikethrough effect, highlight the word or phrase again, and then click the ab icon.
-
4
Apply double-line strikethrough (optional). If you want to cross out the selected word or phrase with two lines instead of one, you can use the double-line strikethrough effect.[1]
Here’s how:- With the word or phrase highlighted, click the small down-arrow on the «Font» panel at the top of the screen.
- Check the box next to «Double strikethrough.»
- Click OK.


Advertisement
-
1
Select the text you want to strike out. To do this, just tap and hold one of the words you want to cross out, and then drag either side of the selection bars until all of the desired text is highlighted.
-
2
Tap the strikethrough icon (Android and Windows tablets only). If you see an icon that has lowercase «
ab
» with a horizontal line crossing through it, you can tap that icon to immediately strike through the selected text. If not, skip to the next step.
-
3
Tap the text formatting icon. It’s the icon of a capital «A» that has three horizontal dots beneath it.[2]
You’ll see this option at the top of the screen if you didn’t see a crossed-out «ab
» icon.
-
4
Tap Strikethrough. This crosses out the selected text.
- If you want to remove the strikethrough effect, select the text again, and then tap the ab icon (if you see it) or tap the text formatting icon and select Clear Formatting.


Advertisement
Ask a Question
200 characters left
Include your email address to get a message when this question is answered.
Submit
Advertisement
Video
Thanks for submitting a tip for review!
About This Article
Article SummaryX
1. Highlight the word or phrase with your mouse cursor.
2. Click the Home tab.
3. Click the icon of a crossed-out «ab.»
Did this summary help you?
Thanks to all authors for creating a page that has been read 395,619 times.
Is this article up to date?
Author:
Joan Hall
Date Of Creation:
26 July 2021
Update Date:
6 April 2023
![How To Cross Out Text In Microsoft Word [For Beginners]](https://i.ytimg.com/vi/MpsQTuqtOPQ/hqdefault.jpg)
Content
- Strikethrough text in Word
- Option 1: Standard strikethrough
- Option 2: Strikethrough with customization of appearance
- Conclusion

The need to cross out a word, phrase or piece of text in a document can arise for various reasons. Most often this is done to visually demonstrate an error or exclude an unnecessary part from what is written, but these are far from the only reasons. In this article, we will show you how to strike out text in Microsoft Word.
See also: Delete annotations in Word
Strikethrough text in Word
You can solve the problem posed to us using the tools presented in the group «Font» on the Microsoft Word ribbon. Another question is whether you will be enough just a solid horizontal line on top of the written text or will you want to change its appearance, and at the same time the text on top of which it is located. Next, we will consider both the strikethrough itself and its «design».
See also: How to underline text in Word
Option 1: Standard strikethrough
Strikethrough is one of the font tools in the arsenal of a text editor. It works in the same way as changing the style (bold, italic, underline) and index (superscript and subscript), which we have already written about. The button necessary for solving our problem is located between them.
Read also:
How to change the font in Word
How to put an index in Word
- Highlight the word or piece of text that you want to cross out.
- Click on the button «Strikethrough» (in current versions of Word, this is the icon with crossed out letters «Ab», earlier — «Abc») located in the group «Font» in the main tab of the program.
- The word or piece of text you have highlighted will be crossed out. If necessary, repeat the same action with other parts of the text.
Advice: To cancel strikethrough, highlight the strikethrough word or phrase and press the button again. «Ab» on the toolbar.


It’s so easy to cross out a word, phrase, sentence and larger fragments of text in the Word with one line. The text obtained as a result of these actions can be changed externally in the same way as the usual one, but the line itself takes the form (color, style, size) of the inscription under it.
See also: How to underline a word in Word
Option 2: Strikethrough with customization of appearance
With a text editor from Microsoft, you can not only cross out words, but also change the color of both the horizontal line and the text itself. In addition, the line passing over the letters can be double.
- As in the case discussed above, select with the mouse the word, phrase or fragment that you want to cross out.
- Open the group dialog «Font» — to do this, click on the small arrow, which is located in the lower right part of this block with tools (shown in the image above).
- In chapter «Modification» check the box next to «Strikethrough»to get the same result as above, or choose «Double strikethrough»… Above you can choose «Text color», which will be applied not only to the letter, but also to the line that crosses them out.


Note: In the sample window, you can see how the selected text fragment or word will look after strikethrough.
After you save your changes and close the window «Font»by pressing the button «OK», the selected text fragment or word will be crossed out with a single or double horizontal line, depending on which option you have chosen.

Advice: To cancel the double strikethrough, reopen the window. «Font» and uncheck the box «Double strikethrough».

Once again, in terms of design options and changes in appearance, the strikethrough text does not differ from the usual one — all the tools presented in the group can be applied to it. «Font», and not only them.
Conclusion
In this short article, we figured out how to cross out a word or any piece of text in Microsoft Word with one or two horizontal lines, giving them the desired appearance.
In this post you’ll learn how to strikethrough text (or cross out text) in Microsoft Word, Excel, and PowerPoint.
Each software works a little bit differently: PowerPoint and Word both have the strikethrough command available in the Ribbon. In addition, for the Microsoft Office programs, if you navigate through the Font dialog box (or Format Cells dialog box in Excel) you get a bunch of other useful text effect options.
If you want to strikethrough text outside of the Microsoft Office suite (like inside a YouTube comment), you can check out the post by Online Sense here.
How to strikethrough text in Word
There are two ways you can strikethrough text in Microsoft Word.
Neither one is better nor worse, it just depends on the number of features you want to get access to. The Font dialog box method below gives you the most text formatting effects.
1. Use the strikethrough command in the Ribbon
To use the Ribbon in Word to create the strikethrough effect, simply:
- Select the text you want to cross out
- Navigate to the Home tab
- Click the Strikethrough command
Note: If you are using the strikethrough effect to show edits and make comments, a better method is to use Microsoft Word’s built-in Comments command. To learn how to add comments in Word, read our guide here.
2. Use the Font dialog box strikethrough command
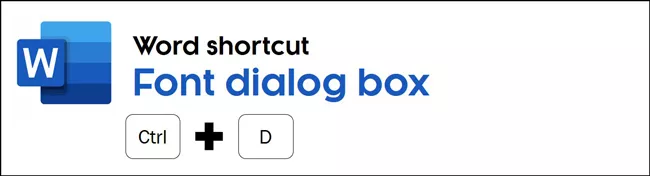
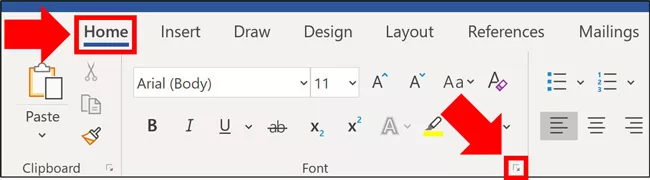
The fastest way to open the Font dialog box in Microsoft Word is with the Ctrl+D keyboard shortcut. If you don’t want to memorize a new shortcut, you can alternatively open it from the Home tab.
- Select the text you want to cross out
- Go to the Home tab
- Click the downward facing arrow in the Font group
- Select Strikethrough (pictured below)
- Click OK
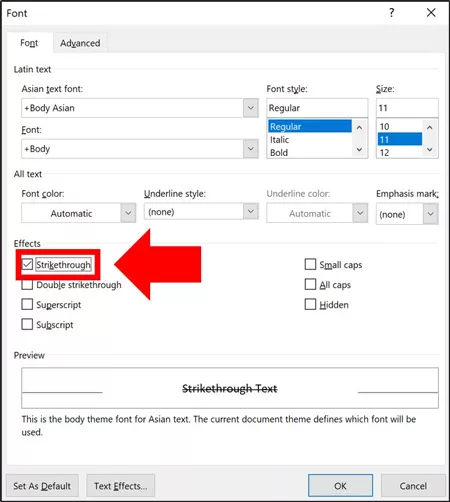
As pictured below, you have a variety of additional text formatting options inside the Font dialog box. To see an example of these different text features, read below.
3. Text effect options in Word
Checking the box creates the crossed out text effect. To remove the text effect, simply open the Font dialog box again and un-check the box.
These options in Word are quite different than what you will find if you migrate to Google docs. To expand your knowledge and learn how to strikethrough on Google docs, read our guide here.
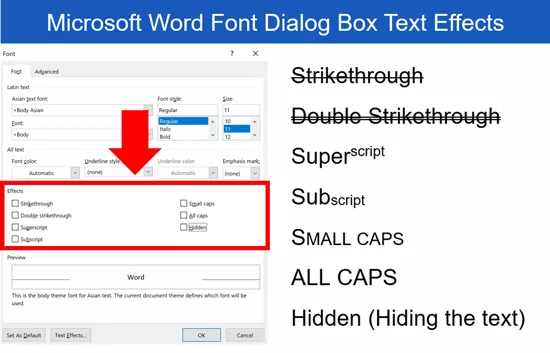
The advantage of using the Font dialog box is that it gives you seven other text effect options (as you can see in the picture above). Here are the keyboard shortcuts for each one:
- Strikethrough: Alt + K
- Double Strikethrough: Alt+L
- Superscript: Alt+P
- Subscript: Alt+B
- Small caps: Alt+M
- All caps: Alt+A
- Hidden: Alt+H
To expand your knowledge and learn how to use the Font dialog box to underline words only and change the underline color of your underline, read our guide here.
Note: To learn all the strikethrough shortcuts for Word, Excel, and PowerPoint, see our guide here.
How to do a strikethrough in Excel
There are 4 different ways you can strikeout text in Excel using the Format Cells dialog box.
The reason that there are so many options in Excel is that you can leverage cell borders to create the diagonal cross-out text effect (described below). But first, let’s start with the basics.
![]()
1. Strikethrough text in Excel
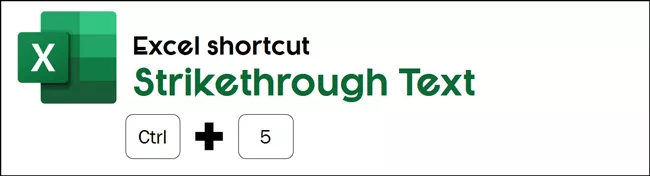
The fastest way to create the strikeout text effect in Excel is to use the Ctrl+5 keyboard shortcut. Simply select your text (or the cell with your text in it) and hit Ctrl+5.
Hitting the Ctrl+5 shortcut once applies the text effect. Hitting the shortcut a second time removes the text effect.
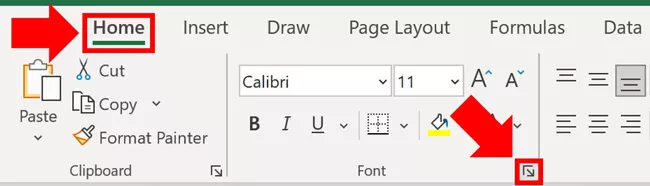
If you don’t want to memorize the shortcut, you can also access the strikethrough command through the Format Cells dialog box.
- Select the cells you want to strikeout in your spreadsheet
- Select the Home tab
- Click the downward facing arrow in the Font group
- On the Font tab select Strikethrough (see image below)
- Click OK
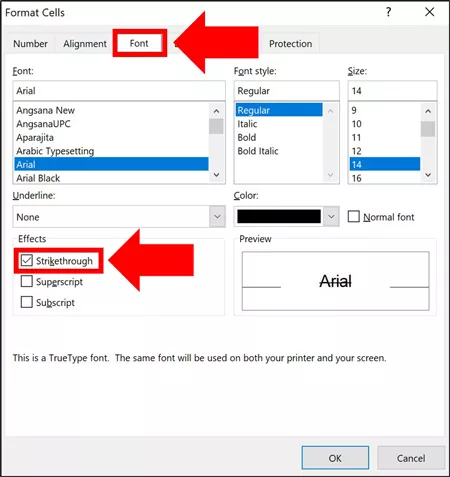
Just like any other program, applying the effect once strikes out your text. Applying the effect a second time removes it.
Also please note that the Format Cells dialog box is where you access the Superscript and Subscript commands. To learn more about this, read our guide here.
2. How to diagonally strikethrough text in Excel
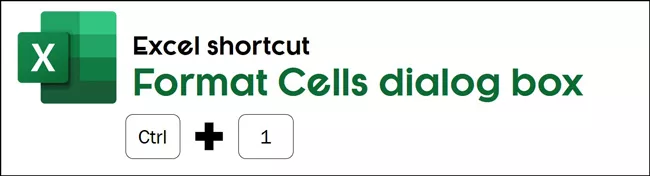
In this example, we are going to create a diagonal strikethrough and use the Format Cells keyboard shortcut.
- Select the cells you want to strikeout in your spreadsheet
- Hit Ctrl + 1 to open the Format Cells dialog box (or use the Ribbon command discussed above)
- Navigate to the Border tab
- Add the diagonal lines (picture below )
- Click OK
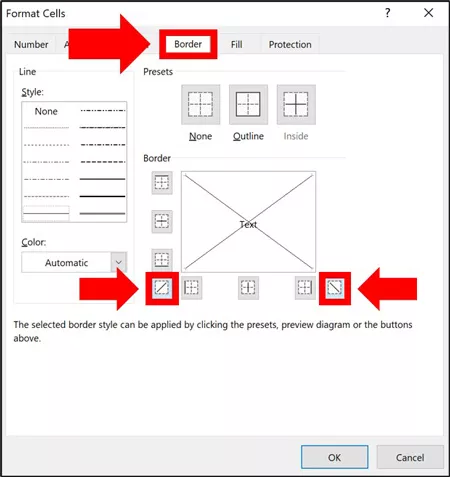
Applying a diagonal border once applies the effect to your cell. Applying it a second time removes it.
So if you later want to remove this diagonal crossed out effect, simply navigate back to the Format Cells dialog box (Ctrl + 1), navigate to the Border section and re-apply the diagonal cell borders.
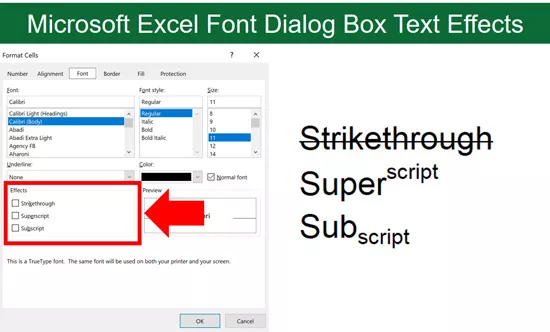
3. Other text effect options in Excel
Inside the Format Cells dialog box in Excel, there are 3 other text effects you can apply to your text (as pictured above):
- Strikethrough: Alt + K
- Superscript: Alt + E
- Subscript: Alt + B
To expand your knowledge and learn how to copy and paste formatting in Excel, see the section on the Paste Special shortcut inside our guide here.
How to strikethrough text in PowerPoint
There are two different ways to cross out text in PowerPoint.
You can either use the strikethrough command in the Ribbon or use the Font dialog box. Which method is best depends on how many text effect options you want to apply.
1. Use the strikethrough command in the Ribbon
- Select the text you want to cross out
- Navigate to the Home tab
- Click the Strikethrough command
To later remove the crossed-out text effect, simply reapply the strikethrough command or select your text and hit Ctrl + Spacebar on your keyboard to wipe out the text formatting.

2. Use the strikethrough command in the Font dialog box
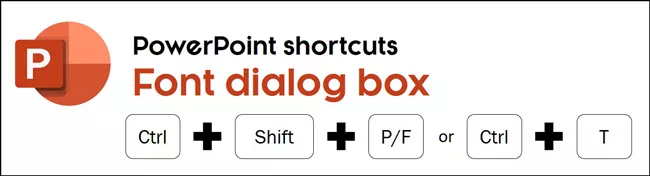
The fastest way to open the Font dialog box in PowerPoint is to use one of the following three shortcuts (they all do the same thing):
- Ctrl+T
- Ctrl+Shift+P
- Ctrl+Shift+F
If any of the above shortcuts do not work for you, check out our guide here.
If you don’t want to memorize one of the above keyboard shortcuts (which I highly recommend doing), you can also access the Font dialog box from your Ribbon as follows:
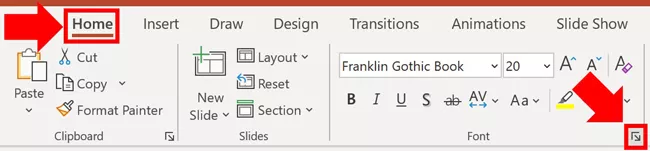
- Select the text you want to cross out
- Click the downward-facing arrow in the in Font group
- Select Strikethrough (pictured below)
- Click OK
If you want to apply the Double Strikethrough effect, you have to go through the Font dialog box in PowerPoint.
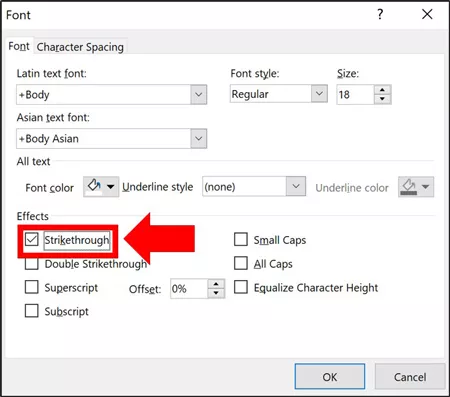
Using the Font dialog box you do not get a live preview of the effect. After selecting the effect(s) you want, click OK to see it applied to your text.
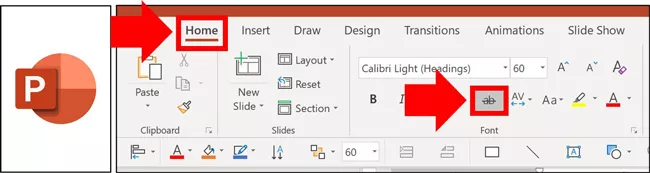
3. Text effect options in PowerPoint
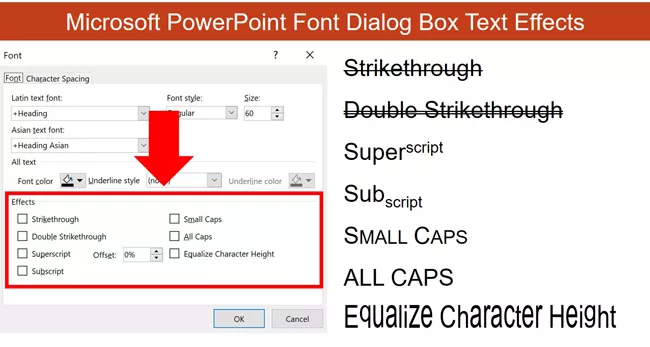
In addition to the strikethrough command, the Font dialog box in PowerPoint gives you 6 other text effects you can apply to your text (as pictured below).
- Strikethrough: Alt + K
- Double Strikethrough: Alt + L
- Superscript: Alt + P
- Subscript: Alt + B
- Small Caps: Alt + M
- All Caps: Alt + A
- Equalize Character Height: Alt + Q
Conclusion
As you can see, there are a variety of ways you can strikethrough text in the Microsoft Office suite.
And while it’s easiest to access the command through the Ribbon in Word and PowerPoint, the Font dialog boxe give you the most text effect options to work with.
If you enjoyed this article, you can learn more about our online courses and presentation resources here.
What’s Next?
Formatting a document is very time-consuming. Without the right commands and shortcuts, it could take you more time than usual. Because of this reason, Microsoft Word offers specific shortcuts to different formatting commands.
By using these shortcuts, you can get the work done in half the time. One of the most used formatting options is strikethrough or cross out text. The strikethrough option is used for eradicating errors and many other formatting tasks.
Though formatting is present through the font dialog box, having keyboard shortcuts will make the task much more manageable. For the strikethrough or crossout formatting, you will not find any default keyboard shortcut. However, the best thing is that you can create one on your own.
There are three ways in which you can use keyboard shortcuts to apply strikethrough in Microsoft Word.
What Is A Strikethrough?
Strikethrough is a formatting effect where a text is crossed out with the use of a horizontal line. When you have a strikethrough text, it will appear like this – Strikethrough. The strikethrough effect can be used using different shortcuts or even from the font option in the ribbon.
Three Ways to Use Keyboard Shortcuts for Strikethrough Option
Ribbon Guide Shortcuts
In Microsoft Word, the ribbon is located on the top of the window. Here you will find all the toolbars. The ribbon is used to give quick commands for different formatting needs. In the ribbon, you will find the strikethrough option.
Here we are talking about keyboard shortcuts, so you will learn how to use the strikethrough without using your mouse. The first thing that you would have to do is select the text. Now you can select the text using your mouse or even use keyboard shortcuts for this.
To select your text using your keyboard, you will first have to bring your cursor to the word or sentence that you want to use strikethrough on. For selecting a word or sentence, you will have to press Ctrl + Shift + Right/Left Arrow Key.
Using a keyboard to select text can be time-consuming if you are new to it. Many people find it easier to use keyboard shortcuts for all Microsoft Word related tasks. If you find it challenging to use your keyboard, simply select the desired text using your mouse.
You will then have to press Alt + H + 4 to use the strikethrough option. Remember that you will not have to hold these keys down together. You simply hit the Alt key and let go of it, then hit the H key and let go of it and finally hit the four key and let go of it.
This is one of the most accessible shortcuts for the strikethrough option. There is no complicated process, and you may find it relatively easy to remember. Another important thing is that you can use this command both on your desktop or laptop.
Strikethrough Effect (Only for Mac)
The second way to use strikethrough is only for Mac users. Using a strikethrough command for Mac word document is very easy. You will have to press Command + Shift + X. For Mac, you will have to hold down the buttons at the same time. Leaving the buttons will not work.
Customized Strikethrough Effect
Since there are no pre-defined shortcuts for strikethrough in Microsoft Word, you can create one for yourself. These are customized shortcuts and will be different for each user. Here the general process using which you can create the shortcut will be mentioned.
First, you will have to open the Font dialog box in Word. You can do this by clicking the downward arrow in the Font box in the ribbon. However, we will be using keyboard shortcuts for opening the Font dialog box as well.
Option 1 – Works on desktop, may not work on laptop
You will have to click Ctrl + D to open the Font dialog box in your word document. Once the Font dialog box opens, press the Alt + Ctrl keys together. Without leaving these keys, hold down the plus sign on your numeric keypad. You should see the mouse cursor turn into a clover.
One thing to remember is that this shortcut can only be used on your desktop. You cannot set this shortcut on your laptop. Holding the Alt + Ctrl + Plus Sign (+), move your mouse to the strikethrough checkbox.
When you move your mouse cursor for selecting the strikethrough checkbox, the clover may change into the arrow again. This is nothing to be worried about, and you can carry on your process as told here.
As soon as you select the strikethrough checkbox, Word will display a dialog box termed “Customize Keyboard.”. The insertion point will be blinking in the “Press new shortcut key” box. Here you can provide input for the shortcut key that you want to use.
Option 2 – Works on all devices
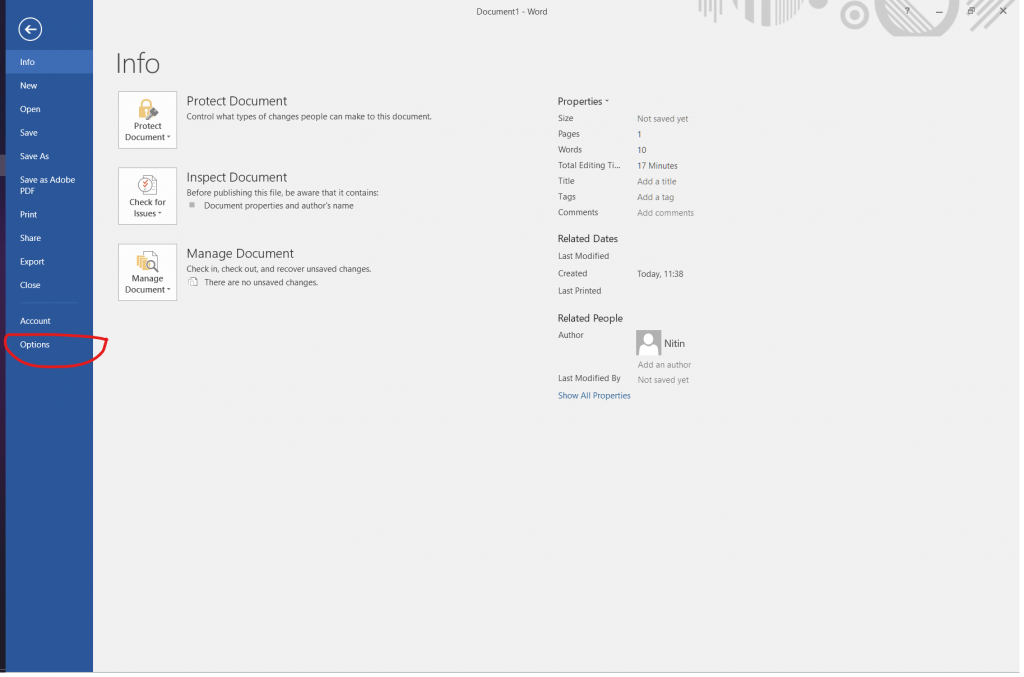
If the above option doesn’t work, then select Options menu from the File menu. This will bring up the Word Options dialog. In the left pane, select Customize Ribbon. At the bottom of the pane, you will see Keyboard Shorcuts: Customize.
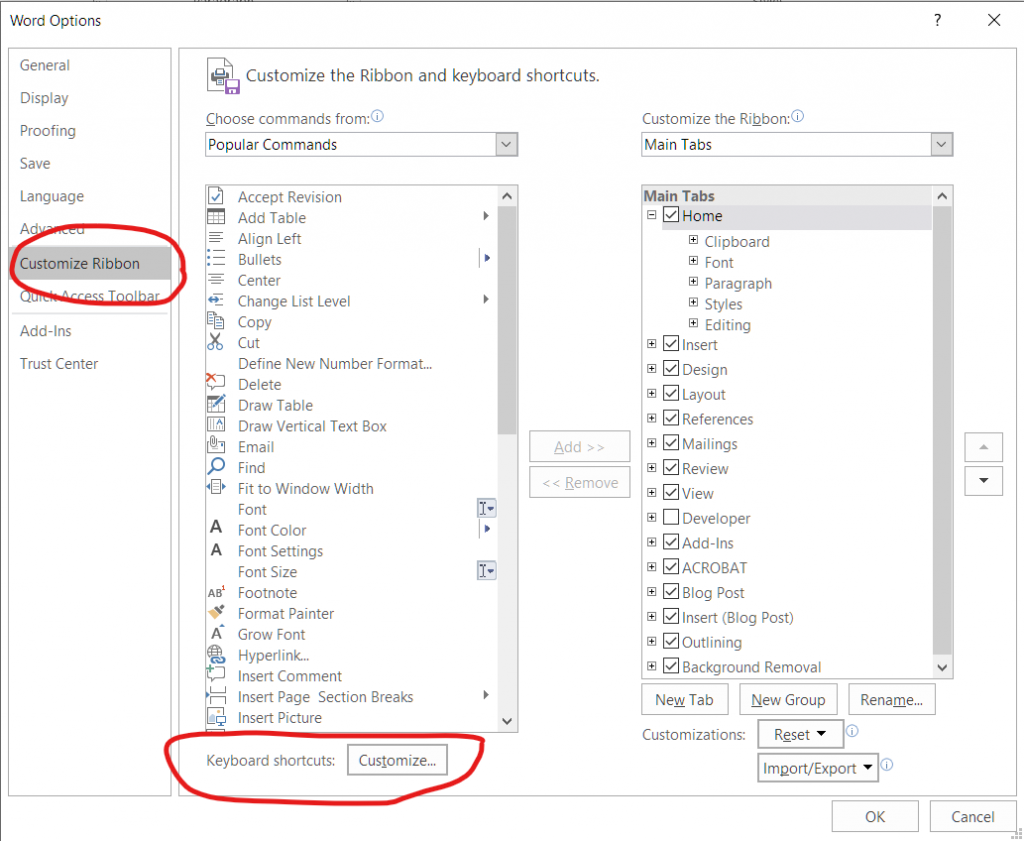
Click on the Customize button to edit keyboard shortcuts for all menu items. Select Home Tab from the categories list, followed by Strikethrough in the Commands list. At this point, you will see the keyboard shortcut for strikethrough in the Current Keys section. By Default, strikethrough does not have any shortcut key assigned. You can assign a new shortcut as per your liking.
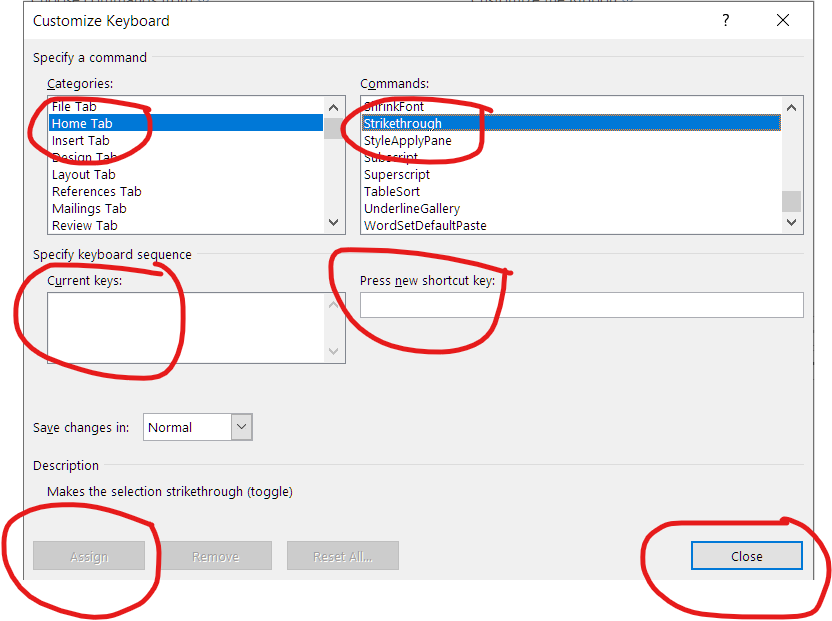
Click on the Press new Shortcut Key edit box, and press any key combination that you would like to use as a shortcut for Strikethrough or cross out text. Click Assign to confirm the shortcut and finally click Close to close the dialog.
To provide this input, you can hold down the key combination that you want. You can use Alt / Ctrl / Shift keys with any other key for the shortcut. If the combination you have given already exists for any other command, Word will notify the same.
You can use other keys to provide a different combination again. You may use the Ctrl + Alt + S or Alt + Shift + S as a combination for the strikethrough shortcut. This is an example since none of these commands are default in Microsoft Word. You can use other combinations as you see fit.
Once Microsoft Word accepts the combination keys you have provided for the shortcut, you can close the “Customize Keyboard” dialog box. Close the Font dialog box by clicking the cancel button. You can now select the text and use the strikethrough keyboard shortcut as and when needed.
Why Do You Use The Strikethrough Command In Microsoft Word?
Before the emergence of technology, mistakes made on handwritten notes were struck off using a single or double horizontal line. People were always told to make a clear strike so that there are no scribbles on the page.
Marking Errors
What do you do when similar errors happen in your word document file? For Microsoft Word, you can use the strikethrough option to cross out the mistakes you have made. You can use strikethrough to show the text that needs to be removed.
When you see the strikethrough formatting in any document, you will know that the struck text is not right. The strikethrough formatting is related to the Track Changes feature in a word document.
When you use the Track Changes feature, you will see certain words or sentences being struck through. These are the ones that have been deleted due to some error. It can be something as simple as a full stop.
Ironic Expression
Another use of strikethrough is that it can be used to show an iconic expression. Many writers use this formatting to say things without actually saying them. This means that they can write something and strike them out, stating that they did not mean the said sentence or word.
For example, ‘I think that is a very annoying funny piece of writing.’ Here the word annoying has been stroked out and replaced by the Word funny. This means that the writer is trying to say that the writeup seemed annoying, but is rather funny.
You may find this used on different articles or blogs, where a lighter topic has been touched upon. This is a written equivalent of mumbling something under the breath that you do not want to say aloud.
The particular style of usage is not done for any serious topics. You will only find this used in topics that are written to create a fun or easy atmosphere.
Correcting Facts
Strikethrough is also used for editing documents and for replacing them with correct facts. You may see many serious articles where the strikethrough option has been used. This is done to eradicate the facts that were previously written. It may be the case of erroneous factual data or updates in the information.
You cannot upload any incorrect facts on the internet. That would be misleading for the readers. Hence, writers try to keep themselves as updated as possible.
Deleting Strikethrough Text Formatting
Just like you apply the strikethrough formatting, you can also delete it quickly. When you use the strikethrough feature by using the Alt + H + 4 commands, you will need to remove it using the same as well. In essence, it acts as a toggle shortcut for strikethrough.
If you feel that the text you have struck through was by mistake, you can delete the strikethrough. You can also use other similar commands to remove the strikethrough feature.
In case you are not comfortable using the shortcuts, you can use the Font dialog box to do so. You can do the same for Track Changes as well. In this, you will have to accept the changes or remove the made changes to remove the strikethrough from the document in which you were making changes.
Double Strikethrough Feature
The double strikethrough feature is similar to the strikethrough feature. However, these two lines are used to strike the text instead of just one. The usage of the double strikethrough is much lower than the strikethrough.

You may find them in legal or some professional documents where you need to make wording changes. Besides the wording changes, you can also find the individual’s initials who are making the changes.
The double strikethrough is generally not used in regular word documents or articles. You can use the strikethrough feature for the changes that you need to make in your word document.
Making Strikethrough of a Different Color in Word
The primary color of a strikethrough is black since the text in a document is mostly written in black. You can modify the color of the strikethrough by changing the text color. If you want the text color and the strikethrough color to be different from each other, then the process will be different.
Here you will have to first draw the line and then put the line over the selected text. The line will be drawn using a different command than the strikethrough. You can choose the thickness and color of the line according to your requirement.
First, you will have to click on the toolbar’s Insert option and then click on Shapes. Select the Line shape from this option. Bring your cursor before the text which you want to strikethrough.

You will have to use your mouse for this since there are no keyboard shortcuts. Pressing the mouse’s left key, drag it over the needed text so that a line is drawn. You can draw the line over one word or a whole sentence or paragraph.
Click on the drawn line, which will open a Drawing Tools option. Here press the button More and then select the color that you want the strikethrough in.
For example, your text is in black and you want the strikethrough to be red, then the result will be as shown in the image below.
If you want to remove the strikethrough, you will just have to select the line and press delete.
Changing Style of Strikethrough Lines
When you use the strikethrough option from the Format option, you will have the same text and line color along with a simple horizontal line. You already know how to change the color of the line from the text.
Following the same steps, you can change the style of the strikethrough as well. Once you have struck the line using the steps mentioned above, select it and go to the Drawing Tools options.
Press on the downward-facing arrow in the Shape Styles section, which will open a dialog box. From here, you can choose the kind of dash you want. You can also increase or decrease the thickness of the line from here.
If you need unique kinds of lines for a particular document, then you can find a suitable one from here.
Related Posts
- How To Unhide Folders In Windows 10
- How To Fix The “This Site Can’t Be Reached” Error In Google Chrome – Windows/Mac/Linux
- How to Enable Dark Mode/Light Theme in Chrome
- How to Download Hotstar Videos on PC, Android, and iOS [Updated]
- How To Use iMac As Monitor – Target Display Mode
- Slow bootup in MacBook Air, Windows & Bootcamp
- How To Delete Files & Folders Using The Windows Command Line (CMD)
- Installing Windows 7 on MacBook Air
- How To Burn or Rip A CD/DVD In Windows Using Windows Media Player
- Service Host SysMain causing high disk or high CPU usage?
Now we will tell you how to cross out the word in the Word. After all, working in the specified text editor gives the user great opportunities. Thanks to the application, you can make various manipulations with the text. We will describe one of them now.
How to cross out the word in the Word: instruction
To begin with, in the Microsoft Word program, type the text we need. It should be noted that for the crossed out text in the word is a special designation. This function and we have to use. If there is no «abc strikeout» button in the toolbar, we place the cursor on the blank field of the toolbar. Click the right mouse button and in the resulting tool window select the «Settings …» section. Further, in order to understand how to cross out the word in a Word, we need to select the «Commands» section in the appeared settings window. Next, go to the left column of the «Categories» and find the «Format» item. Let’s pay attention to the right column of «Team», because there appeared a list of opportunities corresponding to this category. We move the slider down and find the notation «abc Strikethrough». We put the cursor on the icon, click with the left mouse button, and after holding it, drag the symbol to the toolbar field. You can choose the right place for you.
How to use
Now you know how to cross out the word in a word, because the toolbar now assigns the command designation, which allows you to cross out the signs, words and letters. However, we will talk about some more points. So, in our printed text choose the word to be crossed out. Select it. Click on the «abc Strikethrough» symbol in the toolbar. All the word that interests us is crossed out.
Type the text
Next, we will discuss how to write with a crossed out font. Based on specific goals in writing individual blocks of necessary text or an inscription, it is better to use different variants in drawing fonts. Thanks to this content will look expressive, and your reader will be much harder to make a mistake in understanding the semantic load of the inscription. One way to achieve a correct understanding of the written text can be called the use of a crossed out font. If you use the text editor «Word», it is enough to activate the function, which was discussed above, and go to the material set. If you are interested in a similar feature in the Photoshop graphics editor, click on the text layer selected for such processing, then expand the «Window» section in the program menu. You need to select the «Symbol» line in order to open a special panel. In it, you can make changes to text parameters on the selected layer. The second bottom row on this panel has pictograms, each of which depicts the Latin letter «T» in different spellings. In this case, the crossed out letter in this list is in last place. Pressing the rightmost pictogram, you will get the desired result. Now you know how to cross out the word in the Word.