
How to Convert Excel to XML – Step-by-Step Tutorial (2023)
We all know basic excel skills that help us work in excel spreadsheets with extensive data. But what if you need to transfer the excel file somewhere and change it into other formats?
The extensible markup language or XML comes in handy for this. Simply put, it is a markup language that helps store data in an excel spreadsheet and changes its format.
You can easily convert excel data into XML data – but how do you do that?
For that, download our FREE Exercise Workbook here and continue reading the article below. 😀
What is the XML file format?
The XML file format is a way to write text in a document using tags. These tags are customizable and represent the structure of the document.
It also tells how the XLS file can be converted to an XML file and transferred to another application.
XML format uses the DOM or Document Object Model as its basic structure and can help separate text in HTML.
For instance, XML data for a company employee might be:

The tags ‘Name, ID No., Post, Salary, and Status’ consist of the document’s data. You can customize the tags as we did here for an employee’s data.
Create the Excel File
To convert Excel to XML, you need to create an XLS file containing all the data. I have created an example below that lists the members of a company and their details.

Each field contains certain information about every employee.
How to Create the XML Schema?
The XML Schema will structure each spreadsheet field and its appearance in the XML file.
Our spreadsheet has five columns with different data types setting the base for our XML file.
1. To create the XML file, open any text editor and begin entering the standard XML elements.

Don’t fret just yet; We’ll explain all the alien-like items in this image one by one. 😄
The first line in the image is the standard XML line. It is used each time you create XML documents.
The version 1.0 encoding UTF specifies that it is an XML format.
The second line indicates the type of text. For example, this data was about employees of a company, hence <employee-data>. The remaining line is the default.
Since this statement starts with <employee-data>, it is the root element here. The remaining elements of the argument make up for the child element.

The third line, containing the record tag, indicates the beginning and end of a single field. It consists of the information in each field of the spreadsheet.
For instance, the first field is about Alice A. So it will include all the information about Alice on each tag.

The TAG NAME specifies the items in each column, whereas the data contains the corresponding value.
You don’t have to manually input the exact and each column name; they just need to be in the correct order. Excel can help us do the rest.

For the TAG NAME, say we want the first employee’s name.
So, we will write – <Name>Alice A.</Name> – Similarly, for her ID, we will write – <ID No.>2854</ID No.> – .
Pro Tip!
Must note the opening and closing tag identified by a forward slash (/).
These are to be used at the beginning and each of each statement. Also, the closing and opening tags must be in the correct order, as the data between the two tags make for the XML elements.

The last closing tag </employee-data> marks the end of the file. In the last step, save the XML data file as “employee-data.xml.”
Enable the Developer Tab
Now that your schema markup is prepared, let’s add it to Excel.
1. Make sure the developer tab is enabled on your Excel spreadsheet. If it is not visible, right-click on the ribbon and select Customize the ribbon.

2. A dialog box will appear on the screen. On the bottom right side, mark the develop option as shown and click ok.

3. Now, you should be able to view the developer’s tab on the ribbon like this:

That’s it – now what? Now we add the Schema file to Microsoft Excel. 😃
Open the XML Source Task Pane & Add XML Maps
1. Click on Developer from the ribbon, and you will see a number of options. Select the Source icon:

The XML source pane will appear on the Excel spreadsheet.
2. Click XML Maps at the bottom right corner.

It shows a dialog box that searches for the XML map in the workbook.
3. Click the add button and select the XML map stored on your desktop.
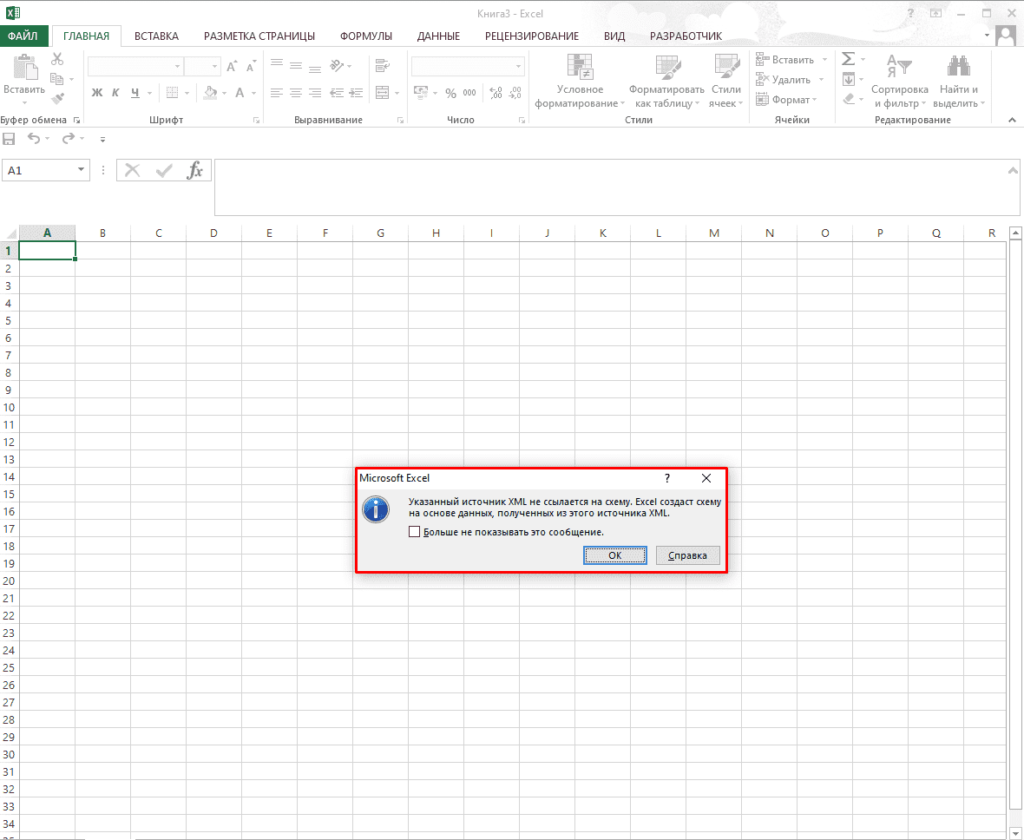
You will see a warning like this one below from Microsoft Excel upon adding the map.

There’s nothing to worry about.
4. Simply press ‘Ok’.
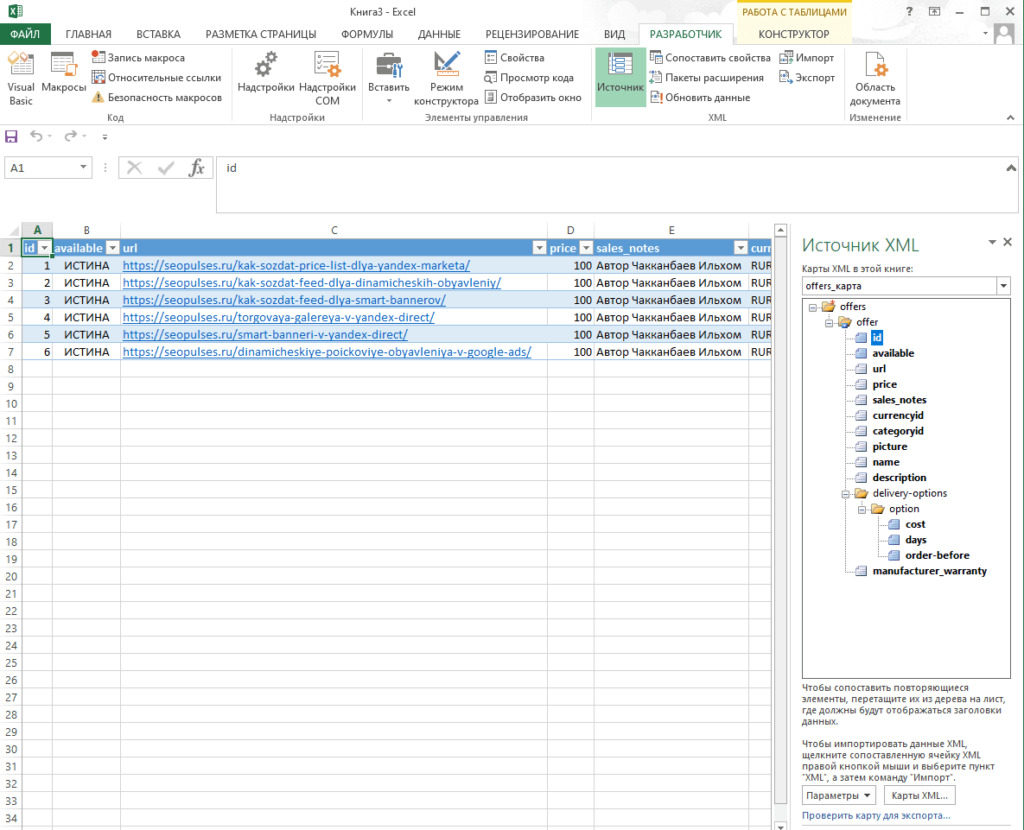
5. You will now see the XML map in the workbook.

6. Click ‘Okay’ and move to the XML source pane, which looks like this.

7. Now, mark the data on the XML Map.
Assign XML Elements
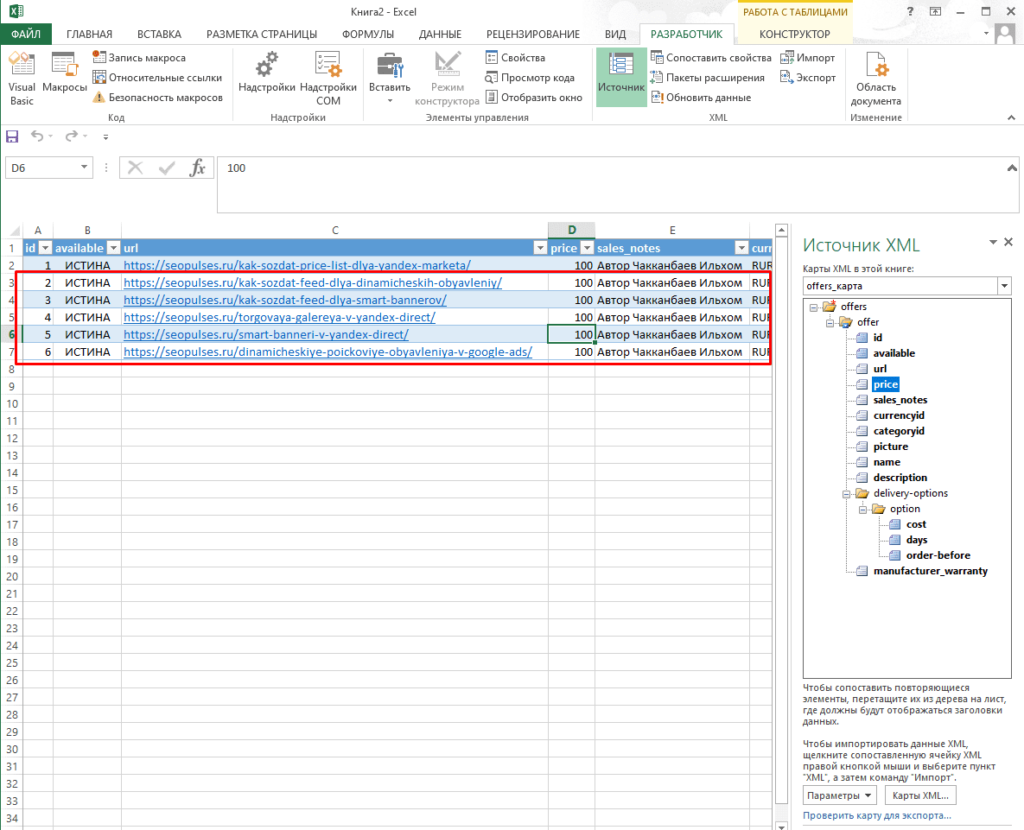
Now that you have the XML schema and the XLSX ready, mark the XML tags to the spreadsheets’ data.
All you need to do now is drag one XML element from the source pane. Then drop it on the corresponding spreadsheets’ column name.
For instance, I will drop the “Name” XML element on the “Name” column, and a blue table will appear.

Apply the same process to the remaining columns. If you have been successful till now, your spreadsheet will look like this:

If you’ve achieved this form, it means all your data is perfectly mapped with XML tags.
Now that we’ve come this far, it is only fair we export it. So, onto the next step.
Export the XML File
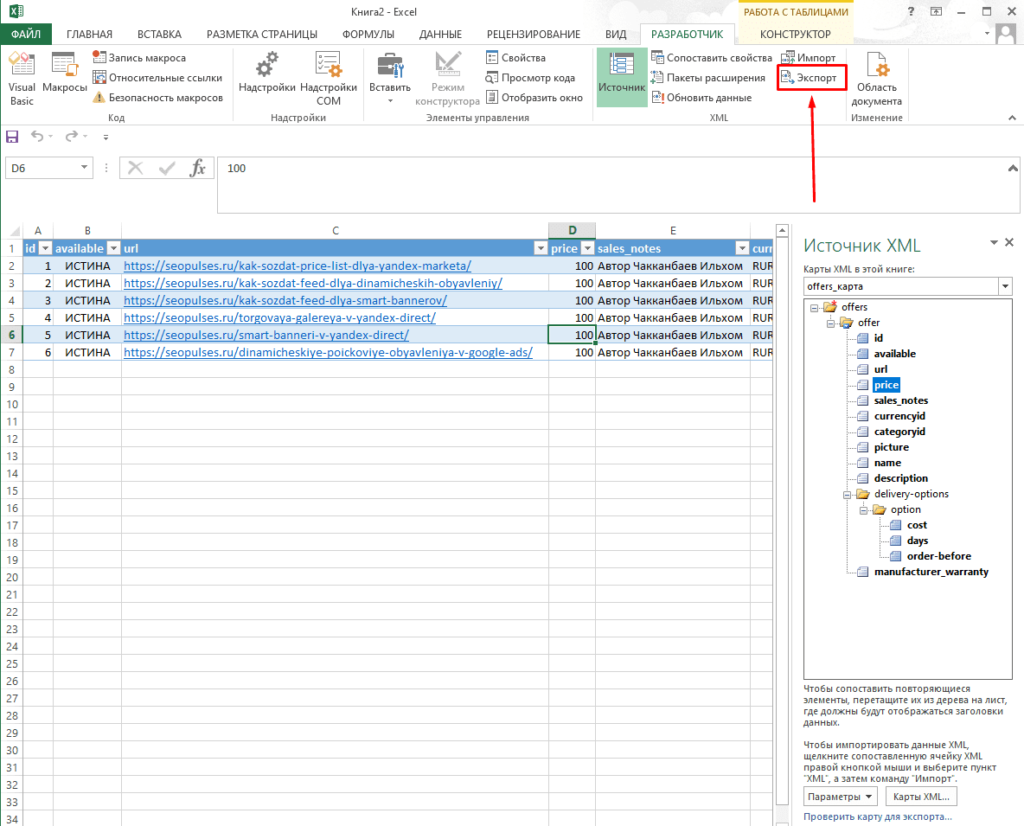
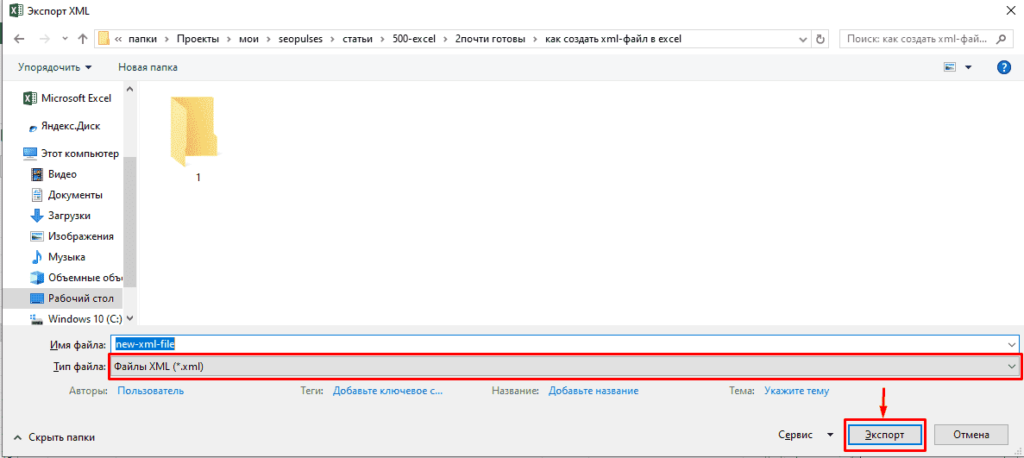
1. To convert Excel to XML file formats, open the developer tab and click the export command.

A dialog box will appear, asking the location to save the file. The file type should be set by default.
2. Select a location, enter the name and click export.
The file is now saved on your desktop with all your XML data. You can open the file from the XML section on a Wordpad or other apps.
The XML file will show up like this:

You might receive a warning from Microsoft office. Exporting the file may cause loss of pictures, formatting, or other non-XML objects.
That’s not an issue. Go ahead and hit ‘Ok’. 🙂
That’s it — Now What
Beginning to convert Excel to XML files can be challenging at the start. But once you get hold of it, you can do it with your eyes closed.
In the above article, we not only learned about creating an XML schema but also to convert an Excel file into XML format and export it.
But that’s only about creating and retaining your Excel file in different formats. There’s so much more to Excel that you’d still want to learn like the VLOOKUP, SUMIF and IF functions.
Want to learn them all? Click here to sign up for my free 30-minute email course to master these functions.
Kasper Langmann2023-01-19T12:23:02+00:00
Page load link
Microsoft Excel makes it easy to import Extensible Markup Language (XML) data that is created from other databases and applications, to map XML elements from an XML schema to worksheet cells, and to export revised XML data for interaction with other databases and applications. Think of these XML features as turning Office Excel into an XML data file generator with a familiar user interface.
In this article
-
Why use XML in Excel?
-
XML data and schema files
-
Key XML and Excel scenarios
-
-
The basic process of using XML data in Excel
-
Working with XML maps
-
Using the XML Source task pane
-
Element types and their icons
-
Working with single-mapped cells
-
Working with repeating cells in XML tables
-
XML map security considerations
-
Importing XML data
-
Working with an inferred schema
-
Exporting XML data
-
Using the Excel macro-enabled Office Open XML Format file
-
Why use XML in Excel?
XML is a technology that is designed for managing and sharing structured data in a human-readable text file. XML follows industry-standard guidelines and can be processed by a variety of databases and applications. Using XML, application designers can create their own customized tags, data structures, and schemas. In short, XML greatly eases the definition, transmission, validation, and interpretation of data between databases, applications, and organizations.
XML data and schema files
Excel works primarily with two types of XML files:
-
XML data files (.xml), which contain the custom tags and structured data.
-
Schema files (.xsd), which contain schema tags that enforce rules, such as data type and validation.
The XML standard also defines Extensible Stylesheet Language Transformation (XSLT) (.xslt) files, which are used to apply styles and transform XML data into different presentation formats. You can apply these transforms before you import XML files into Excel and after you export XML files from Excel. If XSLT files are linked to XML data files that you import into Excel, you do have the option to apply or not apply the formatting before the data is added to the worksheet, but only when you open an XML file by using the Open command from within Excel. Choose the XML Files (*.xml) file type before you click the Open button to see the XML files in the folder.
Key XML and Excel scenarios
By using XML and Excel, you can manage workbooks and data in ways that were previously impossible or very difficult. By using XML maps, you can easily add, identify, and extract specific pieces of business data from Excel documents. For example, an invoice that contains the name and address of a customer or a report that contains last quarter’s financial results are no longer just static reports. You can easily import this information from databases and applications, revise it, and export it to the same or other databases and applications.
The following are key scenarios that the XML features are designed to address:
-
Extend the functionality of existing Excel templates by mapping XML elements onto existing cells. This makes it easier to get XML data into and out of your templates without having to redesign them.
-
Use XML data as input to your existing calculation models by mapping XML elements onto existing worksheets.
-
Import XML data files into a new workbook.
-
Import XML data from a Web service into your Excel worksheet.
-
Export data in mapped cells to XML data files independent from other data in the workbook.
Top of Page
The basic process of using XML data in Excel
The following diagram shows how the different files and operations work together when you use XML with Excel. Essentially, there are five phases to the process:
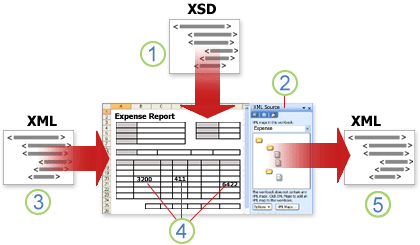
 Adding an XML schema file (.xsd) to a workbook
 Mapping XML schema elements to individual cells or XML tables
 Importing an XML data file (.xml) and binding the XML elements to mapped cells
 Entering data, moving mapped cells, and leveraging Excel functionality, while preserving XML structure and definitions
 Exporting revised data from mapped cells to an XML data file
Working with XML maps
You can create or open a workbook in Excel, attach an XML schema file (.xsd) to the workbook, and then use the XML Source task pane to map XML elements of the schema to individual cells or tables. After you map the XML elements to your worksheet, you can import and export XML data into and out of the mapped cells.
When you add an XML schema file (.xsd) to your workbook, you create an XML map. In general, XML maps are used to create mapped cells and to manage the relationship between mapped cells and individual elements in the XML schema. In addition, these XML maps are used to bind the contents of mapped cells to elements in the schema when you import or export XML data files (.xml).
There are two kinds of mapped cells that you can create: single-mapped cells and repeating cells (which appear as XML tables). To make designing your worksheet more flexible, you can drag the mapped cells anywhere on a worksheet and into any order — even one different from the XML schema. You can also choose which elements to map and not map.
The following rules about using XML maps are important to know:
-
A workbook can contain one or more XML maps.
-
You can only map one element to one location in a workbook at a time.
-
Each XML map is an independent entity, even if multiple XML maps in the same workbook refer to the same schema.
-
An XML map can only contain one root element. If you add a schema that defines more than one root element, you are prompted to choose the root element to use for the new XML map.
Using the XML Source task pane
You use the XML Source task pane to manage XML maps. To open it, on the Developer tab, in the XML group, click Source. The following diagram shows the main features of this task pane.
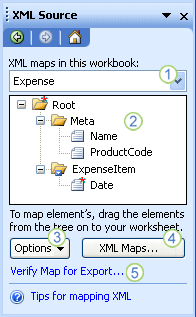
1. Lists XML maps that were added to the workbook
2. Displays a hierarchical list of XML elements in the currently listed XML map
3. Sets options when working with the XML Source task pane and the XML data, such as how to preview the data and control headings
4. Opens the XML Maps dialog box, which you can use to add, delete, or rename XML maps
5. Verifies whether you can export XML data through the current XML map
Top of Page
Element types and their icons
The following table summarizes each type of XML element that Excel can work with and the icon that is used to represent each type of element.
|
Element type |
Icon |
|---|---|
|
Parent element |
|
|
Required parent element |
|
|
Repeating parent element |
|
|
Required repeating parent element |
|
|
Child element |
|
|
Required child element |
|
|
Repeating child element |
|
|
Required repeating child element |
|
|
Attribute |
|
|
Required attribute |
|
|
Simple content in a complex structure |
|
|
Required simple content in a complex structure |
|


Top of Page
Working with single-mapped cells
A single-mapped cell is a cell that has been mapped to a nonrepeating XML element. You create a single-mapped cell by dragging a nonrepeating XML element from the XML Source task pane onto a single cell in your worksheet.
When you drag a nonrepeating XML element onto the worksheet, you can use a smart tag to choose to include the XML element name as a heading above or just to the left of the single-mapped cell, or you can use an existing cell value as a heading.
You can also use a formula in a single-mapped cell, if the cell is mapped to an XML element with an XML Schema Definition (XSD) data type that Excel interprets as a number, date, or time.
Top of Page
Working with repeating cells in XML tables
XML tables are similar in appearance and functionality to Excel tables. An XML table is an Excel table that has been mapped to one or more XML repeating elements. Each column in the XML table represents an XML element.
An XML table is created when you:
-
Use the Import command (in the XML group on the Developer tab) to import an XML data file.
-
Use the Open command from within Excel to open an XML data file — and then select As an XML table in the Open XML dialog box.
-
Use the From XML Data Import command (from the From Other Sources command button, in the Get External Data group, on the Data tab) to import an XML data file — and then select XML table in existing worksheet or New worksheet in the Import Data dialog box.
-
Drag one or more repeating elements from the XML Source task pane to a worksheet.
When you create an XML table, the XML element names are automatically used as column headings. You can change these to any column headings that you want. However, the original XML element names are always used when you export data from the mapped cells.
Two options under the Options button in the XML Source task pane are useful when you work with XML tables:
-
Automatically Merge Elements When Mapping
When selected, Excel creates one XML table from multiple fields as they are dropped onto the worksheet. This option works as long as the multiple fields are dropped on the same row, one adjacent to the other. When this option is cleared, each element appears as its own XML table. -
My Data Has Headings
When selected, existing heading data is used as column headings for repeating elements that you map to your worksheet. When this option is cleared, the XML element names are used as column headings.
Using XML tables, you can easily import, export, sort, filter, and print data based on an XML data source. However, XML tables do have some limitations regarding how they can be arranged on the worksheet.
-
XML tables are row-based, meaning that they grow from the header row down. You cannot add new entries above existing rows.
-
You cannot transpose an XML table so that new entries will be added to the right.
You can use formulas in columns that are mapped to XML elements with an XML Schema Definition (XSD) data type that Excel interprets as a number, date, or time. Just as in an Excel table, formulas in an XML table are filled down the column when new rows are added to the table.
XML map security considerations
An XML map and its data source information are saved with the Excel workbook, not a specific worksheet. A malicious user can view this map information by using a Microsoft Visual Basic for Applications (VBA) macro. Furthermore, if you save your workbook as a macro-enabled Excel Office Open XML Format File, this map information can be viewed through Microsoft Notepad or through another text-editing program.
If you want to keep using the map information but remove the potentially sensitive data source information, you can delete the data source definition of the XML schema from the workbook, but still export the XML data, by clearing the Save data source definition in workbook check box in the XML Map Properties dialog box, which is available from the Map Properties command in the XML group on the Developer tab.
If you delete a worksheet before you delete a map, the map information about the data sources, and possibly other sensitive information, is still saved in the workbook. If you are updating the workbook to remove sensitive information, make sure that you delete the XML map before you delete the worksheet, so that the map information is permanently removed from the workbook.
Top of Page
Importing XML data
You can import XML data into an existing XML map in your workbook. When you import data, you bind the data from the file to an XML map that is stored in your workbook. This means that each data element in the XML data file has a corresponding element, in the XML schema, that you mapped from an XML Schema file or inferred schema. Each XML map can only have one XML data binding, and an XML data binding is bound to all of the mappings that were created from a single XML map.
You can display the XML Map Properties dialog box (Click Map Properties in the XML group on the Developer tab.), which has three options, all selected by default, that you can set or clear to control the behavior of an XML data binding:
-
Validate data against schema for import and export Specifies whether Excel validates data against the XML map when importing data. Click this option when you want to ensure that the XML data that you import conforms to the XML schema.
-
Overwrite existing data with new data Specifies whether data is overwritten when you import data. Click this option when you want to replace the current data with new data, for example, when up-to-date data is contained in the new XML data file.
-
Append new data to existing XML tables Specifies whether the contents of the data source are appended to the existing data on the worksheet. Click this option, for example, when you are consolidating data from several similar XML data files into an XML table, or you do not want to overwrite the contents of a cell that contains a function.
When you import XML data, you may want to overwrite some mapped cells but not others. For example, some mapped cells may contain formulas and you don’t want to overwrite the formula when you import an XML file. There are two approaches that you can take:
-
Unmap the elements that you don’t want overwritten, before you import the XML data. After you import the XML data, you can remap the XML element to the cells containing the formulas, so that you can export the results of the formulas to the XML data file.
-
Create two XML maps from the same XML schema. Use one XML map for importing the XML data. In this «Import» XML map, don’t map elements to the cells that contain formulas or other data that you don’t want overwritten. Use another XML map for exporting the data. In this «Export» XML map, map the elements that you want to export to an XML file.
Note: The ability to import XML data from a Web service by using a Data Retrieval Service Connection (.uxdc) file to connect to a data source is no longer supported in versions later than Excel 2003 through the user interface. If you open a workbook that was created in Excel 2003, you can still view the data, but you cannot edit or refresh the source data.
Working with an inferred schema
If you import XML data without first adding a corresponding XML schema to create an XML map, Excel tries to infer a schema for you based on the tags that are defined in the XML data file. The inferred schema is stored with the workbook, and the inferred schema allows you to work with XML data if an XML schema file isn’t associated with the workbook.
When you work with imported XML data that has an inferred schema, you can also customize the XML Source task pane. Select the Preview Data in Task Pane option from the Options button to display the first row of data as sample data in the element list, if you imported XML data associated with the XML map in the current session of Excel.
You cannot export the Excel inferred schema as a separate XML schema data file (.xsd). Although there are XML schema editors and other methods for creating an XML schema file, you may not have convenient access to them or know how to use them. As an alternative, you can use the Excel 2003 XML Tools Add-in Version 1.1, which can create a schema file from an XML map. For more information, see Using the Excel 2003 XML Tools Add-in Version 1.1.
Exporting XML data
You export XML data by exporting the contents of mapped cells on the worksheet. When you export data, Excel applies the following rules to determine what data to save and how to save it:
-
Empty items are not created when blank cells exist for an optional element, but empty items are created when blank cells exist for a required element.
-
Unicode Transformation Format-8 (UTF-8) encoding is used to write the data.
-
All namespaces are defined in the Root XML element.
-
Excel overwrites existing namespace prefixes. The default namespace is assigned a prefix of ns0. Successive namespaces are designated ns1, ns2 to ns<count> where <count> is the number of namespaces written to the XML file.
-
Comment nodes are not preserved.
You can display the XML Map Properties dialog box (Click Map Properties in the XML group on the Developer tab.) and then use the Validate data against schema for import and export option (active by default) to specify whether Excel validates data against the XML map when exporting data. Click this option when you want to ensure that the XML data you export conforms to the XML schema.
Using the Excel Macro-enabled Office Open XML Format File
You can save an Excel workbook in a variety of file formats, including the Excel macro-enabled Office Open XML Format File (.xlsm). Excel has a defined XML schema that defines the contents of an Excel workbook, including XML tags that store all workbook information, such as data and properties, and define the overall structure of the workbook. Custom applications can use this Excel macro-enabled Office XML Format File. For example, developers may want to create a custom application to search for data in multiple workbooks that are saved in the this format and create a reporting system based on the data found.
Top of Page
Need more help?
You can always ask an expert in the Excel Tech Community or get support in the Answers community.
See Also
Import XML data
Map XML elements to cells in an XML Map
Export XML data
Append or overwrite mapped XML data
После редактирования какой-либо таблицы часто возникает необходимость перевести Excel в xml. Не всем пользователям ПК, особенно начинающим, может быть понятно, как это правильно сделать. Сегодня покажу весь процесс наглядно в нескольких инструкциях.
Содержание
- Что такое форматы xls, xlsx и xml
- Microsoft Excel
- Простое сохранение
- Экспорт через панель разработчика
- Если строк меньше 65 536
- Если строк больше 65 536
- Онлайн-конвертеры
- Tableconvert
- Zamzar
- Onlineconvertfree
Что такое форматы xls, xlsx и xml
Документы Excel могут быть нескольких форматов: xls, xlsx, xlsm, xlstx, xlstm, xlsb и т. д. Самые популярные – xls и xlsx.
XML – это язык разметки, как html. Он создан для хранения и транспортировки каких-либо данных. Используется в том числе для создания таблиц Excel и веб-страниц. По своей сути xml-формат — это структурированная база данных. Файл с таким расширением можно открыть в любом текстовом редакторе. В нем вы увидите код, который и содержит те или иные данные.
Если в вашей таблице Excel встроена карта (схема) XML, вы без труда сможете экспортировать данные из нее в файл xml: с помощью стандартной функции приложения Эксель или за счет сторонних онлайн-конвертеров.
Microsoft Excel
Преобразовать xlsx в xml можно с помощью простого сохранения файла в новом формате, а также через кнопку «Экспорт» в специальном меню разработчика.
Но есть ограничение по количеству строк: при экспорте можно сохранить до 65 536 строк. Если в таблице больше данных, программа сможет обработать число строк, которое определяется формулой: ЧСТРОК ОСТАТ 65537. К примеру, если лист содержит 70 000 строк, Эксель сохранит 4464 (70000 ОСТАТ 65537). Если это ваш случай, данные таблицы придется экспортировать в два файла xml.
Простое сохранение
Самый легкий способ – воспользоваться меню «Сохранить как» и выбрать xml в качестве нового формата. Он подходит для небольших и более простых таблиц, так как есть риск, что потом все другие программы будут некорректно работать с созданным файлом. Тем не менее, метод стоит рассмотреть как один из возможных.
Как сохранить таблицу xls/xlsx в формате xml:
- Сначала откройте файл в программе Excel. Если она установлена в качестве приложения по умолчанию, просто найдите документ в «Проводнике Windows» и кликните по нему дважды.

- Также можете щелкнуть по документу правой кнопкой мыши, а затем выбрать «Открыть с помощью» и «Excel».

- Либо запустите пустую таблицу с помощью ярлыка Excel на рабочем столе или в меню «Пуск».

- Выберите документ в списке недавних либо нажмите «Открыть другие книги».

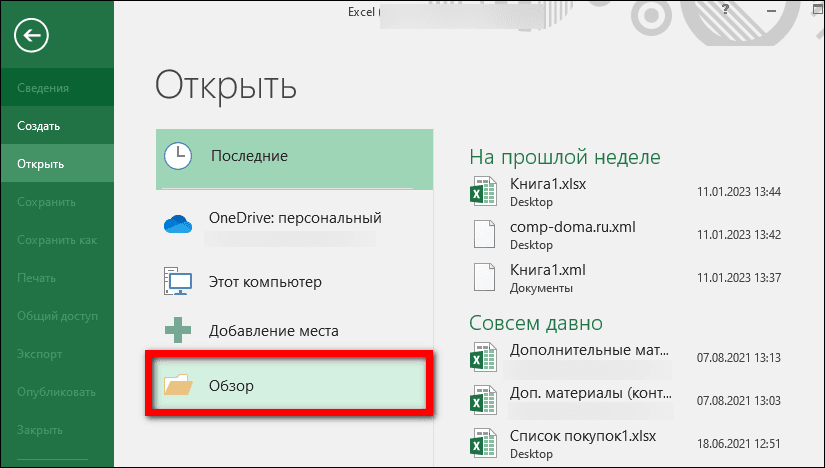
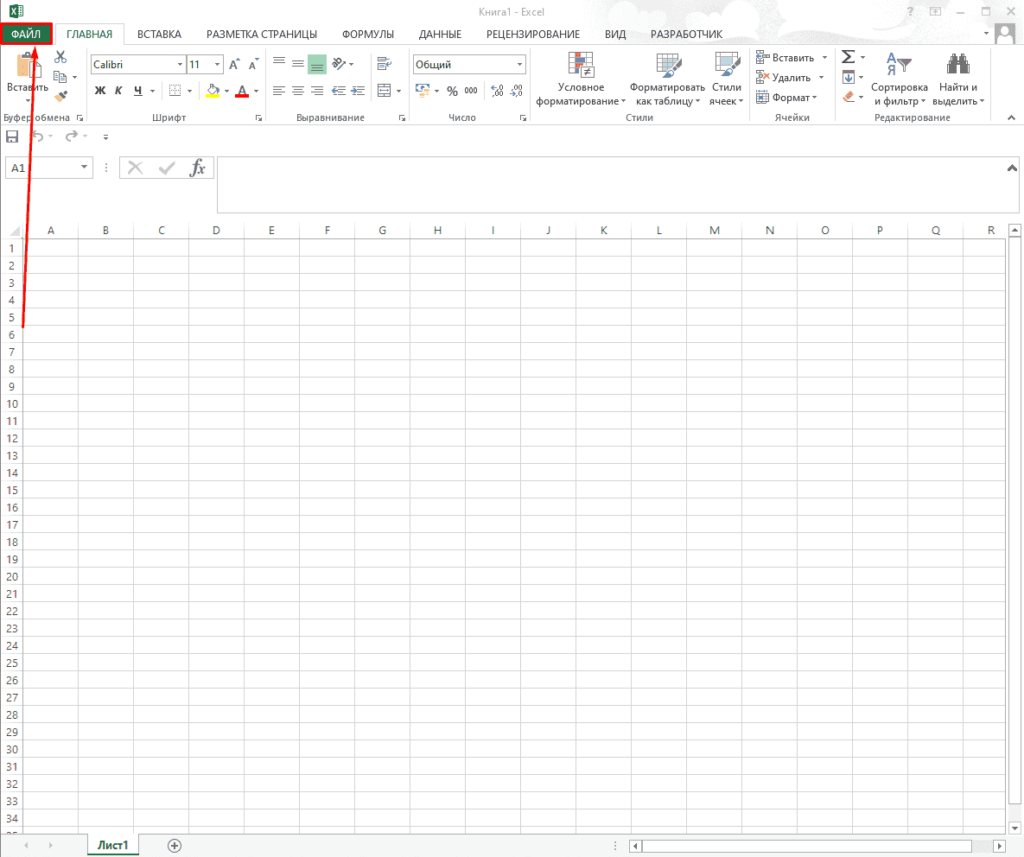
- Если у вас уже открыта какая-то таблица в Экселе, нажмите на вкладку «Файл». Зайдите в раздел «Открыть» и нажмите «Обзор». Выберите, собственно, сам документ в «Проводнике».

- Внесите какие-либо изменения в таблицу при необходимости. Снова нажмите «Файл».

- Откройте вкладку «Сохранить как». Выберите каталог в списке недавних либо щелкните «Обзор».

- В «Типе файла» укажите значение «XML-данные».

- Выберите папку, введите новое название при желании и нажмите «Сохранить».


Экспорт через панель разработчика
Этот способ увеличивает шансы, что созданный файл будет правильно восприниматься другими программами. Панель разработчика по умолчанию отключена в Экселе, поэтому сначала нужно ее включить в настройках, а затем запустить конвертацию.
В меню разработчика есть также функция «Импорт». Она помогает сделать обратную конвертацию – из xml в xls или xlsx. В нашем блоге есть отдельная статья, посвященная этой теме.
Если строк меньше 65 536
Как экспортировать данные таблицы в xml, если количество строк не выходит за рамки нормы:
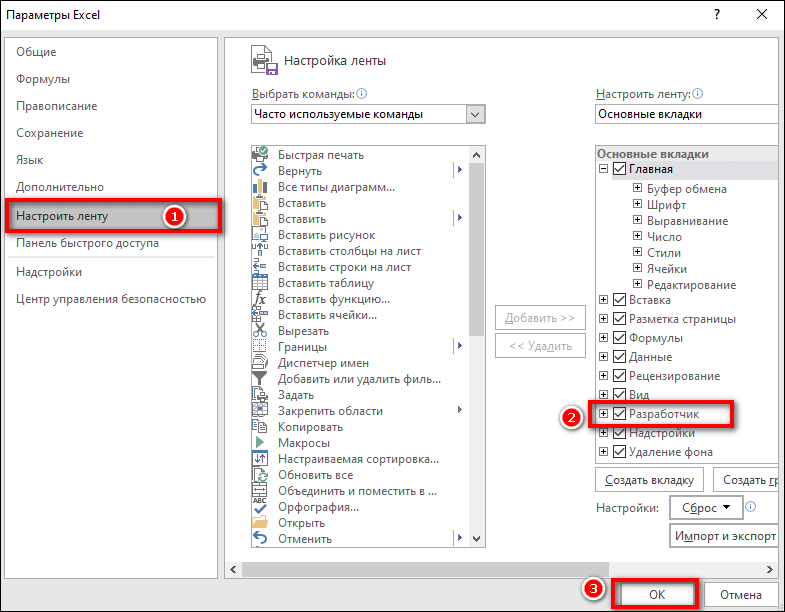
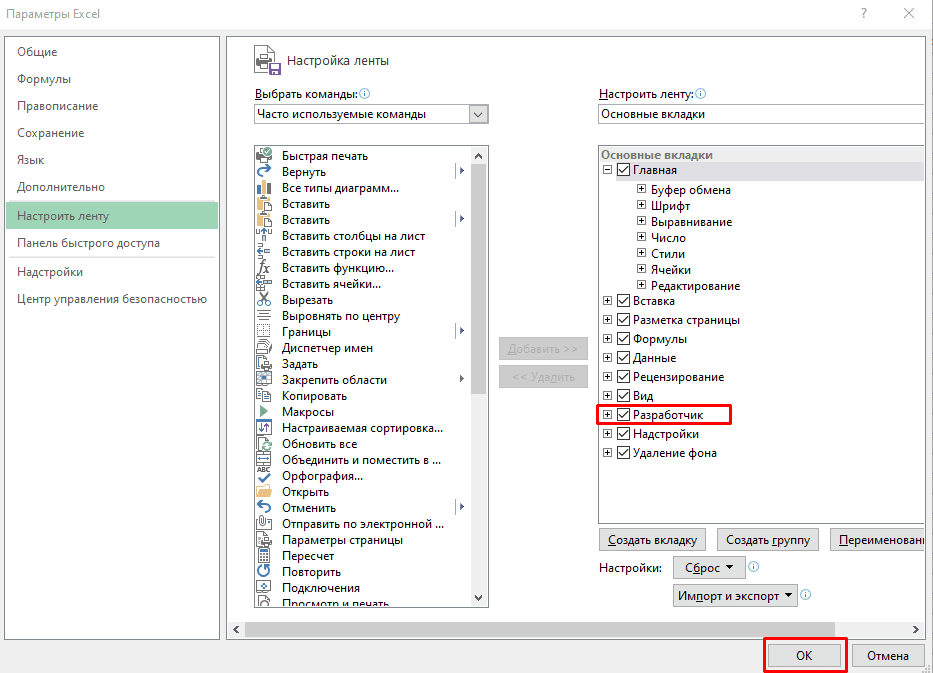
- Сначала включите панель разработчика в настройках Экселя. Для этого кликните «Файл». Нажмите «Параметры».

- Зайдите в «Настроить ленту». Поставьте галочку «Разработчик» в списке справа. Нажмите «ОК» для сохранения настроек.

- Раскройте вкладку «Разработчик» в верхнем меню. Нажмите «Экспорт».

- Если в таблице несколько схем xml, дополнительно появится диалоговое окно. Выберите карту XML, которую вы хотите использовать, и кликните «ОК».
- В «Проводнике Windows» укажите новое имя документа при необходимости. Выберите папку для сохранения и подтвердите экспорт.


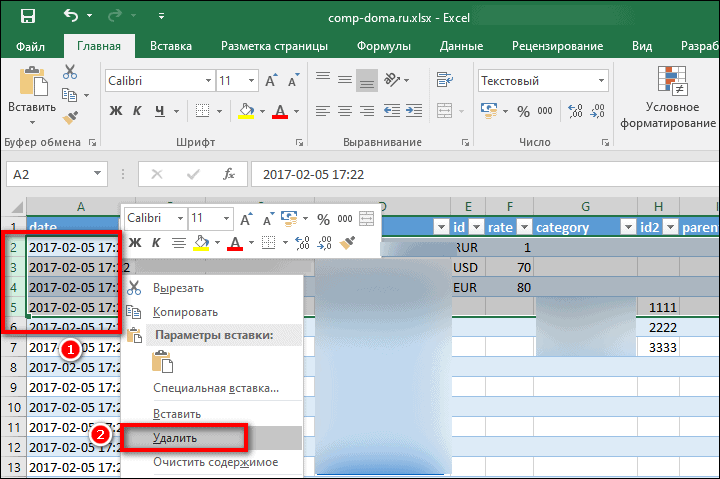
Если строк больше 65 536
Если таблица содержит больше 65 536 строк, придется создать два файла xml.
Вот как это сделать:
- Обозначьте для себя количество строк, которое идет после 65 537. Удалите это количество с начала листа Excel: выделите их, нажмите правой кнопкой мыши и выберите «Удалить».

- Далее экспортируйте данные таблицы в xml через меню разработчика, используя инструкцию выше.

- Нажмите «Закрыть» в правом верхнем углу (кнопка с крестиком).

- В новом окошке программа спросит, нужно ли сохранить изменения в файле (так как вы удалили определенное количество строк). Нажмите «Не сохранять». Таким образом, таблица останется в неизменном виде.

- После закрытия файла снова его откройте. Удалите все данные, которые идут после количества «лишних» строк (его вы определили на первом шаге). Снова экспортируйте таблицу в файл xml, используя руководство выше. Закройте документ, не сохранив изменения.


Таким образом, у вас на руках будет два файла xml. При необходимости их можно будет объединить для создания исходной таблицы.
Онлайн-конвертеры
Если программы Excel нет на вашем ПК или вам не удалось перевести xlsx в xml в этом приложении, воспользуйтесь онлайн-конвертером. Есть много сайтов, которые бесплатно преобразовывают таблицы в подобные документы. Расскажу лишь о нескольких из них.
Не переживайте о конфиденциальности: файлы будут доступны для скачивания только вам. А спустя сутки и вовсе будут удалены с серверов сайта.
Tableconvert
Tableconvert позволяет редактировать таблицу перед конвертацией. Самостоятельно создает для нее код, используя выбранный язык разметки и программирования: xml, html, sql и т. д. С помощью этого сервиса файлы также можно преобразовывать в jpg и pdf.
Сайт бесплатный. Можно по желанию оставить донат разработчикам.
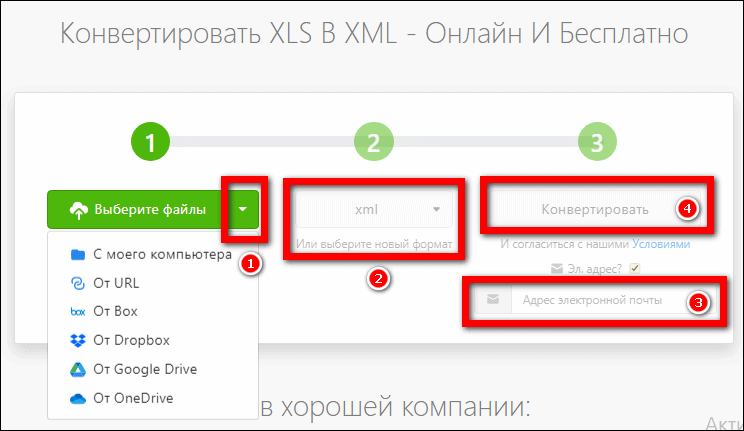
Как пользоваться:
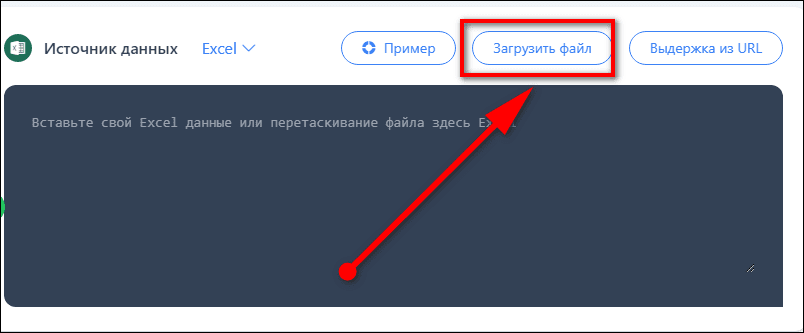
- Перейдите на сайт и загрузите таблицу с ПК с помощью специальной кнопки.

- Либо нажмите «Выдержка URL», вставьте ссылку на файл, опубликованный в интернете, и щелкните «Экстракт Excel».

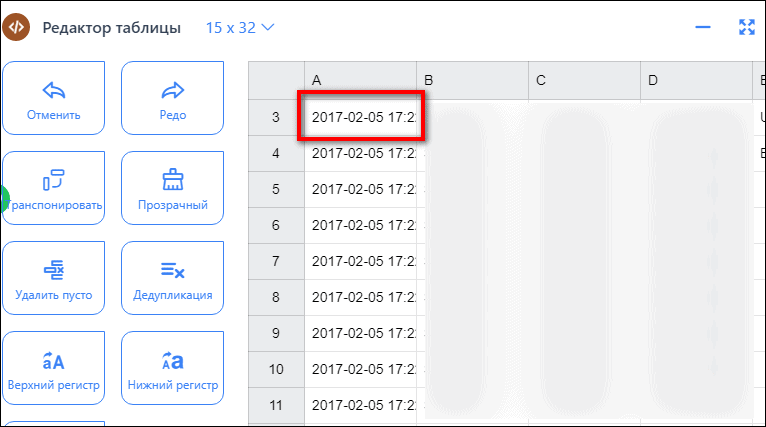
- При необходимости измените содержимое каких-либо ячеек в блоке «Редактор таблицы», который будет чуть ниже.

- Прокрутите страницу еще немного вниз. В разделе «Генератор таблицы» будет код xml. При желании поставьте галочку «Minify XML», чтобы сжать документ. Затем кликните «Скачать» либо «Скопировать в буфер обмена», чтобы затем вставить сгенерированный код в какой-либо текстовый редактор.


Zamzar
Zamzar предлагает несколько способов загрузки исходных файлов: с ПК, по ссылке в интернете, из облачных хранилищ (Box, Dropbox, Google Drive и OneDrive). И вообще в этом сервисе можно преобразовать множество форматов: аудио, видео, текстовые документы, электронные книги, изображения, архивы и т. д.
Одновременно можно сконвертировать несколько файлов. Схема та же: загружаете документы с таблицами, выбираете формат xml (если он не выбран по умолчанию) и нажимаете «Конвертировать».
Предварительно можно указать адрес электронной почты. На него придет ссылка для скачивания обработанного документа. Это на случай, если боитесь потерять страницу из виду.
Максимальный размер файла в бесплатной версии 50 Мб. Подписка стоит от 18$ до 70$ в зависимости от тарифа.
Onlineconvertfree
Onlineconvertfree похож во многом на Zamzar. Здесь тоже можно конвертировать разные файлы: фото, аудио, видео и т. д. По несколько штук за раз.

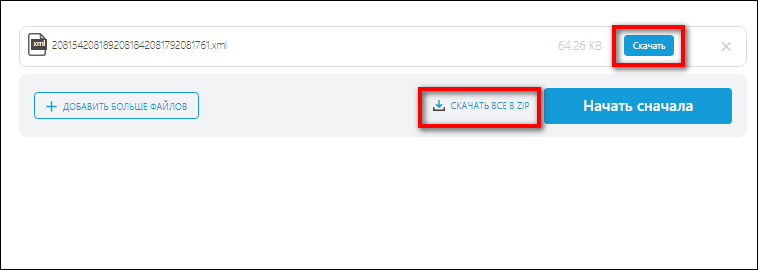
Скачать обработанные документы разрешается по отдельности или общим архивом.
Даже без регистрации на сайте вы получаете доступ к разделу «Мои файлы». В нем будут храниться документы, которые вы ранее обработали в сервисе – в течение суток.

В бесплатной версии есть реклама. Также есть лимит на количество одновременных конвертаций и размер файлов (до 100 Мб, но это больше, чем у Zamzar). Подписка стоит от 9$ до 20$ в зависимости от тарифа.
***
Если у вас установлен Microsoft Excel, сконвертировать таблицу в xml можно прямо в этой программе: с помощью обычного сохранения или функции «Экспорт» в меню разработчика. Если строк больше 65 536, придется создать два файла.
В иных случаях используйте онлайн-конвертеры. В Tableconvert можно предварительно отредактировать таблицу прямо на сайте, а затем скачать сгенерированный код xml. В Zamzar и Onlineconvertfree можно обработать сразу несколько файлов без регистрации в сервисе. Максимальный размер исходного документа должен быть не выше 50 Мб и 100 Мб соответственно.
Возможность конвертировать XML файлы в Excel позволяет открывать и обрабатывать документы этого формата.
- Подготовка;
- Конвертация;
- Создание.
Видеоинструкция
Как открыть файл XML в Excel
Для того, чтобы в MS Excel потребуется первоначально включить данную функцию нажав на «Файл» в левом-верхнем углу экрана.
После открываем «Параметры».
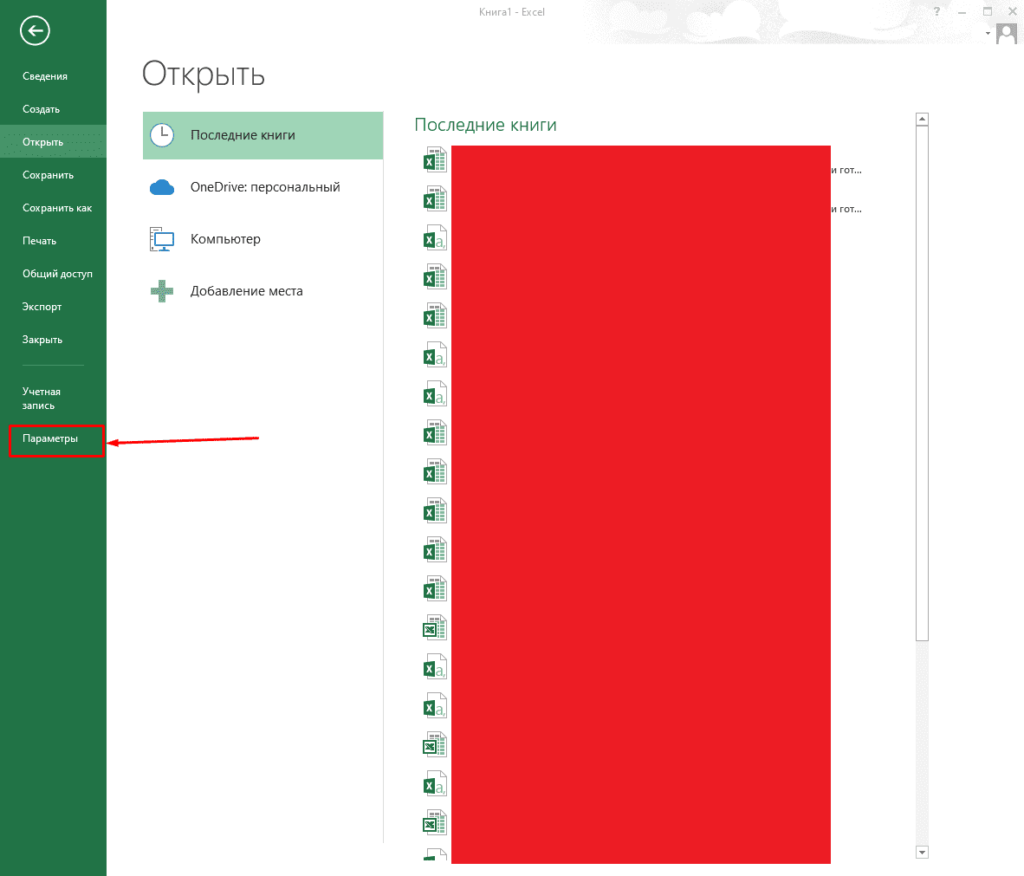
В открывшемся окне открываем «Настроить ленту» и ставим галочку у пункта «Разработчик».
Все готово, теперь можно открывать файлы нужного формата.
Как конвертировать XML в Эксель
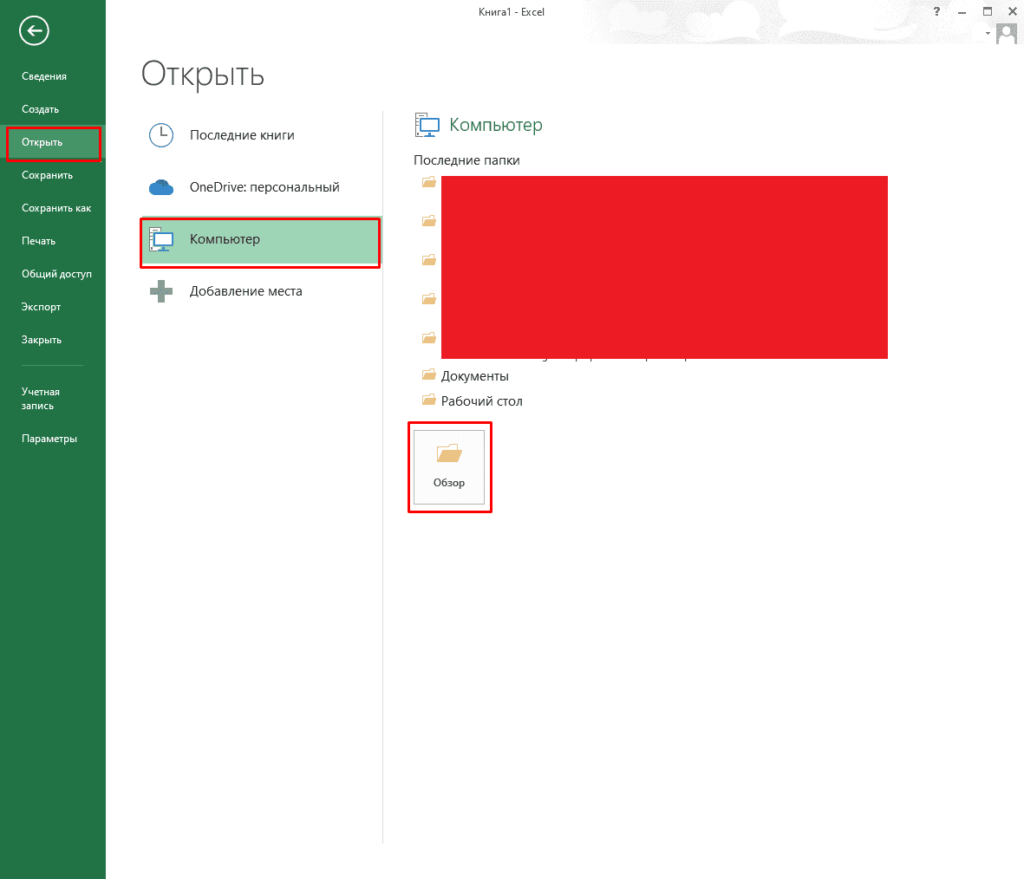
Выполнить эту задачу можно кликнуть на «Файл» в левом-верхнем углу.
Теперь выбираем «Открыть».
Осталось выбрать файл формата XML и открыть его. Для примера можно скачать файлы здесь.
https://drive.google.com/drive/u/0/folders/1ODb0l3zDaPfcnvwcLdciIEZDODkcDlpj
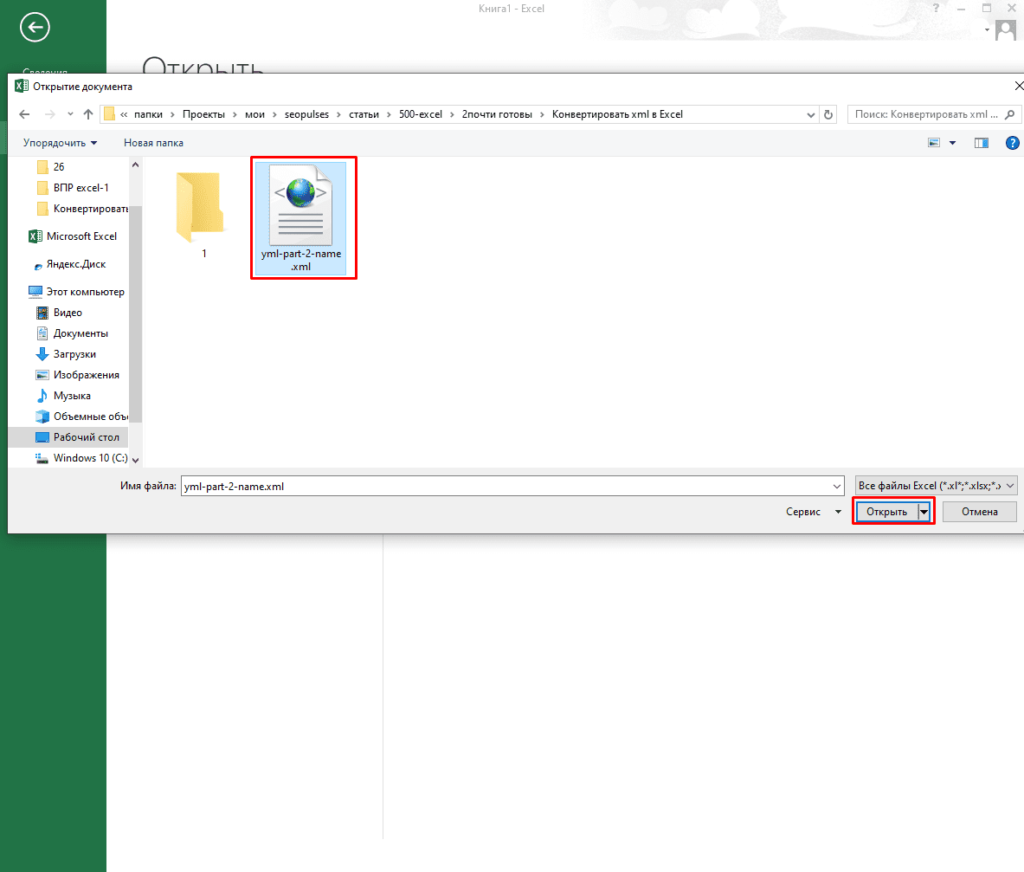
Система выдаст предупреждение и нужно будет оставить основной пункт по умолчанию (XML-таблица).
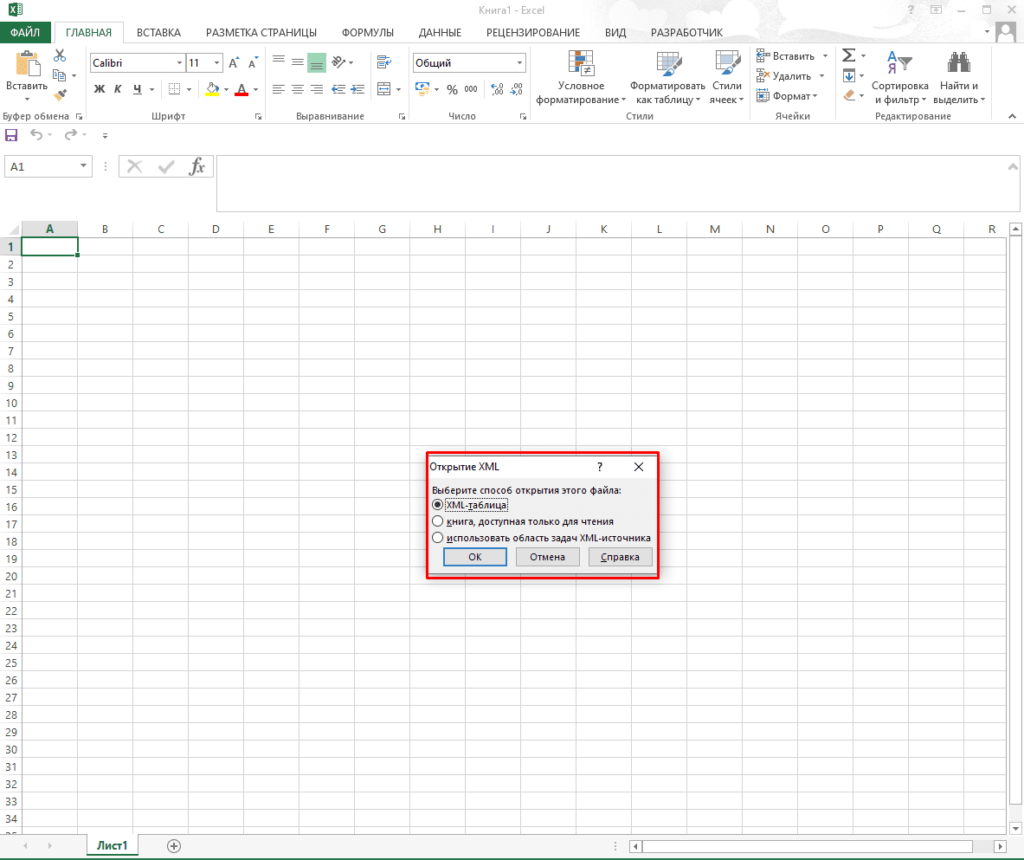
Таблица укажет, что будет создана схема, где нужно кликнуть на «Ок».
Готово, файл открыт.
Создание нового файла XML в Excel
Теперь потребуется удалить лишние строки и заменить их на нужные данные, после чего создать новые
Далее можно изменить его и снова преобразовать из Excel в XML.
Для этого кликаем на «Экспорт» в панели разработчика.
По умолчанию система предложит нужный формат и сохраняем файл с новым названием.
Все готово, документ создан.
Excel spreadsheets are great for storing large amounts of data that would be unmanageable elsewhere. But what happens when you need to transfer that data somewhere else? What if you have hundreds or thousands of cells crammed with information? That would be a lot of data to manually re-type, especially if you need it in another format.
Extensible Markup Language, or XML, is an easy-to-use, read, and format document markup language. It can be used to store data in Excel files and help transfer them to other applications. It is a widely used format on the internet and in other applications.
In this guide, you’ll learn a quick and easy way to convert Excel to XML. All you need is an Excel spreadsheet, an XML schema, and a rudimentary understanding of Excel, which you can learn in this Excel training course for beginners.
Step 1: Create your Excel spreadsheet
The first thing you need is an Excel spreadsheet. Below is an example spreadsheet with six columns and seven rows of data. The columns separate the last names, first names, ages, majors (subject), GPAs (Grade Point Average), and school year of each student listed in the spreadsheet.

Step 2: Create your XML schema
After you have your Excel document set up, you need an XML schema. An XML schema is the document that defines an XML file’s structure. You can create an XML schema in Notepad, as it is a text file format. Here is a basic structure:
<?xml version="1.0" encoding="UTF-8" standalone="yes"?>
<student-data xmlns:xsi="http://www.w3.org/2001/XMLSchema-instance">
    <record>
       <TAGNAME>data</TAGNAME>
       <TAGNAME2>data</TAGNAME2>
       <TAGNAME3>data</TAGNAME3>
    </record>
</student-data>
The first line is a standard line. It identifies that it is an XML file, using the encoding UTF-8 and the XML version 1.0.
The second line identifies that the data is about “student-data”. If you simplify this line and the last line, you have:
<student-data>
</student-data>
The first line above opens the element, and the last line, which includes a “/”, ends this element. It is important that you have a closing tag for every opening tag, and that they are in the right order. Everything in between these lines is part of this element. In other words, it is “student-data”. Because this is the first element, it is also called the “root element”.
The “student-data” above includes a “record” element, which has three data elements, TAGNAME, TAGNAME2, and TAGNAME3.
You can change the name of the <TAGNAME> tags into the names of your columns. They do not have to be the exact name of the columns, as long as they’re in the correct order. You only need to fill out a few examples manually, but we can get Excel to do the rest for us later.
Here’s an example XML schema for our Excel spreadsheet:
<?xml version="1.0" encoding="UTF-8" standalone="yes"?>
<student-data xmlns:xsi="http://www.w3.org/2001/XMLSchema-instance">
    <record>
       <LastName>Takahashi</LastName>
       <FirstName>Jesse</FirstName>
       <Age>19</Age>
       <Major>Literature</Major>
       <GPA>3.8</GPA>
       <Year>Freshman</Year>
    </record>
    <record>
       <LastName>Nguyen</LastName>
       <FirstName>May</FirstName>
       <Age>23</Age>
       <Major>Chemistry</Major>
       <GPA>3.5</GPA>
       <Year>Senior</Year>
    </record>
</student-data>
As you can see, data elements have become <LastName> and <FirstName>, in line with the columns in our data set. You do not need to have the lines indented, but that aids readability.
Also take note of the <student-data> tags that hold the contents of each <record> tag. It should be renamed according to the name of your Excel spreadsheet. In this example, our Excel workbook is called student-data.xlsx, and so our root element tag is called <student-data>.
Don’t forget to name your XML schema with a .xml at the end. In this example, our schema is simply called schema.xml, if you’d like to follow along.
If you want to know more about XML documents, how they work, and what they’re useful for, check out this introduction to XML course. You can also get started with this beginners XML tutorial class.
Step 3: Enable the Developer tab
If the Developer tab is not available, you need to enable it. Click on File – Options, and then the “Customize Ribbon” page. In the column on the right is a list of tabs called Main Tabs with check marks.

Make sure that the check box next to the Developer tab is checked, then click OK. The Developer tab should now be visible in the main Excel window.
If you’re having trouble navigating Excel and its various options, it would be beneficial to take a basic Microsoft Office course for beginners and learn your way around the application.
If you want more advanced skills, then why not take advanced Excel training courses if you need experience with the more complicated elements of Excel.
Step 4: Open the XML Source pane
Now that you’ve brought up the Developer tab and clicked on it, you should see a number of sections called Code, Add-Ins, Controls, and XML.

In the XML section, click on the large button that reads Source. This will bring up the XML Source task pane to the right of the screen, where you’ll have the option to manage XML maps. That’s what we want to do next.
Step 5: Add an XML Map
In the XML Source task pane, click the XML Maps option at the very bottom right. A dialog box will appear. Click Add to add a new XML schema, find your schema.xml file in the browser, and click OK.

Now that your XML file is added, click OK again.
The computer may give you a warning – that’s fine.

Click OK and return to the XML Source task pane.
Step 6: Drag and drop the XML elements into your spreadsheet
Each of your columns should appear as a new element in the record tree created by the XML Source task pane. Drag each element individually into its appropriate column, starting at Row 1.

Converted columns become part of a table and should turn blue. Do this until all of your columns have been mapped to the XML elements.
Step 7: Export your XML data
Once you’ve finished converting each column into an XML element, you can either click on Developer – Export, or go to File – Save As, and change the File Type to “XML Data (*.xml).”

Save your XML file, and Excel will export it to XML. It may warn you that it will result in the loss of non-XML features, such as formatting, pictures, and objects. Again, that’s fine.

You can then open it in Notepad to see your results. Go to File – Open, and change the file type from “Text Files (*.txt)” to “All Files”:
<?xml version="1.0" encoding="UTF-8" standalone="yes"?>
<student-data xmlns:xsi="http://www.w3.org/2001/XMLSchema-instance">
	<record>
		<LastName>Takahashi</LastName>
		<FirstName>Jesse</FirstName>
		<Age>19</Age>
		<Major>Literature</Major>
		<GPA>3.8</GPA>
		<Year>Freshman</Year>
	</record>
	<record>
		<LastName>Nguyen</LastName>
		<FirstName>May</FirstName>
		<Age>23</Age>
		<Major>Chemistry</Major>
		<GPA>3.5</GPA>
		<Year>Senior</Year>
	</record>
	<record>
		<LastName>Johnson</LastName>
		<FirstName>Ori</FirstName>
		<Age>20</Age>
		<Major>Business</Major>
		<GPA>3.2</GPA>
		<Year>Junior</Year>
	</record>
	<record>
		<LastName>Kang</LastName>
		<FirstName>Han</FirstName>
		<Age>18</Age>
		<Major>Biology</Major>
		<GPA>3.9</GPA>
		<Year>Freshman</Year>
	</record>
	<record>
		<LastName>Jones</LastName>
		<FirstName>Raymond</FirstName>
		<Age>19</Age>
		<Major>Engineering</Major>
		<GPA>3.3</GPA>
		<Year>Sophomore</Year>
	</record>
	<record>
		<LastName>Akhtar</LastName>
		<FirstName>Ali</FirstName>
		<Age>19</Age>
		<Major>Literature</Major>
		<GPA>4.0</GPA>
		<Year>Freshman</Year>
	</record>
</student-data>
Excel was able to format all of this information automatically, so you didn’t have to.
This trick can come in handy with large data sets of over thousands of cells, so you can create multiple XML data files quickly. However, you can still save time and export XML more reliably with any amount of data.
This was a very simple example, though, and in the future, you might find yourself facing some tougher scenarios. If this happens, it will help if you have advanced Excel skills. If you want to learn how to handle these scenarios, take a look at this course about Pivot Tables, Power Query, Power Pivot, and DAX.
I hope that you have enjoyed this article. You’ve now successfully converted Excel to XML. Hopefully when you need to do it in your work, you will find it easy to do.
If you’re interested in learning more advanced Excel skills, let’s move on to learning how to use SQL in Excel.
Frequently Asked Questions
What is Excel XML format?
Excel can export data into XML (or Extensible Markup Language). It is based on an XML schema, which defines the structure of the file. You can create it in NotePad. To convert the data, go to the Developer tab – Source. You can then load your XML schema and match it to the data. You can then go to Developer – Export, or File – Save as – XML file.
How do I open an XML file in Excel?
To open an XML file in Excel, you should go to File – Open. On the PC, you should change the File Type from “All Excel Files (*.xl*)” to “XML file (*.xml).” You should then navigate to where the file is stored, click on it, and click OK. Your file will then be opened in Excel.
How do I view an XML file?
You can view an XML file in either Notepad or Excel. To view it in NotePad, go to File – Open, and change the File Type from “Text Documents (*.txt)” to “All Files (*.*)”. To view it in Excel, go to File – Open, and change the File Type to “XML Files (*.xml).”