
- Документы Word
- Создание файлов
- Работа с файлами

Макрос предназначен для программного создания документов Word на основе шаблона
(без использования функции слияния в Word)
В прикреплённом к статье архиве находятся 2 файла:
- шаблон договора в формате Microsoft Word (расширение .dot)
- файл Excel с макросом
Настройки макроса задаются в коде:
Const ИмяФайлаШаблона = «шаблон.dot»
Const КоличествоОбрабатываемыхСтолбцов = 8
Const РасширениеСоздаваемыхФайлов = «.doc»
При нажатии кнопки запуска макрос на основе шаблона dot создаёт очередной файл, и в этом документе производит замену текста («кода поля») из первой строки файла Excel на значение поля (из очередной строки с данными файла Excel)
Папка для сформированных документов создаётся автоматически, и содержит в имени текущую дату и время
(например, созданная папка будет называться Договоры, сформированные 01-05-2011 в 15-03-24)
Имена создаваемых файлов формируются объединением полей фамилия, имя и отчество, с добавлением расширения doc
PS: Макрос был написан достаточно давно, когда я только начинал изучать VBA, — так что код недостаточно универсален.
Но, в качестве примера, пожалуй, подойдёт (если вам нужен более функциональный макрос, воспользуйтесь универсальной надстройкой (см. ниже))
Ознакомьтесь также с универсальной надстройкой формирования документов по шаблонам,
которая может делать всё тоже самое, что и эта программа,
только в качестве шаблонов могут выступать, помимо документов Word, ещё текстовые файлы, и книги Excel.
В надстройке — много возможностей, и полезных дополнений: склонение ФИО в родительный и дательный падежи, автоматический вывод на печать (с заданным количеством копий), размещение созданных файлов в разных папках, создание и рассылка писем со вложениями, и множество других полезных функций.
По вышеприведённой ссылке программа заполнения документов Word из Excel доступна для бесплатного скачивания.
Внимание: просьбы о доработке макроса, описанного в этой статье, не принимаются.
Есть новая (универсальная) версия, — в которой уже есть практически всё, что может понадобиться.
- 196994 просмотра
Не получается применить макрос? Не удаётся изменить код под свои нужды?
Оформите заказ у нас на сайте, не забыв прикрепить примеры файлов, и описать, что и как должно работать.
![]()
Download Article
A simple guide to converting Microsoft Excel projects to Word projects
![]()
Download Article
- Inserting an Excel Chart into Word
- Embedding an Excel Worksheet
- Copying and Pasting Excel Data into Word
- Q&A
- Tips
|
|
|
|
Do you want to export an Excel document into a Microsoft Word document? While Excel can’t directly convert files into Word files, you can insert the Excel file as an Object in Word. You can also copy and paste Excel data into a Word document. After doing so, you can save the Word document. You can also copy and paste an entire Excel chart into Word. This wikiHow will show you how to insert Excel data into a Word document on your Windows or Mac computer.
Things You Should Know
- In Word, click the Insert tab, then Object. Click Create from File, locate your Excel project, then Insert.
- Copy Excel data with CTRL + C (Windows) or CMD + C (Mac). Paste it into a Word document using the Paste icon in the Home tab.
- Right-click an Excel chart, then click Copy. Paste it into a Word document using the Paste icon in the Home tab.
-

1
Open a project in Microsoft Excel. You can use an existing project or create a new one.
- Microsoft Excel is available on Windows and Mac. You can also use the online web version at the Microsoft 365 website.
-
2
Copy the Excel chart. Click the chart you want to copy, then press CTRL + C (Windows) or Command + C.
- You can also right-click the chart and click Copy.
Advertisement
-
3
Open Microsoft Word. You can use the web version of Word or the desktop application.
- You’ll need to open a new or existing project.
-
4
Click Paste. This is the clipboard icon in the Home tab. This will paste the Excel chart into Word.
- You can also move the cursor to the location you’d like your data, and then press CTRL + V (Windows) or Command + V (Mac). The chart will be pasted into Word.[1]
- To select different paste options, click the arrow underneath Paste.
- If you want to link to the original Excel chart so updates are reflected in the destination file, select Use Destination Theme & Link Data.
- If you want to embed the original chart to edit it in Word, select Use Designation Theme & Embed Workbook.
- If you want the chart to act as a picture element, select Picture.
- You can also move the cursor to the location you’d like your data, and then press CTRL + V (Windows) or Command + V (Mac). The chart will be pasted into Word.[1]
-
5
Edit your chart. Click your chart to open the Format Chart Area window on the right panel. You can adjust the Fill and Border.
- You can also click the chart to adjust the Layout Options, Chart Elements, Style, and Values.
-
6
Save your Word document. Click File in the top right corner, then Save As. Choose a name and save location for your document.


Advertisement
-
1
-
2
Place your cursor where you want the Excel data. You can move this around later, but be sure to enter your data in an empty space for easy editing.
-
3
Click Insert tab in the top toolbar. This is located between the Home and Draw tab.
-
4
Click Object. This will be in the Text section of the Insert tab. You can find this next to the Symbols section.
- The Object window will open.
-
5
Click Create from File. This allows you to embed an existing Excel file into your Word document.
- You can also choose Create New then select your Object type. This allows you to embed a new object where you can input data.
-
6
Click Browse. This will open the File Explorer (Windows) or the Finder (Mac). You’ll be able to browse your computer for your file.
-
7
Click your file and click Insert. You may have to search for your file depending on its location.
- The file name and path will be displayed in the File name field.
-
8
Click the box next to Link to file. This will embed the content of the file into your Word document and create a link to the original file. If the original Excel document is updated, the changes will transfer over to the data in your Word document.
- You can check the box next to Display as icon if you only want a quick link to your Excel document from Word. This will override Link to file.
-
9
Save your Word document. Click File in the top right corner, then Save As. Choose a name and save location for your document.
- Your Excel data will be embedded in your Word document. Since the data is linked, you can double-click the Excel chart to open the project in Excel or edit directly in Word.


Advertisement
-
1
-
2
Copy the Excel data. In Excel, click and drag to select the content you’d like to put in the Word document, and then press CTRL + C (Windows) or Command + C.[2]
- On Windows, press CTRL + A to select all the data in a chart, and then press CTRL + C to copy.
- On Mac, press CMD + A to select all the data in a chart, and then press Command +C to copy.
-
3
Open Microsoft Word. You can use the web version of Word or the desktop application.
- You’ll need to open a new or existing project.
-
4
Click Paste. This is the clipboard icon in the Home tab. This will paste the Excel data into Word.
- You can also move the cursor to the location you’d like your data, and then press CTRL + V (Windows) or Command + V (Mac). The table will be pasted into Word.
- To select different paste options, click the arrow underneath Paste. You can choose Keep Original Table Formatting, Merge Table, or Keep Text Only.
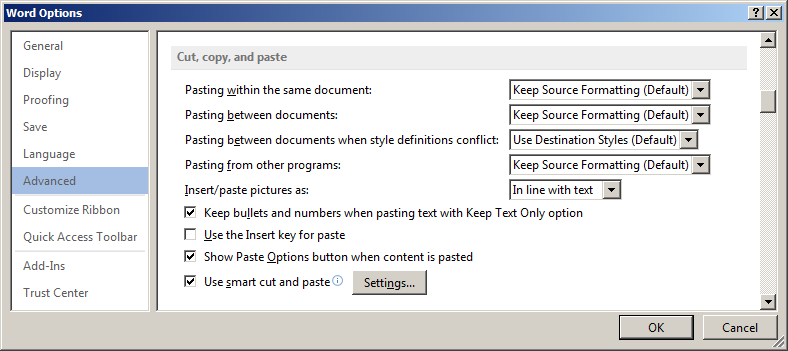
- If you don’t see the Paste Options button, you don’t have it enabled. To enable it, go to Word Options and click Advanced. Under Cut, Copy, and Paste, check the Show Paste Options buttons box.[3]
-
5


Advertisement
Our Most Loved Articles & Quizzes
Add New Question
-
Question
Can I do this if I don’t have Word?

Yes. Just search for «free online excel to word converter» and use one of the websites that shows up. You could also download OpenOffice for free, which you can use the same way as Word and where you can save documents in Word format.
-
Question
I copied my Excel cells into Word as a picture. How can I remove the cell border lines in this process?
I assume you are using a screen clipping tool to copy the Excel cells into Word. I would recommend either copying the cells (dragging to select) and pasting as a table into Word, or embedding the spreadsheet into Word. Method one works perfectly for basic Excel content and allows you to further format it to suit the structure and styling of your Word document. Method two allows complicated Excel content such as graphs to appear in Word without making screen clippings. It also can be used to preserve all formulas in the embedded sheet so that you can access them directly in Word. Either of these methods should help your Excel cells appear correctly in your Word document.
Ask a Question
200 characters left
Include your email address to get a message when this question is answered.
Submit
Advertisement
-
Looking for money-saving deals on Microsoft Office products? Check out our coupon site for tons of coupons and promo codes on your next subscription.
Thanks for submitting a tip for review!
Advertisement
About This Article
Article SummaryX
1. Select the data to convert.
2. Press Ctrl + C to copy.
3. Open a document in Word.
4. Click the desired location.
5. Click the Paste menu on the Home tab.
6. Select a paste option.
Did this summary help you?
Thanks to all authors for creating a page that has been read 1,447,414 times.
Is this article up to date?
Maintenance Alert: Saturday, April 15th, 7:00pm-9:00pm CT. During this time, the shopping cart and information requests will be unavailable.
How to Transfer Data from Excel to Word Automatically
Categories: Excel®
Tags: Export Excel Spreadsheets to Word
Excel lives up to its name when crunching numbers or organizing data. However, when you want to convey ideas beyond the table or graph, you will almost certainly turn to Word or PowerPoint. In the examples below, we are going to look at several different ways you can export, or incorporate, spreadsheets into your Word documents.
SAVE $10 AND TRAIN ON THIS TOPIC TODAY
Find out the Variety of Options to Transfer Data
To follow using our example, download ExportWorksheetsToWord.xlsx. You will need a blank Word document open. This feature applies to Excel/Word 2010 and later versions. Images were taken using Excel 2013 on Windows 7.
Solution One: Copy/Paste
The simplest way to display Excel data in a Word document is to use Copy/Paste.
- Open the destination Word document.
- In the source Excel spreadsheet, select the data you want to copy then hit CTRL-C.
- In the destination Word document, place the cursor where you want the data, then hit CTRL-V.
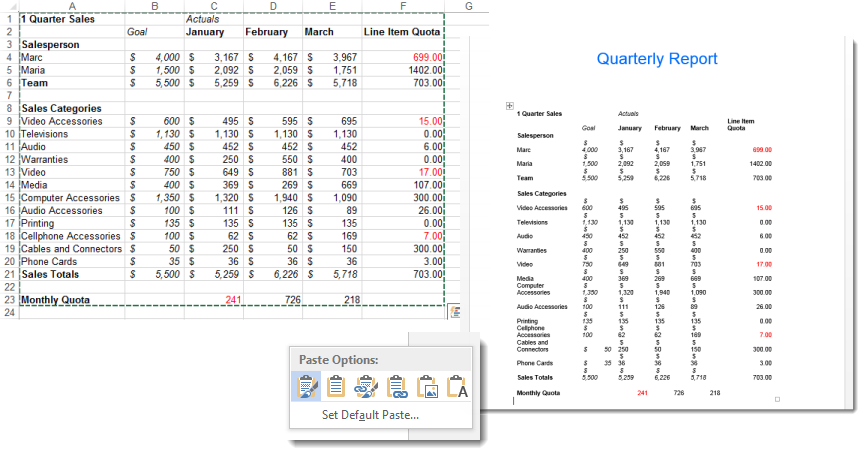
- The default paste will use the Keep Source Formatting (A) paste option. This preserves any formatting you have done in Excel and pastes the data into Word as a table using that same formatting. As you can see, you may need to clean up your table after the paste to make it look correct in the new document.
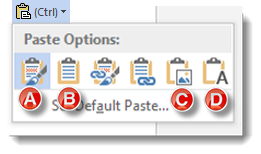
- To change the paste option, click the Ctrl dropdown option in the bottom right corner of your new table after pasting and select a new option. Other Paste options include:
Use Destination Styles (B) – This will paste the data into Word as a table and adapt the display elements into the same formatting as the Word document. Use this to make your fonts and colors consistent in the destination without having to edit in Excel beforehand. Copy as Picture (C) – This will paste the data range as a Word image object. You will be able to resize and edit the image as you would any other picture, but you will not be able to edit the data. The paste will use the original Excel formatting to generate the picture.Keep Text Only (D) – This will paste the data contained within each cell as individual lines of text in the Word document. Data in columns will be separated by a tab, rows will appear as individual paragraphs.
 Copy as Picture (C) – This will paste the data range as a Word image object. You will be able to resize and edit the image as you would any other picture, but you will not be able to edit the data. The paste will use the original Excel formatting to generate the picture.Keep Text Only (D) – This will paste the data contained within each cell as individual lines of text in the Word document. Data in columns will be separated by a tab, rows will appear as individual paragraphs.
Hint! If you frequently use a paste option that is not Keep Source Formatting, you can click the Set Default Paste link and change the default settings in the Cut, copy and paste section of Word Options.
Solution Two: Insert Excel Object
Copy/Paste brings Excel tables or Worksheet data into the Word document by changing it to a Word table or text. Inserting your workbook as an Excel object embeds a mini-version of Excel itself into the middle of your Word document. This Excel object can include multiple sheets, filters and many of Excel’s features.
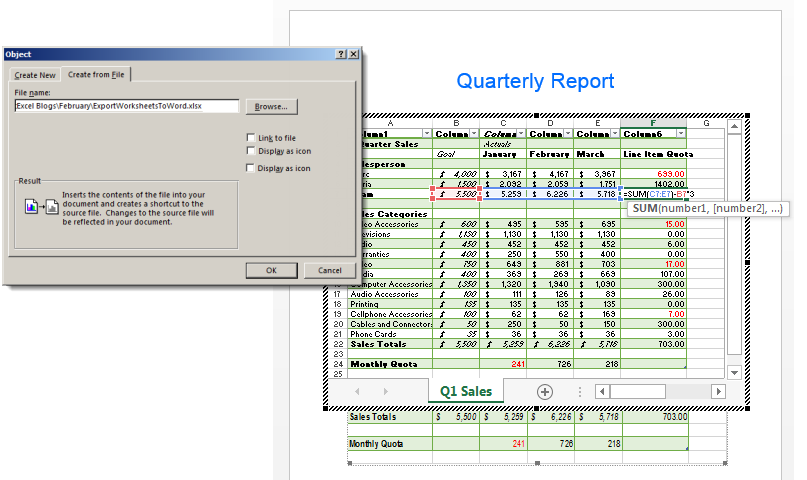
- Click the Insert tab the destination Word document, then select Object from the Insert Embedded Object dropdown button.

- Select the Create from File tab, then browse to the workbook you wish to embed.
- Choose whether you wish the object to be linked or not:
- A linked object will automatically update in the destination Word document if the source Excel spreadsheet is changed.
- An object that is not linked will not be updated automatically in the Word document if the source is changed.
- Click OK to complete the embed.
If your object is not linked, you can edit the data directly – including formulas – from within Word. Double-click on the table and make changes as you would in Excel. If the object is linked, then clicking on the table will open the Excel window.
Solution Three: Insert a Blank Excel Table
If you will be creating or entering your data table from scratch within Word, but want the functionality of an Excel spreadsheet, you can embed a blank Excel spreadsheet and work just as you would in Excel.
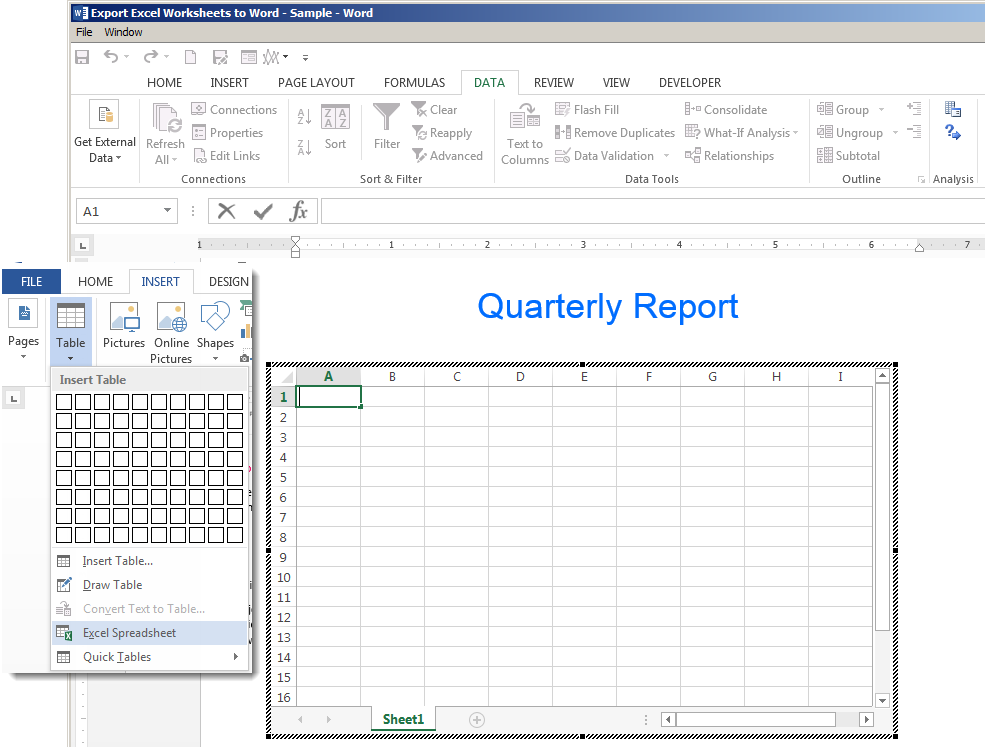
- Click the Insert tab, then select Excel Spreadsheet from the Table dropdown menu.
- Double-click on the worksheet. The Excel ribbon will appear and you will be able to add your data, insert formulas and filter and display the data as if you were working directly in Excel.
- Click outside the spreadsheet pane or hit Escape to continue editing your Word document.
Learn Excel Basics (Or Go Beyond the Basics) With Courses From Pryor Learning
Would you like to add the line “proficient in Excel” to your resume? Or perhaps you already have your dream job but would like to be more efficient and valuable to your employer. Then, consider enrolling in or downloading one of Pryor Learning’s Excel courses.
Microsoft Excel Basics
This one-day seminar is perfect for beginning or intermediate Excel users.
During this course, learn the basics of producing spreadsheets that communicate. You’ll learn to master an array of Excel formulas and functions that will put useful data at your fingertips. You’ll learn how to edit your worksheet – including how to transfer Excel table to Word. We’ll even teach you simple macros that will help you increase your productivity.
Microsoft Excel: Beyond the Basics
You may already be proficient in Excel, but you would like to learn how to use this program at a more advanced level. If so, consider enrolling in Microsoft Excel: Beyond the Basics, a one-day seminar offered live online.
Here’s the agenda for this course:
- Setup and Editing Success
- Formulas and Functions That Cut Work Down to Size
- How to Make the Most of Macros
- Data Exchange with Other Applications
- The Power of Tables, Databases, and Lists
If you’ve shopped around for technical training, you know that it often comes with a hefty price tag. However, this full-day advanced course is only $149. You won’t find any other technical school offering such affordable, high-value training.
60 Minutes of Excel Secrets
Learn hidden Excel tips and tricks from this helpful one-hour webinar. Besides learning how to transfer data from Excel to Word automatically, you’ll learn how to customize your Excel environment to increase your efficiency.
In addition, you’ll learn how to create time-saving macros and organize your spreadsheet to access the data you need. In short, this hour-long session will teach you how to better customize, organize, and format your spreadsheets.
Excel Dashboard 101
Managers, analysts, and others who spend their time looking at spreadsheet data will benefit from Excel Dashboard 101. This course is for you if you have always thought there would be a better way to view and analyze your business data.
You can download this one-hour webinar today to learn how to make your data more visually appealing and, thus – easier to understand.
You’ll learn to set up a navigational menu and move through the dashboard using only links. In addition, you’ll learn how to do the following:
- Create a key performance indicator stoplight graph
- Create a key performance indicator graph using conditional formatting
- Create a completion percentage graph
- Arrange multiple graphs on a dashboard
- And more!
Microsoft Excel Made Easy
This article has already shown you options on how to transfer Excel to Word. Imagine how more efficient you would be at creating, organizing, and analyzing spreadsheets with an hour-long course called Microsoft Excel Made Easy.
This downloadable course offered by Pryor Learning will help you discover the data analysis tools available in Excel that will make it easy to achieve your information goals. In addition, the information will be presented clearly by a professional instructor – not a frustrated IT person with very little patience dealing with someone who doesn’t have a computer science degree.
This course covers Excel 2010 – as well as previous versions. You’ll learn how to utilize old worksheets and modify new ones to be accessible to everyone.
Depend on Pryor Learning for Quality Software Training
Pryor Learning offers software training for beginning, intermediate, and advanced users. Besides providing training in Excel, Pryor Learning also has courses to help you with QuickBooks, Outlook, PowerPoint, and Word.
Are you a leader of your organization? Then, schedule in-person training for your entire staff to improve the efficiency and effectiveness of your employees. We offer a wide range of courses – including time management seminars that would be helpful to everyone.
Pryor Learning offers several different learning options. While we pioneered the one-day seminar during the 1970s, we have changed with the times. As a result, we currently provide 9,000 live and online training options in various helpful subjects – from software training to personal development training to OSHA and workplace safety training.
To become more proficient at Excel, click on one of the courses highlighted in this article. Or consider purchasing an annual pass to access all of Pryor Learning’s great content.
PRYOR+ 7-DAYS OF FREE TRAINING
Courses in Customer Service, Excel, HR, Leadership,
OSHA and more. No credit card. No commitment. Individuals and teams.
How to Convert Excel to Word
There are a few ways to copy From Excel to Word
Updated on November 16, 2021
What to Know
- Highlight content in Excel you’d like to copy, press Ctrl+C to copy it, and press Ctrl+V within Word to paste your content.
- In Word, go to Insert > Object > Object, select Create from File, choose your Excel file, and select Insert.
- To convert entire files, use an online conversion tool to directly convert an Excel spreadsheet into a Word document.
With Excel’s spreadsheet power and Word’s processing magic, they’re a power duo for creating projects. Even though a direct conversion method doesn’t exist, if you need to convert from Excel to a Word document, there are a few ways you can do so in Excel and Word 2019, 2016, and Excel and Word for Microsoft 365.
The first method is the simplest, and you’re probably already aware of the it. You can easily convert your work from Excel to Word by copying and pasting.
While Excel does have an Export option, there’s no built-in way to export to Word from within Excel. Instead, you need to use one of the methods described here to move data from an Excel document into a Word Document.
-
To start, open the Excel document you want to copy from.
-
Open the Word document you’re pasting to.
-
In the Excel document, select the content you want to copy. If you want the entire page, select the triangle icon in the upper left of your work.
-
With the content selected, press Ctrl+C on your keyboard (Cmd+C for Mac users) to copy it.
-
In the Word document, place your cursor where you want to paste your work. Use Ctrl+V (Cmd+V for Mac users) to paste.
You can also use copy and paste to create a new table in Word. Simply create a Word table, select the data in Excel and then copy it directly into the new table you created.
How to Convert Excel to Word Using Insert Object
In contrast to copy and paste, inserting Excel as an object inserts a miniature version of your Excel document in Word, complete with multiple sheets and other features. With Excel and Word open, proceed to the steps to start converting.
How to Convert Excel to Word Using Insert Object on Mac
-
In Word, select Insert from the ribbon.
-
Select the Insert tab and choose the Object icon in the toolbar.
-
Select Text from File in the dialog box and locate your Excel file.
Want your object to automatically update if you change the Excel spreadsheet? Select Options > Link to File.
-
Select Insert in the bottom right corner of the dialog box to place the content.
How to Convert Excel to Word Using Insert Object in Windows
-
In Word, select Insert > Object > Object.
-
Select the Create from File tab > Browse. Locate the file you want to insert.
-
Select Insert. If you want to link it to a file, select the Link to File check box.
-
Select OK.
Convert Excel to Word Using an Online Converter
You can also use an online converter to convert Excel to Word. Locate an online converter by conducting a quick online search. Then upload your two separate documents and allow the converter to do the heavy lifting. When the process is complete, you can download your new document.
Thanks for letting us know!
Get the Latest Tech News Delivered Every Day
Subscribe
Import Linked or Unlinked Excel Worksheet Data into Word Files
by Avantix Learning Team | Updated February 1, 2021
Applies to: Microsoft® Excel® and Word® 2010, 2013, 2016, 2019 or 365 (Windows)
You can easily copy or import Excel worksheet data into Word documents. When you import from an Excel file, you can choose to import linked or unlinked data. If it’s linked, you will be able to update, change and remove the links.
The following are three easy ways to import Excel data into Word by copying and pasting:
- Copy the data in the Excel file, switch to the Word document and then paste the data where you want it to appear as a static copy.
- Import the Excel data into the Word document as a linked OLE (Object Linking and Embedding) object so that when the Excel file changes, the Word document will update as well.
- Create links to the Excel data in a Word table so that when the Excel file changes, the table will update.
If you choose the second or third method, you will need to ensure that the Excel file remains in the same location with the same name or manage the link(s) using Edit Links.
Recommended article: How to Create a Table of Contents in Word
Do you want to learn more about Microsoft Word? Check out our virtual classroom or live classroom Word courses >
Inserting unlinked Excel data
You can easily copy data from Excel and paste it into a Word document. Use this method if you do not need to update the Word file when the Excel data changes.
To insert unlinked Excel data into Word:
- Open the Excel file.
- Select the data you want to copy into the Word file.
- Press Ctrl + C or right-click and select Copy from the drop-down menu.
- Open the Word file.
- Position the insertion point where you want the Excel data to appear.
- Press Ctrl + V or right-click and choose Paste Values from the drop-down menu.
With this method, the Excel data will be copied into Word as a table and the Word file will not update when the Excel file changes. Because the data is pasted into a table, you can use Word’s table tools to format it and the file will be smaller because the data is not linked.
Inserting Excel data as a linked OLE object
You can insert an OLE (Object Linking and Embedding) object when you want to insert a linked copy of Excel data. However, one of the problems with this method is that the OLE object is like a picture of the cells and you would need to format the data in Excel to appear the way you want in the Word file.
To insert Excel data into Word as a linked OLE object:
- Open the Excel source workbook.
- Select the data you want to place in the Word file.
- Press Ctrl + C or right-click and choose Copy from the drop-down menu.
- Open the Word destination document.
- Position the insertion point where you want the linked Excel data to appear.
- Click the Home tab in the Ribbon and select the arrow below Paste. A drop-down menu appears.
- Select Paste Special. A dialog box will appear.
- Click Paste Link.
- Under As, select Microsoft Excel Worksheet Object.
- Click OK.
Note the Paste link option on the left of the Paste Special dialog box:

You can double-click an OLE object to jump to the source Excel file.
Inserting linked Excel data into a Word table
You can insert Excel data as a table in Word where each cell is linked to the Excel data source. This is a great method because you can maintain links but format the data the way you want in Word.
To insert linked Excel data into a Word table:
- Open the Excel source workbook.
- Select the data you want to place in the Word file.
- Press Ctrl + C or right-click and choose Copy from the drop-down menu.
- Open the Word destination document.
- Position the insertion point where you want the linked Excel data to appear.
- Click the Home tab in the Ribbon and select the arrow below Paste. A drop-down menu appears.
- Select Paste Special. A dialog box will appear.
- Click Paste Link.
- Under As, select HTML Format.
- Click OK.
HTML format is selected by default in the Paste Special dialog box:

Click in the table in the Word document. As long as Field Shading When Selected is set in Word Options, each cell will appear with gray shading indicating that it is a field linked to Excel. You can format the table in Word.
Updating or managing links
One of the benefits of linking data is that information in a destination document updates when you change information in the source document. This typically occurs automatically if both documents are open. However, if you open a Word document with links and the Excel file is not open, Word should prompt you to update the links. You may also need to update links yourself or re-establish a link if the original Excel file has been moved or renamed.
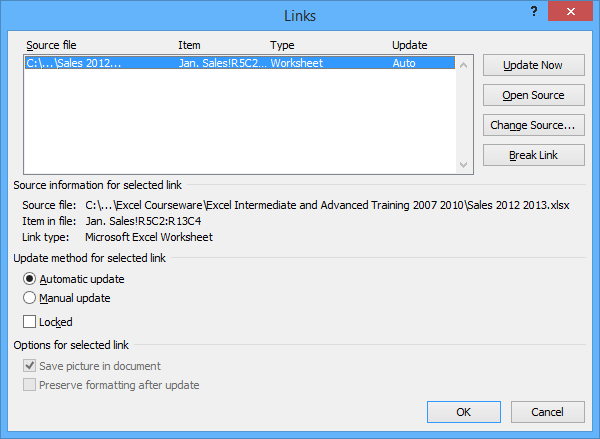
To update or manage links:
- Right-click a linked object or HTML table. A drop-down menu appears.
- Choose Linked Worksheet Object and then Edit Links. A dialog box appears.
- Under Update method for selected link, Automatic update is selected by default. You can choose Manual update if you do not want the data to update automatically. You would then need to click the link and click Update Now to update.
- Make any other changes (such as breaking a link of changing the source for a link).
- Click OK.
The Links dialog box below displays one link:
It’s not difficult to import Excel data into Word. Typically, the biggest issue occurs when other users move or rename the source Excel file but this can be managed using Edit Links and changing the source.
This article was first published on March 13, 2016 and has been updated for clarity and content.
Subscribe to get more articles like this one
Did you find this article helpful? If you would like to receive new articles, join our email list.
More resources
How to View Word Count in Word (4 Ways)
14+ Word Selection Shortcuts to Quickly Select Text
How to Superscipt or Subscript in Word (with Shortcuts)
How to Format Microsoft Word Tables Using Table Styles
How to Insert a Check Mark or Tick Mark in Word (5 Ways)
Related courses
Microsoft Word: Intermediate / Advanced
Microsoft Excel: Intermediate / Advanced
Microsoft PowerPoint: Intermediate / Advanced
Microsoft Word: Long Documents Master Class
Microsoft Word: Styles, Templates and Tables of Contents
Microsoft Word: Designing Dynamic Word Documents Using Fields
VIEW MORE COURSES >
Our instructor-led courses are delivered in virtual classroom format or at our downtown Toronto location at 18 King Street East, Suite 1400, Toronto, Ontario, Canada (some in-person classroom courses may also be delivered at an alternate downtown Toronto location). Contact us at info@avantixlearning.ca if you’d like to arrange custom instructor-led virtual classroom or onsite training on a date that’s convenient for you.
Copyright 2023 Avantix® Learning
Microsoft, the Microsoft logo, Microsoft Office and related Microsoft applications and logos are registered trademarks of Microsoft Corporation in Canada, US and other countries. All other trademarks are the property of the registered owners.
Avantix Learning |18 King Street East, Suite 1400, Toronto, Ontario, Canada M5C 1C4 | Contact us at info@avantixlearning.ca
Purpose: To create a Word document from an existing Excel list (using Mail Merge function of Word)
- Open Word
- Click on Mailings tab
- Click Start Mailing merge
- Choose Directory
- Click Select Recipients
- Choose Use Existing List
- From the Select Data Source box, find and choose your Excel file
- Click Ok in the Select Table Box
- Click Insert Merge Field
- From the dropdown list, choose the fields that you wish to appear in each entry
- Format the fields as needed (add bolding, bullets, etc.)
- Click Preview Results to see how your entries will appear and make adjustments if necessary
- Click Finish and Merge
- Click Edit Individual Documents
- In the Merge to New Document box, choose All and click Ok
- Your list will appear (it may take a minute or so depending on the length). Ready to edit and save.