Excel for Microsoft 365 Word for Microsoft 365 Outlook for Microsoft 365 PowerPoint for Microsoft 365 Excel 2021 Word 2021 Outlook 2021 PowerPoint 2021 Excel 2019 Word 2019 Outlook 2019 PowerPoint 2019 Excel 2016 Word 2016 Outlook 2016 PowerPoint 2016 Office 2016 More…Less
Try it!
When you want text to really stand out on a page, use WordArt to add outlines, shading, and other effects to your words.
Add WordArt
-
Select Insert > WordArt and select the option you want.
-
Enter your text.
Convert existing text to WordArt
-
Select the text.
-
Select WordArt and select the option you want.
Customize your WordArt
-
Select the WordArt.
-
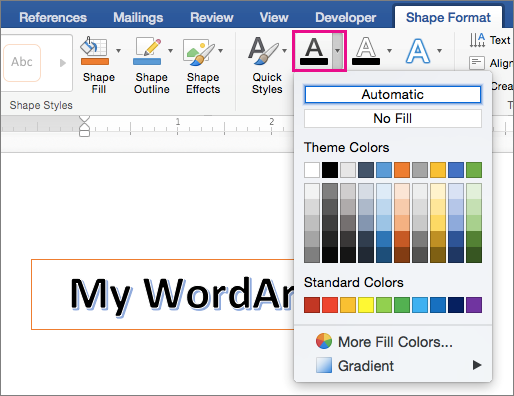
Select Text Fill and select an option.
-
Select Text Outline and select an option.
Add Text Effects
-
Select the WordArt.
-
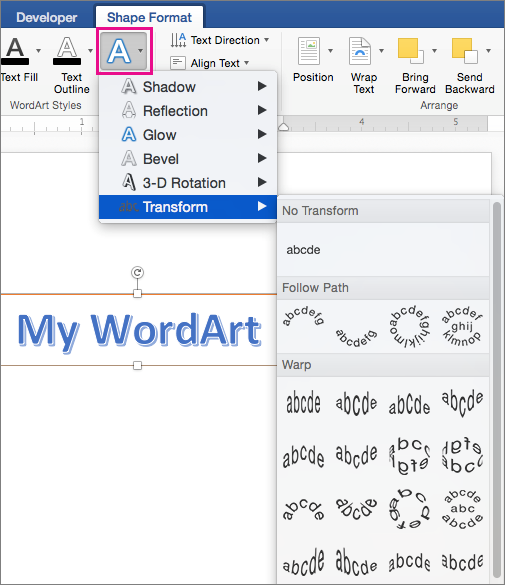
Select Text Effects and select an option:
Rotate your WordArt
-
Select the WordArt.
-
Select the rotation handle and drag it to rotate the text.
Want more?
Insert WordArt
Word training
Excel training
PowerPoint training
Outlook training
Need more help?
WordArt is a quick way to make text stand out with special effects. You begin by picking a WordArt style from the WordArt gallery on the Insert tab, and then customize the text as you wish.
Try it!
-
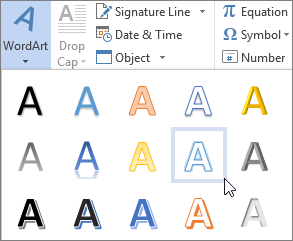
Click Insert > WordArt, and pick the WordArt style you want.
In the WordArt gallery, the letter A represents the different designs that are applied to all text you type.
Note: The WordArt icon is located in the Text group, and it may appear different depending on the program you’re using and the size of your screen. Look for one of these icons:
-
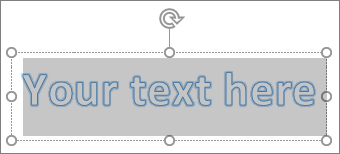
The placeholder text «Your text here» appears, with the text highlighted.
Enter your own text to replace the placeholder text.
Tips:
-
You can enter entire sentences, and even paragraphs, as WordArt. (You may have to change the font size for longer text.) And in Word, you can also convert existing text to WordArt in Word.
-
You can include symbols as WordArt text. Click the location for the symbol, and on the Insert tab, click Symbol, and pick the symbol you want.
Do more things with WordArt
Select a heading below to open it and see the detailed instructions.
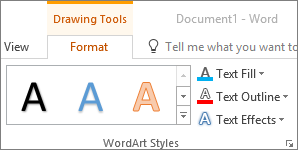
You might have tried using shape styles to change the shape of WordArt and then were puzzled that the text didn’t change. Use the text options in the WordArt Styles group instead. Shape styles and effects apply to the box and background surrounding your WordArt, not to the WordArt text. So, to add effects to your WordArt, such as shadows, rotation, curves, and fill and outline colors, you use the options in the WordArt Styles group, including Text Fill, Text Outline, and Text Effects.
Note: Depending on your screen size, you might only see the icons for WordArt Styles.

-
Select the WordArt text or letters to change.
The Drawing Tools Format tab appears.
-
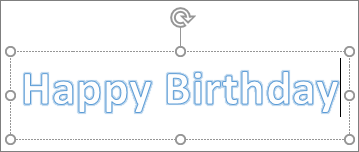
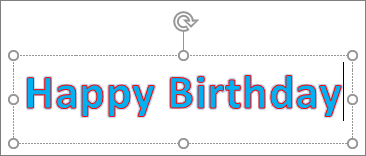
On the Drawing Tools Format tab, click Text Fill or Text Outline, and pick the color you want.
-
Click outside of your text box to see the effect.
In this example, a light blue text fill and a red text outline were applied.
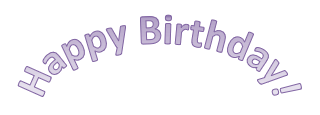
You can curve text around a circular object.
90 seconds
-
Select the WordArt text or letters to change.
The Drawing Tools Format tab appears.
-
To create a curved effect, on the Drawing Tools Format tab, click Text Effects >Transform and pick the one you want.
Important: The Text Effects
menu is not the same as the Shape Effects
menu. If you don’t see Transform at the bottom of the menu, make sure you’ve clicked the Text Effects menu.
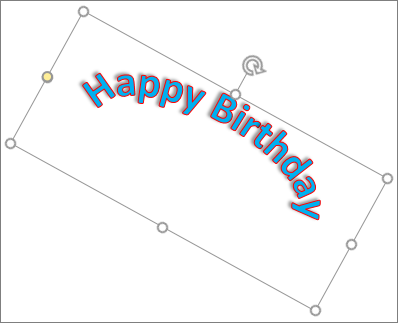
In this example, the first curved transform effect is selected.
-
Click outside of your text box to see the effect.
Use the Text Effects menu to create other effects, such as shadow, reflection, glow, bevels, and 3-D rotation. This example shows WordArt with a curved transform effect and a shadow applied.
-
To rotate WordArt text to any angle, select it, and then drag the circular rotation handle at the top of the box.
-
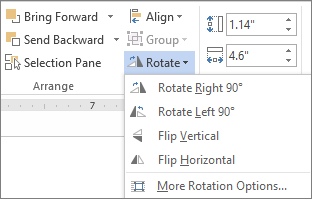
To flip WordArt or rotate it 90 degrees, click the Drawing Tools Format tab, click Rotate in the Arrange group, and then select an option.
To change the font size or style of your WordArt text:
-
Select the WordArt text or letters to change.
-
On the Home tab, select options in the Font group, such as font style, font size, or underline.
-
In your Word document, select the text to convert to WordArt.
-
On the Insert tab, click WordArt, and then pick the WordArt you want.
Double-click the WordArt that you want to remove, and then press Delete.
Insert WordArt
-
Click where you want to insert decorative text in a document.
-
On the Insert tab, in the Text group, click WordArt.
-
Click any WordArt style, and start to type.
Do more things with WordArt
Select a heading below to open it and see the detailed instructions.
-
Click anywhere in the WordArt text that you want to change.
-
Under Drawing Tools, on the Format tab, click any option.
For example, you can change the direction of the WordArt text by clicking Text Direction in the Text group and choosing a new direction for the text.
Double-click the WordArt that you want to remove, and then press Delete.
Add WordArt
Excel
-
On the Insert tab, in the Text group, click WordArt, and then click the WordArt style that you want.
-
Enter your text.
-
You can add a fill or effect to a shape or text box as well as the text in the WordArt.
-
If you have a chart in your 2007 Office release document, you can replace the chart title with WordArt to give the title additional emphasis.
-
Outlook
-
On the Insert tab, in the Text group, click WordArt, and then click the WordArt style that you want.
-
Type your text in the Text box.
You can add a fill or effect to a shape or text box as well as the text in the WordArt.
PowerPoint
-
On the Insert tab, in the Text group, click WordArt, and then click the WordArt style that you want.
-
Enter your text.
-
You can add a fill or effect to a shape or text box as well as the text in the WordArt.
-
If you have a chart in your 2007 Office release document, you can replace the chart title with WordArt to give the title additional emphasis.
-
Publisher
-
On the Objectstoolbar, click Insert WordArt
.
-
In the WordArt Gallery, click the WordArt that you want, and then click OK.
-
Type your text in the Text box.
If you want to change the text in the WordArt, double-click the WordArt that you want to change, and then type the new text in the Text box.
Word
-
On the Insert tab, in the Text group, click WordArt, and then click the WordArt style that you want.
-
Type your text in the Text box.
You can add a fill or effect to a shape or text boxas well as the text in the WordArt.
Do more things with WordArt
Select a heading below to open it and see the detailed instructions.
Excel
Do one or more of the following:
-
To change the text, select it, and then make the changes that you want.
-
To change the font, see Change the font or font size in Excel or Change the color of text in a worksheet.
-
To add an effect to WordArt, see Add or delete a fill, outline, or effect for text or WordArt.
-
To rotate the WordArt, see Rotate or flip a picture, shape, text box, or WordArt in Excel 2007.
-
To resize the WordArt, see Change the size of a picture, shape, text box, or WordArt.
-
To align the WordArt, see Align or arrange a picture, shape, text box, or WordArt.
-
To move the WordArt, see Move a picture, shape, text box, or WordArt.
For more information about selecting WordArt, see Select a shape or other object.
Outlook
Do one or more of the following:
-
To change the text, select it, and then make the changes that you want.
-
To change the font, see Change the size or formatting of text.
-
To add an effect to WordArt, see Add or delete a fill, outline, or effect for text or WordArt.
-
To rotate the WordArt, see Rotate or flip a picture, shape, text box, or WordArt in Outlook 2007.
-
To resize the WordArt, see Change the size of a picture, shape, text box, or WordArt.
-
To align the WordArt, see Align or arrange a picture, shape, text box, or WordArt.
-
To move the WordArt, see Move a picture, shape, text box, or WordArt.
For more information about selecting WordArt, see Select a shape or other object.
PowerPoint
Do one or more of the following:
-
To change the text, select it, and then make the changes that you want.
-
To add an effect to WordArt, see Add or delete a fill, outline, or effect for text or WordArt.
-
To rotate the WordArt, see Rotate or flip a picture, shape, text box, or WordArt in PowerPoint 2007.
-
To resize the WordArt, see Change the size of a picture, shape, text box, or WordArt.
-
To align the WordArt, see Align or arrange a picture, shape, text box, or WordArt.
-
To move the WordArt, see Move a picture, shape, text box, or WordArt.
For more information about selecting WordArt, see Select a shape or other object.
Publisher
Do one or more of the following:
-
To change the text, select it, and then make the changes that you want.
-
To change the font, see Change the font size or Change the color of text.
-
To add an effect to WordArt, see Add or delete a fill, outline, or effect for text or WordArt.
-
To resize the WordArt, see Change the size of a picture, shape, text box, or WordArt.
-
To align the WordArt, see Align or arrange a picture, shape, text box, or WordArt.
-
To move the WordArt, see Move a picture, shape, text box, or WordArt.
For more information about selecting WordArt, see Select a shape or other object.
Word
Do one or more of the following:
-
To change the text, select it, and then make the changes that you want.
-
To change the font, see Change the font size.
-
To add an effect to WordArt, see Add or delete a fill, outline, or effect for text or WordArt.
-
To rotate the WordArt, see Rotate or flip a picture, shape, or WordArt.
-
To resize the WordArt, see Change the size of a picture, shape, text box, or WordArt.
-
To align the WordArt, see Align or arrange a picture, shape, text box, or WordArt.
-
To move the WordArt, see Move a picture, shape, text box, or WordArt.
For more information about selecting WordArt, see Select a shape or other object.
Excel
When you remove the WordArt style from your text, the text remains and changes to plain text.
-
Select the WordArt text that you want to remove the WordArt style from.
-
Under Drawing Tools, on the Format tab, in the WordArt Styles group, click the More button
, and then click Clear WordArt.
To remove the WordArt style from part of your text, select the text that you want to remove the WordArt style from, and then follow the steps above.
PowerPoint
When you remove the WordArt style from your text, the text remains and changes to plain text.
-
Select the WordArt text that you want to remove the WordArt style from.
-
Under Drawing Tools, on the Format tab, in the WordArt Styles group, click the More button
, and then click Clear WordArt.
To remove the WordArt style from part of your text, select the text that you want to remove the WordArt style from, and then follow the steps above.
Do the following for all programs listed in the Applies To at the top of the article.
-
Double-click the WordArt that you want to remove to select it, and then press Delete.
-
In Office for Mac 2016 or later, select the Insert tab on the Ribbon.
or
In Office for Mac 2011, select Insert on the toolbar.
-
Select WordArt, and pick the WordArt style you want.
In the WordArt gallery, the letter A represents the different designs that are applied to all text you type.
-
Enter your text.
Tip: You can also include symbols as WordArt text. To do so, click the location in your document for the symbol, and on the Insert tab, click Advanced Symbol, and pick the symbol you want.
Do more things with WordArt
Select a heading below to open it and see the detailed instructions.
To create curved or circular WordArt text, you add a Transform text effect.
-
Select the WordArt.
When you do that, the Shape Format tab appears.
-
Click Text Effects > Transform and pick the effect you want.
To change the color of the WordArt text, you change the Text Fill.
-
Select the WordArt text or letters to change.
When you do that, the Shape Format tab appears.
-
Click Text Fill, and pick the color you want.
Tip: To change the outline of the WordArt text, on the Shape Format tab, click Text Outline.
-
Select the text to convert to WordArt.
-
On the Insert tab, click WordArt, and then pick the WordArt style you want.
In Microsoft 365 for the web you can see WordArt that’s already in your document, presentation, or worksheet, but to add more WordArt you need to open or edit the doc in the desktop version of Word, PowerPoint, or Excel.
In Microsoft 365 for the web, you can use the Font features on the Home tab to change the font color and size, and apply bolding, italics, or underlines to your text.
If you don’t have the desktop version of Word or PowerPoint, you can try it or buy it in the latest version of Office now.
Add WordArt
- On the Insert tab, in the Text group, click WordArt, and then click the WordArt style that you want.
- Type your text in the Text box. You can add a fill or effect to a shape or text box as well as the text in the WordArt.
Contents
- 1 How do you get word art on word?
- 2 What is word art examples?
- 3 What is considered word art?
- 4 What are the two ways to create WordArt?
- 5 Is WordArt free?
- 6 What is art with text called?
- 7 Who invented word art?
- 8 What is contemporary word art?
- 9 What is use of WordArt?
- 10 How do you make rainbow WordArt?
- 11 How do you make WordArt Classic?
- 12 How do you make word art curve?
- 13 How do I convert WordArt to Word?
- 14 Does Google Docs have word art?
- 15 How do I make a Word picture?
- 16 How do I make words into a shape?
- 17 What artists use words?
- 18 How would you describe graffiti?
- 19 How do you make text art?
- 20 What are the 7 elements of art?
How do you get word art on word?
Find WordArt Tools in Word
- Click or tap where you want WordArt.
- Select Insert > WordArt.
- Pick a style, and type your text.
What is word art examples?
Word Art: Text-based Painting, Prints, Sculpture. Word Art. Painting, Sculpture or Photolithography Using Words and Phrases.
What is considered word art?
1. WordArt is a program that allows you to treat text as a graphic. You can use the program to add special effects and flourishes to text, and then insert the text in your document. It is useful for creating special text elements such as logos, mastheads, or titles.
What are the two ways to create WordArt?
What are the two ways to create WordArt? From new or by convert existing text.
Is WordArt free?
WordArt offers a freemium model but you’ll need to upgrade to the paid version of the word cloud generator if you want to download high-quality word art, which might be useful if you are planning to print your word cloud.
What is art with text called?
Text art, also called ASCII art or keyboard art is a copy-pasteable digital age art form. It’s about making text pictures with text symbols.
Who invented word art?
Etymology. The term “art” is related to the Latin word “ars” meaning, art, skill, or craft. The first known use of the word comes from 13th-century manuscripts. However, the word art and its many variants (artem, eart, etc.) have probably existed since the founding of Rome.
What is contemporary word art?
A reference to Contemporary Art meaning “the art of today,” more broadly includes artwork produced during the late 20th and early 21st centuries. It generally defines art produced after the Modern Art movement to the present day.
What is use of WordArt?
You can use WordArt to add special text effects to your document. For example, you can stretch a title, skew text, make text fit a preset shape, or apply a gradient fill. This WordArt becomes an object that you can move or position in your document to add decoration or emphasis.
How do you make rainbow WordArt?
To get the rainbow effect, do the following:
- Select the font you want changed.
- Using the other mouse button, choose Font from menu.
- Click the Text Effects button at the bottom of the window.
- Choose Text Fill.
- Choose Gradient Fill.
- Now you need to fiddle with Gradient Stops and Colour to get the effect you want.
How do you make WordArt Classic?
If you have not installed Classic Menu for Office on your computer, you can access the WordArt command in Ribbon with following steps:
- Click the Insert Tab;
- Go to Text group;
- Then you will see the WordArt button. See screen shot (Figure 2):
How do you make word art curve?
Create curved or circular WordArt
- Go to Insert > WordArt.
- Pick the WordArt style you want.
- Type your text.
- Select the WordArt.
- Go to Shape Format > Text Effects > Transform and pick the effect you want.
How do I convert WordArt to Word?
To convert regular text into WordArt:
Select the text you want to convert, then click the Insert tab. Click the WordArt drop-down arrow in the Text group. A drop-down menu of WordArt styles will appear. Select the style you want to use.
Does Google Docs have word art?
To insert word art into a Docs document, open your document and go to Insert > Drawing > New. When the drawing panel opens, go to Actions > Word art and create what you need. When you are done, press the blue Save and Close button to put the word art in your document.
How do I make a Word picture?
Open up a new image in a picture editor such as Paint or Photoshop. Press Ctrl and V at the same time, or click edit and then select paste from the drop-down menu to insert the screen capture of your Word document from your clipboard into the new image file [source: Microsoft Windows].
How do I make words into a shape?
Use WordArt to shape text
- On the Insert tab, in the Text group, click WordArt, and then click the WordArt style that you want.
- Type the text that you want.
- Change the font size, if needed, and then click OK.
What artists use words?
In honour of Word Week on AnOthermag.com, we take a look at some of the 20th century’s most influential word artists
- Marcel Duchamp.
- Lawrence Weiner.
- Hamish Fulton.
- Barbara Kruger.
- Jenny Holzer.
- The Guerrilla Girls.
- Ed Ruscha.
- Martin Creed.
How would you describe graffiti?
graffiti, form of visual communication, usually illegal, involving the unauthorized marking of public space by an individual or group. Although the common image of graffiti is a stylistic symbol or phrase spray-painted on a wall by a member of a street gang, some graffiti is not gang-related.
How do you make text art?
ASCII-Art
- Step 1: Choose a Picture. Choose any image from the internet or from your desktop.
- Step 2: Copy the Picture Into Word. Open a new Word-document and paste the picture into it.
- Step 3: Set the Image Properties.
- Step 4: Set the Font and Begin to ‘paint’
- Step 5: Finish.
What are the 7 elements of art?
ELEMENTS OF ART: The visual components of color, form, line, shape, space, texture, and value.
Looks like no one’s replied in a while. To start the conversation again, simply
ask a new question.
Is there a word art equivalent for pages? I hate to compare stuff like that with word, but its the only way I have of describing it!!
Regards
24″ iMac 2.8Ghz 4GB 15″ Late 2008 MBP 2.53Ghz 4GB G4 DA 733Mhz 768MB 10.4,
Mac OS X (10.6.2),
External WD 500GB My Book Studio 1TB Seagate 160GBx4 Black 32GB iPhone 4
Posted on Aug 23, 2010 1:36 AM
2 replies
Aug 23, 2010 4:16 AM in response to alex.lyons
Alex,
No, there is no equivalent in Pages. You can use third party apps like Art Text — they are too expensive for my limited needs, but if you do a lot of that type of work it would be worth buying.
I have an old version of Office for Mac and I use it if I need WordArt in a Pages Doc. Create in Office; Copy and Paste to Pages.
Jerry
Aug 23, 2010 4:36 AM in response to alex.lyons
No, Pages doesn’t have a word art incorporated in the application. Apple are more into using several applications to achieve things than bloat one application.
You can go to _
http://www.belightsoft.com/products/arttext/overview.php_ . They have a free trial version.
You can read here _
http://i-work-in-pages.blogspot.com/_ and see there are things you can do in Pages.
WordArt for pages
Download Article
Download Article
Most people who use Microsoft Word for designing creative printouts know about the WordArt feature and it’s many features. If you don’t know about it yet, follow the directions in this article to help you achieve these same techniques to make your printouts look spectacular.
Steps
-
1
Open your Microsoft Word document, with whatever method you prefer to open the program with.
-
2
Decide in which document, you’d like to start adding/using the WordArt feature in. You can either start a new document, or open an existing document, depending on where you would like to add the WordArt to.
Advertisement
-
3
Locate the place that you’d like to insert your first WordArt piece of text on your page.
- Type the previous text.
- You can either continue on that line (rarely used), or press enter to start a new line.
-
4
Open your menu toolbar. For quick access if this toolbar isn’t available, press and release Alt on your keyboard.
-
5
Click the «Insert» option from this toolbar.
-
6
Click the «Picture» button.This should open a drop-down list.
-
7
Click the «WordArt» option from the drop-down that results. This should open a new window, along with adding a toolbar to the display window, that you can later move into a position on the screen near all the toolbars at the top of the screen. For now, you’ll be concentrated on the dialog box that Microsoft Word brought up when you clicked the option to Insert a new piece of WordArt.
-
8
Click to select the WordArt style that looks the best to you.
-
9
Click the «OK» button. This will open a new dialog box that will help you type the text you want to be inserted to become a piece of WordArt.
-
10
Type your text using proper formatting (such as correct capitalization, grammar, etc.). The text «Your text here» is automatically selected, which means as soon as you start typing, the former pre-filled text will be removed in place for the text you will type.
-
11
Select alternate formatting (bold, italic, font size, font type) from the buttons above the box you type your stuff in.
-
12
Learn how to move your WordArt text. This can be achieved for most viewers by clicking to select and either centering the text like most centering of any other text, or, for some versions (2007 and up) by right-clicking and dragging the text to a new location.
-
13
Learn how to color your WordArt text. Use the same styles to color other text, as you would for this WordArt text. Just be sure the WordArt piece has been selected, before you begin to select your color. If you do end up selecting your color, you’ll be selecting a font color for any additional text near the insertion «I» point on the screen.
- Learn how to copy the piece of WordArt to an alternate location, if you’d like. Use the Copy and Paste technique to copy and paste the item from one area to another, through the use of Windows clipboard (which is where all copy and pasted items are temporarily stored).
Advertisement
Add New Question
-
Question
What is Microsoft Word insert?
Microsoft Word «insert» is used to insert any element or object into a document.
Ask a Question
200 characters left
Include your email address to get a message when this question is answered.
Submit
Advertisement
Video
-
The steps in this article are based on the 2003 version of Microsoft Word.
-
You can also select the text in the original page. You then can select the style, and it will pre-fill the words for you into the boxes.
Show More Tips
Thanks for submitting a tip for review!
Advertisement
Things You’ll Need
- Microsoft Word program
- computer mouse and keyboard
About This Article
Thanks to all authors for creating a page that has been read 115,428 times.
Reader Success Stories
-
«What helped me was the ‘Create Word Art’ video was graphic/demonstrative. It put ‘here/now’ words and directions…» more
Is this article up to date?
In this article we will learn about what is word art in google docs, how to do word art and some daily basis operations like rotating word art, changing border style, changing color, curved style word art etc.
Google Docs must be a game-changer amidst the conventional word processors. Unlike the grueling and obscuring features of other processors, the tools of Google Docs are feasible and easily accessible. It does not broadcast all its features at once by confusing the users. The aesthetics of Google docs is the simple interface with ease of access.
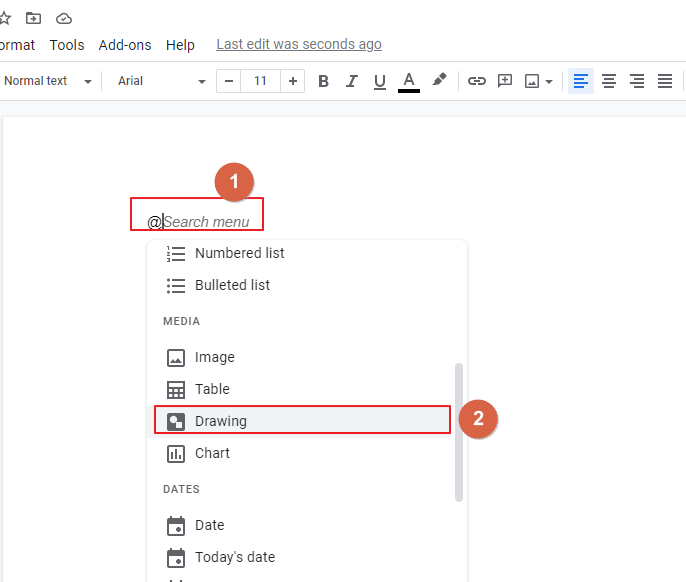
Even more, Google docs display the shortcut keys for the task with the menu options. The @menu option helps navigate the required feature directly rather than the menu options. Rather than bombarding the document using all the available features, google doc provides simple formatting options below the menu options. Not just text formatting, it also offers image, chart, and table formatting to help to create more creative documents.
If you are interested to learn about how to use word art in Google Slides, please follow the below link.
How to Use Word Art in Google Slides (Best Practice)
Advantages of using Word Art in Google Docs
A picture is worth a thousand words. But word art is neither text nor image but a combination of both. Word art feature is used in logos, newspapers headlines, headings, and even t-shirts. A picture with a bigger size of words incites a feeling and power to the message.
- Visual appeal
- Promotes legibility
- Helps to communicate the messaging tone
Google docs have a built-in word art option in the drawing tool. Also, you can format the text in any online word art tool and insert the image in Google Docs.
How to Do Word Art in Google Docs
Google docs allows you to change the formatting setting of the word art to incite the visual appeal of the text.
Here is step by step guide to insert word art in google docs.
Step 1:
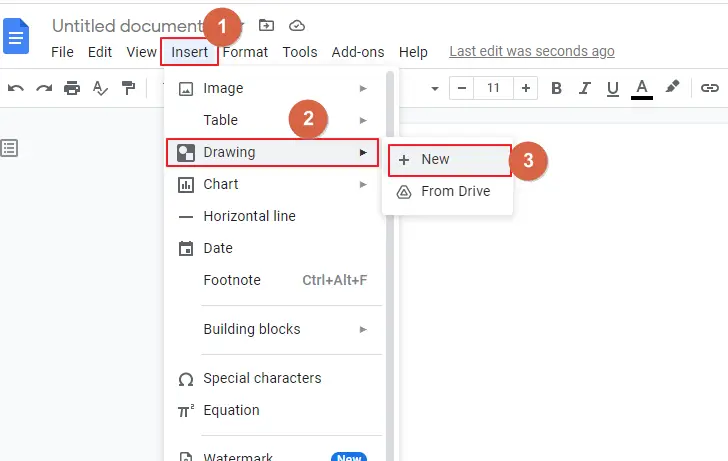
Open Google Docs. Go to Insert -> Drawing -> New. Also, enter @ and select Drawing -> New.
Step 2:
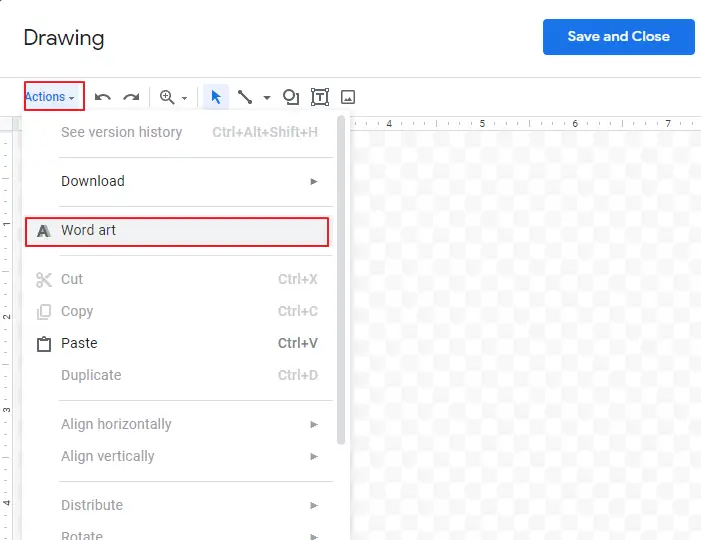
The Drawing tool window opens. Go to Actions- > Word art.
Step 3:
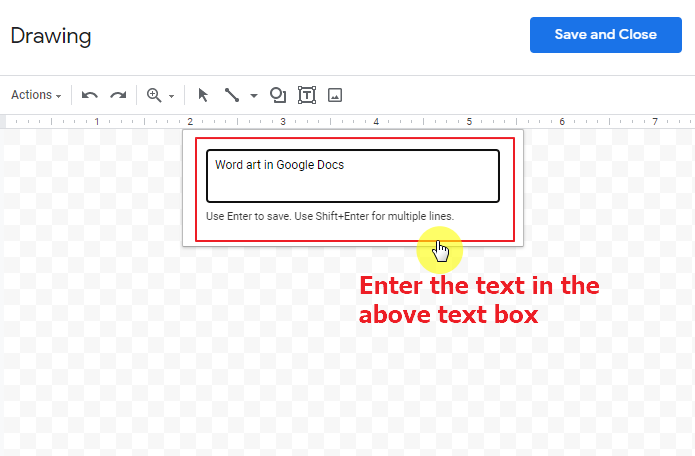
The word art text box appears. Enter the text in the text box and press Enter.
Step 5:
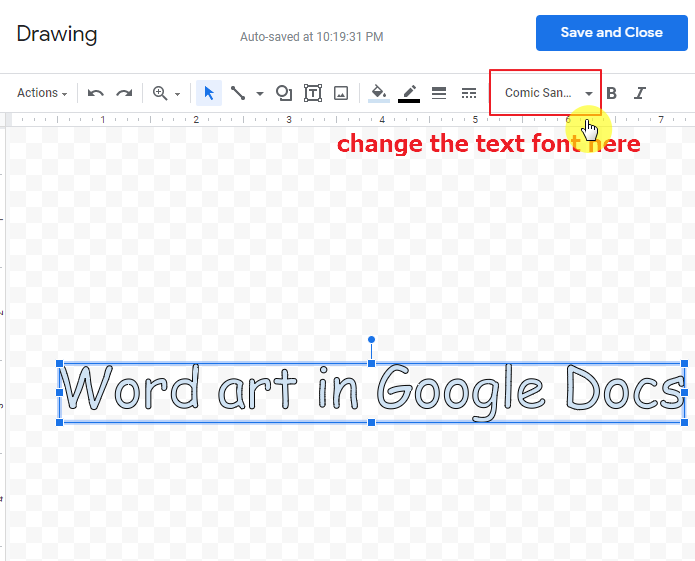
The word art is displayed in the Drawing window. Click the text box and go to the font drop-down to change the text font.
How to Add Border & Color to Word Art in Google Docs
Step 1:
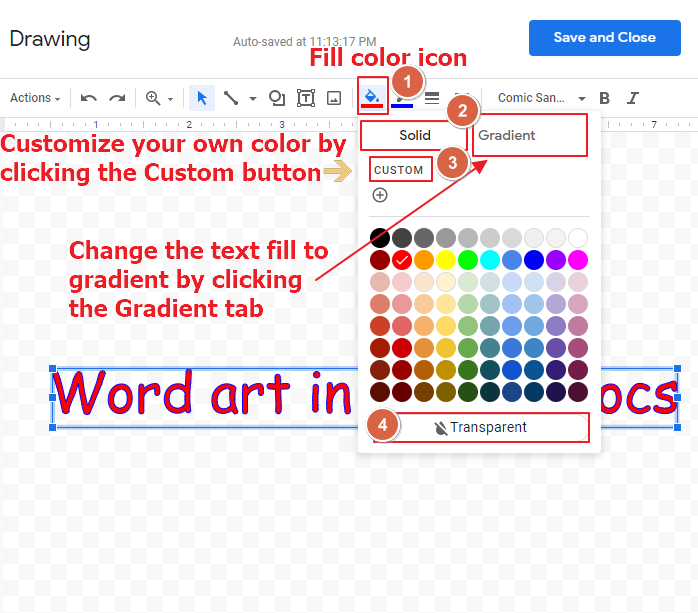
To change the fill color, click Fill color icon in the format options menu. Select the colors from Solid tab or the Gradient tab. You can customize the text fill with your desired color. You can also change the fill to transparent.
Step 2:
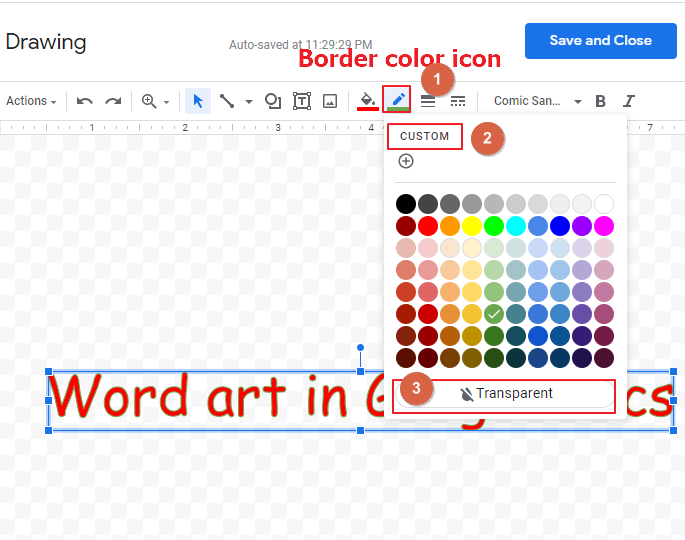
To change the border color of the text, click the Border color icon in the format options menu. You can customize the border color and even change to transparent.
Step 3:
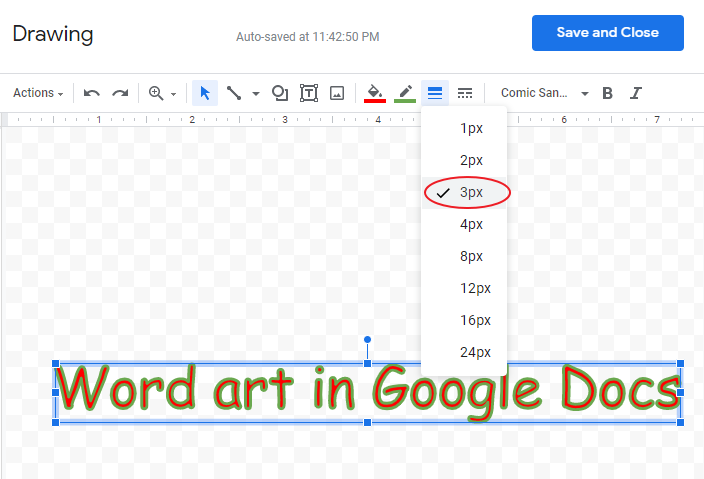
To alter the thickness of the border, click Border weight icon in the format options menu.
Step 4:
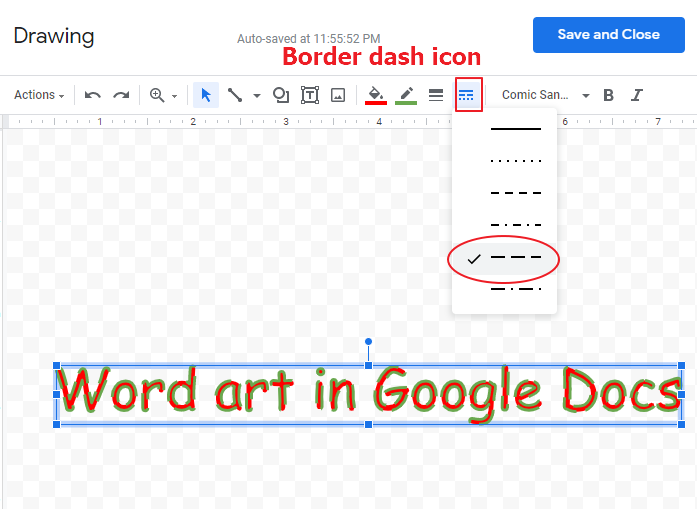
To change the border dash, click the Border dash icon. Select the line from the list of options from the drop-down.
How to Do Text Formatting of Word Art in Google Docs
Step 1:
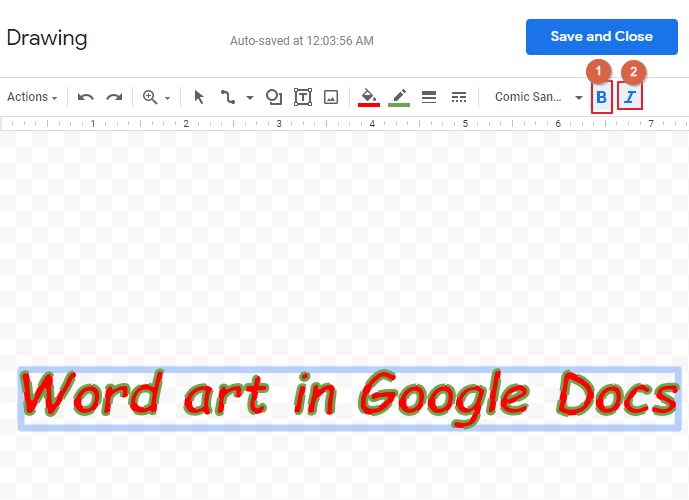
To change the text formatting to bold and italic, select B and I icons in the format options menu.
Step 2:
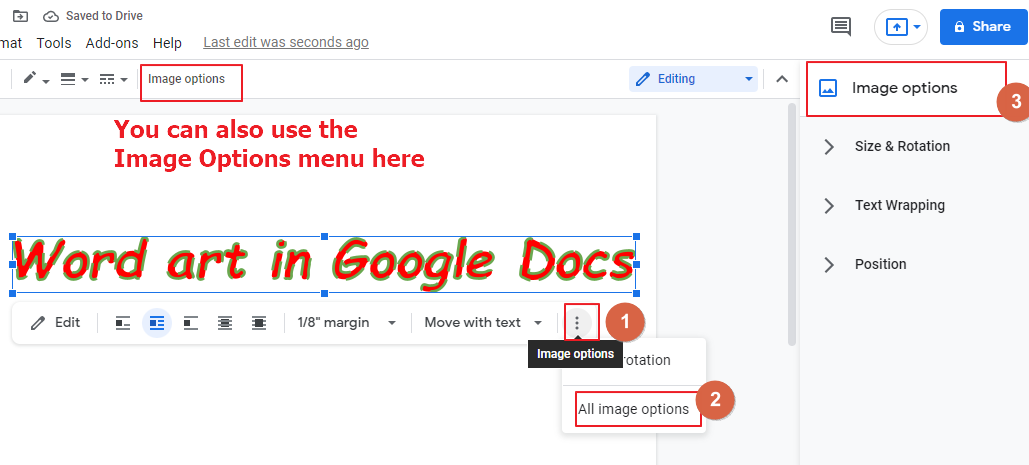
Click Save and Close. The word art appears in the Google Doc screen. Click the image and select Image options (indicated as a vertical dotted line) in the Edit menu displayed below the image. The Image Options toolbar appears in the right side corner of the screen.
Step 3:
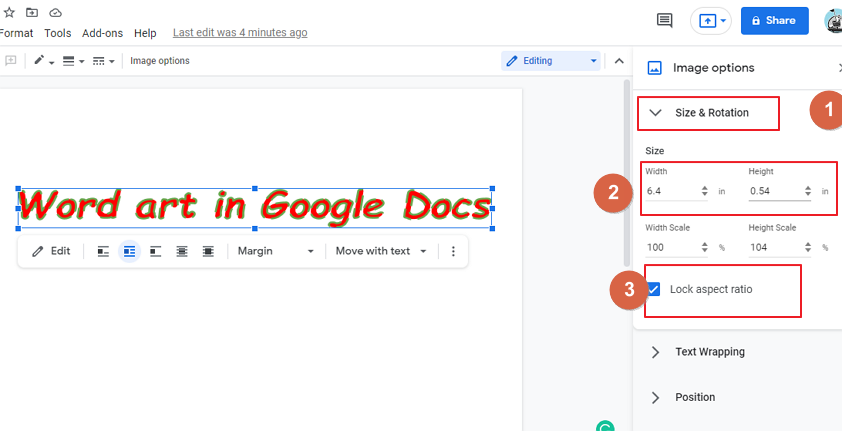
To alter the width and height of the textbox, select the Size & Rotation tab in the Image Options toolbar. Adjust to your required size in the Width and Height labels. The Lock Aspect ratio checkbox enables the ratio between width and height to remain constant.
How to Wrap Word Art Around the Text in Google Docs
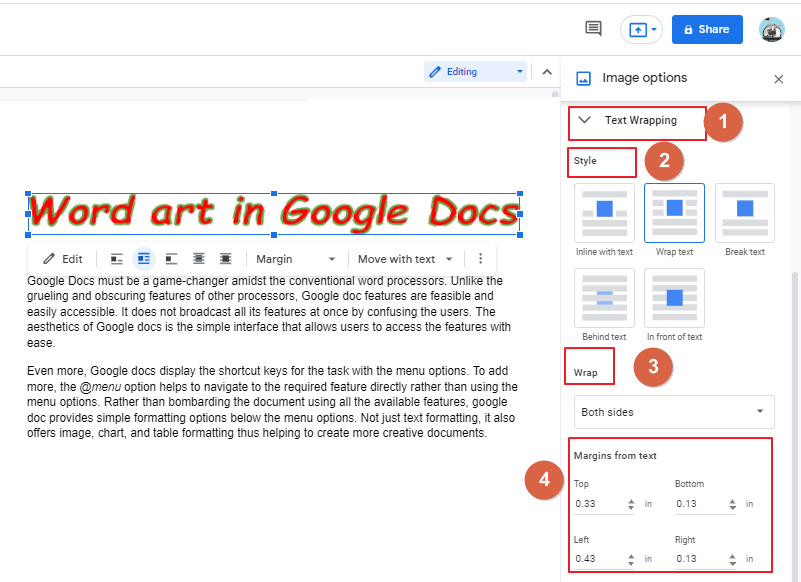
To wrap the word art image around the text, click the text wrapping tab and select the required style.
To wrap the image around the text on both sides or left or right, select the Wrap drop-down and to adjust the margin size of the image from the text, change the top, bottom , left and right margin labels.
How to Move Word Art Image in Google Docs
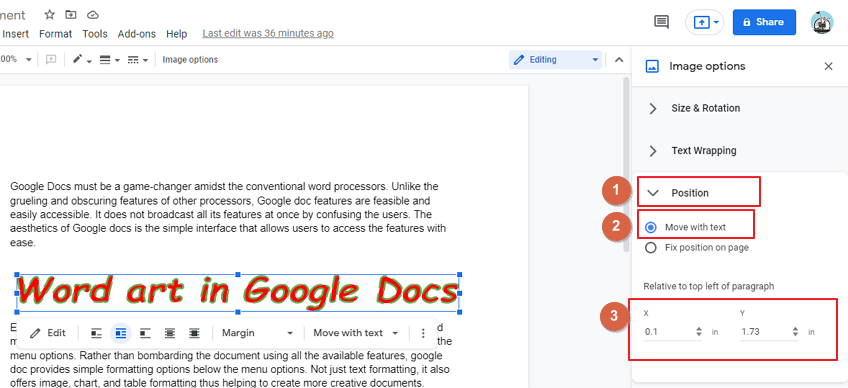
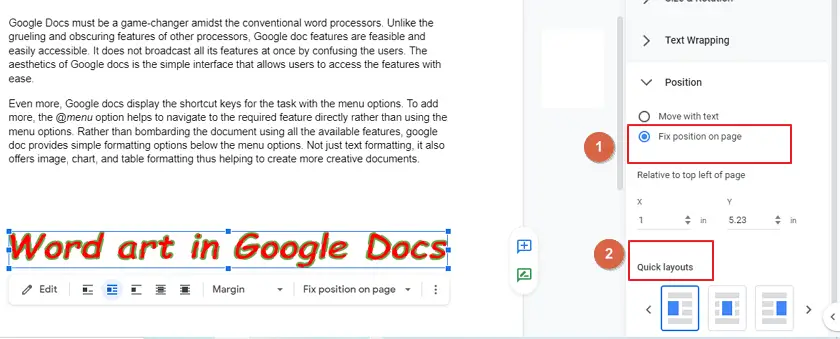
The image can be moved with the text or can be fixed on the same position. In the Position tab, select Move with text to change the position of the image by altering the x-axis and y-axis labels.
Select Fix position on page and the required layout to fix the image on an exact position.
How to Rotate Word Art in Google Docs
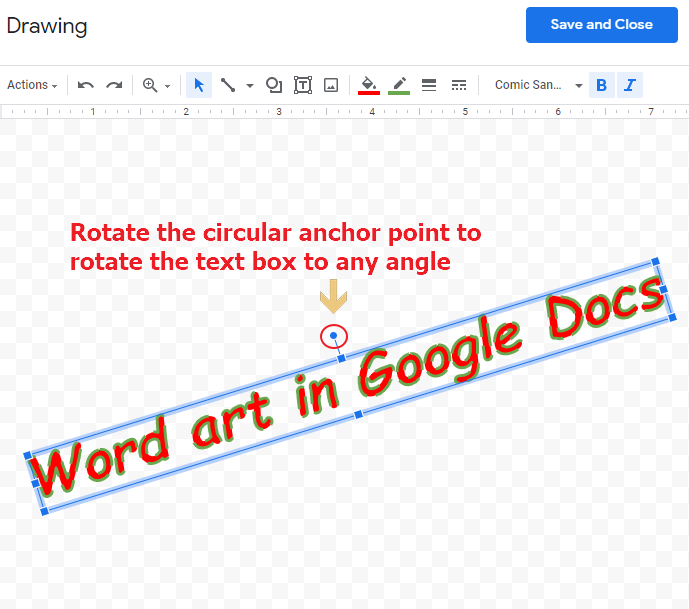
To rotate the word art, click the image and select Edit in the menu below the image.
The Drawing window appears. Select the circular anchor point of the textbox and rotate it to any required angle using your mouse movement.
How to Do Curved Word Art in Google Docs
Step 1:
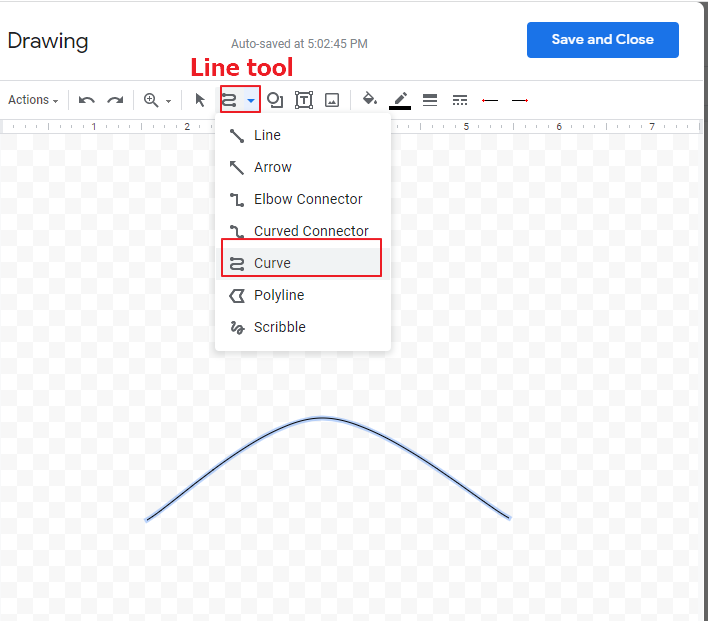
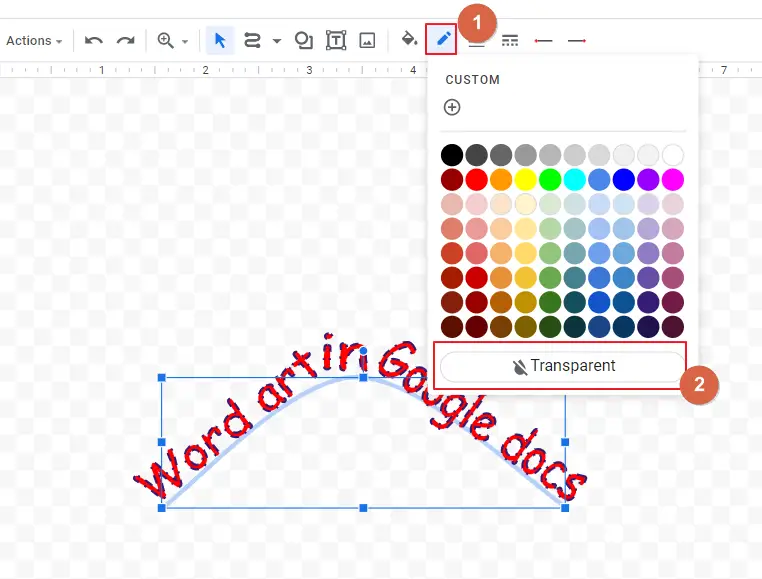
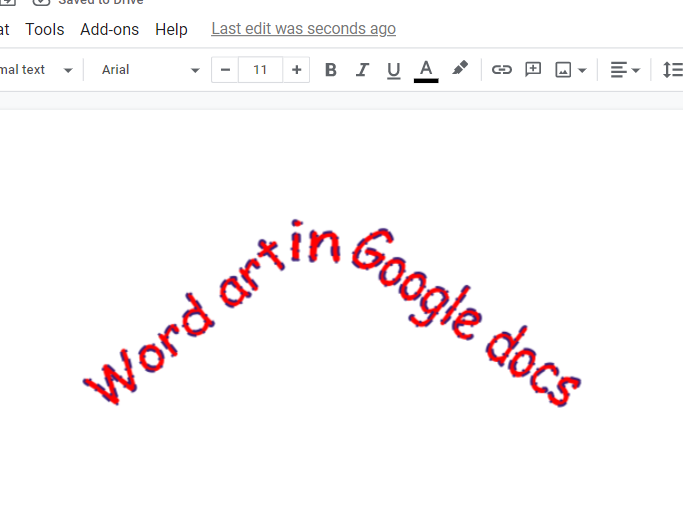
You can also curve the word art using the curve line tool. This is a roundabout way of curving the word art. Open the Drawing tool in Google docs and select the curve line from the Line drop-down. Draw a curve in the drawing panel.
Step 2:
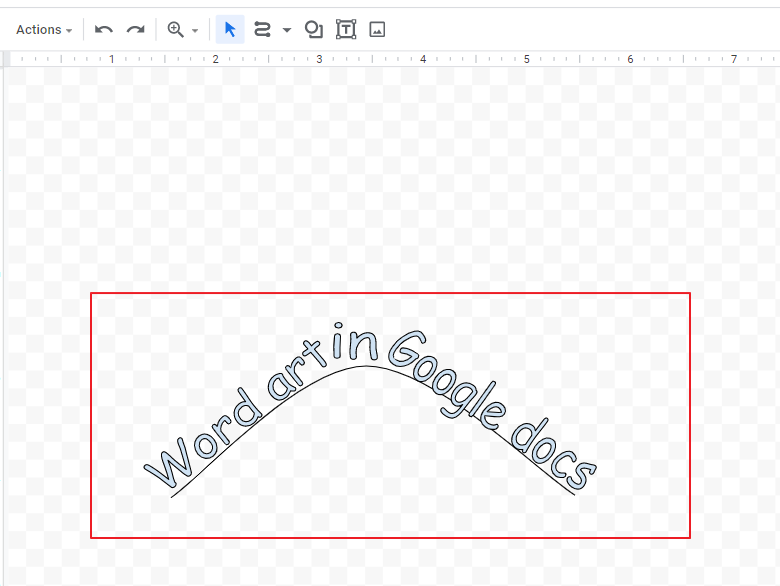
Go to Actions -> Word art. Enter the text in the word art textbox. Adjust the circular anchor point of the word art textbox to each side of the curve. Add as many text boxes as you need to create the word art.
Step 3:
Format the word art to any font and color. Select the curve line and click Line color icon. Select Transparent to change the border color of the curve to transparent.
Step 4:
Click Save and Close. The word art is added to the doc screen.
Alike curved word art, choose any shape from the shapes icon. Insert word art into the selected structure and adjust the angle to get the formation. Even though this is an indirect way of adding effects to the text, this is more feasible than adding an image from an online tool.
Notes
- Use Shift+Enter for multiple lines in the word art text box
- Resize the text box before adding the word art to the Doc screen
- You cannot adjust the font size of the text in the word art
Conclusion
The sentiment of a design emulates a friendly atmosphere. The language and the visual appeal attract more attention. It is easy to insert and use Word art in Google Docs. This article helps in crafting creative text with visual appeal.
Нельзя отрицать, что WordArt играет важную роль в привлечении внимания людей с первого взгляда. В маркетинге или презентации WordArt может быть отличным помощником в донесении сообщения до аудитории инновационным способом.
Сложно ли создать WordArt? WordArt — это часть искусства; для создания Word Art может потребоваться определение эстетики и тенденций. Но это старая история; в настоящее время, с развитием интеллектуального анализа данных и бесплатными генераторами WordArt, любой может создать уникальный WordArt, который всем нравится.
Каковы лучшие бесплатные генераторы Word Art для вас? Эта статья позволяет вам узнать новые идеи о Word Art в благородном и адаптивном облаке слов. Мы предоставим вам целостное представление о плюсах и минусах семи лучших бесплатных генераторов WordArt и определим, какое приложение поможет вам добиться максимального качества вашей работы.
Проверьте больше идей искусства слова, доступных в Интернете!
Дополнительные советы с AhaSlides
- Случайные английские слова
- Процесс генерации идей
- АгаСлайды Живой генератор облака слов
Содержание
- Генератор облаков слов AhaSlides
- Inkpx WordArt — онлайн-генератор модной трехмерной текстовой графики
- Monkeylearn Word Cloud Generator — генератор словесных рисунков на базе искусственного интеллекта
- WordArt.com – Лучшая футболка для печати Word Art
- Облака слов. com — расширенный редактор Word Art
- TagCrowd – Визуализация частоты слов
- Сделать WordArt.com — базовое искусство Word
- Выводы
№1. Генератор облака слов AhaSlides — бесплатные генераторы Word Art
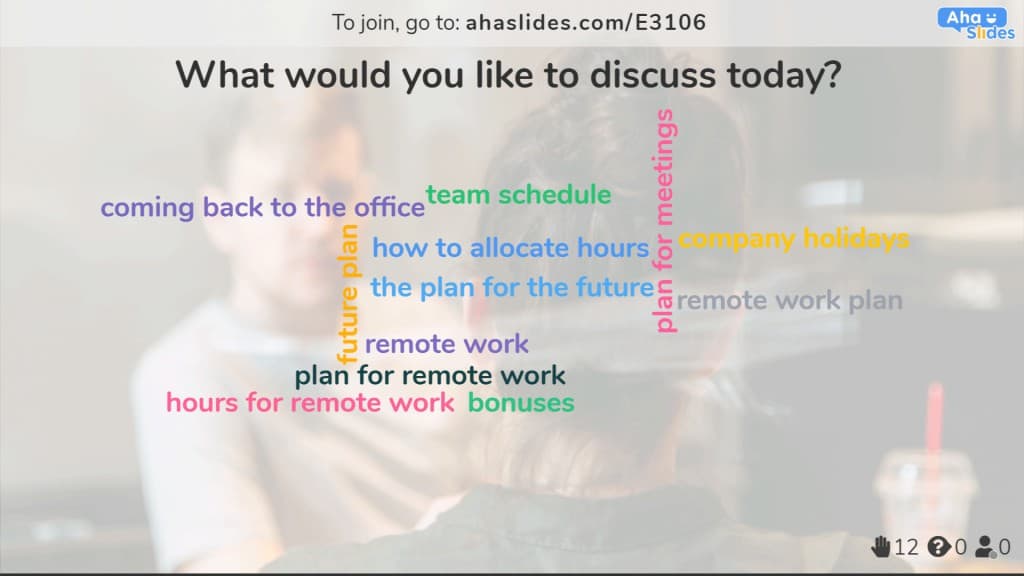
Плюсы: Вы можете настроить свой Word Art с помощью простых шагов с помощью AhaSlides Word Cloud Generator. Его встроенная функция Word Cloud может быть творчески настроена с поддержкой интерактивных и интеллектуальных пользовательских интерфейсов и возможностей. В отличие от других бесплатных генераторов Word Art, AhaSlides Генератор облака слов может воспроизводить длинные фразы и располагать их случайным образом, как по вертикали, так и по горизонтали в привлекательной цветовой гамме радуги.
Его лучшим преимуществом является визуализация живых опросов в презентациях, что позволяет участникам взаимодействовать с размещенными викторинами, например, «Что такое случайные английские слова?». Аудитория может быстро реагировать и одновременно получать доступ к живому отображению Word Cloud со всеми ответами в режиме реального времени.
Минусы: его основная функция — создавать привлекательные объекты Word Art во время интерактивного обучения, поэтому не так много фигур можно настроить.
№ 2. Inkpx WordArt — бесплатные генераторы Word Art
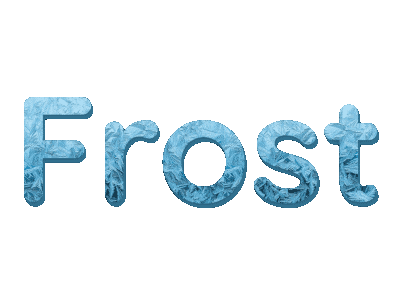
Плюсы: Inkpx WordArt предлагает различную превосходную текстовую графику, которая может немедленно преобразовать ваш вводимый текст в визуальное искусство слова, и вы можете скачать его бесплатно в формате PNG. Если вы хотите создать тематические Word Art, такие как поздравительные открытки и приглашения на день рождения, в течение ограниченного времени, вы можете найти много доступных работ в его библиотеке. Его впечатляющие категории, основанные на стилях, довольно функциональны и удобны для вас, например, натуральные, животные, наложение, фрукты и многое другое, так что вы можете сэкономить время и усилия.
Минусы: функция дизайна карт предлагает 41 шрифт, но когда дело доходит до рисунка из одного слова, шрифты ограничены 7 стилями, поэтому вам довольно сложно создать более сложный шрифт.
№3. Генератор облака слов Monkeylearn — Бесплатный генератор Word Art
Плюсы: Вы можете настроить Word Art в Word Cloud с помощью Генератор облака слов Monkeylearn гибко изменяя тематические фоны с белого и светлого на темный яркий. Кроме того, словесные шрифты ограничены 7 современными и чистыми стилями, поэтому вы не будете злоупотреблять цветами и шрифтами, что может привести к путанице для зрителей. Кроме того, он предоставляет новые возможности для обнаружения сентиментальных текстов и форматирования неструктурированного текста, такого как статьи, социальные сети и электронные письма… более привлекательные.
Минусы: Несмотря на то, что они могут распознавать пары слов или связанные фразы, если в разных фразах со слишком большим количеством слов есть повторяющиеся слова, повторяющееся слово может исчезнуть или быть отделенным. Вы также не можете изменить стиль шрифта каждого слова. Результат облака слов также отделен от экрана поля ввода текста, поэтому вам нужно снова открыть окно, и облако слов отображается снова и снова.
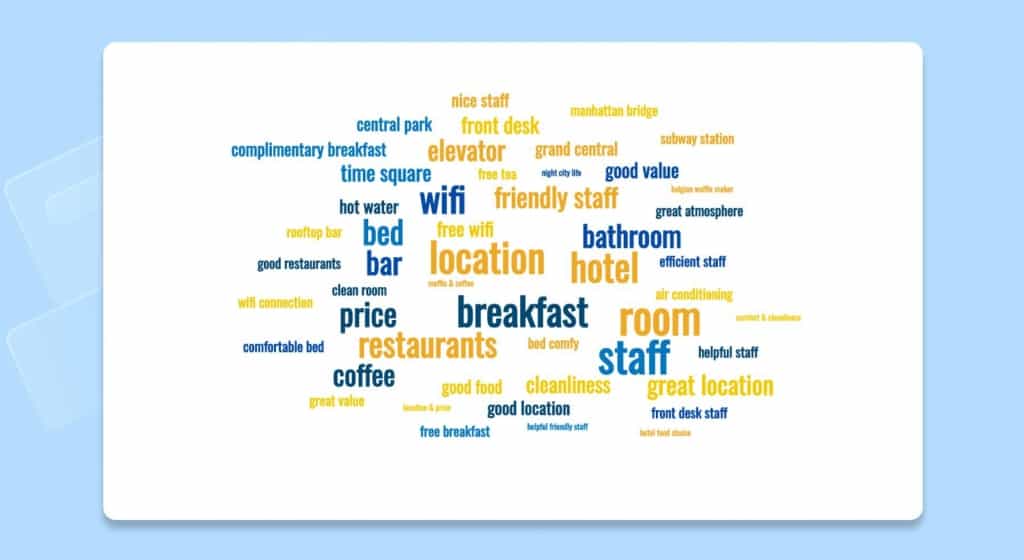
№ 4. WordArt.com — бесплатный генератор изображений Word Art
Плюсы: Цель WordArt.com заключается в том, чтобы помочь клиентам достичь наилучших результатов с легкостью, весельем и индивидуальной настройкой одновременно. Это бесплатный генератор Word Art, который подходит для новичков, которые ищут профессиональный Word Art за пару шагов. Самая выгодная функция — формировать облако слов так, как вам нравится. Существуют различные формы, которые вы можете редактировать и адаптировать в кратчайшие сроки.
Минусы: Вы можете загрузить образцы фотографий HQ перед покупкой. Их высокое качество используется для преобразования визуально рассчитанных изображений в реальные материалы, такие как наряды, чашки для кружек и многое другое, за которое нужно платить.
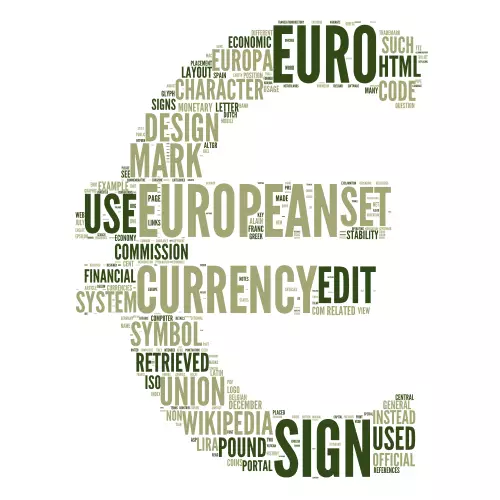
№ 5. Облака слов. com — Бесплатные генераторы Word Art
Плюсы: Очень похоже на функции WordArt.com, wordclouds.com также фокусируется на превращении скучных отдельных текстов и фраз в изобразительное искусство. Вы можете перейти в галерею, чтобы найти образцы и настроить их прямо на основной странице. Это так интересно, что есть сотни форм значков, букв и даже загруженных форм, чтобы вы могли создавать Word Cloud все, что вам нравится.
Минусы: если вы хотите найти интерактивную платформу Word Cloud для обучения, возможно, это не лучший вариант.

№ 6. TagCrowd — бесплатные генераторы Word Art
Плюсы: чтобы визуализировать частотность слов в любом текстовом источнике, таком как обычный текст, веб-URL или просмотр, вы можете использовать ТегТолпа. Основная функция сосредоточена на преобразовании текстов в элегантный и информативный формат, включая облако слов, текстовое облако или облако тегов. Вы можете проверить частоту появления текста и при необходимости исключить его. Кроме того, приложение поддерживает более 10 языков и автоматически группирует слова в кластеры.
Минусы: минимализм и эффективность являются целями TagCrowd, поэтому вы можете обнаружить, что Word Art довольно монохроматичен или скучен без множества форм, фона, шрифтов и стилей.
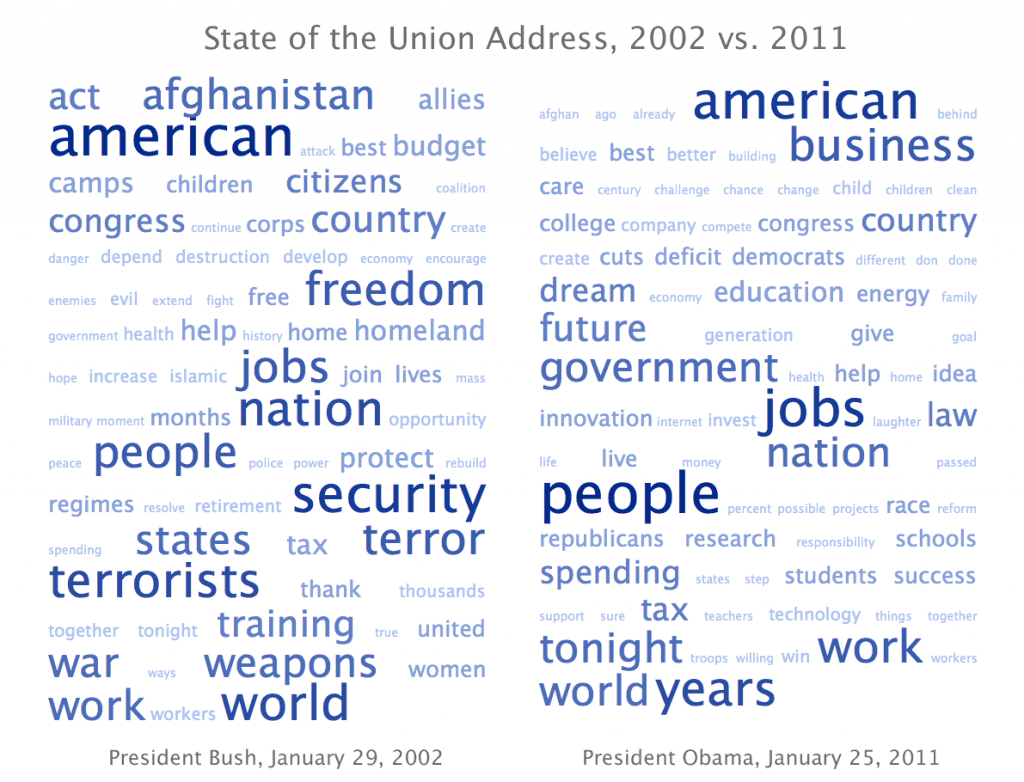
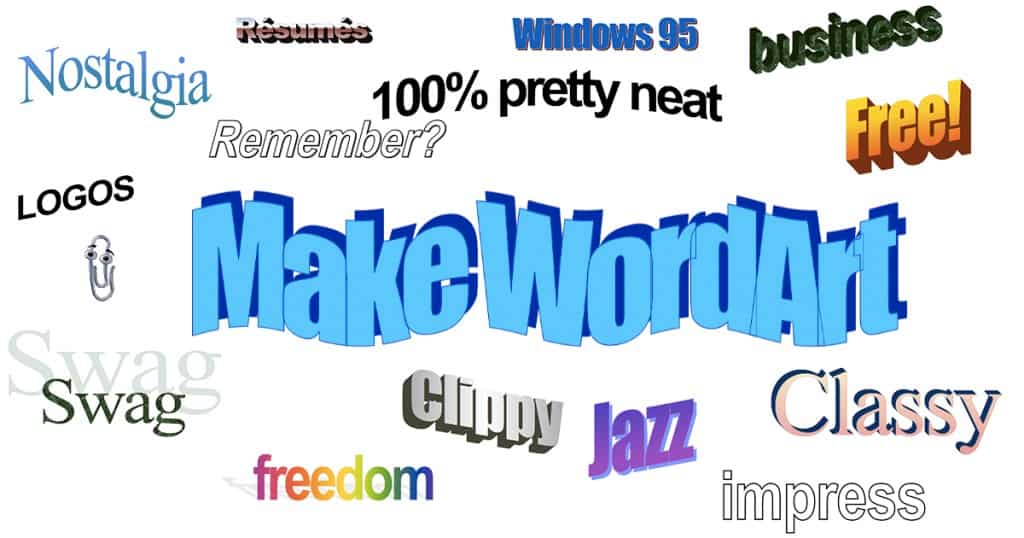
№ 7. Make WordArt.com — бесплатные генераторы Word Art
Плюсы: Еще один бесплатный генератор Word Art, который вы можете попробовать, это Сделать WordArt.com если вы знакомы со стилями Microsoft Word Art. Вы можете создавать простые объекты Word Art с редактируемыми шрифтами, цветами, позициями, размерами и фоном, чтобы печатать их на реальных вещах, таких как футболки. Он прост в использовании и не требует высокотехнологичных навыков.
Минусы: По сравнению с другими генераторами Free Word Art, перечисленными выше, он немного классический и простой и может быть не лучшим выбором для тех, кто любит модный стиль.
Выводы
Вы, наконец, определились со своими любимыми бесплатными генераторами словесных рисунков? Помните, что у каждого свои взгляды на Word Art и методы обучения. В зависимости от ваших мотивов и ресурсов вы можете выбрать лучшие бесплатные генераторы Word Art, которые помогут вам раскрыть свой потенциал и повысить производительность.
Теперь, когда вы четко определили свое восприятие различных генераторов Word Art, вы можете начать создавать свой собственный Word Art. Просто выполните несколько простых кликов, и ваш шедевр ждет вас, чтобы показать. Если вы хотите сочетать совместное изучение словарного запаса с Word Art, Генератор облаков слов AhaSlides является перспективной и выгодной платформой.
Давайте зарядимся энергией и расширим кругозор прямо сейчас с помощью удобного АгаСлайды особенности.
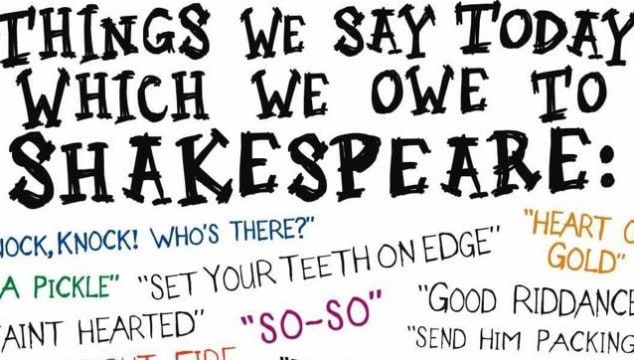
Do you use Google Docs for documents and presentations and wonder how to create Word Art/curved text in Google Docs? If you answered “yes“, then you aren’t the first. Word Art is the creative text that many professionals use for their presentation headings. You most likely want to include Word Art while creating your document to make it more visually appealing.
You can create Word Art directly in your Google Doc using the built-in Word Art feature. This tool is easy to use. Google Docs lets you change the font, color, shadow, border, angle, and more. To create curved text Word Art in a Google Doc, you’ll need to use third-party software such as Troygram and PicMonkey. This way, you’ll need to upload your Word Art/curved text to Google Docs when complete.
This art was introduced in the 90s with Microsoft Word. However, back then, it was not very advanced and creative for users. These days there are many different ways to make creative Word Art. Several different tools are available to create Word Art in Microsoft Word and other programs and then copy-paste into a Google Docs presentation.
We will touch on some of them in this guide. But first, we will look at the built-in Word Art feature that comes with Google Docs.
This is probably the easiest and fastest way to use and generate WordArt in your document because we will use the built-in feature in Google Docs. Now let’s look at how this works:
- Open a document in Google Docs.
- Tap on the “Insert” button in the top header of Google Docs.
- Hover over the “Drawing” option and click on the “New” button.
- As you click the button, a new window of a drawing tool will open, as you see in the screenshot below.
To create Word Art in the drawing popup window, you’ll have to follow the below steps:
- Click on the “Action” button on the drawing window’s left side.
- Select the option of “Word Art” from the drop-down menu.
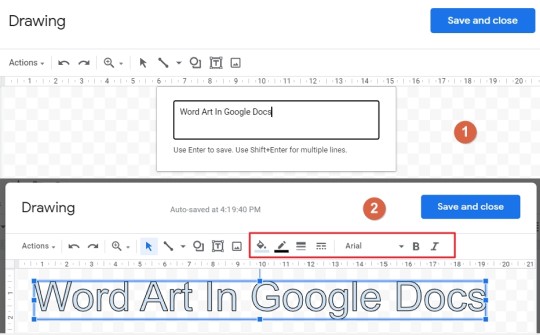
- Now selecting this option will open a text field where you have to enter the text you want in the form of Word Art.
- For example, we chose the text “Word Art In Google Docs.” To type separately in multiple lines, just hit Shift+Enter to create a text line.
- And if your text is just one line, hit “Enter” to create the Word Art in your Google document.
- As you can see below, now you have created basic Word Art that appears in your drawing window.
- We can also do several customizations for this basic Word Art. Let’s explore how that works.
How to Change Word Art in Google Docs
We can use several built-in settings to create and modify the basic Word Art. To modify it, you have to select the Word Art created. It will be highlighted in blue, and a blue box will appear around the text.
After selecting your Word Art, several customization options will appear on the top header of the drawing window, as highlighted in the above screenshot.
In these options, features like Text filling color, Border color & Weight modification are available. You can select different Border hashes and different Google fonts. You can also make the fonts Bold & Italic.
Text Color Filling
To change the color of your Word Art text, you simply need to click on the paint bucket icon, and the color palette will open. As shown below, we choose the “Red” color for the text. You can also have a gradient color for your “Word Art” of choice. Just switch over to the next tab and select the color.
You may have changed the color of the text, but you will notice that the color of the border is not changed yet. To change it, we must select the border color button on the right side of the Color Filling Button. Here we choose “Yellow” for the border.
Border Weight & Dash
Now you can also modify the weight & dashes of the border. To change that, you must select the “Dash” icon from the menu header of the drawing window. You can choose what you prefer from the several options available.
Fonts Plus Bold & Italic
As you create Word Art, Google docs will give them a default font, but the good thing is you can change it with a few clicks. Select the toggle button written Arial, and a drop-down menu containing several different Google fonts will open.

Choosing the correct font will make a massive difference for your Word Art. Here in the example, we chose the font “Lobster,” which seems fine.
Finally, you can also change the thickness, aka the boldness of your Word Art, or change it to an Italic look. After the work is done, click on the “Save and Close” button on the screen’s right side.
How to Rotate Word Art in Google Docs
It is straightforward to rotate Word Art in Google docs. The process for rotating any text or heading will be the same, whether Word Art or simple text. Since we are dealing with Word Art, we have two ways to rotate it. Follow these steps:
#1: Predefined Preset
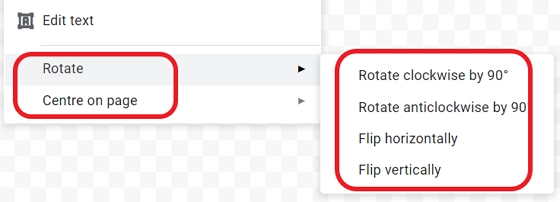
- Select the Word Art by “Clicking” on the text.
- Now, right-click and hover over the “Rotate” option from the menu.
- A new window will open with four options, which come with these pre-set properties:
- Rotate clockwise by 90 degrees.
- Rotate anticlockwise by 90 degrees.
- Flip Horizontally.
- Flip Vertically.
- The main menu will also have a “Center On Page” option. Hover over it & you will see:
- Horizontally.
- Vertically.
- These options will automatically center the Word Art on the page, and further options will do their respective jobs.
#2: Free Flow Rotation
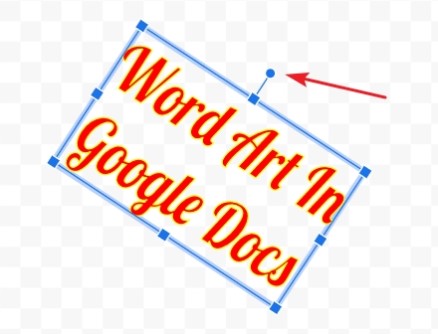
We call this method free flow rotation because, in this, you don’t have any pre-set rotations. We can rotate our Word Art in any direction we want. Follow below to do so.
- Select the Word Art by clicking it and then hold the Blue dot on the art box.
- Now rotate the textbox in any direction you want. There aren’t any limitations on the location.
Now you know the simple ways to rotate Word Art in Google Docs.
Best Way To Create Word Art/Curved Text in Google Docs
Since Google Docs does not have the built-in feature of making text curve. We will discuss a few ways and tools by which you can create Word Art/curved text in Google Docs. Then you can copy the text file into a blank Google Docs document.
#1. Troygram
Troygram is an online tool with the most simple and user-friendly interface. This tool works fast and enables users to create curved text with various Google fonts. To create the curved text, follow the steps:
- Click on the “Enter text” button to open the textbox.
- Insert your text in the textbox. For example, we entered “Word Art In Google Docs” in the textbox.
- After the insertion, click on “Select Font,” and you can choose the font size by “Moving” the slider.
- Now that you have created the curved Word Art, simply click on the second option, “Click here to download (does not work on all browsers).”
- And the file will download to your computer’s hard drive in PNG format.
Now that you saved the file in PNG format, we will upload it to Google Docs. We will show you that in the next section, but for now, let’s look at a more advanced tool.
#2. PicMonkey
PicMonkey is an advanced tool widely used by digital art form creators. You can easily create curved text and add multiple types of customization in styles and colors in just a couple of taps.
So click the link above to visit the website and follow along:
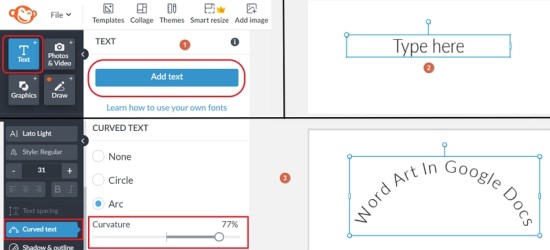
- Firstly, log in with your Google or Facebook ID. I prefer Google ID.
- Once you log into PicMonkey, it will ask you to pick a pre-made design. You can do that or create a custom design on a blank canvas.
- You can choose a (500*500)px ratio for the blank canvas. It would be sufficient.
- Now a new canvas will open. Click on the “Text” button at the window’s top-left corner to add text.
- Click on the “Add text” button in the side panel.
- It will insert a Textbox on the blank document, where you can enter your Word Art text.
- Click on the “Curved text” button, as shown in the screenshot, to create a curved effect. Select Arc from the options, which include:
- None
- Circle
- Arc
- You can adjust curvature by dragging the slider. As the percentage increases, the text will get more curved.
- Also, add style, color, and boldness to make it more creative.
- Finally, you can download this file and upload it to Google Docs.
- Remember that you must start the 7-day free trial to download the file.
How to Upload Curved Text Files in Google Docs
- Open Google Docs and create a blank document.
- Click on “Insert” on the toolbar header.
- Hover over the “Image” option.
- Click on the “Upload from computer” option.
- Locate the curved text file on your computer and upload it.
- Now you will have your curved text file in Google Docs. You can rotate and align it anywhere you want on the page.
- Done.
Conclusion
We discussed several methods to create Word Art and make it more creative. We also discussed the built-in feature of Google Docs for creating simple Word Art. Still, since Google Docs do not have an additional feature for creating curved text, we decided to go through some other third-party tools, which are great at creating curved text and some advanced styling.
We discussed TroyGram and PicMonkey, two of the most user-friendly tools, and both work online, so you don’t have to install anything on your computer. TroyGram is a simple tool that provides a feature to customize fonts and their size, but on the other hand, PicMonkey is a tool that has styling features and advanced calligraphy art.
Following this in-depth guide closely will provide you will the correct tools to create Word Art/curved text in Google Docs.
In this tutorial, we will learn How to Create and Insert Word Art in Google Docs
To create and insert word art in google docs you can use the insert and drawing option or Help and drawing option
Use the following options to create and insert Word Art in Google Docs
- With Help and Drawing option
- Open Google docs document
- Navigate to the Help Menu
- Search and Select Insert drawing
- Choose Word Art from Actions menu
- Type the word which you need and save
- With Insert and Drawing option
- Open the Google docs document
- Create a new drawing
- Choose Word art from Actions menu
- Type the required text
- Click on Save and Close
Let’s go through the above methods in detail.
Option 1 : With Help and Drawing Option
You can use this method in case you are not very familiar with using the Main menu bar in Google docs and would like to use the search functionality.
Step 1: Open Google docs document
Open your google docs document where you want to create and insert word art.
Step 2: Navigate to the Help Menu
- Click on the Help menu on the Main menu bar.
- You can also use the keyboard Shortcut Ctrl+/ which will open the help section for you.
To use the keyboard shortcut press and hold the ‘Ctrl’ key and then press the ” / ” key
Step 3: Search and Select Insert drawing
- Once you click on Help menu ,you will get a search bar .
- Type drawing in the Search area and Select insert drawing from the results ( +Insert drawing )
Select the option + Insert drawing.
Once you click on Insert drawing it will open a Drawing screen.
Step 4: Choose Word Art from Actions menu
- Once you are in the drawing screen,Click on “Actions” .
- Under Actions menu drop-down Choose Word art .
Step 5: Type the word which you need and save
- In the word art text box start typing the word which you want to create and insert.
- Once you are done with typing the word press Enter Key .
You can also change the color of the text using the fill color option.
Click on Save and Close.
Now your word art will be created and inserted in your Google doc.
OPTION 2: Using the Insert and Drawing Option
You can use this method if you are familiar with the Google docs menu option and find it easy to navigate.
Step 1: Open the Google docs document
Open your google docs document where you want to create and insert word art.
Step 2: Create a new drawing
- Click on the Insert menu on the Main menu bar
- Under Insert menu drop-down Select Drawing .
- Under Drawing select “New” with plus sign
Once you click on the + New sign a drawing screen will pop-up
Step 3: Choose Word art from Actions menu
- Click on the drop-down arrow beside the “Actions” menu on the drawing screen.
- From the drop-down Select “Word Art“
Step 4: Type the required text
- Once you click on Word art you will get a text box area where you can type text.
- Tye your desired text in the given text box and press enter key.
You can also change the color of the text using the fill color option on the menu.
On the top right corner of the Drawing screen click on “Save and Close “
After saving the required word art will be inserted in your Google doc.
You can change the font, Border color, Border dash, fill color using the Tools available on the drawing screen.
To edit the word art click on the text and select edit.
Now you will be back to the drawing screen. Click on the word to get the various editing tool.
Use the available tools to make the changes as per your requirement.
Other FAQs
How to make word art in google spreadsheet ?
Follow the below steps to insert word art in Google Spreadsheet.
- Open your Google Spreadsheet.
- Depending on the requirement either open and existing or new spreadsheet.
- Click on Insert menu on Main menu.
- Under Insert menu drop-down ,Select drawing ( Insert > Drawing)
- Now once you are on drawing screen ,Click on Actions menu
- From the Actions menu drop-down ,Select Word art
- Type your required text in the provided Text area and press Enter.
- Now press the Save and Close buttin
- Your word art will be insert in your Googlr Spreadsheet
is it possible to insert word art in google slides ?
Yes, it is possible to insert word art in Google Slides.
To insert word art in Google Slides follow the below steps.
- Choose the Google Slide where you need to insert word art.
- Click on the Insert menu on the Main menu bar
- From the Insert menu drop-down Select Word art.
- Now type your required text in the text Box and press Enter.
- Word art will be inserted in your Google Slide.
Wrapping Up
In the preceding tutorial, we have shown you two options using which you can create and insert word art in Google docs easily without much struggle.
We hope this tutorial on How to Create and Insert Word Art in Google Docs was helpful.
Related articles:
How to Sort a List Alphabetically in Google Docs
How to add Footnotes in Google Docs 2021
How to use autocorrect in Google Docs( Easy Guide 2021 )
How to create a Block Quote in Google Docs ( Quick & Easy Guide )






 menu is not the same as the Shape Effects
  menu. If you don’t see Transform at the bottom of the menu, make sure you’ve clicked the Text Effects menu.

 .
. , and then click Clear WordArt.

