
Word 2013
You can format your document in a newspaper-style column layout by adding columns. On the Page Layout tab, click Columns, then click the layout you want.
-
To apply columns to only part of your document, with your cursor, select the text that you want to format.
-
On the Page Layout tab, click Columns, then click More Columns.
-
Click Selected text from the Apply to box.
Word 2016
You can format your document in a newspaper-style column layout by adding columns. On the Layout tab, click Columns, then click the layout you want.
-
To apply columns to only part of your document, with your cursor, select the text that you want to format.
-
On the Layout tab, click Columns, then click More Columns.
-
Click Selected text from the Apply to box.
Need more help?
Want more options?
Explore subscription benefits, browse training courses, learn how to secure your device, and more.
Communities help you ask and answer questions, give feedback, and hear from experts with rich knowledge.
![]()
Download Article
A user-friendly guide to create two separate text columns on Microsoft Word
![]()
Download Article
- Using a Computer
- Using the Mobile App
- Q&A
- Tips
|
|
|
Do you want to split text into multiple columns in Microsoft Word? With the «Columns» feature, you can easily do so in a few simple steps. With the desktop version of Word, you’ll be able to create columns with selected text. On mobile, you’ll need to change the whole document layout. This wikiHow will show you how to make two or more columns in your Microsoft Word document using your Windows, Mac, iPhone, or Android device.
Things You Should Know
- On desktop, highlight the text you want to split. Click «Layout» → «Columns» → «Two.»
- On mobile, tap ••• → «Home» → «Layout» → «Columns» → «Two».
- You can only split selected text on desktop. Creating columns on mobile will change the entire document layout.
-

1
Open the Microsoft Word document you want to edit. Find the Word document you want to edit on your computer, and double-click on its icon to open it.[1]
- If you don’t have Microsoft Word on your Windows or Mac computer, you can download it or use the free web version at https://www.office.com.
- You can also add images to your document if you’re planning to create a «news column» type document.
-
2
Select all the text you want to split into columns. Click the beginning of the text you want to edit, and drag your mouse until the end of it. Selected parts will be highlighted.
- If you want to select the whole document, you can use a keyboard shortcut.
- On Mac, press Command + A.
- On Windows, press CTRL + A.
Advertisement
- If you want to select the whole document, you can use a keyboard shortcut.
-
3
Click the Layout tab at the top. This button is located above the toolbar at the top of your document.
- Depending on your version of Word, this button may also be labeled Page Layout.
-
4
Click the Columns button on the Layout toolbar. This looks like a rectangle with horizontal lines divided in two sets.
- A drop-down menu will open.
-
5
Select Two on the drop-down menu. This will split the selected text into two columns.
- Alternatively, you can select another option here, and create even more columns. You can select: One (default), Two, Three, Left, Right, or More Columns.
-
6
Change the size of your columns (optional). You can click and drag the edges of the ruler at the top of your document to change the size of your columns.
- If you don’t see the ruler, click the View tab, then click the box next to Ruler in the Show section.
- Make sure you still have your column text selected when you adjust the size.
- This is an optional adjustment. If you prefer not to change the column sizes, your columns will be equal in size by default.
- Be sure to save your Word document when you’re finished.


Advertisement
-
1
Open a document in the Microsoft Word app. This looks like a blue notebook next to a W. Microsoft Word is available for iOS in the App Store and for Android in the Google Play Store.
- Tap Blank document to open a new document or tap a file to open an existing document.
- You can’t put specific text into two columns on the mobile app. This method will adjust the entire document’s layout without needing to select text.
-
2
Tap ••• . This can be found above the keyboard, to the right.
- If you don’t see your keyboard, tap the document to bring it up.
- A new menu will open.
-
3
Tap Home. This will be to the left of the formatting window.
- A drop-down menu will open.
-
4
Tap Layout. You’ll see a list of options you can make to your page layout.
-
5
Tap Columns. This will be next to the icon of horizontal lines divided in two sets.
-
6
Tap Two. This will split the selected text into two columns.
- Alternatively, you can select another option here, and split your text into more columns. You can select: One (default), Two, Three, Left, or Right.
- Your page layout will now have two columns. When you enter text, it will fill the left column first, then continue onto the right column.


Advertisement
Add New Question
-
Question
My layout key does not have the option for columns. How do I add that?

You are probably using the web version. It doesn’t have a lot of special options. The best solution is just to get the Word app and try again.
-
Question
How to create a two columns with separate texts?
This is very simple. When typing in each column, type different things. If it tries to connect them, just start a new paragraph.
-
Question
I want to change back to a full document after the columns. Then change back to columns and so forth (Recipe title and serving size, then columns for actual recipe; then another recipe on same page.)
At the bottom of the advanced column settings, there is a dropdown box labeled «Apply to:». Set the column number and click this to select the section you want to update. The easiest option is to highlight a section and select the «selected text» option.
See more answers
Ask a Question
200 characters left
Include your email address to get a message when this question is answered.
Submit
Advertisement
Thanks for submitting a tip for review!
Advertisement
About This Article
Thanks to all authors for creating a page that has been read 384,000 times.
Is this article up to date?
In this article, we will demonstrate you 3 effective ways to create a two-column Word document where the first column text is independent of the second one.
Naturally, when we create a document in columns, the text of the first column is always linked to that of the next one on the same page. Yet, in some cases, we may need to connect it to the first column text on next page. For example, to compile a translation work in bilateral languages will need to set the source contents and targeted translation in parallel columns on one page. Besides, some people could just prefer to make notes on the column next to the body text.
Luckily, the following 3 methods will enable you to achieve that goal.
Method 1: Insert a Table
- First and foremost, click “Insert” tab.
- Then click “Table”.
- On the drop-down menu, choose a table in size of one row and two columns.

- Next, click the plus sign on the upper-left corner to select the table.
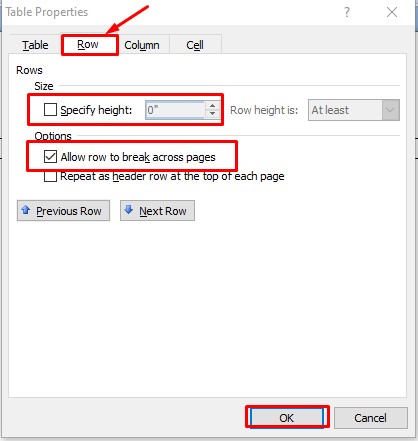
- Right click and choose “Table Properties”.

- Now click “Row” tab first.
- And ensure the “Specify height” box is cleared and the “Allow row to break across pages” box is checked.
- Then click “OK”.

- You can click and drag the line between 2 columns to adjust the column width.

- Then select the table again.
- Right click and choose “AutoFit”.
- Then choose “Fixed Column Width” on the extend menu.

- If you want no border for the table, just select it and click “Borders” under “Design” tab. Then choose “No Border”.


Method 2: Insert Linked Text Boxes
- First off, open a new document.
- Then click “Insert” and click “Blank Page” to insert a new page.

- Now go back to the first page and click “Text Box” under “Insert” tab.
- Choose “Draw Text Box”.

- Next draw 2 text boxes on the first page, with one on the left and another on the right. Here we just name them A1 and B1.
- Repeat step 2 to insert another new page that is page 3. This is to guarantee that you can always to insert a new page on a blank page without cut the link between text boxes.
- On page 2, draw 2 text boxes. Here we name them A2 and B2.
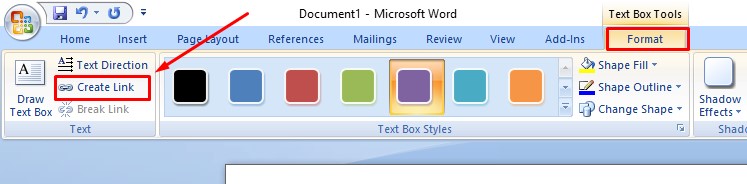
- Make sure all text boxes are empty. Now click on text box A1 and then click “Create Link” under “Format” tab.

- You shall observe that the cursor changes to a shape like teapot. Go to click on the text box you want to link. In this case, it’s text box A2. And then use the same way to link text boxes on the other side, such as B1 and B2. When the first text box is full, contents will automatically flow to the linked one.
- To remove box lines, you can right click on text box line and choose “Format Shape”. Then choose “No line” under “Line Color” and close the “Format Shape” dialog box.


Method 3: Use Text Box in a Two-column Document
For those documents which have the final contents settled, you can take method 3.
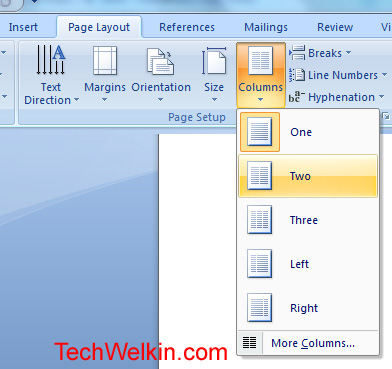
- At first, click “Page Setup” tab and then click “Columns”.
- Next choose “Two” to set the document in 2 columns.

- Now put cursor at the end of the first column on the first page and click “Insert” tab.
- Then click “Page Break”. You shall see the second column text on first page just jump to the left on the second page, leaving the right side of the first page in blank.

- Apply the same way to move the second column on second page to the left side on the third page, and so on. The aim is to keep the right side of all pages in empty.
- Then you can insert text box on the right side of each page and link them by taking steps in method 2.


Manage Long Word Documents
Due to all reasons, processing long documents is inevitable in office work. Since we know Word is susceptible to corruption, long files just increase its risk of being compromised. Thus, to back up files on a regular routine seems never more important. It allows you to turn to the latest version of data in case Word damage happens.
Author Introduction:
Vera Chen is a data recovery expert in DataNumen, Inc., which is the world leader in data recovery technologies, including corrupt Excel xls fix and pdf repair software products. For more information visit www.datanumen.com
Most books present their content as a single column on their pages. You read one page and move on to the other. Many magazines and newspapers present their content in columns. Here, you read one column to the bottom of the page, then proceed to the top of the neighboring column on the same page.
Another use of pages with columnar text is when presenting a translation. One column represents the original language, while the neighboring column carries the translation.
The difference is after reading the first column, you proceed to the first column on the next page. Likewise, the second column on one page connects to the second column on the next page.
Sometimes, it is necessary to leave a part of the page blank for others to add notes or place comments. A page with two columns helps.
Word allows making two or more columns on a page in a document. You can use three different methods for making columns in a Word document. They satisfy all the requirements above. We will show you how to make the columns by 3 mehods.
- Inserting a table
- Inserting linked text boxes
- Inserting columns
Let us start.
Method #1: Make two columns by inserting a table.
Step #1: Open a new document
Open a new Word document.
Click on the Insert tab on the top menu bar to change the ribbon.

Step #2: Insert a table
In the Tables section, click on the Table icon to open the Insert Table dialog.

Hover the mouse cursor over the second square in the Table dialog.
A table with two cells will appear on the page.
Click the second square to fix the 2×1 table on the page.

Step #3: Change table properties
Hover the mouse pointer near the top to the left side of the table.
Click on the cross icon that appears. This will select the entire table.
Right click to open a menu. Click on Table Properties.

This opens the Table Properties dialog.

In Table Properties, click on Row. This opens the Row dialog.
Under Size, click on Specify height to ensure there is no tick-mark inside the square next to it.
Under Options, click on Allow row to break across pages to ensure a tick-mark appears within the square next to it.
Click on Ok to apply the choices you made.
Step #4: Adjust column width
Hover the mouse pointer over the divider between the two columns in the table.
The cursor changes into a double arrow.
Hold the left mouse button down and drag the divider to the approximate center of the table.

Step #5: Fix the column width
Select the table. Right click to open a menu.

Click on Auto Fit. This will open three choices. Click on Fixed Column Width.
You can now enter text in the two columns.

Method #2: Make two columns by inserting linked text boxes.
Step #1: Open a new document
Open a new Word document.
Click on the Insert tab on the top menu bar to change the ribbon.

In the Pages section, click on Blank Page to insert a new page.
Return to the first page.
Step #2: Draw a text box
Under Insert, and in the Text section, click on the Text Box icon.

This will open the Built-in selection for various types of text boxes.

Click on Draw Text Box.
The cursor will change to a large cross.
Place the cross on the top left side of the page.
Keep the left mouse button pressed down and drag the cross diagonally to the middle of the page.
Word will draw a box on the page.

Step #3: Draw the second text box
Repeat Step #2 and draw a second text box next to the first.

Step #4: Insert a new page
Follow Step #1 to insert another new page. Now we have three pages with the first one containing two text boxes. This step allows you to enter new pages without cutting the link between text boxes.
Step #5: Draw two boxes on page #2
Follow Step #2 and Step #3 to draw two additional text boxes on page #2. Now we have three pages with two empty text boxes each in page #1 and in page #2.
For reference, we will name the two text boxes on page #1 as A1 and A2, and the two text boxes on page #2 as B1 and B2.

Step #6: Create link between boxes on the left side
Select text box A1 on page #1.
Click on the Format tab on the top menu bar to change the ribbon.

In the section Text, Click on Create Link. The cursor changes to resemble a coffee mug.
Place the coffee mug cursor inside text box B1 on page #2 and click. This will link text box A1 to B1.
Step #7: Create link between boxes on the right side
Follow Step #6 to create link between text boxes A2 and B2.
Now, you can enter text into the text boxes. Once A1 fills up, text will overflow into B1. Likewise, overflowing text from A2 will appear in B2.

Step #8: Remove outline from text boxes (optional)
Select a text box from which you want to remove the outline.
Right click to open some choices.

Click on Outline to open some more choices.

Click on No Outline. Click anywhere outside the text box to remove the outline.

Repeat Step #8 to remove outline from other text boxes of your choice.
Method #3: Make two columns by inserting columns
Step #1: Open a new document
Open a new Word document.
Click on the Layout tab on the top menu bar to change the ribbon.
Step #2: Create Columns
In the Page Setup section, click on Columns.

This will open the Columns selection.

Click on Two to create two columns. The horizontal scale splits to accommodate the two columns.

Now, whatever you type in the page will first fill the left column and then fill the second column. Then the text will overflow to the next page, following the same two column patterns in the previous page.
Note: Method #3 applies to existing Word documents also for changing it to columnar text.

Conclusion
Change your document to a columnar layout. Follow our step-by-step approach to make columns in your Word document.
Learn how to create two columns in Google Docs.
Typically, Word documents like books, reports, and letters have paragraphs that occupy the whole page width. In articles, newsletters, flyers, and brochures, all or only parts of the text may be arranged in two or more columns:

You don’t need to create tables to structure text into columns. Tables are useful for displaying translated versions of the legal document side-by-side, but table cells break the text flow and are not recommended for multi-column layouts. It is more convenient to use columns for text formatting in most other cases. Word also allows you to adjust your columns by adding column breaks.
Format text in columns
To format a text into columns, do the following:
1. Do one of the following:
- To use the same number of columns for an entire document, click anywhere in the document (empty or with content).
If you choose to format text in columns, Word fills the first column with text on the page and then moves to the beginning of the next column. When all columns on one page are filled, the text moves to the next page.
- To format only a part of the document, select the paragraphs that you want to wrap in columns.
If you select a part of the text and wrap it in columns, Word inserts section breaks at the beginning and end of the selected text to delineate the area where the column layout is applied:

See more about breaks and how to display them.

To manually specify where the text in each column should end, you can use a column break.
2. On the Layout tab, in the Page Setup group, click the Columns button:

3. In the Columns dropdown list, select one of the options:

- One (used by default),
- Two, Three to create two or three columns of equal width,
- Left, Right to create two columns of unequal width,
- More Columns… to specify more options in the Columns dialog box:

- In the Presets section, you can choose the same options as in the Columns dropdown list – One, Two, Three, Left, or Right.
- If you need more columns, type or select the number of columns you need in the Number of columns field. The maximum number of columns may vary depending on the font, font size, margins, etc. E.g., 13.
- The Line between checkbox inserts a vertical line between columns. This line clearly defines column borders, especially if you want to fit as much content on the page as possible (very handy for cheat sheets).
See more options below.

Format columns
I. It is recommended to justify the paragraphs in columns to give the page a clean and organized appearance. To justify the column text, select it and do one of the following:
- On the Home tab, in the Paragraph group, click the Justify button:

- Press Ctrl+J.

II. To change the width of columns or the space between them, do the following:
1. Click anywhere in the columnar text.
2. Do one of the following:
- On the Layout tab, in the Page Layout group, click the Columns button, then choose More Columns…
In the Columns dialog box, in the Width and spacing section:
In the Width box for any columns, enter or select a new width.
The Width measurements for the other columns change to match, and the width of all the columns changes.
See how the columns will be displayed in the Preview section.
- On the horizontal ruler, drag the margins to change the width of the columns:


III. To reduce white space on text lines, you can set up Word to hyphenate the text and break long words into syllables. See how to hyphenate automatically and manually for more details.
Remove columns
To remove column layout for the selected text or entire document, do the following:
1. Click anywhere in the columnar text.
2. On the Layout tab, in the Page Layout group, click the Columns button, then choose One.
Insert a column break
In the Word document, you can manually break columns. When you break a column, the text after the break moves to the top of the next column:

You can display column breaks as regular nonprintable symbols. Word displays them as ![]() .
.
To insert a column break, position the cursor at the beginning of the line you want to start in the new column, and then do any of the following:
- On the Layout tab, in the Page Setup group, click the Breaks button, and then click Column to insert a column break:

- Press Ctrl+Shift+Enter.

The column break is inserted, and the cursor moves to the beginning of the next column.
Remove a column break
To remove a column break, click at the left end of the break or select the break and press the Delete key.
Microsoft Word is the most widely used word processing software in the world. It provides a great number of features that easily fulfill our day-to-day word processing needs. Often times, we want to write text in two (or more columns) just the way they publish text in newspapers, magazines and books. Two column text is easier to read because readers’ eyes don’t have to move across the full width of the page.
Let’s learn how to create a two column page in MS Word.
SEE ALSO: My guide on MS Word tips
Obviously, you can create two columns using table but the problem with table columns is that the text will not continue to flow from one column to another. Table cells are mutually exclusive and don’t permit text to adjust across cells. This will make it difficult to adjust text in two columns.
Create a new Word document with two columns
If you have made up your mind that you want to create a document with two columns, follow these steps:
1) Open a new Word document
2) Go to Page Layout tab
3) From Page Setup section click on Columns menu to select the number of columns you require.
4) Now begin typing the way you always do. Cursor will break into a new line as per the column width. Eventually, you will come to the second column only after completely filling the first column with text. (SEE: How to create shorter columns)
Insert Columns in MS Word
Convert existing Word document into two columns
If you already have a document and you want to convert it into a two column layout, that is also possible and very easy to do.
1) Open the document in which you want to implement two column layout
2) Select the text that you want to convert into two columns
3) Go to Page Layout tab
4) From Page Setup section click on Columns menu to select the number of columns you require.
5) MS-Word will automatically adjust your selected text into the number of columns you chose.
So, this is how you can easily create two or multiple columns page layout in MS Word documents. Such a layout makes your document look more professional.
Please let me know if you have any questions about this topic. I will try to help you. Thank you for using TechWelkin!
The widely used Microsoft Word lets us to write our documents in a single column by default. But there can be occasions where you need to present your work using double columns. Newspapers, magazines, academic journals, and newsletters frequently ask writers to use two columns for better readability and an organized touch. Knowing how to Make Two Columns in Word for One Section can also make your document more accessible to information.

What is a Section in Microsoft Word
One of the neat things about Microsoft Word is that you can divide your document into subdivisions known as sections. Once you have a section, you can format it to your likings. For example, changing the number of columns in a section. Formats and styles in a section apply exclusively to that section once you apply a section break. This is one of the easiest ways to maintain several different formats in a Word document.
Methods for Creating Two Separate Columns
There are three different ways for you to create two separate columns in Microsoft Word. You can use Tables, Linked Text Boxes, and manually change the number of columns in a section. The steps here will guide you through each of the three techniques for making two columns in a Word document. If you apply these instructions point by point, you may seamlessly format any Word document.
Method 1: Using Tables
- For adding a Table, navigate to the “Insert” tab in the Microsoft Word Ribbon.
- Click on “Table” to add a table.
- Create a table with one row & two columns from the drop-down menu.

4. To select the table, select the + symbol in the edge on the upper-left of the table.
5. Select “Table Properties” from the context menu by right-clicking.

6. Then, Navigate to the “Row” tab from the “Table Properties” window.
7. Next, ensure that the “Specify height” box is unchecked and the “Allow row to break across pages” option is selected.
8. Click the “OK” option from the bottom right corner.
9. Click and drag the boundary between two columns to customize the size.

10. Select the table again using the “+” sign and right-click and hover the cursor over the “AutoFIt” option.
11. Click the “Fixed Column Width” option from the extended menu.

12. For hiding the borders of the table, select the table and navigate to the “Borders” option under the “Design” tab. Then, select “No Border”.

13. Now you can add your text in two separate columns of the table.
Method 2: Using Linked Text Boxes
- From the Microsoft Word ribbon, go to “Insert” and select “Blank Page” to add a new page.
- Change back to page one and from the “Insert” menu pick “Text Box.”
- From the options, choose “Draw Text Box”

- 4. Next, on the first page, draw two text boxes, one on the left side of the page and one on the right side. We’ll call them A1 and B1 for now.
- 5. Just as we did in step 1, insert another new page to be page 3. This step ensures that you may always add a new page to a blank page without breaking the link between text boxes.
- 6. Draw two text boxes on page 2. We’ll call them A2 and B2 in this case.
- 7. Make sure that all of the text boxes are blank. Then, under the “Format” tab, click “Create Link” in text box A1.
- 8. You’ll see that the cursor takes on the shape of a teapot. Go to the text area you wish to link and click it. It’s text box A2 in this situation. Afterward repeat the procedure with both the text boxes but on the opposite side, like B1 and B2.
- 9. You may remove box lines by right-clicking on the text box line and selecting “Format Shape.” After that, below “Line Color,” select “No line” and exit the “Format Shape” window.
- 10. Now, as you have two linked text boxes in the shape of columns, you can use them for two-column Word document pages.
Method 3: Changing the Number of Columns in a Section
Next Page: The “Next Page” option stops the current section and begins another section on the following page. This sort of section break is effective for splitting up a document into new chapters.
- Go to the “Layout” tab from the Microsoft Word Ribbon.
- From the “Breaks” drop-down menu, choose your desired section break from the “Section Breaks” option. Here’s a quick rundown of what each of them stands for.
- Next Page: The “Next Page” option stops the current section and begins another section on the following page. This sort of section break is effective for splitting up a document into new chapters.
- Continuous: It creates a section break where the cursor was and begins another section on that page. It is essential in making format changes on a page, for example, altering the number of columns.
- Even Page or Odd Page: It breaks the section and moves the upcoming section to the following even or odd-numbered page.Now that you have a new section, click on the “Columns” option.
3. Now that you have a new section, click on the “Columns” option.
4. From the presented menu, select “Two” as it will change the number of columns in that section to be two.

5. Now you have two columns in a new section inside Microsoft Word.
6. You can follow step 2 again to add another section break to stop formats from interfering among different sections.
Create Columns in Word in the Middle of a Document
Conclusion
Maintaining columns is an easy way to turn your writings more organized and polished. You can also include diagrams, illustrations, and figures in separate columns to make them more presentable. When used properly, you can make an impact on the readers with your writings. You can add any number of columns into Microsoft Word by following the steps discussed above.
Showing the content in full width of a document may quickly bore the reader. Sometimes, it is a good idea to create your document like newspaper layout with multiple columns. This is one of the easy ways to show attractive content similar to newsletters and brochures. It helps to add different types of content in a single page and highlight the actionable part. In this article, we will explain how to insert columns in Word documents and arrange text using columns. If you have a long content, then make sure to add table of contents for easy accessibility of headings.
Using Default Templates with Columns
Though creating a custom column layout is easier, it takes
time to setup the layout. However, Microsoft offers predefined column templates
that you can choose for your use.
- Launch your Word application. On the backstage view, you can see the predefined layouts to select under “Featured” section. If you do not see backstage view, navigate to “File > New” menu and look under “Featured” section. You can also search for the column layouts using the search box.

- Select the template and Word will download it from the Microsoft Office library.
- As you can see, there are lot of beautiful columned layouts for resumes, brochures and events that you can choose from and modify.

Creating
Columns in Your Documents
If you do not want to use the template and start from the
scratch, you can create your column layout. It is possible to set a whole text,
a selected area or a section into columns. Let us take an example document
having two text paragraph like below:

In order to break the two paragraphs into two columns, simply
go to “Layout” menu. Click on “Columns” dropdown and select “Two”. Word will
automatically split the two paragraphs into two columns as shown below.

Related: How to create eBook in Word?
Inserting
Manual Column Break
In the above example, you do not have to highlight the
section when you have two paragraphs. Just place the cursor in the section to
split into two columns based on the previous section break. If this does not
work for you or you want to manually decide the column break point, then follow
the below instructions.
- First click on the search box on the top menu and type
“show”. Select “Show All” option to show all formatting markups on your
document.

- Position your cursor where you want to create a column
break. - Switch to the “Layout” tab and click on the “Breaks”
list box. - Select “Columns” option to set a column break in the
selected cursor position.

- You can see the “Column Break” markup on your document
and Word will move the content below the column break to next page. - Now go to “Layout > Columns” and select “Two” to
create two columns at the column break point.

You will notice that Word continue the content from the first
column to next. The column break will make your document like a newsletter or
newspaper layout that continues from one column to next. However, you can also
manually type different content after creating columns.
Adjusting
the Column Width
By default, Word will adjust the columns to have equal width.
However, you can change the width of each column as per your need. In order to
adjust the column width, go to “Layout > Columns > More Columns” option.

You can customize the following options:
- Presets – choose one of the existing preset layout options.
- Number of columns – change the number of columns.
- Line between – enable the checkbox to insert a line between the columns.
- Equal column width – disable this checkbox and setup custom width and spacing for your columns.
- Apply to – apply the changes to whole document or only to this section.
After customizing your column layout, you can continue to
type in a columned layout.

Related: How to change embedded file name in Office?
Using
Markers in the Ruler
When you are working with columns, Word will split the
document into sections. You can view the width of the sections on the marker
available in top ruler.
Simply, double click on the ruler marker to open “Columns”
pop-up box to customize the options as explained above. Alternatively, you can
also set the width by dragging the markers in the ruler using mouse.

Undoing
Column Layout
If
you do not need the distribution into columns anymore, you can simply undo this
setting. Afterwards your text will appear in the original structure.
- In order to do so, open the “”Layout > Columns” list box and select the entry “One”.
- The formatting markups will remain intact. You can remove the column break by placing the cursor in front of the formatting symbol and remove it using the delete key.
Creating
Mixed Layout
You
can also easily create columns and full width layout sections in a single
document.
- In order to exit the column layout and go to full width section,
position your cursor at the end of the last column. - Go to “Breaks > Continuous” and apply a section break on the same
page. Now your cursor will go to next section and you can see a section break
in the formatting markup. - Go to “Columns” and select “One” to disable the columns and continue in
a full width.

Tips and Tricks
- In order to divide a section of your document into columns, select it with the mouse and create columns. When creating columns, Word defines the area automatically for individual sections.
- You can apply column break only to particular section of your document when your document has multiple sections.
- Use keyboard shortcuts, “Control + Shift + Enter” to create a column break.
- You can adjust the column width via the markers in the ruler only when you have selected “Equal column width” checkbox in the “Columns” dialogue window.
- Column changes are an important element to structure texts with multiple columns.