
Click the “Title” button in the “Styles” group under the “Home” tab on the main menu ribbon to automatically apply a title style to your title text. Click the “Subtitle” button in the “Styles” group to automatically apply the recommended subtitle style to the selected text.
Contents
- 1 How do you create a title in Word?
- 2 How do I make a fancy title in Word?
- 3 Where is the title bar in Microsoft Word?
- 4 How do I add a title to a table of contents in Word?
- 5 How do you shade text in Word?
- 6 Where is the title bar in Windows 10?
- 7 What is the title bar in Word 2016?
- 8 What does title bar look like?
- 9 How do I insert a title style in a table of contents?
- 10 How do you make titles appear in table of contents?
- 11 Do you include title page in table of contents?
- 12 How do I use dictation in Word?
- 13 Is there a note taking template in Word?
- 14 How do I get rid of widow orphan control?
- 15 Where is the widow orphan control in Word?
- 16 How do you put a box around a border in Word?
- 17 How do I add a title bar?
- 18 Which toolbar is on the title bar?
- 19 How do I change my Windows title?
- 20 What is title bar in Word document?
How do you create a title in Word?
Inserting the Document Title in Your Document
- Position the insertion point where you want the title to appear.
- Display the Insert tab of the ribbon.
- Click the Quick Parts tool in the Text group and then choose Field.
- In the Categories list, choose Document Information.
- In the Field Names list choose Title.
How do I make a fancy title in Word?
Create a title style in Word to save time and mouse clicks
- Open a blank document and type Title.
- Select Title and click the Bold and Center buttons on the Formatting toolbar or Home tab.
- Change the font to 22 points.
- Click anywhere in your title text.
Where is the title bar in Microsoft Word?
We will start with the Title bar, which is located at the very top of the screen. On the Title bar, Microsoft Word displays the name of the document you are currently using.
How do I add a title to a table of contents in Word?
(3) To add a Heading to the Table of Contents, highlight the added heading on the document, and click on the correct “Heading” button ( e.i. Heading 1, or Heading 2, etc.) at the “Styles” Section from the “Home” Tab.
How do you shade text in Word?
Apply shading to words or paragraphs
- Select the word or paragraph that you want to apply shading to.
- On the Home tab, in the Paragraph group, click the arrow next to Shading.
- Under Theme Colors, click the color that you want to use to shade your selection.
Where is the title bar in Windows 10?
The title bar is at the top of every window in Windows 10. This includes three buttons at the top right corner of the window and a title for each open window. There are a number of ways you can customize the title bar with a few extra software packages and the options included in Windows 10.
What is the title bar in Word 2016?
name of current document
Title Bar: The title bar displays the name of current document. For the first time it is document when you saved your document the will display on the title bar. C. Sign in: Here you can use most of Microsoft word functionality.
What does title bar look like?
A title bar is a small strip that extends across the top of a window. It displays the title of the window and typically includes the close, minimize, and maximize buttons. In macOS, these buttons are on the left side of the title bar, while in Windows, they are on the right.
How do I insert a title style in a table of contents?
To verify that the Title style will now be added to the Table of Contents:
- Choose the References tab.
- Click Table of Contents.
- Choose Insert Table of Contents…
- Click the Options… button.
- Scroll through the Available styles: list to make sure that the Title style now shows up and that it has the desired TOC level.
How do you make titles appear in table of contents?
To customize your existing table of contents:
- Go to References > Table of Contents.
- Select Custom table of contents.
- Use the settings to show, hide, and align page numbers, add or change the tab leader, set formats, and specify how many levels of headings to show.
Do you include title page in table of contents?
The Table of Contents should appear after the title page in the document. To create the Table of Contents manually, start a new page right after the title page.The Table of Contents should be on its own page. Do not include the introduction or a dedication on the same page as the Table of Contents.
How do I use dictation in Word?
Dictate in Word For the Web
Open a document and click the Dictate icon on the Home Ribbon and dictate your text. When finished, click the icon again to turn off Dictation. To see other languages available for dictation, click the Down arrow next to the Dictate icon and choose the language you’d like to use.
Is there a note taking template in Word?
Organize your notetaking with this notes template in Word. With place for a title and bullet points, a Microsoft Word note taking template is perfect for lectures, important meetings or teleconferences, sales pitches, and more.
How do I get rid of widow orphan control?
How to Turn the Widow Orphan Control Setting On or Off in Microsoft Word
- Open a document in Word.
- Select everything with Ctrl + A.
- Click the Home tab.
- Click the Paragraph button.
- Select the Line and Page Breaks tab.
- Click Widow/orphan control to remove the checkmark.
- Click OK.
Where is the widow orphan control in Word?
Control widow and orphan lines
On the Format menu, click Paragraph, and then click the Line and Page Breaks tab. Select the Widow/Orphan control check box.
How do you put a box around a border in Word?
Boxing text or paragraphs
Select the text you want to box in. Choose the Borders and Shading command from the bottom of the Border menu. The Borders and Shading dialog box appears. If you want to apply the border to only text (words) and not to the entire paragraph, choose Text from the Apply To drop-down list.
How do I add a title bar?
There are two ways to change title bar for your activity:
- Design time (that is, change title in AndroidManifest. xml file).
- By coding (that is, you can code to change the activity title).
Which toolbar is on the title bar?
The toolbar that is present on the left of the title bar is most frequently used commands in the application. Toolbars are mostly present in the word, office suite, web browsers and other such computing languages. Mostly, the toolbar hides the menu bar by default.
How do I change my Windows title?
Right-click on one of the selected windows commands and click Change Window Title. You can also use the Actions button to select the Change Window Title option. Set a common Window title for the selected windows that your want to change and click OK. The windows titles are changed to the new title that you’ve assigned.
What is title bar in Word document?
• Title Bar: A horizontal bar at the top of an active document. This bar displays the. name of the document and application. At the right end of the Title Bar is the Minimize, Maximize and Close buttons. •
Tables are visual displays of data arranged in rows and columns. Table cells contain numbers, text, or a combination of numbers and text. Some cells can include images, symbols, links, and other objects. See how to create and modify tables in Word.
Each table should be referenced in the document content. Typically, tables have a number and a title, which are referenced. Microsoft Word offers functionality to create automatically updated numbers for figures, tables, and equations. The numbers and titles, created using the Captions functionality, are used to cross-reference tables in a document and create a List of Tables.
The word Table and a number identify a table then follows the caption. A caption is a short block of text that explain table contents without referring to the document content:

See more about creating numbers and captions for figures: images, pictures, charts, etc., creating captions for equations, and creating captions for photographs.
Attention! We highly recommend checking the formatting requirements, accepted by your college, university, company, or established on the project, etc.
Insert a caption for tables
To add automatically updated numbers and a title (caption) for a table, select it by:
- Selecting all rows or columns of the table one by one, or
- Moving the mouse over the table until you see the table selection icons in the upper-left corner of the table and clicking it:

Note: You can also click on the table selection icon in the bottom-right corner for the same effect. See how to select table elements for more details.

After selecting a table, do one of the following:
- On the References tab, in the Captions group, click the Insert Caption button:

- Right-click on the selection and select the Insert Caption… in the popup menu:


In the Caption dialog box:

Select the label and its position
- Under Options:
- From the Label dropdown list, select the item type you need:

- Table,
- Equation – see how to create captions for equations,
- Figure (selected by default) — see how to create captions for figures,
- Another label (in this example, My Caption) was created using the New Label… button (see how to create a new label below).
Note: Remember that each type of object you labeled will be numbered sequentially within its group.
- From the Position dropdown list, select one of the options:
- Above selected item (selected by default for the Table label), or
- Below selected item (selected by default for the Figure label).
Note: The captions for tables are usually located above the tables.
- From the Label dropdown list, select the item type you need:


Exclude label from caption
- Select the Exclude label from caption check box if you don’t need to add the label to the caption:
Some requirements recommend using the lowercase word table instead of the automatically added Table in Word cross-references.
The option Exclude label from caption hides the label from being displayed in cross-references or a List of Tables.
For example:
- When you insert a cross-reference with the selected option Entire captions or Only label and number (see more details how to use cross-references in Word), Word adds the capitalized label and number, as you see in the Caption field of the Caption dialog box. E.g., “are listed in Table 3” or “are listed in Table 3 Number of articles by statuses and products”.
- All captions, created with selected option Exclude label from caption, Word adds in cross-references as their numbers without the labels. Type the word table (as required) and insert a reference to a caption (e.g., “are listed in table 3”).

Add a new label
- Click the New Label… button to create a new label:
In the New Label dialog box, type a new label name:


Note: See also how to delete a custom label.
Modify caption numbering
- Click the Numbering… button if you want to change any of the numbering options:
In the Caption Numbering dialog box:

- In the Format dropdown list, select the numbering format you need (some requirements recommend using Latin capital letters instead of numbers for tables):
- Select the Include chapter number check box to include the chapter number in the caption number. After selecting this option, two more options will be unlocked:
- From the Chapter starts with style dropdown list, select the heading level you need to include in the caption:
- In the Use separator dropdown list, select the punctuation you need to insert between the chapter number and the table number:
- At the bottom of the dialog box, see how your choices will look in the Examples section. E.g., Table 2.3” means the third table in chapter 2.
- Click the OK button.
- From the Chapter starts with style dropdown list, select the heading level you need to include in the caption:


Add a title
- To add the text of your caption, click after the table number and enter the text. E.g.:

Notes:
- There are several standard requirements for table titles:
- Chicago style recommends using the table title in line with the label and number. E.g.:

- In opposite, APA (American Psychological Association) and MLA (Modern Language Association) styles recommend using the table title with one double-spaced line below the table number (see how to adjust line spacing). E.g.:

To create such a title, don’t type any text in the Caption field, leave it, then do the following:
- Create a caption without a title.
- Position cursor after a caption number and add a new line (by pressing Shift+Enter) in which type of title you need.
Note: You can press Enter and create a new paragraph instead of a new line. See how to create a List of Tables (Table of Figures) for more details.
- Format the caption to adjust line spacing (see how to change caption line spacing).
- In addition, MLA style recommends using a hanging indent to the second line of long titles. E.g.:

- Chicago style recommends using the table title in line with the label and number. E.g.:
- Word offers very helpful functionality to create a text that can be displayed in a List of Tables instead of a caption text. See how to create a Table of Contents Entry.
- For most requirements, the number and the title should be without an ending period. If you need a period after a number, type it in the Caption field.
- If a table spans more than one page, the first page of that table should have a complete caption; the subsequent pages should have an abbreviated caption consisting of a label, a number, and the word Continued. E.g., “Table 3. Continued”.


Using an AutoCaption
See Adding captions with AutoCaption.
Group a table and its caption
According to all requirements, a table (or its part) with its caption should appear on the same page. Word adds captions for tables as a regular paragraph with selected Keep with next option. See how to keep lines and paragraphs together for more details.
See also how to keep a table row on one page and keep a table on one page of a Word document.
Edit or modify a caption
Microsoft Word adds numbers in captions as fields.
![]()
You can show all fields in a document with a gray background, see how to turn on or turn off highlighting of fields in a Word document.
- Labels:
If needed, you can change the label. Word for Microsoft 365 will update the reference if available. In this case, Word will not create a new label and a separate numbering. Be careful!
- Numbers:
DO NOT edit caption numbers! If you change a number:
- In some cases, Word will update it, and you will lose your changes,
- Otherwise, the caption number may stop updating automatically.
- Text:
To add or modify a caption text, click on it and change what you need, like in a regular paragraph.
Do not forget to format a caption according to the requirements you use!
Delete a caption and an unnecessary label
If you need to remove some caption, select the caption paragraph (full line or several lines) and press Delete. Do not forget to update fields in the document!
To remove the unnecessary label, do the following:
1. Open the Caption dialog box.
2. In the Label dropdown list, select the label you want to remove.
3. Click the Delete Label to remove a custom label:

Note: You can’t delete predefined labels: Equation, Figure, and Table.
Update caption numbering
Word automatically updates references and numbering if you insert a new text. However, copying, deleting, or moving context often leads to confusion in the document. After such operations, you have to update all dependencies manually.
To update fields in the document, select the entire document by clicking Ctrl+A, and do one of the following:
- Press F9,
- Right-click on any of the fields and select Update Field in the popup menu:


Word will update all fields. You can be sure that the numbering and references are correct.
We strongly recommend checking a document at least visually after changes!
Заголовки позволяют обратить внимание на текст и помогают пользователям искать в документе нужную информацию.
Добавлять заголовки проще всего с помощью стилей заголовка. Используя стили заголовков, вы также можете быстро создать оглавь, изменить структуру документа и изменить его структуру, не изменяя текст каждого заголовка вручную.
-
Выделите текст, который хотите использовать в качестве заголовка.
-
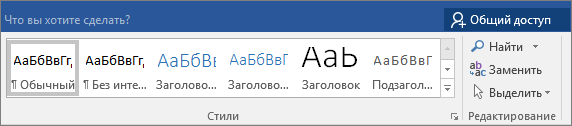
На вкладке Главная наводите указатель мыши на разные виды заголовков в коллекции стилей. Чтобы увидеть, как будет выглядеть стиль заголовка в документе, задержите на нем указатель. Выберите понравившийся вариант.

Если нужный стиль не заметок, нажмите кнопку Дополнительные
, чтобы развернуть галерею.
 , чтобы развернуть галерею.
Совет: Вы можете изменить шрифт и форматирование стиля заголовка. Просто вы можете выбрать текст заголовка, который вы хотите настроить, изменить его стили, а затем на вкладке Главная в группе Стили щелкните правой кнопкой мыши настроенный стиль заголовка и выберите обновить заголовок в соответствие с выбранным выбором. Каждый раз, когда вы применяте этот стиль заголовка в документе, он будет включать ваши настройки.
Использование стилей позволяет делать очень многое, в том числе быстро создавать оглавления. Посмотрите это короткое видео, и вы узнаете, почему стоит полностью составить текст, прежде чем форматировать с его помощью стилей.

Заголовки позволяют обратить внимание на текст и помогают пользователям искать в документе нужную информацию. Добавить заголовки проще всего с помощью стилей заголовка.
-
Выделите текст, который хотите использовать в качестве заголовка.
-
На вкладке Главная выберите нужный стиль заголовка.
Если нужного стиля нет на странице, прокрутите ее с помощью стрелок влево, вправо и вниз.
Содержание
- Создание заголовка с помощью встроенных стилей
- Заголовок 1
- Заголовок 2
- Создание собственного стиля и сохранение его в качестве шаблона
- Вопросы и ответы

Некоторые документы требуют особого оформления, и для этого в арсенале MS Word содержится довольно много средств и инструментов. В числе таковых различные шрифты, стили написания и форматирования, инструменты для выравнивания и многое другое.
Урок: Как выравнивать текст в Ворде
Как бы там ни было, но практически любой текстовый документ невозможно представить без заголовка, стиль которого, конечно же, должен отличаться от основного текста. Решение для ленивых — выделить заголовок жирным, увеличить шрифт на один-два размера и на этом остановится. Однако, есть ведь и более эффективное решение, позволяющее сделать заголовки в Word не просто заметными, а правильно оформленными, да и просто красивыми.
Урок: Как изменить шрифт в Ворде
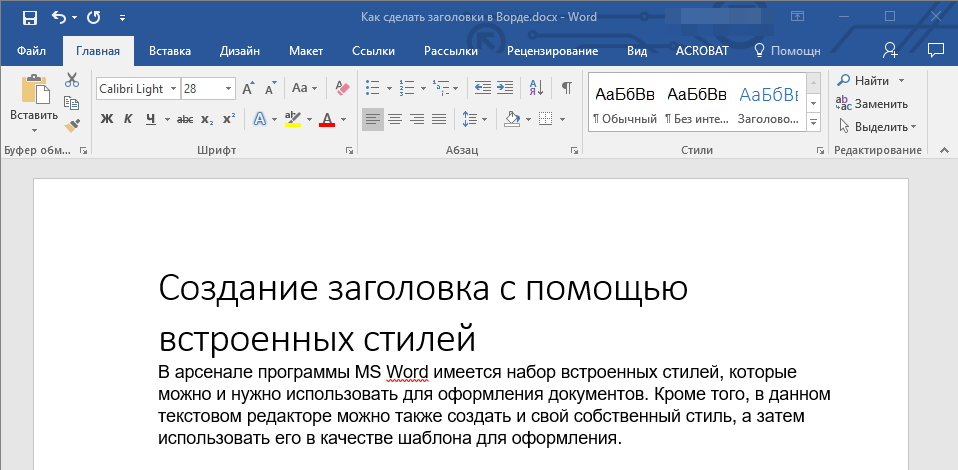
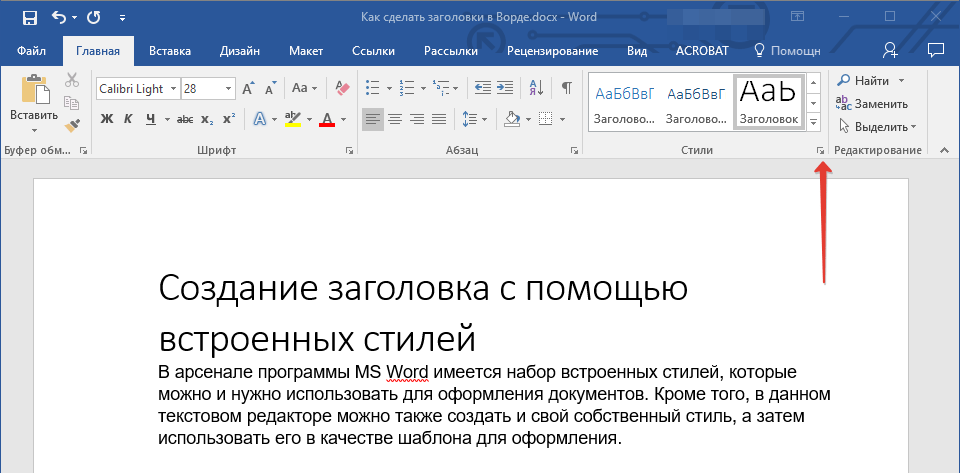
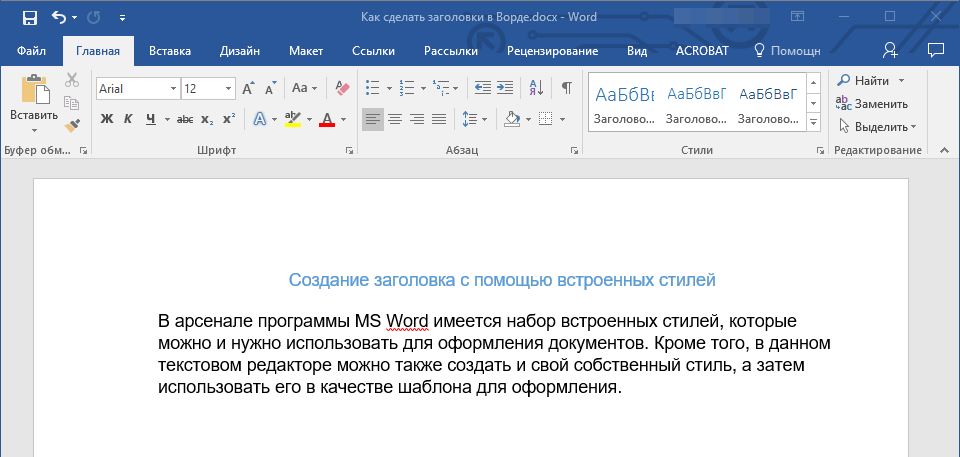
Создание заголовка с помощью встроенных стилей
В арсенале программы MS Word имеется большой набор встроенных стилей, которые можно и нужно использовать для оформления документов. Кроме того, в данном текстовом редакторе можно также создать и свой собственный стиль, а затем использовать его в качестве шаблона для оформления. Итак, чтобы сделать заголовок в Ворде, выполните следующие действия.
Урок: Как в Word сделать красную строку
1. Выделите заголовок, который необходимо оформить должным образом.

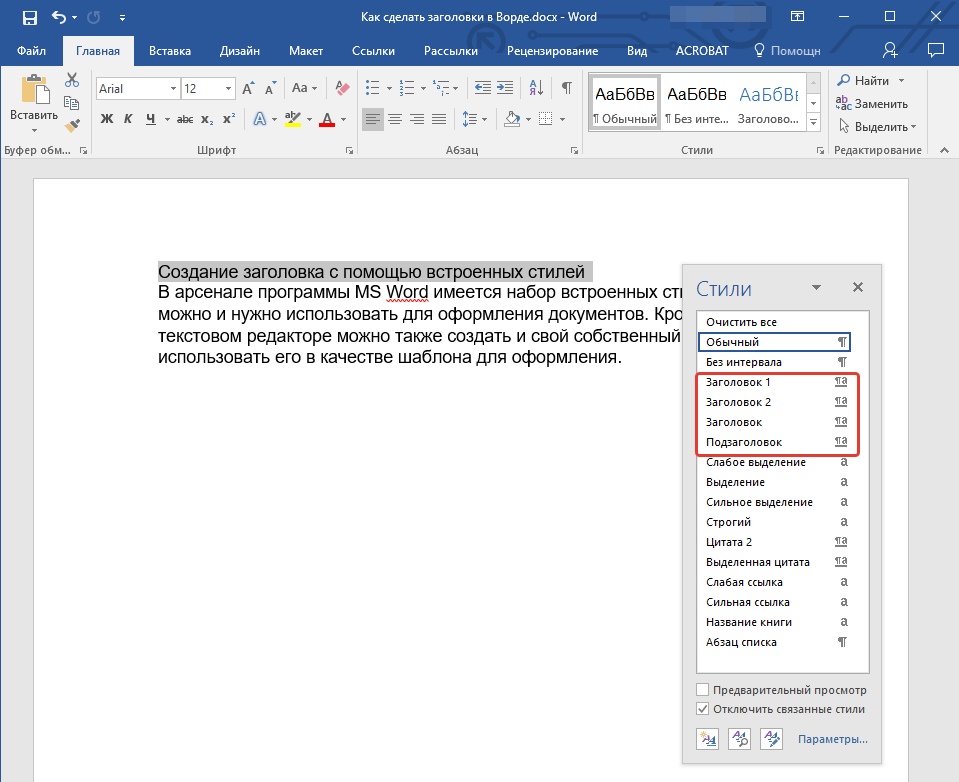
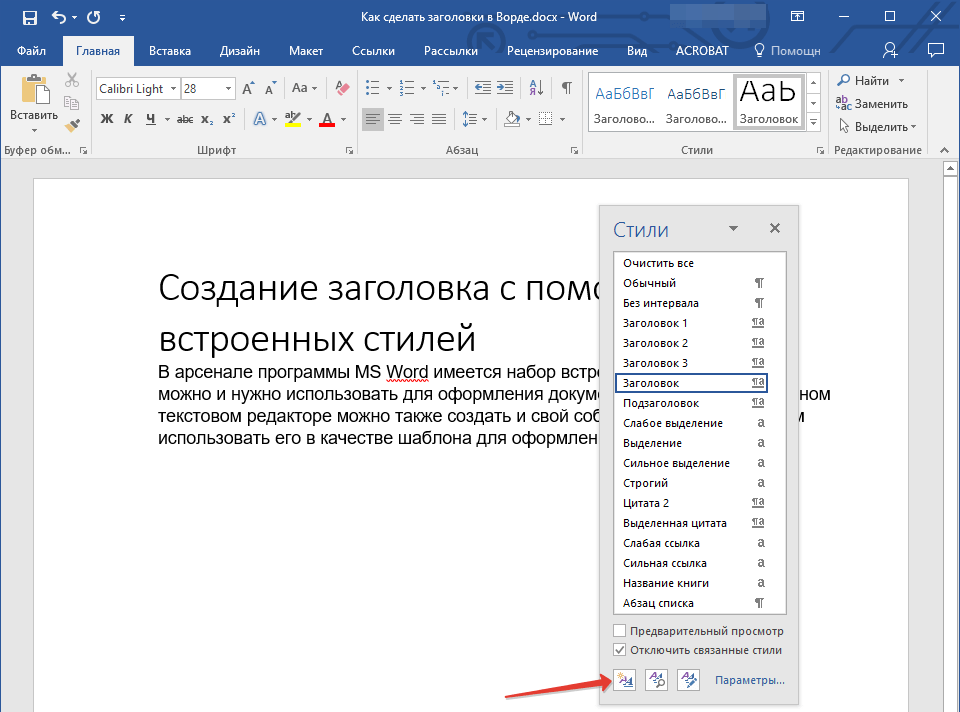
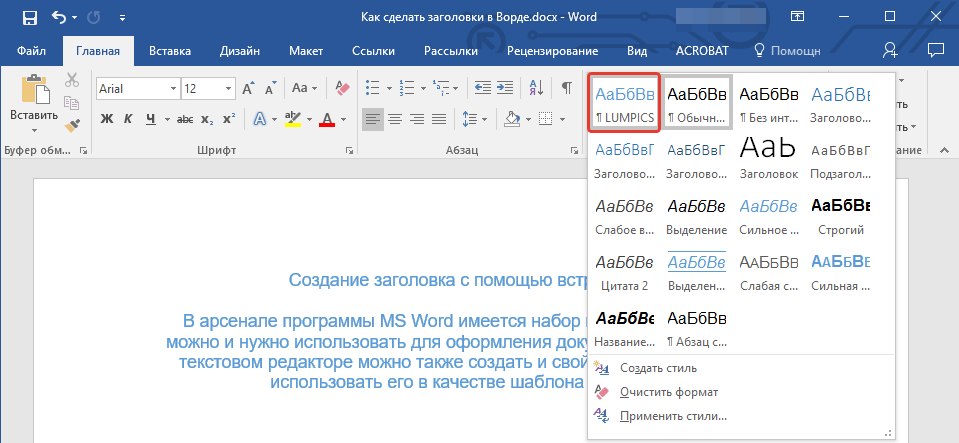
2. Во вкладке “Главная” разверните меню группы “Стили”, нажав на небольшую стрелочку, расположенную в ее правом нижнем углу.
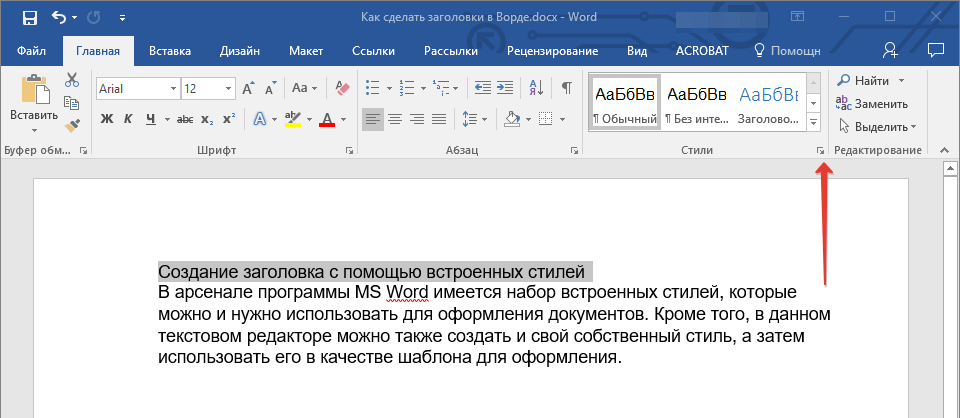
3. В окне, которое откроется перед вами, выберите необходимый тип заголовка. Закройте окно “Стили”.
Заголовок
это основной заголовок, идущий в самом начале статьи, текста;

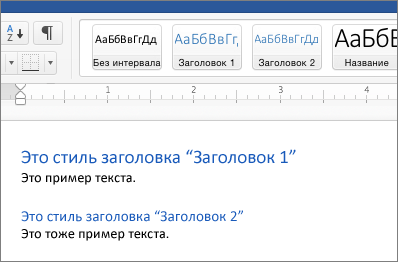
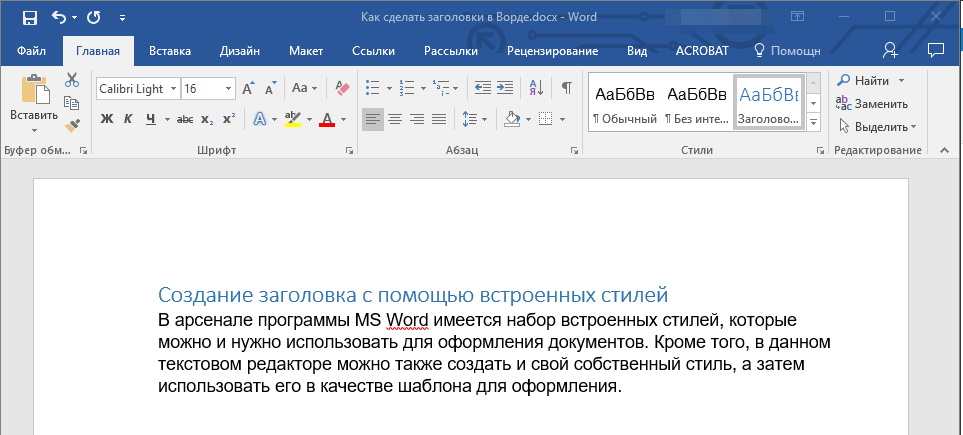
Заголовок 1
заголовок меньшего уровня;
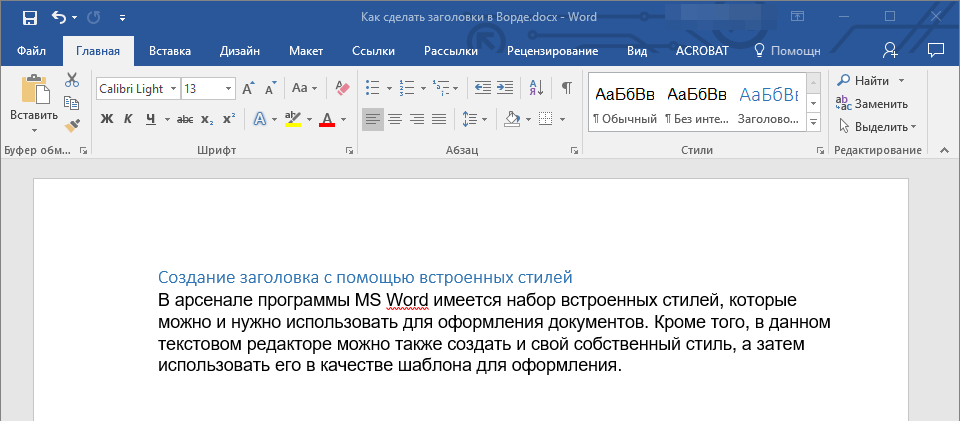
Заголовок 2
еще меньше;
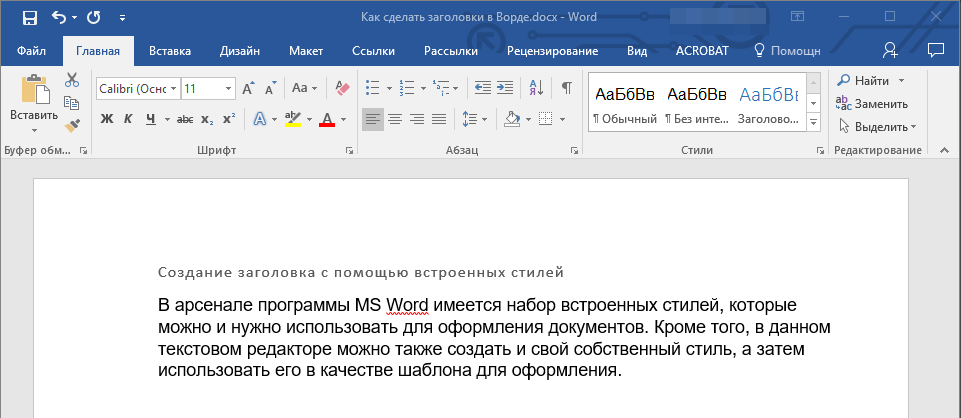
Подзаголовок
собственно, это и есть подзаголовок.
Примечание: Как можно заметить со скриншотов, стиль заголовка помимо изменения шрифта и его размера также изменяет и междустрочный интервал между заголовком и основным текстом.
Урок: Как изменить междустрочный интервал в Ворде
Важно понимать, что стили заголовков и подзаголовков в MS Word являются шаблонными, в их основе лежит шрифт Calibri, а размер шрифта зависит от уровня заголовка. При этом, если у вас текст написан другим шрифтом, другого размера, вполне может быть такое, что шаблонный заголовок меньшего (первого или второго) уровня, как и подзаголовок, будут мельче, чем основной текст.
Собственно, именно так получилось в наших примерах со стилями “Заголовок 2” и “Подзаголовок”, так как основной текст у нас написан шрифтом Arial, размер — 12.
- Совет: В зависимости от того, что вы можете себе позволить в оформление документа, измените размер шрифта заголовка в большую сторону или текста в меньшую, дабы визуально отделить одно от другого.
Создание собственного стиля и сохранение его в качестве шаблона
Как было сказано выше, помимо шаблонных стилей, вы также можете создать свой собственный стиль оформления заголовков и основного текста. Это позволяет переключаться между ними по необходимости, а также использовать любой из них в качестве стиля по умолчанию.
1. Откройте диалоговое окно группы “Стили”, расположенной во вкладке “Главная”.
2. В нижней части окна нажмите на первую кнопку слева “Создать стиль”.
3. В окне, которое перед вами появится, задайте необходимые параметры.
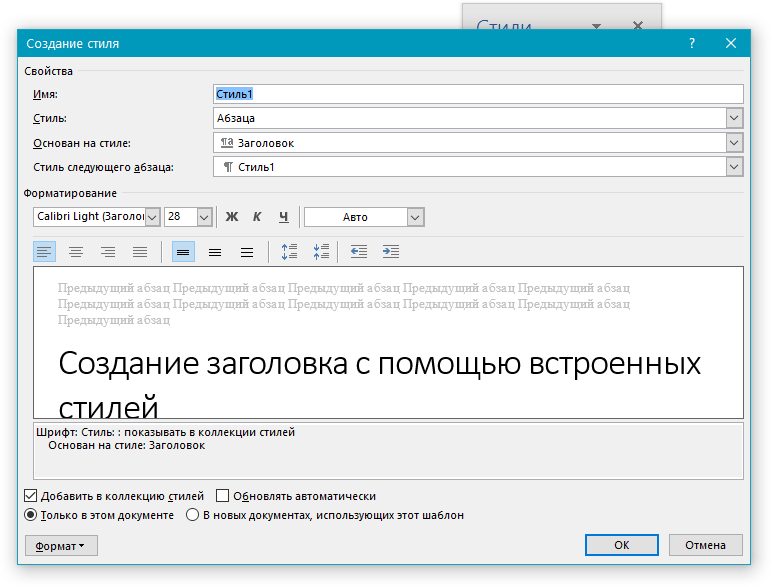
В разделе “Свойства” введите название стиля, выберите ту часть текста, для которой он будет использоваться, выберите стиль, на котором он основан, а также укажите стиль для следующего абзаца текста.
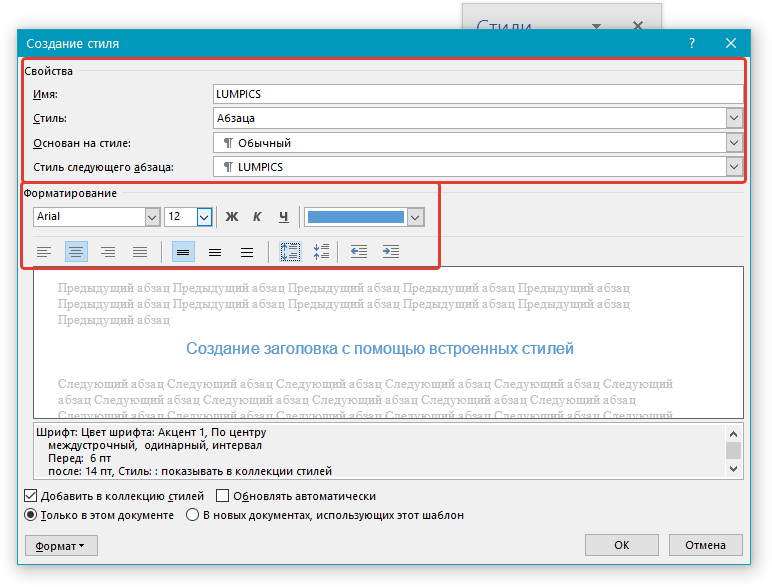
В разделе “Формат” выберите шрифт, который будет использоваться для стиля, укажите его размер, тип и цвет, положение на странице, тип выравнивания, задайте отступы и междустрочные интервалы.
- Совет: Под разделом “Форматирование” находится окно “Образец”, в котором вы можете видеть то, как будет выглядеть ваш стиль в тексте.
В нижней части окна “Создание стиля” выберите необходимый пункт:
- “Только в этом документе” — стиль будет применим и сохранен только для текущего документа;
- “В новых документах, использующих этот шаблон” — созданный вами стиль будет сохранен и станет доступен для использования в дальнейшем в других документах.
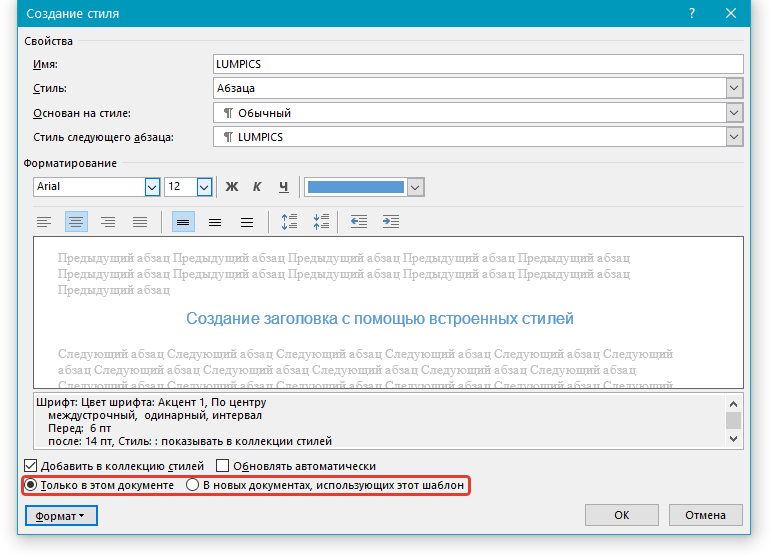
Выполнив необходимые настройки стиля, сохранив его, нажмите кнопку “ОК”, чтобы закрыть окно “Создание стиля”.
Вот простой пример стиля заголовка (хотя, скорее, подзаголовка), созданного нами:
Примечание: После того, как вы создадите и сохраните свой собственный стиль, он будет находится в группе “Стили”, которая расположена во вкладе “Главная”. Если он не будет отображаться непосредственно на панели управления программы, разверните диалоговое окно “Стили” и найдите его там по названию, которое вы придумали.
Урок: Как сделать автоматическое содержание в Ворде
На этом все, теперь вы знаете, как правильно сделать заголовок в MS Word, используя шаблонный стиль, доступный в программе. Также теперь вы знаете о том, как создать свой собственный стиль оформления текста. Желаем вам успехов в дальнейшем изучении возможностей этого текстового редактора.

UPDATED ✅ Do you want to know more about how to insert titles in Microsoft Word documents? ⭐ ENTER HERE ⭐ and learn everything FROM ZERO!
East text processor has become the main tool for most users when they have to prepare a report. And it is that here you can find a large number of tools that will help you achieve results very good at writing.
One of the most important things when carrying out a wording is the titles, since these will always be present in any text. It is because of that Word has a specific tool for them, which will allow you to use them according to your needs.
In this way, here we are going to teach you what are the main steps to insert titles in your Word documents in an easy and fast way. To do this, follow in detail everything that we will teach you in the post.
What are the main types of titles that we can insert in Word?
Microsoft Word It has different tools that will allow you add titles to your essays, this will help you create much more professional and attractive text for the reader. To insert this item into your worksheet You can do it in two ways, either using the tool “Insert” or the tool “Format”.
This means that currently there are two types of headline styles on the platform that you will be able to use, each of them It will depend on the situation in which you want to use them.
That is why here we present each of these types:
Using the Insert Title tool

The first option available is Insert, in this case you will have three types of default titles, in this case you can add numbered labels like “Equation 1”, “Illustrations 1”, “Table 1”, or you can yourself create your own label according to your needs.
This type of title is mainly used when you want to present some image, some data table or a mathematical or chemical formula and they usually go marked with a number. Is very common to read a book or report both digital and physical and see that everyone the objects added in it like images, tables, equations or any other are marked with a number which is increasing as these appear.
This means that this title type is used to carry a sequence of each of the objects that are added to the text. In case you have to remove some of them, example Illustration 4, you will be able modify the enumeration of all the others in an easy and fast way. Also, you can accompany “Illustration 4” with some extra phrase or word.
Using heading formats

The other tool that can be used to carry out the titles of the text Its the the formats found in the section on “Styles”. In this case you will find five completely different title types what are you going to be able to apply throughout your text.
In this case these formats are applied to indicate the main title of a text or chapter. That is, if your writing consists of several chapters then you can go using each one of them along the same. In this case you will get a text of a different size than the rest of the worksheet with a new style and color, this with the aim that stand out and can be grasped quickly.
Therefore, with the title formats you will be able to present your articles or chapters during writing, while with the insert tool you will be able present the different objects that are added to the text as they are pictures, equations, data tables, graphsamong others.
Steps to insert titles in Microsoft Word documents easily and quickly
Considering what they are types of titles that can be insert into word worksheet, here we are going to explain what are the main steps What do you have to do to apply each of them?
In this way, follow each of the methods that we will explain below in detail:
Insert
The first method that we present to you is about using the “Insert title”, As we explained before, this is mainly used for present some kind of object that is added to the text how is one illustration, chart, graph, equation, among others.
Therefore, follow each of these steps to be able to apply this tool to your texts:
- Once you have entered Microsoft Word You must go to the ribbon, there select the tab of “Reference”.
- Now you will find the section of “Titles”, here you must click on the icon “Insert title”.

- Then a window will appear in the middle of your screen where you will find different options, as you can see a title and below the option “Label”, which you can scroll to see the options availablein this case you can see the items of “Table”, “Equation” and “Illustration”.

- Here you must select those that you want to use, either because you are going to add an image, a mathematical or chemical formula or a data table. in case you want add a graphyou can also create your own label which you can call “Graphics” to do this you must click on “New label” and you will automatically see a mini window where you should insert the name of “Graph”.

- Once you have the label selected, in the part of Title you will be able add something extra in this case has been selected “Illustration 1” so you can write “Illustration 1 landscape in summer” This will allow you to explain a little more about what is about or signifies the image or object you are adding to the text. When you have added the corresponding text, the following will be to click on “To accept” for that element to be applied to the text.

- This way you can start add this tool in each of your texts and so have a greater order when adding any type of extra element to your drafting.

apply formatting
As we mentioned before, the other method to be able to adding titles is through the formats, in this case these are used as main title of the text or to start a chapter of the same.
Therefore, to apply this tool to your text, you must perform the following steps:
- The first thing will be to enter the Word worksheet.
- When you are there you must write title of what you are going to write.
- Once you have written it, the next thing will be to select it and go to the tab of “Start” and there to the section of “Styles”.

- there you will find the five options available to apply the title to your text, in case you want to see more options you can scroll the window clicking on the arrow located in the lower right corner. There you will see other categories like “Quotes”, “Subheadings”, “Reference”, “Paragraphs” among other.

- once you have selected your text you should apply title option that you like, here you can try each of them and so you can check which of the five is more in line with what you are looking for. To select the one that you like the most, you just have to click on the icon.

- In this way you will have the title of your essay. a form of power improve the presentation of the text and make it much more professional.

delete title
If you have created a title and you did not like it or you have written something wrongthen it will be necessary delete it from the text. This process is very simple, it is done just like when any text in the paragraph is deleted. Therefore, in this case you should only select the title you have created and press the “Delete” key this way you can delete everything you don’t like.
Software

on
August 18, 2008, 5:00 PM PDT
Create a title style in Word to save time and mouse clicks
It’s easy to define a custom style for your document titles — and it will greatly simplify the task of formatting title text. Mary Ann Richardson explains how to do it.
Are you finding that after you type and format a title or heading and press Enter, you need to manually change the paragraph text back to the Normal style? You can save a lot of time by creating a custom heading or title style that does all the work for you. Follow these steps to create a custom Title style:
- Open a blank document and type Title.
- Select Title and click the Bold and Center buttons on the Formatting toolbar or Home tab.
- Change the font to 22 points.
- Click anywhere in your title text.
- Go to View | Task Pane, click the arrow in the New Document box, and select Styles And Formatting. In Word 2007, click the Styles dialog launcher in the Styles group of the Home tab.
- Click the New Style button in the Task Pane. Figure A shows the New Styles button in Word.)
Figure A
- Click in the Name box and enter My Title.
- Select Normal from the Style For Following Paragraph drop-down list.
- If you want this style available to all documents you work with, select the Add To Template check box. In Word 2007, click the New Documents Based On This Template button (Figure B).
Figure B
- Click OK.
The My Title style should appear in your Task Pane. Now when you type your title text, click My Title in the Styles Task pane. Word automatically formats the title text for you. When you press Enter to begin typing the next paragraph, Word will automatically switch back to the Normal style. You can use the same procedure for creating custom headings that save keystrokes.
Miss a Word tip?
Check out the Microsoft Word archive and catch up on other Word tips.
Help users increase productivity by automatically signing up for TechRepublic’s free Microsoft Office Suite newsletter, featuring Word, Excel, and Access tips, delivered each Wednesday.
-
Software
This tutorial shows how to insert figure captions and table titles in Microsoft Word.
We will also look at how to create two-line table titles and figure captions that will appear as one line in the list of tables or figures.
Table of Contents
- How to Insert Figure Captions and Table Titles
- How to Create Two-Line Figure Captions and Table Titles
Watch all the steps shown here in real time!
Explore more than 200 writing-related software tutorials on my YouTube channel.
The images below are from Word for Microsoft 365. The steps also apply to Word for Microsoft 365 for Mac (a.k.a., Word for Mac), Word 2021, Word 2019, Word 2016, and Word 2013.
- (Tables only) Hover your pointer over the table and then select the handle that appears on the top, left corner to select the entire table.

- Right-click (PC) or Control-click (Mac) the table or figure and then select Insert Caption from the shortcut menu.

Alternative: Select the figure or table and then select Insert Caption from the References tab in the ribbon.

- Select Figure or Table from the Label menu in the Caption dialog box.
The Figure label is appropriate for visuals such as graphs, charts, photos, illustrations, and maps.

Important Note: Each label type maintains its own number sequence. For example, if you have a Figure 1 and then insert a table, it will be Table 1.
- Select Above selected item or Below selection item from the Position menu.

The default option for Figure is Below selected item. The default option for Table is Above selected item. These defaults will be appropriate for most situations. However, APA style places both the table title and figure title above the item.[i]
Optional Step: Change the Figure or Table Label
- Select the New Label button.

- Enter your new label in the Label text box in the New Label dialog box. (For example, you may want to change Figure to Fig.)

- Select the OK button.

Optional Step: Change Figure or Table Numbering
- Select the Numbering button (PC) or Format button (Mac) to change how your figures or tables are numbered.


- Select numerals, letters, or Roman numerals from the Format menu in the Caption Numbering dialog box.

- If you have already added heading numbers, select Include chapter number to start with the chapter or section number. (This option won’t work if you don’t have established heading numbers.)
For more information, please see “How to Add Heading Numbers to Table Titles and Figure Captions in Microsoft Word (PC & Mac).”

- Select the OK button.

- Type your caption or title after the label and number in the Caption text box.
Pro Tip: Most of our primary style guides recommend placing a period after the figure or table number. However, Word doesn’t provide a way to add that period automatically, so remember to add it manually as you type each caption.

See “How to Write Figure Captions” and “How to Write Table Titles” for information on writing captions and titles according to Chicago style (including Turabian), APA style, and MLA style.
- Select the OK button.

Your caption or title will now appear with your figure or table.

How to Create Two-Line Figure Captions and Table Titles
The following steps show how to place the label (e.g., Table 1) and the title or caption on two separate lines, but format them in such a way that they will still appear on one line in the list of tables or figures.
- Insert your figure caption or table title shown in the previous section.
- Place your cursor at the start of the title or caption and then press the Backspace key on a PC or Delete key on a Mac to remove any extra spaces between the number and the title or caption.

- Press Shift + Enter (PC) or Shift + Return (Mac) to create a soft return instead of a regular hard return.
The label and title or caption should now appear on two different lines.

However, when you create or update your list of tables or figures, it should appear on one line.

Important Note: Caption and title numbers won’t automatically update if you move or delete figures or tables in your document. Visit “How to Update Table and Figure Numbers in Microsoft Word” for information about manually updating table and figure numbers.
[i] Publication Manual of the American Psychological Association, 7th ed. (Washington, DC: American Psychological Association, 2020), 7.23–7.25.
Related Resources
How to Add Background Images to Tables in Microsoft Word (PC & Mac)
How to Add Background Images to Charts in Microsoft Word (PC & Mac)
How to Save Tables and Figures as Images in Microsoft Word (PC & Mac)
Updated March 05, 2023
Apply and Customize Headings in Word Documents
by Avantix Learning Team | Updated April 19, 2022
Applies to: Microsoft® Word® 2010, 2013, 2016, 2019, 2021 or 365 (Windows)
You can create headings in Microsoft Word documents by applying Word’s built-in heading styles (such as Heading 1 or Heading 2). After you have applied styles, you can modify them and change the font, size, color, and other formatting attributes so the entire document will update. Once you have applied heading styles, you’ll be able to navigate to the headings using the Navigation Pane and create a table of contents.
Recommended article: How to Hide Comments in Word (or Display Them)
Do you want to learn more about Microsoft Word? Check out our virtual classroom or in-person classroom Word courses >
Heading styles are very important because they create structure in your documents and are readable by screen readers or assistive technology programs used by people with vision impairments. They can also save you a lot of time formatting and reformatting documents.
In addition to creating structure, heading styles are also used to:
- Generate a table of contents
- Reformat a document using Style Sets
- Navigate using the Navigation Pane (select Navigation Pane on the View tab in the Ribbon)
- Rearrange a document using the Outline View
- Create a structured PDF (portable document format) file with heading tags
Note: Screenshots in this article are from Word 365 but are very similar in previous versions of Word.
Creating headings by applying Word heading styles
To create or designate headings, you will need to apply the built-in heading styles in order (Heading 1, Heading 2, Heading 3, and so) to paragraphs. There are 9 levels of headings available in Word.
Heading styles are technically available as paragraph and character styles, but it’s important to apply them as paragraph styles to entire paragraphs. A paragraph in Word is anything with a hard return after it (you have pressed Return or Enter).
Heading styles are affected by your theme choices (overall theme, color theme, and font theme). You can change theme options using the Design tab in the Ribbon.
To create headings by applying heading styles:
- Click in the paragraph (title or subheading) you want to designate or format as a heading.
- Click the Home tab in the Ribbon.
- Click the heading style you want in the Styles Gallery (such as Heading 1) in the Style group. You may need to click the More arrow on the bottom right of the Styles Gallery to view more styles and then click the style you want to use.
All available heading styles do not appear initially in the Styles Gallery. When you apply a heading level (such as Heading 3), an additional heading level should appear in the Gallery (such as Heading 4).
The Styles Gallery appears on the Home tab in the Ribbon and typically displays top level headings:

If you click the More arrow on the bottom right of the Styles Gallery, an expanded gallery appears:

Modifying or customizing heading styles using the Styles task pane
If you modify heading styles, every instance of the modified style will change in your document. Not only will this save time, but it will also ensure consistency. There are many ways to customize heading styles in Word. In this article, we will modify heading styles using the Styles task pane.
The Styles task pane appears with styles in the document (you can change this display by clicking Options at the bottom of the task pane):

To modify or customize a heading style:
- Click the Home tab in the Ribbon.
- Click the dialog box launcher (diagonal arrow) on the bottom right in the Styles group. You can also press Ctrl + Alt + Shift + S. The Styles task pane will appear. If the task pane is floating, double-click the title bar.
- Click in a paragraph using the style you want to modify.
- Click the arrow to the right of the heading you want to modify in the Styles task pane and then select Modify from the drop-down menu. You can also right-click the heading style in the task pane and select Modify. A dialog box appears.
- In the Modify Style dialog box, select the desired options such as font, font size, font color, alignment, and line spacing. Buttons in this dialog box are comparable to those in the Ribbon.
- If you want to change some other formatting options (such as paragraph formats), select Format at the bottom of the dialog box and select other options from the drop-down menu.
- Select Only in this document so that the style is modified in the current document only.
- Do not select Automatically Update unless you want the document styles to update when a user changes heading formatting in the document. It’s typically best to leave this option unchecked.
- Click OK or press Enter. The entire document will change unless a heading has been manually formatted (which overrides the style). You can simply reapply the style if this occurs.
The Modify Styles dialog box displays the style name, the type of style and options for modifying the style:

When you save the document, the modified styles are also saved.
Styles are the most important formatting feature in Word to automate formatting in longer documents. Heading styles also have the added benefit of creating structured documents and are integrated with several other Word features such as generated tables of contents.
This article was first published on May 15, 2021 and has been updated for clarity and content.
Subscribe to get more articles like this one
Did you find this article helpful? If you would like to receive new articles, join our email list.
More resources
How to Create a Table of Contents in Word
14+ Word Selection Shortcuts to Quickly Select Text
How to Copy Styles Between Microsoft Word Documents Using the Organizer
How to Insert Reusable Text Snippets in Word with Quick Parts (Great Timesaver)
How to Convert a PDF to Word in Microsoft Word (for Free – No Third Party Programs Needed)
Related courses
Microsoft Word: Intermediate / Advanced
Microsoft Excel: Intermediate / Advanced
Microsoft PowerPoint: Intermediate / Advanced
Microsoft Word: Long Documents Master Class
Microsoft Word: Styles, Templates and Tables of Contents
Microsoft Word: Designing Dynamic Word Documents Using Fields
VIEW MORE COURSES >
To request this page in an alternate format, contact us.
Our instructor-led courses are delivered in virtual classroom format or at our downtown Toronto location at 18 King Street East, Suite 1400, Toronto, Ontario, Canada (some in-person classroom courses may also be delivered at an alternate downtown Toronto location). Contact us at info@avantixlearning.ca if you’d like to arrange custom instructor-led virtual classroom or onsite training on a date that’s convenient for you.
Copyright 2023 Avantix® Learning
Microsoft, the Microsoft logo, Microsoft Office and related Microsoft applications and logos are registered trademarks of Microsoft Corporation in Canada, US and other countries. All other trademarks are the property of the registered owners.
Avantix Learning |18 King Street East, Suite 1400, Toronto, Ontario, Canada M5C 1C4 | Contact us at info@avantixlearning.ca