
Insert a table

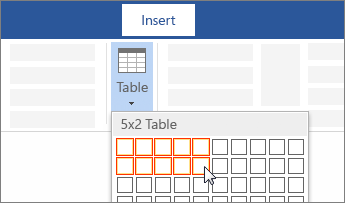
For a basic table, click Insert > Table and move the cursor over the grid until you highlight the number of columns and rows you want.
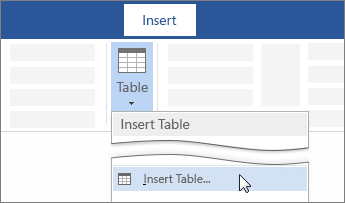
For a larger table, or to customize a table, select Insert > Table > Insert Table.
Tips:
-
If you already have text separated by tabs, you can quickly convert it to a table. Select Insert > Table, and then select Convert Text to Table.
-
To draw your own table, select Insert > Table > Draw Table.
Need more help?
Want more options?
Explore subscription benefits, browse training courses, learn how to secure your device, and more.
Communities help you ask and answer questions, give feedback, and hear from experts with rich knowledge.
-

1
Open Microsoft Word. Its icon resembles a blue background with a white «W» on top.
- If you’d rather edit an existing document, simply double-click the document in question.
-
2
Click Blank document. It’s in the top-left corner of the templates page.
- If you’re editing an existing document, skip this step.
Advertisement
-
3
Click the Insert tab. This tab is to the right of the «Home» tab in the top-left corner of the Word window.
-
4
Click Table. It’s the grid icon directly beneath the «Insert» tab.
-
5
Hover the mouse cursor over a square. You should see a drop-down menu with a series of squares below the Table button; hovering the cursor over a square will cause the pertaining table to appear in your document.
- For example, selecting a section four squares down and eight squares right will create a table with eight columns and four rows.
-
6
Click your preferred square. Doing so will create a table with your selected number of rows and columns.


Advertisement
-
1
Open Word. It’s a blue app with a blue «W» written on a white folder icon.
-
2
Tap New. You’ll see this option at the bottom-left side of the screen.
- If Word opens to a document, tap the «Back» button in the top-left corner of the screen first.
- If you’d rather load a pre-existing document, tap Open in the bottom-right corner of the screen and then tap a document’s name to open it.
-
3
Tap Blank Document. It’s in the top-left corner of the page.
- If you’re opening an existing document, skip this step.
-
4
Tap the «…» button. It’s in the middle-right section of the screen in the toolbar above the keyboard.
-
5
Tap Home. You’ll see this option on the left side of the toolbar.
-
6
Tap Insert. It’s below «Home» in the drop-down menu that appears.
-
7
Tap Table. This option is near the top of the options that are listed at the bottom of the page. Tapping it will insert a three-by-three table into your Word document.
-
8
Tap ▼. It’s on the right side of the toolbar. From here, you can format your table in a few different ways:
- Tap a cell to select it for writing.
- Tap the leftmost button in the toolbar to add a column to the left of your cursor.
- Tap the button to the right of the leftmost button to add a row below your cursor.


Advertisement
-
1
Open Word. It’s a blue app with a blue «W» written on a white folder icon.
-
2
Tap Blank document. It’s at the top of the screen.
- You can also tap a document’s name from the left side of the screen to open it.
-
3
Tap Insert. You’ll see this tab at the top of the screen, to the right of the «Home» tab.
-
4
Tap Table. It’s directly below the «File» tab in the top-left corner of the screen. A table will appear in your Word document.
-
5
Tap a cell in the table. Doing so will place a cursor in your selected cell. From here, you can add columns or rows by tapping the Insert button (below the «Insert» tab) and then tapping one of the following options:
- Insert Above — Add a row above the row in which your cursor sits.
- Insert Below — Add a row below the row in which your cursor sits.
- Insert Left — Add a column to the left of the column in which your cursor sits.
- Insert Right — Add a column to the right of the column in which your cursor sits.


Advertisement
Add New Question
-
Question
What if I created several cells, but later find I don’t need all of them? How can I make some disappear?

Right-click the cell you don’t want anymore. In the pop up menu, select «Delete» and select which cells you want to delete.
-
Question
How do I download Excel?
If you are using Windows 10, use the Microsoft Store. But if you are using Android (easier) download it on the Google Play Store. The website play.google.com has it for laptops and PCs.
-
Question
How do I increase my row line?
Go to Insert-Table on the main menu. This will open up a Table Tab with sub tabs for Design and Layout. Select Layout. Click in a row immediately above or below where you ant to add one or more rows. On the Table Layout menu, click Insert Below or Insert Above once for each row you want to add.
Ask a Question
200 characters left
Include your email address to get a message when this question is answered.
Submit
Advertisement
-
If you wish to change the cell formatting or the color of the table, select it and click Design at the top of the Word window to view formatting options.
-
You can use your table to create a custom calendar or a weekly schedule.
Thanks for submitting a tip for review!
Advertisement
About This Article
Article SummaryX
1. Open Microsoft Word.
2. Double-click Blank Document.
3. Click Insert.
4. Click Table.
5. Choose a table size/layout (rows x columns).
Did this summary help you?
Thanks to all authors for creating a page that has been read 160,140 times.
Is this article up to date?
Many documents present some data in the form of figures or tables. Creating tables is often more efficient than describing the data in the paragraph text, especially when the data is numerical or large. The tabular data presentation makes it easier to read and understand.
A table is a collection of information or data, usually represented by horizontal rows and vertical columns. Each column and each row can have a header. Some tables have only column headings or only row headings. The box at the junction of each column and row is a cell that contains data such as text, numeric information, or images. Some cells can be merged or split (see more about formatting tables). E.g.:

Microsoft Word has many features that make working with tables simple and convenient.
Create a table
There are several ways how to insert or create a table:
- Create a blank table of up to 10 columns and 8 rows,
- Create a blank table with more than 10 columns or more than 8 rows,
- Create a blank table manually (Draw a table),
- Create a table using predefined templates (Quick Tables),
- Create a table from the existing data (Convert Text to Table),
- Insert a Microsoft Excel spreadsheet.
To create a blank table in a Word document, do the following:
1. Place your cursor where you want to insert the table.
2. On the Insert tab, in the Tables group, click the Table button:

3. Do one of the following:
Create a blank table of up to 10 columns and 8 rows
- To create a table of up to 10 columns and 8 rows, move the cursor right (to select columns) and down (to select rows) the grid to select as many cells as you need. E.g., the table of 5 columns and 3 rows (selected cells will turn orange):

Click on a cell in the grid with the expected number of rows and columns (or press Enter) to insert an empty table to fit the width of the text (paragraph).
The table has the specified number of single-line text rows in the current paragraph and equal-width columns. E.g., the table of 3 rows and 5 columns:


Create a blank table with more than 10 columns or more than 8 rows
- To create a table with more than 10 columns or more than 8 rows, do one of the following:
- Create a table with exactly 10 columns or 8 rows, then add as many columns or rows as you need (see below how to customize table).
- Click the Insert Table… option:
In the Insert Table dialog box:

- In the Table size group, specify the number of columns and rows,
- In the AutoFit behavior group, specify the width of the table and its columns:
- Select the Fixed column width option to customize width in the appropriate field: select Auto (used by default) or specify width. E.g., 0.75″:

- Select the AutoFit contents option to adjust cell sizes to the document content. E.g.:

- Select the AutoFit to window option to adjust the table’s width to the document content width. E.g.:

- Select the Remember dimension for new tables check box if you want to create tables with the same options later. Word will remember your customization.


Create a blank table manually
- To manually create an empty table, click the Draw Table option:
After clicking that option, the cursor changes to the pencil
 that allows drawing cells directly in the Word document to create a table:
Click anywhere in a document but the table itself by the pencil to stop drawing a table.
Notes:
- To draw additional lines, select a table, then on the Table Layout tab, in the Draw group, click the Draw Table button:

- If you draw a line in the wrong position, click the Eraser button in the Draw group of the Table Layout tab:
- We recommend displaying the rulers or gridlines to help you place the lines correctly.
- To draw additional lines, select a table, then on the Table Layout tab, in the Draw group, click the Draw Table button:


Create a table using predefined templates
To create a table using predefined Word templates of tables and calendars, do the following:
1. Place your cursor where you want to insert the table.
2. On the Insert tab, in the Tables group, click the Table dropdown list, then select Quick Tables list:

3. From the Quick Tables gallery, select the template you prefer.
For example:

Create a table from the existing data
To create a table from the existing data in a document data (either as regular text or as a tabbed list), do the following:
1. Select the document data you want to shape into a new table.
2. On the Insert tab, in the Tables group, click the Table dropdown list, then select Convert Text to Table…:

3. In the Convert Text to Table dialog box:

- In the Table size group, specify the number of columns,
- In the AutoFit behavior group, specify whether the width of the columns should be fixed (see details above),
- In the Separate text at group, select the character that separates text into columns in the selected text: paragraph marks, commas, tabs, or some other character.
E.g.:

Insert a Microsoft Excel spreadsheet
Note: It is possible to insert a Microsoft Excel spreadsheet in a document. To do so, on the Insert tab, in the Tables group, click the Table dropdown list, then select Excel Spreadsheet:

Word opens the Excel spreadsheet where you can enter the data. You can use Excel features such as functions and formulas to create or manipulate the data. Note that it is not a Word table.
Add rows and columns
To add a row and a column to a table, do the following:
1. Position the cursor:
- to a cell in a row above or below which you need to insert a row,
- to a cell in a column left or right which you need to insert a column.
2. Do one of the following:
- Click the Insert dropdown list in the Mini toolbar:

- On the Table Layout tab, in the Rows & Columns group:

- Click the Insert Above button to insert a row above the row with the cursor,
- Click the Insert Below button to insert a row below the row with the cursor,
- Click the Insert Left button to insert a column left to the column with the cursor,
- Click the Insert Right button to insert a column right to the column with the cursor.
- Right-click and select the Insert list:


Notes:
- To insert rows or columns, move the mouse over the table or left of the table until you see the Insertion indicator, then click the icon:
 and
and
- You can choose the option Insert -> Insert Cells… from the popup menu; Word opens the Insert Cells dialog box:

After selecting the option and clicking the OK button, Word adds an entire row or column, not a cell. Word just moves cells according to the selection.
 and
and 

Delete a table element
To delete a table element, do the following:
1. Select the cell, multiple cells, the entire column or multiple columns, the entire row, or multiple rows.
2. Do one of the following:
- Click the Delete dropdown list in the Mini toolbar:

- On the Table Layout tab, in the Rows & Columns group, click the Delete dropdown list, then select one of the options:


3. Select one of the proposed options:
- Delete Cells… opens the Delete Cells dialog box, in which select the option you need:
- Delete Columns
- Delete Rows
- Delete Table

Note: You can select the element you want to delete, right-click on the selection and select the appropriate item in the popup menu. For example, if the entire table is selected or the column is selected:
 and
and

Convert a table into text
To convert a table into text in Word, follow the next steps:
1. Click anywhere in the table.
2. On the Layout tab, in the Format group, click the Convert to Text button:

3. In the Convert Table to Text dialog box, select the charter to separate cells data in the text:

4. Click OK.
Tables in Word are useful in so many situations. In this post you’ll discover how to create tables, then manipulate and design them in the quickest and easiest way to provide that visual punch.
Clickable Table of Contents
Enhance your Word tables with these advanced features
1. What are tables in Word good for?
Tables are useful for 2 distinct reasons.
- To show an actual table of data, or
- To organise and postion text, images and other elements on the page.
Many years ago, typewriters ruled the world. And a feature of a good typewriter was the tab stop, which was a device that essentially let you control indentation.
Over the years many people have continued to use tabs to indent text, because of its convenience, but they are hard work to set up properly.
Tables provide a much easier way to organise content on a page.
1. Select the Insert tab.
2. Click the Tables icon in the Tables group.
3. Move your mouse pointer into the table grid until the required number of rows and columns are highlighted orange, then left-click.

An empty table is inserted into the document.
Two new tabs, Design and Layout are also added to the ribbon area, under the banner of Table Tools.


3. MOVING AROUND A Word TABLE
- While the table is empty, you can use the cursor keys to move around the cells. However, when the cells contain information, using the cursor keys will move through the cell content first before moving to the next cell
- You can left-click in any cell to position the cursor.
- Press Tab to move to the next cell. The cursor will move across and then down the table.
- Press Shift + Tab to move to the previous cell.

NB. Using Tab is better than using the cursors as it will move to the next/previous cell regardless of whether there is information in the cells.
NB2. If you press Tab while you are in the last cell, a new row will be added to the bottom of your table
4. SELECTING A CELL, ROW, COLUMN OR THE ENTIRE TABLE
To select a cell:
1. Position the mouse pointer inside the cell on the bottom-left corner of the cell.
The pointer will change shape to a solid black arrow that points up and right.
2. Left-click.

To select a row of a table:
1. Position the mouse pointer in the left margin in line with the row you want to select.
The mouse pointer will change to a white arrow that points up and right.
2. Left-click.

To select a column
1. Position the mouse pointer so that it rests on the top border of the table, above the column you want to select.
The mouse pointer will change to a solid black arrow pointing down.
2. Left-click.

To select the entire table:
1. Position your mouse pointer over the 4-headed arrow icon situated at the top-left of the table.
2. Left-click.

5. INSERTING AN EXTRA ROW OR COLUMN
To insert an extra row:
1. Position the cursor in a cell.
2. Select the Layout tab, under the Table Tools banner.
3. Click Insert Above or Insert Below in the Rows and Columns group

Here is a quick way to insert new rows:
1. Position the cursor to the left of the table, but in close proximity.
2. A plus symbol will appear above or below the mouse pointer indicating where the new row will be added.

3. Nudge the mouse pointer up or down to move the plus sign above or below.
4. Left-click to insert the new row,
To insert an extra column:
1. Position the cursor in a cell.
2. Select the Layout tab, under the Table Tools banner.
3. Click Insert Left or Insert Right in the Rows and Columns group

Here is a quick way to insert a new column:
1. Position the cursor above a column, but in close proximity to the table.
2. A plus symbol will appear to the left or right of the mouse pointer indicating where the new column will be added.
3. Nudge the mouse pointer left or right to move the plus sign to the left or the right of the column.
4. Left-click to insert the new column,

6. DELETING A ROW OR COLUMN
To delete the current row or column:
1. Position the cursor in any cell of the row you want to delete.
2. Select the Layout tab, under the Table Tools banner.
3. Click the Delete icon in the Rows and Columns group.

4. Choose Delete Row or Delete Column from the drop-down menu.
7. Quickly fORMATTING tables in Word
Word provides you with a number of pre-set table designs. This means that it formats the headings and the data, applies a variety of borders and colours the cells in a way that makes it look like a professionally produced table. As a beginner this simple technique will give you a good-looking table.
1. Position the cursor in any cell in the table.
2. Select the Design tab under the Table Tools banner.
The Table Styles group lists a number of table designs. To get the full list, click the More button beneath the table styles scroll bar
The default table style is Table Grid in the Plain Tables category which adds simple gridlines but no shading to your table.
Live Preview allows you to hover over a design and see it applied to your table. If you like what you see, click to select the table design.

In the Table Style Options group of the Design tab, tick the components that you have in your table. For example, if your table has column headings, tick Header Row. In doing this, the various parts of your table are formatted accordingly

Header Row
This will emphasise the header row by making the text bold or applying a different cell colour (depending on the table style selected.
Total Row
This will emphasise the bottom table row by making the text bold or applying a different cell colour (depending on the table style selected.
First Column
This will emphasise the first column (for labels etc.) by making the text bold or applying a different cell colour (depending on the table style selected.
Last Column
This will emphasise the last column (for row totals etc.) by making the text bold or applying a different cell colour (depending on the table style selected.
Banded Rows
This will make odd rows one colour and even rows a different colour. This helps readability.
Banded Columns
This will make odd columns one colour and even columns a different colour. This helps readability.
8. SETTING THE BORDERS AND SHADING
The Table Styles Gallery allows you to completely format a table with one click. Whereas you used to need some nous, anybody can now create a professional looking design.
However, you will often still need to apply your own border and shading, and manually change a table design. With a little effort can add a lot of flavour to your page and dramatically enhance the overall appearance of the document.
To set the borders for tables in Word:
1. Select the portion of the table that you wish to set the borders for. This may be the entire table, a row or rows, a column or columns or a selection of cells.
2. Select the Design tab under the Table Tools banner.
3. Select the Borders icon. A drop-down list appears. This list shows every combination of border that can be turned on or off. The icons with a shaded background are currently switched on. The rest are switched off.
4. Click any icon to switch the border on or off. The border style that is applied is the default style (½ pt solid black line ) or the last style that was used.

5. To apply customised borders, with different colours, styles and widths, click the Borders & Shading option at the bottom of the list to display the Borders and Shading dialog box.


Your selection will always have an outer border, and if you selected more than one cell, you will have some inside borders as well. The easiest way to use the dialog box is to start on the bottom-middle and work your way up and right.
1. Select the colour and width (thickness) that you would like for your border.

2. Choose a style (e.g. dotted, dashed, double, solid etc.)

3. Paint your borders. There are two ways to do this.
- The first way is to click directly on a border in the Preview itself.
- The second way is to click the appropriate icon around the edge of the Preview section that represents each border. Depending on which cells you selected in your table, some of these icons may not be available.

On the left-hand side of the dialog box, there are some pre-defined border combinations which you can use to save yourself some time. Depending on your selection of cells, the pre-defined options may differ. Here’s a run-down:

To shade the cells of tables in Word:
1. Select the portion of the table that you wish to shade. This may be the entire table, a row or rows, a column or columns or a selection of cells.
2. Select the Design tab under the Table Tools banner.
3. Click the Shading icon.
The colours that you see displayed match the current them of the document. Themes were discussed earlier in the course.
4. Click a colour in the palette.
While you can pick any colour, it is recommended to stick with the light colour shades, otherwise your tables will appear very loud and ugly, like they’re shouting in your face. Subtle is the order of the day. The exception to this is column headings or other cells that you wish to differentiate. Under these circumstances, you can use a dark colour, but use a light font with it.

If you cannot find the exact colour you need,
- Click the More Colours link underneath the palette. This displays a larger, more accurate colour palette.
- And if that’s not enough, click the Custom tab and you’ll get a really fine selection of colours (you can even enter your own RGB settings if you know them)

9. REPEATING table HEADINGS ON EVERY PAGE WHEN PRINTING
When you have large tables that occupy two or more pages, many people insert manual page breaks, then copy and paste their table header rows at the top of each page.
When rows are added or removed from tables in Word, the table headers end up half way down the page.
There is a simple tool that will eliminate this problem
1. Ensure that the table is a single table, with no manual page breaks in the middle, and one header at the top. The table header may occupy more than one row, it doesn’t affect the way this feature works.
2. Position the cursor somewhere in the top row of the table.
3. Select the Layout tab under the Table Tools banner.
4. Click the Repeat Header Rows icon ion the Data group.

Now, it doesn’t matter how many rows tables in Word contain, if the table ever spills across into another page, the header row (which normally displays the column headings) will always appear at the top of the table.
10. All the key points again
- Tables in Word serve 2 distinct purpose: to display a table of data and to organise and position items on the page
- To create table, select 2 tabs — Design and Layout under the Table Tools banner.
- There are 2 tabs — Design and Layout under the Table Tools banner.
- You can press the TAB key to move direct to the next cell and SHIFT and TAB together to move backwards through a table.
- The four elements of a table are cells, rows, columns and the whole table. Each can be selected.
- Rows can be inserted by selecting the Layout tab under Table Tools, then clicking the Insert Above or Insert Below icons. Alternatively, hover to the left of a row and click the plus symbol that appears above or below the mouse pointer.
- Columns can be inserted by selecting the Layout tab under Table Tools, then clicking the Insert
Left or Insert Right icons. Alternatively, hover above a table column and click the plus symbol that appears to the left or right of the mouse pointer. - Columns and rows and be removed from the table, by positioning the cursor in the row or column to be removed, then clicking the Delete icon on the Layout tab of Table Tools and choosing Delete
Row or Delete Column. - Tables can be formatted using the Table Style gallery or by manually setting the shading and borders manually. Both sets of tools are found on the Design ribbon of the Table Tools.
- When using the Microsoft Table Styles, you can control the behaviour of the formatting by setting the Table Style options – 6 tick boxes that define the structure of your table.
- For long tables that spill across onto subsequent pages, the top row, which normally contains the column headings can be set to repeat automatically. So there is no excuse for cutting and pasting headings midway through your table or taping pages together to make sense of the table!
I hope you found plenty of value in this post. I’d love to hear your biggest takeaway in the comments below together with any questions you may have.
Have a fantastic day.


About the author
Jason Morrell
Jason loves to simplify the hard stuff, cut the fluff and share what actually works. Things that make a difference. Things that slash hours from your daily work tasks. He runs a software training business in Queensland, Australia, lives on the Gold Coast with his wife and 4 kids and often talks about himself in the third person!
SHARE
Are you struggling to get your message across? When your Microsoft Word project contains information, try presenting it in the form of a Word table. Learn how to make tables in Word quickly with a template.


A table is a kind of chart that organizes and presents data in rows and columns. It makes information easier to grasp, understand, and analyze at a glance, compared to explaining the same data through plain text.
Microsoft Word gives you various ways to insert or create a table. And you’ve got granular control over the formatting, layout, and appearance of Microsoft Word tables. Table charts are useful in different types of Word projects, whether for personal, educational, or business use.
This article will show you how to make a table in Word using a template. Then edit and format it to change its appearance.
(Note: The screenshots and instructions that follow are made using Microsoft Word for Mac version 16.4. If you’re using a different version of Word, then the interface and steps may be different.)
How to Make & Edit MS Word Tables (Video)
In this video, you’ll learn how to quickly make tables in Mircosoft Word. Find out how to start with a premium template. Quickly customize it to make an attractive, professional MS Word table you can use and reuse.
To learn even more about MS Word tables and about templates than can be used for tables, study the step-by-step tutorial below:
How to Make Basic Tables in Word
Let’s start by learning how to make a basic table in Microsoft Word:
1. Insert a Table
You can create a basic Microsoft Word table in one of two ways:
Method 1. The Insert Tab
Click on the Insert tab, then click the Table button on the ribbon.


The Insert Table panel appears. Drag the cursor over the squares to specify the number of columns and rows you want to create. Click to apply.


Method 2. The Insert Menu
Go to Insert > Table….


The Insert Table panel opens. Specify the number of columns and rows you need. (You can always add or remove columns and rows later.)


Also select the Autofit Behavior you want the table to have. You’ve got several options:
- Initial column width. The default setting is Auto, which divides the entire width of your page window across the number of columns in the table. Or, you can specify a different column width.
- AutoFit to contents. Resizes the column width based on the width of the content inside the column.
- AutoFit to window. Distributes the columns equally across the entire width of the page window.
- Set as default for new tables. Check this option if you want the settings to be applied globally to all new tables you create.
When you’re happy with the options you’ve selected, click OK.


2. Draw a Table
Or, you can draw a table in MS Word. This is a useful feature if you want to create an irregular or more complicated table with columns and/or rows of varying widths.
To draw a table, click Insert > Table > Draw Table.


With your mouse or trackpad, click and drag the cursor to start drawing your table. You can begin by drawing the outermost boundary of the table first.


Then, click and drag the cursor to create columns and rows inside the table. When you’re done, click anywhere outside the table.


Here’s an example of an “irregular” table you can draw using this feature.


If you make a mistake, click Layout > Eraser to erase a line from the table.


Click and drag the eraser along the line you wish to erase. The line that’ll be erased appears as a thick, red line. Release the mouse or trackpad to erase.


Click outside the table when you’re done.
3. Convert Text to Tables and Vice Versa
Another way to create a table is by converting text into a table. This means you can take non-tabular data from a CSV or plain TXT file and convert them into a table.
First, copy and paste the non-tabular data into your Word document.


With the text selected, go to Insert > Table > Convert Text to Table….


The Convert Text to Table panel opens. Specify the settings you wish to use. Click OK.


The text is then converted into a table.


You can also do the opposite, which is to convert a table into text.
Select the cells or entire table you want to convert. Next, click on the Layout tab then click the Convert Table to Text icon.


The Convert Table to Text panel opens. This is where you’ll decide how you want to separate text that’s currently in different columns. When you’ve made a selection, click OK.


For this example, I chose to separate text with commas. This is what the converted table looks like.


4. Advanced: How to Insert a Table from Excel
If you’ve already created a table in Excel, you can embed it into your Word document.
Open the Excel file. Click and drag the mouse to select the table.


Go back to your Word document. Go to Edit > Paste Special ….


In the Paste Special panel, select Microsoft Excel Binary Worksheet Object, then click OK.


This embeds the Excel table into Word. It’s still an Excel table, which means you can’t edit or format the table in MS Word. You’ve got to do so in Excel.


Double-click anywhere in the table to launch the source file in Excel. When you make any changes to the table in Excel, the table embedded in your Word project automatically updates to reflect those changes.
Now you know how to make a table in MS Word using various options.
How to Edit Tables
At any time after creating your table, you can edit and customize it to look the way you want it to. Here are some steps for editing tables in Microsoft Word:
1. Add a Column or Row
To add a row or column, click inside a table cell. Right-click on the mouse, then click Insert.


Select one of the following:
- Columns to the Left. Adds a column to the left of the current column
- Columns to the Right. Adds a column to the right of the current column
- Rows Above. Adds a row above the current row
- Rows Below. Adds a row below the current row
- Cells … Inserts a cell and shifts the rest of the cells either to the right or down from where the cursor is
- Table … Inserts a table inside the current cell
Or, with the cursor in one of the cells, you can click on the Layout tab.


Then choose of the following buttons on the ribbon:
- Insert Above. Inserts a row above the current cell
- Insert Below. Inserts a row below the current cell
- Insert Columns to the Left. Inserts a column to the left of the current cell
- Insert Columns to the Right. Inserts a column to the right of the current cell
Finally, you can add a new row when you’ve reached the last cell in the last row of your table. Simply press tab and a new row appears.
2. Delete a Column or Row
To delete a cell, column, row, or table, click on the Layout tab > Delete.


Select one of the options that appear:
- Delete Cells …
- Delete Columns
- Delete Rows
- Delete Table
You can use the same steps to edit a table you’ve drawn. Or, you can use the Layout tab to add or delete rows and columns.


Merge Cells
Sometimes you may want to merge cells to present information more clearly. To merge cells, click and drag the cursor to select the cells you wish to merge.


On the Layout tab, click on the Merge Cells button.


Or, after selecting the cells to be merged, right-click on your mouse, then click Merge Cells.


Now the cells have been merged into one.


Split Cells
After merging cells, you can always split them again into separate cells.
Place the cursor in the merged cell, then click Layout > Split Cells.


Or, right-click on your mouse, then click Split Cells….


Either way, the Split Cells panel pops up. Specify the number of columns and rows you want to split the cell into. Click OK.


Split Table
You may decide that it makes more sense to split up a table into two separate tables. Microsoft Word lets you do that easily, too.
In this example, I want to split the table right above the Accessories cell. And so, I’ll place the cursor in that cell. Next, click on the Layout tab, then click the Split Table button.


Now, we’ve got two separate tables.


Table Formatting
When you first create a table, it looks plain and boring. But Microsoft Word has many features so you can format tables to look exactly the way you want them. Here are some common ways to format tables:
1. Table Styles
The easiest way to format a table is by using one of the pre-formatted table styles. Put the cursor in any cell in the table. Click on the Table Design tab. Next, click on the arrow to expand the Table Styles group.


Click on a style you want to use and it’s applied immediately.


You can change any style you’ve selected. Again, click on Table Design, expand the Table Style group, then click Modify Style.


The Modify Style panel opens. Make the selections you want, then click OK.


2. Use Your Own Formatting
The Table Design tab gives you control over the appearance of every aspect of your table. Click on the Table Design tab and any of the appropriate buttons on the ribbon.


Resize a Table
You can also resize your table. Click on any cell to select the table, then click and drag one of the corners to resize it.


Or, you can use the Layout tab to resize individual cells, specific rows or columns, or the entire table. Select the columns or rows you wish to resize. Specify the height and/or width you wish to apply.


You can also adjust column width by hand by using the Table Ruler. Click inside a column you want to change. Then, drag the sliders in the Table Ruler to set to desired width.


Text Wrapping
If you want text to flow around the table, you can do so by changing its text wrapping.
Click in any cell to select the table. Click Table > Table Properties….


In the Table Properties panel and under Text Wrapping, click Around > OK.


Now the text flows around the table.


Take note that the Table Properties panel allows you to format other qualities of the table, including:
- Size
- Alignment
- Positioning
- Borders and Shading
On the other tabs, you can change:
- Column, Row, and Cell Size
- Allow row to break across pages
- Repeat as header row at the top of each page
- Cell Vertical Alignment
- Alt Text (Title and Description) — more information about the table, to help people with vision or cognitive impairment who may not see the table
Find Great Styles for Microsoft Word
You don’t have to start from scratch to create an impressive and effective Word document — even if you don’t have design skills. You can find great styles by using a template for Word.


One great source for great Microsoft Word templates and professional graphics is Envato Elements. For one low monthly subscription, you get unlimited downloads of templates, graphics, fonts, and other creative tools you need for your project. It’s a terrific option if you create plenty of materials.
For single projects, GraphicRiver is an outstanding source for templates for Word. This marketplace gives you access to thousands of creative elements on a pay-per-use basis.
Learn More
Microsoft Word has many robust features to help you realize the vision you’ve got for your document. But with power comes complexity. That’s why it’s a good idea to learn how to use Microsoft Word.
These articles will help you get started:
Visualize Your Data with Microsoft Word Tables
Make your information clearer and easier to understand by learning how to make a table in Microsoft Word. Tables organize data into rows and columns, which makes them easier to grasp at a glance. Follow the steps in this article to create, format, and customize tables in Word.
You can also use a premium Word template to get a premium design created by designers. Get Word templates from Envato Elements, if you want unlimited downloads of templates, graphics, and other creative tools you need — all for one flat monthly fee.
Or, get premium templates for Word from GraphicRiver if you prefer to pay for each use of an item. Both sources give you access to thousands of design elements created by professionals, so you can save time, energy, and effort while creating an outstanding Word document.
Did you find this post useful?

Marketing & Communications Professional and Lifelong Learner/Canada
Lexi Rodrigo is a marketing and communications professional, copywriter, and course creator who helps remarkable brands and people get seen, heard, and known. Writing for the web since 2008, she has over 100+ blog posts published on Envato Tuts, Acadium, Mirasee, Vero, Copyblogger, FreelanceFolder, Business2Community, and others.
Lexi has supported multimillion-dollar companies and nonprofits in various marketing and communication roles. She has driven results like tripling the organic search traffic of a blog in three months and generating over $65 million in revenues, donations, and sponsorships.
She has a Bachelor of Arts degree in communications. She is also the co-author of «Blog Post Ideas: 21 Proven Ways to Create Compelling Content and Kiss Writer’s Block Goodbye.» When she’s not reading or writing, Lexi bakes bread, grows food, and takes long walks.

You can organize data in a Word document by using tables. Here’s how to add and customize tables in Word.
You can use a few methods to organize the content in a Word document, but one of the best is to use a table. This allows you to separate your content into columns and rows, allowing for better presentation.
There are a few methods you can use to create tables in Microsoft Word. You can insert, draw, or copy in a table from elsewhere, should you want to. Here’s how to create and customize tables in Microsoft Word following these methods.
How to Insert a Table in Microsoft Word
You can insert a table in Microsoft Word in several ways, but three ways are worth mentioning in particular. You can add a table by inserting it automatically with a set size, or you can draw a table manually using your mouse or trackpad.
Alternatively, you can also copy and paste a grouping of cells from Microsoft Excel. Once pasted, Word will convert these cells into the format of a table. The instructions below should work for all recent versions of Word. There may be slight differences in older versions of Office, however.
To add a table in Word, you’ll need first to open a blank or existing Word document and press the Insert tab on the ribbon bar. From here, click the Table button.

This will display a drop-down menu with various options. To insert a table automatically, select the size you want from the grid.
Once pressed, the table will be inserted onto the page using the number of rows and columns you select.

Alternatively, press the Insert Table option, selecting the number of rows and columns you need from the Insert Table pop-up box that appears afterward.

You can also draw a table instead. From the Table drop-down menu, click the Draw Table option.

Using your mouse or trackpad, draw a table to the size you want on your chosen page.
Once you’ve created the outer border for your table, you’ll need to draw downwards inside the table to add a column or horizontally to add a row.

As we’ve mentioned, you can also paste in a table using cells from a Microsoft Excel spreadsheet.
To do this, open an Excel spreadsheet, select a grouping of cells and press Ctrl + C on your keyboard (or press Home > Copy).

Return to your Word document, then press Ctrl + V on your keyboard to paste the cells into your document (or press Home > Paste).

Formatting a Microsoft Word Table
Once your table is created in Word, you can then begin to format it. You can resize the table once it’s been created, as well as alter the bordering, font style, and more.
One easy way to format your table is by using a table style. These apply preset formatting choices to your table. To add these, select your table, then press the Design tab under the Table Tools section on the ribbon bar.
Click one of the options from the Table Styles section to apply that style to your table.

To add your own formatting, select and right-click your table, then press Table Properties.

You can set the size of your table using the options shown in the various tabbed menus in the Table Properties box. These include options to alter the length, width, and alignment of your table columns and rows.
To change the border and shadings of your table, press the Borders and Shadings button at the bottom of the Table tab.

You can easily change other table formatting options, including the font, color, and other text styles, using the standard formatting options in Word.
To do this, select the text in your table, then use the formatting options from the Font and Paragraph sections in the Home tab on the ribbon bar to make changes.

Bringing Microsoft Office Skills Together
Creating tables in a Word document is, as we’ve mentioned, a good way to organize and present your data. There are other ways you can do this, however. You could add and edit images in Microsoft Word to get your points across visually, for instance.
If you want to stick with tables, don’t forget that it’s easy to copy data from Microsoft Excel and paste it into your Word document later. If you’re new to Excel, you might find these Excel beginner tips helpful.
![]()
Insert and Edit a Table with Multiple Columns and Rows in Word
by Avantix Learning Team | Updated August 23, 2022
Applies to: Microsoft® Word® 2013, 2016, 2019, 2021 and 365 (Windows)
You can create a table in a Word document in 4 easy ways using the Ribbon. A table is a grid made up of columns and rows that intersect to form cells. You can insert text, numbers and images in a table. Once you have inserted a table, you can easily add and resize columns and rows and change table formatting.
It’s best to avoid using Draw Table to create a table since the table may not be created in a consistent way.
Note: Buttons and Ribbon tabs may display in a different way (with or without text) depending on your version of Word, the size of your screen and your Control Panel settings. For newer versions of Word, Ribbon tabs may appear with different names. For example, the Table Design tab may appear as Table Tools Design.
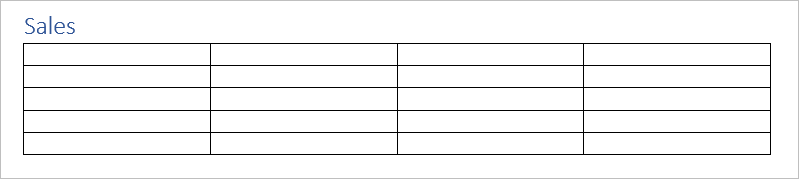
In the following example, a table with 4 columns and 5 rows has been inserted in a Word document:
Recommended article: 10 Microsoft Word Shortcuts for Moving Around in Tables
Do you want to learn more about Microsoft Word? Check out our virtual classroom or in-person classroom Word courses >
Create a table using the Table Grid
To insert a table using Insert Table and select columns and rows in the Table Grid:
- Click in the Word document where you want to insert a table.
- Click the Insert tab in the Ribbon.
- Click Table in the Tables group. A drop-down menu appears with a Table Grid.
- Hover over the grid until the number of columns and rows you want is selected.
- Click in the highlighted area of the grid to insert a table.
To insert a table, select cells in the Table Grid as follows:

Create a table using the Insert Table dialog box
To insert a table using the Insert Table dialog box:
- Click in the Word document where you want to insert a table.
- Click the Insert tab in the Ribbon.
- Click Table in the Tables group. A drop-down menu appears.
- Select Insert Table. A dialog box appears.
- Enter the number of columns and rows you want to create.
- Select the desired options below AutoFit behavior (typically Fixed column width: Auto).
- Click OK.
The Insert Table dialog box appears with options to select the number of columns and rows:

Create a table using Quick Tables
To insert a table using Quick Tables:
- Click in the Word document where you want to insert a table.
- Click the Insert tab in the Ribbon.
- Click Table in the Tables group. A drop-down menu appears.
- Select Quick Tables. A gallery appears.
- Click the table you want to insert.
Quick Tables appear in the Table drop-down menu:

Create a table by converting text to a table
If you have used tabs or other delimiters in paragraphs, you can convert the data into a table (if the delimiters are entered consistently). Wherever you have pressed Enter or Return to create a new paragraph, Word will create a new table row. You can use various delimiters to separate data but the most common are tabs, spaces or commas.
To convert delimited data to a table:
- Select the text that you want to convert.
- Click the Insert tab in the Ribbon.
- Click Table in the Tables group. A drop-down menu appears.
- Select Convert Text to Table. A dialog box appears.
- Enter the number of columns if necessary and ensure a delimiter is selected in the Separate text at area.
- Under AutoFit behavior, choose how you want your table to appear. Word chooses a width for the table columns by default. If you want a different column width, choose AutoFit to contents or AutoFit to window.
- Click OK.
In the Convert Text to Table dialog box, enter the number of columns as well as the delimiter:

Show table gridlines
Gridlines show the cell boundaries of a table on screen if table borders are not applied. Gridlines appear only on the screen and are not printed.
Gridlines are not visible when you view a document in a Web browser or in Print Preview.
To show table gridlines in a Word document:
- Click in a table.
- Click the Table Layout or Table Tools Layout tab in the Ribbon.
- In the Table group, check View Gridlines.
View Gridlines appears on the Table Tools Layout or Table Layout tab in the Ribbon:

Move around in a table
You can use the following keys to move from one cell to another in a table:
- Tab to move to the next cell to the right.
- Shift-Tab to move to the cell to left.
- Ctrl-Tab to tab within a cell.
Add a row or a column
To add a row in a table:
- Click in a cell that is located above or below where you want to add a row.
- Click the Table Layout or Table Tools Layout tab in the Ribbon.
- To add a row above the cell you clicked in, click Insert Above in the Rows and Columns group. To add a row below the cell you clicked in, in the Rows and Columns group, click Insert Below.
The commands to insert rows or columns appear on the Table Tools Layout or Table Layout tab in the Ribbon:

You can also right-click in a row and choose Insert from the drop-down menu and insert options from the sub-menu.
If you click in the last cell in a table and press Tab, Word will automatically add a row.
To add a column in a table:
- Click in a cell that is located to the right or left of where you want to add a column.
- Click the Table Layout or Table Tools Layout tab in the Ribbon.
- To add a column to the left of the cell you clicked in, click Insert Left in the Rows and Columns group. To add a column to the right of the cell you clicked in, in the Rows and Columns group, click Insert Right.
You can also right-click in a row and choose Insert from the drop-down menu and insert options from the sub-menu.
Delete a column or row
To delete a row or column:
- Select the row or column (drag over the cells or click to the left of a row or above a column when the arrow appears).
- Click the Table Layout or Table Tools Layout tab in the Ribbon.
- In the Rows & Columns group, click Delete. A drop-down menu applears.
- Click Delete Rows or Delete Columns as appropriate.
You can also right-click in a row or column and choose Delete from the drop-down menu and delete options from the sub-menu.
Change column width
To change column width:
- Select the column or columns you want to change.
- Click the Table Layout or Table Tools Layout tab in the Ribbon.
- Click Properties in the Table group. You can also right-click and choose Properties from the drop-down menu. A dialog box appears.
- Click the Column tab.
- Check Preferred Width.
- Type the new measurement for the column width. For example, typer 1.0″ or click the up and down arrows.
- Click OK.
The Table Properties dialog box appears as follows with the Column tab selected:

You can also drag the right line of a column to resize it.
Change row height
To change row height:
- Select the row or rows you want to change.
- Click the Table Layout or Table Tools Layout tab in the Ribbon.
- Click Properties in the Table group. You can also right-click and choose Properties from the drop-down menu. A dialog box appears.
- Click the Row tab.
- Check Specify Height.
- Type the new measurement for the row height. For example, type 1.0″ or click the up and down arrows.
- Specify row height as At Least or Exactly.
- Click OK.
The Table Properties dialog box appears as follows with the Row tab selected:

You can also drag the bottom line of a row to resize it.
Distribute rows and columns evenly
To distribute rows and columns evenly:
- Select the entire table by clicking the four-arrows that appear on the top left of the table.
- Click the Table Layout or Table Tools Layout tab in the Ribbon.
- Click Distribute Rows and / or Distribute Columns in the Cell Size group.
Apply a table style
To apply a table style:
- Click in the table.
- Click the Table Design or Table Tools Design tab in the Ribbon.
- Click a table style or click the More arrow to display the Table Styles gallery and click a style.
Table Styles gallery appears on the Table Tools Design or Table Design tab in the Ribbon:

To learn more about working with table styles, check out the article How to Format Microsoft Word Tables Using Table Styles (Ultimate Guide).
Subscribe to get more articles like this one
Did you find this article helpful? If you would like to receive new articles, JOIN our email list.
More resources
4 Ways to Delete a Table in Word
How to Make Columns in Word (Newspaper-style)
How to Insert Formulas and Functions in Word Tables
How to Keep a Microsoft Word Table Together on One Page
How to Delete a Page in Word (Remove Blank or Extra Pages)
Related courses
Microsoft Word: Intermediate / Advanced
Microsoft Excel: Intermediate / Advanced
Microsoft PowerPoint: Intermediate / Advanced
Microsoft Word: Long Documents Master Class
Microsoft Word: Styles, Templates and Tables of Contents
Microsoft Word: Designing Dynamic Word Documents Using Fields
VIEW MORE COURSES >
Our instructor-led courses are delivered in virtual classroom format or at our downtown Toronto location at 18 King Street East, Suite 1400, Toronto, Ontario, Canada (some in-person classroom courses may also be delivered at an alternate downtown Toronto location). Contact us at info@avantixlearning.ca if you’d like to arrange custom instructor-led virtual classroom or onsite training on a date that’s convenient for you.
Copyright 2023 Avantix® Learning
Microsoft, the Microsoft logo, Microsoft Office and related Microsoft applications and logos are registered trademarks of Microsoft Corporation in Canada, US and other countries. All other trademarks are the property of the registered owners.
Avantix Learning |18 King Street East, Suite 1400, Toronto, Ontario, Canada M5C 1C4 | Contact us at info@avantixlearning.ca

Tables help you present information in a clear and organized way. There are three ways to add tables to your documents in Microsoft Word, each taking only a few easy steps. These instructions are based on Microsoft Word 2003, but the process is very similar in other versions of Word.
Here’s how to make a table from the Tables and Borders toolbar:
- Place the cursor where you want to place the table.
- Click the Insert Table icon on the Tables and Borders toolbar at the top of the window. [Microsoft]
- Drag the corner of the table until you have the desired number of columns and rows.
- Click the mouse to insert the table.
Here’s how to make a table from the Insert Table dialogue box:
- Click on Table from the menu bar. Select Insert, and then Table… A dialogue box will open.
- Enter the desired number of rows and columns.
- Choose AutoFit behavior if you want the table’s cells to automatically expand to fit the text inside them. Choose AutoFormat if you’d rather select a table with a specific format.
- Click OK to insert your table.
Here’s how to draw a table:
- Select Table from the menu bar.
- Select Draw Table.
- Drag the pencil diagonally across the page to make a rectangle where you want to place your table.
- Draw lines vertically and horizontally to create the columns and rows you need.
You can modify your table as follows:
- Select your table, or a portion of it.
- Right click your mouse. Choose Table Properties. You can also choose Table Properties from the Table menu in the menu bar. [Home & Learn]
- Adjust the alignment, as well as the row and column settings. You can also make use of the text wrapping feature. Click OK when you’ve made the desired changes.
Adjust your table’s colors and lines, as follows.
- Click the Table tab.
- Choose Table Properties.
- Click on the Borders and Shading… button. Make the desired selections and click OK, and then click OK again.
Originally Published: Apr 14, 2011
Make Table In Microsoft Word FAQ
How do you create a table in Word?
Follow these steps to make a table: (1) Put the cursor where you want to position the table, (2) On the Tables and Borders toolbar, click on the Insert Table icon, (3) Drag the table’s corner until you have the desired number of rows and column and (4) Insert the table by clicking the mouse.
How do I make a quick table in Word?
To make a table quickly, add one of the most used tables from the Quick Tables gallery.
How do I format multiple tables in Word?
Choose the table with the formatting you want to apply to other tables. Then, under the Table Tools, go to the Design tab. Click on the arrow mark under the group Table Styles and choose New Table Style. In the Properties group, set a name for the style, apply the format changes and then create new tables using the preset.
Can you do conditional formatting in a Word table?
You can use VBA to specify conditional formatting of colors in a word table. Choose Macros from the View tab > View macros. Set the name, create, replace all the content with the following code and hit Save.
How many ways are there to create a table in MS Word?
Microsoft offers five ways to create tables: draw table, insert table, the graphic grid, insert an existing or new spreadsheet table, quick tables and an option for converting existing text into a table.
When you want to structure data or details in a clean and clear way in a Word document, tables are ideal. You can insert a table with the number of columns and rows you want, add borders, shading, and banded rows, and even apply an attractive style. If you’re new to using tables in Microsoft Word, this tutorial shows you how to create and customize tables in your documents.
Content
- How to Insert a Table in Word
- How to Resize a Table in Word
- How to Align a Table in Word
- How to Insert or Remove Columns or Rows
- How to Add a Border or Shading to a Table
- How to Apply a Style to a Table
- How to Delete a Table in Word
- Additional Table Properties
- Frequently Asked Questions
How to Insert a Table in Word
Microsoft makes it super easy to insert a table to your Word document. The two ways to do add one are described below.
Insert a Table With the Grid
For the simplest way to insert a table, select the number of columns and rows.
- Place your cursor where you want the table and navigate to the “Insert” tab. Select the “Table” drop-down arrow in the Tables section of the ribbon.

- Drag your cursor across and down the grid at the top of the drop-down menu. As you drag, you’ll see the number of columns and rows for your table as well as a preview of the table.

- When you see the dimensions you want, click. Your table will pop into your document.

Insert a Table and Adjust the Settings
If you’d like to take care of a few table settings upfront, use the “Insert Table” option.
- Place your cursor where you would like the table, navigate to the “Insert” tab, and select the “Table” drop-down arrow.
- Select “Insert Table” in the drop-down menu.

- At the top of the pop-up box, enter the number of columns and rows you’d like.

- Choose an auto-fit setting for the table.
- Fixed column width: choose “Auto” for automatic sizes or enter a particular measurement for the columns.
- AutoFit to contents: size your table width according to the data within it.
- AutoFit to window: size your table according to the Word window size.

- If you’d like new tables you create to adhere to these same settings, check the box at the bottom to “Remember dimensions for new tables.”

- When you finish, click “OK” to create your table in Word.

Note: read this tutorial to learn how to create a macro to create tables in Word.
How to Resize a Table in Word
Once you insert the table in Word, you may want to resize it manually. Either adjust the size of the entire table or just the columns and rows.
Resize the Table
To make the entire table larger or smaller, just drag.
- Select the table and grab the square that appears in the bottom-right corner.

- Drag the square in, out, up, or down to adjust the size of the table.

Resize a Column or Row
If you only want to adjust the size of a column or row, this is just as easy.
- Hover your cursor over a column or row border and a double-sided arrow will appear. The arrows face left and right for columns and up and down for rows.
- When you see the arrow, click and drag. Drag left or right to resize a column or up or down to resize a row.

How to Align a Table in Word
If you resize your table so that it doesn’t stretch the width of the page, you may want to align it on the left, center, or right in your document.
- Select the table and head to the “Home” tab.

- Use the Align Left, Center, or Align Right button in the paragraph section of the ribbon to position your table on the page.

How to Insert or Remove Columns or Rows
You might insert a table with a plan for its dimensions, then realize you have too many or too few columns or rows. Columns and rows can be added in a snap.
Add Columns or Rows
- To insert a single column or row, place your cursor at the top (column) or left (row) of the table. When the plus sign appears, click it.

- To insert multiple columns or rows, select the same number of existing columns or rows. For example, if you want to add two columns, select two existing columns by dragging your cursor through or above them.

- Right-click, move to “Insert” in the menu and select to inserting to the left or right for columns or above or below for rows.

Remove Columns or Rows
To remove a column or row, select it. For more than one, select multiple columns or rows by dragging through them. Right-click and choose “Delete Columns” or “Delete Rows.”

How to Add a Border or Shading to a Table
Once table has been inserted, aligned, and sized as you would like, you may want to spruce it up a bit by adding a border or shading to the table.
Select the table and go to the “Table Design” tab.

Add a Border
- Use the “Borders” drop-down menu to choose the type of border you want. For example, you can add a border around each cell, on only the outside of the table, or vertically on the inside of the table. As you hover your cursor over the options, you’ll see a preview on the table itself.

- Click to apply the border you want to use.

- If you prefer to place a border around a specific cell, column, or row, select it first, then open the “Borders” menu and choose a style.

Apply Shading
- To shade the cells in your table a particular color, use the “Shading” drop-down menu to choose a color you’d like.

- If you prefer to shade only a cell, column, or row, select it first, then use the “Shading” menu to choose a color.

How to Apply a Style to a Table
As an alternative to borders and shading, choose from one of Word’s premade table styles. These allow you to add accent colors and borders with little effort.
- Select the table and navigate to the “Table Design” tab. Use the up and down arrows in the “Table Styles” box to view the options or the More arrow on the bottom right to see them all.

- Hover your cursor over an option to see a preview of it on your table.

- Click to choose the style you want.

Tip: you can also style text in Microsoft Word.
Include or Remove Header, Total, or Banded Rows
If you apply a premade style to your table, you can adjust it per your preferences. You can include or remove the header row, total row, first or last column, or banded rows and columns.
Select your table and return to the “Table Design” tab. Check or uncheck the corresponding box(es) in the “Table Style Options” section of the ribbon.

For instance, if you choose a table style that has a dark shaded header row, you can uncheck the “Header Row” box to remove that formatting.

How to Delete a Table in Word
If you insert a table that you no longer need, you can simply remove it from the document. Keep in mind that this removes the table as well as the table’s contents.
Select the table, right-click, and choose “Delete Table.” You will not be asked to confirm this action, so make sure you want to remove the table before proceeding.

Additional Table Properties
Along with the above customization and formatting table options in Word, you can also set a specific height for your rows or a different alignment for the cell contents.
- Select the table, right-click, and choose “Table Properties” in the menu.

- When the Table Properties box displays, use the tabs to adjust for size, text wrapping, alignment, and alt text.

- Click “OK” to apply the settings to your table.

Remember, you can also select the table and review the additional formatting options in the “Table Design” tab.
Tip: you can copy your table from Word to PowerPoint.
Frequently Asked Questions
Can I use existing text to make a table in Word?
Rather than cut or copy and paste text from your document into a new table, you can convert it.
Select the text, go to the “Insert” tab, open the “Table” drop-down menu, then choose “Convert Text to Table.” Choose the number of columns and rows for your table. Note that you may still need to adjust the placement of the contents within the table.
Can I draw my own table in Microsoft Word?
Word gives you a feature to draw your own table from scratch.
Go to the “Insert” tab and select “Draw Table” in the “Table” drop-down menu. Use your cursor, which transforms into a pencil icon, to draw the outside of the table and the columns and rows inside.
How do I create a table of contents in Word?
Format the main sections of your document using the Heading 1 and Heading 2 styles in the “Home” tab. Go to the “References” tab and choose a style in the “Table of Contents” drop-down menu. For complete details on the process, check out our guide on creating a table of contents in Word.
Image credit: Pixabay. All screenshots by Sandy Writtenhouse.

Sandy Writtenhouse
With her BS in Information Technology, Sandy worked for many years in the IT industry as a Project Manager, Department Manager, and PMO Lead. She wanted to help others learn how technology can enrich business and personal lives and has shared her suggestions and how-tos across thousands of articles.
Subscribe to our newsletter!
Our latest tutorials delivered straight to your inbox