
![]()
Download Article
![]()
Download Article
This wikiHow teaches you how to create your own symbols and use them in Microsoft Word. Creating and installing symbols is different than inserting pre-installed symbols into your document. You can create and install symbols on Windows by using a hidden program called «Private Character Editor», while Mac users can create and install their own font with customized symbols by using the Calligraphr template. Keep in mind that any custom symbols you make will not display on any platform that doesn’t have your symbols installed as well.
-

1
Open Start
. Click the Windows logo in the bottom-left corner of the screen.
-
2
Type in eudcedit. This is the code you’ll need to locate Private Character Editor since the program doesn’t have a built-in shortcut.
Advertisement
-
3
Click eudcedit. It’s at the top of the menu. This will open the Private Character Editor program.
-
4
Select a space for your symbol. Click one of the grid squares in the window.
- Your selected space will correspond to Character Map later (for example, if you pick the upper-left corner box, the symbol will be in that box when you open Character Map later).
-
5
Click OK. It’s at the bottom of the window. Doing so confirms your space and opens the symbol editor window.
-
6
Draw your symbol. Click and drag your mouse around the window to draw. This part is largely up to you, though keep in mind that the bottom of the window represents the bottom of a text line; if you create a symbol that starts above the bottom of the window, it will be higher than the rest of the text in the line.[1]
- You can select different drawing tools in the left-hand side of the window to change the drawing style.
- If you make a mistake, you can undo it by pressing Ctrl+Z, or by using the eraser tool in the bottom-left side of the window.
- You can use an existing symbol as your base by clicking Edit, clicking Copy Character…, selecting a character, and clicking OK.
-
7
Save your symbol. Click the Edit menu item in the upper-left side of the window, then click Save Character. The symbol is now installed on your system.
-
8
Open Character Map. Click Start
, type in character map, and click Character Map at the top of the Start menu.
- The Character Map program keeps track of all available symbols on your system.
-
9
Click the «Font» drop-down box. It’s at the top of the Character Map window. A drop-down menu of different font names will appear.
-
10
Click All Fonts (Private Characters). This option is near the top of the drop-down menu. Doing so will display a list of your created symbols.
- You may have to scroll up to see this option.
-
11
Insert your symbol into a Microsoft Word document. If you want to place the symbol in a Word document, click the symbol to select it, click Select, click Copy, and then open the Microsoft Word document and paste in the symbol by pressing Ctrl+V.
- Your symbol may not be large enough or bold enough to be easily visible in Word. You can change that by selecting the symbol and raising the font size to the appropriate level.


Advertisement
-
1
Download the Calligraphr template. Calligraphr is a free service which allows you to create your own font. In order to download the font creation form, you’ll need to create an account on Calligraphr’s website.
- Follow How to Create a Font for more detailed steps on how to create an account, log in, and download a template.
-
2
Select the template file. Open the template file’s download folder, then click the template file to select it.
-
3
Click File. It’s at the top of the screen. A drop-down menu will appear.
-
4
Select Open With. You’ll see this near the top of the File window. Selecting it prompts a pop-out menu.
-
5
Click Preview. It’s in the pop-out menu. Doing so opens the Calligraphr template in your Mac’s Preview program.
-
6
Click the «Markup»
icon. This option is at the top of the Preview window.
- On some versions of macOS, the «Markup» icon resembles a bag instead.
-
7
Click the «Draw»
icon. It’s in the Markup toolbar. This will allow you to draw by clicking and dragging your mouse.
-
8
Draw your symbol on top of a letter. Whatever you draw on top of a letter (e.g., A) is what will be typed when you press that letter’s key.
- You can repeat this process for multiple symbols in order to bind them to letters (e.g., A-Z).
- Keep in mind that capital letters and lower-case letters have their own distinct bindings.
-
9
Save your template. Press ⌘ Command+S to do so. This will save the changes you’ve made to the Preview template, which will allow you to create your own font by uploading the template back to Calligraphr and then downloading the resulting font file.
-
10
Upload your template. Go back to https://www.calligraphr.com/en/ in your computer’s web browser, then do the following:
- Click START APP
- Click MY FONTS
- Click Upload Template
- Click Choose File
- Select your template file, then click Open
- Click UPLOAD TEMPLATE
-
11
Scroll down and click ADD CHARACTERS TO YOUR FONT. It’s near the bottom of the page. A window will open.
-
12
Create your font file. Click Build Font at the top of the page, enter a name for your font, and click BUILD.
- The name that you select for your font is the name that will display for the font when you select it in Microsoft Word.
-
13
Download and install your font. Click the font file that ends in .ttf to download it onto your Mac, then double-click the font file and click Install at the bottom of the window.
-
14
Insert your symbol into Microsoft Word. If you want to type your symbol into Word, open a Word document, then select your custom font on the Home tab and type the symbol’s corresponding letter. You should see the symbol appear.
- You’ll have to switch to another font in order to type actual letters.


Advertisement
Add New Question
-
Question
How do I convert scanned PDF documents into Word?

Use an online PDF-to-Word converter.
Ask a Question
200 characters left
Include your email address to get a message when this question is answered.
Submit
Advertisement
-
If you have a Microsoft Office 365 subscription on a Windows computer, you can insert Windows icons into your document by clicking the Insert tab, clicking Icons in the «Illustrations» section of the toolbar, and selecting an icon. This will not work on the Mac version of Word.[2]
Thanks for submitting a tip for review!
Advertisement
-
Since custom symbols are only available for Word documents on your computer, other people will not be able to view your symbols if you share the document with them. You can get around this limitation by printing the document or saving it as a PDF.
Advertisement
About This Article
Thanks to all authors for creating a page that has been read 281,747 times.
Is this article up to date?
Go to Insert > Symbol. Pick a symbol, or choose More Symbols. Scroll up or down to find the symbol you want to insert. Different font sets often have different symbols in them and the most commonly used symbols are in the Segoe UI Symbol font set.
Contents
- 1 How do I insert a symbol in Word?
- 2 How do I create a new symbol?
- 3 How do I make my own text symbols?
- 4 Can you create a custom symbol in Word?
- 5 How do I make symbols with my keyboard?
- 6 What is a custom symbol?
- 7 How do I insert a diamond symbol in Word?
- 8 How do I get symbols on my keyboard Windows 10?
- 9 How do you make symbols on a laptop?
- 10 How do I get symbols on my laptop?
- 11 How do I make a symbol for a picture?
- 12 How do you get SF Figma symbols?
- 13 How do you use SF symbols?
- 14 How do you make a diamond symbol on a keyboard?
- 15 How do you make a diamond symbol on a PC?
- 16 What is the symbol font in Word?
- 17 What are symbols in MS Word?
- 18 How do I type Alt symbol?
How do I insert a symbol in Word?
To insert a symbol:
- From the Insert tab, click Symbol.
- Choose the symbol that you want from the drop-down list. If the symbol is not in the list, click More Symbols. In the font box, choose the font you are using, click the symbol you want to insert, and select Insert.
How do I create a new symbol?
To create a new symbol:
- Select the object to convert into a symbol.
- Select Modify > Create Symbol.
- Click OK.
- If the Next Mouse Click insertion point option is selected, click to specify the desired symbol insertion point.
- Specify the folder location for the new symbol in the next Create Symbol dialog box.
- Click OK.
How do I make my own text symbols?
How to create your own characters with the Private Character Editor from Windows
- Start the Private Character Editor.
- Select the code for your new character.
- Use the available tools to draw a new character.
- Edit your new character.
- Link the character with one or more fonts.
- Save your character.
Can you create a custom symbol in Word?
You can create and install symbols on Windows by using a hidden program called “Private Character Editor”, while Mac users can create and install their own font with customized symbols by using the Calligraphr template.
How do I make symbols with my keyboard?
To insert an ASCII character, press and hold down ALT while typing the character code. For example, to insert the degree (º) symbol, press and hold down ALT while typing 0176 on the numeric keypad. You must use the numeric keypad to type the numbers, and not the keyboard.
What is a custom symbol?
The Custom Symbols section allows users to create new symbols from their own bitmap and icon files which they can then use as the symbol to display for a given type. Custom symbols will also be available for layer or point specific symbol options.
How do I insert a diamond symbol in Word?
First, press the option button+shift button+V. If you do this, your diamond symbol will appear on your document. If you don’t want to use the keyboard shortcut sequence, there are other means to insert the diamond symbol in your document.
How do I get symbols on my keyboard Windows 10?
To insert symbols or kaomoji on Windows 10, use these steps:
- Open a text file, document, or email.
- Use the Windows key + (period) or Windows key + (semicolon) keyboard shortcut to open the emoji panel.
- Click the Omega button to access the symbols.
- Select the symbols you want to insert.
How do you make symbols on a laptop?
Release the ALT key and the symbol will appear. Create a symbol with a number pad. If your keyboard has a number pad on it, this is a much simpler process. Ensure Num Lock is enabled, then just hold alt, enter the code on the number pad, and receive your symbol.
How do I get symbols on my laptop?
Steps
- Find Alt code. Numeric Alt codes for symbols are listed in Alt codes list ☺♥♪ keyboard symbols.
- Enable Num Lk . You may need to simultaneously press [“FN” and ” Scr Lk “] keys.
- Hold down “Alt” key. Some laptops require you to hold both “Alt” and “FN” keys.
- Input Alt code of symbol on Keypad.
- Release all the keys.
How do I make a symbol for a picture?
To use an image as a custom symbol, follow these steps.
- Step 1 — Open the sample web map.
- Step 2 — Find an image file at a URL location.
- Tip: use a PNG or GIF with a transparent background if your symbol does not fill the square to avoid unwanted white space.
- Step 3 — Change the layer style.
- Step 4 — Click options.
How do you get SF Figma symbols?
The work around i found was to;
- Drag/drop the icons from SF Symbols app into an Apple Note.
- Select and copy them in Apple Notes.
- in Figma create a new / or edit existing text field set to SF Pro.
- paste into it.
How do you use SF symbols?
As you can see, Apple made it really easy to use the SF symbols:
- Browse and find your icon in the SF Symbols Mac app.
- Use ⇧⌘C to copy the name of the symbol.
- Use the name inside the UIImage(systemName:) initializer.
- Use the image inside a UIImageView, UIButton, or any other UI element.
How do you make a diamond symbol on a keyboard?
Make the symbol “Diamond”: Alt + 4 =
This symbol represents one of the 4 colors or “signs” of the playing cards.
How do you make a diamond symbol on a PC?
Press alt key and type the decimal code. For example, alt + 11201 will make black diamond centred symbols like ⯁. However, you have to turn on numeric lock and use separate number pad for typing numbers. Alternatively, type the hexadecimal code (given in Mac Shortcut column) then alt + x keys.
What is the symbol font in Word?
These are often called “symbol,” “dingbat,” or “pi” fonts. Several of the “Windows core fonts”—Symbol, Wingdings, Wingdings 2—are such fonts, and are by far the most frequently used (Zapf Dingbats is another commonly used one). If you have Internet Explorer installed, you probably also have Webdings.
What are symbols in MS Word?
When creating documents, you may need to use a symbol or special character that does not appear on the keyboard. These symbols and special characters can be accessed through the Symbol dialog box. Use the Symbol dialog box to locate symbols, characters from other languages, arrows, and other characters.
How do I type Alt symbol?
To use an Alt code, press and hold down the Alt key and type the code using the numeric key pad on the right side of your keyboard. If you do not have a numeric keypad, copy and paste the symbols from this page, or go back try another typing method.
Word for Microsoft 365 Word 2021 Word 2019 Word 2016 Word 2013 Word 2010 Word Starter 2010 More…Less
You can easily insert a special character, fraction, or other symbol in your Word documents.
The most important thing to understand when inserting symbols, fractions, special characters, or international characters is that the font you use is critical. Not all fonts have the same characters in them. For example, the Elephant font has no fraction characters in it, while Verdana does. As a result it’s important to use the right font to find the symbol or character you want.
These marks are static symbols. If you’re looking for an interactive check box that you can click on to check or uncheck, see Make a checklist in Word.
Symbol such as currency (¥), music (♫), or check marks (✔)
-
Place your cursor in the file at the spot where you want to insert the symbol.
-
Go to Insert > Symbol.
-
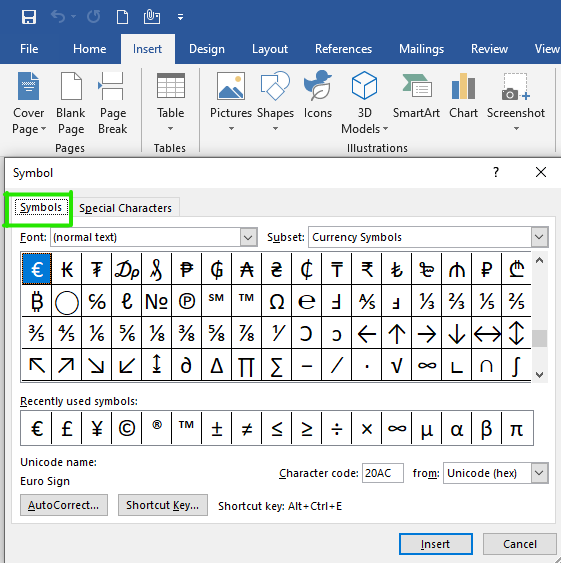
Pick a symbol, or choose More Symbols.
-
Scroll up or down to find the symbol you want to insert.
Different font sets often have different symbols in them and the most commonly used symbols are in the Segoe UI Symbol font set. Use the Font selector above the symbol list to pick the font you want to browse through.
-
When you find the symbol you want, double-click it. The symbol will be inserted in your file.
-
Select Close.
Tip: If you want to make your symbol larger or smaller, select it and use the Font Size setting.
If you’re going to insert the same symbol often, consider setting up AutoCorrect to insert it for you. You can find more info about that here: Insert a check mark or other symbol using AutoCorrect.
-
Click or tap where you want to insert the special character.
-
Go to Insert > Symbol > More Symbols.
-
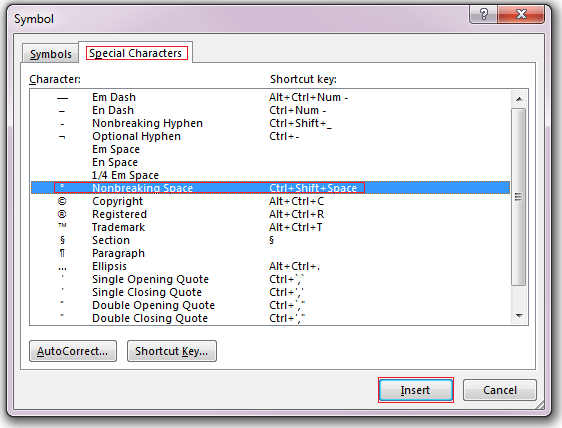
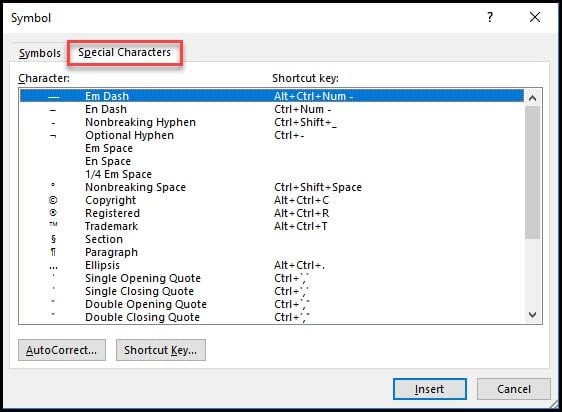
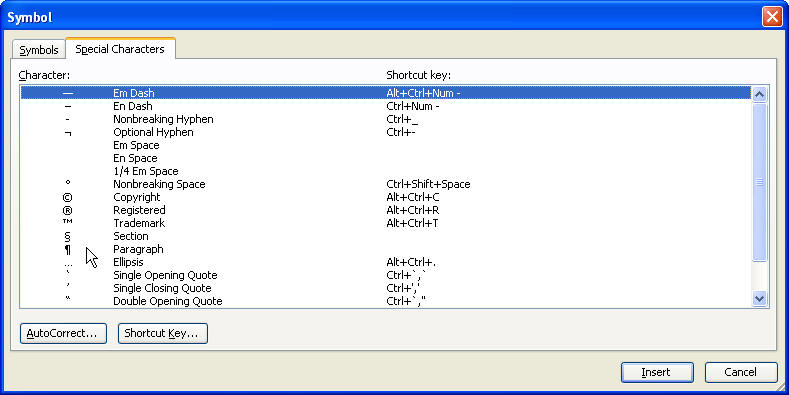
Go to Special Characters.
-
Double-click the character that you want to insert.
Tip: Many of the special characters have shortcut keys associated with them. If you want to insert that special character again in the future, just press the shortcut key. ALT+CTRL+C inserts the Copyright symbol (©), for example.
-
Select Close.
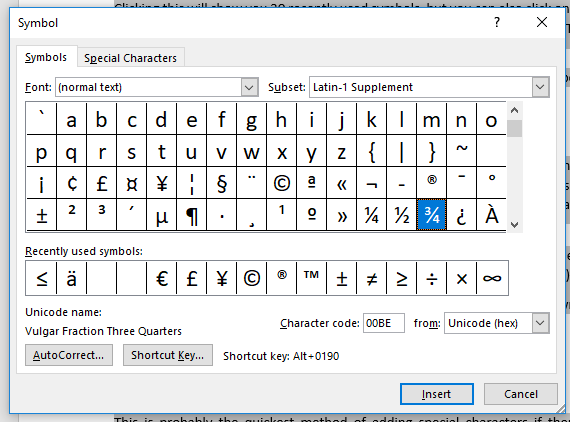
Some fractions (1/4, 1/2, and 3/4) automatically switch to a fraction character (¼, ½, ¾) when you type them. But others do not (1/3, 2/3, 1/5, etc.) so if you want to insert those as symbols you’ll need to use the insert symbol process.
-
Click or tapwhere you want to insert the fraction.
-
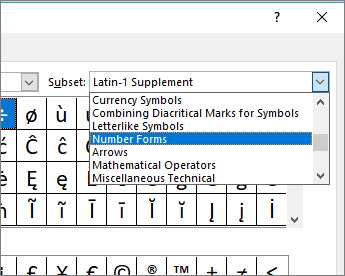
Go to Insert > Symbol > More Symbols.
-
In the Subset dropdown, choose Number Forms.
Note: Not all fonts have a number forms subset. If you don’t see the number forms subset available for your font you will have to use a different font, such as Calibri, to insert the fraction character.
-
Double-click the fraction that you want to insert.
-
Select Close.
Only a handful of common fractions have a symbol that you can substitute. For more unusual fractions, such as 8/9, you can approximate the symbol by setting the numerator as superscript and the denominator as subscript. For more information see Insert subscript or superscript text.
If you plan to type in other languages often you should consider switching your keyboard layout to that language. You can find more information about that at Enable or change a keyboard layout language.
For one-off characters there are almost always keyboard shortcuts in Office to do that. For example:
-
CTRL+SHIFT+ALT+? inserts a ¿
-
CTRL+SHIFT+~ followed immediately by «a» will insert ã.
-
CTRL+SHIFT+: followed immediately by «u» will insert ü.
For more info on international characters see: Keyboard shortcuts for international characters.
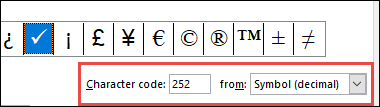
You can also use the character code of the symbol as a keyboard shortcut. Symbols and special characters are either inserted using ASCII or Unicode codes. You can tell which is which when you look up the code for the character.
-
Go to Insert >Symbol > More Symbols.
-
Scroll up or down the list to find the symbol you want. You might have to change the font or the subset to locate it.
Tip: The Segoe UI Symbol font has a very large collection of Unicode symbols to choose from.
-
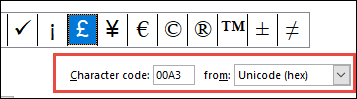
Towards the bottom right you’ll see boxes for Character code and a from:. The character code is what you’ll enter to insert this symbol from the keyboard and the from: tells you what kind of character it is. If from: says «Unicode (hex)» it’s a Unicode character. If from: says «Symbol (Decimal)» then it’s an ASCII character.
Unicode
ASCII
ASCII and Unicode information and character tables
For more info about using ASCII or Unicode characters, see Insert ASCII or Unicode character codes.
Insert a check mark
For info on inserting a check mark, see Insert a check mark.
Need more help?
Want more options?
Explore subscription benefits, browse training courses, learn how to secure your device, and more.
Communities help you ask and answer questions, give feedback, and hear from experts with rich knowledge.
Your average keyboard has enough letters, numbers, and punctuation marks for all your day-to-day typing needs. But what if you need symbols or special characters that aren’t on your keyboard?
Well, in Microsoft Word, you have three main options:
- Use the Symbol menu.
- Learn some ASCII codes.
- Use Microsoft Word’s special character shortcuts.
In the rest of this post, we’ll look at how to do each of these in your writing. Watch the video or read the post below to get started:
1. Using the Symbol Menu
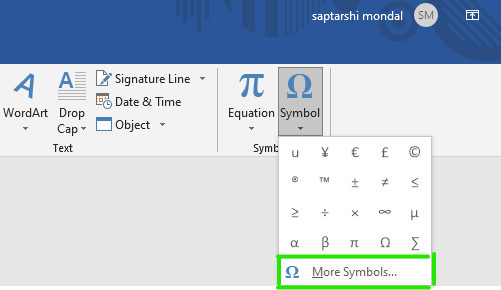
To see the Symbol menu in Microsoft Word, go to Insert > Symbols on the ribbon and click the Symbol button (or Insert > Advanced Symbol > Symbols in the menu system in Word for Mac).
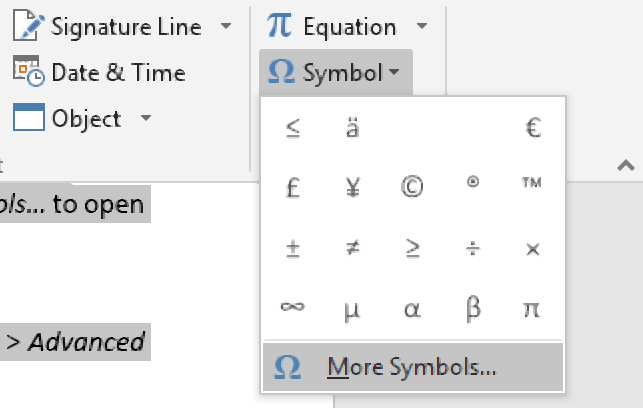
This will open a quick access menu of 20 frequently used symbols to pick from. However, you can also access the full range of special characters in Microsoft Word as follows:
- Go to Insert > Symbols and click Symbol to open the menu.
- Click More Symbols… to open a new window.
- Scroll through until you find the symbol you want to use.
- Click Insert to add the symbol to your document.
The symbol will then appear in your document at your cursor. Microsoft Word will also add it to the quick access menu, saving your time if you need to use the same symbol again.
2. ASCII Codes
ASCII codes each indicate a different symbol, so you can use them to add special characters to a document quickly via the numeric keypad:
- Learn or look up the correct ASCII code for the symbol(s) you need.
- Turn on Num Lock on your keyboard to activate the numeric keypad.
- Hold down the Alt key and type the required code.
The corresponding symbol will then appear at your cursor position.
3. Shortcuts for Special Characters
For some special characters, your simplest option is to let Microsoft Word do the hard work! There are, for example, shortcuts available for the following common symbols:
|
Special Character |
Shortcut |
Autocorrect Option |
|
Trademark symbol (™) |
Ctrl + Alt + T |
Write “TM” in parentheses |
|
Registered trademark symbol (®) |
Ctrl + Alt + R |
“R” in parentheses |
|
Copyright symbol (©) |
Ctrl + Alt + C |
“C” in parentheses |
|
Closed Ellipsis (…) |
Ctrl + Alt + . |
Three periods without spaces |
|
Euro (€) |
Ctrl + Alt + E |
“E” in parentheses |
You’ll notice we’ve included an “autocorrect” version for each symbol above. In these cases, Microsoft Word will automatically correct the specified text to create the symbol.
Find this useful?
Subscribe to our newsletter and get writing tips from our editors straight to your inbox.
For example, to add a trademark symbol to a document, we have two options:
- Hold down Ctrl + Alt + T at the same time.
- Write “(TM)” and let Microsoft Word change this to the symbol.
These shortcuts are very quick and simple, so it is worth memorizing them if you use any of these symbols frequently. Similar shortcuts are also available for accented letters.
(◕‿◕)
SYMBL
Popular queries
Heart symbols
Basic latin
Non breaking space
Combining Enclosing Screen
English alphabet
Symbol Text
Text (Latin)
Result
Blank letters
Painted letters
Letters with background
Letters from the symbol $
Letters from the symbol #
Letters from the symbol ¶
Result
Blank letters
Painted letters
Letters with background
Letters from the symbol $
Letters from the symbol #
Letters from the symbol ¶
See also
-
HTML-Encoder
-
Unicode Decoder
-
Flip
-
Unicode Character Table Generator
-
Strikethrough Text
-
Case Converter
-
Character Calculator
-
Braille Translator
-
Text Converter to Gothic Style
-
Text to Morse Code Converter
-
Password Generator
-
Stylish Text & Nickname Generator
-
Typographer
-
Whitespace
-
Emoji Keyboard
Write text symbols
Instead of a thousand words, write one, but spot-on.
This tool will turn any word in a piece of art. Your text will exclusively consist of various symbols that will make each letter of your message more significant than usual.
Such symbol texts are very popular on social media. When words are redundant, send a picture from our Text Art section. By the way, they also belong to ASCII symbols.
Microsoft Word symbols cannot be easily typed in using the keyboard.
However,
the need to include these characters in documents is increasingly common these
days.
Even when writing in English, foreign names of places and people may require some of these special characters.
Scientific writings also include mathematical symbols and Greek letters.
Text may also include characters like the degree symbol and copyright symbol.
There
are character codes you can use to enter a symbol in Word. However, most people
don’t have the time to memorize these character codes.
So, in this guide today, you’ll learn how to insert any symbol in Word either using the mouse pointer or a keyboard shortcut.
NOTE: There are several methods you can use to type symbols in Word. For me, the method I use to type symbols depends on how many and how frequently I need to type them. Keep reading to choose the best method for you
Without
further ado, below are the ways to type symbols in word
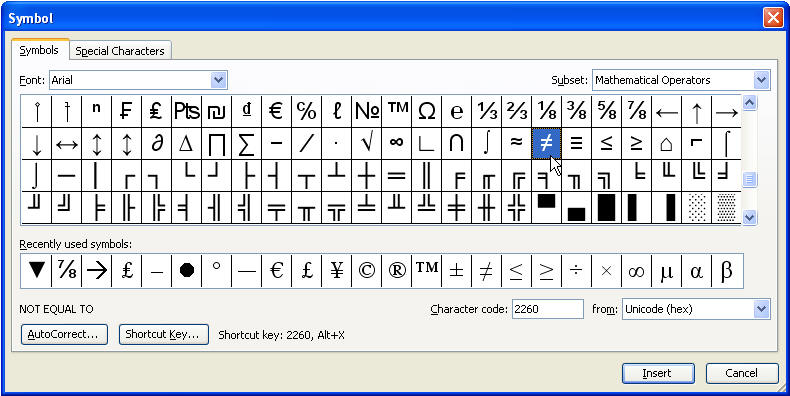
1st Method: Using Insert Symbols
This
method involves using the symbols dialog box located in the symbols area at the
right border of the insert tab.
Below are steps to insert symbols in MS Word using Insert Symbols.
NOTE: in the steps below, I’ll illustrate how to insert symbols in MS Word by inserting the greater than or equal to symbol. You can use the same steps to insert any symbol of your choice.

- STEP 1: Click to position the insertion point at where you want to insert the symbol. In this example, we will place the symbol between X and 10 as you can see in the above picture.
- STEP 2: Go to the Insert tab, in the Symbols group and click Symbol, then More Symbols.

NOTE: If the symbol you want to insert is found in the symbols gallery as shown in the picture above, click it to insert it into your document. Any symbol you use will move to the first position in the gallery. Thus, the symbol gallery box gives you access to the 20 most recently used symbols. However, if you can’t find the symbol you are looking for in the symbol gallery, click on More Symbols to display all the symbols.
- STEP 3: Select your desired font from the Font drop down. You can leave it as default (Normal text). You don’t have to explore every font in the list. However, it is worth looking at Wingdings or Symbol if you want a fancy symbol.

- Step 4: Scroll down or up until you find the required symbol, then
click to select it. You can also click the desired symbol in the Recently used
symbols. - Step 5: Click Insert to insert the selected symbol then click
to close the dialog. Alternatively, double-click on the desired symbol to
insert it into your document, then close the dialog.
As soon as you click insert or double-click the symbol, Word will insert it into your document.
2nd
Method: Using the keyboard to insert symbols in Word.
Not all the symbols in Word can be found on the keyboard.
However, all the symbols can be typed using the keyboard.
Typing symbols that are not found on the keyboard can be very tedious. In fact, it is not even necessary in Word because using the first method above is much easier and simple to compare with.
However, it is still useful to know as it becomes handy to obtain certain characters or symbols in software that has no access to Insert Symbol like in Microsoft Word.
Let’s use the following exercise for example:
- Turn on your Num Lock.
- Whilst holding down the [Alt] key, type [065]
on the numeric keypad (on the right). - Then release the [Alt] key. The letter A should
appear. - To type the letter B, repeat steps 2 and 3. But this
time type [Alt 066] on the numeric keypad. - [Alt 067] should give you C, and [Alt 068] should give
you D, and so on.
This
exercise isn’t really necessary because one can easily type in any letter
directly with the keyboard.
However, not all characters and symbols are on the keyboard. Hence let’s try out the following:
- Hold down the [Alt] and type [0176] for a degree sign (°)
- Type [Alt 0189] and [Alt 0190] for fractions (½ and ¾)
- Also try [Alt 0181] for µ
But
how do you remember the number for each symbol?
It’s
almost impossible to remember. It’s not even necessary.
Instead, you should make a note of the symbols or characters you use very often.
In the next section, you’ll learn how to get the shortcut to any symbol into your Word document.
How to find the keyboard shortcut for symbols in word
You
can use the Symbol dialog box to find the character code (or keyboard shortcut)
for any symbol or character.
This way you can insert symbols by typing them on your keyboard instead of using the Symbol dialog box.
Here’s how to learn the keyboard shortcut code for a particular symbol or character in Word:
- Open the Symbols dialog box.
To
display the Symbols dialog box, go to the Insert tab, in the
Symbols group and click Symbol, then More Symbols.
- Select the symbol you want to take note of, then look near
the bottom of the dialog for the symbol name as well as its code. - To insert any symbol using its character code, press down the
[Alt] key, type the code, then release the [Alt] key.
If you are lucky, you’ll see another shortcut key aside from the character code which is much easier to type than the code.
See
screenshot below:

Assigning
shortcut keys to symbols
In
Microsoft word, you are not limited to the default hotkeys.
You can assign any keyboard shortcut key to any command or symbol to fit your needs.
As
mentioned, each and every character or symbol in Microsoft Word has a character
code that you can use on the keyboard.
Aside from these character codes, Word still gives you the space to assign a shortcut key to any symbol.
Below
are the steps to do so:
- Open the Symbols dialog box.
To
display the Symbols dialog, navigate to the Insert tab, in the
Symbols group and click Symbol, then More Symbols. The Symbols
dialog box should display.
- Click to select the symbol to which you want to assign a shortcut.
- At the bottom area of the dialog, click Shortcut Key… The Customize Keyboard dialog box appears.

- Under Specify keyboard sequence, in the Press new shortcut key field, type the keyboard shortcut you want to assign for the symbol.
If the shortcut key you assign is already assigned for a command, Word will tell you that hey dude, the shortcut key you are assigning to this symbol is already taken by another command. If you ignore and continue to assign, Word will not stop you. However, this shortcut will not work again for the command it was previously assigned to. It will now work for this symbol.

- Click Assign to assign the shortcut.
NOTE: There is another box labeled Current keys. These are the current hotkeys assigned to the selected symbol. You can take note of these hotkeys without assigning another one for the same symbol.
Typing
any symbol in Word doesn’t have to be difficult as you can see.
If you don’t understand anything explained here, let me know in the comments section below for more clarification.
Thank you very much for reading this article.
Microsoft Word is a software tool that allows us to create documents file like articles, office letters, projects files and many more in a very simplest and easy manner. MS Word makes our document more attractive as compared to paper or file work by providing different features like it has different sizes of pages, fonts, colors, design, bullets, tables, charts, page border/number, and many more.
It also provides various features like editing, texting, formatting, graphics designs, fonts color and styles, inserting images, videos, printing documents etc.
This MS Word software saves our articles/letters in a form of a document and saves them on the computer forever. Whenever it is required it can be shared or can access the document.

Features of MS Word
- Images- MS Word provides the inserting of various images in our document.
- Videos- We can insert videos in our document
- Fonts Styles- It has a wide range of font styles for our text.
- Colors- It also has different types of colors to make our document more attractive.
- Page number and size- You can set the size of the page of your document
- WordArt- It provides various writing styles for our documents.
- Tables- Tables in MS Word are used to represent data in Tabular form
- Graph and Charts- These are used to represent statistical data
- Animations and Designs- MS Word allows the creation of Animations and designs as per user needs
- Page border/color- MS Word allows adding borders and colors to pages.
What are Symbols in MS Word?
Microsoft Word has a special features called symbols in which user can insert many different types of symbols in the document.
MS Word has a variety of symbols, special characters, fractions, languages, etc. We can insert the symbols and special characters with the help of the Symbol dialog box present in MS Word.
Some pictures of symbols in MS Word are:


Steps to Add Symbols in MS Word
Step 1: On the navigation menu click on the insert option.

Step 2: On the right-hand side of the navigation menu select the Symbol option as shown in figure:

Step 3: Next select the symbol from the menu as per your need.

Step 4: You can also select more different types of symbols by just clicking on the More Symbols option as shown in the figure:

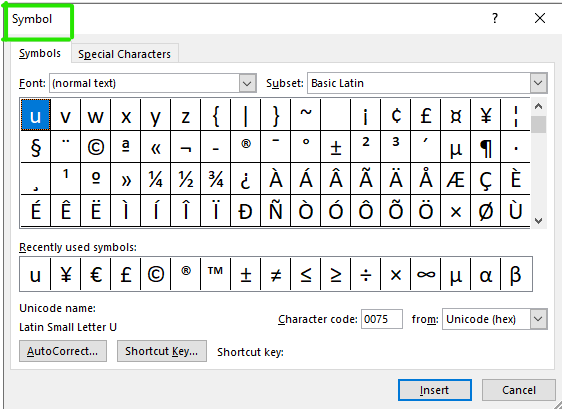
Step 5: A symbol dialog box will be pop up on the screen.

Step 6: Now click on the symbols option as shown in the figure:
Step 7: Next click on the drop-down arrow of the font box to change the font style of symbols.

Step 8: Select the font style from the style menu.

Step 9: Next click on the drop-down arrow of subset box to select the different categories of the symbols.

Step 10: Select the symbol category from the menu.

Step 11: Select the symbol as per your choice as shown in the figure:

Step 12: Then click on the insert option to insert the symbol on your current page of the document.

Note – You can also search for a particular symbol using its character code as shown in the figure:

Step 13: Enter the symbol character code in the character code box.

Step 14: Select the option (UNICODE, ASCII) as shown in the figure:

Step 15: Then click on the insert option.
Step 16: Close the symbol dialog box as shown in the figure:

Finally, the symbol is added to your document.
Steps to Insert Special Symbols in MS Word
Step 1: Click on the Symbol option from the navigation menu.

Step 2: Select the More Symbols option as shown in the figure:
Step 3: A symbol dialog box will open.
Step 4: Now select the special characters option as shown in the figure:

Step 5: Select the special character as per your choice from the menu.

Step 6: Click on the insert option to continue.

Step 7: Close the symbol dialog box.

Finally, special characters symbol is added to your document.


These are some of the steps to insert symbols and special characters in the document.
Symbols and special characters are part of both formal and informal work when creating documents with Microsoft Word. Fortunately, Windows users have many ways to insert symbols on documents. Alt codes are one of the easiest ways but have restriction that you need a numeric keypad which is not part of most of the modern laptops. Even though you can use Character Map, it is difficult to navigate every time. Therefore, the easy way is to create custom shortcuts for symbols to use quickly when required.
Related: Assign keyboard shortcuts for applications in Windows 10.
Follow the below instructions to create custom shortcuts for symbol in Microsoft Word:
Open a new or an existing document in Word. Navigate to ‘Insert > Symbol’ menu and click on the ‘More Symbols…’.

Insert Symbols in Word
Selecting Symbol
You will see the ‘Symbol’ popup like below:
Symbol Dialog Box in Word
- First, select the ‘Font’ as Windings, Windings 2, or Windings 3.
- Select the symbol you like to use frequently on your document. Let us say, you want to insert ‘windows’ symbol. Scroll down in the list and select ‘windows’ symbol.
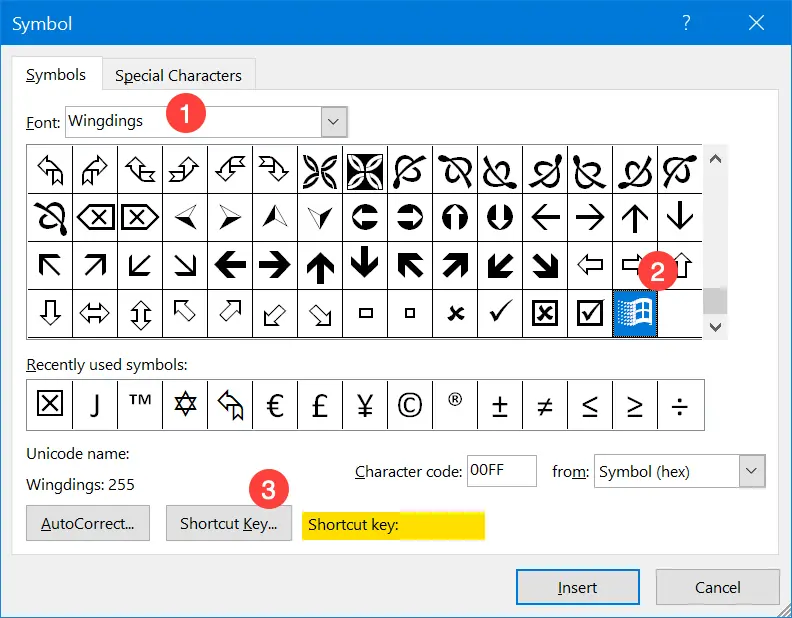
- As you can see, there is no ‘Shortcut key:’ assigned to this symbol. Click on the ‘Shortcut Key…’ button.
Customize Shortcut
You will see the ‘Customize Keyboard’ dialog box.

Create Custom Keyboard Shortcut
- Click on the text box under ‘Press new shortcut key’.
- Enter any combination of keys. For example, enter ‘Control + Shift + Q’.
Assigning the Shortcut
- You can assign the shortcut either to all new Word documents or only to the current document. In the ‘Save changes in:’ dropdown choose ‘Normal’ for assigning the shortcut to all new Word documents. Normal is the template used for new document, so all new documents will have the shortcut valid.
- On the other hand, choose the current document name from the dropdown to assign the shortcut only to the current document. Let us select ‘Normal’ option and click on ‘Assign’ button to assign the entered shortcut to the selected symbol.
- Close all the open dialog boxes.

Assigning Custom Keyboard Shortcut
Testing the Shortcut
- Press ‘Control + N’ to open new Word document.
- Enter ‘Control + Shift + Q’ keys to insert Windows symbol.
3
We all know that a keyboard has a standard set of letters, numbers, and symbols on it. We usually don’t need to press more than a few keys at once. However, there are times when we need a special character or glyph. In this tutorial, I’ll show how to make symbols with a keyboard and other options.
Before I get to the instructions, you should know there are many ways to make these. There can be multiple codes for the same item. Your choices will depend on where you need the code, such as a Microsoft Word document, email, web page, and more.
And to clarify, when I say “keyboard symbols,” I mean I’m using the keyboard to make them. This is a bit different than representing symbols on a keyboard using your Shift key. For example, this isn’t about typing Shift + 2 to produce the “at sign” – @.
While these codes are universal, they don’t work across all applications or even with your regular keyboard. That is why it helps to know multiple solutions.
What is a Special Character?
This depends on the context and vendor. For example, sometimes, when you create an online password, you’ll see a hint or tooltip that references non-numeric keys like @, #, $, %, &, *, and +. These are easy to enter as they are on your keyboard. These are “special characters” examples, even though they exist on your keyboard.
Special typographical symbols are a type of character that does not exist on the standard keyboard. These special characters range from currency symbols to legal symbols to degree symbols to Greek letters.
In contrast, there are a lot of symbols that require you to enter or type multiple keys. There are no dedicated keyboard keys for them. However, even symbols that are on your keyboard can also be entered using these methods.
If you use one of Microsoft’s Office programs to insert a symbol, they have a dedicated tab called Special Characters with the assigned shortcut key. These special characters relate to formatting, punctuation, em dashes, copyright ©, and trademark ™ signs.
A more common set of special characters are for things like accented letters, fractions, and currency symbols.
For this article, I’m going to call all these items “symbols.” This may upset some purists, but I don’t want to get into code page history except to say some of these codes came about before we had graphical interfaces.
Symbol Representations & Codes
Depending on your symbol, there could be several codes that represent it. For example, every key on your keyboard has a code that represents the same value. So while the keyboard accounts for over a hundred entries, there are thousands of symbol codes when you factor in different languages.
Alt Codes
Alt codes come from pressing and holding down your Alt key and pressing a specific set of numbers. It could be from 1 to 4 digits. These codes are useful when you don’t have some symbol tool like a character map. They can also be faster if you know the codes.
There are 256 Alt Codes in the first set. The first 126 map well to a US English keyboard and work in almost any application. The remaining items are called “extended ASCII” and work fairly well in all applications.
I said “fairly well” because the beginning numbers 0 to 31 represent other graphical symbols. For example, pressing ALT + 1 will get you a smiley face ☺, while ALT + 3 will get you a heart ♥. And depending on where you use the code, the colors may change, such as a red heart.
However, there are Alt codes with numbers greater than 255, which can pose problems in certain programs. In particular, programs outside Microsoft Office.
Things to Remember About Alt Codes
- You must use the numbers on the Numeric keypad. Using the number keys below your function keys won’t work.
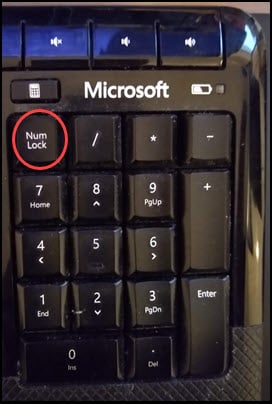
- Num Lock should be on.
- If your keyboard doesn’t have a dedicated Numpad, you may have to use a Fn key combined with a Num Lock key.
- Not all code symbols show on printouts even though they show on your screen.
- Apple has its own method and doesn’t rely on these codes.
On a Mac, you’ll need to use the Character Viewer instead of using Alt codes. Apple has a support document on this.
How to Find Alt Codes
The problem with finding ALT codes is not all lists are complete. Some have the first 128 items. Others include extended ASCII, and a few have all of them, including the 4-digit Alt Codes that start with 0.
One site that I prefer is Alt-Codes.net. It has a numeric listing that is larger than most. While it doesn’t provide the literal name of the symbol like “copyright,” it’s easy to find the graphical representation. It also provides some groupings on the sidebar and top navigation like “currency,” “language,” “gender,” and others. It also has a test window where you can try out the symbol code.
How to Create Symbols Using Alt Codes
Going back to my story, here are three examples of codes.
Example 1: The Cents symbol (¢)
- Open a document where you want to see the symbol.
- Make sure the Num Lock key is on.
- Press and hold down your left Alt key.
- Press the 1 key on your Number pad.
- Press the 5 key on your Number pad.
- Press the 5 key on your Number pad.
I mentioned the left Alt key because some keyboard language settings don’t allow the right side key to work.
Example 2: The Degrees symbol (°)
- Open a document where you want to see the symbol.
- Make sure the Num Lock key is on.
- Press and hold down your left Alt key.
- Press the 0 key on your Number pad.
- Press the 1 key on your Number pad.
- Press the 7 key on your Number pad.
- Press the 6 key on your Number pad.
Notice how in this example, you have to type the 0. If you don’t, you’ll get a different symbol.
Example 3: The Section symbol (§)
- Open a document where you want to see the symbol.
- Make sure the Num Lock key is on.
- Press and hold down your left Alt key.
- Press the 2 key on your Number pad.
- Press the 1 key on your Number pad.
As mentioned, you can also use these code combinations when your keyboard doesn’t work properly. For example, a reader contacted me about his @ key not working. Something about a cat sitting on the keyboard. The workaround is to press ALT + 6 + 4 to get @.
Why Alt Codes Don’t Work
Sometimes, the Alt codes don’t work as expected. This has to do with details like rich editors, code pages, and Windows registry settings.
For example, it would work fine if you tried to enter the Alt code for the French Franc in Microsoft Word, WordPad, or Microsoft Outlook. But it doesn’t work in Gmail, Microsoft Excel, my code editor, or other programs. With these programs, any code greater than 255 will provide unexpected results. You’ll see a symbol produced, but it won’t be what you want, making it more confusing.
Currency Symbol Examples
Here are some examples you can try. You might notice that lower numbers have a dedicated keyboard key, such as the $ sign.
| Currency Symbol | Alt Key Codes |
|---|---|
| $ (Dollar) | Alt 3 6 |
| ¢ (Cents) | Alt 1 5 5 |
| £ (Pound) | Alt 1 5 6 |
| ¥ (Yen) | Alt 1 5 7 |
| ƒ (Guilder) | Alt 1 5 9 |
| € (Euro) | Alt 0 1 2 8 |
| ₣ (French Franc) | Alt 8 3 5 5 |
The last example for the Euro € sign has a 4-digit Alt code, and you must put in the leading 0. Even though this code has 4 digits, it is still less than 256, so it works in just about any application, including Gmail.
Trademark, Copyright & Fraction Symbols
| Symbol | Alt Key Codes |
|---|---|
| ™ (Trademark) | Alt 0 1 5 3 |
| © (Copyright) | Alt 0 1 6 9 |
| ® (Registered Copyright) | Alt 0 1 7 4 |
| ℅ (c/o) | Alt 8 4 5 3 |
| № (Numero sign) | Alt 8 4 7 0 |
| § (Section sign) | Alt 2 1 |
| ½ (One half) | Alt 1 7 1 |
| ⅓ (One third) | Alt 8 5 3 1 |
| ¼ (One quarter) | Alt 0 1 8 8 |
| ⅛ (One eighth) | Alt 8 5 3 9 |
Alt Code Outlier Symbols – 0 to 31
In my testing in Gmail and Microsoft Word, other symbols for low-range codes were displayed. However, I would get different characters in these apps. Here are some popular examples that may be easier than using Unicodes. After 31, the codes synced.
For example, typing Alt 3 in Gmail produced a heart symbol ♥. However, once the email was received, the heart turned red. The same thing happened for the smiley – ALT 1. ☺
Below are some examples I use in documentation.
| Symbol | Alt Code Keys |
|---|---|
| White circle ○ | Alt 9 |
| Right pointer ► | Alt 1 6 |
| Left pointer ◄ | Alt 1 7 |
| Up arrow ↑ | Alt 2 4 |
| Down arrow ↓ | Alt 25 |
| Left arrow ← | Alt 27 |
| right arrow → | Alt 26 |
| Down triangle ▼ | Alt 3 1 |
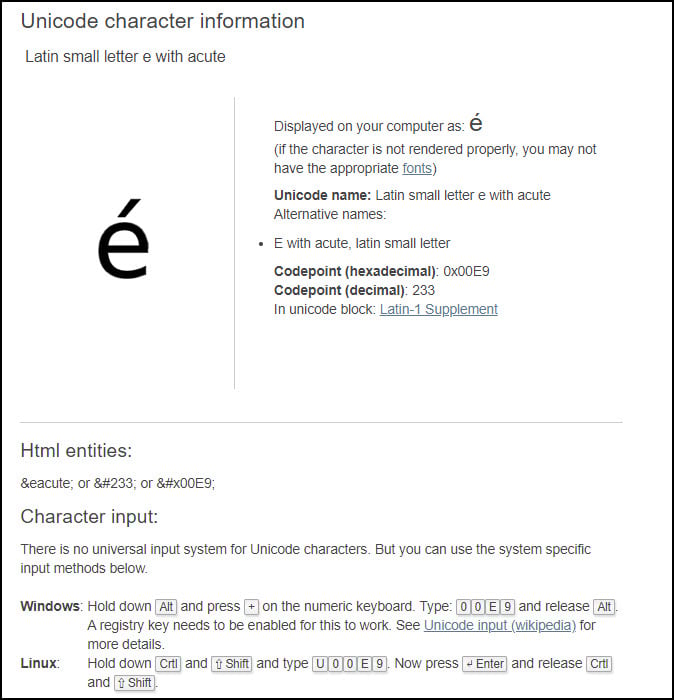
Unicodes
Unicodes are another way to represent and standardize characters. A big difference is set size as there are well over 100,000 Unicodes. Unicodes also represent many more languages. While there are symbols in the set, you won’t find things like trademarked symbols. For example, there isn’t a Unicode for the Windows symbol. ![]()
How to Enter Unicodes
The Unicodes work in a different way. You do not need to use the numeric keypad; the letters are not case-sensitive.
Below are the steps to create the ¢ sign.
- Open a document where you want to see the symbol.
- Press 0 0 a 2.
- Press and hold Alt
- Press X.
- Let up on the keys.
You can find a detailed code list at the https://unicode-table.com
Entering Unicodes in Microsoft Excel
I found entering some of these codes in Excel a challenge. Although the documentation says it accepts Unicodes, I couldn’t do it using those codes. I had to use HTML codes or HTML-Entity Decimal codes. This name differs based on which lookup service I used.
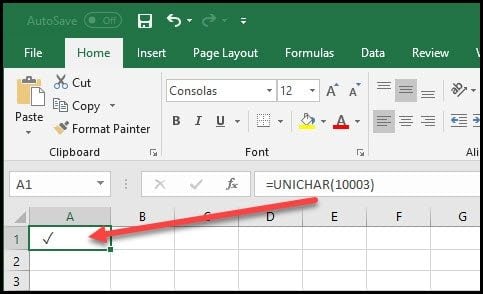
To give an example, I wasn’t able to use the Unicode for a checkmark. I had to use a different code.
- Find the HTML code for your symbol.

- Look for the value in the HTML-code field. You can find values at https://unicode-table.com
- Copy just the number. No punctuation.
- In Excel, type =UNICHAR(10003). The number in ( ) represents your HTML code.
- Press Enter.
How to Make Symbols with Laptop Keyboard
Creating symbols with a laptop can be more cumbersome. The keyboard layout for most laptops has fewer keys. Very few have a dedicated numeric keypad.
Trying to find the Num Lock key on notebooks can be challenging. To give an example, my Asus notebook doesn’t have a dedicated key. I had to search Google to find out where it was.
Next, I had to run a program called OSK that brought up an on-screen virtual keyboard. Then I had to hit an Options button to toggle Turn on the numeric keypad.
Other systems may have visual keyboards under some accessibility options.
TextExpander
Another option is to use a software program such as TextExpander. (Please note I am an affiliate for this program.) The program works with Microsoft Windows, Mac OS, and iPad and saves your text shortcuts to the cloud. For example, I can assign a keyboard shortcut of “zc” and have it equate to the Alt codes I would use for the cents sign.

The program has many predefined symbols, which may save you from finding the initial key codes. Moreover, the program does a lot more than special symbols. It can string together entire documents.
The methods mentioned above were direct, and you had to know the symbol code. However, an easier method is to check your program for a menu option that allows you to insert symbols.
Many products include this option. For example, Microsoft Word, Microsoft Outlook, Microsoft Excel, and Microsoft PowerPoint all have an Insert menu with an option for Symbol. The most common symbols are included.
The nice thing about this symbol utility is you don’t need to figure out which code set to use. Simply highlight the symbol, click the Insert button, and close the utility. However, you could change the code set by choosing another option from the drop-down list. Currently, you can use:
- Unicode Hex (default)
- ASCII (decimal)
- ASCII (text)

The tool has 6 areas, but these can change based on your options. This dialog is consistent with most Microsoft products. However, the free online versions of Microsoft programs have fewer symbols.
- This area shows your Symbols or Special Characters. The default starts on the Symbols tab. In this example, I’ve clicked the Cents symbol.
- This drop-down allows you to select different fonts, weddings, and wingdings.
- Indicates the selected symbol.
- Indicates the character set. The default is ASCII decimal.
- Depending on your selection, you may see a predefined shortcut. For the cent sign, it’s Ctrl + / + c.
- To accept the assigned Symbol, click the Insert button.
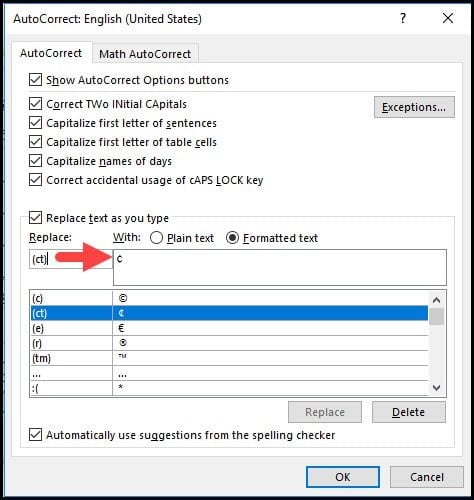
Using the Keyboard shortcut or AutoCorrect
If you look at the screen snap above, you’ll see a shortcut has been assigned to this symbol. If you usually use a symbol, the keystroke option may be the fastest method. You can also change the Shortcut key using the button.
An alternate method is to use the AutoCorrect… button and assign a new set of keystrokes that are intuitive to you. This is the same function that allows you to type (c) and get a copyright symbol. This is a great feature.
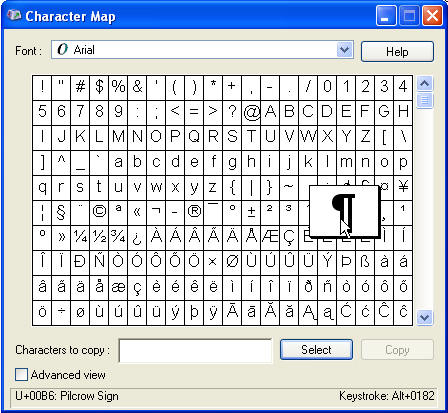
Windows Character Map
If you’re like me, you don’t like looking up codes. Instead, you want to see a graphical representation of the symbols and say “that one!” This is especially true if the symbol is one you rarely use. For these times, you can use Windows Character Map (charmap.exe).
To use Windows Character Map Tool,
- Press your Windows key + r. This should open Windows Run
- In the Open: textbox, type charmap.
An insert symbol tool similar to the one in Microsoft Word appears. When you click a symbol, a larger image appears with the description and key codes displayed on the status line. If this is a program you think you’ll use frequently, you might want to add it to your Windows taskbar.
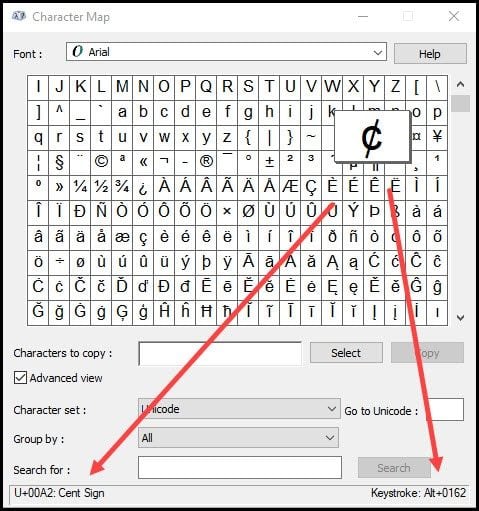
You can click the Select button and copy the symbol to your clipboard to paste it into another program. Or, you can type the keystroke equivalent.
Even though the character map is a system tool, it doesn’t mean the results will work everywhere you need them. The codes that seem to work without issue are Alt codes less than 255. And yes, it seems odd that ¼ works fine, but ⅛ produces a [.
And in case you’re wondering how I got that ⅛ symbol, it has to do with another set of codes that work with HTML. I suggest trying some of these examples and testing to see which ones work in your apps.
When You Don’t Know the Symbol Name
Sometimes, you’ve seen a symbol but are unsure of the name. These tend to be items used less often, such as the section sign, which looks like two overlapping S. In these circumstances, you can try to draw the symbol you need using Shape Catcher. Instead of searching by name, you draw the symbol you need in a specified box and click the Recognize link.

If I click the More Info link, I get details on how to enter the symbol.
How to Add Emojis
Last but not least are emojis. These are the symbols or ideograms you often see on social media sites. Think of smiley faces. With most of these applications, some built-in tool within the messaging app allows you to insert them easily. Emojis are also built into the Windows and Mac operating systems. Each OS has a keystroke combo to open the app.
Apple: Press Control + Command + space.
Using Windows Symbol App
While most people associate this tool with emojis, it does handle other symbols and Kaomojis. Kaomojis remind me of ASCII art but may incorporate Japanese characters. Sometimes you need to look at these a bit before getting the meaning.
| Name | Kaomoji |
| Annoyed | (¬_¬ ) |
| Shrugging | ¯_(ツ)_/¯ |
To access the symbol tool,
- Press your Windows key
 and then ..
 - The tool will pop up with Emojis highlighted.
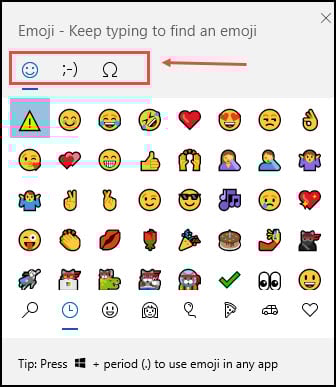
- Choose your symbol type from the top three icons.
- If you’re using Emojis, you can also start typing a name such as “heart”.
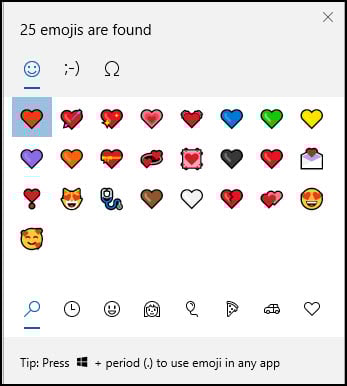
- Click the emoji you wish to use.
The process is similar to Kaomoji and symbols, except you need to do a visual search.
By now, you should know what are special characters and how to do symbols on your keyboard. No doubt, some people will commit their favorite ones to memory. Others may choose to use programs like ActiveWords to do text substitution. So remember you have many options the next time someone asks, “do you know how to type this symbol?”.
Hand-picked Tutorials
It seems a lot of people can’t find how to get certain symbols or
characters into their documents, so I hope to offer every method here.
Insert Symbol
This is one of the easiest methods. If you use the symbol a lot, you may
want to memorize the shortcut key for it, or create a shortcut key or
AutoCorrect entry for it. This is Word’s Symbol dialog.
Word’s Symbol dialog also has a Special Characters tab that
you shouldn’t miss if you use Word a lot. One of the most commonly looked for
symbols here is the Paragraph return, also called a Pilcrow.
Special for Excel
Excel lovers can download a special
Excel Insert Character
dialog created by Jon Peltier, Microsoft Excel MVP and owner of
PeltierTech. Thanks very much, John!
Character Map
If you can’t find your symbol or character using the Symbol
dialog, try the Character Map, which comes with Windows. To use it, hit Start Run
and type «charmap» (without the quotes) and hit Enter.
Shortcut Keys
Both the above methods may show keystrokes to use, such as the
one above displays:
Keystroke: Alt+0182
To use this keystroke, hold your Alt key while typing the
numbers on the number keypad. It won’t work using the regular keypad. Once you
type the last number, your symbol or character should appear.
Equation Editor
For even more symbols, usually of a scientific or mathematic
nature, or for creating Arithmetic problems, use the Equation Editor. Don’t
expect to jump right in and become an expert. It takes a bit of time. My
experience has been, too, that every time I try to edit the fonts, I mess it
up even more. Try to live with them the way they are.
To access the Equation Editor, hit Insert Object,
choose Microsoft Equation 3.0. This brings up the toolbar. You can create an
equation, which looks a lot like a graphic in your document. To edit the
equation later, just double-click it. To create another, you can copy the
first one, and paste it, then double-click it to change it.
