
Иногда вам может понадобиться написать письмо, которое вы будете отправлять разным людям, но вы бы например, чтобы отдельные его части были индивидуализированы для каждого адресата: такие части, как приветствие, имя, адрес, и т.п. Выражаясь языком Word, это означает, что вы должны создать форму письма, что действительно легко сделать.
Прежде чем приступить к работе с шаблонами писем, вы должны убедиться, что у вас уже настроена база данных со всеми полями, которые вы хотите включить. База данных может быть такой же простой, как электронная таблица Excel со столбцами для имени, фамилии, адреса и т. Д.
Оглавление
Word может импортировать данные из Excel, Access и текстовых документов. Если у вас еще нет настройки базы данных, вы всегда можете создать ее в Word, и я покажу вам, как это сделать.
Создание форм букв в Word
Для начала создайте документ со стандартным текстом, как в примере рождественского письма ниже:
Обратите внимание на отсутствие приветствия, адреса и т. Д. потому что все они будут добавлены позже как поля в нашем формном письме. Первое, что вам нужно сделать, это нажать на
Выберите получателей на Рассылки вкладка:
Здесь вы добавляете людей, которые будут получать письмо, или импортируете список из файла базы данных.
Вы можете нажать на Введите новый список если вы хотите создать список внутри самого Word. Чтобы импортировать, нажмите на Использовать существующий список. В этом примере мы просто напечатаем список.
Примечание. Когда вы собираетесь сохранить список получателей, Word предложит вам указать место на жестком диске для сохранения файла данных, который будет создан.
Сохранив список получателей, вы заметите, что многие значки на Рассылки ленту теперь можно щелкнуть.
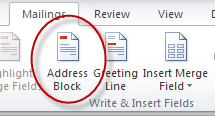
Чтобы начать добавлять поля в форму письма, щелкните место в документе, чтобы указать, где вы хотите разместить поле, а затем щелкните Адресный блок.
Это вызовет Вставить блок адреса диалог.
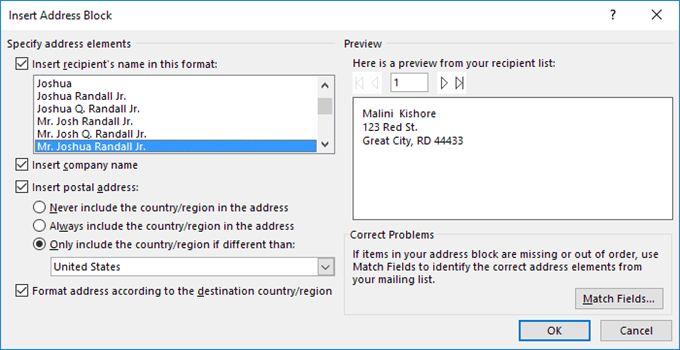
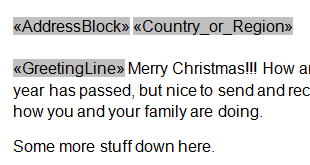
Нажмите хорошо чтобы использовать формат по умолчанию, и вы должны получить что-то вроде этого:
Затем добавьте Войти после Блок адреса чтобы переместить текст вниз по строке, затем нажмите на Линия приветствия икона:
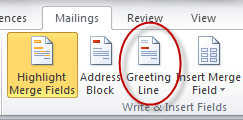
Это вызовет Вставить строку приветствия диалог.
Еще раз, давайте выберем формат по умолчанию и просто нажмем на хорошо кнопка.
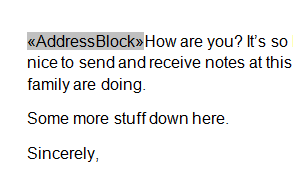
Затем выделите, где написано
, щелкните правой кнопкой мыши, выберите Параграф а затем установите флажок рядом с Не добавляйте пробелы между абзацами одного стиля.Это приведет к правильному соединению адресного блока вместо того, чтобы между каждой его частью была пустая строка.
Затем нажмите на Предварительный просмотр результатов значок, расположенный на вкладке «Рассылки» на ленте.
Вместо индикатора поля блока адреса вы должны теперь увидеть фактическое содержимое, указанное в документе Word.
Когда вы закончите предварительный просмотр, нажмите на Предварительный просмотр результатов значок, чтобы выключить предварительный просмотр. Затем, чтобы увидеть, как добавить другие поля, щелкните сразу после
в вашем документе, чтобы сделать это вашей текущей позицией, затем нажмите на Вставить поле слияния икона.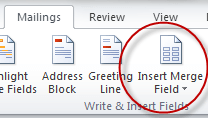
У вас должно получиться что-то вроде этого:
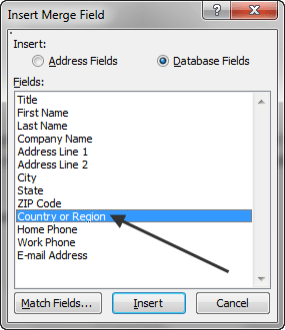
Выбирать Страна или Регион, затем щелкните Вставлять кнопка.
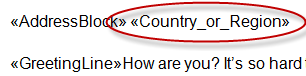
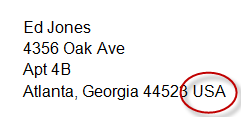
Попробуйте щелкнуть Предварительный просмотр результатов еще раз, чтобы посмотреть, как это выглядит. Вот мой пример ниже:
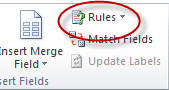
Теперь, когда форма письма настроена правильно, вы можете выполнять более сложные операции, например настраивать правила. Правила позволят вам показать один текст для определенных получателей и скрыть его для других. Чтобы начать, нажмите на Правила кнопка.
Вы увидите раскрывающееся меню с несколькими вариантами, такими как «Спросить», «Заполнить» и т. Д.
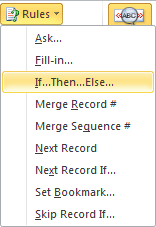
В нашем примере выберем Если… Тогда… Иначе, что приведет нас к следующему диалогу:
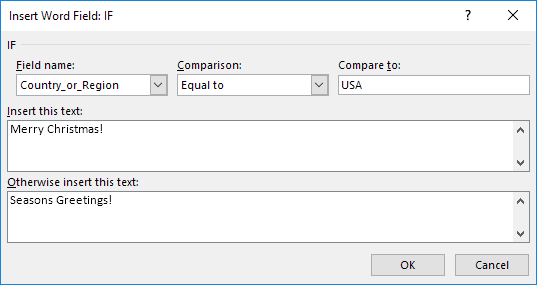
Изменить Имя поля: к Страна или Регион, и введите Соединенные Штаты Америки в По сравнению с: поле. Затем добавьте текст в поля, где написано Вставить этот текст и В противном случае вставьте этот текст.
В этом примере, если получатель проживает в США, он получит текст С Рождеством вставлены в свое письмо, а все остальные получат сообщение Сезоны Приветствия.
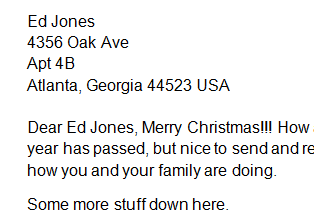
Вот как это будет выглядеть, когда вы нажмете хорошо кнопку, а затем Предварительный просмотр результатов кнопка.
Затем обратите внимание на Предварительный просмотр результатов раздел:
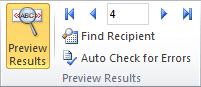
Здесь вы можете нажимать на кнопки со стрелками (когда Предварительный просмотр результатов включен) слева и справа от номера для прокрутки всех писем, которые будут отправлены. Таким образом, вы можете быть уверены, что все ваши письма будут выглядеть правильно перед печатью или отправкой по электронной почте.
Примечание: выбор меню полей соответствия в Правила предназначен для сопоставления имен полей в базе данных с именами заголовков в вашем списке получателей.
Также, чтобы было легче увидеть, где вы вставили поля в документ, используйте ВыделятьОбъединить поля кнопка.
Это переключатель, который вы можете включать и выключать по своему усмотрению. Наконец, когда вы будете довольны своим письмом, нажмите кнопку Завершить и объединить икона:

Вы должны получить это раскрывающееся меню с тремя вариантами.

Выбирать Редактировать отдельные документы чтобы Word мог объединить все ваши письма в один большой документ, который вы можете просмотреть перед печатью или отправкой по электронной почте.
Как видите, создание стандартных писем с помощью Word больше не является рутинной работой, как раньше, и вы можете создавать и отправлять документы быстро и легко. Если у вас есть вопросы, не стесняйтесь комментировать. Наслаждаться!
Summary
This article explains how to use the Mail Merge feature in Microsoft Word to create and to print form letters by using data from a Microsoft Excel worksheet.
When you use the Word Mail Merge feature, Word merges a main document with a recipient list to generate a set of output documents:
-
The main document contains the basic text that is the same in all of the output documents. It may contain a letterhead, text, and instructions in merge fields for inserting text (such as recipient names and addresses) that vary from one output document to another.
-
The recipient list is a database that contains the data that is to be merged into the output documents. For example, the recipient list is a Microsoft Access database file or an Excel worksheet.
This database is typically a list of names, addresses, phone numbers, and other categories of personal information.
-
The output documents are the result of the mail merge. The text in an output document can be the same in all output documents, but you can apply formatting to specific documents.
Step 1: Set Up the Excel Data File
Before you proceed with the Mail Merge Wizard, make sure that your Excel worksheet is well structured for this purpose. Note the following requirements for the data table:
-
The first row should contain field names for each column — for example, Title, Salutation, First Name, Middle Name, Last Name, Address1, and Address2.
-
Each field name should be unique.
-
Each row should provide information about a particular item. For example, in a mailing list, each row might include information about a particular recipient.
-
The table should contain no blank rows.
Create your Excel data file, and then arrange it by using the fields that you want to use for your letter, as shown in the following sample data file.
After you create your Excel data file, save it, and then close the data file.
For more information about how to create a mail-merge address list, click the following article number to view the article in the Microsoft Knowledge Base:
294688 How to design and set up a mail merge address list in Word 2002 and in later versions of Word
Step 2: Set Up the Main Document
-
In Microsoft Office Word 2003 and in earlier versions of Word, point to Letters and Mailings on the Tools menu, and then click Mail Merge Wizard.
In Microsoft Office Word 2007, click Start Mail Merge in the Start Mail Merge group on the Mailings tab, and then click Step by Step by Mail Merge Wizard.
-
Under Select document type, click Letters.
The active document becomes the main document. The main document contains the text and graphics that are the same for each version of the merged document. For example, the return address and the salutation in a form letter are the same for each version.
-
Click Next: Starting document.
-
Use one of the following methods:
-
Start with the document that is currently shown in the document window. To do this, click Use the current document.
You can then either type the letter in the document window or wait until the wizard prompts you to do so in a later step.
-
Start with a template. To do this, follow these steps:
-
Click Start from a template.
-
Click Select template.
-
On the Mail Merge tab, select the template that you want in the Select Template dialog box, and then click OK.
-
-
Start with an existing document. To do this, follow these steps:
-
Click Start from existing document.
-
In the Start from existing box, select the document that you want, and then click Open.
-
If you do not see the document, click More files, and then click Open. In the Open dialog box, locate the document that you want, and then click Open.
-
-
-
Click Next: Select recipients.
Step 3: Specify the Excel Data Source
-
Under Select recipients, click Use an existing list.
-
Click Browse.
-
In the Select Data Source dialog box, locate and then click the Excel worksheet that you want to use.
By default, Word opens the «My Data Sources» folder.
-
Click Open.
-
If your Excel worksheet contains information about multiple tabs, select the tab that contains the information that you want, and then click OK.
-
All entries in the data source appear in the Mail Merge Recipients dialog box. Here, you can refine the list of recipients to include in the merge.
Step 4: Select the Recipients
-
In the Mail Merge Recipients dialog box, select the recipients that you want to include. To do this, use one of the following methods:
-
Use the check boxes to designate recipients.
This method is most useful if the list is short. Click to select the check boxes next to the recipients that you want to include, and then click to clear the check boxes next to the recipients that you want to exclude.
Note If you know that you want to include most of the list in your merge, click Select All, and then click to clear particular records. Similarly, if you want to include only a few records in the list, click Clear All, and then select the records that you want.
-
Sort items in the list.
This method is useful if you want to see items in alphabetical or numeric order. Click the column heading of the element by which you want to sort. For example, if you want to display the list alphabetically by last name, click the Last Name column heading.
-
Filter items in the list.
This method is useful if the list contains records that you know you do not want to see or include in the merge. After you have filtered the list, you can use the check boxes to include and exclude records, as described earlier. To filter the list, follow these steps:
-
Click the arrow next to the column heading of the element that you want to filter by.
-
Click any of the following:
-
(Blanks): This option displays all the records in which the corresponding field is blank.
-
(Nonblanks): This option displays all the records in which the corresponding field contains information.
-
If the data source contains records that share the same information, and if there are 10 or fewer unique values in the column, you can filter by specific information. For example, if there are multiple addresses that list Australia as the country, you can filter by Australia.
-
-
-
The Mail Merge Recipients dialog box displays only the designated records. To display all the records again, click (All).
Notes
-
For advanced sorting and filtering, click the arrow next to any column name, and then click (Advanced). Use the Filter Records and Sort Records tabs to set up the sorting or filtering query that you want.
-
If you have installed address validation software, click Validate in the Mail Merge Recipients dialog box to validate your recipients’ addresses.
-
-
Click OK to return to the Mail Merge Wizard.
Word uses the recipients that you designated for the merge.
-
Click Next: Write your letter.
Step 5: Complete the Letter and Add Merge Fields
If you have not already done this, type the text that you want to appear in every form letter in the main document.
Insert Merge Fields
Insert merge fields where you want to merge names, addresses, and other information from the data source. To insert merge fields, follow these steps:
-
In the main document, click where you want to insert the field.
-
Insert any of the following:
-
Address block with name, address, and other information:
-
Click Address block.
-
In the Insert Address Block dialog box, select the address elements that you want to include and the formats that you want, and then click OK. For help on an option, click the question mark, and then click the option.
-
For help on an option, click the question mark, and then click the option. If the Match Fields dialog box appears, Word may be unable to find some of the information it needs for the address block. Click the arrow next to
(not available), and then select the field from your data source that corresponds to the field required for the mail merge.
-
-
Greeting line:
-
Click Greeting line.
-
Select the greeting line format that includes the salutation, name format, and following punctuation.
-
Select the text that you want to appear in the cases in which Word cannot interpret the recipient’s name. For example, Word cannot interpret the name when the data source contains no first or last name for a recipient, but only a company name.
-
Click OK.
-
If the Match Fields dialog box appears, Word may be unable to find some of the information it needs for the greeting line. Click the arrow next to (not available), and then select the field from your data source that corresponds to the field required for the mail merge.
-
-
Other fields of information:
-
Click More items.
-
Use one of the following methods:
-
Click Address Fields to select from address fields that will automatically map to corresponding fields in your data source, even if the data source’s fields do not have the same name as your fields.
-
Click Database Fields to select from fields that always take data directly from a column in a database.
-
-
In the Fields box, click the field that you want.
-
Click Insert, and then click Close.
-
If the Match Fields dialog box appears, Word may not be able to find some of the information it needs to insert the field. Click the arrow next to (not available), and then select the field from your data source that corresponds to the field required for the mail merge.
Note If you insert a field from the Database Fields list, and if you later switch to a data source that does not have a column with the same name, Word cannot insert that field information into the merged document.
-
-
Electronic postage:
To add electronic postage, you must first install an electronic postage program, such as one that you can purchase from a third-party provider on the Web. To use electronic postage, follow these steps:
-
Click Electronic postage.
If you do not have an electronic postage program installed, Word prompts you to install one, and offers to connect to the following Microsoft Office Web site:
Print Online Postage
http://office.microsoft.com/services/service.aspx?sid=2.4 -
Insert the postage according to the program’s instructions.
-
-
To add electronic postage, you must first install an electronic postage program, such as one that you can purchase from a third-party provider on the Web. To use electronic postage, follow these steps:Postal bar code: You must select a letter or envelope type that supports the POSTNET bar code. To use the Postal bar code, follow these steps:
-
Click Postal Bar Code.
-
In the Insert Postal Bar Code dialog box, select the appropriate address fields.
Note The Postal Bar Code option appears only if you are using the U.S. language version of Word.
-
Repeat steps a and b for all the fields that you want to insert. NOTES:
-
You cannot type merge field characters (» «) or insert them by using the Symbol command on the Insert menu.
-
If the merge fields appear inside braces, such as { MERGEFIELD City }, Word is displaying field codes instead of field results. This does not affect the merge, but if you want to display the results instead, right-click the field code, and then click Toggle Field Codes on the shortcut menu.
-
For example, by using the sample database shown earlier, your letter might contain the AddressBlock and GreetingLine fields, and therefore your first page appears similar to the following:
February 26, 2002
AddressBlock
GreetingLine
Type your letter here.
Sincerely,
Type your name here
-
Note You can also use the Mail Merge toolbar to insert merge fields, work with your mail-merge main document, or run a mail merge. To display the Mail Merge toolbar, point to Letters and Mailings on the Tools menu, and then click Show Mail Merge Toolbar.
The Mail Merge toolbar provides additional commands that are not included in the Mail Merge Wizard task panes. For example, you can use the Insert Word Field menu on the Mail Merge toolbar to insert Word fields for controlling the merge process. For example, you can insert an IF field that inserts text only if a particular merge field has a specified value.
Alternatively, you can click Check For Errors to make Word run the mail merge and report any errors that are contained in the main document.
-
Change the Format of the Merged Data
To format merged data, you must format the merge fields in the main document. Do not format the data in the data source, because its formatting is not retained when you merge the data into the document. To change the format of the merged data, follow these steps:
-
In the main document, select the field that contains the information that you want to format, including the enclosing merge field characters (<< >>).
-
In Word 2003 and in earlier versions of Word, click Font on the Format menu, and then select the options that you want.
In Word 2007, click the option that you want in the Theme Fonts box in the Font group on the Home tab.
Format by Using Field Codes
To control other aspects of formatting, press ALT+F9 to display field codes, and then add switches to the merge fields. When you work with fields, a switch is a special instruction that causes a specific action to occur. Generally, a switch is added to a field to modify a result.
Examples of how to use switches are as follows:
-
To display the number 34987.89 as $34,987.89, add the Numeric Picture switch (#).
-
To print client names in uppercase letters, add the Format switch (*).
-
To make sure that the merged information has the same font and point size that you apply to the merge field, add the Charformat switch (*).
Step 6: Save the Document
After you have completed the main document and inserted all the merge fields, make sure that you save the document before proceeding. To do this, follow these steps:
-
In Word 2003 and in earlier versions of Word, click Save As on the File menu.
In Word 2007, click the Microsoft Office Button, and then click Save As.
-
Name the document, and then click Save.
-
Click Next: Preview your letters.
Step 7: Preview the Letters and Fine-Tune the Recipient List
When the wizard displays the «Step 5 Mail Merge» task pane, the wizard replaces each of the merge fields in the main document that has the actual text from the first entry of the recipient list.Therefore, you can see how your first output document will look.
For example, if you were to continue to use the sample database shown earlier, the first page should resemble the following page after you click Next: Preview your letters:
February 26, 2002
Andrew Fuller
908 W. Capital Way
Tacoma 98401
Dear Andrew Fuller,
Type your letter here.
Sincerely,
Type your name here To preview additional entries, use one of the following methods:
-
To preview the items in order, click the left or right arrow buttons.
-
To locate and preview a specific item, click Find a recipient, and then enter the search criteria in the Find Entry dialog box.
Fine-tune the recipient list if you want. To do this, use one of the following methods:
-
To exclude a particular recipient from the merge operation, click Exclude this recipient.
-
To change the list of recipients, click Edit recipient list, and then make your changes in the Mail Merge Recipients dialog box.
Step 8: Complete the Merge
To complete the merge, use any of the following methods.
Personalize Individual Letters
To personalize individual items, you actually complete the merge, and then edit the information that you want in the resulting merged document. To do this, follow these steps:
-
Click Edit individual letters.
-
In the Merge to New Document dialog box, select the records that you want to merge.
-
Click OK.
Word creates and opens a new merged document. Your main document also remains open, and you can switch back to it if you want to change all the documents.
-
Scroll to the information that you want to edit, and then make your changes.
-
Print or save the document just as you would any regular document.
Print the Letters
To print the letters, use one of the following methods:
-
If you personalized the items and if the merged document is active, follow these steps:
-
In Word 2003 and in earlier versions of Word, click Print on the File menu.
In Word 2007, click the Microsoft Office Button, and then click Print.
-
Select the options that you want.
-
-
If you want to print directly from the Mail Merge Wizard, follow these steps:
-
In Step 6 of the Mail Merge Wizard (Complete the merge), click Print.
-
In the Merge to Printer dialog box, use one of the following methods, and then click OK:
-
To print all the documents, click All.
-
To print the document that you see in the document window, click Current record.
-
To print a range of documents, click From, and then type the record numbers in the From and To boxes.
-
-
In the Print dialog box, select the options that you want.
-
Save the Merged Letters for Later Use
If you want to edit merged letters or to save them for later use, you can collect them into a single document. To do this, follow these steps:
-
Click Edit individual letters.
-
In the Merge to a New Document dialog box, use one of the following methods, and then click OK:
-
To merge all the documents, click All.
-
To merge only the document that you see in the document window, click Current record.
-
To merge a range of documents, click From, and then type the record numbers in the From and To boxes.
-
-
Word opens a single new document that contains all the individual letters. You can then save the document for later use, just as you would any regular document.
References
For more information, click the following article numbers to view the articles in the Microsoft Knowledge Base:
318117 How to use addresses from an Excel worksheet to create labels in Word
318115 How to create a form letter by using information from an Access database in Word 2002
318112 How to use addresses from an Access 2002 database to create labels in Word 2002
294686 How to use mail merge to create a list sorted by category in Word 2002 and in later versions of Word
290408 Frequently asked questions about mail merge in Word 2002
294688 How to design and set up a mail merge address list in Word 2002 and in later versions of Word
294693 How to use mail merge to create a directory in Word 2002 and in later versions of Word
294683 How to use mail merge to create form letters in Word 2002 and in later versions of Word
To create a form in Word that others can fill out, start with a template or document and add content controls.
Start with a form template
- Go to File > New.
- In Search online templates, type Forms or the type of form you want and press ENTER.
- Choose a form template, and then select Create or Download.
Contents
- 1 How do you create a fillable form in Word?
- 2 How do I create a form template in Word?
- 3 How do I create a fillable PDF form in Word?
- 4 How do I create a fillable form in Word with lines?
- 5 How do I save a Word document as a fillable template?
- 6 What software do I need to create a fillable PDF form?
- 7 What is the best software for creating fillable forms?
- 8 How do I type under a line in Word?
- 9 How do you type over a dot in Word?
- 10 How do I create a form letter in open office?
- 11 How do you automate letters in Word?
- 12 What is a form letter or template?
- 13 How do I create a form in Word 2016?
- 14 What is a form letter in Word?
- 15 How do I create a form letter in Word 2013?
- 16 Is fillable a word?
- 17 Is there a free way to create a fillable PDF?
- 18 How do I make a fillable form for free?
- 19 What software can I use to create forms?
- 20 What program would you use to create a form?
How do you create a fillable form in Word?
Creating Fillable Forms Using Microsoft Word
- Enable Developer Tab. Open Microsoft Word, then go to the File Tab > Options > Customize Ribbon > check the Developer Tab in the right column > Click OK.
- Insert a Control.
- Edit Filler Text.
- Design Mode button again to exit the mode.
- Customize Content Controls.
How do I create a form template in Word?
Procedure
- Start by opening a Microsoft Word.
- From the Tools menu select Mail Merge.
- Click on the Create button listed under Main Document.
- Select Form Letters from the drop down menu.
- In the dialog box that appears select Active Window to start the form letter in the new document.
How do I create a fillable PDF form in Word?
Create a Fillable PDF Form from a Word Document
- Open the Word document that you want to make into a PDF form.
- Go to File -> Print, make sure “Adobe PDF” is selected as your printer, and then click the Print button.
- Word will ask you where to save the PDF file you’re creating.
How do I create a fillable form in Word with lines?
Firstly, click “Underline” under “Home” tab and choose one line style. Then press “Shift+ Underscore” to get a line. Then place cursor above the line and type the content. As you type, you will find the line gets longer and longer.
How do I save a Word document as a fillable template?
Saving and Using a Form
- Press F12. Word displays the Save As dialog box.
- Using the Save As Type drop-down list, select Word Template.
- If necessary, change to the directory where the template is to be stored.
- In the File Name field, enter the name under which you want this template saved.
- Click on Save.
What software do I need to create a fillable PDF form?
Adobe Acrobat Pro DC is the best app to create fillable forms, and consists of three main functions, Acrobat DC, Adobe Document Cloud, and Acrobat Reader. The first one enables you to edit PDFs, the second one keeps PDFs in sync in its cloud storage, and the last one is to read, print, and sign PDFs.
What is the best software for creating fillable forms?
Recommendations for Best Fillable PDF Form Designer Tools
- Foxit PDF Editor. This is one of the top PDF form designer tools capable of designing highly-quality fillable PDF forms with ease.
- Nitro PDF Pro. Nitro PDF Pro is one of the most popular PDF editors on the market.
- PDF Studio.
- Adobe Acrobat DC.
How do I type under a line in Word?
Place the insertion point where you want the ruling line (underlining). On the Format menu, click Font. In the Underline style box, select the line style you want, and then click OK. For every blank space you want to underline, press CTRL+SHIFT+SPACEBAR.
How do you type over a dot in Word?
To use a line shortcut, first, open your document with Microsoft Word. Next, place your cursor where you want to add a dotted line in your document. Type the asterisk sign (“*”) three times in your document. Now, press Enter, and Word will convert your asterisks into a dotted line automatically.
How do I create a form letter in open office?
Create a new text document: File > New > Text Document, or open a pre-existing form letter with File > Open. Display the registered data sources: View > Data sources (or press F4). Find the data source that you wish to use for the form letter, in this case Points.
How do you automate letters in Word?
To do this, follow these steps:
- Click Edit individual letters.
- In the Merge to New Document dialog box, select the records that you want to merge.
- Click OK.
- Scroll to the information that you want to edit, and then make your changes.
- Print or save the document just as you would any regular document.
What is a form letter or template?
A form letter is a letter written from a template, rather than being specially composed for a specific recipient. The most general kind of form letter consists of one or more regions of boilerplate text interspersed with one or more substitution placeholders.
How do I create a form in Word 2016?
How To Create A Fillable Form in Word 2011 and 2016
- Open a new document in Word.
- Click on the Word menu and select Preferences.
- Click the Ribbon button on the bottom row on the right-hand side.
- In the Customize section, scroll through the list and insert a check mark next to Developer.
- Click the OK button.
What is a form letter in Word?
Two Microsoft Office applications will be required for this task. Excel will be used for the data and Word will be used to create the form letter. A form letter is one in which the body of the letter stays the same but specific information is inserted for/about several different individuals.
How do I create a form letter in Word 2013?
Create a Mail Merge Letter in Word 2013
- 2On the Mailings tab, from the Start Mail Merge group, choose Start Mail Merge→Letters. This will give you the necessary format.
- 3Type the letter. You’re typing only the common parts of the letter, the text that doesn’t change for each copy you print.
- 5Save the main document.
Is fillable a word?
Able to be filled.
Is there a free way to create a fillable PDF?
Open Jotform
Create a free Jotform account and build your fillable PDF form from scratch — or upload an existing PDF form to convert it into a fillable PDF in a single click.
How do I make a fillable form for free?
How to create fillable PDF files:
- Open Acrobat: Click on the “Tools” tab and select “Prepare Form.”
- Select a file or scan a document: Acrobat will automatically analyze your document and add form fields.
- Add new form fields: Use the top toolbar and adjust the layout using tools in the right pane.
- Save your fillable PDF:
What software can I use to create forms?
Best online form builders of 2021
- Hubspot Free Online Form Builder.
- Gravity Forms.
- Typeform.
- Wufoo.
- Microsoft Forms.
- Formstack.
- Paperform.
- Formsite.
What program would you use to create a form?
The 8 best online form builder apps
- Google Forms for quickly creating powerful forms for free.
- Microsoft Forms for collecting and analyzing form results in Excel.
- Jotform for building a form from a template.
- Formstack for advanced analytics and regulated industries.
- Typeform for conversational data collection.
Perform a Mail Merge in Microsoft Word to Generate Form Letters for Bulk Mailings
by Avantix Learning Team | Updated January 10, 2021
Applies to: Microsoft® Word® 2013, 2016, 2019 and 365 (Windows)
You can use mail merge in Microsoft Word to create form letters, labels, envelopes and even a catalog or directory. In this article, we’ll review the process for creating form letters for multiple contacts or clients. You’ll need to create a main document or letter in Microsoft Word and then connect to a data set of names and addresses in a Word document, Excel worksheet, delimited file or database like Microsoft Access. When you run the mail merge, you have the option of creating a new merged file (which would include a letter for each contact) or merge directly to a printer.
Recommended article: How to Create Labels in Word Using Mail Merge and Excel Source Data
Do you want to learn more about Word? Check out our virtual classroom or live classroom Word courses >
Understanding the mail merge process for form letters
There are 7 steps in the mail merge process to create form letters in Word:
- Start the merge and specify the main document for the letter.
- Select the source file containing the data set with names and addresses. Microsoft refers to a data set or database as a list. It’s best to create this file before you begin the mail merge process.
- Insert fields into the letter and any other required content (such as the body of the letter and signature).
- Format the letter.
- Select specific recipients or filter the recipient list (optional).
- Preview the merged letter (optional).
- Run the mail merge.
During the mail merge process, fields are inserted into the main document and appear in carets (such as <<FirstName>>). By default, when you click in a field, it is displayed with grey shading. When you run the merge, the fields are replaced by data from the source file.
In this article, we’ll be using the Mailings tab in the Ribbon to set up and run a mail merge (not the Mail Merge Wizard):

Step 1: Start the merge and specify the main document
The first step in the mail merge process is to start the merge using Start Mail Merge on the Mailings tab in the Word Ribbon:

To start the merge and specify the main document as a form letter:
- Create a new blank document or open a Word document containing a sample letter.
- Click the Mailings tab in the Ribbon and then click Start Mail Merge in the Start Mail Merge group.
- From the drop-down menu, select the type of document you want to create. In this case, select Letters. By default, Word uses the current document. At this point, you may want to insert other components such as a date, the body of the letter and a signature.
Step 2: Select the source file containing the data set
The next step is to connect to a source file containing a list of names and addresses using Select Recipients. The source file can be a Microsoft Word document containing a table or delimited data, Excel worksheet or even a table or query in a database such as Microsoft Access. For Word tables and Excel spreadsheets, the first row in the table or worksheet must contain field names such as FirstName, LastName, Company, Address and so on. In a Word source file, there cannot be any paragraphs above the table or data. You can also use a comma or tab delimited file as long as the first line in the document contains field names. In delimited files, the field names and data are separated by a delimiter such as a comma or tab.
Select Recipients appears on the Mailings tab in the Ribbon:

In the following example, note that the field names are in the first row of a Word table which will be used as a source:

In the following Excel example, note that the field names are in the first row of the worksheet which will be used as a source:

To select a Microsoft Word source file containing a table with names and addresses:
- In the main Word document, click the Mailings tab in the Ribbon and then click Select Recipients in the Start Mail Merge group. A dialog box appears.
- Click Use an Existing List from the drop-down menu. A dialog box appears.
- Navigate to the Word file containing the names and addresses you want to use.
- Double-click the file.
To select a Microsoft Excel source file containing a worksheet with names and addresses:
- In the main Word document, click the Mailings tab in the Ribbon and then click Select Recipients in the Start Mail Merge group. A dialog box appears.
- Click Use an Existing List from the drop-down menu. A dialog box appears.
- Navigate to the Excel file containing the names and addresses you want to use.
- Double-click the file. A dialog box appears.
- Ensure First row of data contains column headers is checked.
- Click the Excel worksheet containing the data you wish to use.
- Click OK.
The following dialog box appears when you select an Excel file as the source for a merge:

Step 3: Insert fields from the source file
Once you have connected to a source file, you can insert fields into the main document or letter. You have the option of using special Word fields such as Address Block and Greeting Line (for example, to insert Dear John) or inserting individual fields.
Address Block and Greeting Line appear as follows in the Ribbon:

To insert the Address Block field:
- Click in the main document where you want to insert an address block.
- Click the Mailings tab in the Ribbon and then click Address Block in the Write & Insert Fields group. A dialog box appears. Word will display an address based on the source data.
- In the samples on the left, select the address sample you prefer.
- Check or uncheck other options if necessary.
- Click OK. Word inserts an Address Block field into the main document.
For Address Block, select a sample address in the area on the left in the Insert Address Block dialog box:

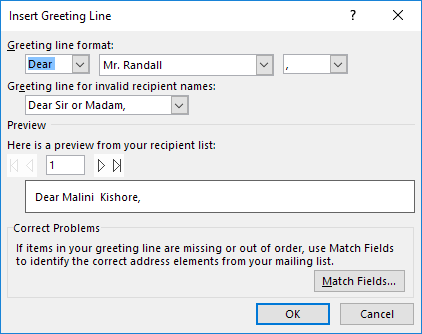
To insert a Greeting Line field:
- Click in the main document where you want to insert a greeting.
- Click the Mailings tab in the Ribbon and then click Greeting Line in the Write & Fields group. A dialog box appears. Word will display a greeting based on the source data.
- Select greeting line options for the Greeting line format.
- Select an option for invalid recipient names.
- Click OK. Word inserts a Greeting Line field into the main document.
For Greeting Line, select greeting line options in the Insert Greeting Line dialog box:

To insert fields individually:
- Click in the main document where you want to insert a field (such as FirstName).
- Click the Mailings tab in the Ribbon and then select Insert Merge Field in the Write & Insert Fields group.
- From the drop-down menu, select the field you want to insert.
- Press the spacebar, type text or press Enter if necessary.
- Repeat for other fields you want to insert.
Step 4: Format the letter
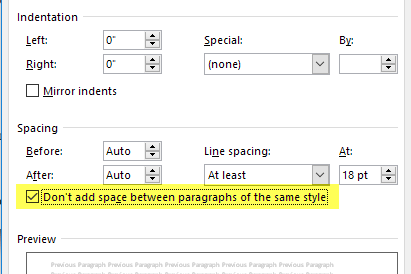
You may need to apply formatting to the letter such as changing the font and size and adjusting paragraph spacing.
It’s common for an Address Block field or address lines to have extra paragraph spacing above and / or below lines in the address when the results are previewed or printed. This is caused by default settings for space above and below paragraphs.
To remove the paragraph spacing:
- Select the Address Block field or other lines (often in the address if you have inserted individual fields).
- Click the Home tab in the Ribbon and select the dialog box launcher on the bottom right of the Paragraph group.
- Select Don’t add space between paragraphs of the same style. Alternatively, change the space above and below the paragraph(s).
- Click OK.
Step 5: Select specific recipients or filter the recipient list (optional)
You have the option of specifying specific recipients or filtering the recipient list if you don’t want to create form letters for all contacts in the data source.
To choose specific contacts:
- Click the Mailings tab in the Ribbon and then click Edit Recipient List in the Start Mail Merge group. A dialog box appears.
- Uncheck the check boxes beside the recipients you do not want to include in the mail merge.
- Click OK.
To filter the source list:
- Click the Mailings tab in the Ribbon and then click Edit Recipient List in the Start Mail Merge group. A dialog box appears.
- Click Filter. A dialog box appears.
- Select / enter the desired filtering options.
- Click OK.
For example, below is a filter to display records from Toronto:

To remove the filter, repeat the process, but click Clear All in the Filter and Sort dialog box.
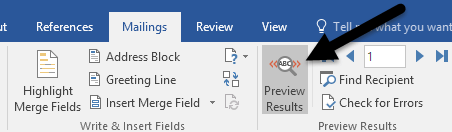
Step 6: Preview the results (optional)
Before you run the mail merge, you can preview the results:
- In the main document, click the Mailings tab in the Ribbon and then click Preview Results in the Preview Results group.
- Click the arrows in the Preview Results group to go to the next or previous letter.
- Click Preview Results to view the fields again.
Step 7: Run the mail merge for letters
The final step is to run the merge. You can either create a new merged document or merge directly to a printer.
To run the letter mail merge in the main document and create a new merged document:
- Click the Mailings tab in the Ribbon and then click Finish & Merge in the Finish group. A drop-down menu appears.
- Click Edit Individual Documents. A dialog box appears.
- Click Current Record or enter a selected range if necessary.
- Click OK. Word creates a new merged document that you can edit, print and save. Each letter will appear on a new page in a new section.
The following dialog box appears when you select Edit individual documents.

To run the letter mail merge in the main document and print the merged documents:
- Click the Mailings tab in the Ribbon and click Finish & Merge in the Finish group. A drop-down menu appears.
- Select Print Documents. A dialog box appears.
- Click Current Record or enter a selected range if necessary.
- Click OK. A dialog box appears.
- Select the desired printer and other printer options.
- Click OK.
The following dialog box appears when you select Print Documents:

You will typically want to save the main document and the source file. If you save the merged file, you will have a record of the letters that were created.
The process is similar for labels. The main document would be labels (usually a label type with a product code) and would connect to the source document in the same way.
This article was first published on December 9, 2019 and has been updated for clarity and content.
Subscribe to get more articles like this one
Did you find this article helpful? If you would like to receive new articles, join our email list.
More resources
How to Insert a DRAFT Watermark in Word and Remove It (Add Text or Picture Watermarks)
How to Remove Hard Returns in Word Documents
How to Superscipt or Subscript in Word (with Shortcuts)
Related courses
Microsoft Word: Intermediate / Advanced
Microsoft Word: Designing Dynamic Word Documents Using Fields
Microsoft Word: Long Documents Master Class
Microsoft Word: Accessible Word Documents
Microsoft PowerPoint: Intermediate / Advanced
VIEW MORE COURSES >
Our instructor-led courses are delivered in virtual classroom format or at our downtown Toronto location at 18 King Street East, Suite 1400, Toronto, Ontario, Canada (some in-person classroom courses may also be delivered at an alternate downtown Toronto location). Contact us at info@avantixlearning.ca if you’d like to arrange custom instructor-led virtual classroom or onsite training on a date that’s convenient for you.
Copyright 2023 Avantix® Learning
Microsoft, the Microsoft logo, Microsoft Office and related Microsoft applications and logos are registered trademarks of Microsoft Corporation in Canada, US and other countries. All other trademarks are the property of the registered owners.
Avantix Learning |18 King Street East, Suite 1400, Toronto, Ontario, Canada M5C 1C4 | Contact us at info@avantixlearning.ca
Mail merge is a Microsoft Word feature that helps you streamline creating personalized letters, labels, envelopes, emails, and a directory. Since mail merge is not among the most commonly used MS Word features, some users might not know how to do a mail merge in Word to create letters, labels, and envelopes.
If you’re trying to save time spent on manually personalizing each letter, label, or other documents, mail merge can come in handy. Even if you’ve never tried to create a mail merge letter, the process is pretty straightforward, and we walk you through each step below.

Microsoft Word has a wizard that walks you through creating mail merge letters. The wizard will ask for the letter you’d like to use and the recipients of the letter along the way, so make sure you have a list of recipients ready to insert. If you don’t, no biggie, you can always add a list of recipients manually.
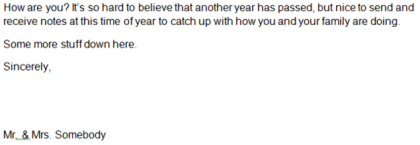
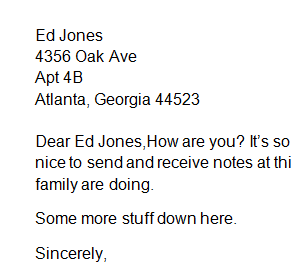
- Open a Word document and type out your message. Leave out the personalized elements (for instance, title, name, city, etc.). For now, you could just leave a blank space for where you want to insert these elements, like so:
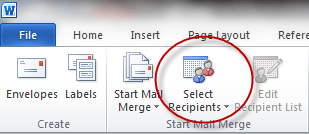
- When your template is ready, select Mailings > Start Mail Merge > Step-by-Step Mail Merge Wizard from the top ribbon.
- A new pane will appear along the right border of your MS Word window. This is the wizard that will walk you through the process. As a first step, you’ll need to select the type of document you’re working on. Select Letters and choose Next: Starting document.
- You’ll need to choose the document you want to use for mail merge in the next.
If you’ve already typed in some content for your letter, select Use the current document.
If you want to use a ready-to-use template, select Start from a template. When you’ve chosen a starting document, click on Select recipients.
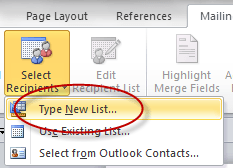
- The next step is to select recipients. Assuming you have an Excel sheet populated with the recipient data, you can import the data by selecting the Use an existing file option and selecting Browse from the subsequent section.
Navigate to the sheet containing the list of recipients using the explorer, select the sheet and select Open.
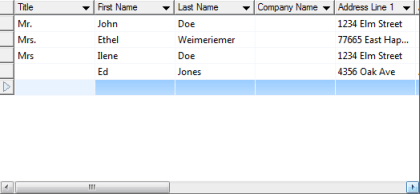
When you select the sheet, you’ll see the Select Table window. Select the relevant table(s). Be sure to check the box beside the text First row of data contains column headers if that’s true for your data, and select OK.
Next, you’ll see the list of recipients that Word will use in your merge. If everything looks good, select OK.
When you’ve added the Excel sheet, select Next: Write your letter.
- You’re now ready to add placeholders in your letter. Bring your cursor to where you want to add the placeholder and select More items from the mail merge pane.
The Insert Merge Field dialog box will open from where you can select the relevant placeholder and select Insert to add it to your letter.
- When you’ve inserted all merge fields, select Next: Preview your letters.
This will show you a preview of all letters generated with mail merge. You can use arrow buttons in the mail merge pane to switch the preview of letters.
- Select Next: Complete the merge. In the subsequent step, select either Print (if you want to print all letters) or Edit individual letters > All (if you’re going to merge the letters into a single document).
It’s always a good idea to compile your mailing list tidily in an Excel sheet so you don’t feel dizzy when you need someone’s mailing details. However, if you want to print the labels, your Excel sheet compilation won’t cut it. Instead, you’ll need to create mail merge labels on MS Word.
- If you already have an Excel sheet with mailing details, you can skip over to the next step. If not, organize your mailing list on an Excel sheet. Add some headers (First Name, Last Name, Address, etc.) and get your list sorted.
- Switch over to MS Word. Use the wizard for creating labels. Open a blank document and select Mailings > Select Mail Merge > Step-by-Step Mail Merge Wizard.
- Select Labels and then Next: Starting document.
- On the next screen, select Change document layout. Next, select Label options to set your product number and label brand.
Once you select OK, you’ll see the labels outlined on your document. If you don’t, go to Table Design > Borders and select View Gridlines.
- Go back to the Mailings tab in MS Word and select Select Recipients > Use an Existing List.
Navigate to the Excel file containing the mail list. Select the file and select Open.
- You’ll see the Select Table window. If you have multiple sheets in your workbook, you’ll see more than one item here. Select the one that contains your mailing list. Check the box besides the text First row of data contains column headers, and select OK.
- MS Word imports the mailing list. Select Address Block. Look at the preview on the right.
If it doesn’t look like how you want it, select Match Fields. Make sure that all details correspond to an appropriate header from your worksheet and select OK.
Look at the preview again. If it looks good, select OK.
- You’ll now see <<AddressBlock>> in the label. Go to Mailings > Update Labels to add <<AddressBlock>> to all labels.
- The labels are now ready to be merged. Go to Mailings > Finish & Merge > Edit Individual Documents.
You’ll see a small window pop up. Select All and then OK.
- You’ll now see all your labels merged.
Creating mail merge envelopes is mostly the same as that for labels, but with a few tweaks.
Again, click on Mailings > Start Mail Merge > Step-by-Step Mail Merge Wizard, but this time, select Envelopes and then select Next: Starting document from the bottom.
- You’ll be asked to select a starting document. Select Envelope options to select envelope size and position of the delivery/return address (refer to next step), and select Next: Select recipients.
- When you select Envelope options, you’ll see a small window pop up. Select your preferred envelope size and select the font and the placement for delivery and return address.
- The next step in the wizard is to select recipients. Select Use an existing list (assuming you already have an Excel sheet containing the recipient data), and select Browse to look for the file. Select the relevant file and click on Next: Arrange your envelope.
- On your next screen, select Address block, look at the preview to ensure it looks like you want it to, and select OK.
You’ll now see <<AddressBlock>> appear on the envelope.
- Select Next: Preview your envelopes. You’ll see the same preview you saw in the previous step but on your document. You can use the arrow buttons in the wizard pane to switch between envelopes.
Your envelopes are now ready to be merged. Select Next: Complete the merge.
- On the following screen, you’ll see an option to Edit individual envelopes. Select it, select All to merge all records, and select OK.
You’ll now see all envelopes merged into a single document.
Using mail merge can save you a ton of time you’d otherwise spend customizing your letters, labels, or envelopes. That’s not all you can do with MS Word, though. You can also create greeting cards, booklets, and index cards.
Mail merge has been around for a while, but if you’re looking to make your processes efficient, Microsoft Office 2019 introduced some neat features you may want to look at.