
Create a document in Word

With Word on your PC, Mac, or mobile device, you can:
-
Create documents from scratch, or a template.
-
Add text, images, art, and videos.
-
Research a topic and find credible sources.
-
Access your documents from a computer, tablet, or phone with OneDrive.
-
Share your documents and work with others.
-
Track and review changes.
Create a document
-
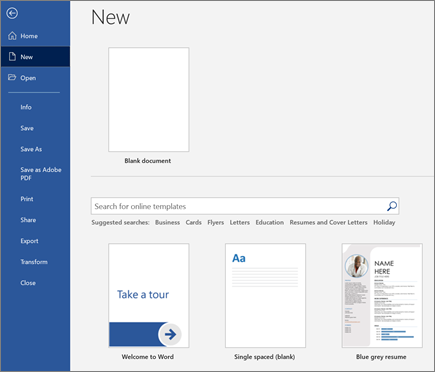
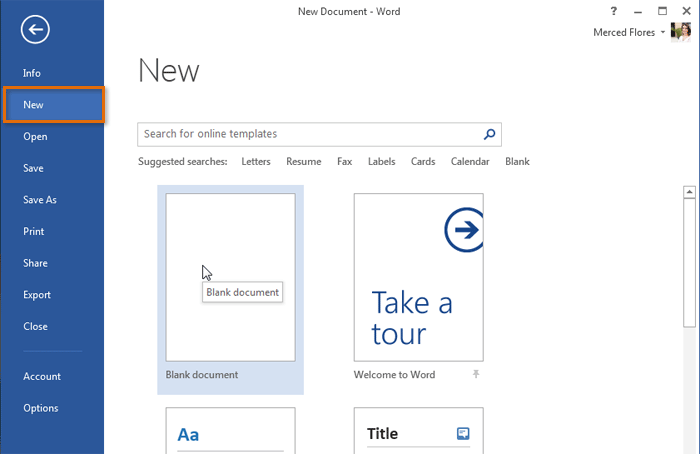
On the File tab, click New.
-
In the Search for online templates box, enter the type of document you want to create and press ENTER.
Tip: To start from scratch, select Blank document. Or, for practice using Word features, try a learning guide like Welcome to Word, Insert your first table of contents, and more.
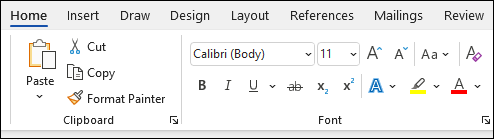
Add and format text
-
Place the cursor and type some text.
-
To format, select the text and then select an option: Bold, Italic, Bullets, Numbering, and more.
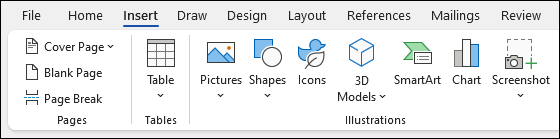
Add Pictures, Shapes, SmartArt, Chart, and more
-
Select the Insert tab.
-
Select what you want to add:
-
Tables — select Table, hover over the size you want, and select it.
-
Pictures — select Pictures, browse for pictures from your computer, select a stock image, or even search Bing.
Note:
Older versions of Word may have Online Pictures on the ribbon next to Pictures. -
Shapes — select Shapes, and choose a shape from the drop-down.
-
Icons — select Icons, pick the one you want, and select Insert.
-
3D Models — select 3D Models, choose from a file or online source, go to the image you want, and select Insert.
-
SmartArt — select SmartArt, choose a SmartArt Graphic, and select OK.
-
Chart — select Chart, select the chart you want, and select OK.
-
Screenshot — select Screenshot and select one from the drop-down.
-
Next:
Save your document to OneDrive in Word
Need more help?
Want more options?
Explore subscription benefits, browse training courses, learn how to secure your device, and more.
Communities help you ask and answer questions, give feedback, and hear from experts with rich knowledge.
Find solutions to common problems or get help from a support agent.
Updated: 11/18/2022 by
To create a document, you must either have a word processor for word processing or a computer capable of creating a document on an online service.
Note
When we refer to a «document,» we’re talking about a rich text document with text formatting (e.g., bold), images, different fonts, and font sizes, and not a plain text file. For steps on making a text-only file, see: How to create a text file.
The most common and widely used word processor program is Microsoft Word. However, because of all of the different needs of users today, we’ve included additional options that are available for creating a document.
Creating a document with Google Docs

Google Docs is one of our favorite solutions for most users, especially those who are new computers. The reasons we like it are because it’s free, easy to access, supports collaborative editing, can open other document files, and may be accessed from many devices. To create a document in Google Docs, follow the steps below.
Create a blank document
- Open Google Drive. If prompted, log into your Google account.
- In the upper-left corner of the window, click the
 button.
 - In the drop-down menu that appears, move your mouse cursor over the arrow next to Google Docs.
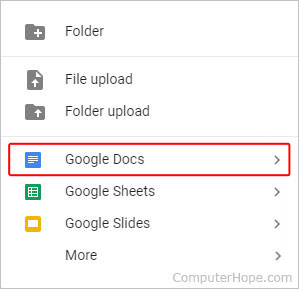
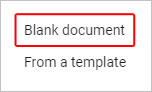
- Choose Blank document from the box that appears.
Create a document using a template
- Complete steps 1-3 in the previous section.
- Choose From a template in the box that appears.
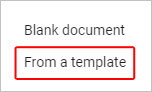
- Select a template in the window that appears.
Tip
Your newly-created document may be accessed in the My Drive section (first tab in the left menu).


Creating a document with Microsoft Word
To use Microsoft Word to open a document, follow the steps below.
Open Word in Windows
- Open Microsoft Word. If you’re unsure how to open or find Word, skip to the finding Microsoft Word section.
- In newer versions of Word, the first screen asks what type of Word document you want to create. Select the «Blank document» option to create a document from scratch. You can also select from one of the Word templates provided if you want to create a specific type of document.
- Once the blank document or template is open, any new information can be entered using a keyboard or on-screen keyboard.
- Once complete or while working on the document, you can save through the File tab at the top of the Word program window.
How to find Microsoft Word in Windows
- In Windows, click Start.
- In the search box, type word. If Word is installed, it shows in the search results. For example, you may see Microsoft Word 2010, Microsoft Word 2013, or Microsoft Word 365.
Tip
In Windows 10, the search box is on the Taskbar next to Start. In Windows 8, start typing word on the Start page and the search results show on the right side of the screen.
Note
Word and WordPad are two different programs. See the creating a document with Microsoft WordPad section below for further information on this program.
How to install Microsoft Word
If Word is not found, it needs to be installed before it can run, or one of the other free alternatives can be used. Today, the latest version of Word is included in Office 365 and requires a subscription. You can download Office 365, which includes Excel, Word, and other Office applications, from the Office 365 website.
Tip
If you’ve purchased Office or Word in the past, older versions of Office can also be installed on newer computers, even those running Windows 8 or Windows 10. You must have the installation discs to install Office or Word again.
How to open a new document if a Microsoft Word document is already open
Press the shortcut keys Ctrl+N simultaneously to open a new document.
— OR —
- Click File in the file menu or the File tab at the top of the program window.
- Select the New option.
- A prompt should open that presents you with several options. Select the Blank document option.
Creating a document with Microsoft WordPad
Microsoft WordPad is a free rich-text editor included with Microsoft Windows for viewing and editing rich-text files (.RTF, .DOCX, and .ODT) files. WordPad can perform basic text formatting like changing the font, alignment, and inserting multimedia. However, realize that it does not support all formatting options in .DOCX and .ODT files, so some formatting may be incorrect. To open WordPad, follow the steps below.
- In Windows, click Start.
- In the search box, type wordpad and select the WordPad application in the search results. Once open, there should be a blank window similar to the example below.
Tip
In Windows 10, the search box is on the Taskbar next to Start. In Windows 8, start typing wordpad on the Start page and the search results show on the right side of the screen.
- Type and create the document how you want it to appear.
- After changes are made to your document, you can save the file in the File section.
If WordPad is already open and you want to create a new document
Press the shortcut keys Ctrl+N simultaneously to open a new document.
— OR —
In the menu bar, click File and select New. If the File tab or menu is not available, click the blue Menu tab ![]() in the top-left corner and select New from the drop-down menu.
in the top-left corner and select New from the drop-down menu.
Creating a document with LibreOffice and OpenOffice
LibreOffice and OpenOffice Writer are other great free products that allow anyone to create documents on their computer and can even support most of the features in Word. Below are the steps on how to run LibreOffice and OpenOffice in Windows.
Open LibreOffice and OpenOffice in Windows
- In Windows, click Start.
- In the search box, type writer. If LibreOffice or OpenOffice is installed, either LibreOffice Writer or OpenOffice Writer show in the search results.
Tip
In Windows 10, the search box is on the Taskbar next to Start. In Windows 8, start typing writer on the Start page and the search results show on the right side of the screen.
How to install LibreOffice or OpenOffice
LibreOffice is available for download on the LibreOffice website and OpenOffice is available for download on the OpenOffice website.
Once either of these programs are installed, you can follow the steps above to create a document.
Creating a document with AbiWord
AbiWord is another great free product and solution for creating documents on your computer. Below are the steps on how to create a document with AbiWord.
- Open AbiWord.
- Click File and New or press the shortcut Ctrl+N to create a new document.
- Type the document you want to create.
- Save the document by clicking File > Save or pressing the shortcut key Ctrl+S.
Thanks to Microsoft Word, almost anyone can turn out professional-looking office documents.
Even if you’ve never used MS Word before, you’ll find that it only takes a few minutes to become familiar and comfortable with its interface and basic features.


Note: We used the Invoice template from Elements to create this letter. Find more great Word templates from Envato Elements.
In this tutorial, I’ll show you how to write a business letter in MS Word. In the process, you’ll learn the answers to the following:
- How to create a Word document?
- How do you save a file on Microsoft Word?
- How to open a new file in MS Word?
- How do you use a Word template?
- How do you copy a Word document?
By the end of the tutorial, you’ll be able to create your own document using Microsoft Word.
Launch Microsoft Word
Start by launching Microsoft Word. To use Microsoft Word online, you must have an Office 365 account (paid).
Sign in to your account, then click on Word.


How to Launch Microsoft Word on a Mac
If you’re on a Mac, you’ve got several options for launching Microsoft Word.
Option 1. Launch in Finder
Go to Applications, then double-click on Microsoft Word.


Note: In this tutorial, I’m using a Mac so that’s the interface you see. If you’re on Windows, the steps will be similar, albeit with different names for different applications and interfaces. For example, Finder on a Mac is either Windows Explorer or File Explorer on Windows, depending on which version you’re using.
Option 2. Launch in Spotlight.
Launch Spotlight by clicking on the search icon in the upper right-hand corner of the screen on your Mac.
![]()
![]()
![]()
A Spotlight search bar pops open. Type “Word.” Double-click on the Microsoft Word app that appears in the Spotlight results.


When you launch Microsoft Word for the first time, it automatically opens a new blank Word document. From here, you can proceed to make your business letter.
Otherwise, when prompted, select New > Blank Document > Create.


And that’s how to create a new document in MS Word.
Make a Business Letter From a Template
If you want your document to have a fancier layout, the fastest way is to start with a business letter template for Word made by a professional designer.
Word comes with its own built-in templates. You may wish to use one of these. But, keep in mind that many other Word users may use these templates. That means you may get a document that looks like someone else’s. What you want to do is to make a good impression and stand out. The best way to do that is with a template.
You could make a template yourself. But, unless you’re already familiar with the advanced features of Microsoft Word, creating a complicated layout would take you a lot of time.
In this section, I’m going to show you how to make a business letter from a template in Word. I’m using the Invoice template for Word from Envato Elements. It includes a template for a cover letter, which would work well with the business letter we’re making.


,
Step 1. Download the Template
Save the template to your hard drive. Duplicate it, so you’ll always have the original files on hand. These will come in handy in case you want to revert back to the original version of the template.


Most premium templates include a help file. Read it for specific instructions and tips from the template’s designer.


Step 2. Open the Template in Word
Launch Microsoft Word, then select Open. Follow the rest of the prompts to open the duplicate template file you created earlier.


Since I only need the letter template for Word, I’m going to delete the page with the invoice. Go to the invoice page, then click Edit > Select All.


Press the Delete key on your keyboard. Now, only the letter template page remains in the document.


Step 3. Customize the Letterhead Template for Word
Replace the placeholder text with your own. Double-click into the text boxes to type your own text. You may have to click-and-drag a corner of the text box to make it bigger and accommodate your text.


Delete any other text boxes and graphic elements you don’t want to use. Use the formatting tools to apply styles to your text and add a bullet list, as you learned to do in the previous section. Finally, insert your logo.
Since we’re not using the large signature, there’s a large space on the lower half of the letter. To balance the page, I moved the entire body of the letter lower on the page.
This is the business letter all done:
Next, I’m going to show you how to make a business letter without a template.
Make a Business Letter From Scratch
If you don’t need a professional appearance for your business letter or if it’s a personal letter, you can still make a business letter. With a new blank Word document open, type your business letter.


You’ve just created a business letter as a new Word document! As you’ll notice, it’s very plain.
However, you may wish to modify the document’s default settings in Word.
1. Change the Margins
Go to Format > Document.


Change the margins as you wish. Click OK.


2. Change the Font and Font Size
Highlight the text whose font you wish to change, then click the drop-down arrow for the font section of the Microsoft Word ribbon. Scroll down the list of fonts until you find the one you want to use. Click on it to apply the font to the selected text.


To change the font size, select the text you wish to edit. Click the drop-down arrow for the font size section of the ribbon (it’s beside the font selector). Click on the font size you want to apply.


3. Format the Text
It’s easy to apply formatting styles to your business letter. Highlight the text you want to format. Then, click on any of the formatting buttons on the Microsoft Word ribbon.


The text formatting section of the ribbon, shown above, lets you apply a variety of styles and effects on your text, including changing the color of the font. Hover over a button to learn what it’s for.
4. Add Bullets
It only takes one click to add a bulleted list in Microsoft Word. Take note that each item on the list must be typed on a separate line.
To create a bullet list, select the items for the list. Click on the Bullets button.


This applies a basic dot-bullet on your list, with default settings for indents.


If you want a different bullet character, after selecting the list text, click on the drop-down arrow beside the Bullets button. Choose a bullet style from the selection that appears.


Or, click Define New Bullet, then select a different bullet character.


Here, you can also change the bullet position and text position. When you’re done, click OK.
5. Insert Your Logo
Our business letter is looking good! The only thing missing is our logo.
To add a logo in the header of the letter, double-click on the top-most part of the document. This opens the header. Click the Picture from File button.


Find the logo file in your computer, then click Insert.
![]()
![]()
![]()
To exit the header, click the Header & Footer tab in the ribbon. Then select Close Header and Footer.


The logo appears greyed out when the Header section is closed. Don’t worry, it’ll display properly when you print the letter.
After moving the entire letter body down to add space below the logo, our business letter now looks like this:


You’ve just learned how to make a business letter from scratch using Microsoft Word.
How Do You Save a File in Microsoft Word?
Always save your work as you go! Otherwise, you run the risk of losing your work, should your computer shut off or crash unexpectedly. This section is for you if you’re asking: «how do you save a file on Microsoft Word?»
The quickest way is to click the Save button on the top of Microsoft Word.


Or, go to File > Save.


Alternatively, go to File > Save As to make a copy of the file.
If you’re saving the file for the first time, or if you selected Save As, you’ll be prompted to give the file a name and indicate where to save the file. When you’re done doing so, click Save.


You can also set up a default location where Word will save your files. To set this up, go to Word > Preferences.


Click File Locations.


Select AutoRecover files, then click Modify…


Choose a location on your computer for where you want your Word documents to be saved. Click Open.


The new location appears under File Locations. If it’s correct, close this dialogue box by clicking on the X in the upper-left corner.


From this point forward, the files you save will be placed in the location you specified.
There’s yet another way to save your Word files. Microsoft Word Autosave saves your work automatically every few seconds. To use Microsoft Word Autosave, you must:
- have an Office 365 account
- be logged into it when you use Word
- save your file in your OneDrive
To enable Microsoft Word Autosave, toggle the Autosave button on the top left corner of the screen.


How to Open a File in Word
You can open a saved MS Word file on a Mac in one of three ways:
Option 1. Use Spotlight
If you remember the file name, you can use Spotlight to find and open the file. Click on the Spotlight button in the upper-right hand corner of your screen. Type the file name in the Spotlight search box.


When the file appears in Spotlight, double-click on the file name. The file opens in MS Word.
Option 2. Use Finder
Launch Finder. Either use the Search bar to find the file or navigate to the file by going to its specific location.


Double-click on the file name to open the file.
Option 3. Use Microsoft Word
Here’s how to open a saved document in MS Word.
Launch Microsoft Word, then click on Recent to see a list of files you’ve worked on recently. Double-click on the file you wish to open.


Or, click on Open. Locate the file you want to open in your computer or cloud storage and select it. Click Open at the bottom of the dialog box.


Discover Great Word Graphic-Print Templates for 2019
As you can see, you can create an impressive document in Microsoft Word—even if you’re not a graphic designer, don’t want to hire one, or don’t want to spend hours designing a creative layout.
The answer is to start with a premium Word template. Envato Elements is a terrific source of graphic print templates for Microsoft Word. If you make many Word documents, you’ll love the unlimited downloads you get from Elements, all for one small subscription.
Aside from templates, you also get unlimited downloads of stock photos, graphics, logos, and fonts. It’s truly an amazing deal.
Here’s a sampling of the print templates for Word that you can find at Elements:
For those who only need the one-off document, GraphicRiver is another source of outstanding templates for Word. Here, you can find premium Word templates on a pay-per-use basis. That’s an economical option for those who don’t make a lot of print materials in Word.
Create Your Business Letter In Microsoft Word
In this tutorial, you learned how to create a Word document in the form of a business letter. You now know how to save a file on Microsoft Word, as well as how to open new and saved files. You’ve even picked up basic text formatting skills.
You’ve seen how to make a new document (such as a business letter) in Word from scratch. Or, you can create a new document with an advanced design by using a template for Word.
If you’re a power communicator who needs to churn out several documents, then look to Envato Elements for outstanding templates for MS Word. But, if your needs are few, then GraphicRiver may be the more logical place for you to find Word templates.
Lesson 5: Creating and Opening Documents
/en/word2013/getting-to-know-word/content/
Introduction
Word files are called documents. Whenever you start a new project in Word, you’ll need to create a new document, which can either be blank or from a template. You’ll also need to know how to open an existing document.
To create a new blank document:
When beginning a new project in Word, you’ll often want to start with a new blank document.
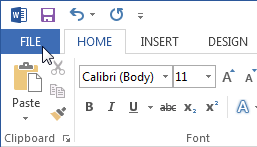
- Select the File tab. Backstage view will appear.
 Clicking the File tab
 - Select New, then click Blank document.
 Creating a new document
 - A new blank document will appear.
To open an existing document:
In addition to creating new documents, you’ll often need to open a document that was previously saved. To learn more about saving a document, visit our lesson on Saving and Sharing Documents.
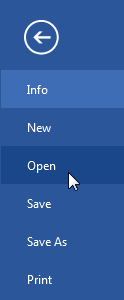
- Navigate to Backstage view, then click Open.
 Opening a file
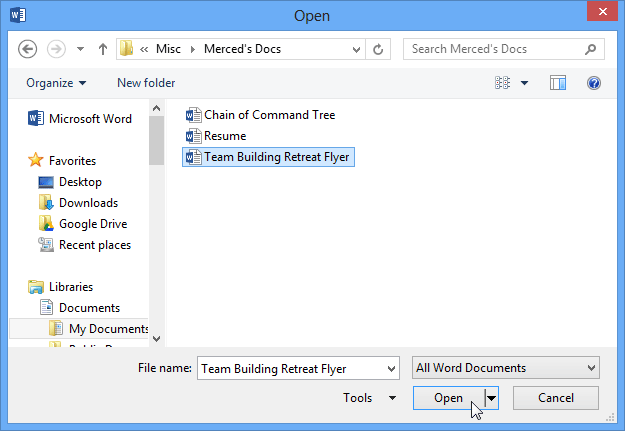
 - Select Computer, then click Browse. Alternatively, you can choose OneDrive (previously known as SkyDrive) to open files stored on your OneDrive.
 Opening a locally saved document
 - The Open dialog box appears. Locate and select your document, then click Open.
 Opening a document

If you’ve opened the desired presentation recently, you can browse your Recent Documents rather than search for the file.
 Recently opened documents
Word 2013 also allows you to open existing PDF files as editable documents. This is useful when you want to modify a PDF file. Read our guide on Editing PDF Files for more information.
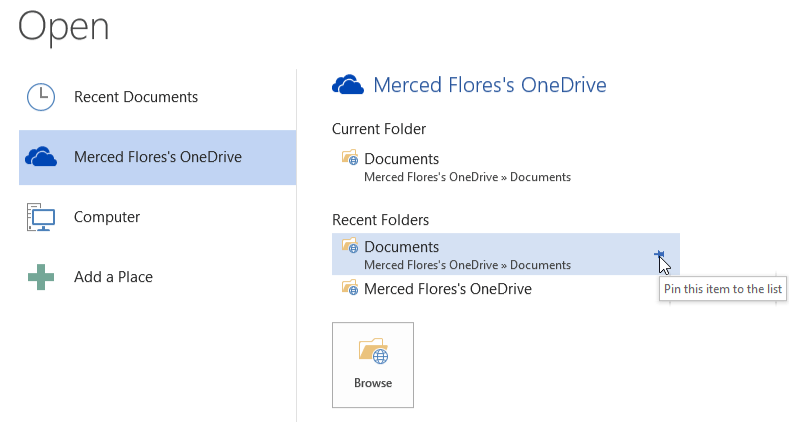
To pin a document:
If you frequently work with the same document, you can pin it to Backstage view for quick access.
- Navigate to Backstage view, then click Open. Your recently edited documents will appear.
- Hover the mouse over the document you want to pin. A pushpin icon will appear next to the document. Click the pushpin icon.
- The document will stay in Recent Documents. To unpin a document, click the pushpin icon again.
 will appear next to the document.
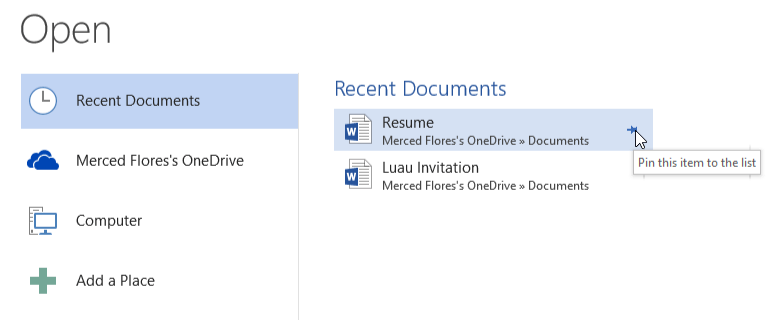

You can also pin folders to Backstage view for quick access. From Backstage view, click Open and locate the folder you want to pin, then click the pushpin icon.
 Pinning a folder to Backstage view
Using templates
A template is a predesigned document you can use to create a new document quickly. Templates often include custom formatting and designs, so they can save you a lot of time and effort when starting a new project.
To create a new document from a template:
- Click the File tab to access Backstage view.
Navigating to Backstage view
- Select New. Several templates will appear below the Blank document option.
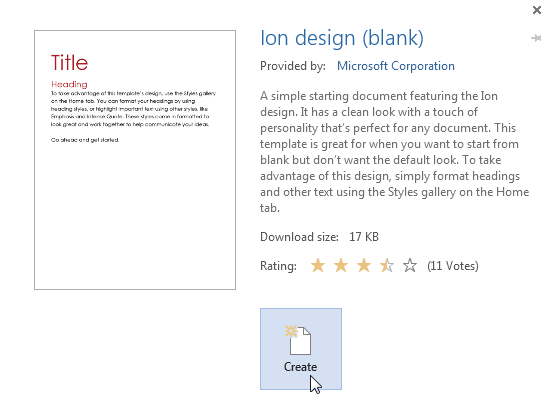
- Select a template to review it.
 Selecting a template
 - A preview of the template will appear, along with additional information on how the template can be used.
- Click Create to use the selected template.
 Creating a new document with a template
 - A new workbook will appear with the selected template.
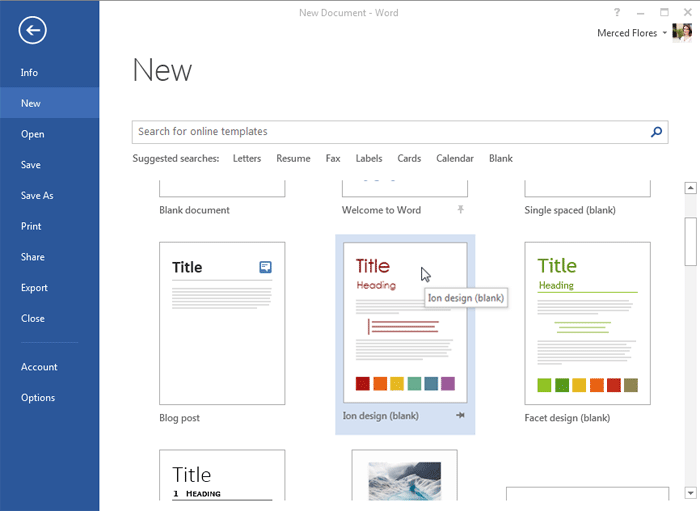
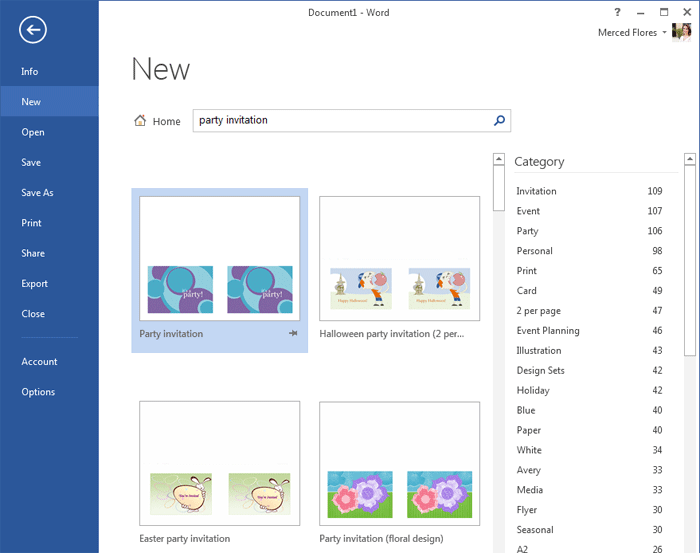
You can also browse templates by category or use the search bar to find something more specific.
 Searching for a template
It’s important to note that not all templates are created by Microsoft. Many are created by third-party providers and even individual users, so some templates may work better than others.
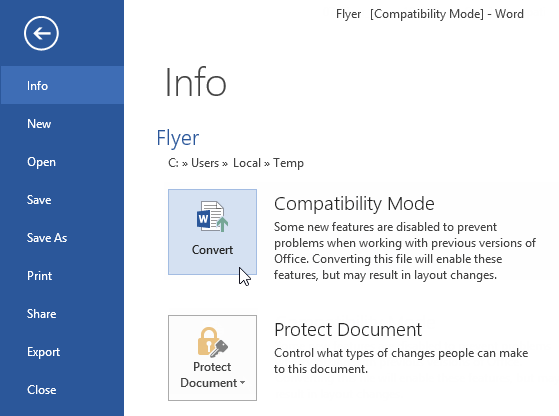
Compatibility mode
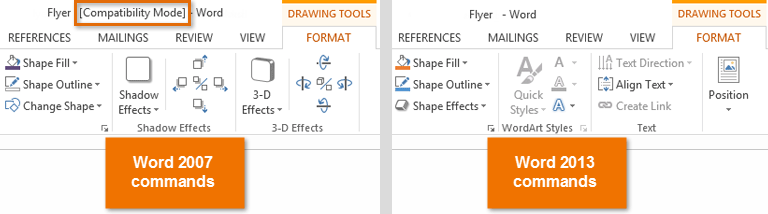
Sometimes you may need to work with documents that were created in earlier versions of Microsoft Word, such as Word 2010 or Word 2007. When you open these types of documents, they will appear in Compatibility mode.
Compatibility mode disables certain features, so you’ll only be able to access commands found in the program that was used to create the document. For example, if you open a document created in Word 2007 you can only use tabs and commands found in Word 2007.
In the image below, you can see how Compatibility mode can affect which commands are available. Because the document on the left is in Compatibility mode, it only shows commands that were available in Word 2007.
 Compatibility mode vs. Normal mode
To exit Compatibility mode, you’ll need to convert the document to the current version type. However, if you’re collaborating with others who only have access to an earlier version of Word, it’s best to leave the document in Compatibility mode so the format will not change.
You can review this support page from Microsoft to learn more about which features are disabled in Compatibility mode.
To convert a document:
If you want access to all Word 2013 features, you can convert the document to the 2013 file format.
Note that converting a file may cause some changes to the original layout of the document.
- Click the File tab to access Backstage view.
Clicking the File tab
- Locate and select the Convert command.
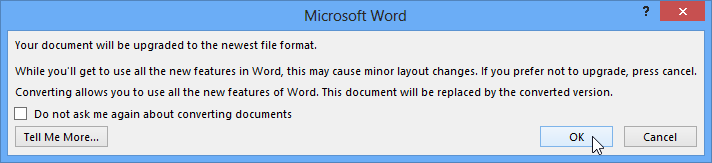
 Converting the document to the newest file type
 - A dialog box will appear. Click OK to confirm the file upgrade.
 Clicking OK
 - The document will be converted to the newest file type.
Challenge!
- Create a new blank document.
- Open an existing document from your computer or OneDrive.
- Pin a folder to Backstage view.
- Create a new document using a template.
/en/word2013/saving-and-sharing-documents/content/
Chapter 1. Creating, Opening, and Saving Documents
Every Word project you createâwhether itâs a personal letter, a TV sitcom script, or a thesis in microbiologyâbegins and ends the same way. You start by creating a document, and you end by saving your work. Sounds simple, but to manage your Word documents effectively, you need to know these basics and beyond. This chapter shows you all the different ways to create a new Word documentâlike starting from an existing document or adding text to a predesigned templateâand how to choose the best one for your particular project.
Youâll also learn how to work faster and smarter by changing your view of your document. If you want, you can use Wordâs Outline view when youâre brainstorming, and then switch to Print view when youâre ready for hard copy. This chapter gets you up and running with these fundamental tools so you can focus on the important stuffâyour words.
Tip
If youâve used Word before, then youâre probably familiar with opening and saving documents. Still, you may want to skim this chapter to catch up on the differences between this version of Word and the ghosts of Word past. Youâll grasp some of the big changes just by examining the figures. For more detail, check out the gray boxes and the notes and tipsâlike this one!
Launching Word
The first time you launch Word after installation, the program asks you to confirm your name and initials. This isnât Microsoftâs nefarious plan to pin you down: Word uses this information to identify documents that you create and modify. Word uses your initials to mark your edits when you review and add comments to Word documents that other people send to you (Section 16.3).
You have three primary ways to fire up Word, so use whichever method you find quickest:
-
Start menu. The Start button in the lower-left corner of your screen gives you access to all programs on your PCâWord included. To start Word, choose Start â All Programs â Microsoft Office â Microsoft Office Word. -
Quick Launch toolbar. The Quick Launch toolbar at the bottom of your screen (just to the right of the Start menu) is a great place to start programs you use frequently. Microsoft modestly assumes that youâll be using Word a lot, so it usually installs the Word icon in the Quick Launch toolbar. To start using Word, just click the W icon, and voilá!Tip
When you donât see the Quick Launch toolbar, hereâs how to display it: On the bar at the bottom of your screen, right-click an empty spot. From the menu that pops up, choose Toolbars â Quick Launch. When youâre done, icons for some of your programs appear in the bottom bar. A single click fires up the program.
-
Opening a Word document. Once youâve created some Word documents, this method is fastest of all, since you donât have to start Word as a separate step. Just open an existing Word document, and Word starts itself. Try going to Start â My Recent Documents, and then, from the list of files, choose a Word document. You can also double-click the documentâs icon on the desktop or wherever it lives on your PC.
Tip
If you need to get familiar with the Start menu, Quick Launch toolbar, and other Windows features, then pick up a copy of Windows XP: The Missing Manual, Second Edition or Windows Vista: The Missing Manual.
So, what happens once youâve got Wordâs motor running? If youâre a newcomer, youâre probably just staring with curiosity. If youâre familiar with previous versions of Word, though, you may be doing a double take (Figure 1-1). In Word 2007, Microsoft combined all the old menus and toolbars into a new feature called the ribbon. Click one of the tabs above the ribbon, and you see the command buttons change below. The ribbon commands are organized into groups, with the name of each group listed at the bottom. (See Figure 1-1 for more detail on the ribbon.)
Creating a New Document
When you start Word without opening an existing document, the program gives you an empty one to work in. If youâre eager to put words to page, then type away. Sooner or later, though, youâll want to start another new document. Word gives you three ways to do so:
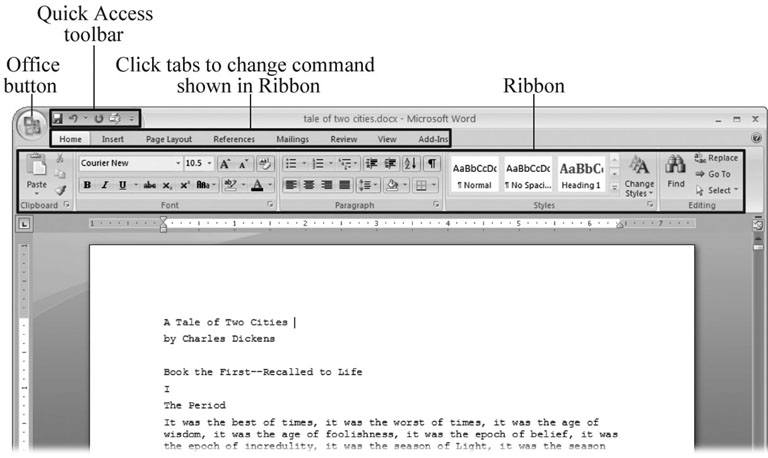
Figure 1-1. When you start Word 2007 for the first time, it may look a little top-heavy. The ribbon takes up more real estate than the old menus and toolbars. This change may not matter if you have a nice big monitor. But if you want to reclaim some of that space, you can hide the ribbon by double-clicking the active tab. Later, when you need to see the ribbon commands, just click a tab.
-
Creating a new blank document. When youâre preparing a simple documentâlike a two-page essay, a note for the babysitter, or a press releaseâa plain, unadorned page is fine. Or, when youâre just brainstorming and youâre not sure what you want the final document to look like, you probably want to start with a blank slate or use one of Wordâs templates (more on that in a moment) to provide structure for your text.
-
Creating a document from an existing document. For letters, resumes, and other documents that require more formatting, why reinvent the wheel? You can save time by using an existing document as a starting point (Section 1.2.2). When you have a letter format that you like, you can use it over and over by editing the contents.
-
Creating a document from a template (Section 1.2.3). Use a template when you need a professional design for a complex document, like a newsletter, a contract, or meeting minutes. Templates are a lot like formsâthe margins, formatting, and graphics are already in place. All you do is fill in your text.
Tip
Microsoft provides a mind-boggling number of templates with Word, but theyâre not the only source. You can find loads more on the Internet, as described in Section 5.2.1. Your employer may even provide official templates for company documents.
To start your document in any of the above ways, click the Windows logo in the upper-left corner of the screen. Thatâs Office 2007âs new
Office button. Click it, and a drop-down menu opens, revealing commands for creating, opening, and saving documents. Next to these commands, you see a list of your Word documents. This list includes documents that are open, as well as those that youâve recently opened.
The Office button is also where you go to print and email your documents (Figure 1-2).
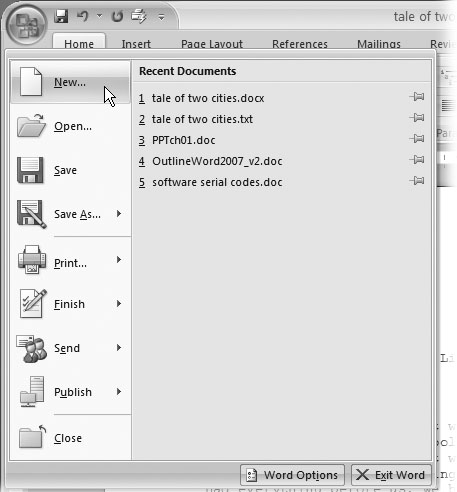
Figure 1-2. The phrase most frequently uttered by experienced Word fans the first time they start Word 2007 is, âOkay, whereâs my File menu?â Never fear, the equivalent of the File menu is still thereâitâs just camouflaged a bit. Clicking the Office button (the one that looks like a Windows logo) reveals the commands you use to create, open, and save Word documents.
Creating a New Blank Document
Say you want a new blank document, just like the one Word shows you when you start the program. No problemâhere are the steps:
-
Choose Office button â New.
The New Document dialog box appears.
-
In the upper-left corner of the large âCreate a new Word documentâ panel, click âBlank documentâ (Figure 1-3).
The New Document box presents a seemingly endless number of options, but donât panic. The âBlank documentâ option you want is on the left side of the first line.
-
At the bottom of the New Document dialog box, click Create.
The dialog box disappears, and youâre gazing at the blank page of a new Word document.
Better get to work.
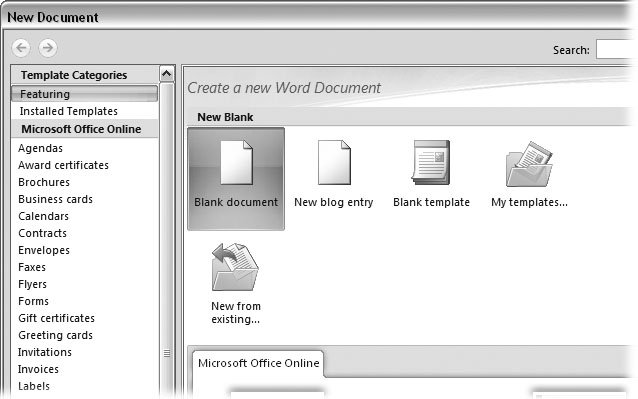
Figure 1-3. Open the New Document box (Office button â New, or Alt+F, N), and Word gives you several ways to create a new document. Click âBlank documentâ to open an empty document, similar to the one Word shows when you first start the program. Or you can click âNew from existingâ to open a document that you previously created under a new name.
Creating a New Document from an Existing Document
A blank Word document is sort of like a shapeless lump of clay. With some work, you can mold it to become just about anything. Often, however, you can save time by opening an existing document thatâs similar to the one you want to create. Imagine that you write the minutes for the monthly meetings of the Chief Executive Officerâs Surfing Association (CEOSA). When itâs time to write up the June minutes, itâs a lot faster to open the minutes from May. You keep the boilerplate text and all the formatting, but you delete the text thatâs specific to the previous month. Now all you have to do is enter the text for June and save the document with a new name:
JuneMinutes.docx.
Note
The .docx extension on the end of the filename is Word 2007âs new version of .doc. The switch from three-letter to four-letter filename extensions indicates a change in the way Word stores documents. (If you need to share documents with folks using earlier versions of Word, choose Office button â Save As â Word 97-2003 document when you save the file. See the box in Section 1.2.3 for details.)
Word gives you a âNew from existingâ document-creation option to satisfy your desire to spend more time surfing and less time writing meeting minutes. Hereâs how to create a new document from an existing document:
-
Choose Office button â New (Alt+F, N) to open the New Document window. Then click âNew from existingâ¦â (it sits directly below the âBlank documentâ button).
The three dots at the end of the buttonâs title tell you that thereâs another dialog box to come. And sure enough, when you click âNew from existingâ¦â, it opens another box, appropriately titled New from Existing Document (Figure 1-4). This box looksâand worksâlike a standard Windows Open File box. It lets you navigate to a specific folder and open a file.
-
On your computer, find the existing document youâre using for a model.
You can use the bar on the left to change the folder view. Word starts you in your My Documents folder, but you can switch to your desktop or your My Computer icon by clicking the icons on the left. Double-click folder icons in the large window to open them and see their contents.
-
Click to select the file, and then click Create New (in the lower-right corner). (Alternatively, just double-click the fileâs icon to open it. This trick works in all Open File boxes.)
Instead of the usual Open button at the bottom of the box, the button in the New from Existing Document box reads Create Newâyour clue that this box behaves differently in one important respect: Instead of opening an existing file, youâre making a copy of an existing file. Once open, the fileâs name is something like Document2.docx instead of the original name. This way, when you save the file, you donât overwrite the original document. (Still, itâs best to save it with a new descriptive name right away.)
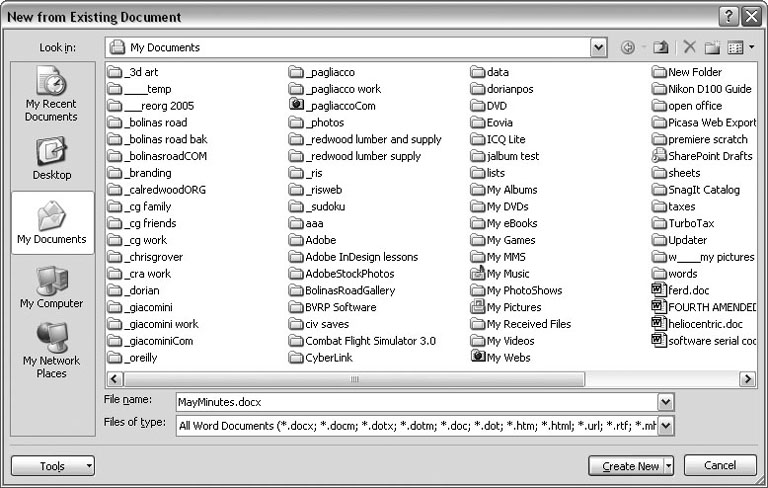
Figure 1-4. Use the New from Existing Document box to find an existing Word document that youâd like to open as a model for your new document. When you click Create New at bottom-right, Word opens a new copy of the document, leaving the original untouched. You can modify the copy to your heartâs content and save it under a different file name.
Tip
Windowsâ Open File boxes, like New from Existing Document, let you do a lot more than just find files. In fact, they let you do just about anything you can do in Windows Explorer. Using keyboard shortcuts, you can cut (Ctrl+X), copy (Ctrl+C), and paste (Ctrl+V) files. A right-click displays a shortcut menu with even more commands, letting you rename files, view Properties dialog boxes, and much more. You can even drag and drop to move files and folders.
Creating a New Document from a Template
Say youâre creating meeting minutes for the first time. You donât have an existing document to give you a leg up, but you do want to end up with handsome, properly formatted minutes. Word is at your serviceâwith
templates. Microsoft provides dozens upon dozens of prebuilt templates for everything from newsletters to postcards. Remember all the busy stuff in the New Document box in Figure 1-3? About 90 percent of the items in there are templates.
In the previous example, where you use an existing document to create the meeting minutes for the Chief Executive Officerâs Surfing Association (CEOSA), each month you open the minutes from the previous month. You delete the information that pertains to the previous month and enter the current monthâs minutes. A template works pretty much the same way, except itâs a generic document, designed to be adaptable to lots of different situations. You just open it and add your text. The structure, formatting, graphics, colors, and other doodads are already in place.
Note
The subject of Word templates is a lengthy one, especially when it comes to creating your own, so thereâs a whole chapter devoted to that topicâChapter 20.
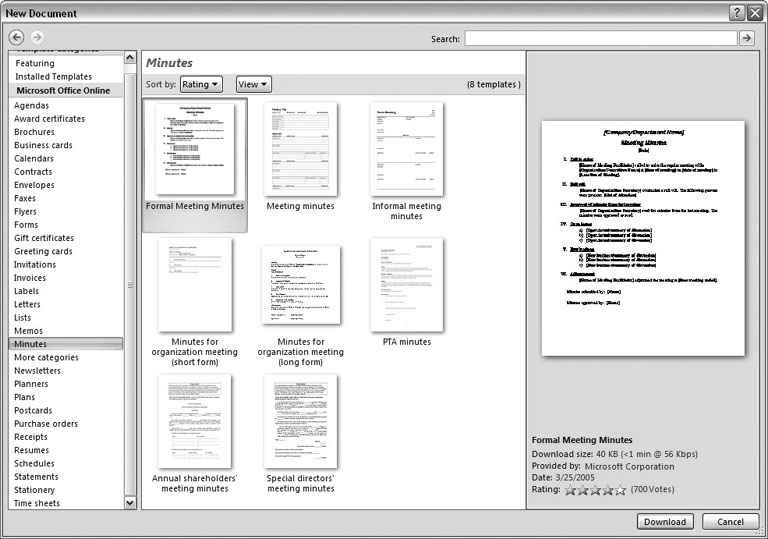
Hereâs how to get some help from one of Microsoftâs templates for meeting minutes:
-
Choose Office button â New (Alt+F, N) to open the New Document window.
On the left of the New Document box is a Template Categories list. The top entry on this list is Installed Templatesâthe ones Word has installed on your computer.
You could use any of these, but you also have a world of choice waiting for you online. On its Web site, Microsoft offers hundreds of templates for all sorts of documents, and you can access them right from the New Document box. If you have a fast Internet connection, then itâs just as quick and easy to use an online template as it is using the ones stored on your computer. In fact, youâll use an online template for this example.
Note
If you canât connect to the Internet right now, then simply choose one of the installed templates instead. Click Create, and then skip to step 4.
-
Scroll down the Template Categories list to the Microsoft Office Online heading. Under this heading, select Minutes.
In the center pane, youâll see all different types of minutes templates, from PTA minutes to Annual shareholderâs meeting minutes (Figure 1-5). When you click a templateâs icon, a preview appears in the pane on the right.

Figure 1-5. The New Document box lists prebuilt templates that live at Microsoft Office Online in categories like Agendas, Brochures, Calendars, and Minutes. Below the thumbnail you see an estimate of how long it takes to download the template from the Microsoft Office Online Web site. A rating, from 0 to 5 stars, tells you what other people think of the template (the rating system is kind of like the one at Amazon.com).
-
When youâre done perusing the various styles, click the Formal Meeting Minutes icon. (After all, CEOSA is a very formal organization.) Then click Download.
Word downloads and opens the document.
-
Start writing up the minutes for the CEO Surfers.
To follow the templateâs structure, replace all the words in square brackets ([ ]) with text relevant to CEOSA.
Tip
If youâd rather not download the Formal Meeting Minutes template every time you use it, then you can save the file on your computer as a Word template. The steps for saving files are just around the corner in Section 1.5.
Opening an Existing Document
If youâve mastered creating a document from an existing document and creating a document from a template, youâll find that opening an existing document is a snap. The steps are nearly identical.
-
Choose Office button â Open (Alt+F, O). In the Open window (Figure 1-6), navigate to the folder and file you want to open.
The Open window starts out showing your My Documents folder, since thatâs where Word suggests you save your files. When your documentâs in a more exotic location, click the My Computer icon, and then navigate to the proper folder from there.
Tip
When you open a document youâve used recently, you may see its name right on the Office button â Recent Documents menu. If so, simply click to open it without a trip to the Open dialog box.
-
With the file selected, click Open in the lower-right corner.
The Open box goes away and your document opens in Word. Youâre all set to get to work. Just remember, when you save this document (Alt+F, S or Ctrl+S), you write over the previous file. Essentially, you create a new, improved, and only copy of the file you just opened. If you donât want to write over the existing document, use the Save As command (Alt+F, A), and then type a new name in the File Name text box.
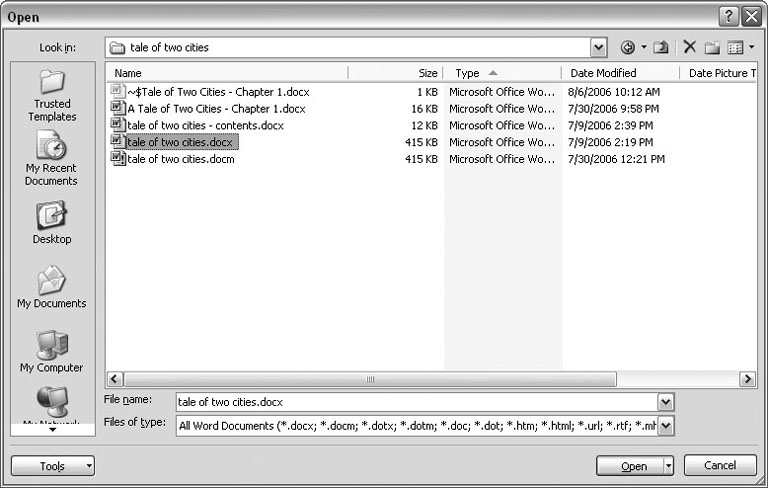
Figure 1-6. This Open dialog box shows the contents of the tale of two cities folder, according to the âLook inâ box at the top. The file tale of two cities. docx is selected, as you can see in the âFile name boxâ at the bottom of the window. By clicking Open, Mr. Dickens is ready to go to work.
Tip
Opening a file in Word doesnât mean youâre limited to documents created in Word. You can choose documents created in other programs from the Files of Type drop-down menu at the bottom of the Open dialog box. Word then shows you that type of document in the main part of the window. You can open Outlook messages (.msg), Web pages (.htm or .html), or files from other word processors (.rtf, .mcw, .wps).
Your Different Document Views
Now that you know a handful of ways to create and open Word documents, itâs time to take a look around the establishment. You may think a documentâs a documentâjust look at it straight on and get your work done. Itâs surprising, though, how changing your view of the page can help you work faster and smarter. When youâre working with a very long document, you can change to Outline view and peruse just your documentâs headlines without the paragraph text. In Outline view, you get a better feeling for the manuscript as a whole. Likewise, when youâre working on a document thatâs headed for the Web, it makes sense to view the page as it will appear in a browser. Other times, you may want to have two documents open on your screen at once (or on each of your two monitors, you lucky dog), to make it easy to cut and paste text from one to the other.
The key to working with Wordâs different view options is to match the view to the job at hand. Once you get used to switching views, youâll find lots of reasons to change your point of view. Find the tools you need on the View tab (Figure 1-7). To get there, click the View tab (Alt+W) on the ribbon (near the top of Wordâs window). The tab divides the view commands into four groups:
-
Document Views. These commands change the big picture. For the most part, use these when you want to view a document in a dramatically different way: two pages side by side, Outline view, Web layout view, and so on. -
Show/Hide. The Show/Hide commands display and conceal Word tools like rulers and gridlines. These tools donât show when you print your document; theyâre just visual aids that help you when youâre working in Word. -
Zoom. As you can guess, the Zoom tools let you choose between a close-up and a long shot of your document. Getting in close makes your words easier to read and helps prevent eyestrain. But zooming out makes scrolling faster and helps you keep your eye on the big picture.Tip
In addition to the Zoom tools on the ribbon, handy Zoom tools are available in the windowâs lower-right corner. Check out the + (Zoom In) andâ(Zoom Out) buttons and the slider in between them. See Section 1.4.3 for the details on using them.
-
Window. In the Window group, youâll find creative ways to organize document windows on your screenâlike split views of a single document or side-by-side views of two different documents.
All the commands in the View tabâs four groups are covered in the following pages.
Note
This section provides the short course on viewing your Word documents. For even more details and options for customizing your Word environment, see Chapter 17.
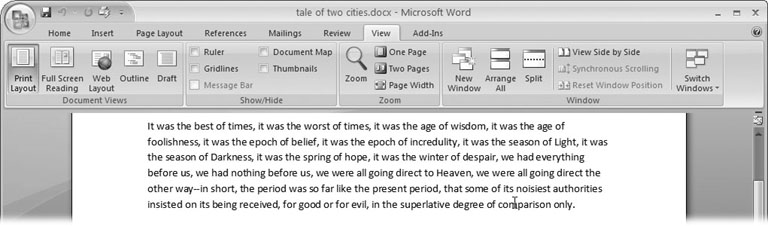
Figure 1-7. The View tab is your document-viewing control center. Look closely, and you see itâs divided into four groups with names at the bottom of the ribbon: Document Views, Show/Hide, Zoom, and Window. To apply a view command, just click the button or label.
Document Views: Five Ways to Look at Your Manuscript
Word gives you five basic document views. To select a view, go to the View tab (Alt+W) and choose one of the Document Views on the left side of the ribbon (Figure 1-8). You have another great option for switching from one view to another thatâs always available in the lower-right corner of Wordâs window. Click one of the five small buttons to the left of the slider to jump between Print Layout, Full Screen Reading, Web Layout, Outline, and Draft views. Each view has a special purpose, and you can modify them even more using the other commands on the View tab.
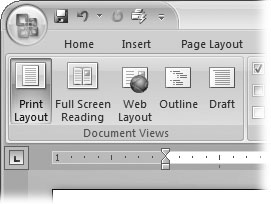
Figure 1-8. On the left side of the View tab, you find the five basic document views: Print Layout, Full Screen Reading, Web Layout, Outline, and Draft. You can edit your document in any of the views, although they come with different tools for different purposes. For example, Outline view provides a menu that lets you show or hide headings at different outline levels.
Note
Changing your view in no way affects the document itselfâyouâre just looking at the same document from a different perspective.
-
Print Layout (Alt+W, P). The most frequently used view in Word, Print Layout, is the one you see when you first start the program or create a new blank document. In this view, the page you see on your computer screen looks much as it does when you print it. This viewâs handy for letters, reports, and most documents headed for the printer.
-
Full Screen Reading (Alt+W, F). If youâd like to get rid of the clutter of menus, ribbons, and all the rest of the word-processing gadgetry, then use Full Screen Reading view. As the name implies, this viewâs designed primarily for reading documents. It includes options you donât find in the other views, like a command that temporarily decreases or increases the text size. In the upper-right corner you see some document-proofing tools (like a text highlighter and an insert comment command), but when you want to change or edit your document, you must first use the View Options â Allow Typing command. For more details on using Word for reviewing and proofing, see Chapter 16. -
Web Layout (Alt+W, L). This view shows your document as if it were a single Web page loaded in a browser. You donât see any page breaks in this view. Along with your text, you see any photos or videos that youâve placed in the documentâjust like a Web page. Section 13.2 has more details on creating Web pages with Word. -
Outline (Alt+W, U). For lots of writers, an outline is the first step in creating a manuscript. Once theyâve created a framework of chapters and headings, they dive in and fill out the document with text. If you like to work this way, then youâll love Outline view. Itâs easy to jump back and forth between Outline view and Print Layout view or Draft view, so you can bounce back and forth between a macro and a micro view of your epic. (For more details on using Wordâs Outline view, see Section 8.1.) -
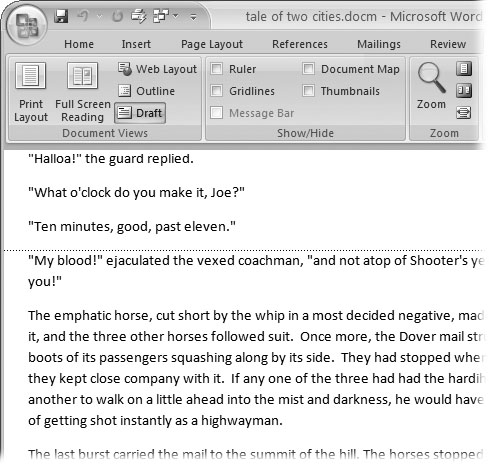
Draft (Alt+W, V). Hereâs the no-nonsense, roll-up-your-sleeves view of your work (Figure 1-9). You see most formatting as it appears on the printed page, except for headers and footers. Page breaks are indicated by a thin dotted line. In this view, itâs as if your document is on one single roll of paper that scrolls through your computer screen. This viewâs a good choice for longer documents and those moments when you want to focus on the words without being distracted by page breaks and other formatting niceties.
Show and Hide Window Tools
Word gives you some visual aids that make it easier to work with your documents. Tools like rulers and gridlines donât show up when you print your document, but they help you line up the elements on the page. Use the ruler to set page margins and to create tabs for your documents. Checkboxes on the View tab let you show or hide tools, but some tools arenât available in all the views, so theyâre grayed out. You canât, for example, display page rulers in Outline or Full Screen Reading views.
Use the checkboxes in the Show/Hide group of the View tab (Figure 1-10) to turn these tools on and off:
-
Ruler. Use the ruler to adjust margins, set tabs, and position items on your page. For more detail on formatting text and paragraphs, see Chapter 4.
-
Gridlines. When you click the Gridlines box, it looks like you created your document on a piece of graph paper. This effect isnât too helpful for an all-text document, but it sure comes in handy if youâre trying to line up photos on a page.

Figure 1-9. In Draft view, you see most text and paragraph formatting, but headers, footers, and other distracting page formatting features are hidden. Your text appears as a continuous scroll, with the margins hidden. Page breaks appear as dotted lines.
-
Message Bar. The Message Bar resides directly under the ribbon, and itâs where you see alerts about a documentâs behavior. For example, when a document is trying to run a macro and your Word settings prohibit macros, an alert appears in the Message Bar. Click the checkbox to show or hide the Message Bar. -
Document Map. If you work with long documents, youâll like the Document Map. This useful tool appears to the left of your text (you can see it in Figure 1-10), showing the documentâs headings at various levels. Click the little + andâbuttons next to a heading to expand or collapse the outline. Click a heading, and you jump to that location in your document. -
Thumbnails. Select the Thumbnails option, and you see little icons of your documentâs pages in the bar on the left. Click a thumbnail to go to that page. In general, thumbnails are more useful for shorter documents and for pages that are visually distinctive. For longer documents, youâll find the Document Map easier to use for navigation.
Zooming Your View In and Out
When youâre working, do you ever find that you sometimes hold pages at armâs length to get a complete view, and then, at other times, you stick your nose close to the page to examine the details? Wordâs Zoom options (Figure 1-11) let you do the same thing with your screenâbut without looking nearly as silly.
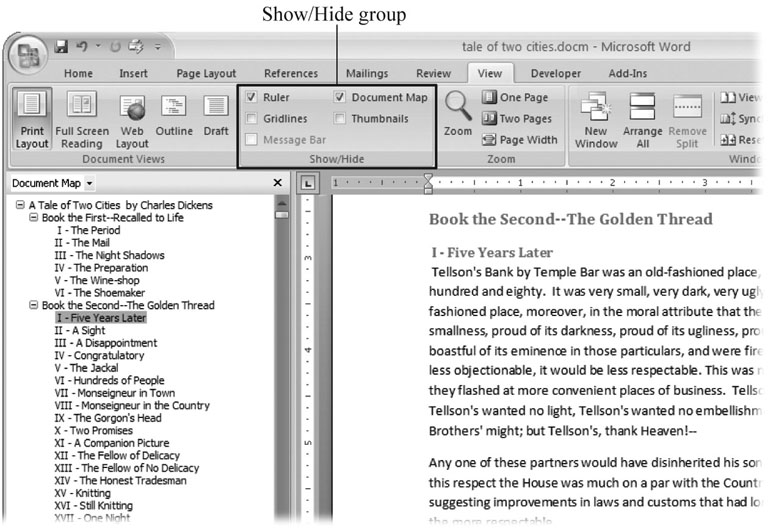
Figure 1-10. Use the Show/Hide group on the View tab to display or conceal Word tools. The Ruler gives you a quick and easy way to set tabs and margins. The Document Map is particularly helpful when you work with longer documents because it displays headings in the bar on the left of the screen. In the left pane, you can see that Mr. Dickens wrote more than his fair share of chapters.
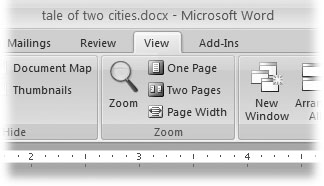
Figure 1-11. The Zoom group of options lets you view your document close up or at a distance. The big magnifying glass opens the Zoom dialog box with more controls for fine-tuning your zoom level. For quick changes, click one of the three buttons on the right: One Page, Two Pages, or Page Width.
Note
Even though the text appears to get bigger and smaller when you zoom, youâre not actually changing the document in any way. Zoom is similar to bringing a page closer so you can read the fine print. If you want to actually change the font size, then use the formatting options on the Home tab (Alt+H, FS).
On the View tab, click the big magnifying glass to open the Zoom dialog box (Figure 1-12). Depending on your current Document View (see Section 1.4), you can adjust your view by percentage or relative to the page and text (more on that in a moment). The options change slightly depending on which Document View youâre using. The Page options donât really apply to Web layouts, so theyâre grayed out and inactive if youâre in the Web Layout view.
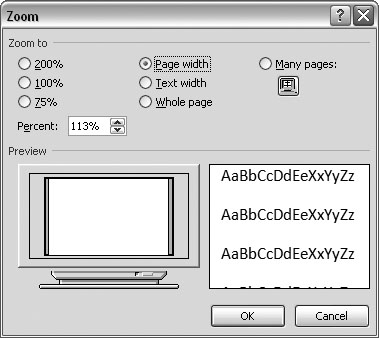
Figure 1-12. The Zoom dialog box lets you choose from a variety of views. Just click one of the option buttons, and then click OK. The monitor and text sample at the bottom of the Zoom box provide visual clues as you change the settings.
Zooming by percentage
In the boxâs upper-left corner, you find controls to zoom in and out of your document by percentage. The view varies depending on your computer screen and settings, but in general, 100% is a respectable, middle-of-the-road view of your document. The higher the percentage, the more zoomed in you are, and the bigger everything looksâvice versa with a lower percentage.
The three radio buttons (200%, 100%, and 75%) give you quick access to some standard settings. For in-between percentages (like 145%), type a number in the box below the buttons, or use the up-down arrows to change the value. For a quick way to zoom in and out without opening a dialog box, use the Zoom slider (Figure 1-13) in the lower-right corner of your window. Drag the slider to the right to zoom in on your document, and drag it to the left to zoom out. The percentage changes as you drag.
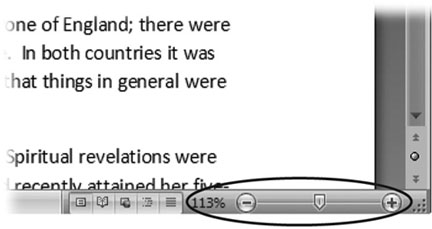
Figure 1-13. The Zoom slider at the bottom of the document window gives you a quick and easy way to change your perspective. Drag the slider to the right to zoom in on your document, and drag it to the left to zoom out. To the left of the slider are five View buttons: Print Layout, Full Screen Reading, Web Layout, Outline, and Draft (Section 1.4.2). Since the first button is selected, this document is in Print Layout view.
Zooming relative to page or text
Not everyoneâs a number person. (Thatâs especially true of writers.) So you may prefer to zoom without worrying about percentage figures. The Zoom dialog box (on the View tab, click the magnifying-glass icon) gives you four radio buttons with plain-English zoom settings:
Page width. Click this button, and the page resizes to fill the screen from one side to the other. Itâs the fastest way to zoom to a text size that most people find comfortable to read. (You may have to scroll, though, to read the page from top to bottom.)
Text width. This button zooms in even farther, because it ignores the margins of your page. Use this one if you have a high-resolution monitor (or youâve misplaced your reading glasses).
Whole page. When you want to see an entire page from top to bottom and left to right, click this button. Itâs great for getting an overview of how your headings and paragraphs look on the page.
Many pages. This view is the equivalent of spreading your document out on the floor, and then viewing it from the top of a ladder. You can use it to see how close you are to finishing that five-page paper, or to inspect the layout of a multi-page newsletter.
Warning
When youâre zoomed out to Whole or âMany pagesâ view, watch those fingers on the keyboard. You can still make changes to your text in these views, even though you canât see what youâre doing.
Changing page view from the ribbon
The ribbon offers radio buttons for three popular page views. (You can see them back in Figure 1-11, to the Zoom toolâs right.) Theyâre a quick and dirty way to change the number of pages you see onscreen without fiddling with zoom controls.
-
One Page. This view shows the entire page in Wordâs document window. If your screen is large enough, you can read and edit text in this view. -
Two Pages. In this view, you see two pages side by side. This viewâs handy when youâre working with documents that have two-page spreads, like booklets. -
Page Width. This button does the exact same thing as the Page Width button in the Zoom dialog box (Section 1.4.3). Itâs more readable than the One Page and Two Page options, because the page fills the screen from edge to edge, making the text appear larger.
The Window Group: Doing the Splits
Back when dinosaurs roamed the earth and people used typewriters (or very early word processors), you could work on only one document at a timeâthe one right in front of you. Although Word 2007 has more options for viewing multiple documents and multiple windows than ever, some folks forget to use them. Big mistake. If you ever find yourself comparing two documents or borrowing extensively from some other text, then having two or more documents visible on your screen can double or triple your work speed.
The commands for managing multiple documents, views, and windows are in the View tabâs Window group (Figure 1-14).
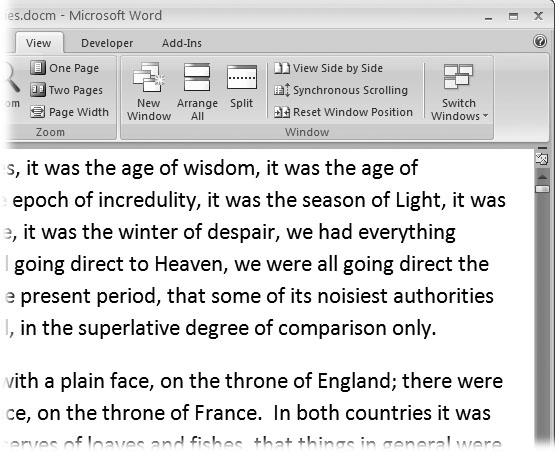
Figure 1-14. In the Window group, the three commands on the leftâNew Window, Arrange All, and Splitâlet you open and view your work from multiple vantage points. The commands in the middleâView Side by Side, Synchronous Scrolling, and Reset Window Positionâare helpful when reviewing and comparing documents. The big Switch Windows button lets you hop from one document to another.
-
New Window (Alt+W, N). When youâre working on a long document, sometimes you want to see two different parts of the document at the same time, as if they were two separate documents. You may want to keep referring to what you said in the Introduction while youâre working in Chapter 5. Or perhaps you want to keep an Outline view open while editing in Draft view. Thatâs where the New Window command comes in. When you click this button (or hit this keystroke), youâve got your document open in two windows that you can scroll independently. Make a change to one window, and it immediately appears in the other. -
Arrange All (Alt+W, A). Greatânow youâve got documents open in two or more windows, but it takes a heck of a lot of mousing around and window resizing to get them lined up on your screen at the same time. Click Arrange All and, like magic, your open Word document windows are sharing the screen, making it easy to work on one and then the other. Word takes an egalitarian approach to screen real estate, giving all windows an equal amount of property (Figure 1-15). -
Split (Alt+W, S). The Split button divides a single window so you can see two different parts of the same documentâparticularly handy if youâre copying text from one part of a document to another. The other advantage of the Split command is that it gives you more room to work than using Arrange All for multiple windows because it doesnât duplicate the ribbon, ruler, and other Word tools (Figure 1-16).
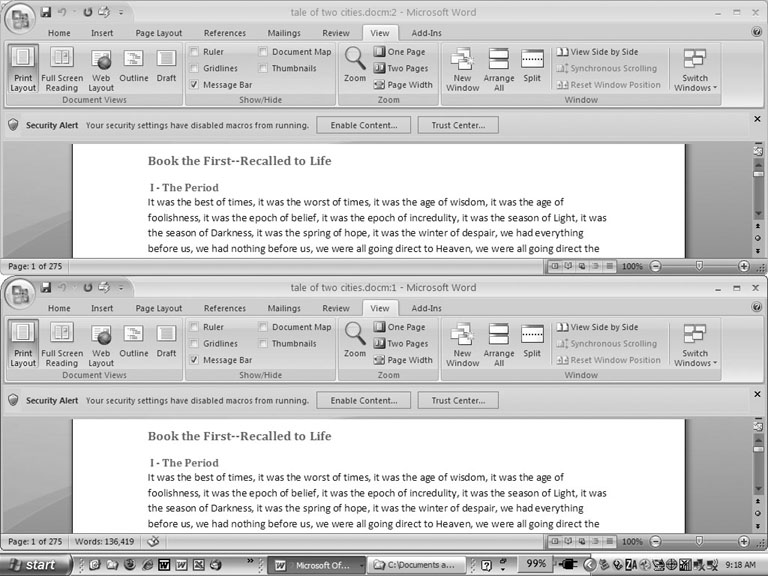
Figure 1-15. One downside of Office 2007âs ribbon: It takes up more space on your computerâs screen than menus or even the older button bars. When you open a couple of windows, youâre not left with much space to do your work, especially when youâre working on an ultra-portable laptop or a computer with a small screen. You can double-click the active tab to hide the ribbon, but in most cases, youâre better off working with a split screen, as shown in Figure 1-16.
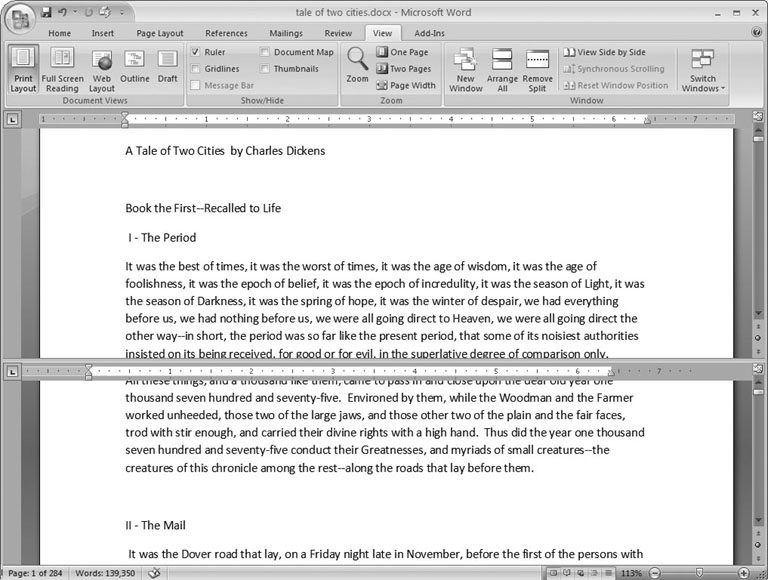
Figure 1-16. When youâre viewing two different parts of a single document, use the Split command; it leaves you more room to work than two separate windows, as shown in Figure 1-15. Each section of the split window has a scroll bar, so you can independently control different parts of your document. If you want to fine-tune your split, just drag the middle bar exactly where you want it. When youâre done, click Remove Split to return to a single screen view.
Viewing multiple windows
One common reason for wanting to see two documents or more on your screen at once is so you can make line-by-line comparisons. Imagine you have two Word documents that are almost identical, but you have to find the spots where there are differences. A great way to make those differences jump out is to put both versions on your screen side by side and scroll through them. As you scroll, you can see differences in the paragraph lengths and the line lengths. Here are the commands to help you with the process:
-
View Side by Side (Alt+W, B). Click the View Side by Side command and Word arranges two windows vertically side by side. As you work with side-by-side documents, you can rearrange windows on your screen by dragging the very top of the Window frame. You can resize the windows by pointing to any edge of the frame. When you see a double arrow, just drag to resize the window. Synchronous Scrolling (described next) is automatically turned on. -
Synchronous Scrolling (Alt+W, Y). The Synchronous Scrolling feature keeps multiple document windows in lock step. When you scroll one window, the other windows automatically scroll too. Using the same button or keystroke, you can toggle Synchronous Scrolling on and off as you work with your documents.
-
Reset Windows Position (Alt+W, T). If youâve moved or resized your document windows as described earlier under View Side by Side, then you can click this button to reset your view so the windows share the screen equally.
Saving and Closing Documents
From the earliest days of personal computing, the watchword has been âsave early, save often.â Thereâs nothing more frustrating than working half the day and then having the Great American Novel evaporate into the digital ether because your power goes out. So, here are some tips to protect your work from disasters human-made and natural:
-
Name and save your document shortly after you first create it. Youâll see the steps to do so later in this section.
-
Get in the habit of doing a quick save with Alt+F, S (think File Save) when you pause to think or get up to go to the kitchen for a snack. (Note for old-timers: Ctrl+S still works for a quick save too.)
-
If youâre leaving your computer for an extended period of time, save and close your document with Alt+F, C (think File Close).
The Many Ways to Save Documents
Itâs the Microsoft Way to give you multiple ways to do most everything. Whether thatâs because the companyâs programmers believe in giving you lots of choices, or because they canât make up their minds about the best way to do something is a question best left to the philosophers. But the point is, you do have a choice. You donât have to memorize every keystroke, button, and command. Especially with saving, the important thing is to find a way you like and stick with it. Hereâs a list of some ways you can save the document youâre working on:
Saving by keyboard shortcut
-
Ctrl+S. If youâre an old hand at Word, this keyboard shortcut may already be burned in your brain. It still works with Word and other Office programs. This command quickly saves the document and lets you get back to work.
-
Alt+F, S. This keyboard shortcut does the exact same thing as Ctrl+S. Unlike Ctrl+S, though, you get visual reminders of which keys to press when you press the Alt key. See the box above.
Saving by menu command
-
Office button â Save. If you donât want to use keyboard shortcuts, you can mouse your way to the same place using menus. Like the options above, this command saves your file with its current name.
-
Office button â Save As. The Save As option lets you save your file with a new name (Figure 1-17). When you use this command, you create a new document with a new name that includes any changes youâve made. (The individual steps are described in the next section.)

Figure 1-17. Use Office button â Save As to save your file with a new name or in a different file format. In this example, the Word file tale of two cities is being saved as an HTML type fileâa format used for Web pages.
-
Office button â Close. When you close a document, Word checks to see if youâve made any changes to the file. When youâve made changes, Word always asks whether youâd like to save the document (Figure 1-18).
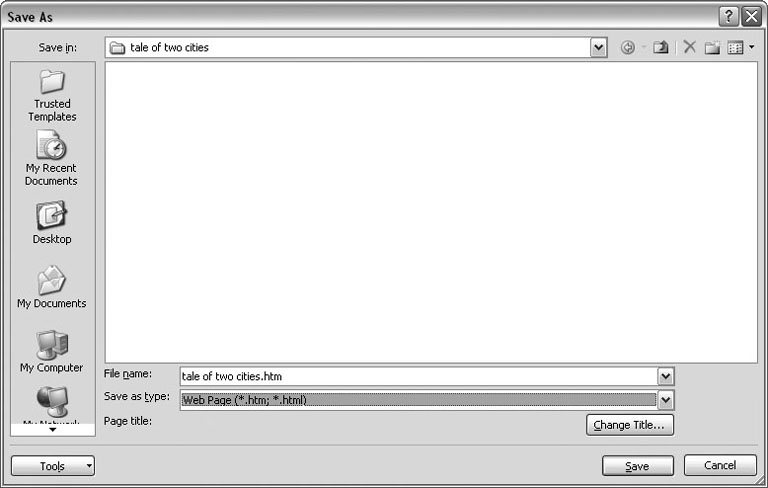
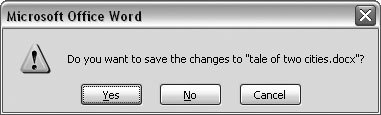
Figure 1-18. When you see this message box, you have three choices: Yes saves your document before closing it; No closes your document without saving it; Cancel leaves your document open without saving it.
Saving with a new name
When you save a new document or save a document with a new name (Save As), youâve got three things to consider: a filename, a file location, and a file format.
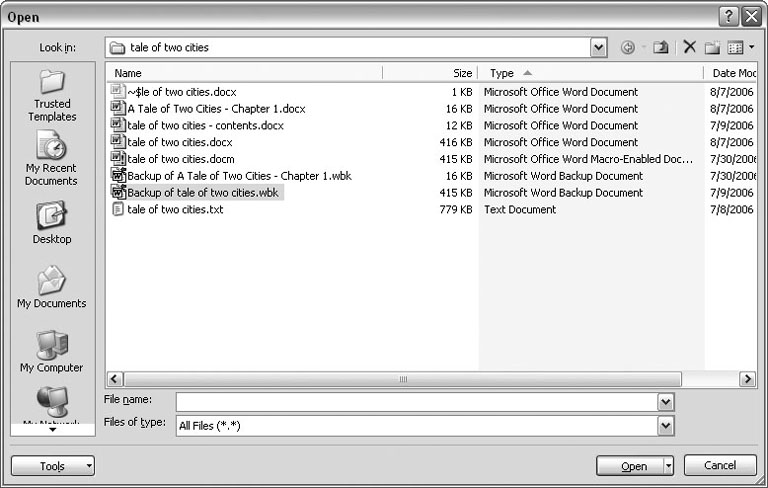
Figure 1-19. To open a backup file, choose All Files (*.*) in the âFiles of typeâ drop-down menu at the bottom of the Open dialog box. Look for a file that begins with the words âBackup of.â Double-click to open the file.
Here are the steps for saving a file, complete with a new name:
-
Choose Office button â Save As to open the Save As box.
You use the Save As command when youâre saving a file with a new name. Word also displays the Save As box the first time you save a new document.
-
Use the âSave inâ drop-down list or double-click to open folders in the window to find a location to store your file.
The buttons in the upper-right corner can also help you navigate. See the details in Figure 1-21. Word doesnât care where you save your files, so you can choose your desktop or any folder on your computer.

Figure 1-20. When you canât open a file with a normal Open command, click the arrow to the right of the Open button, and choose Open and Repair from the drop-down menu. Some parts of your file may still be damaged, but you can usually recover most of your work.
Tip
The more files you save on your computer, the more helpful it is to have a logical folder and file system. If you keep hundreds of Word documents, you may want to have different folders named: letters, memos, reports, and newsletters.
-
At the bottom of the Save As dialog box, type a name in the File name box.
Word accepts long names, so you donât need to skimp. Use a descriptive name that will help you identify the file two weeks or two years from now. A good name saves you time in the long run.
-
Use the âSave as typeâ box to choose a file type.
In most cases you donât need to change the file type. Word automatically selects either .docx or .docm depending on the contents of your file, but Word can save files in over a dozen different formats. If youâre sharing the file with someone whoâs using an older version of Word, then choose Word 97-2003 Document to save the document in .doc format. If youâre sharing with someone who uses a Mac or Linux computer, then you may want to use the more universal Rich Text Format (.rtf).
Tip
If you want to use your document as a template in the future, then choose Word Template (.dotx). Use the Word Macro-Enabled format (.dotm) if youâve created any macros (Section 19.2).
Unless youâre sharing your file with someone using an older version of Word or a different operating system or making a template, stick with the new standard Word file types .docx (for normal Word files) and .docm (for files that run macros). See the box in Section 1.2.3 for a complete rundown.
-
Click Save.
Word does the rest. All you need to do is remember where you saved your work.
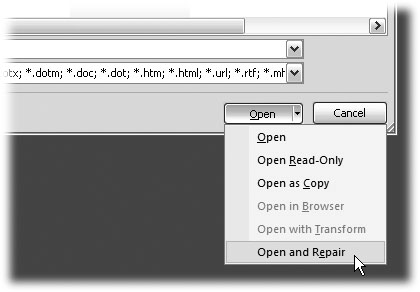
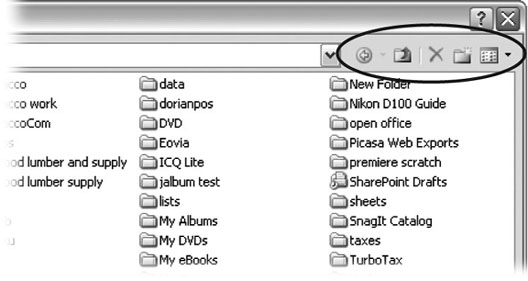
Figure 1-21. The Save As dialog box has all the controls you need to navigate to any location on your computerâincluding five nifty buttons in the upper-right corner. From left to right: The left arrow button steps you backward through your past locations (just like the back button in a Web browser). The up arrow takes you out to the folder enclosing the one youâre in now. The X button deletes folders and filesâbe careful with it. Click the folder with the star in the corner to create a new folder.
Get Word 2007: The Missing Manual now with the O’Reilly learning platform.
O’Reilly members experience books, live events, courses curated by job role, and more from O’Reilly and nearly 200 top publishers.